How to make an umbrella out of paper. How to make an umbrella out of paper. The last stage of work
A beautiful and bright volumetric paper umbrella can be used as a decor for a room, as well as an interesting craft that will appeal to all children. And the main thing is that it is absolutely not difficult to make such a multi-color.
Materials required:
- Colored paper of various colors;
- Cocktail tube;
- Double sided tape;
- A simple pencil, compasses, scissors, glue stick.
If you need a small umbrella, you can save on colored paper by using its multi-colored leftovers.

How to make a voluminous paper umbrella?
To work, you need circles of colored paper. I have 20 circles, but 15 may be enough, especially with a small umbrella. For a large umbrella, you can cut all 20, so it will appear in its maximum beauty.

Fold the circle in half.

Then again to make a quarter of a mug.

Turn all the colorful paper circles into such quarters.

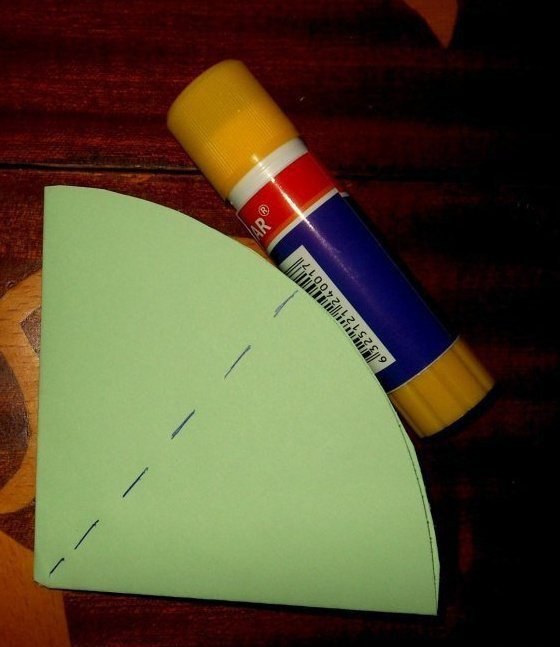
So that in the future the parts do not open, you need to fix them a little with glue. Open the quarter and go over the top with some glue. You don't need to use the whole half.

Glue the sides. Now they will be fastened only in the upper part, without interfering with the lower part as it should open.

Glue all the quarters together.

Next, they need to be glued together, but not anyhow, but in a certain way. Lay the two quarters, split sides down, as shown in the photo. It is in this position that they need to be glued - the forked side to the forked side, the right angle to the right angle.

The glue should also be applied between these two quarters.

But here, too, the entire side should not be fully fastened. Only the upper part is enough for the lower one to open. In the photo, the quarter is divided into two parts, but this division is conditional, so that it is clear where to apply the glue. As you can see, only the upper part of the quarter is involved.

Glue the two pieces together.

And after them all the rest. You can stack them in a pile and press down well so that the glue adheres properly.


Then close the circle by gluing the sides of the first and last quarters. Prepare a cocktail tube. Bend its edge near the accordion, try it on to your umbrella and, if necessary, shorten the tube.

Glue double-sided tape to the straw, peel off the plastic and quickly place it in the hole in the umbrella. A glue gun can replace the adhesive tape, glue the moment. PVA and a pencil with plastic do not interact well. There is a risk that the cocktail tube will not stick at all.

Here is such a voluminous paper umbrella. Very bright and positive.


Made in the same technique, or rather her skirt.
Such a charming decor item as an origami paper umbrella is indispensable in mobiles and garlands for a nursery. In autumn, when it is gloomy and rainy outside the window, a bright accessory will cheer you up and create an atmosphere of comfort. It is interesting that in Japan traditional umbrellas are also made of paper, however, they are not inferior in reliability to the best textile samples. They are called "ja-no-me" - "snake's eye" because of the characteristic white circle in the center of the dome.

The Japanese use only washi paper for umbrellas, which has a unique strength. It has a special structure of fibers, due to which, resembling an exquisite toy ja-no-me, it is able to withstand hurricane showers and serve its owner for more than one decade.
From modules
This voluminous umbrella can be attributed to origami models with some stretch. The modules it consists of are connected with glue, which is not typical for classical technology. But any child can make such a spectacular decor. It turns out easily, quickly and on a budget. Umbrellas can be used to decorate not only the nursery, but also the premises of the kindergarten or the classroom in the elementary school.
You will need:
- colored office paper;
- scissors, pliers;
- glue, or even better narrow double-sided tape;
- floristic wire (drut).
Step-by-step instruction:
- We cut out 10 - 15 circles, d10 - 15 cm. You can take a different size, taking into account the fact that the height of the umbrella will be equal to the radius of the workpiece.
- Fold the circle in half. And then twice more.
- We open the last fold. We glue a strip of double-sided tape diagonally so that the sectors of the circle do not diverge.
- This is what the finished module looks like. It remains to assemble the dome.

- We connect the modules with scotch tape. If the umbrella does not seem voluminous enough, you can add a few more elements.
- We glue the beginning and end of the workpiece. You should get a hemisphere.
- Making a handle. Cut the wire twice as long as the height of the dome. At the end we twist a neat loop. Mask the wire with tape.
- We pass the handle through the dome, glue it with a thermal gun or "Moment". The loop will prevent it from falling into the product. Bend the opposite end of the wire nicely

You can make an origami umbrella out of different colored paper. And also add decorative beads or paper droplets.


Wall arrangement:

Classic model
The origami umbrella, assembled according to the classic pattern, looks good in garlands. The patterned kami paper will give the model a “real” Japanese flavor.

Step-by-step instruction:
- Fold the 21x21 cm square diagonally from bottom to top.
- We "close" the resulting triangle from right to left.
- We open the upper part and flatten it into a rhombus.
- We repeat the same action for the reverse side. We get the "Double Square".
- Fold the outer corners towards the center. We return to the starting position.
- We open the right "pocket" to the left. Press and smooth.
- Flip the right edge to the left. We repeat step 6.
- We continue the same steps until we add up the entire model.
- Bend the upper triangles along the dotted line.
- And then we "fill" inward.
- We align the product so that there are four folds on both sides. Iron all the folds again.
- Distribute the folds evenly around the circle. Cut off the bottom corner.
- We take a strip of paper 11x21 cm. We roll it into a tube. For convenience, you can use a knitting needle or bamboo skewer. We fix the tube with glue so that it does not open. We bend the lower part, forming a handle. Cut the opposite end with a corner and insert it into the hole in the dome. Fill with hot glue.
- The origami paper umbrella is ready:

The video shows how to make the same model in a different way:
Foldable design
For children, the most interesting is the origami umbrella with a drop-down dome. The transforming model is quite complex, it requires skills, attentiveness and patience. Recommended from 10 years of age.
You will need:
- 3 sheets of double-sided colored paper, A4 size - green, white and mint;
- bamboo skewer;
- scissors;
- glue gun or "Moment".
Step-by-step instruction:
- Cut out a 21x21 cm square from the green sheet. Less is undesirable - it will be more difficult to fold the model.
- We make diagonal folds.
- We turn the sheet over. Divide it in two in both directions.
- We place the workpiece of one of the vertices towards us. We connect the side corners in the center. And the upper and lower valves, which are lowered at the same time, press and smooth.

- We get the basic shape "Double square". We place it with its free edge down.
- Bend the right side to the middle. We return to the place.
- We open the resulting "pocket".
- We spread it and press it.

- Turn the resulting fold over to the right.
- Repeat steps 7 - 9 for 3 more sides.
- The result is a Kite-like shape. There are 4 folds on both sides of the center line.
- Now you need to make 8 narrower triangles. We start from the side that is open to us. We bend its right side.

- Then the left one.
- This is what the result looks like.
- Continue folding until we have finished the entire dome.
- The upper part of the origami umbrella is ready.

Decor element
- The second square is a mint shade, we add it in the same way as green. Make diagonal folds on one side of the sheet. On the other hand, there are folds in the longitudinal and transverse directions.
- We open the workpiece and cut off ¼ part. We will make a decorative overlay from it, like the traditional "snake's eye" for our origami umbrella.
- We repeat steps 6 - 15 from the first part. We get an identical workpiece, only of a smaller size.
- Cut off the protruding fragments at the bottom.

- We trim the green model with the help of scissors.
- Cut off the top of it.
- Now add the white square using the same algorithm. We cut it 1 cm higher than the green one.
- This is the inside of the umbrella that will keep the canopy open.

- We make notches on the folded blank, as shown in the photo.
- We cut them not completely and very carefully so as not to damage the thin partitions.
- The appearance of the figure at this stage.
- We reveal all three models - green, mint and white. We start working with the latter.

- We bend the white workpiece in such a way that the cloves rise up.
- We go through the folds of the upper part.
- Turn the folds of the model's "skirt" in reverse.
- The result is a shape reminiscent of a manual citrus juicer.

- Fold the model along the fold lines.
- Until it is completely compact.
- This is what the lining looks like on the side.
- Cut off the top, the hole should be small.

- Glue the mint patch on a green base. This is a purely decorative element.
- And we fasten the white model with the "skirt" inside the green one.
- We glue well.
- We pass a wooden skewer into the hole. Its sharp end must be broken off and cleaned.

Fasteners
- Cut out 3 strips of paper, 1 cm wide.
- Glue one on the top of the skewer to fix the dome.
- Let's fix the second at the bottom, marking the handle.
- We wind the third on the base of the umbrella lining. Make sure that no glue gets on the skewer. Then the dome can be opened and closed.

The opening origami umbrella is a great accessory for dolls, including those made by hand. It is also used in the decoration of the festive table and as a New Year's decoration.

Baroque style
Europeans began to actively use umbrellas in the 17th century, and they protected themselves mainly not from rain, but from the sun. Ladies from high society covered their faces during walks, fearing "plebeian" sunburn. The decorativeness in the accessory of those times clearly prevailed over practicality. Laces, scallops, bows and ribbons turned the umbrella into a worthy continuation of a lush lady's outfit. It is such a masterpiece of the "gallant age" that can be made from modules using the origami technique.
You will need:
- 7 square sheets of paper 10x10 cm;
- mini cocktail tube;
- bead;
- thermal gun.

Video on assembling an exquisite origami umbrella:
Handicraft lovers are constantly improving their skills, learning to create new crafts. It will be interesting to learn how to make beautiful paper umbrellas with your own hands. You can make small crafts for a child to play or for an autumn exhibition at school. Large-sized products that are used for decorative purposes when decorating rooms or premises for special events look beautiful.
In this article, we will consider several popular ways to make an umbrella out of paper. A detailed description of the work will help to cope with the task even for novice craftsmen or schoolchildren. The photographs we have selected will help you see what should come out in the end, and compare the result of your work with the work of experienced craftsmen.
How to make a craft from circles
Before making an umbrella out of paper, prepare the material for work. Cut out many identical circles from a thick double-sided sheet using a template made from cardboard. To connect the parts together, you can use PVA glue, but only if the umbrella is small. If the craft needs to be large and made of thick paper, it is better to use a glue gun. To form the umbrella handle, prepare some wire and pliers to round the edges of the section with eyelets.
Each element of the craft is folded in a certain way. To do this, the circle is bent in half twice to make a quarter. The folds should be straight, so when forming the sectors, first fold the paper correctly, aligning the edges clearly.
When many parts are made, start assembling them together. You can make an umbrella dome by placing the parts at right angles to the table surface. The more elements, the more magnificent the umbrella will be. If you didn't have enough ready-made quarters to make a tight round dome, don't worry. You can always cut the missing number of circles and complete the craft.
Room decoration
Knowing how to make an umbrella out of paper, you can decorate a room with such crafts. Hang the resulting crafts on a string or thin rope. It is best to use uncoated wire to create the handle. She's not that fat and won't look rough. To hang the umbrella on a string, make the upper edge of the wire slightly longer than the umbrella so that you can roll the loop from the top with wire cutters.

You can attach a piece of plastic cocktail straw to the bottom end of the handle using a glue gun.
How to make an origami umbrella out of paper
You can assemble a beautiful umbrella by folding a square sheet of paper. It is interesting to take a sheet with a printed print, then the craft will be with a bright picture. The umbrella is assembled gradually, the folds of the paper are performed in accordance with the instructions and time-lapse photography below. To do the work, use scissors, but not for cutting, but to obtain an even thin element of the umbrella.

Carefully consider the diagram and carry out all the work in accordance with the serial numbers. Origami Christmas trees are folded in the same way, only a square-shaped blank is cut out in a larger size.
The last stage of work
After the end of the main work, you need to roll a dense tube out of white paper and bend it at the end. This will be the handle of the umbrella. Glue its edge to the last turn with PVA glue.

The upper part is fixed with a glue gun. You can make a small hole and stretch it to the back of the craft. You can also close the hole by attaching a decorative mug to the top in the center.
Fan circle umbrella
Such a craft can be folded from either thin paper or cardboard. The umbrella can be made up of sectors of different colors. Prepare rectangles for work. To make an even "accordion", you can draw parallel lines on the back using a ruler and a simple pencil. Then make even folds of the paper back and forth alternately.

Fold the resulting "accordion" in half, as shown in the photo above, and glue the outer strips together. To get a full circle, you need to make 3-4 identical parts, depending on the quality and thickness of the paper. Then all the elements are connected to each other. If the paper is thin, then you can use PVA glue for bonding, but if you are making crafts from cardboard or printed paper, then the connection made with a glue gun will be more reliable.
Decorative umbrellas
After making a paper fan, you will see a small hole in the center of the craft. Usually, a thread or thin rope is inserted into it and the craft is hung from the ceiling or on the cornice by the window. But if you want to decorate the room with umbrellas, then you need to make a handle. For this purpose, you can use a wire, but it is advisable in this case to take an aluminum one in a plastic sheath. Such a wire bends well and keeps its shape.

A small amount of hot glue is dripped into the hole in the center of the circle and a piece of wire is inserted with its upper end. The lower part arches in a semicircle.
As you can see, making paper umbrellas on your own is not difficult, and besides, it is an exciting and creative process. Join the craftsmen and you will quickly understand how to make an umbrella out of paper. You will definitely like manual labor!
One of the areas of application of umbrellas is decorative arts. You can create a decorative element from any material: paper, fabric, wood, mesh, plastic, autumn leaves. Even out of money! A gift for a wedding or anniversary in the form of an umbrella made of banknotes looks original.
Crafts made from various materials of natural origin are popular in kindergartens and schools.
Various accessories and crafts can be made from junk material. Such art has become popular because it costs almost nothing. For example, an old, unusable umbrella can be turned into an element of garden decor by decorating it with flowers, ribbons and figurines.
How to make such an autumn decorative accessory? Paint the old dome with acrylics in one theme. It can also be pasted over or sheathed with bright maple leaves.
Crafts made of wire, hairpins or rods from handles will become original. It is enough to fasten together six or eight of these knitting needles, wrap them with threads, and the decorative umbrella is ready.
The two-position canopy is constructed from lightweight and flexible materials and is not decorated with three-dimensional elements so that it can be closed. Such a canopy is easy to design and make out of paper.
Exhaust hoods protect ventilation ducts from precipitation and clogging with debris and leaves. The structure in the form of a cone-shaped roof, which is fixed on a section of pipe, is made of galvanized steel. To make an umbrella for a hood, you need metal scissors and rivets.
There is another type of protective umbrellas - sandbox sun protection fungi. You can build such a roof yourself from tarpaulin, thick fabric or wood. Cloth or tarpaulin canopies can be made removable. This is a suitable summer cottage option. Variants of fungi made of wood look attractive. They are suitable for a kindergarten or yard playground.
The canopy is built on four tall logs set at the corners of the sandbox. The recommended height of the logs, taking into account the part that is underground, is 2-2.5 m. The sandbox-fungus consists of a high bar (cross-section of at least 20 cm) and a hat, which is made of wood, plywood or chipboard. Color the sandbox fungus with bright colors - a beautifully painted mushroom will add mood for children's games and entertainment.

You can make a flat and volumetric applique with your own hands. This activity is useful for developing fine motor skills in children. It helps develop imagination and cheer up.
Stages of work when creating an applique for volumetric crafts:
- Glue the crepe paper onto a 25 x 35 cm piece of heavy cardboard.
- Lock the edges from the wrong side.
- Draw patterns for future applique elements.
- Cut and fold the dome pieces in half.
- Stick the cut-out elements on the cardboard in the correct order: first the handle, then the parts of the dome. The handle can be made from a cocktail tube.
The Chinese origami art is great for making a DIY paper umbrella. By adhering to symmetry and neatness, you can create an original decoration for your home.

Many practical women of fashion know how to sew a stylish accessory from an old umbrella. How to sew an umbrella bag without a pattern:
- Separate the fabric from the frame, wash, iron and cut into wedges.
- Sew two parts together so that you get two rectangles - this is the basis of the future bag.
- For pens, also sew two pieces at a time, and then cut the resulting rectangle into an even number of strips (depending on the size of the shape).
- Sew together two large rectangles, close the bottom.
- Roll the edges of the pen fabric strips inward and sew.
- Connect all the details - the bag is ready.
To create a more complex model, it is better to look at the master class of knowledgeable masters.

Crafts are not only decorative objects. For example, an old canopy can be converted into a hat that will stick to your head on its own. For such a transformation, a sample with a small diameter is useful. To transform into a headdress, unscrew the handle and attach a cylinder to support the hat on the head. The holder can be a cardboard or plastic cylinder with a diameter that matches the circumference of the head.
A clothes dryer from an old accessory is a profitable solution. Add a few more braces to hang the drying area on the frame.
How to make an umbrella with money
It is customary to give money for the wedding celebration. There are many ways to make a cash gift in an unusual way. A creative gift is a money umbrella. Attach bills to the knitting needles and present this accessory as a wedding gift. The newlyweds will definitely be delighted by opening such an umbrella!

A doll's umbrella can be made using an ordinary pen with a metal tip - just cut a circle out of the fabric, and attach the center of the circle to the base by screwing the tip onto the handle. You can decorate the handle and the hat with beads, ribbons. True, such a canopy is always folded. An unfolded umbrella can be made from paper and toothpicks, or you can wind the threads around the wire frame.
DIY dance umbrella
You can create a large flower on the visor using ready-made artificial flowers appliques. You can fold a large peony from self-made corrugated paper petals. Decorate your umbrella with these flowers, and no judge can resist your dance!
DIY fishing umbrella grabber
The old umbrella mechanism can also be used to create fishing tackle. The design of the grabber umbrella is so convenient that it serves as a principle for the consciousness of many devices. Fishing tackle-grabber is made using knitting needles connected at the edges with a cable. The grabber, covered with a net, descends into the water. With a sharp lift up, the knitting needles fold, and the fish gets tangled in the nets.
Main photo: planetaorigami.ru
In order to make a small miracle, sometimes supernatural efforts and incredibly rare and expensive materials are not needed. Often, paper and glue are sufficient.
An example of a very simple, but very colorful, bright and cheerful craft - handmade paper umbrellas.
Take a look, such a beautiful paper umbrella can decorate any composition or larger craft, but it only takes ten minutes to make it, colored paper, glue, a piece of wire and scissors.
Take a piece of colored paper, draw a circle on it using a plate or saucer and cut it out. Fold it in half and then in half again. The resulting detail is the main element of the paper umbrella dome. You need to make more of these blanks, preferably in several colors.


The picture shows a dotted line part of the workpiece, which we grease with glue-pencil, leave the lower part dry. Notice the split-edged part at the bottom.
Alternating colors, glue the blanks together. This is how we form the dome. It is better to take a lot of blanks so that the paper umbrella turns out to be lush.
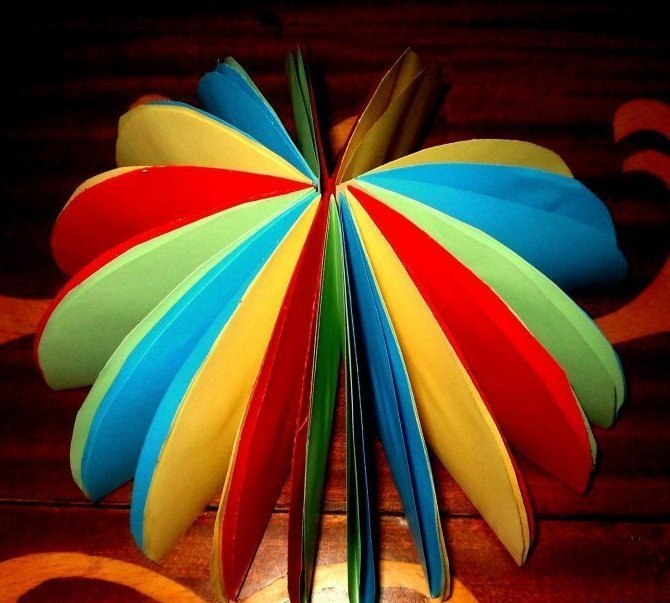
There is a small gap in the middle. We insert a small wire into it, with a curved edge - this is a handle. For beauty, it can be wrapped in corrugated wrapping paper or foil.
