Christmas tree made of tinsel. DIY Christmas tree: simple and unusual master classes
The Christmas tree is one of the main attributes of the New Year. Nobody forgets about it: people buy to decorate them with different outfits - souvenirs and garlands.
relax.by offers its readers 5 ways to make a New Year tree out of paper, which can be placed not only in the apartment, but also decorate the desktop or make a nice gift to family or friends. Here is a selection of ways to make a paper tree, with photos and step-by-step instructions.
Method number 1 - paper Christmas tree
You will need:
green paper;
ruler;
compass;
glue;
scissors;
pencil or tube for juices, cocktails.

Step 1.
Use a compass to draw several circles on the paper. Make each new circle 1-2 cm smaller than the previous one. Choose the number and size of circles yourself, depending on what size the Christmas tree you want to see in the end. The cut out circles are the tiers of our future Christmas tree.
Step 2.
Fold each circle in half once, twice and third times: Fold each circle in half three times. To make the fold lines clear, draw along the edges with scissors.
Step 3.
Straighten out the circles and cut a hole in the center of each that should match the diameter of the pencil or tube - it all depends on what you will be using.
Step 4
.
Cover the pencil or tube with green or brown paper.
Step 5.
Now is the time to assemble the tree. Carefully string all the tiers onto the base - a pencil or a tube.
Step 6.
Decorate the top of the Christmas tree with a beautiful bead or star. You can also decorate the tree with glitter and pieces of chocolate foil.
Method number 2 - a volumetric herringbone made of paper
You will need:
green paper;
scissors;
pencil;
glue;
compass;
ruler;
needle;
wire.

Step 1.
Draw a circle of sufficient size on green paper with a compass - this will be the bottom tier of your future Christmas tree. Next, draw another circle inside the first circle, departing from the outline of the first circle a little more than half the radius. Using a ruler, divide the circle into 12 sectors.
Step 2.
Make an incision along the lines, up to the inner (second) circle.
Step 3.
Roll the sector into a cone, which needs to be secured with glue.
Step 4.
Prepare the rest of the tiers in the same way, gradually decreasing their size.
Step 5.
Use a needle to make a hole in the center of each piece.
Step 6.
Roll the bottom of the wire into a spiral.
Step 7.
All the tiers of the tree must be assembled on a wire basis. You can fix the tree on top with a cone made of the same paper.
Method number 3 to make a paper tree
You will need:
green paper strips 5 mm wide;
four stripes 1 cm each;
red and yellow stripes 3-5 mm wide;
toothpicks;
glue (instant and PVA).

Step 1.
Use the previously prepared green strips 30, 20, 15 and 10 cm long. Twist them with a toothpick, then remove and let the strips unfold slightly. Secure the end of each strip with PVA glue and give all the spirals a drop shape by pinching and slightly pulling one of the ends of the spiral up.
Step 2.
Wind the wide green stripes tightly around the toothpick and glue the tip to them without letting it bloom. This is the trunk of your tree.
Step 3.
For the top of the tree, make a drop from a green strip 30 cm long.
Step 4.
Start assembling the tree, securing its elements with instant glue. Glue the parts of the barrel and give the glue time to dry.
Step 5.
Insert a toothpick inside the trunk and glue the droplets-twigs. Start glueing with the smallest branches that are attached to the top of the tree.
Step 6.
Make toys out of yellow and pink stripes by rolling the paper without using a toothpick. You can pin the ends of the strips until the paper unwinds, or you can loosen the toys a little and shape them into small droplets. Glue the balls to the branches you like.
Step 7.
Glue the drop at the very top - don't forget about it! - fasten the decoration.
Step 8.
If you wish, you can make a stand for the Christmas tree. To do this, you need to make nine curls from white paper stripes. Glue the curls tightly together and secure the tree to the snowy white stand with glue. For complete naturalness, the stand can be decorated with cotton wool.
Method number 4 - New Year's tree made of cardboard
You will need:
colored cardboard;
glue;
scissors;
hole puncher;
a small stick with a diameter approximately equal to the diameter of the holes that are obtained from a hole punch;
decorations.

Step 1.
Take a rectangular cardboard, fold it several times (as shown in the picture) and make holes in the center using a hole punch.
Step 2.
Then take a piece of cardboard and cut it "at an angle" to make the craft look like a Christmas tree.
Step 3.
Slide the stick through the hole. If it does not hold firmly, then fix it in place of contact with the cardboard with glue.
Step 4.
Decorate the tree. Ornaments can also be secured with glue.

It is convenient to put such a Christmas tree (if you make a base for it), and also hang if there is absolutely no space on the desktop for a Christmas tree made of paper.
Method number 5 - a tree from a magazine
The most budgetary Christmas tree!
The material for such a craft will be one large magazine or several small magazines. If the magazine has a hard cover, then it is advisable to remove it.

Follow these steps for each page:
Step 1.
Start at the top right corner and fold the page to a 45-degree angle.
Step 2.
Fold the sheet diagonally and in half again.
Step 3.
Tuck the corner that goes beyond the borders of the magazine upward.
Step 4.
Follow the same procedures with the rest of the pages and you will end up with an unusual origami tree.

In addition to paper, a Christmas tree can be made from sweets. How? See below.
Christmas tree made of candies
For the Christmas tree, you will need:
500-600 grams of sweets in a bright wrapper;
thick cardboard;
glue, scissors and double-sided tape;
Christmas tree decor: rain, a small star for the crown.
Please note that the color of the candy wrapper does not match the color of the Christmas tree decor. If you decide to use rain, then pick it with a short "nap" so that the candy is visible.

Step 1.
Make a cone from thick cardboard, cut a semicircle and wrap it. Glue the edges with super glue, which will secure and set quickly.
Step 2.
Cut the bottom of the cone into strips, bend inward and glue a circle on top, which will help make the base as stable as possible.
If you are preparing a Christmas tree as a gift for a child, then you can hide a small car or a soft toy inside the cone. It is only necessary to think over the opening bottom for the herringbone.
Step 3.
Cover the cone with double-sided tape, remove both protective films. Next, glue a row of chocolates from below. The candies must be pressed very carefully to the scotch tape, otherwise they will quickly fall off.

That is why it is advisable to choose lightweight sweets. If you decide to use heavy chocolates, then glue them to the tree directly with glue.
Step 4. Decorate the top of the Christmas tree made of candies with a light star made of wood or foam, and then mask the top of the head with serpentine or tinsel. Your sweet Christmas tree is ready!
But what is the New Year without a Christmas tree made of tinsel?
DIY tinsel tree
You will need:
tinsel 2 m;
sheet of whatman paper;
PVA glue;
glue "Moment"
scissors;
pencil;
needle with thread;
glue brush.

Step 1.
On a piece of Whatman paper, draw a circle with a radius of 25 cm. To draw such a large circle exactly, make the following fixture. Tie a pencil to the end of the thread with a needle, stick the needle in the middle of a sheet of Whatman paper, pull the thread and draw a circle of the required diameter with a pencil.
Step 2.
To create the cone-base of the tree, you only need half of this circle, so we cut the circle in half.
Step 3.
Overlap the edges of the halves and fix them with glue - for this purpose it is better to use Moment glue. The base of the Christmas tree is ready.
Step 4.
To glue the tinsel to the base, apply PVA glue over the cone and gently glue the tinsel in a circle. Tinsel is well attached to PVA. In this way, paste over the entire cone and let the glue dry. The tinsel herringbone is ready!
You can also decorate a hand-made Christmas tree with home-made decorations from small cones, nuts, beads, bows, tinsel of a contrasting color. Get some small toy bells and glue them to the tree.
To make the Christmas tree taller, make a stand for it, for example, from a small flower pot: glue a cardboard circle to it and fix the Christmas tree there.
Interesting master classes in relax.by Magazine:
Need to decorate the room for the holiday? Looking for simple, original and inexpensive options? For example, it is quite simply made from tinsel. Read the tips, prepare your materials, and get started with the creative process.
How to make a Christmas tree from tinsel
From this affordable and at the same time very decorative material, they make different options for jewelry. The most popular Christmas-themed object is the Christmas tree. It can be made as a contour flat one to hang on a wall, door or window, and voluminous, which will decorate a festive or office table. The size is also chosen different - from a few centimeters to a meter. It all depends on the amount of material and the task at hand.
A do-it-yourself Christmas tree from tinsel is made both monochromatic and multi-colored. For this, garlands of appropriate shades are used. The options look good when the tips of the tinsel "needles" are made silvery with a basic green or blue tone. This creates the effect of frost or snow on the tree.
Decoration for vertical surfaces
Here is the most common and simplest way to create a Christmas tree on a wall from tinsel can be made by the following methods:

The choice of method depends on the area of the surface to be decorated and the amount of tinsel that you intend to spend on creating a Christmas tree. You can attach the material with tape, pins, staples, and a thermal gun. The choice is determined by what surface you decorate, and whether it will be easy to remove the decoration after the holiday.
Tinsel and small decor
The rest of the considered options for creating a Christmas tree are voluminous, that is, they are intended to be hung or placed. From the size of the souvenir you choose, you will get a toy, an element of a garland or a full-fledged New Year's decoration of the room.

A do-it-yourself Christmas tree made of tinsel is usually made on the basis of a paper frame. It is made independently by twisting the sheet in the form of a cone and gluing the joint. If there is no time or desire to make such a basis, you can take a ready-made one, using, for example, a paper colored one. Another option is a frameless openwork translucent souvenir, which will be discussed below.
- It is better to paint it to match the color of tinsel so that you do not need to place it very tightly on the base.
- After the tinting has dried, start attaching tinsel in a spiral from bottom to top. Spread it evenly, gradually sticking to the base.
- When you have completed this stage of the process, decorate the product with beads, bows, balls and any other elements.
You can get an original effect by combining tinsel of varying degrees of "fluffiness" or different colors. You can distribute two "threads" of tinsel along the warp cone, or twist them into one common one before starting work.
and tinsel
A good decoration for a festive interior, a souvenir and an excellent gift will turn out if you make the Christmas tree sweet, that is, place sweets between the tinsel. There can be two options:
- Sweets are simply hung on the tree as toys.
- The candy wrappers are matched in the same color and make up an additional or even the main decoration of the Christmas tree.
The second method is the most original and interesting from a design point of view. A Christmas tree made of sweets and tinsel is made using the same technology as described in the previous section. The difference is as follows:

In general, you can make such a product completely from some sweets. Tinsel allows you not only to decorate the object, but also to use less sweets.
The combination of cones and tinsel
Using natural materials, especially cones, to make a Christmas tree is quite popular. You need to make this souvenir using the same technology as in the case of sweets. Cones can be placed tightly together, creating a continuous surface, and only decorate with tinsel from above, distributing it in a spiral. Another option is the opposite, when the cones are used as decoration on a tinsel cone. You can choose any of the ways. Such a Christmas tree-crafts will perfectly decorate the festive table or will be an original gift.

Openwork souvenir made of threads and tinsel
Translucent lace designs made of yarn look very unusual. This is usually done by balls or lamps. This tree idea works as well.
The work is as follows:

Such a Christmas tree-crafts will decorate the New Year's table, it can be used as a toy, souvenir, gift or even a lampshade for a small holiday lamp.
So, you learned how to make a Christmas tree with your own hands from tinsel. A flat decoration can be used to decorate a wall, a door, a window, and a voluminous one can be placed on a table or bedside table. Choose any idea and implement it. Create a festive atmosphere in your home easily and easily.
The Christmas tree is without exaggeration an international symbol of the New Year, and it is also an image associated with childish carelessness, miracles and cute fairy tales. And if there is anything to give for this holiday, it is an original Christmas tree, which you can make yourself - for example, from cardboard.
We offer you original ideas: how to make a Christmas tree out of cardboard with your own hands, ready-made templates, step-by-step instructions with photos and videos.
Beautiful does not mean difficult, so many models of Christmas trees made of cardboard can really be made even by children. Although they look very impressive, and they can serve not only as an excellent craft for a kindergarten or school, but also as a pleasant addition to a gift to family and friends.
From cardboard and tinsel
For manufacturing, we need very few materials:
- white cardboard (it is advisable to take different formats - traditional A4 and larger from A1 to A3);
- tinsel green or multi-colored - as anyone likes;
- glue stick;
- double sided tape;
- compass;
- sweets in beautiful wrappers - round truffles look especially impressive.
Here's how to make a tree like this:
Step 1. First you need to make a cone. To do this, using a compass, draw a circle of arbitrary diameter on cardboard, depending on the height of the tree: 15 cm, 20 cm or even 30-40 cm.Then we cut off exactly a quarter from this circle and glue the remaining parts, forming a cone, as shown in the figure.

Step 2. You can immediately make cones of different sizes, but their shape should be approximately the same - the upper corner is quite sharp.

Step 3. Now, with the help of a glue-pencil or PVA, we simply glue the tinsel - in a circle to the very top of the head. For beauty, you can take 2 different tinsel in contrasting shades and simply alternate them in a spiral.

Step 4. Now let's attach the candies. You can do this with glue, but the most convenient way is to use double-sided tape. It turns out that such a delicious beauty is an excellent gift for a baby, and he can make it on his own.

And once again we will repeat the entire sequence of actions in the photo.

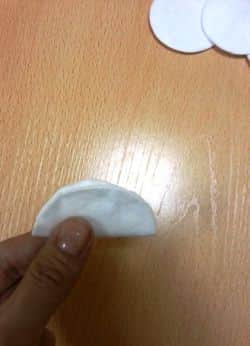
Made of cardboard and cotton pads
This craft takes a little longer, since it requires more painstaking work. However, all actions are simple enough for younger students to cope with them.
We will need again:
- cone,
- a lot of cotton pads (100-200 pieces depending on the model size),
- glue,
- stand. It can be made from any container, a pot, which is better to decorate with tinsel beforehand.
The sequence of actions is as follows:
Step 1. First, as in the previous case, we make a cone.

Step 2. Now we are preparing cotton pads. They just need to be folded in half 2 times, then apply glue to the bends and fix them on the surface of the cone, as shown in the photo.


Step 3. And so we glue the cone with discs to the very top. This must be done quite carefully, in even rows. For convenience, on the surface of the cone, in advance (even on the circle), you can draw several even rows for a reference point with a compass.


Step 4. Now we will make the stand. To do this, you need to take a small pot and wrap it with shiny paper or tinsel, fixing it with glue.
You will also need to make a "trunk" from a cardboard tube, on which to stick a circle of cardboard. It is attached to the inside of the cone, after which the structure becomes sufficiently stable.

Step 5. Well, now the most enjoyable stage - decorate the tree as your imagination tells you. Ribbons, bows, tinsel, sparkles, colored paper figures will do. It turns out a real collective creativity, in which several kids can participate.

You can clearly see the whole process here:
In general, making Christmas trees from cardboard based on a cone is a fairly popular technique that allows you to use your creative imagination in all its glory. Indeed, along with cotton pads and tinsel, you can use a variety of materials - for example, threads, self-adhesive rhinestones, etc.
10 inspiring ideas: how to make a Christmas tree with your own hands
And there are other ways to make Christmas trees - here are 10 ideas for inspiration.
Christmas tree made of cardboard - an original photo stand
And now let's move on to a more complex model of a Christmas tree made of cardboard. For example, an original gift - a photo stand. You can make such a Christmas tree with your own hands and give it to colleagues, relatives and friends, or just please yourself with an original decoration for your favorite holiday.
Each person has, perhaps, hundreds and thousands of photographs in stock, but among them there will certainly be that very favorite photo, which in itself creates a festive mood. Why not make a special stand for such a shot?
We will need:
- green cardboard - 1 sheet;
- a skein of thick threads of green or blue-green color;
- white boucle threads or cotton balls;
- glue;
- pencil;
- scissors;
- beads;
- glue gun.

We will act in stages:
Step 1. First of all, fold a sheet of green cardboard in half with the wrong side outward, after which we draw a half of the Christmas tree on it. To do this, you can simply print a template or sketch from a sample.

Step 2. Cut out the workpiece along the contour (folded).
Step 3. Now let's take the threads. They need to be folded in layers several times and cut into small pieces (1-2 cm each), folding into a previously prepared container.

Step 4. Now comes a rather painstaking stage of work. We grease the surface of the Christmas tree with glue-pencil and glue the skeins on it. It is better to do this in stages so that dust does not accumulate on the sheet.

Step 5. In this way, you need to decorate only the upper 3 sections, since we will decorate the lower one in a different way.

Step 6. Let the tree sit for a few minutes, and the glue dries a little. In the meantime, take the boucle thread or simply roll up a few small lumps of snow-white cotton wool.

Step 7. These lumps can be glued on with a glue gun or glue stick. The work must be done carefully enough so that no glue streaks remain on the surface.

Step 8. Now you need to make some tinsel for decoration. We will use a weed thread or other similar material.

Step 9. Attach tinsel, glue and other decorations - this is such a festive photo stand.

New Year in the office: a quick Christmas tree
There are cases when you need to make a Christmas tree literally in a matter of minutes - for example, a friendly company is ready to receive guests, or the team is actively preparing for a festive corporate party, which is about to begin. For such situations, we can do with the simplest version of the Christmas tree with our own hands.
We will need:
- sheets of colored cardboard or any cardboard and green paint;
- scissors;
- pencil;
- colored paper, glitter and other elements for decoration.
The creation of such a model will not take much time:
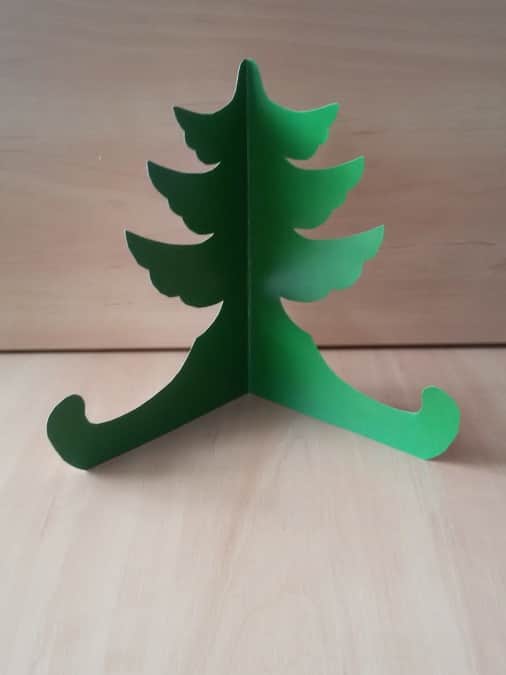
Step 1. First, bend the cardboard in half and draw a half of a Christmas tree on it - literally 3 or 4 triangles of different sizes, as well as a small trunk. Let's cut along the contour. Put the blank on another sheet of cardboard, draw a pencil around the contour and cut out exactly the same model.

Step 2. Cut out the stand: cardboard circles with bases (2 or 3 intersecting lines). We will make neat cuts along the lines.
Step 3. Now we bend the Christmas tree blanks in half and insert them in turn into these slots: 2 or 3 pieces each, depending on how many lines are made at the base.

Step 4. It remains only to paint the Christmas tree green and dress it up with colored figures, sparkles and other materials.
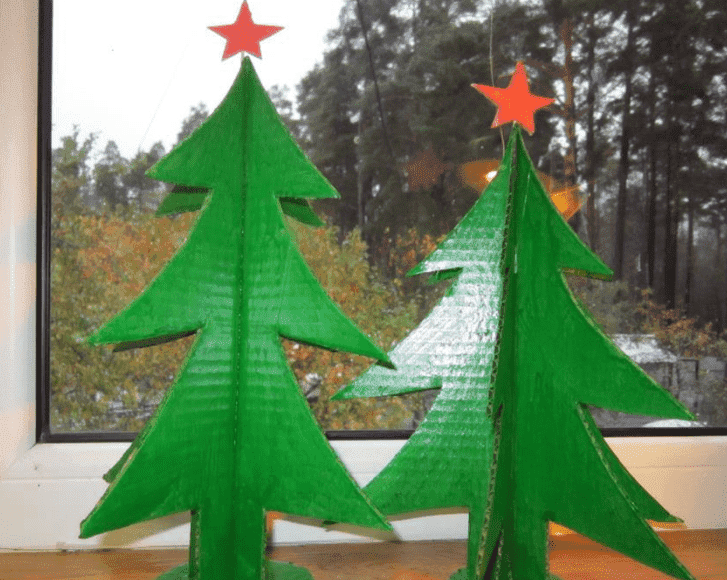
For example, these are the stars that can also be cut out of cardboard.

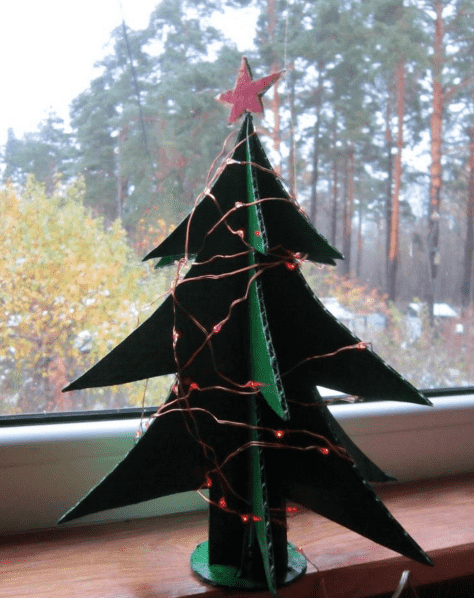
By the way, a Christmas tree made of cardboard can bear even the weight of a small garland - let's take this opportunity.
How to make a Christmas tree out of cardboard with your own hands: 10 ready-made templates
Of course, you can use a ready-made template during manufacturing. Here are some samples of a New Year's forest beauty that you can print, cut, and then make from cardboard in a matter of minutes.


Christmas tree 3D in papercraft technique
And here is another very interesting model of the forest guest, which, despite such an ornate name, is made quite simply. Although, of course, in this case you need to spend a little more time.
And the result will definitely please you, because the finished product will look like this:

In order to make a Christmas tree out of cardboard with our own hands using the papercraft technique, we need:
- several thin sheets of cardboard (or thick sheets of colored paper). By the way, they can be alternated in color: dark and light green;
- glue;
- compass;
- ruler;
- pencil,
- and also a stick or wire.
We will act like this:
Step 1. The product is based on the same workpiece - this is a circle, lined with 6 lines and 2 circles. The largest circle is 2 times larger in diameter than the smaller one.
Step 2. You need to make 5-6 pieces of such blanks or even more. Each subsequent one is smaller than the previous one in diameter by 1-2 cm.
Step 3. After all the models are prepared, cut the circle inward to a smaller circle, as shown in the photo. We glue each fragment, making a cone out of it.
Step 4. At the last stage, we simply string each element on a stick or wire (first, you need to make a hole in the center with a needle).
Step 5. The crown can be made from a small cone of the same color. It remains only to dress up our Christmas tree and put it in the most conspicuous place.

In the papercraft technique, you can make several different Christmas trees - "thicker" and "slimmer". You will get a small forest, which will certainly be able to create a cozy atmosphere of childhood in any home.
By the way, this "forest" is easy to make and suspended - for this you can take a beautiful ribbon and attach it to the top of the trees with glue or a needle.

Details and comments can be seen here:
Folding Christmas tree made of cardboard - we do it quickly and easily
And here is another quick option - such a Christmas tree is made from several cardboard circles, which are also put on a skewer.
Accordingly, we need:
- cardboard,
- wire or wooden stick,
- as well as a plastic bottle cap or other similar object - it will be a stand.
We will act like this:
Step 1. Cut out several circles of different diameters - each subsequent one should be 2 cm less than the previous one.
Step 3. After all the blanks are ready, straighten them, make a small hole in the center and put them on a skewer.
Step 4. The last stage - we make a hole in the stand (lid) and attach a skewer to it. We decorate our Christmas trees - that's all, the holiday is approaching!

Here are just some examples of making a Christmas tree out of cardboard with your own hands. It is clear that the finished model can be of completely different sizes - from small beauties on the table to rather large ones that can be put on the floor or on a bedside table.
Create a festive mood and gifts - to the delight of yourself and your loved ones!
Happy New Year!
There are many ways to personally create a New Year's mood in your home, for example, to make an unusual Christmas tree from available tools. It won't take long, but it will be a great additional decoration for New Year's decorations. Today we will consider several possible ways to make a Christmas tree with your own hands.
Christmas tree made of tinsel and sweets
In order to make a Christmas tree from tinsel and candies, we need cardboard, tinsel, glue and candies. First of all, you need to roll a cone from a sheet of cardboard and fasten the edges with a stapler, after which, in a spiral, glue tinsel to the cone. We decorate a similar Christmas tree with sweets. The table decoration is ready!
Christmas tree made of champagne and tinsel

As in the previous version, we need tinsel, but this time a bottle of champagne will act as the base of the tree. Carefully wrap the bottle in tinsel, gluing it to the glass with double tape or glue. You can decorate the resulting artificial Christmas tree by placing candies or any other small decorations. And put tangerines under the bottle as a finishing touch. Such a beautiful Christmas tree made of tinsel and a bottle of champagne will look great on a festive table.
Christmas tree made of tinsel on the wall

Such a homemade tree is suitable for those who do not have the opportunity to put up a New Year tree. Using glue, tape or pins, the tinsel is attached to the wall. The silhouette of the Christmas tree on the wall will create a festive mood in the home, and if you decorate it with a garland, it will look great.
Christmas tree made of tinsel and wire
Various shapes can be created using wire. In order to make a Christmas tree out of wire, it is necessary to bend the “skeleton” of the Christmas tree out of it, onto which tinsel is attached with glue. You can also decorate such a tree with sweets.
The main thing to remember is that we ourselves create the New Year's mood. The more we put in this effort, and the more we please our loved ones, the more pleasant it is for us. Happy New Year!