Cardboard tulip. A paper tulip - step by step instructions on how to make it at home. Real photos of finished crafts. Making a flower using origami technique
Tulips are spring flowers loved by many. But, unfortunately, tulip blooming time is quickly coming to an end. And cut flowers will soon lose their attractiveness.
But paper tulips will remain intact for a long time and will delight you and your loved ones at any time of the year. If you want to make an original gift that will never fade - present a handmade tulip. Or make a whole bouquet and decorate the room with it. Today we will look at several techniques for making flowers.
Lesson number 1: volumetric tulips from paper triangles 
The first lesson is the most difficult to implement. But this only makes it more interesting! To assemble this flower, you will need a large number of triangular pieces (95 for each flower). They are done as follows:
1. Cut an A4 sheet into 16 equal squares. 
2. Take one of the squares and fold it in half horizontally. 
3. Fold the square vertically again, then unfold it. 

4. Fold both edges of the rectangle along the centerline and carefully smooth both folds. 

5. Turn the shape over and cut off the protruding ends. 

6. Fold the bottom edge of the shape up and smooth the fold. 
7. Fold the shape in half towards you. 
8. Repeat all these steps on the remaining squares. 
Having made the required number of parts, you can start assembling the flower:
1. Form rows 1 and 2 by joining the pieces through the slots in the end face. 
2. Make a circle of 15 pieces in each row. 
3. Add a third row. 
4. Turn the piece over and squeeze it into a bud. 

5. Add rows 4 and 5 with 15 pieces each. 

6. Next, build on the structure on one side so that you get a triangle: 
Row 6 - 4 pieces Series 7 - 3 pieces (over row 6) Row 8 - 2 pieces Series 9 - 1 piece
Repeat the superstructure on the opposite side of the flower, opposite this triangle. 
It remains to make the stem. To do this, take a sheet of thick paper and, rolling it into a solid thin tube, wrap it with green floral tape. 
Apply some glue to the end of the stem and stick it into the tulip. 
Cut and glue 1-2 oblong leaves to the stem. 
The tulip is ready! 
Master class number 2: tissue paper tulips 
In this lesson, you will learn how to make very delicate, airy, thin and graceful tulips. At the same time, they will be quite simple to manufacture, only perseverance and a little skill in working with watercolors are needed. They can be a great gift not only for a mother from a child, but also for a girlfriend.
Materials:
White, yellow and green tissue paper
Watercolor paints
Several poached eggs (boiled egg holders)
Drinking tube
Glue
Operating procedure:
1. Cut out identical petals with slightly wavy edges from white tissue paper.
2. Stick two petals on top of each other (one layer of tissue paper is too thin, it will be difficult for you to work with it).
3. When the glue is dry, spread the petals on a flat surface, such as a tray, and paint with watercolors.
4. Without waiting for the petals to dry completely, carefully lift them off the tray and place them in the poached makers to shape them in a curved shape.
5. Place poached makers near a heat source to dry the paper. 
6. Cut a wide strip of yellow tissue paper, fold it in half lengthwise and make a small fringe along the double edge.
7. Wrap the strip around the edge of the drinking straw and secure with glue - this is the core of your flower.
8. Remove the dried petals from the poached pot and glue them to the tube around the core.
9. Cut a strip of green tissue paper and, securing its edge under the flower, wrap the entire tube. Cover the opposite end of the tape. 
Instruction number 3: tulips from thick colored paper 
The easiest way to make flowers. It is perfect for small children.
Materials:
Thick colored paper (about 270 gsm)
Wooden sticks for stems
Green acrylic paint
Hot glue
Stationery glue
Green soft-tip marker
Flower template that can be downloaded here
Sheet of cardboard
Operating procedure:
1. Print or draw on cardboard and cut out a template for flowers and leaves.
2. Cut 4 flowers and 1 leaf for each tulip. 
3. Fold the flower blanks in half along the center line (if the paper is single-sided, the colored side should remain inside). Iron the fold and unfold them to their original position. 
4. Glue two pairs of blanks, as shown in the photo. 
5. If the edges of the parts are not perfectly aligned, trim off the excess. 
6. Paint the sticks with green paint and let them dry. 
7. Now glue two pairs of flower blanks, placing the edge of the stick-stem between them. While the glue dries, the parts can be pressed together with paper clips. 
8. Cut leaves out of green paper and draw center lines with a green felt-tip pen.
9. Glue the leaves onto the stems. 

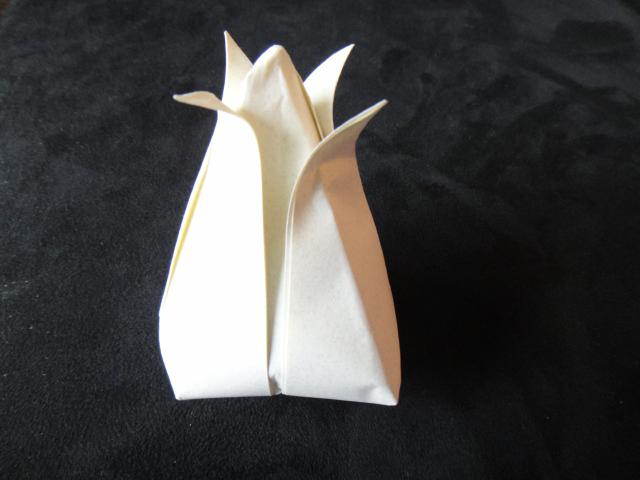
Lesson # 4: a classic origami tulip with a stem 
Not the easiest, but far from the most difficult option for creating a paper tulip using the origami technique. This lesson can also be realized with your child. For this project, you only need square sheets of paper - green and yellow.
Flower head
1. Place the yellow sheet colored side up, fold vertically and horizontally in half, and then return to its original position.
2. Flip the sheet over and make two diagonal folds, then unfold again.
3. Fold the square into a triangle so that the two side points meet at the bottom. 
4. Bring the side corners of the shape's top layer up along the center line. Then flip the shape over and do the same on the other side. 
5. Flip the right side of the diamond to the left, then flip the shape and do the same on the other side. You will get the same diamond shape, but with a smooth surface. 
6. Flatten the edges of the top layer and nest one into the other. Smooth out the folds around the edges and make sure that A and B are equal. 
7. Repeat the same on the other side of the shape.
8. Grasp the cones obtained on both sides, slightly spread them to the sides and inflate the bud through the opening in its base.
9. Fold back the edges of the petals at the top of the bud. 
Stem
1. Lay the green square on the table, colored side down, as shown in the diagram, and fold vertically. Then return the square to its original position. 
2. Fold the corners towards the center along the first fold line. 
3. Next, bend the formed corners again along the same line, and then again. 
4. Flip the shape over and fold it in half lengthwise, lifting the bottom corner to the top.
5. Fold the resulting shape in half widthwise.
6. Fold out the top edge of the outside of the shape.
7. If you did everything right, you will have a stem like this that you can put on the table: 
Now just slide the tulip head onto the vertical rod.
Origami art for kids and adults. A detailed lesson on making a tulip out of paper with step-by-step instructions and video. No assembly diagram needed - everything is easy
5/5 (2)
One of the most common origami figurines is this is a tulip... This pretty paper flower is pretty easy to make. It will not be difficult for a child to master it. You can make a whole bunch of multi-colored tulips and present them to your mother or grandmother. Such a surprise from your child will bring a sea of smiles and give everyone a great mood.
Instructions for making a tulip from paper
For making a paper tulip for you will need:
- colored paper
- scissors
- for the stem, you can use a green cocktail straw, or twist a green paper tube
- We bend a sheet of paper diagonally:

- Cut off the remaining rectangle with scissors:


- We open our triangle. It turned out to be a square. Now we fold it diagonally again, but this time in a different direction. When we open our work, we will see a cross:

- We turn the sheet over. The work will now look like a pyramid. Next, we fold our square in half (bend the paper in the direction from the table towards us).
- Unfold 90̊ and fold in half again. Expand - we should see four lines (something like an asterisk):


- Next, we form a triangle. To do this, you need to slightly press on the center of the square to make a pyramid. Now the left and right sections of the pyramid need to be tucked in and ironed all the folds with your fingers. We will get two triangles, as if lying on top of each other:

- We unfold the triangle at a right angle to ourselves. Next, bend the left and right corners of the upper triangle to the top of the right angle:


- Now we turn the work over and similarly bend the corners of the lower triangle. As a result, we should get a rhombus:

- Now grab the top left triangle and fold it towards the center. We turn the work over and bend the opposite triangle to the center as well.


- Attention! Now you need to insert the left corner inside the right one as shown in the picture. Then do the same with the lower triangle. We carefully straighten everything with our fingers:


- Well, now the fun begins. In the lower part of the rhombus, you need to make a small hole (you can use scissors or a knitting needle) and blow into it. Our bud is straightened out. Bend the petals outward. Here is such a wonderful tulip should come out:


- It remains only to insert the stalk. It can be rolled from green paper (it is more convenient to wrap the paper on a knitting needle, and fix the edges with paper glue) or use a green cocktail tube.
Video instruction on how to make a tulip out of paper.
For a more visual understanding of the process, watch the video instruction. The author of the video will teach you how to carefully work out the folds and in which directions you need to fold the paper so as not to get confused. It also demonstrates how to form a tubule for a tulip.
How can you play with paper tulips.
Making paper flowers is not only a useful, entertaining and developing activity for a child (and not only for a child). Subsequently, you can come up with very interesting games with them.

 One of these games once my little daughter came up with... We made paper tulips with her by March 8, we wanted to please grandmothers with crafts. When the number of flowers was already more than ten, Diana said: “Mom, we have a whole flower bed! Let's make a real flower bed. " And they did. They poured sand into shoe boxes, stuck our flowers in there and put them in the nursery. Diana was just happy. She spent a week hovering around the boxes, straightening flowers and even watering them. Well, we invited the grandmothers to visit to admire our front garden.
Spring is coming, time for love and flowers, spring holidays. And I just want to
please your beloved women with flowers. However, this pleasure is not cheap now. What to do? Ancient origami will help us out. It has helped lovers to be original more than once, and now it will help to make an unusual gift for your loved ones. We invite you to make a bouquet of delicate tulips using origami technique. After all, as they say, the most unforgettable gift is a handmade gift.
Simply and easily
There are many options, from the simplest to the more intricate.
In this article, we will tell you one of the easiest ways to make a paper tulip. A small note: it is better to take thick tulip paper so that it can hold the volume well.
Required material
To make a tulip, you will need to prepare:
- 1 sheet of paper for a tulip (the size and color of the paper is entirely at your discretion);
- 1 green sheet of paper for the stalk;
- PVA glue;
- pencil or pen.
Getting Started
So, the circuit is pretty simple.
Take a sheet of paper. If it is rectangular, fold it diagonally so that the sheet is square. Cut off the excess part, and it will no longer be useful to you.

Fold the sheet in the other direction. You will have two lines crossing the square sheet of paper crosswise.

Fold the sheet in half so that you get a rectangle.

Fold the triangle by bending both sides of the square inward.
Smoothing the corners of the triangle.

Bend the corners of the triangle towards the vertex on both sides.
It turns out a four-sided figure.

Both bent triangles must be inserted with their ends into each other. You have got two kind of "little bags".


And the final stages
In the lower part we make a hole for the stem. Inflate the tulip so that it becomes voluminous.

A few more steps, and you will learn how to make a paper tulip. We turn the tulip over and bend four petals from the side of the tip.
Making a stalk
We take a green sheet of paper. Wrap it tightly around a pencil or pen. We glue the end of the leaflet and tighten it. We take out the pencil. Insert the resulting tube into the bud.

We make a leaf for a tulip from the same green paper and glue it to the stem.
Here is a tulip. The scheme, as you can see, is straightforward. But not everyone succeeds the first time. Try again and you will succeed.
How to make a paper tulip so that it is not boring? Of course, together with the children. The child will be happy to surprise his beloved mother with a bouquet of homemade tulips by March 8. And simply, without any reason.

In conclusion
This craft is perfect for decorating your home and creating a spring mood for your whole family, will bring a sense of celebration and freshness to your home. Moreover, such flowers will stand much longer than natural ones. And the joy from them is no less.
We wish you success in all your endeavors.
An original birthday present for mom with children's hands - a paper flower. Interesting work on making flowers from paper develops finger motor skills in children, teaches fine skills of working with colored paper, and fosters the aesthetic taste of a little artist. A bright multi-colored bouquet of paper flowers looks great as a home decor element. The easiest paper flower to make is a tulip. By following the instructions on how to make a tulip out of paper or cardboard, you can learn how to quickly and easily create such a gift even every day, and without much effort and material investment. If you wish, you can visit or watch a specialized master class with your child.
An original birthday present for mom with children's hands - a paper flower.
Making a paper bouquet of tulips according to a modular template is a painstaking business that requires a lot of perseverance. However, the result is pleasing to the eye for a long time and creates a spring mood.
Necessary:
- Colored paper;
- Scissors, PVA glue.
What to do:
- The preparation of a volumetric flower involves assembling the image in stages in modules. Each module is done separately, then assembled into one image.
- The modular part is made of a rectangular sheet folded horizontally.
- Fold both upper corners of the workpiece down, press down. Turn the product over.
- We wrap the resulting ends onto a triangular shape, while visually "hugging" the base with the corners. We hide them inside.
- Bend the triangle vertically with your fingers. This is the module - part of the preparation of a volumetric floral image.
- Using this technology, we prepare several blanks of the same color.
- We connect the modules in stages. First, we put two pieces of blanks, hiding the ends in the pockets of the third module.
- On the first main row, we connect 5 modules together, the second row is made of 4 modules, and the third - 2 modules.
- Fasten the first two rows of five modules. We fold the last module of the first row with a pocket in the first second row.
- Thus, make the first row of the flower base from 15 modules, that is, 3 blanks.
- The next 3 and 4 rows of the flower are made with a decrease in one module.
- After finishing the first row, be sure to turn the workpiece out by gently pressing on the middle.
- Do this for 2 more rows, you should get the lower part of the bud, uniform in volume.
- Subsequent rows visually reduce the volume of the image being formed.
- We make the stem from wire, you can use a toothpick by winding it with green paper and fastening the ends with glue.
We form a tulip leaf from double-sided green paper, fold the sides inward into triangles, and fold the bottom base inward.
Pictures in the gallery will not only help you see examples of finished works, but also get acquainted with the schemes, thanks to which you can assemble a tulip from paper or cardboard.
Gallery: paper tulips (25 photos)


DIY origami tulip (video)
How to make a colored tulip from corrugated paper: a simple scheme of work
Corrugated paper, due to the wrinkled appearance, creates a visual volume and naturalness of the finished product. Flowers made of corrugated paper are used by craftswomen not only for bouquets - they can be made with a rim or wreath on the head.
Necessary:
- Corrugated paper of different colors;
- Thin wire;
- Scissors, glue.

Corrugated paper, due to the wrinkled appearance, creates a visual volume and naturalness of the finished product
Single petal cutting method
- Form the first flower bud from the selected paper color. To do this, cut a long strip of approximate dimensions from a paper strip: 18 cm in length 3-4 cm in width.
- Fold the part several times so that the width becomes one centimeter wider.
- We form visually the contours of the future petal of the bud, cut out the blank. Having rolled the bottom of the workpiece into a tube with your fingers, we expand the top.
- For a full-fledged tulip bud, we collect eight such blanks.
- We form the stem from green paper by cutting off strips and twisting them along the length of the wire.
- At the same time, we form a petal from the green corrugation, screw it into the stem with your fingers, fluffing the top.
- We make the tulip stamens yellow by twisting small strips with flagella. We insert it inside the bud, gradually twisting the bundles with the main petals.
Multiple petal cutting method
- Cut out the strips of the bud 4 cm wide. Cut out the petals. Twist each separately with your hands below, bend the upper corner of the petal in half to the base.
- We put the blanks of the petals of the bud together, covering the next one by about 0.5 cm.At the same time, carefully twist the bud. As you scroll, insert the yellow stamens.
- After finishing the formation of the bud, gently stretch each petal with your fingers, open the bent edges.
- For a lush look, fluff the bud by lightly pressing it down with your hand.
- We also make flower leaves, you can vary the size of the leaf, make more or less blanks from the strips.
- Cut pieces of equal length from the wire. Wrap the green wire with corrugation, securing the paper ends with glue.
- We fasten the green leaves to the stem, fix it with a drop of glue.
We fix the finished tulip bud with glue on the stem. Allow the product to dry in an upright position.

The simplest paper tulip: a step-by-step description
Necessary:
- Colored paper in green and yellow;
- Scissors, PVA glue.

These tulips are very simple.
Volumetric flower from A4 sheet
What to do:
- First, we make a flower bud. Fold the yellow paper diagonally to make a square. Expand, cut off excess.
- On both sides, fold the resulting shape again, then fold it in the center.
- Expand the paper, bend the folds inward along the formed median line, forming a double triangular shape. Flatten the structure by hand.
- Bend the bottom corners on both sides to the top of the triangle. Now we have a square with small side triangles.
- Putting both triangles together, unfold the square shape with its solid side.
- Turning the craft up with the main vertex, we insert one corner of the first triangle into another corner of the second shape. It turns out a paper pocket. On the other side of the product, we do the same.
- Smooth the pockets with your hand. Insert your fingers into the grooves of the pockets, gently push the edges of the product to the sides.
- Make a small hole in the middle with a pin, blow a little air into the hole with your mouth - the product will expand like a flower bud.
- Turn the craft over and bend the paper petals.
- We form a green stalk by twisting the paper between the palms. Cut a leaf out of paper with scissors.
Stick the stem into the hole made with a pin on the bud, glue the green leaf with glue.
Origami is fun and rewarding. A popular figure that many had to fold with enthusiasm in childhood is a tulip. This is one of the simple and interesting origami models. We offer you to remember how to make a tulip out of paper, and teach this to children.
Folding different shapes out of paper with your own hands develops fine motor skills, concentration and attentiveness. These qualities should be stimulated by children and adults. If you want to captivate the child with something, then offer to make paper crafts.
You don't need to use scissors or glue to make paper flowers. Therefore, you can even attract restless kids to this exciting activity.
Show them how to make a beautiful tulip out of paper, collect a whole bouquet and decorate the room with such a spring gift. For these purposes, you will need white or colored (preferably double-sided) paper.

If you have forgotten or do not know how to make a flower out of paper, then we offer a simple step-by-step instruction:
- Take a sheet of A4 paper and make a square out of it: fold it diagonally, and bend the remaining segment and tear it off.
- Expand the square and bend along the second diagonal.
- Unfold and fold in half again. Draw well along the fold lines. There should be 8 triangles on a piece of paper.
- Turn the workpiece over with a cross fold up and bend the side triangles inward. Focus on the fold lines. A two-layer triangle will come out.
- Wrap the edges of the workpiece to the top point. A rhombus will come out with parts cut in the center.
- Expand the workpiece with the uncut part. Fold the corners so that they cover 2/3 of the shape and form an overlap on the center line. To do this, step back from the top point by 0.3–0.5 mm.
- Thread one corner into the pocket of the other. Repeat on the other side.
- Take the structure in your hand, straighten it. Inflate through the hole that was created during the folding process. The figure will acquire volume.
- Peel back the petals.
- From the rest of the paper, form a stalk and put a flower on it.

A paper tulip is a simple and interesting figure, it is easy to model it. Children will easily grasp the sequence of actions and will be enthusiastic about creating their own greenhouse of paper flowers. Try making this flower out of crepe paper. Comes out original and unusual.