Do-it-yourself origami paper heart. Big heart made of two parts. Origami heart with flower
If you want to beautifully decorate your home for Valentine's Day or just make a nice romantic surprise, then you may need voluminous heart, do it yourself you can do it by choosing very simple or more intricate ideas.
A variety of hearts are the main symbol of Valentine's Day, so most often they turn to such master classes on the eve of the holiday of all lovers. Today it is customary to congratulate not only your soul mate, but also close friends, parents, work colleagues, and for them you can also create handmade souvenirs that will remind you of this day for a long time.
Do-it-yourself voluminous heart
First of all, we will turn to the traditional Mexican toy, which is often used during fun celebrations and parties. As you know, the Mexicans know a lot about colorful holidays, so their ideas, how to make a voluminous heart with your own hands, you will definitely like it.
Surely you have already guessed that we are talking about a piñata, a large-sized hollow toy. Not a single Mexican holiday is complete without traditional entertainment: one of the guests picks up a wooden stick or bat and begins to beat the paper figure with all his might. As a result, the volumetric figure is torn, and tinsel, small sweets, candy wrappers, confetti fall out of it.
It is unlikely that such a part of the program is included in your romantic dinner, but the heart of the piñata itself can be used as a decorative element in order to create a festive atmosphere.
In the States, single girls have a tradition of throwing a party on February 14 called "Breaking Hearts", which is dedicated to broken hearts.
In order not to feel lonely or to cheer up after a breakup, girls have fun, and the main decoration of such a holiday is just a heart-shaped piñata, which is beaten with sticks with all their might.
Since not everyone celebrates this holiday with a loved one, perhaps this entertainment option will come in handy for you. So that the piñata can be broken, it is made of thin paper or papier-mâché, but if you want to make a voluminous heart for decoration, then you can use corrugated cardboard.
For papier-mâché, we will need a base, because the piñata should be hollow inside, with thin paper walls. You can take a heart balloon and cover it with pieces of old newspaper in several layers. Each layer must be smeared with a thin layer of glue, and then another layer of paper should be glued. There should be enough layers for our craft to keep its shape.

How to make a voluminous heart with your own hands
Can create do-it-yourself voluminous hearts made of cardboard, they will not only decorate your holiday, but also a wonderful backdrop for a romantic photo shoot. Such hearts can be placed not only in a room, but also in nature, for example, in a park or in a forest, they can be hung on thin strings to tree branches. A photo shoot will keep the impressions of this day for a long time.
You can make a voluminous heart and fill it with love notes, following the example of the Valentine's Day present "100 reasons why I love you." Or just use this craft to decorate your holiday, anyway, we need the same set of materials to complete:
Scotch thin double-sided
glue gun
Corrugated cardboard
Crepe paper (red, pink)

To make the craft neat, you may need a template, because you need to make a symmetrical heart. If possible, the template can be printed. Depending on the desired size, two separate halves can be printed and then glued together. You can also draw on your own by folding a large sheet of paper in half.
In order to draw a template, you can take whatman paper or a piece of old wallpaper. We hope that you will not have any difficulties with this part of the work, and you will get a neat template that matches the future craft.
So that our voluminous heart does not lose its shape, and the base is suitable for decoration, you will need a fairly dense material.
We chose ordinary corrugated cardboard, because this is the most affordable material for the base, for example, you can use any large box from household appliances. We should cut out two blanks according to the template, they should be cut in mirror image.

And in order to connect these two cardboard halves, you also need to cut out a cardboard strip, let it be at least 10 cm wide. The length of this strip should be equal to the length of all sides of our template. When you cut the strip, be sure to place it so that the grooves of the corrugated board run across the long side. In this case, it will be very easy for you to bend the strip when you glue it on the sides of the heart-shaped blank. Along the entire length of the strip on both sides, we need to make bends.
For these bends, we need to draw a line, stepping back from the edge on both sides of one and a half centimeters. Then draw a sharp object along this line, it can be a ruler, and after that it will be easier for you to make bends.
And when all the details are ready, there are only a few simple steps left to do. The assembly process will be as simple as the previous steps.

Do-it-yourself voluminous hearts made of cardboard
To assemble our parts into a three-dimensional figure, we need to stick double-sided tape on the side parts along the edge, and then start gluing a long cardboard strip with folded edges.
This strip must be bent so that it follows the contour of the side. In the same way, you need to glue the second half on the other side, it will be a little more difficult to do this, but on the other hand, our long strip has already acquired curved shapes and it remains only to glue the cardboard side half on top, and we are ready do-it-yourself paper heart.
If in the future you are going to fill the cavity inside the craft with notes or small sweets, then you need to leave a small hole (just cut a piece of the side strip with a clerical knife. You need to make holes on top, and thread a piece of twine or strong rope through them to make a loop. As in our master class, a decorative arrow can become an additional decoration for crafts.
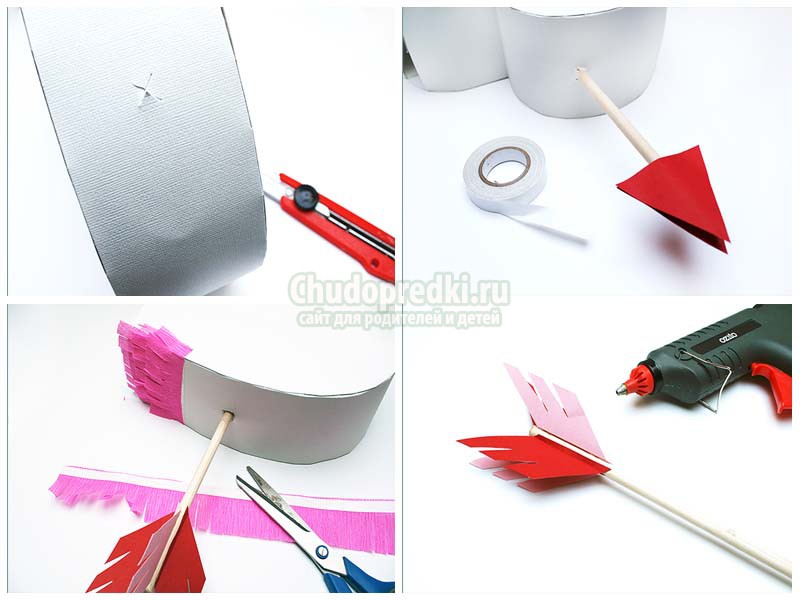
We will need red or pink paper, which must be cut into strips, and each strip with a thin fringe. We will decorate our hearts with such a fringe. Before gluing the fringe, you should completely glue our three-dimensional figure with colored paper, and then the fringe on double-sided thin tape. First, one side is glued with paper strips, then the second, then the sides.
It remains only to work with scissors - cut off the fringe along the edges to emphasize the shape of the heart. Now you know, and, therefore, your holiday will always be bright and colorful.

Do-it-yourself volumetric paper heart: origami
And here is another simple master class that will help you create a festive mood. A few simple steps and you're done do-it-yourself origami paper heart.
If you create 10-20 of these red hearts, then with their help you can make a garland and decorate a room with it. Or the ideas presented will help you organize a themed backdrop for a photo shoot. This option is also useful for schoolchildren, because a hand-made heart can replace a purchased valentine card, and a friend will be pleased to receive just such a sign of attention.
The set of materials for origami, as always, is incredibly modest, and for this craft we need only one rectangular sheet of red color, it is important that it be painted on each side.
Our rectangular sheet should have one side larger than the other by only 1-2 cm, only under this condition will the origami turn out the way you see it in the picture. The sheet should be bent in half, and draw a finger along the fold line to make it even and pronounced. Now you can unfold the paper again. is performed without the help of glue and scissors, but only by folding the paper according to a given pattern.

Now we need to remember those 1-2 cm, which distinguished one side from the other. We need to bend the strip along the larger side to make a square-shaped sheet, and already bend this sheet in half again so that the previous fold line is located across.
Next, we will move on to the corners - you need to bend the triangles on both sides, while you will see that you have a strip in the middle. Now, for each folded triangle, you should bend the corners, you can see about this step in the photo. Then they must be bent back so that an even fold line remains, and bend the corners on both sides to the center.

We have almost reached the final stage of creation, how to perform do-it-yourself voluminous heart made of paper, schemes here is a step-by-step guide to making paper sheet folds. The main thing is that our heart should have neat and voluminous two upper halves, and it is to their formation that we will proceed in the next step. Follow the photo in our step by step tutorial. Now it remains to bend the upper part along the center line with your finger, and you have a paper heart.
There are other origami heart folds that can decorate greeting cards and you will end up with a beautiful do-it-yourself heart card to congratulate a loved one on the holiday.

Do-it-yourself voluminous heart from napkins
There are many different options for how to do-it-yourself voluminous heart from napkins: it can be both a decorative souvenir and an element of decor for your home on the eve of the holidays. The easiest option is to cut out a cardboard heart, and then paste over this base with napkin flowers.

You can look at our creation master class, this is a topiary, where a heart-shaped foam blank was taken as the basis. And coffee beans are used as the main element of decor. By the same principle, you can make a topiary heart, just decorate it with napkin flowers.
No matter how hard we try to create festive decor, the main element of February 14 remains unchanged - this postcard. Do-it-yourself volumetric paper heart with a congratulatory inscription inside or even a small symbolic present - the best gift for your soulmate and for a close friend to whom you want to show your tender feelings.

It’s easier than ever to make it for the holiday, for example, among the simplest options, you can choose this one: we need two sheets of thick paper. Both sheets must be folded in half, and then on one (this layer will be located below) cut out a heart. But you don’t need to cut it to the end, there should be small uncut sections. And then this sheet must be pasted into another. When you open the card, the heart will also “open up”.


Let's go to the world of modular origami to do paper heart different ways. Let's start with a simple one and end with a complex one.
Hearts from modules can be presented on Valentine's Day or on another occasion. They are suitable for room decor. Not many parts are required to make each model. Prepare them in advance so that nothing distracts from the assembly.
simple modular heart
You will need 64 red paper modules (how to make them). Take thick sheets, but not cardboard. The optimal indicator is 80-100 g / sq. m.
Take 6 triangles and connect them into a circle with 6 more details, inserting the long ends of the modules of the second row into the pockets of the first.


The next row - 12 triangles, put on a pocket at each end of the previous row. Make 2 more rows of 12 parts - this is the base of the paper heart. Set it aside.

Take 14 modules and thread them one into the other in a chain. Repeat again to get two identical blanks.
Now they need to be rounded and attached to the base on the sides. I recommend gluing all the details of this model. She becomes very fragile. Pull the ends down where the sides of the heart meet. It made a lovely present for Valentine's Day.

Modular origami - paper heart in red and white colors
You will make the next heart too quickly. There will be no difficulties, since the standard assembly method is used.
You will need:
- 35 red modules;
- 39 white details.
Glue is not needed. The heart is strong.
Start with one red module. Lay it in front of you with the long ends forward. Put one triangle on each of them so that the long tips also look forward.
In the 3rd row there are three modules: two red and one white in the middle. Further, the red parts are worn only at the edges, that is, they occupy the first and last place in the row. The rest of the details are white. Their number increases with each row by 1 piece, until there are 7 white ones in the row and a red module on the sides.


Heart dividers into two equal halves. Put on from one edge 1 cr., 2 white., 1 cr. Same thing from the other side.

In the penultimate rows, 2 cr., in the last 1 cr. The red and white heart from the modules is ready. As you can see, nothing complicated.

Large two piece heart
Let's proceed to the most difficult and beautiful option. The model consists of two parts, which are then connected together by additional modules. You will need red and white triangles.

big red heart
Take 74 reds and collect in the following order:
- The long ends of the module are facing you. Insert two more into the pockets of one, and then three.
- Now continue assembling on one side only. Put on 2 modules: the first in the pockets of the 1st and 2nd from the previous row, the second in the extreme pocket of the 1st so that the extreme end remains free.
- Make 34 more rows with two red pieces inserted in a similar way.
- Continue the same assembly on the other side.
- When the two parts of the heart are ready, combine them together by inserting the ends of the last modules into the pockets.
- Form a heart and set aside.

Small red and white heart
For the inside, take 48 white parts and 48 red ones.
The heart is assembled according to the same principle as the big one, only the outer edging is white, and the inside is red.
Start also. Then work 24 rows on each side. They consist of 1kr. and 1 white. triangles. Connect the ends and form a heart.

To connect the prepared parts, take two red modules and insert them into the center of the small heart. From above, attach a large one in the place where the halves connect. Ready! The result is impressive. Is not it?

Modular origami: broken heart
Another unusual option is a broken heart made of modules. It can be assembled in one evening. It will be easy for you if you are at least a little familiar with modular origami.

To work again, take paper in red and white. Make the right amount of detail:
- 130 red modules;
- 213 white triangles.
Start assembly from the bottom by connecting one red piece to two, inserting its long ends into the pockets. Gradually increase the number of modules in a row, guided by the scheme. All parts with the long side out and the ends look forward. Use white where indicated on the diagram.

You can give such a heart to your loved one as a sign of your feelings. For strength, glue the modules together during the assembly process.

Good afternoon - today I will show the most interesting ways to fold a heart using the ORIGAMI technique. That is, we will add voluminous puff heart from an ordinary square sheet of paper. I will show simple quick techniques that can be used as a paper heart craft for kids. I will also show beautiful origami crafts in the shape of a heart with which you can decorate a gift for Valentine's Day or inside which you can hide the gift itself(jewelry). You can make little hearts, big paper hearts. Use the heart as an idea for decorating valentine cards. Make a heart bookmark for a book with your own hands as a gift to your loved one. And even a heart in which you can wrap a lollipop. Anything from the simplest ideas to more complex paper heart folding techniques. Templates, schemes, master classes are waiting for you in this article.
Paper origami heart
PLUSH INFLATABLE.
Here in the photo below we see a beautiful paper heart made of paper, which is filled with air and due to this it turns out to be plump like a donut.

The basis for this origami heart is a regular square of paper - red on both sides. Office crane paper is suitable. We fold the square in half twice - vertically and horizontally. We get a strip (a square folded in half) in which the line of the previous fold is visible in the middle. Now we raise the corners of this strip - not reaching half a centimeter to the center line (fold).
Turn the craft over so that it lies with the top of the triangle up. And now we raise the edges of the lowered sashes up - flush with the sides of the triangle.

Now lower the newly raised edges of the flaps again. We lifted them only to get the fold lines. And now we bend both corners of the triangle (left and right) with a sharp edge to the beginning of this fold line (which we just got). We get the upper triangular ears.
Now you need to raise the corners - sticking out below the ears. Bend these corners up. And then hide under the upper ears.

The finishing touches of this simple origami paper heart craft are left. We see that the craft resembles a pentagon with sharp corners on the sides. We need to smooth out these sharp corners, so we knead them slightly with our fingers (as shown in the photo of the paper heart).
Now turn our heart craft face up. And we notice that at the bottom of the sharp tip of the heart we have a hole. It is necessary to blow into it - so that our heart straightens, fills with air and becomes lush like an airy soufflé.

HEART ORIGAMI
WITH WINGS
From red and white paper.
For this craft, we need paper that is painted red on one side only.

Here's an easy way to make this origami paper heart with one side dyed red.

We take an even square of paper as a basis. We bend the square in half - 2 times, vertically and horizontally. Then again we straighten the square with the white side up - it turns out 2 fold lines - cross to cross.
We raise the lower edge of the square to the horizontal fold line in the middle. And immediately turn the craft over with the colored side up - so that the fold line of our edge is at the top. And now we bend 2 corners down to the middle vertical line - the right corner and the left corner below - it turns out as in photo 2.
We turn the craft with the white side up - we get the position as in photo 3. And then something that I could not decipher begins. No matter how I twisted the module, I could not figure out what to do with it in order to get picture 4 from picture 3. Maybe I'm stupid, but you have a bright head and you can understand how to make such an origami heart. I am publishing this step-by-step puzzle for those who like to brainstorm.


I have Another way out of this puzzle... Below we see a heart that can be made with wings. If we go through this master class, we get just the stage of a heart with a piece of white paper behind. This white part can be folded into an accordion in the form of a fan and decorated as wings.

2 easy ways
Quickly make an origami heart
from paper.
Here are two step-by-step diagrams for how to make a beautiful little paper heart.
The size of the future heart will be 4 times smaller than the sheet you have chosen. That is, the side of the square of your sheet of paper should be 2 times longer than the intended origami heart.

And here are more step-by-step photos for folding a heart from a two-color sheet of paper.

Such hearts can decorate a card or gift wrap for Valentine's Day.

And here is a way to make a simple paper heart FROM A TRIANGULAR piece of paper. And you can also immediately rob this heart for good - wrap a lollipop in it.


Lollipop sticks can be designed as cupid's arrows. A great souvenir gift for Valentine's Day.

You will find even more simple ideas with a heart craft for children's creativity in a special article.
heart envelope
with a surprise or a note inside
in origami technique.
Here is an interesting master class that will help you make an interesting heart craft. A square of paper with the contour of a folding heart extended upwards. The upper part of the square opens and inside under the heart can hide a note or a small gift (ring, chain, keychain, earrings).


And here is another very simple packaging-envelopes in the form of origami hearts. Where inside the heart - in its two halves triangular pockets are formed in them, you can hide coins or small jewelry gifts.
And here is another folding envelope decorated with a heart made of soft but thick paper napkins. The master class below is quite simple - follow the arrows on the diagram and repeat all the simple operations of the template.

You can find other interesting ideas for heart-shaped envelopes in the article.
And also we have an article that will teach you how to make boxes in the form of a heart simply and quickly.
Bookmarks
in the form of a paper heart.
Here's a pretty little heart that can work as a bookmark for your book. A great gift for Valentine's Day is a book and a simple handmade heart.


And you can make a bookmark-heart - which is put on the corner of the book. Because it has a triangular pocket at the bottom, which you can just put on the corner of the page you are reading now.

And here is another option for bookmarking books, also in origami technology. The heart that wears anything, on the edge of a gift bag, on the edge of a book, or on a clothesline in the bathroom… that you have filled with the scent of a bubble bath and strewn with rose petals. Great idea for a romantic evening on Valentine's Day.

big complex
ORIGAMI HEART
With a large flower.
In the photo below, we see a detailed master class for crafting a pink heart with a beautiful origami flower in the center of the heart. It looks complicated to the eye. But in fact, this is a very understandable way to fold origami hearts. The photo looks scary. But when you start doing it with your hands, everything folds up by itself and easily turns in the right direction.


Minor manipulations, with the eversion of the flower petals, are best done with an auxiliary tool (nail file). So even the smallest almost jewelry paper crafts-hearts can be made without difficulty with your thick fingers. As in the photo below.

These are the step-by-step, step-by-step lessons on creating a do-it-yourself paper heart using the origami technique you found today in our article. Simple ways and easy options are good for warming up your arms. To quickly get the result and be happy, but you can take a picture of complex things on your phone and someday sitting in a boring place (queues at the clinic or in the waiting room waiting for the customer) - you can tear a page out of a notebook and get a new skill - the ability to make a small symbol out of paper love. A great gift for the eighth of March, for Valentine's Day.
Inspiration to you and love.
Olga Klishevskaya, specially for the site
On Valentine's Day, Valentines are given - small hearts as a declaration of love. Today we will talk about how to make an origami heart out of paper. Why not Valentine?
All you need is a sheet of red or pink paper. After all, red is the color of love, and pink is the color of tenderness.
Operating procedure
1. Place a rectangular sheet of paper in front of you. The larger sides of the rectangle are located at the top and bottom. Align the top and bottom sides of the rectangle. Smooth out the fold line with your finger.


2. Align the left and right sides of the rectangle. The fold line will mark the middle.

3. Bend the right corner of the rectangle down. The middle of the upper side is the top of the corner.

4. Similarly, bend the left corner of the rectangle.
5. Turn over the resulting figure. Align the fold lines with the middle of the shape.


6. Bend the top corners.

7. Bend the left and right corners.

Option 2
1. A heart will look more interesting if the paper is on both sides of a different color. Cut a sheet of paper in such a way that you get a rectangle, in which one side is 2 times longer than the other.

2. Fold the rectangle in half. You should get a square.

3. Align the side of the square with the fold line. Flip. Align the side of the square with the fold line again. You should get a rectangle. Expand.


4. Align the upper right corner with the middle of the lower side of the rectangle. Smooth out the fold line. Expand. Align the lower right corner with the middle of the upper side of the rectangle. Smooth out. Expand.


5. Align the top right and bottom right corners of the rectangle with the middle of the top and bottom sides of the rectangle.

6. Repeat steps 4 and 5 for the upper and lower left corners. You should get a square.


7. The resulting square consists of two triangles. Align the corners at the base of the triangles with the top. Smooth out the fold lines.


8. Against the background of the square, you see 4 triangles, more precisely 4 pockets. Straighten the pockets so that they become squares.


9. For each resulting square, align two sides with the diagonal.


10. In the center of our figure you see a group of triangles - pockets. Straighten them in such a way that you get a flower. If you have difficulty, then take a needle. It will help open the pocket.


11. Align the top corner of the shape with the bottom corner.

The art of origami is very ancient, China is considered its homeland, and it received its development in Japan. The Japanese believed that do-it-yourself paper figures carry a particle of the soul. Making origami is a useful and exciting activity that develops imagination and artistic taste. The heart is a symbol of love, hope, attention. Not without reason, on Valentine's Day, an origami paper heart is one of the most original and desired gifts.

Consider how to make a heart out of paper, its types and materials for manufacturing. Our master class, we hope, will help you with this. We will need: paper, ruler and good mood.
Origami consists of two directions: classical and modular. In the classic version, a simple paper figure is created. The modular version focuses on the creation of a complex composition that can be connected with glue.
Classic options
Scheme of the classic version of the "Simple Heart":
- We take a square sheet of bright colored paper;
- We bend it diagonally twice - we get a triangle;
- We unfold the sheet;
- We connect two opposite edges alternately along the fold line;
- We bend the upper edge so that it is aligned with the center of the square;
- We impose the lower edge on the middle of the upper part;
- We bend the right side of the heart in the center up;
- We do the left side in the same way;
- We bend the upper and side sharp corners inward.

We offer another option - "Wicker Heart".

An original piece for beginners. You will need two sheets of multi-colored paper, select the desired size according to your taste. Fold each sheet in half, and then bend them again. Now we cut the resulting blanks into narrow rectangles.
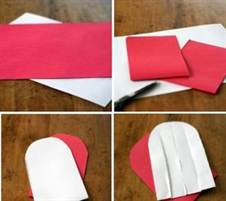
Then we round the sides of the rectangles opposite to the fold. We make cuts of the same length in the sides of the rounding.

We thread blanks into each other in a checkerboard pattern, decorate with a ribbon on top.

Another simple and quick job that can be done in 10-20 minutes will create a good mood. To do this, you need a heart-shaped template that you can draw yourself. To carefully cut the workpiece, take a clerical knife, make a cut in the paper, and then work with small scissors. Then we circle the template along the contour on thick paper. The number and color of hearts depends on your taste. We glue the cut out hearts on top of each other, combining in the center.
An interesting solution would be to stick templates of hearts of different sizes on top of each other, starting from the largest.

Origami heart with a flower:

You will need white thick paper, measuring 15 by 30 cm, a ruler.
We take paper, bend the lower corners up, getting a triangle, unbend. We bend the upper corners down, straighten. Fold the paper along the fold lines. We bend the upper corners down, the lower corners up.
We bend the edges, straighten, bend to the center. As a result, there are four small squares on the large square. We bend their side corners inward. Next, bend the edges, straighten, bend to the center. We have a flower. We turn the craft with the flower down, put the upper corner on the lower one. Fold the side edges inwards. Bend the bottom corner up to the top point, straighten it.
Then lift the bottom edge up to the first fold line. Heart with a flower is ready!
More volume
A voluminous heart will be an excellent present, suitable for home interiors, it is easy to make.

We need a sheet of red paper.
We take square paper. We bend the sheet in the middle, open it.

We bend the lower part of the sheet down by 5-7 mm.

Fold the square in half on the other side. There is a fold at the top.

Align the bottom edge of the rectangle with the fold. A triangle has formed.

We form a triangle on the other side.

Flip the figure.

Bend the edges of the triangles from the fold line outward, then unfold. We do this to form creases.


Bend the lower outer corners to the center.


We bend the inner edges outwards and then put them into the formed pockets.


Insert a pencil or stick into the upper hole. We blow there and get our cherished heart.

A video on how to make a volumetric heart can be viewed here.