How to make a large box with your own hands. How to decorate a box, make it from various materials? Original box for money
Jewelry box, the most versatile and essential female household item. It is very convenient to store all the jewelry in a box, especially which you can make with your own hands. A jewelry box made of cardboard looks very nice, it is not difficult to make it yourself from simple and affordable materials. And also you can present a handmade jewelry box, and this will be the most memorable and dear gift to a person. Hand-made products are always more expensive, as they are exclusive. And you will see below how to make a jewelry box with your own hands.
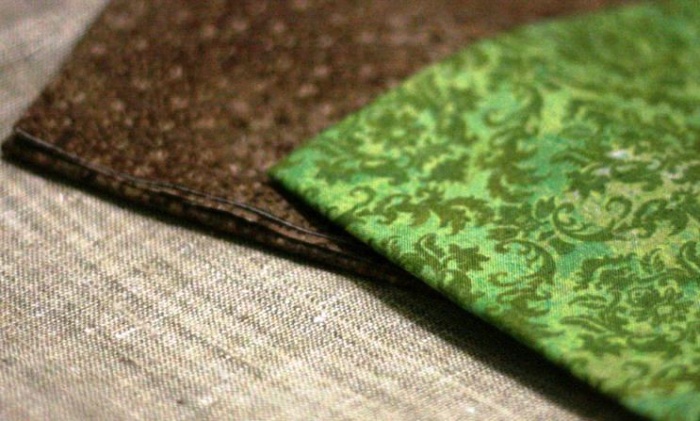
Materials that you need: binding cardboard (preferably 2 mm thick), PVA glue, masking tape (4 mm wide), Moment-crystal glue, ordinary Whatman paper, fabric (preferably cotton), ribbons - 2 pcs of 15 cm
Tools: knife, scissors, self-healing cutting mat. or an unnecessary piece of linoleum, a ruler, a synthetic glue brush, a pencil, a stack for smoothing surfaces and corners, a jar for glue
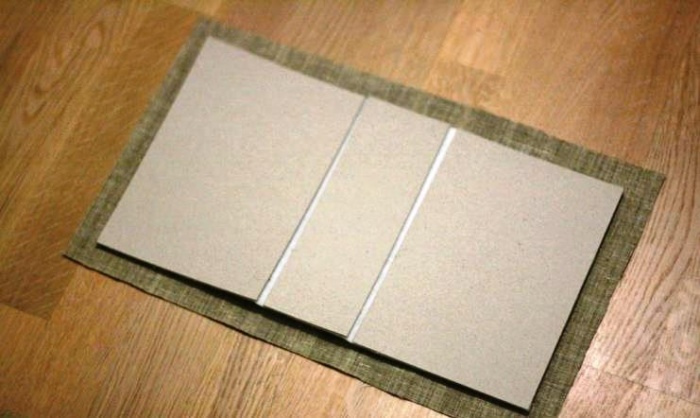
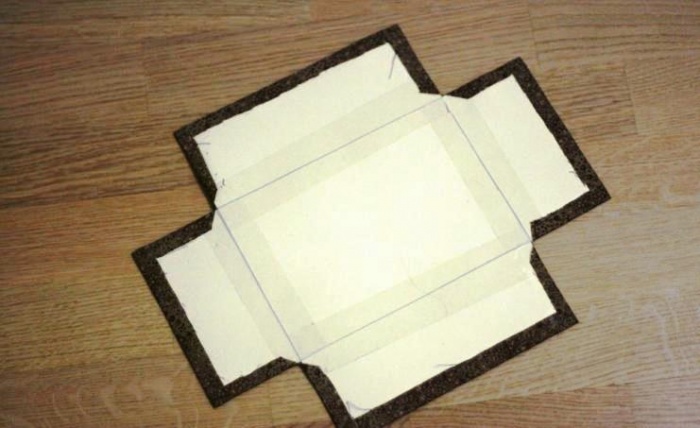
Start by assembling the base. To do this, you must make a drawing.

We glue the walls from top to bottom, not from the side. The glue must be applied to the parts along the entire length. We apply a large amount of glue, we do not regret to keep the box strong.

Always align when applying the part, the glue dries slowly, so you have the opportunity to put the part straight.
First we glue a long wall, then two short ones, it is better to apply the glue on two sides so that you get a neat corner

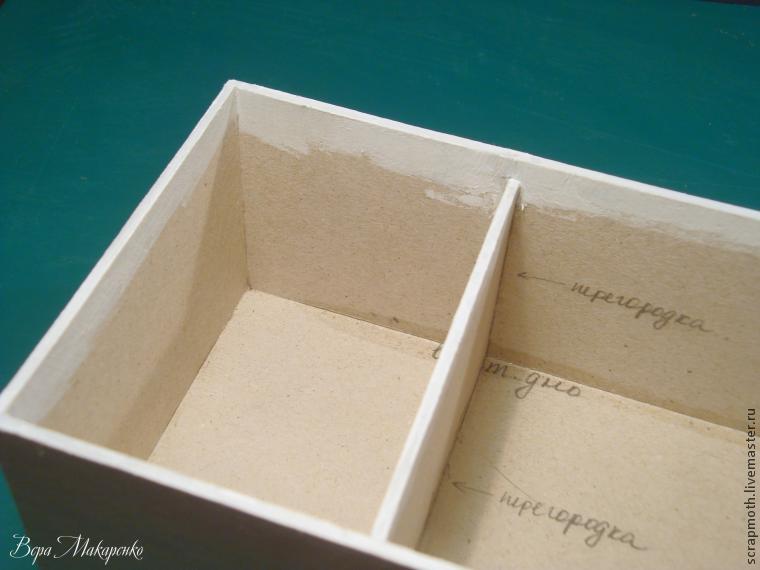
In order to glue the partition between two sections, mark in advance the place where it will stand.
Next, apply glue to the partition and paste in the place where it will stand. Now you need to take white acrylic paints and paint all the upper cuts of the parts so that the color of the fabric on the sides is not distorted.
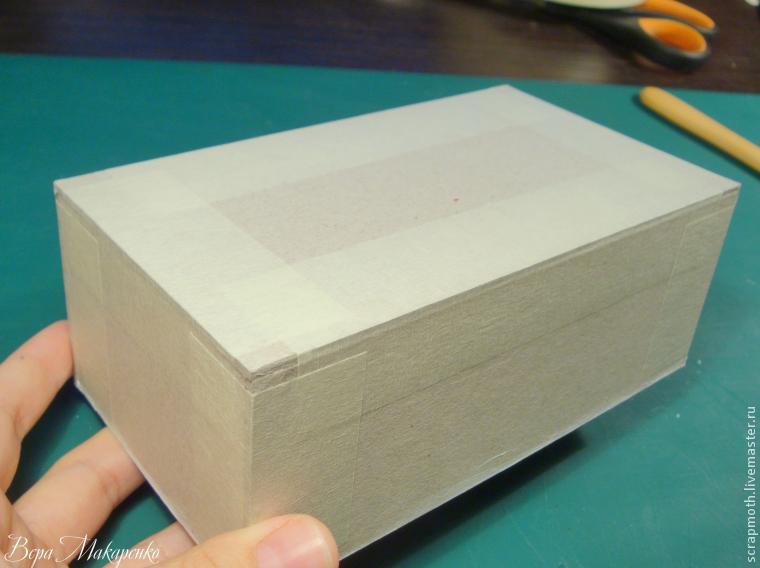
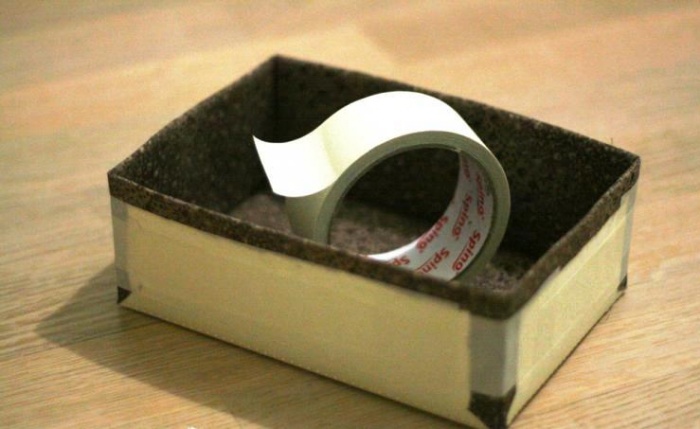
 In order to strengthen all corners, take a piece of masking tape and attach it to all corners of your box and smooth it well. It is better to flatten it with a stack, and then press firmly.

 Next, you need to glue the inside of your box
 Here again you need to use a stack, iron the tape from the glued edge towards the corner and along the hollow.
 We strengthen all the joints inside.


Finally, you have completed the cardboard base of your box. The next step is to decorate.
In order to decorate a jewelry box with fabric, you should know a few tips.
- The fabric completely covers the cardboard. There should be no gaps anywhere in the finished box.
- Avoid open cuts.
- Apply the glue in a thin, even layer so that it does not bleed through the fabric to the right side.
Glue the fabric to the cardboard with PVA glue.

Glue the side and the strip on the inside of the wall with glue.
Apply glue to the paper piece in a thin, even layer.
We glue the paper piece to the wrong side of the fabric.
 Before you are going to glue the allowances on the back wall, you should make cuts in them and form corners.
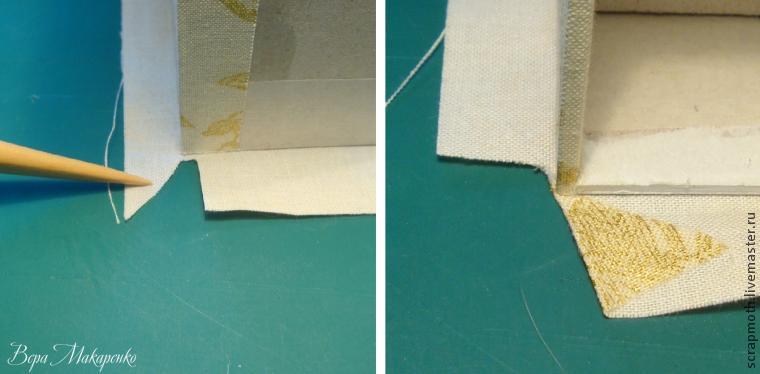 Fold and glue the protruding allowances.


Next, we attach the allowances from the bottom.

After gluing, we get flat corners.


First, we glue the bottom with glue, place our part there. Then we glue the allowances and corners. We smooth everything with a stack.

Close the cardboard slice with a fabric rectangle.


Now let's take on the cover for your box.
The cover should consist of three parts: bottom, cover and spine. The lid will be with a padding polyester layer. Bottom and spine - with white paper interlayer. Here you first need to glue the paper to the cardboard, and only then - the fabric. Cover the cover with glue and apply it to the synthetic winterizer.

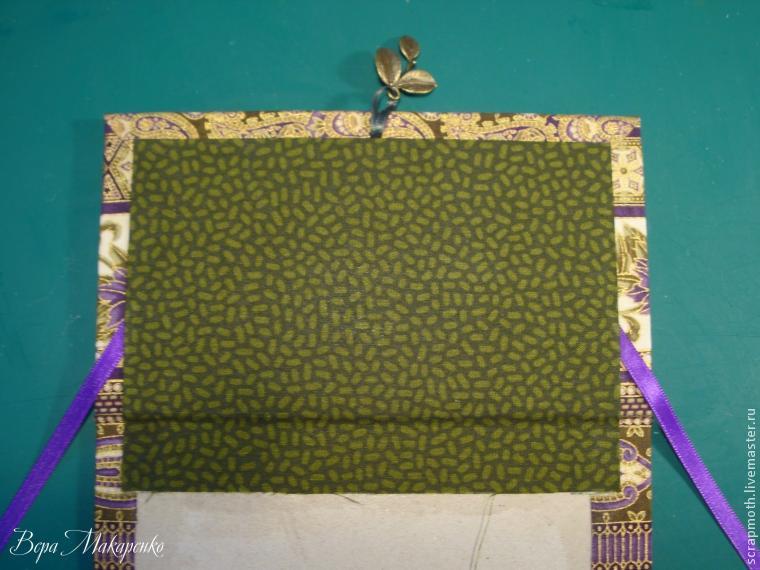
To decorate the lid with a pendant, make a small slot. Mark the middle along the long side. On the short one - 1 cm from the edge. We make a small slot, insert a ribbon there and glue the ponytails to the cover.

For the cover, we cut out the fabric with 2 cm allowances on each side.

Place all three parts on the fabric, leaving a distance of 3-4 mm between them. We immediately glue the flat parts, temporarily attach the part with the padding polyester to the spine with pieces of masking tape so that it does not fidget. And glue the allowances along the long edge.

We make a cut for the suspension.

We make corners with minimal thickening, we cut the fabric along the cardboard, not reaching an angle of 2mm. After we have formed all four corners, glue the allowances on the short sides.
It's time to glue the stopper tapes. Thanks to them, the hinge will last much longer. And it is more convenient to use the lid with stoppers.
Cut two strips 14 cm long and glue them symmetrically at an angle to the cover. They should be free at a distance of 1 cm from the edge. The rest is glued.

Now let's make the flyleaf. To do this, we cut out a detail from paper 2 cm shorter than the cover and 1 cm narrower in width. On three sides, the allowances are 1.5 cm, on the fourth - 3 cm. This long allowance will then hide between the spine and the back wall.

Form the corners on the paper parts as follows: from the long side, cut off the excess fabric flush with the edge of the paper part. On the short side, we make a broken line, as in the photo below. We glue the long side first, then the short one.

Glue the resulting detail onto the flyleaf. It will turn out like this:
It's time to connect the main box of the box and the cover. To do this, coat the bottom with moment-crystal glue. Apply the glue to the smaller part, i.e. to the bottom of the box, not to the lid. We do not reach the edge a little and carefully spread the glue so that it is evenly distributed.
Press the bottom of the box to the bottom of the lid. We align the back wall with the edge of the part, the three outer walls will have indents of 7 mm. In general, cardboard sticks together quickly, the main delay is in the fabric allowances. You need to wait until it all sticks together and the bottom does not lag behind the box.
Then I glue the spine to the back wall. Likewise, you won't be able to crush with books.
After that, you can glue the free ends of the stopper tapes to the box on the PVA. This must be done symmetrically on both sides.

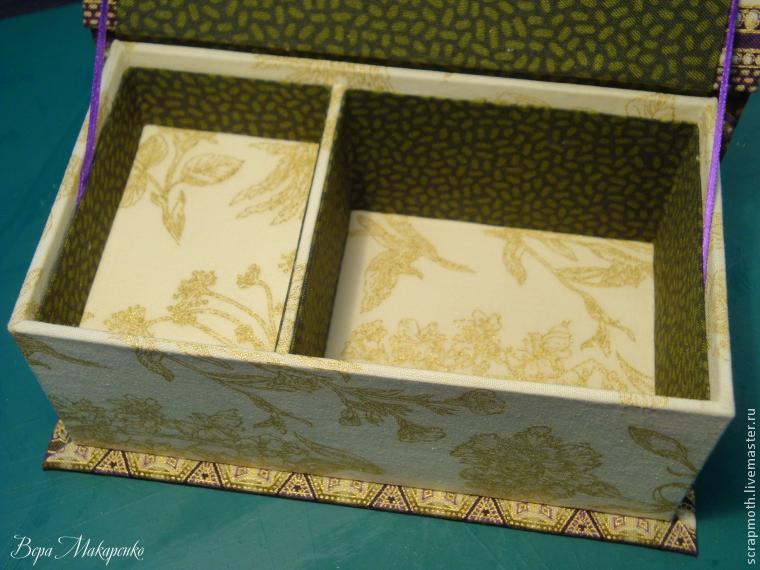
We will paste over the inner walls of the box. To do this, cut out two long rectangles. For a deep compartment, this rectangle will be 5.2 cm high, for a shallow one - 2.3 cm.
We glue the paper parts to the fabric, cut out, glue the allowances. Leave the allowance free on one narrow edge.

Diligently glue the part into place. We start from the end where we have a free allowance. We glue the part in stages on each of the 4 walls. Carefully iron the corners with a stack. If not ironed, there will be rounded holes in the corners inside the box.

We make a joint near the front wall.
It remains to make the rollers for the rings from rolls of white felt.
For your box you will need 6 pieces of felt 20 cm long and 5.5 cm wide.We roll them into not tight rolls and glue them with glue-moment. Lay the rolls tightly to each other and glue.


So we got a gorgeous DIY cardboard box. You can also show your imagination and make the design of such a box as you want. Below is another do-it-yourself box idea in a video tutorial.
The box is a wonderful thing in which you can store various little things. Not only is it functional, it also brings some charm to the design of your room. In this case, you do not have to go to the store and buy a suitable box. You can do it yourself from improvised means. This DIY jewelry box will be a great addition to your home.
In this article we will look at what a box can be made with our own hands, and how exactly.
Box of postcards
Simple but beautiful box. To work you will need:
- postcards, 13 pcs .;
- scissors;
- needle and thread;
- pencil and ruler;
- the cloth;
- cardboard.

Now let's look at a step-by-step way to bring everything to life:
- Take 4 whole cards and sew around the edges with a buttonhole.
- Take the other 4 cards and cut out the triangles from them. Make a square out of 1 other. Sew all 5 blanks again with a buttonhole seam.
- Take a piece of cardboard and cut 5 identical squares out of it, the width of which is identical to the width of the postcard, and sew them over with fabric.
- Now, using a needle and thread, connect the sheathed sheets of cardboard so as to get a box with a bottom and four walls.
- Take the 4 whole postcards that you trimmed at the beginning, on each side, attach them to the top and bottom of the box, bending the postcard in an arc.
- From triangles and 1 square, make a box for the finished design.
- To cover the sides of the box, make a stencil and cut out the sides from the remaining four postcards. Sew them with a buttonhole seam too.
- It remains to sew the sidewalls and the cover. To ensure that the lid closes and opens normally, sew on only one side.
Now the product from postcards is ready with your own hands.

DIY wood box
The most common handcrafted option is wood. The material is affordable, beautiful and easy to process. Such a box with your own hands will be an excellent gift for a friend or family. You don't need special tools and expensive materials.

Plywood, 4-6 mm thick, will serve as a base. It is important that it is dry. To work you will need:
- jigsaw (manual can be used);
- jigsaw files;
- hammer;
- hacksaw for wood;
- different files;
- sandpaper;
- pencil, ruler, tape measure;
- varnish, paint and swabs.
The first thing you need to do is draw the blueprints. One of these is provided below if you can't make your own.

Now you need to compactly place all the parts on the plywood, adhering to the dimensions. Use templates to make things easier. Finally, use a jigsaw to cut out all the details. Having all the components on hand, it is easy to combine them into one beautiful box.

DIY plywood box is ready. Such a wooden gift, made by yourself, will please everyone.
DIY cardboard box
Quite a simple and economical option. Here's what you need to get started:
As for the tools, the set is standard: a knife, scissors, pencil and ruler, clamp, needles and thread. First, you need to cut the cardboard correctly. The photo shows how to do this. Light paper is thin, and darker paper is thick.

Note! An unnecessary part is marked with a cross.
So, you see 6 types of paper. Let's figure it out;
- The first four parts (No. 1) are 7 × 13 cm in size. These are cardboard and paper.
- The next four parts (no. 2), measuring 7x19 cm.
- Under No. 3, a paper blank, measuring 7 × 19 cm.
- This is a 7 × 20 cm cardboard blank.
- Under No. 5, two blanks 13 × 19 cm.
- And the last two blanks are 14 × 20 cm.
This will be a great DIY craft box. Here is a step-by-step instruction on how to build it.
Take all parts # 4 and # 6 and glue the identical piece of fleece onto them.

Place the blank on the fabric and cut out a rectangle, leaving a 2-3 cm margin on each side.
Fold and glue the edges carefully as shown in the photo. You will have to do this often.


Secure the structure with paper tape.

It remains to cut everything around the edges.
Lay the blank on the fabric and carry out all the same manipulations as with the first part.
For reliability, you can sew the lines where the bend will be.

It remains to bend it inward and fix it with tape.
The base is ready, you can put it aside and take the rest of the cardboard parts. Duplicate them with fleece.
As always, cover the whole thing with a cloth. But, please note that you do not need to bend long planks on the short side.

Now glue the 4 pieces on the sides of the box. Long first, then short.

You can put the finished box aside. Take blank # 3. Cover it with fabric. This time, you need to cover the short sides, and leave the long ones as they are.
To make a box with your own hands, you do not need to have special knowledge in a specific area.
It is enough to have the necessary materials, and you can get ideas here.
There are many options for boxes and the most interesting and uncomplicated ones are presented below.
Stock up on tools, arm yourself with ideas, and use your imagination.
DIY box (master class)
You will need:
2 milk cartons (tetra pack with square base)
Thick cardboard
Scissors
PVA glue
Kraft paper
Two small magnets
Wrapping paper, beads (for decorating the box)
Wooden beads (to make the legs)


Cardboard heart box


We make a jewelry box from ice cream sticks

You will need:
Ice cream sticks
Glue gun
1. Making the base of the box.
To do this, you need to arrange 10 sticks in one row.
Glue sticks on the right and left to secure the base.


2. Raise the walls. Glue the sticks as shown in the image to form the walls of the box. Choose the height of the box yourself.

3. Making the cover. To do this, you just need to repeat step 1 (you can add 2 more sticks across those that hold the lid together).


4. You can decorate the lid to your liking - for example, glue a picture, photo, sticker, or simply paint with gouache, making several patterns.
5. To attach the lid to the box, prepare 2 pieces of tape of the same size and glue them with one end to the lid and the other to the box (see image).

DIY box out of the box

You will need:
Magazine clippings
Simple small box
1. Prepare a few sheets of paper (preferably thin) and start rolling them into tubes. You need to make a lot of tubes.
2. Prepare any box - this will be the base of your box. Turn it upside down and draw a rectangle at the bottom.
3. Around the perimeter of the drawn rectangle, begin to glue the paper tubes (see image). Leave a distance of 5 cm between the tubes.


4. To make the bottom of the box even, you need to cut a rectangle out of cardboard. Its size is equal to the size of the bottom of the box. Glue this rectangle to the bottom of the box to cover the glued ends of the tubes.

5. Now begin to gently weave the paper tubes around the base. It is worth noting that the tubes should fit snugly together. It is advisable to fix each tube with glue.


6. Make a lid for the box in a similar way. You can use string to attach the lid to the box by making small stitches.
DIY paper box


How to make a jewelry box


How to make a cardboard box
This handy craft box is easy to make. It's compact enough to take with you.

You will need:
Fabric in two colors
Foam rubber (sintepon)
Super glue
Linen elastic
Thread and needle
Stationery knife or scissors
1. Prepare a piece of cardboard and cut a square out of it. In this example, the dimensions of the square are 28 x 28 cm
2. Divide this square with a ruler and a pencil into 9 squares (9.5 x 9.0 x 9.5 cm)


3. Cut off the 4 squares in the corners (see image) and set them aside.
* To fold the cardboard at the designated locations, you can use a knife to make incomplete cuts in the fold lines.


4. Glue the fabric to the inside and cut off the excess, while leaving 2 mm along the edge to bend later.
5. On the front side of the cardboard, you need to glue a cloth that is 1.5 cm larger than the cardboard form.


6. Fold the edges of the fabric and glue it to the mold.


7. Take the squares that you set aside and cut 0.5 cm from the edges of each (the size of each square should be 8.5 x 8.5 cm).
8. Glue foam rubber (sintepon) to these squares.


9. From the fabric, cut out squares that are 1.5 cm larger than the cardboard form. Use these fabric squares to wrap the cardboard squares and fold the edges. You should get pads.


10. Now wrap a rubber band around each pad and secure with glue.


11. Glue the pads to the cardboard base.


12. Prepare another 18 x 18 cm cardboard square and draw and then cut out the shape shown in the image.


13. To make a lid, prepare a 15 x 15 cm square. Measure and cut about 2.5 cm around the edges.


14. Now fold the edges of the blank and glue it in the same way as the box.
DIY box (video)
Do you have a lot of jewelry and would like to keep them on the dressing table in a beautiful box? Or are you looking for something else to diversify your home interior with? Then you should stop at our page, and we will tell you in detail how to make a jewelry box with your own hands. Consider the most affordable and popular options.
Content:
Box made of thick cardboard
In order to create a feminine and graceful chest, you will need the following materials:
- milk bags (2 pcs.);
- scissors;
- kraft paper and thick cardboard;
- glue, preferably PVA;
- ribbon;
- magnets (2 pcs.)
- wood beads (for legs), beads;
- wrapping
Master Class. Step-by-step instruction
Step 1. Cut out cubes of the same size without a bottom from milk bags.

Step 2... Take one piece of the shoe box and insert the resulting cubes, glue them. These will be the cells of the box.

Step 3. Cover the resulting box with wrapping paper, and the bottom and inner walls with kraft paper.

Step 4. We make a spectacular "wrapper" for our box:


Instead of beads, you can use beads, glass beads and even rose petals, dried or artificial. Decorate the box to your liking and style, showing your imagination and desire.

Examples of beautiful jewelry boxes
It's actually quite simple to create a beautiful box on your own, you just have to pay attention to the objects around you at home and turn on your wit.
Examples include the following products:
From packing for cotton swabs
To create such a pretty thing, take an empty round cotton swab wrap. Cut out pieces of colored fabric according to the size of the bottom, walls and lid of the future box and carefully glue everything with colorless glue. You can decorate the box with beads, feathers, various ribbons.
If you have a child in your home, ask him to paint the box himself. Such a cute casket will look both in your bedroom and in the nursery.
It is good when the needleworker is “on your toe” with knitting needles and knitting threads. With the help of them, you can knit an outfit for a box in a very original way.


Out of the candy box
If you love sweets and accidentally left a plastic box from them, rejoice: a pretty box for women's items is almost on your table.
Take a transparent package, sand it with sandpaper, and then cover it with acrylic primer (you can make uneven layers and squiggles). The next step is painting.
Let the box dry and start decorating.


Design creation option:
- take a napkin with nautical patterns, cut them out and glue them. Use decoupage glue.
- open the resulting product of arts and crafts with a transparent layer of acrylic varnish.
Out of the shoe box
To do this, prepare:
- boxes from under any shoes (2 pieces);
- velvet of any color;
- non-woven fabric;
- a small piece of crepe satin;
- gold-colored faux leather braid;
- dish sponges or foam rubber;
- pen or pencil;
- matches (needed to burn fabric);
- newspapers (useful for patterns);
- stapler (staples should be 20 mm);
- iron;
- ruler, scotch tape (not wide);
- scissors, sheets of cardboard;
- iron.


To decorate such a box, it is advisable to opt for designer cardboard, which can be either purchased ready-made or created with your own hands.
From empty matchboxes
It is quite easy to make such a casket as in the photo. You should take only a few matchboxes and glue them in pairs to form some small chest of drawers. To make the base work, choose thick cardboard and make squares.


An elegant box will be made by colored paper with beads, beads and ribbons, stickers, appliqué from buttons. Can be originally tied with woolen multi-colored threads.
From unnecessary books
The most unusual and aesthetic boxes are made from books that have served their service.
To do this, remove all the sheets, leaving only the frame (step back from the edge 2 cm). All pages should form thick walls, for this glue them around the entire perimeter. The base is ready. Any little things will come in handy in the decoration: beads, beads, parts of old hairpins or belts, artificial flowers, lace, trims of beautiful fabric, etc.
The box is an irreplaceable item for storing any small items, from jewelry to items for sewing and other handicrafts. It is not at all necessary to buy ready-made boxes, because you can make them yourself even from scrap materials, and the work will not take much time and money. A DIY homemade box is a great reason to get creative and show your imagination quickly and easily.
Let's make a box from an adhesive tape reel with our own hands quickly and easily
A scotch tape reel is perfect for making a small round jewelry box. But it can be replaced with a piece of cardboard pipe (from linoleum).
- You will need to cut 2 circles from thick cardboard along the diameter of the bobbin (for this, simply circle it twice). One is for the bottom, the other is for the lid. The lid should be slightly larger than the bottom, for this we add a few millimeters.
- We glue the bobbin to the bottom with instant glue or tape. Another way is to make a hem allowance at the base and glue it with regular glue.
- We glue a narrow strip of cardboard to the lid so that it fits on the reel.
- The base of the box from the scotch reel is ready. We decorate it with any materials at hand. For example, you can glue the blank with beautiful paper or fabric, decorate with ribbons using the kanzashi technique.
For work, you need a box with a lid, a piece of fabric, a lace ribbon, scissors and glue. Let's analyze the work step by step:
- If necessary, remove labels, stickers and glue residues from the box.
- Cut out a rectangle in the shape of the bottom from a thick fabric and glue it inside.
- With another cloth (preferably light and elastic) we glue over the outer walls of the box.
- We also glue the inner sides of the box with cloth (choose a soft and dense one).
- We also paste over the lid and decorate it with lace ribbons.
- On the inside, you can make an applique.
The box is ready from the box! You can also decorate it to your taste.
This work is done very quickly from thread and cardboard. Let's take a closer look at the manufacturing process.
- We cut out two blanks for the base in the shape of a heart or any other (round, rectangular).
- We glue one of them with decorative paper or decorate in another way, this will be the bottom.
- In the other base, we mark the points for the holes at a distance of 1 cm, as often as possible. We stick toothpicks into the holes and glue them.
- Sequentially weave the toothpicks with a thread (bending around them in a checkerboard pattern).
- In the middle of weaving, put on a bead on each stick and continue weaving.
- At the end of weaving, we put on and glue the beads to the toothpicks.
- You can make a decoration from ribbons for the top of the box.
For this master class, you will need pasta of various shapes, spaghetti, a cardboard box with a lid, plastic lids from four bottles, PVA glue, a can of acrylic paint and paper.
- Having cut a square out of paper, we glue a composition of several types of pasta on it. This will be the central part of the future box.
- We glue the side parts of the box symmetrically with pasta in the form of an interesting pattern.
- Glue the paper with the finished composition in the center of the lid. Create a pattern of large pasta around the edges, fill the gaps with spaghetti, pasting them with PVA glue.
- The plastic lids will serve as the legs of the box. We glue them from the bottom from the outside. Then they can be painted.
- We paint the box in any chosen color (for example, golden, blue or red paint) using a spray can. We also paint over the bottom, turning the box over.
In the photo you can see another option for decorating the box with pasta:

We will make this box out of a round plastic box. In addition, for work you will need: white acrylic paint, varnish, PVA glue, blue and green gouache, a napkin with an interesting pattern, brushes and foam rubber (sponge).
We paint the box and lid with a sponge on all sides with white paint. Dry and apply a second layer. The image will look best on a clean white background.
Carefully separate the top layer with the pattern from the napkin. Cut out the template for the cover from white paper so that a small frame remains when overlaid. We apply a napkin to the template and outline the outline. Carefully cut out the circle without capturing the pencil mark. The diameter of the napkin should be 5-10 mm less than the diameter of the lid, since the napkin stretches slightly when glued.
Let's start decoupage technique. Glue the napkin to the lid with water. To do this, moisten the brush and apply a little water to the center. Smooth the napkins with a brush from the center in all directions to the edges. Gradually add water, moistening more and more area of the napkin and slightly stretching it.

This method will prevent the design from wrinkling. In addition, the napkin can be adjusted slightly as you work. When the whole napkin is stuck, go to work with glue.
We dilute PVA with water and coat the entire napkin on top with this solution. We dry it. Then we paint all other surfaces with gouache, shade the transitions between colors so that they are smooth. Below you can decorate the box with decorative elements - flowers, butterflies, etc.
We paint the protruding parts with a gold color, dry the box and varnish it in several layers. The box is ready!
Related videos
For those who want to disassemble the making of boxes more clearly and get new ideas for decor, we have prepared a selection of video master classes: