Knitted crochet outfits for barbie dolls. Crochet a simple and complex dress for Barbie: patterns
When a little princess grows up in a family, she tries to dress her dolls like a king. But constantly buying new outfits for your daughter's favorite doll becomes financially expensive. And it’s not always possible to find a new set of clothes for a toy, since the doll fashion industry is rather stingy with ideas. Mom's skills will come to the rescue, which involve the independent production of outfits. The easiest way is to tie it. Therefore, a mother-craftswoman must definitely find a suitable crochet dress pattern for Barbie, since this tool is the easiest to work with.
What you need
The ideal option for the material for creating clothes for Barbie dolls will be the remnants of any yarn, hanks of old threads. Of the tools you need only a hook and sewing needles.
In addition, you will need several crocheted dress patterns for Barbie so that the girl chooses the option to her liking.
The simplest dress for a doll
For beginners, a model of a summer dress is suitable, which has a straight silhouette and rests on two thin straps.

In any case, it is worth measuring the parameters of the doll, which will determine the width of the future product. When creating a model, you should use a simple crochet dress pattern for Barbie:
- Dial a chain of air loops, which is about a centimeter more than the measure of width.
- Knit the fabric using single crochets. The length of the canvas is determined by the height of the doll and the preferences of the needlewoman.
- Having finished the first canvas, you need to start knitting the second.
- Then the canvases are sewn together and where the top of the dress will be, 2 straps are formed from chains.
Such a description of a crocheted dress for Barbie is not too difficult to implement, so even a beginner needlewoman can make a beautiful outfit. On the canvas, you can make embroidery or appliqué.

You can use a pattern that does not differ in complexity from the one described above, but at the same time knitting the product will turn out much faster. If you use columns with 1 or 2 crochets in your work, you will get the original model as in the photo above.
Ball gown for Barbie crochet
You can create a more festive costume for a doll by learning how to knit openwork napkins. The crochet dress pattern for Barbie in a ballroom style is not too complicated if you know how to knit a double crochet and a single crochet.

The principle of creating a ball gown for Barbie:
- Dial a chain of 15 air loops. Close the chain into a ring.
- Knit the first row with ordinary single crochets.
- In each subsequent row, you need to evenly add 8 columns.
- After forming the base of the skirt, you should choose any openwork pattern for the napkin.
- When the skirt is ready, you need to tie the bodice. Tie the canvas, which in width will correspond to the height of the torso of the doll. You can use the simplest pattern, which consists of single crochets.
- Then the blank for the bodice must be sewn so that a ring is obtained.
The next step is to assemble the ball gown. The process is very simple: you need to sew the blank of the bodice to the skirt. To do this, you can use a thread with a needle or a hook. A seam made with a needle will be thinner and neater.
To increase the volume of the skirt, it is worth making a tulle petticoat. On a regular elastic band that is inserted into the underwear, sew on several strips of tulle. The mesh material must be trimmed along the length of the hem. You can sew pieces of material to the dress. It is enough to fix them with a needle and thread under the seam where the bodice meets the skirt.

After assembly, it is worth decorating the product. On the back of the bodice, you can sew a satin ribbon in the form of lacing. This decor option will make the inconspicuous upper part of the dress more elegant. In addition, lacing will be a good imitation of a full-fledged corset. Beads, beads, sequins and other shiny decorations can be sewn along the edge of the skirt.
To create this outfit for my daughter's doll, I used double mercerized cotton yarn 50g/165m, crochet hook No. 2.5 and 3 black hook fasteners.
The dress is crocheted from denim yarn.
Dress pattern for Barbie.
The dress is worked top down in rows of single crochet and double crochet stitches.
Dial the required number of air loops, trying on your doll. If you want to sew on buttons to fasten the dress, then cast on 3-4 loops more than the bust (so that the edges of the knitting overlap).
To decrease stitches around the waist, double crochet in each stitch, alternating 2 regular double crochets and the next 2 double crochet stitches.
In the narrowest part of the dress, work 2 rows of single crochets.
Below the waist line you need to add loops. To do this, knit double crochets, and in every 3rd loop of the previous row, knit 2 double crochets.
Since I plan to use hook-and-eye fasteners, my knitted Barbie dress is butt-jointed at the back.
I decided to connect the extreme halves, and this is what I got:
And it turns out very nice:
And at the back it is better to hem the top and bottom edges.
For this kit knitted clothes for barbie left to knit a hat.
Hat.
2nd row: 1 column b / n, 2 column b / n in one p.
3rd row: 2 columns b / n, 2 columns b / n in one p.
4th row: 3 columns b / n, 2 columns b / n in one p.
5th row: 4 columns b / n, 2 columns b / n in one p.
6-9 rows: no increase.

Despite the abundance of new toys, girls all over the world still play with dolls. And one of the most popular are Barbie and other beauties of the same size. Therefore, elegant, unusual, interesting dresses will be needed by any little housewife. With the help of a hook and a small amount of thread, you can knit a dress for Barbie and please the child.
Required materials:
- hook №1,1
- yarn "Iris" blue
- Yarn "Grass" white
- Velcro for clothes
How to crochet a dress for Barbie, a master class with a photo
Work starts from the waist. First you need to dial a simple chain of 40 air loops.

The dress is made with single crochet. In the first row, no increase is needed:

In the second and fourth row, five columns are added. Here is the canvas that should be formed:

The same must be done in the sixth and eighth row. This is how the top of the dress looks like on the tenth row:

Periodically it is worth trying the canvas on the doll to make sure that the dress will fit well. In the eleventh row, you need to knit 12 single crochets + 5 double crochets in one base + 3 single crochets + 5 double crochets in one loop. Next come simple single crochet.


The twelfth row is performed in a special way. Before the first arch, you need to knit single crochets. Above the last column before the arch and the first double crochet column, you need to tie two columns together. The same decrease in loops occurs after the first arch, as well as at the beginning and end of the next.

The next two rows are performed in the same way, with a decrease in the total number of loops. The last row is knitted without reducing the number of columns. The thread breaks.

Now you can move on to the skirt. To do this, the thread is attached to the beginning of the canvas, a series of single crochets are made.

In the next row, in every second loop of the base you need to knit two columns.

In the third row, there is no need to increase.

Knitting continues unchanged until the eighth row.

Now you can cut off the blue thread and move on to the fastener. To do this, a piece of Velcro is carefully sewn to each shelf of the dress.

First to the top:


Then to the bottom:

The shelves of the dress are superimposed on each other and neatly sewn together:

Here's what should happen:


The next row is done with Grass. The number of loops does not need to be changed.
Today we will crochet a dress for a Barbie doll, and we will call it "Pink Breeze". Our detailed master class with descriptions and photos will help you knit this elegant doll dress.
Necessary materials:
- Pink yarn (100% acrylic with the addition of lurex) - 50 grams (skein 100g / 450m).
- Yarn "Grass" white - 50 grams.
- White and pink satin ribbon (ribbon width 0.5 cm) - 30 cm each.
- White beads.
- Pink sequins for decoration (optional).
- Hook.
- Wide pink satin ribbon (width 2.5) optional.
- Barbie doll". Height is about 30 cm.

And you can buy a doll or an original outfit here:
How to crochet a barbie dress
We take a pink acrylic thread. We start knitting a dress for a doll from the top. Using a hook, cast on a chain of 17 air loops.

Knit the first row with a half-column with a crochet.


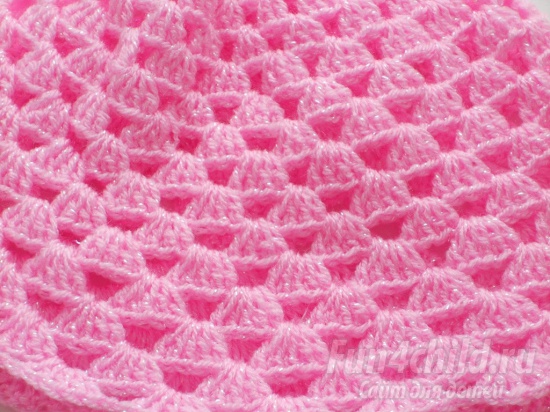
When the top of the dress is ready, connect the ends with an air loop. Then, we start knitting the lower part (skirt). To do this, knit the first row as follows: * 3 double crochets in one loop of the previous row, 1 air loop, 3 double crochets *. We knit double crochets in every third loop.

We knit a skirt in a circle (spiral). We connect the last double crochets with the first ones. To start the next row, make 3 chains for lifting.

We knit 4 more rows. Then, from row 5 to 9, we knit according to the following pattern: * 4 double crochets in one loop of the previous row, 1 air loop, 4 double crochets *.

From 10 to 13 rows: * 5 double crochets in one loop of the previous row, 1 air loop, 5 double crochets *.
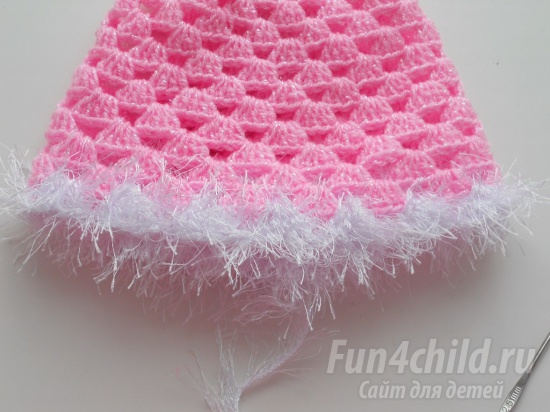
We cut off the pink thread.

We attach a white thread and knit another additional row.

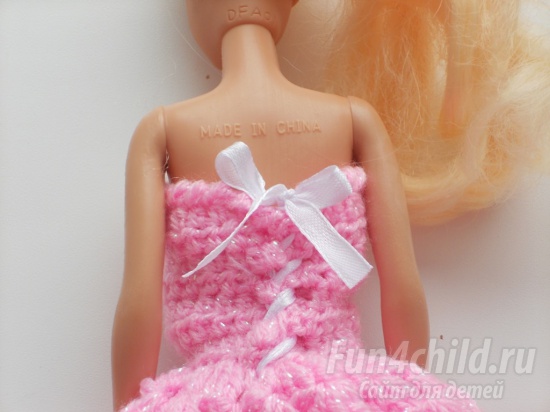
Crochet dress for Barbie doll is almost ready. Now, take a white satin ribbon and carefully thread it through the extreme loops of the shelf (top of the dress). The tape should be criss-cross. Just like lacing.

Tie a bow.
Now we start knitting a snow-white cape for the doll. Take white yarn. Measure the circumference of the shoulders of the doll and dial a chain of air loops of the required length.

Work in half double crochet for 7 rows, inc 2 stitches every other row.

Ready! We put an outfit on the doll and now she is already a princess.


/ 08/07/2016 at 18:01
Greetings, my dears!
Again I decided to make a new thing for the doll. Only now it will no longer be, but a casual dress for Barbie with knitting needles - fitted, with a fashionable pleated skirt and a three-quarter sleeve.
The main difficulty of knitting for Barbie, in my opinion, is that you need to knit with thin threads and on thin knitting needles, and still for such a “girl” like her, it turns out big ... I’ll try to provide a master class of the process.
To knit this dress, I took ANGORA Turkish sectional dyeing yarn and needles No. 2. Knitting density: 3 loops x 6 rows = 1 x 1 cm on the front surface.
Skirt
We start knitting a dress with a skirt, which we will knit from top to bottom - from the waist.
Cast on 27 stitches. In the first row, we immediately add loops in this way: edge, * yarn over, front * - repeat until the end of the row. At the end of the row, the last loop is edge. Thus, there are 52 loops in the row. In the next row, we knit all loops and crochets with purl loops.
For the skirt, we knit as usual to get a chain-like edge (the last wrong side, the first one is removed untied). Thus, at the beginning of knitting, we added loops and got holes that will be useful to us later.
1st row(front side of the work): * 1 out., 1 person., 1 loop to remove untied (thread at work), 1 person., 1 out. * - repeat the combination to the end of the row (it will turn out 10 times);
2nd row and all even rows
(wrong side of the work): the loops removed in the previous row are knitted on the wrong side, all other loops are knit.
Further odd rows from 3rd to 11th: knit as the first row; and all even rows from the 2nd to the 12th - knit as the second row.

13th row:* 1 out., yarn over, 1 person., remove 1 loop (thread at work), 1 person., yarn over, 1 out. * - repeat from * to *.
14th row: knit, like all even rows, knit yarns with crossed facial loops so that holes do not form (they serve to expand the pleated wedges).
15th row and all odd rows up to and including the 23rd row: * 1 out., 2 persons., 1 loop to remove untied (thread at work), 2 persons., 1 out. * - repeat from * to *.
even rows: we knit, as before - the loops removed in the previous row - purl, the rest are all front loops
What did we get? As you may have guessed, the removed loop serves to form an inflection on the outer, protruding edge of the pleated, and a strip of 2 loops of the wrong side forms its internal inflection.
Thus, with the help of yarn, we will expand the pleating wedges every 12 rows (in the face on the outer fold, it looks like a chain of 6 loops that are removed in the front rows. That is, we knitted chains of removed loops to a height of 6 loops - and we make additions with crochets, it’s just easier to count the rows). We add the loops with crochets after and before the wrong loops, until we get 5 loops on each side of the removed loop.
That is, we do the next addition with crochets in the 25th row (we will get 3 loops on the sides of the removed loops), in the 37th row (we will get 4 loops each), in the 49th row (already 5 loops each). In the even rows that follow the rows with the crochets, we knit the crochets with crossed loops.
If you want a shorter skirt - you can add loops up to 4, if you want longer - add at the same interval to the desired length. After the last increase, we knit another 11 rows and in the wrong row we freely close all the loops in the rhythm of the pattern.
Now the skirt is ready, or rather its turn:

- Note: Actually, this skirt is more comfortable. But I decided that I would need to leave a slit along the top for comfortable dressing, and I did not know beforehand how long it would be needed. Therefore, I decided to sew the skirt at the back to the distance I needed.
Bodice
Cast on 26 sts along the top edge of the skirt. To do this, we draw out the loops by inserting the knitting needle into the holes formed from the crochets in the very first row, and we collect the last loop from the hem.

Selection of loops from the top edge of the skirt.
2nd row and all even rows (wrong side of the work): we knit with purl loops, with the exception of the edge loops, which, as you remember, we knit with facial loops.
Attention! For the bodice, so that the edges are denser and do not wrap, we will knit the hem so that we get a knotted edge. To do this, we knit the first and last loops of the row each time only with facial loops.
We knit the 3rd (front) row as follows: edge (front) loop, 1 front, yarn over, 2 loops together with the front with a slope to the left, 4 front, 2 loops together with the front with a slope to the right, 6 front, 2 loops together with the front with a slope to the left , 4 front, 2 loops together front with a slope to the right, yarn over, 1 front, edge (front).
In this row, we started to make holes along the edges for a lacing fastener and reduced 2 loops in the center to make the dress more fitted.
5th row: all loops are facial.
7th row: hem, 1 front, yarn over, 2 loops together front with a slope to the left, 16 front, 2 loops together front with a slope to the right, yarn over, front, edge.
9th row: all loops are facial;
11th row: knit like 7th row;
13th row: 8 knit (including hem), yarn over, knit, yarn over, knit, yarn over, knit, yarn over, knit 2, yarn over, knit, yarn over, knit, yarn over, knit, yarn over, knit 8 (including hem). In this row we added bust loops.
14th row: all loops are purl, yarn overs are knitted with crossed purl loops.
15th row: all loops are facial, make holes for the fastener along the edges, as described in the 7th row.
17th row: K 5 (including edge), close 4 loops, knit 13, close 4 loops, knit 5 at the end of the row, including edge.
Closed loops are designed for armholes. After knitting the 17th row, the work looks like this:

Now we have knitting divided into 3 parts: on the sides of the halves of the back, and in the middle - in front of the bodice of the dress. The working thread is at the left edge of the work. First, we knit half of the back with it, continuing to make holes along the edge, as before.
After knitting the sixth hole, we knit another row of purl loops, one row of front loops, and in the next purl row 4 we close the first loops for the neckline, and 2 on the remaining two loops for the shoulder we knit 2 more rows, after which we reshoot these loops on a safety pin , we break the thread.
We turn knitting to the wrong side, attach the thread on the right side of the central part and knit in front (14 loops). At the same time, I left the loops of the right side of the back on the working knitting needle, but you can also re-shoot them on a pin so that they slide off the knitting needle during work.
We knit up 6 rows. In the seventh row we knit 2 loops (they will then need to be re-shot onto a safety pin), then we close the loops for the neck and at the end of the row we also leave 2 loops for knitting. We knit 2 more rows of these loops.

Finished back and front.
Then we do this: we put the connected half of the backrest face to face on the front, we remove the loops of the back from the pin onto the knitting needle to the two loops of the front left on the knitting needle (we alternate them - the loop of the front, the loop of the back, the front, the back), and close the loops, at the same time knitting along Purl 2 together. In this way, the shoulder seam made is almost invisible.

Again we turn the knitting to the wrong side, attach the thread and knit the second half of the back symmetrically to the first. We remove the two front shoulder loops from the pin, knit 2 rows, re-slip on the knitting needle with the back loops and close as described above to simultaneously sew on the shoulder.
In principle, the sleeveless dress is almost ready. You can carefully tuck in the threads and leave it sleeveless if you like this model.
Sleeves
And to knit more sleeves, you need to pick up the loops in a circle along the armhole on thin stocking needles No. 2 and knit the sleeves in a circle. I picked up 18 loops and distributed them on 3 knitting needles so that the joint between the two lower knitting needles was in the place where the seam is supposed to be at the sleeve, and the shoulder seam falls in the middle of the third knitting needle.
