Do-it-yourself holiday card for February 23. Do-it-yourself ordinary and interesting postcards. Making a postcard using quilling for boys
Summary: Do-it-yourself cards for February 23. Do-it-yourself cards for dad and grandfather for February 23. Defender of the Fatherland Day. Postcards for the Defender of the Fatherland Day.
On February 23, dad or grandfather will be pleased to receive a hand-made postcard from the child. Postcards for February 23, which we offer in this section, are decorated with regular or voluminous applications made of colored paper. There are very simple applications available even to children 3-5 years old. There are more difficult crafts for children of senior preschool and primary school age. For young children, prepare in advance, cut out all the details of the picture so that they only have to stick them on the postcard. Adult children can cut out parts of the applique themselves. It will be interesting to make an origami card for a child for dad or grandfather. You can find origami schemes on our website.
Dads love technology, so postcards for February 23 with its image will be very useful. Make an applique with a typewriter, airplane, rocket. The application can be either simple or voluminous.
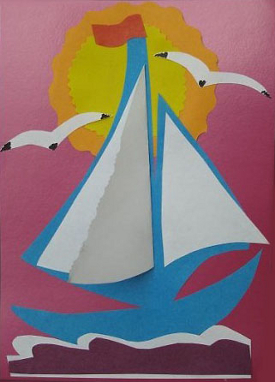
Application boat. Applique ship
Even a three-year-old can make a simple paper applique. On the site Pochemu4ka.ru you can download a ready-made template for making a simple paper boat applique. See link >>>>
And here are examples of more complex volumetric applications with the image of ships. How to make such postcards by February 23 with your own hands can be guessed from the photographs.


Applique machine. Applique machine
We suggest you decorate a card for dad on February 23 with an unusual applique in the form of a typewriter made of candy wrappers. For a master class on making this postcard on February 23, see the link >>>>

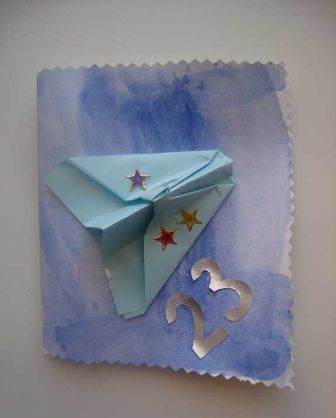
Application airplane

Rocket applique
Finally, from transport, the rocket applique is also suitable for decorating cards for dad or cards for grandfather. In the window, a child can paste his own photo or a photo of his beloved dad / grandfather. You can download a ready-made rocket template.


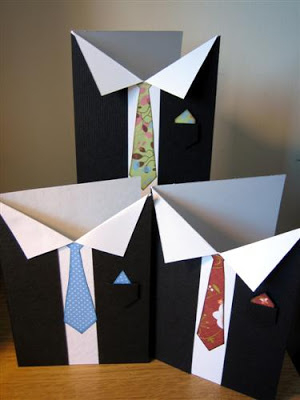
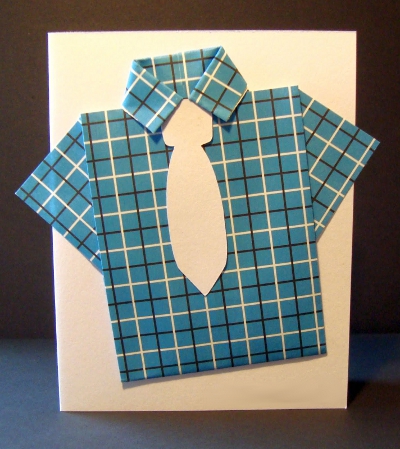
Another interesting do-it-yourself card for dad is an origami shirt card. There are many ways to make cards of this type, we will talk about the main ones, from simple options to more complex origami cards.
The easiest way is to fold a rectangular piece of paper in half. From the back of the card, cut a strip of paper from the top. In front, make two shallow cuts to the sides and fold them towards the center to form a shirt collar. Separately cut the tie, decorate it with pieces of colored paper, and then glue it onto the postcard.

But everything is the same, only the "collar" of the shirt-postcard is made on the other side (therefore it is double) and decorated with buttons. For detailed instructions (with a photo) on making this postcard by February 23, see the link. A ready-made tie template can be downloaded.

When making such a postcard by February 23, you can use a ready-made template from the site Krokotak.com. Download the template.

How to make an elegant postcard with your child in the form of a business suit with a tie as a present for dad on February 23, see and read on this site.


Making such an original origami card for February 23 as a gift for dad or grandfather is much easier than it might seem at first glance. With a little help from an adult, even an older preschool child can do it. For a detailed master class, see below.

1. Fold a piece of rectangular paper in half.
2. Fold the sides towards the center.
3.4. Fold the edges of the sheet as shown in photos # 3 and # 4. Now you are making the sleeves of the future shirt.
5. Turn the sheet of paper over and fold the top edge.
6.7. Flip your workpiece back and fold the top corners towards the center as shown in photos # 6, # 7 and # 7a. Now you are making a collar.
8. You just have to fold the bottom edge and tuck it under the collar. Postcard for February 23 is ready!

Or you can write a congratulation for dad or grandfather right on the sheet of paper from which you will fold the shirt using the origami technique.


You've probably noticed that the paper shirts in the photo are decorated with ties. A tie can simply be cut out of paper, or you can fold it, like a shirt, using the origami technique.
An interesting idea is to decorate a postcard with a shirt with real buttons, and instead of a tie, make a pasta bow tie of the same shape. Pre-paint the pasta with paint, preferably waterproof acrylic paint.


Instead of making a postcard-shirt, you can glue a pocket on a greeting card, decorate it and put a congratulation in it. Simple and tasteful!

3. Postcard for dad do it yourself. How to make a card for dad
You can also make a do-it-yourself card for dad in the form of a suitcase with tools. You can download ready-made tool templates. Print and cut them out. Let the child color the tools and on each of them, on the back, write one positive quality of his dad. You will understand how to make a suitcase from a sheet of colored cardboard if you carefully consider the photos below.

4. Postcard for grandfather. DIY greeting card for grandfather
If your grandfather or dad is fond of fishing, then the next postcard for February 23, made by hand, will be appropriate for him. To make it, you will need a thin string in addition to colored paper. From it you will make a fishing line for a fishing rod.
On February 23, dad or grandfather will be pleased to receive a hand-made postcard from the child. Postcards for February 23, which we offer in this section, are decorated with regular or voluminous applications made of colored paper. There are very simple applications available even for children 2-5 years old. There are more difficult crafts for children of senior preschool and primary school age. For young children, prepare in advance, cut out all the details of the picture so that they only have to stick them on the postcard. Adult children can cut out parts of the applique themselves.
Dads love technology, so postcards for February 23 with its image will be very useful. Make an applique with a typewriter, airplane, rocket. The application can be either simple or voluminous.
Application boat.
Even a three-year-old can make a simple paper applique. On the site Pochemu4ka.ru you can download a ready-made template for making a simple paper boat applique. See link >>>>
And here are examples of more complex volumetric applications with the image of ships. How to make such postcards by February 23 with your own hands can be guessed from the photographs.
Applique machine.
We suggest you decorate a card for dad on February 23 with an unusual applique in the form of a typewriter made of candy wrappers. For a master class on making this postcard on February 23, see the link >>>>
Application airplaneRocket applique
Finally, from transport, the rocket applique is also suitable for decorating cards for dad or cards for grandfather. In the window, a child can paste his own photo or a photo of his beloved dad / grandfather. You can download a ready-made rocket template.
And here is a voluminous postcard for February 23 with the image of a rocket.
Another interesting do-it-yourself card for dad is an origami shirt card. There are many ways to make cards of this type, we will talk about the main ones, from simple options to more complex origami cards.
The easiest way is to fold a rectangular piece of paper in half. From the back of the card, cut a strip of paper from the top. In front, make two shallow cuts to the sides and fold them towards the center to form a shirt collar. Separately cut the tie, decorate it with pieces of colored paper, and then glue it onto the postcard.
But everything is the same, only the "collar" of the shirt-postcard is made on the other side (therefore it is double) and decorated with buttons. For detailed instructions (with a photo) on making this postcard by February 23, see the link. A ready-made tie template can be downloaded.
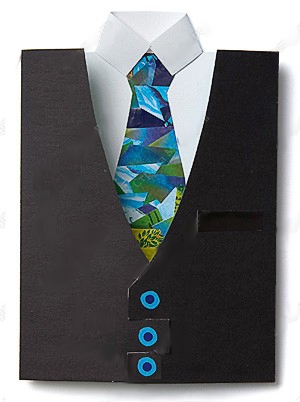
The Land of Masters website offers a more interesting version of this voluminous postcard for February 23rd. Postcard in the photo below with a surprise! The elegant vest can be unbuttoned and you can find a note or congratulations in the inner pocket. In order to make such an unusual tie, you will need several candy wrappers. The use of "candy wrapper design" allows you to give the image of the costume a unique festive look. For a detailed master class on making this postcard on February 23rd, see the link. Postcard for February 23 do it yourself. Origami card
Making such an original origami card for February 23 as a gift for dad or grandfather is much easier than it might seem at first glance. With a little help from an adult, even an older preschool child can do it. For a detailed master class, see below.
1. Fold a piece of rectangular paper in half.
2. Fold the sides towards the center.
3.4. Fold the edges of the sheet as shown in photos # 3 and # 4. Now you are making the sleeves of the future shirt.
5. Turn the sheet of paper over and fold the top edge.
6.7. Flip your workpiece back and fold the top corners towards the center as shown in photos # 6, # 7 and # 7a. Now you are making a collar.
8. You just have to fold the bottom edge and tuck it under the collar. Postcard for February 23 is ready!
You can decorate it with a homemade tie and write congratulations for dad or grandfather inside the postcard or right on it.
Instead of making a postcard-shirt, you can glue a pocket on a greeting card, decorate it and put a congratulation in it. Simple and tasteful!
3. Postcard for dad do it yourself.
You can also make a do-it-yourself card for dad in the form of a suitcase with tools. You can download ready-made tool templates. Print and cut them out. Let the child color the tools and on each of them, on the back, write one positive quality of his dad. You will understand how to make a suitcase from a sheet of colored cardboard if you carefully consider the photos below.
4. Postcard for grandfather.
If your grandfather or dad is fond of fishing, then the next postcard for February 23, made by hand, will be appropriate for him. To make it, you will need a thin string in addition to colored paper. From it you will make a fishing line for a fishing rod.
For the holiday of Defenders of the Fatherland Day, kindergartens and schools begin to prepare in advance: educators and teachers need to come up with what their pupils will give to their beloved dads and grandfathers, and children - all these ideas to bring to life under the strict guidance of adults.
We offer to congratulate a man on Defenders of the Fatherland Day with the most expensive gift - a postcard or a drawing made by the hands of a child. What can babies do for their dads and grandfathers? Read in the article material.
How to draw a postcard for February 23 with a pencil and paints for children?
In kindergarten, children learn to draw their first schematic drawings. Step-by-step lessons will help educators prepare gifts for dads and grandfathers for February 23, because it is in the preschool institution that kids learn about the holiday and its meaning, and why men are congratulated on this day.
Let's start with a drawing. We need:
- protractor (we will use it to draw a star)
- a compass or other device with which you can draw a circle
Let's move on to drawing:
- Draw a circle and draw two lines in it, which will divide it into 4 equal sections.
- We measure 72 degrees on the protractor and draw a line inside along two opposite sections.

 We measure 72 degrees on the protractor and draw a line
 - Again we measure 72 degrees from the already drawn line and draw a second straight line, and then a third.

 We repeat
 - In order not to get confused, we mark with dots what we measure and from what. How to draw the lines correctly can be seen in the photo.


- We should have 10 identical sections. Let's outline dashes in the middle of each line (through one straight line). Draw a star and round the corners a little.
- Erase the circle and additional lines inside the star with an eraser. We outline the outline around the star.

 We draw a line along the entire contour
 - Now we will depict the St. George ribbon with the edges bent down. Extend the edges of the tape to either side of the star.

 Draw the ribbon
 - Draw three parallel black lines on each part of the tape. We turn the schematic drawing into a postcard by decorating the star and the ribbon, and adding the inscription "Happy Defender of the Fatherland".

 We bring the ends of the tape to the edges of the sheet
 Draw stripes on the ribbon
 Video: Simple drawings. Soldier
An excellent drawing on the theme of Defender of the Fatherland Day - a valiant soldier on duty. Such a drawing will decorate both a postcard and a school wall newspaper prepared for the holiday.
For the drawing you will need:
- blank sheet of paper
- simple pencil
- colour pencils
- ruler

- Divide the sheet into two halves by drawing a vertical line in the center. The left side should be slightly narrower than the right. Draw an oval in the upper third. This will be the head. Draw the contour of the future collar under it.
- Focusing on the preliminary marking, we draw in detail the head of a soldier, on which a hat with earflaps is worn. Add the neck and shoulders. The soldier will be wearing a pea jacket, so let's outline his outline.


- We draw a face, hands. We finish drawing small details of the clothes.
- Do not forget to draw a submachine gun in his hands for our defender. First, sketch out the lines, and then draw in more detail. The photo shows what needs to be portrayed.


- Now you need to draw the protective color of the form and the outline of the banner in the background.


- We write on the left side of the sheet the inscription "Happy Defender of the Fatherland Day" and specify the background.
- After that, all that remains is to decorate the drawing.

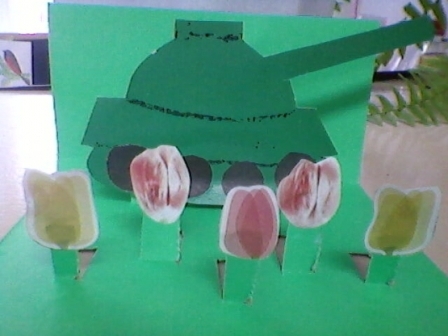
If the previous drawing is difficult to draw, then the child can cope with the schematic image of the tank presented in the step-by-step lesson below without the help of adults.
- For the drawing, you will need pencils and a sheet of paper. It is better to use a checkered notebook sheet. So it will be easier for the child to navigate and draw all the lines correctly.
- Let's draw the muzzle of the tank: draw a line 4-5 cm long in the center of the sheet, and another parallel line above it at a distance of about 1 cm.

- We will connect the lines on the left side, and on the right side we will depict the beginning of the muzzle with an oval.
- Let's start drawing the turret of the tank. To do this, we step back 1 cm and at a distance of about 1/3 of the muzzle length draw an elongated rectangle 10-12 cm long. We step back from the edge of the base about 0.5 cm, put dots and connect them in a semicircle.


- Draw the base of the tank track below. How to do this is shown in the photo. Draw 5 circles inside the base and draw them with a black pencil.

 Draw a tank track
 Paint over 5 circles in black at the base of the track
 - Draw a star in the center of the tower and a waving flag on a long pole. We paint the tank in green, the asterisk in red and add an inscription.


Video: Simple drawings. Children's tank
Video: Postcard to Pope on February 23, Military Aircraft
A schoolboy can easily cope with the "Warship" drawing, which will be a good present for dad or grandfather, if tanks and planes have already been presented to the heroes of the holiday.


Since Defender of the Fatherland Day was once called "Day of the Soviet Army and the Navy", it is celebrated by all the military: both on land and at sea.
Here's what we will draw:


First, let's prepare everything you need:
- blank sheet of paper
- simple pencil and black felt-tip pen
- colored pencils or available paints


- Divide the sheet into two halves by drawing a horizontal line. Do not forget that we draw all the preliminary contours without pressing the pencil, so that later there is no trace of the erased lines.
- We will draw the ship in the lower half. First, let's draw a wavy line that will represent the surface of the water. Let's draw the stern with all the necessary protrusions.
- Draw a cannon on the left at the stern. In the central part of the stern, add the following elements: the captain's cabin and the radar. It's easy to draw them if you repeat exactly all the lines, as in the photo.


- In the lower part of the captain's cabin we will draw a battery of torpedoes, add a row of windows.

- We draw a waving flag and for a more realistic picture we add a couple of birds flying in the distance.
- You can stop there and move on to coloring. But for a greeting card, this is not enough: you will also have to add an inscription.
- You need to paint the picture like this: a warship - in gray-blue, water - in blue, draw a red stripe at the bottom of the ship and choose the right colors for the national flag.


Video: How to draw a cool drawing for February 23?
Ideas and templates for cards for February 23 in kindergarten
- The question of preparing for the holiday on February 23 begins to worry kindergarten teachers and school teachers long before its onset. It only seems at first glance that there is nothing difficult in choosing a suitable option for a presentation.
- But this is not at all the case, since the process of creating crafts or postcards with their own hands, which the children will then give to the most dear people - dads and grandfathers, should captivate them, and therefore it is worth immediately abandoning complex elements or multi-tiered paper structures.
- A simple but original postcard or craft will be much more pleasant for both the little “creators” of the masterpiece and adults. What gifts can be prepared for the holiday on February 23 with children in kindergarten - see the photo selection below.


 Cover for postcards


Ideas and templates for cards for February 23 to school
The guys at school already know a lot, and therefore a simple image of a tank or an airplane will not bring such pleasure as creating with your own hands a postcard with a surprise, retractable details, special applique, and so on.
See the photo below for a selection of gifts for the holiday on February 23, made by schoolchildren, and get inspired!


- Cut a star out of red colored paper. To make it voluminous, you need to bend the "ears" that will be glued to the card. The star bends along lines with the outer edges outward and the inner edges inward.
- We glue an asterisk on the seamy side of the postcard (spread).


- We will decorate with stripes cut from golden colored paper. Let's make the little star golden too.
- We glue 3 golden stripes vertically and horizontally on the front side of the card, as shown in the photo. Glue a gold star next to it. In order for the strips to stick evenly, it is better to first mark with a dotted line the places where they should be.

 How to fold an asterisk correctly
 - A volumetric postcard can also be made using the quilling technique. To make a postcard, in addition to paper (colored and white), you will need toothpicks, glue and scissors.
- Fold the sheet so that one part is slightly longer. We write on it large numbers of the date of the holiday. The number two should be on the front of the card. After the deuce is drawn, on the second page of the postcard we add the three. Cut out the numbers along the outer edge.
- Preparing "curls" from strips of colored paper. To make them, a strip of colored paper must be “put” on a toothpick and twisted. How to stick the resulting curls on a postcard - you can see in the photo.
- We apply each spiral with the glued side to the numbers, trying not to leave large gaps between the curls. Add an asterisk between the numbers and sign the postcard.
- We draw a boat or print a ready-made template on double-sided cardboard.
- Cut out some areas in the picture.
- Fold the postcard along the fold line.
- With a felt-tip pen, draw a dotted line along the edges of the postcard and the image of the boat.
What postcard to make for my brother by February 23?
You can surprise your brother with the original "Ship" postcard.

 Postcard "Ship"
 Such beauty can be done in half an hour. So let's get started!


For a brother who has not yet served in the army, you can make a shirt-postcard.
Video: DIY / Postcard - SHIRT / Gift for FEBRUARY 23


Handprints, fingers and feet can be taken with mom, brother or grandmother.

You can take a print as a basis for a drawing and turn it into something more. For example, for a fishing dad, you can make a postcard with a funny fish.
Postcard-star

Postcard for February 23 can be cut out of paper in the shape of a star. To do this, you can use colored paper, leftover wallpaper, or scrapbooking paper. Draw two star parts using a template, cut them out, and then glue them together. When the glue is dry, poke a small hole in the corner and insert tape or coarse thread.
Postcard - shirt

This card looks very impressive! There are a lot of options for the design of such a voluminous postcard.

The easiest is to fold a rectangular piece of paper in half and cut a strip of paper from the top of the back of the card. Then make two small cuts in the front on the sides and bend to the center of the edge. This will create a shirt collar.

Of course, the kids will have to help a little with the design and prepare complex details in advance.

Cut out the detail for the tie in advance, and take a couple of small buttons for the collar. You can fantasize as much as you like, add a jacket, business suit or military uniform to the shirt.

By the way, you can make a postcard for February 23 with your own hands using only the very shape of the tie. You can paint it, make an applique on it and attach it to the tape with glue, and write the text and congratulations on the back.
master class: do-it-yourself voluminous postcard for February 23

Instead of a tie, you can try to make a pasta bow tie, which you will first need to paint with paints.
You will need:
- colored cardboard and paper
- farfalle pasta (pasta in the form of bows)
- dye
Master Class
- Color the pasta with different colors and let it dry on a piece of paper or newspaper.
- Take a sheet of A4 paper and fold it in half. Departing 2 cm from the edge of the folded sheet, draw two lines.
- Make two cuts along the sides to form a rectangle. Unfold the sheet and fold to form a collar around the shirt.
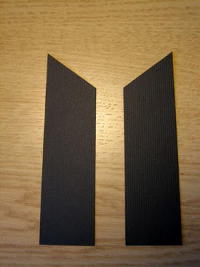
- Unfold the shirt, draw the sleeves and cut them along the outline.
- Glue the shirt silhouette to a piece of cardboard, and then decorate it with a beautiful pasta butterfly.
Postcard - tablet

Another idea for those who are older. Does your dad spend time on the Internet all the time and just can't live without a tablet? Present him with a voluminous postcard for February 23, made by hand in the form of a small tablet with your favorite photographs. Here you can print the details of the templates: iPad Tablet Template, and the icon images can be found on the Internet.
Etc.)
If earlier a postcard was an obligatory attribute when presenting a more worthwhile gift, now a handmade postcard may well act as the main gift. Cardmaking (the art of making postcards) is very popular these days. Many needlewomen take up the creation of postcards with interest, because materials and tools are available to almost everyone, and ideas and step-by-step master classes help to make beautiful postcards even for beginners.
Postcards for February 23 in the technique of cutting
For travel lovers or men who served in the Navy, you can make such an interesting postcard:

Instead of the usual decorative paper, the map is used very successfully here! You can find such a fragment of the map, which depicts the place of service of your man or just a country or city that is significant to him.
And the quilling elements are used here: "eye" - for the sails and the base of the ship, "triangle" - for the flag.

Postcards for "non-military"
You will hardly surprise anyone with postcards in the form of men's shirts and jackets, this idea has become too common, although it is, of course, interesting. And if you like it, then most likely you will appreciate this version of the postcard:

It is done very simply: in fact, here you just need to pick up paper in the same style and cut rectangles out of it, and then stick it on the base for the postcard. The "tie" is tied from a satin ribbon, the tip is melted over the candle so that the ribbon does not crumble.
But such a card with a pocket is ideal if, in addition to the postcard, the man is planning to present a certificate in the form of a plastic card. In this case, it fits perfectly into the pocket.

Cool postcards for February 23
And finally, 4 postcards for connoisseurs of humor) They are really very funny, see for yourself))


There are many ideas for postcards, so there will be enough for all your family, friends and the closest representatives of the opposite sex) Good luck with your work!