Openwork paper cutting: schemes and recommendations. Openwork paper cutting: diagrams and recommendations for needlewomen Cut out figures from paper
The art of paper cutting was given to the world by Japanese and Chinese masters. Since ancient times, they began to use various templates for these purposes. In the culture of our peoples, this art became known as vytynanka. The ancient Slavs used it to make napkins and patterns to decorate their homes. Such products were given magical abilities. It was believed that vytynanki protect the house from misfortunes and attract joy and good luck. If you want to touch the art of your ancestors, then for this you will need stencils and paper cut letters. Templates of such blanks can be easily made by hand.
To learn this art, you need to properly prepare and select all the necessary materials and tools for openwork paper cutting. You can easily find diagrams for vytynanka on the Internet and print. An ordinary, but not very thin, A4 sheet of paper is suitable for them. Those people who have the talent of an artist can draw a template on their own and make a unique and beautiful piece of furniture.
Before starting work, you need to clearly understand that making one product will take you a lot of time and patience. If you are not sure that you will be able to complete the work, then it is better to choose a business for yourself, which will spend less time and effort.
To successfully master the art of vytynanka, you need to prepare the following devices and materials:
- stationery knife;
- small scissors with sharp and fine tips;
- templates (for beginners who want to master openwork paper cutting, templates should be taken as simple as possible. Experienced craftsmen can experiment and take on more complex things);
- sheets of thick paper or cardboard of the desired color and size;
- board for work.
The stationery knife is the main tool of any craftsman. It is used to cut out the smallest details of a drawing or pattern. If you are a beginner and use simple templates, then nail scissors will be enough for work.

In the process of work, you should cut out large details of the image, gradually moving on to smaller and more complex ones. By combining various patterns, patterns, letters and numbers, experienced craftsmen achieve the optimal result, thus creating whole paintings.
Products cut from paper are most often used to decorate offices, schools, kindergartens and apartments before the holidays. They help to fully convey its atmosphere and improve mood. In silhouette cutting from templates, you can apply various plots and ideas. The most popular of these are:
- New Year's vytynanki (images of Santa Claus, fishnet trees and Christmas tree decorations, snowflakes, New Year's landscapes). Such figured work is used to decorate the windows of living quarters, offices, as well as shop windows.
- Easter works (openwork Easter eggs, pictures of festive chickens and hares).
- Works dedicated to popular holidays (February 23, March 8, May 9, Valentine's Day, etc.).
- Products in the form of birds and animals.
- Images of flowers and other plants. Often several flowers are made, which are combined with each other and decorate with them on holiday cards.
- Landscapes.
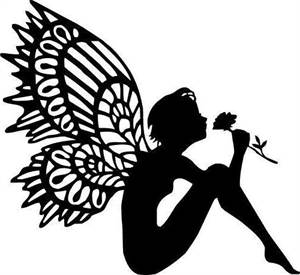
- Mythical creatures and fabulous men.
- You need to look at several ready-made works before mastering silhouette paper cutting yourself. It is better to choose ready-made schemes with a minimum number of small details.
- You need to choose pictures without unnecessary bends. They are the most difficult to cut, and without proper experience in this matter, you can ruin the workpiece.
- The finest details of the image are best cut with a clerical knife or sharp blade. When performing this work, you need to be careful not to cut the table on which the craft is being made.
- Finished works are best framed. So they look more impressive and will be noticeable to each of your guests.
- The finished craft can be glued to thick paper or cardboard. This will give your work solidity and completeness.
Countless crafts can be made to decorate your apartment using the paper cutting technique. The process of creating them is simple, but requires a certain investment of time, effort and patience. If you have all this, then you can safely get to work.
Napkin on the table
Before you start cutting the napkin on the table, you should decide on its shape and size. Experienced craftsmen advise making crafts according to the shape of the table and taking into account the degree of filling with the pattern. To make a napkin in the form of lace, you will need the following materials and tools:
- thick colored paper or cardboard;
- tracing paper and cardboard to create a template;
- glue;
- simple pencil;
- spoon.
Having prepared everything you need, you can start making napkins. To do this, you need to perform a number of such actions:
This napkin is often used as a stand for a vase of flowers or a pot with a decorative tree.
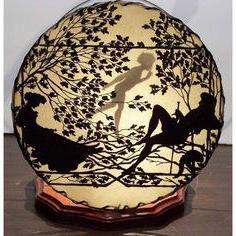
Mirror decoration
The most ordinary mirror can be easily decorated with a vytynanka. Correctly made decorative elements will help turn a boring piece of furniture into an exclusive and original thing. To do this, you will need the following materials:
- metallized paper with a wrinkled golden effect;
- thick paper or cardboard;
- tracing paper;
- scissors;
- simple pencil.
All materials are inexpensive and readily available. They can be easily found in any store that specializes in the sale of handicraft goods. To decorate the mirror you need to do the following:
- The selected pattern is transferred using tracing paper to cardboard.
- Take the second sheet of paper and fold it three times. After that, it bends diagonally.
- The finished template is attached to a folded sheet and outlined with a simple pencil.
- After that, the pattern is separated from the template and cut out with scissors.
- The resulting image is unwrapped and smoothed.
- The finished product is decorated with a mirror around the entire perimeter.
You can decorate old photo frames in the same way.

In order to create a festive atmosphere in an ordinary room, you need to decorate it with various elements of festive decor. For each celebration, you can come up with your own original decorations and diversify your interior.
Christmas snowflakes
The most popular and traditional New Year's decorations are paper-cut snowflakes. They learn to do them from a very early age and, with experience, improve their technique. As a rule, such decorations are glued to walls, doors, windows. Some make garlands based on them and hang them from the ceiling or place them on a Christmas tree.
Work order:
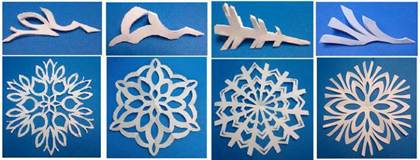
- There is a ready-made snowflake template on the Internet and is printed on a printer.
- A sheet of thick paper is taken and folded in half diagonally. The resulting triangle also folds in half.
- Next, the workpiece is folded at an angle and the lower part is cut to form a triangle.
- After that, the shape of the circle sector is cut out.
- The product unfolds and smoothes.
Postcard for May 9
If you have veterans of the Great Patriotic War in your family, then a postcard made by yourself will be a wonderful gift for them. You can involve your children in this work, thereby instilling in them an interest in history and respect for great heroes. To work, you need to buy or find such materials and tools at home:
- thick sheet of white paper;
- watercolor paints;
- a sheet of red paper;
- scissors;
- stationery knife;
- glue;
- brushes;
- felt-tip pens.
The whole process of making a craft is simple, but it requires a little care and perseverance. It is important on the future postcard to depict all the symbols of Victory Day: the eternal flame, carnation, St. George's ribbon.
Step-by-step description of making a cut-out card:

Artistic paper cutting is a fun process. With a minimum amount of materials used, wonderful original products are obtained. Correctly following all the recommendations, you can easily make a decoration or a postcard that will appeal not only to you, but also to your family and friends.
Attention, only TODAY!
Looking for a new hobby? How about a paper cut? Surely someone is now grinning ironically. Completely in vain: art carving is incredibly beautiful. We were convinced of this by opening the book "The Magic of Paper". See for yourself.
“You can cut out of paper without even having the ability to draw,” says Louise Firschau.
There are a million ready-made templates: just print them. Or come up with your own design on your computer: install the free Inkscape design program, with which you can create basic templates.

How to start cutting
Intricate plots and ornate contours - each picture seems to be created by a skilled artist. But, believe me, you can easily do it yourself. You just need a desire and a few tools.
Choose a round one: a pencil-like holder is more convenient to work with than a flat one. You will understand this when you start making rounded cuts and feel the knife turn slightly in your hand.

Surgical blades
The choice of blades on the market is huge: it's up to you. At first, it may seem too flexible and unpredictable. But as you get used to it, you will find that it is very convenient for them to make round cuts, and the tip is great for cutting out small details.
Self-healing cutting mat
You don't need expensive branded cutting mats. Take a regular rubber - after a few weeks of intensive use, they all look the same.
It is better to have two rugs, one for cutting and one for gluing. If you do everything on one, it will get dirty with glue and can ruin the next clipping.
Paper
- Do not use office paper: the lines are jagged and the results are not impressive.
- Use special cutting paper or experiment with heavy paper. For example, you can take textured watercolor or mulberry.
- Do not use paper heavier than 170 g / m²: it is very difficult to cut and your hand gets tired quickly.
Cutting template
Where do you start? We offer you such a cute picture from the book "The Magic of Paper": it will decorate any home.

- Before tackling the first template, practice simply cutting the paper. Understand how hard to press on the blade so that it does not break, the hand does not start to hurt, and the cut is "clean". Press lightly on the blade and carefully cut through the paper. Take your time to make several lines, maintaining the same pressure along the entire length.
- Start cutting from the tricky part or where you have the most doubts.... Then, if you're wrong, you don't need to redo too much.
- Do not hurry... Change the blade every 10-15 minutes and take regular breaks to relax your head and neck. It is much more convenient to work on an inclined surface - for example, on a drawing board.
- Pencil marks on the wrong side do not need to be erased... Nobody will see them anyway, and the eraser can damage the paper. Always cut from the inside out.
- Do not remove scraps of paper while you work, even if you really want to... Leave everything in place to stabilize the tenderloin. The sleeve / bracelet / cat's tail will have nothing to catch on.
- When you're done cutting, do not push out the pieces of paper with your finger, but remove with a knife. This will prevent the paper from tearing, and you will see in which places you need to walk again with the blade.

Imagine how surprised your friends and acquaintances will be delighted when they see what pictures you create. And, in addition to fame, you will enjoy the creative process, when an ordinary template turns into a charming and charming masterpiece.
Illustrations and materials from the book "The Magic of Paper". The book will be out very soon. You can subscribe to the exit notification and get a nice discount just for your own people.
Figured paper cutting is a traditional Chinese art, the first mention of which dates back to the 6th century AD. But even now this type of art is popular all over the world. We have collected the works of the best masters of paper carving. These people are real wizards who can turn an ordinary sheet of paper into a work of art. They can spend hours carving ornate lines, watching incredible beauty emerge from an ordinary sheet of paper.
Kiri Ken

Japanese artist Kiri Ken, whose pseudonym translates to "Cutting Sword", creates incredibly delicate works of art from paper.
Some of his works are carved so finely and painstakingly that they seem to be floating living creatures. A talented Japanese man prefers to cut out sea inhabitants or expressive portraits from paper. Undoubtedly, his work is inspired by ink miniatures, and the graphic technique is guessed in the thin lines. To create his exquisite work, the Japanese use a special X-ACTO knife and a special Ehime Paper.
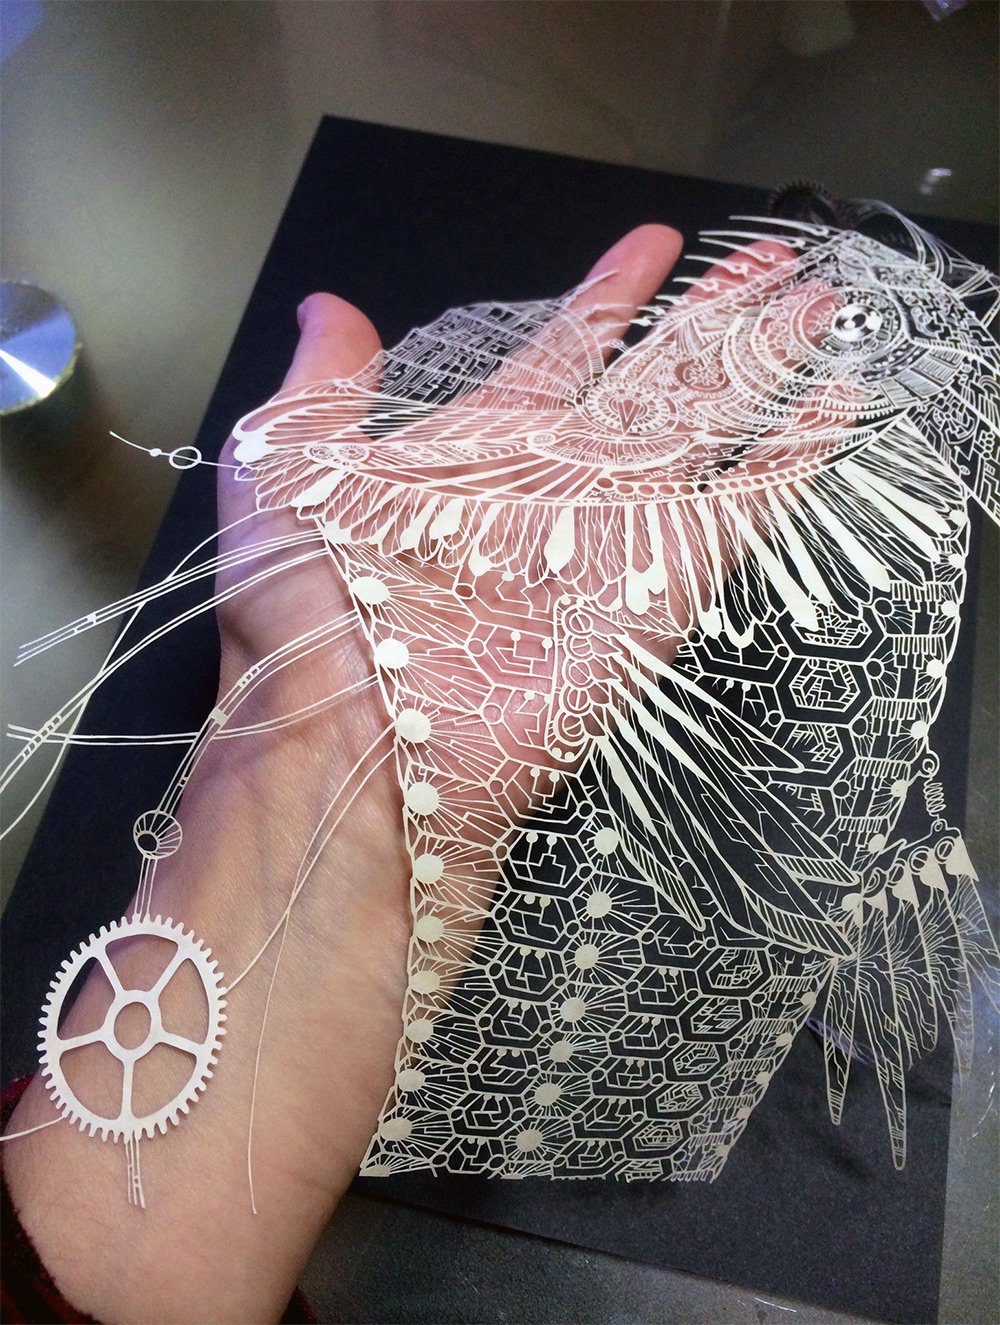

Rogan Brown

Renowned for his filigree work of paper microorganisms, Irish artist Rogan Brown uses the "prism of the imagination" to create stunning works of art. Rogan Brown's creations are distinguished by the fact that they are not just fancy patterns, but a kind of interpretation of the surrounding world. The author creates his complex "lace", for the most part, with his hands, cutting out turn by turn. And only occasionally uses laser cutting of paper. The artist draws inspiration from everything from the outlines of cells under a microscope to large-scale geological structures.


Suzy Taylor

Talented English artist Susie Taylor from Hertfordshire creates stunning detailed artwork from paper, drawing inspiration from her love of folk art and floral motifs. Moreover, the girl cuts out exclusively by hand. Suzy is so fascinated by her work that she can spend hours concentrating on cutting ornate lines, watching incredible beauty emerge from an ordinary sheet of paper.


Patrick Cabral

Filipino master Patrick Cabral creates minimalist 3D portraits of rare animals. At the same time, paper sculptures are just his hobby, Patrick works as a programmer and web animator. And in his spare time, he creates three-dimensional paper portraits of animals, decorated with exquisite lace abstract patterns. According to Patrick himself, in this way he wants to draw people's attention to how fragile this world is.


Pippa Dyrlaga

Yorkshire artist Pippa Deerlag transforms a sheet of paper into a work of art with pinpoint precision. Her creations are inspired by nature, animals, architecture, pop culture and the area where the artist lives. According to Dirlagi, she works in a traditional technique using a scalpel and pencil. One stencil usually takes one sheet of paper.


Hina Aoyama

Japanese artist Hina Aoyama was born in Yokohama but now lives in France. She became interested in "ultra-thin lace paper clippings" back in 2000. Hina uses exclusively scissors for her work, carving delicate lace flowers, texts and butterflies with jewelry precision and impeccable accuracy. Because of their fragility, carvings are applied to fabric or placed between glass to preserve the patterns. It takes Hina Aoyama to create her wonderful creations from a couple of days to long weeks of painstaking work, depending on the complexity of the sketch conceived.


An Indian artist from Ahmedabad, Part Kotekar does paper miracles. The idea to start cutting out of paper came to him while experimenting with stencils for graffiti, and what started as a hobby turned into a profession. The artist's works are a reflection of aspects of everyday life. The most exciting thing about this work, says Part, is that until the last moment he does not know how his next masterpiece will look. And this curiosity is one of the main reasons why he continues to create.


Yoo Hyun

Korean artist Yo Hong cuts portraits of famous personalities from sheets of paper: Pablo Picasso, Audrey Hepburn, Michael Jackson and others. All of Yo Hong's work is cut by hand using only a special paper cutter. The peculiarity of his work lies in the fact that he carves portraits with a "herringbone", from which he even dazzles. None of these portraits would be visible in white, so each of them is presented against a dark background.


Riu

An artist from Japan, acting under the pseudonym Ryu, has mastered the art of paper cutting to perfection. The Japanese creates his work with a clerical knife. At the same time, he works in the zentangle technique, that is, he does not have any preliminary sketch of the work, but "draws with a knife" on paper just as the flight of imagination tells him. The master calls the secret of his success a special sense of rhythm, which helps to create new masterpieces.


Bovey Lee

Artist Bovey Lee was born in Hong Kong and now lives and works in Pittsburgh, USA. She creates amazingly detailed illustrations from Chinese rice paper and silk, almost weightless works full of fantastic stories. When creating her works, the artist first converts the hand-made images into electronic form, then prints them, and only then starts a long and painstaking work with a knife and sharp blades.


Cutting shapes and shapes out of paper helps young children develop fine motor skills in a playful way!
How to teach a child to cut out of paper?
- First of all, your baby's handles should be ready to instill the skill of cutting. The best exercise for a baby is to squeeze water out of a simple sponge, it trains the right muscles.
- Then show your child how fun it is to rip old newspapers and pieces of paper into pieces - this will teach him to hold the paper in his hands without dropping it.
- Now you can learn to cut from paper with special materials for children! Start by cutting straight and wavy lines, then teach your child how to cut out shapes, and only then suggest pictures to cut.
Important! Remember to take breaks if your child is tired or bored. Be sure to verbally encourage the child, praise him and try to interfere less with the cutting process itself.
Paper Cut Safety
Before starting the training, show your child how to hold the scissors correctly and talk to him about the safe use of the scissors. The child must clearly understand that:
- Cut away from the body and fingers.
- You can't play and indulge when you hold scissors.
At what age to start learning to cut?
All children develop in different ways. The age limits below should be used as a guide, taking into account the interests, temperament and ability to focus on specific children.
2 years: Children of this age will enjoy tearing paper into small pieces and cutting something, only repeating after adults;
3 years: at this age, with a child, you can try to cut out any shapes, sitting next to him and continuously observing the process;
4 years: the child is able to cut simple lines and shapes by himself with a little help from an adult;
5 years and older: the child must easily cut out pictures himself and even glue them on paper, making applications.
Seeing products made in the form of carved lace from plain paper, you will never say that such beauty is easy to create with your own hands. Everyone can master openwork paper cutting, the schemes of which are also provided. This type of handicraft is also called paper graphics, silhouette cutting, but the essence is the same, it is always a one-piece cut drawing on a plain background. There are two main directions: cutting with a knife and scissors. For beginners, creating patterns from paper will require tremendous patience, perseverance and desire.
This interesting technique can be applied not only to create postcards, panels, but also to decorate the interior. Usually products are made from white or black paper, but other shades will look good too. Openwork paper cutting can be both flat and volumetric. So, using the silhouette cutting technique, you can make such fabulous things: window decorations, snowflakes, postcards, napkins and much more.
What materials and tools will be needed in order to master openwork paper cutting? In fact, nothing special and expensive is needed. You will need:
- printed circuits (invented independently or ready-made);
- sheets of white (other possible) color;
- breadboard (clerical) knife;
- a tablet, a regular board or a piece of thick cardboard on which you will cut;
- nail scissors.
As you can see, you will need regular office stationery.


Consider a master class on openwork paper cutting, which will help you master this interesting art.
When all the tools and materials are ready, you can start working. Most often, patterns are cut on a piece of paper that is folded in a certain way. Almost everyone cut out intricate patterned New Year's snowflakes in childhood. But in this way, you can still make a frame for a mirror or a table napkin. A napkin or frame made to the sample in the photo below will look very nice:

Step-by-step description of work:
- Take a sheet of white paper and fold it.
- With the help of tracing paper, we translate the outline of the pattern onto the base, circling it twice.
- Cut out the pattern with scissors or a knife.
- Unfold the garment very carefully and press the folds with an iron through the other sheet.
- We put an openwork napkin on colored cardboard or paper and glue it. Make sure that the glue does not leave marks.
- If you wish, you can laminate the product to make it last longer.

We decorate the house for the holiday
Easter is one of the most beloved holidays for both Orthodox and Catholics. Many housewives traditionally prepare for it - they paint eggs, bake cakes, decorate their home. We will help you in this matter. Using special templates for Easter, you can make beautiful attributes and wonderful decorations. But you can show your imagination in the filigree cutting technique and come up with your own options.
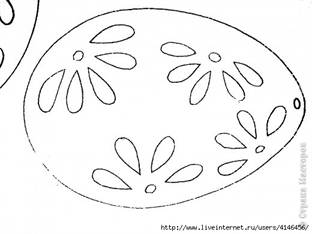
Eggs are one of the main symbols of this holiday. Usually housewives paint natural eggs or decorative ones, for example, made of wood. But you can easily make fishnet eggs with your own hands. To do this, you just need to transfer the pattern using carbon paper or tracing paper to drawing paper, cut and carefully glue it. It is better to glue from the center, first to one end, then to the other. During work, you must allow the glue to dry before taking on the next seam, otherwise it may come apart. Put ready-made eggs in a patterned basket for a fabulous composition!


In this way, you can also make greeting cards for Easter, decorate gift bags and boxes, decorate windows. Eggs are even used as a festive garland, connecting them together. Inspiration and imagination will help to make a unique holiday of bright Easter.
For the new year
Both children and adults love New Year's holiday. Everyone wants to create a New Year's fairy tale at home and plunge into the wonderful atmosphere of magic. Nowadays, New Year's decorations are not only balls for the Christmas tree and garlands, but also many other wonderful gizmos for the festive decoration of your home. Our tips will help you prepare uniquely for this wonderful holiday. One of the most traditional ways to decorate a room is to decorate with paper snowflakes. They can be made, for example, like this.

Usually they are glued to windows, cabinet doors, shelves, walls. Some make garlands of them and place them on the tree.

In order for you to get beautiful openwork snowflakes out of paper, it is better to take ready-made schemes for cutting.
The main thing in the work is to correctly fold the sheet of paper to apply the template. Each snowflake consists of a repeating pattern around the circumference. The blanks are usually folded for 1/6 and 1/12 parts. You can fold the part on the basis of an already cut circle or any sheet, which must first be cut to a square, and then folded, or, conversely, bends are made first, and then the shape of a circle sector is cut.