Figures from plastic cups. Snowman made of plastic cups: lamp. What you need to create a snowman from plastic cups
After trips to nature, festive events, especially for children, not only pleasant memories remain, but also a huge amount of plastic spoons, forks, plates, cups and straws for a cocktail. As a result, all this is usually thrown away, because the price of new packaging is extremely low. DIY crafts from plastic dishes are not only fast, but also probably the cheapest type of needlework.
The following master class with step-by-step instructions will help you create original crafts.
Plastic flower
 For the manufacture of flower from plastic cups you will need:
- plastic cup;
- straw for drinks;
- scissors.
Manufacturing instruction:
- Tear off the edge of the glass and rip the edge almost to the end, leaving a centimeter to the bottom.
- In the same way, work the entire edge in a circle, each tear should be about half a centimeter from the previous one.
- Make an incision in the bottom.
- Now you need to fold the resulting lines into petals. Fold them back, in half, hide the edge of each petal under the previous one so that they go obliquely.
- Insert a straw into the incision.
The flower is ready. The petals can be decorated with beads.
Christmas decorations
To create a very cute Christmas tree decoration, you will need the following items:

How to make a decoration for a Christmas tree from plastic cups:
- Place the upside-down glass on the felt and circle it. Cut the circle a little larger to fit the glass.
- Punch a hole in the bottom of the glass.
- Fold the twine in half and thread through the hole. Make a knot and loop.
- Cut the straw to fit inside the glass.
- Cut a small triangle out of the felt and write “North Pole” on it. Glue the felt to the straw.
- Cut a piece of green tulle and wrap it around the lollipop stick. Then trim the tulle to form a fir tree.
- Glue wood and straw in the middle of the felt circle.
- Sprinkle the tree with glue and sprinkle with glitter.
- Glue the glass to the felt.
The decoration is ready, you can hang it on the tree!
Halloween monsters
 Your child will be happy to help you make these funny monsters... To create them you will need:
- plastic cups;
- permanent marker;
- orange, green and black paints for plastic;
- plastic moving eyes.
Making monsters will not be difficult:
- Paint the glasses different colors, let dry.
- Turn the glasses upside down. With a marker, draw a variety of mouths: toothy, open, etc.
- Paste on the eyes.
The monsters are ready. "Heads" can be decorated with hats, sequins and beads.
Crafts from disposable spoons and forks
Crafts made from spoons and forks are one of the varieties of jewelry made from disposable tableware. They came into vogue relatively recently in connection with the boom of handmade goods that erupted in the world.
ladybug
Such ladybirds you can decorate a nursery or plants. To do this, you will need:

How to make cute insects:
- Cut off the handles from the spoons.
- Paint the spoons with permanent markers or paints: two spoons red, one black, let dry completely.
- Flip the spoons with the curved side up. Apply glue to the sides of the black spoon and attach two red spoons, forming the half-open wings of a ladybug. Important: the "head" of the ladybug is where the handle was cut off.
- Glue the elongated antenna beads onto the head.
- Use black paint or a marker to draw dots on the ladybug's wings.
The ladybug is ready.
Christmas tree made of plastic spoons
 For this Christmas craft, you will need a whole mountain of plastic disposable spoons (about 100 pieces)! In addition, you will need:
- papier-mâché cone (the blank can be purchased at handicraft stores);
- scissors;
- green paint can;
- hot glue gun.
Instructions for creating Christmas tree:
- Cut off the handles from the spoons.
- Start gluing the spoons to the cone starting from the base. Each new row should slightly overlap the bottom one.
- Cover the resulting tree with a few coats of paint, then turn over and paint over the undersides of the spoons.
Done! You can decorate the paws of the tree with beads or pearls.
Unusual flowers
This is the simplest method for creating unusual colors. To do this, you will need:
- 4 plastic spoons of bright color;
- green ribbon.
To make such a flower is as easy as shelling pears: turn all four spoons with curved sides to the center and tie with a ribbon. You can make several of these flowers and decorate your flower pots or garden with them.
Using other plastic utensils
 Creative people with a lot of imagination and imagination can make wonderful things out of almost any material. An example of this are crafts made from plastic bottles and plates.
Can be made plastic bottle mermaid costume... A skirt with sparkling scales on your daughter at matins or other celebration will look interesting and original. To do this, you will need:
- long green skirt;
- 2-3 two-liter green or colorless plastic bottles;
- oval hole punch (5 cm);
- utility knife;
- fabric glue;
- tape;
- stapler;
- rubber;
- scissors;
- tulle (1 meter).
Step-by-step instructions for creating mermaid tail from plastic bottles:
- Cut off the top and bottom of each bottle. Place them on the table and press down with your hands, smoothing out the plastic.
- Use a hole punch to create scales.
- Use a stapler to attach the scales to the skirt. Each bottom row should be covered with scales from the top row by a few millimeters.
- Flip your skirt over. Use a stapler to attach the tulle one third below the top of the skirt, tie it with tape and secure with an elastic band. The tulle should hang from the skirt - this is the mermaid tail.
The skirt for the suit is ready. Add a green top, fan, and jewelry to complete the look.
In addition to clothes, you can make crafts for a Christmas tree or just to decorate a room. For example, a Christmas ball with a snowman made from a plastic or paper plate. During the manufacture of this craft, you need to be careful, then the result will delight both you and your children. For creating christmas ball you will need:

How to make beautiful plate decoration:
- Cut out a paper snowman figurine.
- Use glue to attach the figurine to the bottom of the blue plate. Paint the snowman with felt-tip pens, creating the face, hat, and hands to your liking.
- Sprinkle fake snow into the middle of the plate.
- Turn the clear plate or lid upside down and glue it to the main plate.
Done. When the glue is dry, you can shake the craft and watch the snowman come to life.
Attention, only TODAY!
Cheap, cheerful and fast? This is possible, especially if a few plastic containers - bottles or cups - have accumulated in your house.
We present to your attention a double detailed master class: how to make an exclusive New Year's structure from recycled materials with your own hands.
Master class 1: tree made of plastic bottles
We will need:
Remember to stick to the mesh as well as the smallest red pompom. Hopefully the following picture will help you create a deer or a whole team. You will definitely love today's idea! Start by painting the trinket with poster paint before it dries to a shine. Wheels from Bristol should be painted in the same color, with the same gloss, and the middle part, for example, with a pink gloss. Fold them in half and attach one of the pins to the baubles. Finally glue your nose with a pompom, eyes, and you can safely hang on the tree!
Thus, one night you will create a whole flock of angry birds. The idea is a little longer, so the template, guide, and individual photos are in a separate post. Get ready to face Red, Chuck, Bomb and Blue. You had a lot of work on the problem yesterday, so today something is easier. You will need: 7 creative sticks, brown felt, brown paint, red pompom, 2 eyes, a piece of tape, scissors and glue. From three sticks lay a triangle and glued magic glue. The two sticks are cut in half and glued together like horns, as you can see in the image below.
- plastic bottles of different sizes, from 0.3 to 3 liters. Preferably green;
- a wooden stick, the height of which is the same as our tree will be. The diameter of the stick should be slightly less than the diameter of the neck of the bottles;
- bottle cap;
- stationery knife;
- scissors.
Stage one:
Carefully cut off the bottom of all plastic bottles. Carefully, with a clerical knife - first you need to make a puncture in the wall, and only then cut along the circumference. If it seems difficult to cut with a knife, you can cut with scissors. We leave one big bottom - it will serve as a support for us, on which the Christmas tree will be held. The rest of the bottoms can be thrown away.
DIY snowman from plastic glasses
Paint all sticks thoroughly with brown paint. Cut the triangle off the felt and glue it down by inserting the tape between the felt and the stick. Dock pump, eyes and deer are ready! Prepare this time: one big, one tiny, 2 eyes, 3 brown wires, brown felt, red, brown, free shine, 2 pins, skewers and toothpicks, A well-known way to paint a large styrofoam ball with brown paint and a little red. Dry it with shine and stick with a large spatula toothpick before less time.
Stage two:
We cut the bottles with sawn-off bottoms into strips, 2-2.5 cm wide, of course, without bringing the cut to the neck. As a result, we get a kind of plastic "flower".
Stage three:
We cut each strip along the edge, leaving a distance of 0.5 mm between the cuts. These are our "needles". Thus, we will be able to make the future Christmas tree "fluffy". We bend each "needle" - the branches are "lush".
New Year's craft ideas
Cut two wheels out of the felt, fold them in half, and attach a pin to the sides of the spinners. Two wires fall on the felt ears, and the third are chunks around them. Do you like the game of bingo? Put the cards in the bag, draw and have each player mark the box if they have one on board.
Use nuts, pom-poms or buttons for marking. Winter evenings are very cloudy. Especially when illuminated with hand lamps. I have a recipe for you for such a decorative lantern. Today's balls you can make peacefully with your children. The idea will be so quick that they won't get bored once the decorations are ready! Just glue the styrofoam on a stick, paint it with your chosen paint, and don't wait until it's dry to wrap it in sugar. Just so many and amazing brick effect!
Stage four:
Gently string the twigs on a stick with our own hands - this is how the tree is assembled. Wider blanks (from larger bottles), of course, will be at the base, and those that are smaller (smaller bottles) - at the top. We put the bottom of the bottle on a stick, this will be the base on which the tree rests. We screw on the lid on top, you can hammer in a nail for strength.
Master class: DIY Christmas toy - "Ermik"
For fixing, you can spray with an aerosol spray, but not too close to the sugar does not dissolve! At the end of the pin and tape of the trailer, go to the peak, the choice is yours. Yesterday's spoons are sweet because they are made from sugar. But remember not to eat them - Styrofoam, even with added sugar, doesn't taste the best. But today you will make them even more enjoyable. There are only two items glued to the sugar trinket: a muffin bun on one side and a red pompom on the other.
I have a patent for you to make a simple and effective Christmas card! Cut a triangle out of a loose piece of crystal and set it aside and place the frame on a piece of paper with tape. Thanks to this, when you draw a Christmas tree, you will not marry the line! Place the eraser on the back of the pencil in green paint and reflect the dots in the free area.
A Christmas tree made of plastic bottles is ready! Decorate! Tinsel, rain and simple matte balls will look great on such a peculiar New Year's beauty. A garland on an ascetic plastic tree can also look very stylish. Experiment!
You can add some red dots. Insert a triangle frame, attach a star to the tree, write your wishes, and you can rush to the post office! All you have to do is stick the polystyrene cone of the green yarn once in a while, from top to bottom. Finally, decorate your tree with paper or foam stars.
It took him a while, but how proud he was when he was ready! I like to surround myself with pictures of my loved ones. Framed photos hang on the walls, sit on the table, and now the photos appear on the tree too! You must make exactly this decoration! On the back of the photo, you can add a date, interesting quotes, or a list of your favorite stories, colors, or current height and weight - this will be a memorial for years! You will learn everything from the movie, just press 🙂.
Master class 2: how to make a Christmas tree from cups
The most difficult thing in this procedure is, perhaps, to find green cups.
We will need:
- plastic cups;
- stapler;
- glue;
- toys, balls for decorations.
Stage one:
Cut out two aluminum foils, pour them into a glass bowl, and prepare your eyes for them. Punch through the creative wires on the top of the bauble and two black pieces of over-the-counter glue on the opposite side of the bauble. Paper bag with black and red paper moving eyes. ...
Maybe you have a Christmas tree in your house, but you have nothing to do so that you make another one. Moreover, the one we are going to do will be completely different. She will not have chipped needles, only soft feathers. Draw the baubles in yellow. Small Christmas balls are cut in half. Two of them are painted with black paint, and the other two have brown eyes and black paint.
We spread eight cups with our own hands in the first row, in a semicircle. We fasten them with a stapler. Then we spread the second row on top - already seven cups. We also fasten them with a stapler. And so on, each row is one less cup. The rows between each other can be lightly glued, for reliability, and also fixed with clips. The finished tree must be stable.
Stage two:
We put a toy or ball in each glass. You can drip some glue so that they are securely fixed inside. By the way, if you have a special glue gun - great, it will help to discreetly attach toys to plastic.
The original Christmas tree made of plastic cups is ready! But if it seems to you that this idea is not creative enough, then here are the options for decorating or modifying such a structure with your own hands:
- You can lay out the cups not in a semicircle, but in a circle. Only in this case it is better to "plant" them on a base made of a cardboard cone. Such a tree will have an attractive "facade", that is, it can be placed in the center of the room, while a semicircular tree looks good when it stands against a wall.
- If you make a small cut at the top of each cup, you can pass a ribbon through it, fasten it with a knot, and hang the decoration on it.
- Pasta bows painted with golden gouache will look great as decorations.
- A garland can be placed inside a round Christmas tree made of cups. It will shine very beautifully through the plastic, and its top bulb will perfectly replace the traditional star.
You can easily make Christmas decorations from plastic cups with your own hands. The most important thing you need is miniature Christmas toys - a small Christmas tree, a snowman, Santa Claus and any other themed miniature. Such toys can always be purchased in stores in which sections with New Year's gifts, sparkling tinsel and children's attributes for the holiday have already been opened. Much can be found at home, in boxes with old Christmas tree decorations. You can involve children in creating New Year's decorations, because handmade to the New year is aimed primarily at children's joy, fun and happy faces of our kids)
To create Christmas decorations that can be used as pendants for a Christmas tree, as a New Year's garland, or simply as decorative elements for festive Christmas compositions, we need:
- plastic cups;
- white cardboard;
- silver tinsel;
- artificial snow;
- miniature toys - snowman, Santa Claus, gnome and so on;
- white acrylic paint;
- brush;
- hot glue gun;
- bell;
- velvet or silk ribbons.
Having prepared all the materials, we get to work. We take a plastic cup and cut a circle out of cardboard by its size, this will be the bottom. We glue silver rain or other tinsel to the cardboard.
Now we tint the plastic cup with white acrylic paint, create a snowy effect.
Now we glue the glass to the bottom.
The Christmas decorations are ready, all that remains is to glue the bells with ribbons.
That's the whole master class), I hope you liked the idea and you will decorate your festive interior with New Year's decorations, creating them yourself. And don't forget to take photos of your creations and show them to your virtual friends and readers. By the way, all the necessary equipment for photography can be purchased in the online store falcon-eyes.ru. Products are available here not only for home, but also for work in a professional photo studio. The store's catalog contains studio and camera flashes, light stand , light shaping nozzles and reflectors, commission photographic equipment and much more.
Winter is already close, which means that soon one of the most beloved holidays of the year will come - New Year. To give yourself and your loved ones a festive mood, we suggest making a funny snowman out of plastic cups with your own hands. Using our step-by-step instructions, it won't be difficult to do this. The product will not only decorate your house or yard, but will also bring a lot of joy to you and your children.
What you need to create a snowman from plastic cups
Making a snowman out of disposable glasses is a snap. They taper downwards and this shape allows the formation of spherical structures. You do not need expensive materials and any special tools, because glasses are cheap, and there is a stapler in almost every home. In addition, making such a craft will not take you much time and will be a great way to have fun for the whole family.
You may need the following tools and materials:
- plastic cups - 300 pcs.;
- stapler;
- staples - pack 1 yew. PC.;
- glue or glue gun;
- transparent tape;
- Double-sided tape;
- scissors;
- elements for decoration.
The number of cups may vary. This primarily depends on the size of the snowman, the number of parts it will consist of, and the shape of the body - a sphere or a hemisphere. Cups can be chosen as one size or different. For the torso, you can take ordinary 100 ml cups, and for the head, small ones, 50 ml.
Choose cups with narrow rims as they are easier to staple together.
It is better to buy glasses with a small margin, since during operation some of them may be damaged and become unusable.
The main tool for creating a snowman is a stapler. You will need the most common stationery stapler and a pack of staples (approximately 1000 pcs.). The number of staples used will depend on how the snowman is made. If you decide to use glue or double-sided tape, then you will need much less.
It is better to take polymer universal glue, which is designed to connect plastic parts. Great if you have a glue gun. With its help it is very convenient to apply glue pointwise. You can also use double-sided tape.
Glue and tape are rather auxiliary materials. It is not necessary to use them, since the cups can be connected using staples alone.
Photo gallery: tools and materials for manufacturing
 Instead of traditional white cups, you can use transparent
  The stapler will need a small size so that it fits easily in the cup
  Any craft can be done with a glue gun
  It is better to buy scotch tape with a cutting knife.
  Using double-sided tape, you can connect large structural parts
  Eyes, nose, mouth, headdress and buttons are made of colored cardboard
Plastic cup snowmen options
All options are quite similar to each other. The glasses are connected in such a way that the result is a ball or hemisphere. This can be done in two ways: with a stapler or glue. Let's consider both methods.
Step-by-step instructions for creating with a stapler
This is the easiest and fastest way. In addition to the stapler, you will also need tape. For decoration, prepare colored cardboard, tinsel for decorating the Christmas tree, or a regular scarf. Cardboard is needed to make eyes, nose and buttons. A tinsel or scarf is tied between the "head" and "body" so that the image of our homemade snowman is complete.
The snowman will consist of two parts - a torso and a head. The cups are connected together only with a stapler. We suggest making the lower part from large cups (164 pcs.), And the upper part from small ones (100 pcs.). You can, of course, use the same dishes, but then the head and body of the snowman will be the same.
"Sculpt" a snowman in stages:
- Lower torso.
- Head.
- Attaching the torso to the head.
- Decoration.
First, make the bottom part. So that the snowman can stand on the floor, the bottom ball is not completely covered and a hole is left. The head is "sculpted" from small cups and also not completely covered. A small hole is needed to connect the top to the bottom.
The cups are placed with the bottom inside the ball, aligning the outer walls with each other.
As for the decor, you can limit yourself only to making eyes, a nose and buttons. Or you can give yourself and your loved ones a real holiday and put an LED garland inside the finished snowman.
Consider making a snowman step by step:
- Open the packaging of the cups and lift them off each other.
- Lay out a circle of 17 pieces and staple the cups together with a stapler from the side of the rim.

Place a circle of glasses on the floor and staple them together.
- This will be the base of the "torso".

You should get a circle of glasses
- Arrange the second row in a circle: the upper glasses are placed between the two lower ones, as if filling the space between them.

Place the glasses on top and clip them to the bottom
- Fasten together the upper row with the main one (the upper glass with the lower one, and so on in a circle).
- Clip the glasses together from the second row.
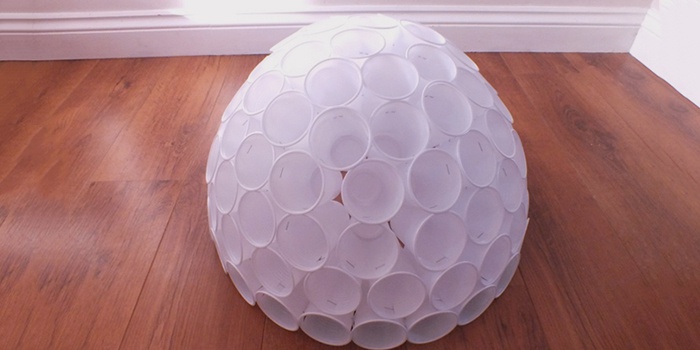
- Make the rest of the rows in the same way. You should get a hemisphere - this will be the upper part of the body.

Gradually, you will have a hemisphere
- Make the lower hemisphere in the same way, only it will already have a small hole and consist of four rows.
- Connect the bottom of the sphere to the top using the same stapler.

Remember to leave a hole in the bottom ball
- Now start making the "head". Everything is the same: we build the main row of small glasses (also 17 pieces), then the next row (15 pieces) and so on until we get a sphere.
- We also leave a hole in the “head”, the size of one glass.

Leave a small hole for the head, about the size of one glass
- Now you need to make a "rod" to connect the head to the body.
- Take 2 glasses and make three cuts on each, 4 cm deep.
- Place one glass at the very top of your torso so that each cut is lower in the glass.
- For reliability, wrap the glass with tape so that the cuts do not "go" up.
- Place another glass on top of the first one and also tape it together.
- To prevent the glasses from falling out of the structure, glue their ends with tape to the inner walls of the glasses.
- Slip the "head" over the resulting rod.

When you attach the top to the bottom, you get this design.
That's it, the snowman is almost ready. It remains only to glue the eyes and nose, and also make a headdress.
The snowman can have three parts, but then it will be unstable and you will need more cups and staples.
How to decorate and "animate" a snowman
Prepare colored cardboard, scissors and glue. Better to use two types of glue. One for working with paper, that is, ordinary stationery or PVA, and polymer glue for gluing the decor to the snowman. If you have double-sided tape, you can use it. What and how to do:

From the same cardboard, you can make a hat, for example, a cylinder.
In the same way, you can connect structural parts with glue. The glasses are arranged in a circle and glued together.
If you want the snowman to glow like a Christmas tree, then put an LED garland inside and connect it to electricity.

It turned out to be a beautiful lamp
Video: how to make a snowman from plastic cups and an LED garland
And from the remaining cups, you can make a disco ball and a garland.
Video: disco ball made of plastic cups
How to make a product with your own hands using a glue gun
You will need about 300 cups of the same size, a stapler, staples and a glue gun. The essence of this method is that you need to combine a connection with staples and a connection with glue. Do the following:
- Lay out a circle of glasses (17 pcs.) On a flat surface. This will be the main row.

By connecting the glasses together in this way, you will be able to form a circle.
- Staple each glass together.

Don't worry if the cups are wrinkled
- Apply glue to each glass approximately in the middle (make a circle).
- Place the next row of glasses on top. This will form a hemisphere.
- Wait a few minutes and allow the adhesive to “grab”.
- Additionally, fasten the glasses together in the top row.

Before you have time to look back, two rows of glasses will be connected to each other.
- Then put the glasses in such a way that they move inside the structure.
- Apply glue to each row and hold the glasses together in the same row.
- When the upper hemisphere is completely ready, proceed to the lower torso.
- For the first row, you should need 15 glasses (just in case, count how many glasses you got in the second row of the hemisphere).
- The lower hemisphere should be unfinished; it is enough to make three rows. Then the snowman will stand firmly on the floor and not fall.
- Make a head, also from two hemispheres. The hole does not need to be left.
- When the head and torso are ready, make a "rod" from two glasses. With it, you will connect the top and bottom parts.
- Connect the cups together so that the rim of one glass fits into the rim of the other (you can make several cuts on one glass).

This is how the “rod” of glasses looks like for connecting the upper and lower balls.
- Rewind with tape so that the structure does not fall apart.
- Insert one end of the "rod" into the uppermost glass of the torso, and put your head on the other. For safety, pour a little glue into each glass you will place the "rod" into.
- Start decorating the finished snowman. You can wear a funny Santa Claus hat on your head or leave it as it is.
If you make a snowman from the same dishes, then both parts will turn out to be the same. We advise you to resort to a little trick. When you make your head, then squeeze the glasses a little at the bottom - the ball will turn out to be smaller.
Content
Winter is coming, New Year's holidays, matinees time, time to decorate your home. Already now you can practice creating several interesting New Year's items, you will not notice how time flies and the child will require crafts for school or kindergarten. And there will be something to decorate your home. So, involve children in the creation. In this article, we will look at several options for creating a snowman from cups.
The easiest option
Let's start with a simple option. To do this, we need a couple, or even more disposable paper cups, felt-tip pens, threads, glitter, shiny glue, paints, wire. This set of items can vary, it all depends on how exactly you want to design the snowmen.
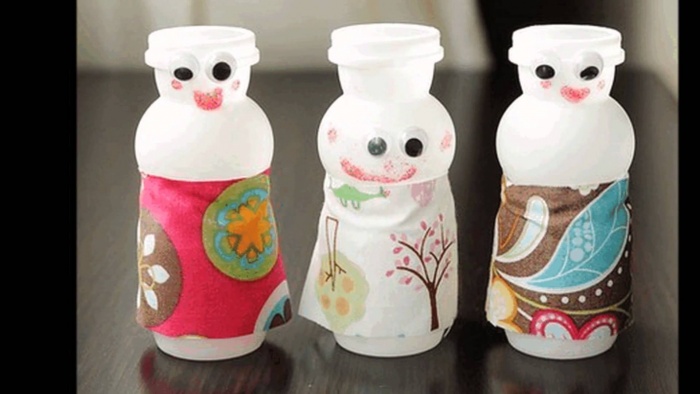
Turn the cups upside down. And start creating: draw eyes, a nose-carrot, mouth-buttons with paints or felt-tip pens. Tie a kind of scarf for a snowman out of woolen threads, you can put on a knitted small hat on top. You can make a kind of rim with ear cannons. Use glitter glue or glitter varnish to decorate your snowmen.
By the way, instead of disposable cups? you can also use plastic bottles of yoghurt, detergents, decorating it all with buttons, colored paper, paints and bright varnishes.


Christmas toy from a plastic cup
Another pretty simple but fun way to create a Christmas toy. We will need a transparent plastic cup, styrofoam, cardboard, a bell, a snowman figurine, a herringbone.
Cut a circle out of the cardboard, which will be slightly larger than the top of the glass. We attach a figurine of a snowman, a Christmas tree to it, decorate all this with grains of foam. We cover the composition with a glass and attach it to glue. The protruding part of the cardboard can then be carefully cut or also decorated with small grains of foam. You can glue a bell on top, the souvenir is ready!
Any figures can be used as internal filling. Small figurines of angels, deer or favorite children's characters will do.


Snowman made of plastic cups: lamp
A snowman made of plastic cups with your own hands can turn out to be very multifunctional: firstly, it will decorate the house and please the eye, and secondly, it can become an excellent nightlight or lamp for reading a book or doing handicrafts. What we need:
- somewhere between 200-300 pieces of plastic disposable cups (yes, here you have to go broke a little, just a little);
- stapler with staples or glue;
- colored paper for decoration;
- a scarf or piece of red fabric;
- light bulb or garland.
To begin with, lay out 25-30 pieces of cups with the bases inside and fasten them with a stapler or glue. We lay out another row on top, but with a smaller number of glasses and in a checkerboard pattern. And so you need to lay out somewhere 6-7 rows, do not completely close the structure so that you can attach the head.

Now we are preparing the head of the snowman. For the head, fasten 18 glasses to start, as in the version with the torso. Next, lay out several rows, and you should have a small hole, which then you just need to close with a hat.
Please note: glasses must be combined with glasses from the previous row.
Now you can style the face of the snowman. To do this, use colored paper, cut out the eyes, mouth, create a voluminous nose. For the eyes, you can use tennis balls, having previously painted them black or dark blue. The nose can also be molded from plasticine and attached to one of the cups, many use foil for the nose.
The dock between the torso and the head can be covered with a scarf. The craft will look spectacular if you place a light bulb or a whole garland in the middle.

To create such a snowman, you can use both matte and transparent disposable cups, it all depends on what effect you want to achieve.

You can also use colored plastic cups as a decoration, you can make buttons for a snowman from them, and blue glasses can act as eyes.

In addition, such a craft can be a good decoration for a wall or door to a school class. To do this, you do not need to make a full circle of glasses, but leave a semicircle so that the product is easier to attach to a flat surface.
Use a garland to illuminate the torso and head separately, it looks very original and at first glance you can't even tell that the snowman is made of disposable tableware.

By the way, not only plastic cups can be used. Also use plastic water bottles that are clear or can be painted white. The assembly principle is the same, only it is better to use not a stapler, but serious glue.


It looks amazing, and, most importantly, it teaches children, and adults too, to reuse plastic products.
And here is a variant of such a hybrid of a snowman and Santa Claus. Please note - there is a method of using materials of different colors.
You have a lot of plastic dishes lying around at home and you don't know what to do with it? Our advice to you is, in no case throw it away, because from such an improvised material - seemingly rather primitive, you can create with your own hands some decorations for the house for the New Year holidays. Thus, you will save money and reveal yourself as a talented person. And the atmosphere of celebration in your home will take on a proper look. With such basic things, you will have a unique opportunity to show off your personality in front of guests and family. So, let's take a look at our article, which will provide you with 4 photos of ideas for wonderful crafts from disposable tableware for the New Year 2019 with your own hands made extremely quickly and easily. Without possessing the skills of this skill, you can freely acquire them with the help of our master classes containing information that is easy to understand.
Snowman from a disposable cup
Snowmen are now being made with their own hands for the New Year 2019 from anything. Crafting from a disposable cup is considered another interesting idea.
This will require:
- Disposable tableware - cups;
- Colored paper;
- Scissors;
- Glue;
- Paints;
- Brush;
- The cloth.
Progress:
- Since the cup is white, you do not need to repaint it. On its surface, you need to draw eyes, nose and mouth. For a toy made of fabric, you need to make a hat and a scarf. You can use glue to keep these products stronger.
- Hands, feet and buttons are best made of colored paper and glued to the surface. It turned out to be a great snowman for the New Year 2019, made with your own hands from disposable tableware. Such a craft is quite suitable for children, for self-production.
Video: master class for making a snowman from disposable cups
Herringbone made of plastic spoons

A simple master class will be interesting for both children and adults. The result is a beautiful Christmas tree craft made by hand for the New Year 2019 from disposable tableware. As you can see in the photo, in its appearance it looks more like a purchased toy than a self-made one.
This will require:
- Plastic spoons;
- Cardboard;
- Scotch;
- Acrylic paint;
- Brush;
- Scissors;
- Hot glue gun;
- Decorations for the Christmas tree.
Progress:
- You need to make a cone out of cardboard and fix it with tape. After that, the spoons should be painted green and allowed to dry. A handle must be cut from each product and the part with which it is eaten will be used for the Christmas tree. The cone itself should also be coated with acrylic paint.
- Then, using a glue gun, each spoon must be attached to the cone. This should be done until the whole Christmas tree is in green twigs. You can attach a finished star to the top, or you can make it yourself. And on the entire surface you need to glue bows, beads and other decorations. A wonderful Christmas tree is ready, which will look very beautiful in absolutely any place. When creating such a craft from disposable tableware for the New Year 2019, other instructions can also be used with your own hands, because there are many ways.
Disposable straw vase

You can make a beautiful vase from ordinary straws from juice or other drinks. It turns out a very beautiful craft for the New Year 2019, made by hand from disposable tableware. This is not just an unusual decoration for the home, but also useful, since you can put artificial flowers in this kind of vase. All this will perfectly decorate the room.
This will require:
- Many colored disposable tubes;
- Plastic bottle;
- Glue;
- Decor.
Progress:
- The top of the bottle needs to be cut off and you won't need it for this craft.
- The bottle must be pasted over with disposable tubes, alternating colors. When the work is over, the product will delight, because it has many bright colors. To decorate a do-it-yourself vase from disposable tableware, you can use various decor: ribbons, beads, rhinestones, etc. For the New Year 2019, such a product will become truly excellent and relevant, because the abundance of bright rainbow colors will greatly improve the mood of the whole environment.
Video: master class on making a vase from disposable tubes
Disposable Plates Decoration

If you are in doubt about what kind of crafts you need to make from disposable tableware for the New Year 2019 with your own hands in order to perfectly decorate your home, we suggest that you familiarize yourself with our excellent idea, which we hope you will like. Such a decoration, made from disposable plates, can be hung both on the wall in your apartment, and placed neatly on the chest of drawers as a decorative piece. If there is a desire and children, then it would be nice to present this product to the kindergarten as a present.
For manufacturing you will need:
- disposable plates;
- glue;
- gouache paints;
- brushes;
- decorative elements: cotton wool, rhinestones, sequins, bows and much more.
Work process:
- First, think about what you want to create: either a snowman, or Santa Claus, or a deer. Everything is at your discretion.
- Take an easy-to-use brush and paint the image of the fairy-tale character of your choice with paints.
- Then decorate it, if necessary, with cotton, sparkles or something else. For example, you can refer to the ideas presented in the photo. A great option, quite funny and colorful. Make your wishes come true and get excellent crafts for the New Year 2019, made with your own hands from disposable tableware.
Finally
So you learned how you can create a variety of crafts from disposable tableware for the New Year 2019 with your own hands in an original and simple way. Transform your home elegantly and interestingly and the mistress of the coming year, the Yellow Earth Pig, will reward you with luck, prosperity and great happiness. Happy holiday, dear friends! All the best to you!