Rules for choosing and applying makeup for beginners. Makeup Tutorials for Beginners: Free Self-Study Videos
In this article, we will talk about all the tricks and rules of makeup for beginners and offer several options for simple but spectacular images. If you are just starting to use cosmetics, but do not know where to start and what products to use, read our article.
Makeup Basics: 3 Rules
The right foundation
To create makeup, as a rule, begin with the application of a tonal foundation. A properly selected product will hide skin imperfections, even out the tone and prepare the face for the next steps. Foundation can be powder, cream or a light fluid. When choosing it, rely on and its type (ours will help determine it). For oily skin, powders are suitable, for normal and mixed tonal fluids, and for dry skin, a nourishing creamy texture is needed.
Minimum funds
If you are new to makeup, use as few products as possible, gradually add new items from the world of cosmetics to your arsenal. For starters, this set is enough: foundation, mascara, light shadows and blush. Such a minimal set will hide skin imperfections and give it a healthy look, while mascara and radiant shadows will instantly make the look more open.
Proper make-up removal
If you have begun to actively use cosmetics, then it is necessary to add one more step to the standard care procedure -. In addition to the usual gel for washing, you will need a make-up remover. It can be a two-phase product with the addition of oils, micellar water or hydrophilic oil. Choose what suits you best and does not irritate your skin. High-quality facial cleansing is the key to beautiful and healthy skin.
How to do eye makeup for beginners?
Fancy eye makeup doesn't have to be complicated. Follow our tutorial to create a trendy red eye makeup.
Prepare the eyelid for applying shadows, distribute a thin layer or primer. Powder light shadows on top.

Add a purple shade to the crease of the eyelid and blend into a light haze.

Apply a dark shade with sparkles to the entire moving eyelid. At the outer corner, gently blend, connecting with purple shadows.

Underline the lower eyelid with darker purple shadows, a small dense brush is suitable for this.

Line the mucous membrane of the eye with a soft black pencil.

Apply mascara to your eyelashes. Eye makeup is ready!

How to quickly create lip makeup?
If you have chosen a bright lipstick for your makeup, follow our tips for applying it.
Moisturize your lips with a nourishing balm and after a couple of minutes remove the remnants with a napkin. Using a pencil suitable for your lipstick, start drawing the outline, starting with the upper lip. Draw a line from the top corner of the lip to the middle.

Repeat the same action with the second corner, creating a "cross" in the center of the lips.

Mark the central part of the contour of the lower lip.

Put small dots between the already drawn lines and the corners of the lips. With their help, you can easily draw the outline.

Connect all parts of the circuit.

Fill in the lips with a pencil and then with lipstick. So the coating will turn out uniform and resistant. In this way, you can create both glossy lip makeup and matte.

Everyday face makeup for beginners
Skin preparation
Cleanse your skin and apply a moisturizer. After a few minutes, you can use . Choose according to your skin type. Work the area under the eyes with a concealer, and hide imperfections with a corrector. Blend all products properly so that no borders and non-uniform texture are visible.

Eye and eyebrow makeup
- with a pencil and fix with gel.
For eye makeup, use cream shadows with a satin texture. Firstly, they are easy to apply, secondly, they last a long time, and thirdly, one shade is enough to create a beautiful smoky make-up. Apply eye shadow, such as Maybelline's Color Tattoo 24h or Giorgio Armani's Eye Tint, to the entire lid and blend with fingertips. Choose calm shades: golden, bronze or light brown.

Lip makeup
Apply light lipstick or gloss to your lips. For everyday makeup, it is better to use moisturizing lipsticks with a creamy texture. They take care of the lips, they are easy to touch up during the day.

Fixing makeup

Apply primer to your eyelids. To create makeup, you will need three shades of shadows from the same brown-bronze range: light, medium and dark. Apply the lightest to the corner of the eye, add light bronze shadows to the center of the eyelid, and darken the outer corner with the deepest shade. Erase the borders between the shadows by slightly feathering them.
Every girl wants to master for beginners at home. It’s not always possible to go to the salon, and it’s a little expensive. But a woman wants to be beautiful 24 hours a day. In addition, you must determine your type of appearance, because makeup for fair-skinned and dark-skinned girls may differ. Knowing this, you will be able to perform the makeup technique competently. Therefore, you should learn everything, and make-up lessons for beginners will help in this.
Determining the shape of the face
If you know how to determine the structure of the face, besides the existing flaws, you can easily correct it with makeup. To find out the shape of your face, you should wash off all makeup, comb your hair back, remove your glasses. Now go to the mirror, it is better if it is with a magnifying effect. Look at the outlines of your face. Determine what geometric shape your face oval looks like:

- A circle. It is determined by the expansion in the cheekbones. To correct such a face, you need to visually make the cheeks not so large. To do this, a darker color of the foundation or powder is applied on the sides of the face and in the temporal region. The center of the face (forehead, nose and chin) is highlighted. Attention is focused on the eyebrows.
- A heart. The forehead and temple area are expanded relative to the chin line. The cheekbones are set high, but do not protrude. To make your face appear narrower, apply a darker foundation on the sides of your forehead. Cheekbones, on the contrary, need to be made lighter.
- Pear. In this case, the forehead is narrowed, and the chin and jaws are wider. To do this, darken the sides of the jaw. To make the forehead visually appear wider, its sides are highlighted.
- Oval. The oval face does not have pronounced flaws, its lines are smooth, with regular transitions. This face shape is considered ideal, and other forms are equal to this type.
- Elongated oval. The height of the face is greater than its width. To hide this elongation, the upper part of the forehead is darkened just below the hairline. The chin area is also darkened, approximately to the cheekbones. The cheekbones are illuminated.
- Rhombus. Here the cheekbones protrude significantly. Other parts of the face: forehead and chin are narrowed. A darker color in relation to the base is applied to the cheekbones, and the chin is highlighted. Blush at the same time fall on the most convex place on the cheeks and shade closer to the corners of the mouth. Highlight the eyes.
- Trapeze. With this form, the jaw is expanded, the forehead is relatively narrow. The lower jaw is darkened. A lighter color is applied to the corners of the forehead. Blush is applied from the temple. The lower cheekbones are decorated with blush.
- Square. The face is characterized by a massive forehead and jaw, while the shapes are all angular, resembling a square. A darker color is applied to the corners of the forehead and jaw. On the chin should lighten the skin. Blush is applied from the temples to the corners of the mouth.
- The triangle is defined by a wide forehead and a pointed chin. To give the face an oval shape, darken the temples and the protruding part of the chin. The area of the lateral cheekbones is clarified. In this case, blush of two colors is used. At the same time, dark colors shade the upper cheekbones, and lighter colors are applied to the hollow in the cheekbones. The emphasis is on the eyes.
Foundation features
 If your skin is imperfect, there are circles under the eyes, spots and pigmentation, then you should master the technique of masking defects. It will be better, of course, if you pre-cleanse the skin, since even carefully masked defects can look unnatural.
Before applying the make-up base, cleanse your face with lotion or milk. The base consists of emulsions that allow make-up to stay on the face longer. After that, a foundation is applied. It is worth noting that if your skin is young, elastic and, most importantly, clean, you should not use foundation, so as not to clog pores.
The tonal tool must be of good quality, when choosing it, you need to rely on the following factors:
- It should match the color of your skin. Apply the cream on the inside of your wrist, the tone should merge with the color of your skin.
- Good manufacturers produce tonal products for every skin type. Therefore, when choosing a foundation, specify for what type of skin it is made.
- A good foundation cannot be too cheap, buy only proven products.
If the skin is young, then do not purchase a foundation based on silicone, as it clogs the pores.
 For mature women, such a remedy is necessary: it not only evens out complexion, but also smoothes fine wrinkles.
When foundation is applied to the face, it is usually set with powder or thermal water. Powder makes the skin velvety, and thermal water moisturizes.
Blush is applied to the face in a small amount, they should merge with the complexion. It is better to use a brush beveled to the side. Blush is applied to the protruding part of the cheeks and shaded to the edge of the face.
Evening makeup for beginners
Simple daily makeup is done quickly, so you should not focus on it. You can go directly to the evening version (step by step).
After the face has been cleansed, the foundation and foundation, powder have been applied, proceed to the eye makeup.
Sequencing:

- Take care of your eyebrows first. If you are going to visit a restaurant, then you should prepare your eyebrows for this in advance by adjusting them yourself or in the salon. To make them more charming, shadows or an eyebrow pencil will help. If the eyebrows are already expressive, then apply a little gel on them so that the eyebrows lie perfectly. Shadows are used to highlight the eyes. If this is an evening make-up, then you can use two or more colors. If you are a brunette, then the color of gold in combination with a brown tint will be ideal for you, for blondes, a combination of silver and dark gray colors will suit. If at the same time the corners of the eyes are closer to the nose, you need to apply light shadows. This will give the image freshness.
- Let's move on to eyelashes. For a more expressive look, apply eyeliner along the upper eyelid closer to the growth of the eyelashes. The lower eyelid is better to draw a pencil. The next step is to apply mascara. For evening makeup, you can make eyelashes thicker.
- Line your lips before applying lipstick. The lip pencil should be slightly darker than the natural color. After that, lipstick is shaded with a brush or lip gloss is used. If you want to give the look a sensual look, cover your lips with a colorless lipstick or gloss.
- The makeup is almost ready, it remains to correct the image with the help of powder and blush. First, blush is applied to the cheekbones. After that, with small strokes, where a greasy sheen may appear (forehead, wings of the nose and chin), powder is applied.
Evening makeup for beginners is ready.
Makeup brushes:

- Get a set of quality makeup brushes, there may not be many. The main ones include brushes for applying shadows, eyeliner, blush and foundation.
- The brushes should be soft.
- Since you are new to this business, get a foundation sponge.
- Buy a brow kit, even if you have your brows trimmed in the salon, you know how quickly they grow back. Therefore, just in case, you should have tweezers.
- Do not forget about the proper care and storage of brushes. Remember that they need to be washed with soap from time to time.
Face. As mentioned above, foundation is produced according to skin type. Choosing it, you need to be guided by your skin type. So, for dry skin, it is better to choose a liquid foundation, for oily skin - on a powdery basis or matting. For women of age, a moisturizer is suitable.
In the presence of circles under the eyes, a lighter foundation should be applied. The foundation should be chosen according to the color of your skin. Do not buy pink foundation, it will make the face unnaturally red. There is also a concealer for sale. This is a tonal tool that is applied pointwise. It is designed to correct skin imperfections.
Rules for applying blush:
- Blush is applied to the apples of the cheeks, that is, to their most protruding part.
- If you can’t decide where to apply blush, then just smile is enough. Here you will find the most protruding part.
- When purchasing blush, remember that cream types are suitable for smooth skin, but powder blush can mask uneven skin, acne and wrinkles.
Features of applying shadows, applying eyeliner:
- Choosing the color of the shadows, it is not necessary to be guided by the color of the eyes, now this is no longer relevant.
- Eyeliner makes them wider and more expressive.
Lips can be distinguished as follows:
- Choosing the color of lipstick, the main thing is not to make a mistake. Do not chase fashion, the main thing is that the color matches the type and color of the skin. If you are a dark-skinned girl, then warm shades will look good on the lips, but with a pale face, it is preferable to use cold colors. You should also know that light colors make the lips fuller, dark ones narrow the contour of the lips.
- Use lip balm occasionally to keep them healthy and beautiful.
These are the makeup tutorials for beginners. Such makeup lessons will help you learn the structure of your face and the appropriate way to apply cosmetics. Makeup for beginners and its lessons are very important for women inexperienced in this matter.
Many girls, while still very young, look forward to the moment when they grow up and get a certain independence, as well as the opportunity to do their own makeup. This moment inevitably comes, the girl wants to experiment with her images, stand out from the crowd, and our task will be to teach them how to do it. We will give makeup lessons for beginners, accompanying them with video clips, on which you can see online how the procedures are performed step by step.
Everything starts with the face. More precisely, from the surface of his skin. The result of your makeup as a whole will depend on how well the foundation is applied. With it, you can get rid of minor flaws, giving your face a uniform tone.
To eliminate the effect of glossy shine, it is desirable to apply a light layer of powder on the foundation.
To avoid an overly vulgar look, young girls should not make their makeup too bright.
It will not be superfluous to remember that attempts to mask all your shortcomings in the form of pimples and redness under a layer of cosmetics can lead to the opposite effect. Remember that beautiful skin is healthy skin and take care of it properly.
When choosing a foundation, pay attention not only to its color, but also to its suitability for a particular skin type. It is not excluded the use of "tonac" in combination with a regular moisturizer.
But when choosing a color, a drop of the product should be applied to the skin of the face or neck and let it absorb. If it has merged with your natural color, you have made the right choice. When applying, pay special attention to thorough shading in the area of the ears, forehead, and also when moving to the neck. In the video you can see online lessons on how to properly apply foundation on the face:
Eyes and eyebrows
Eyes are a key area of your face, and eyebrows are an indispensable addition to them. If you have blond hair, be careful with the brown brow pencil so you don't get a reddish tint effect. It is not necessary to limit your choice to traditional black - try, for example, light olive, which is especially successful in the case of fair-haired girls.
Let's continue our lessons for a beginner makeup artist with eye design. Here it is important to immediately understand the difference between daytime and evening makeup, where in the latter case contrasting and bright transitions are allowed. As a daily solution, you can give your choice in favor of elements of cosmetics in pastel colors - beige, peach.
If you want to give your image brightness, if appropriate, use eyeliner. On normal workdays, limit yourself to mascara and shadows that are close to a neutral color. To apply shadows, use the applicator, and only then blend the product with a brush from the inner corner of the upper eyelid to the outer.
The video shows an example of how to properly apply shadows on the eyes:
With the applicator brush, you can apply the product in a denser layer. For owners of green eyes, a palette of colors with a red tint is perfect. If necessary, if you realize that you overdid it with color saturation, you can dilute it by applying shadows of lighter tones.
Do not forget about the insidiousness of red: in the area around the eyes, shadows with this shade can create the effect of inflammation and fatigue.
The main emphasis should be on expressiveness and depth of view. This is what we should strive for in the first place. The final touch is the application of a light product on the skin under the eyebrow, which will visually reveal your look and give the eyebrow bend a special delicacy.
Our lessons will not do without mentioning eyelashes: it is advisable to apply mascara on them with a rather stiff brush. This will separate our hairs, which will make the picture more natural, and your eyes will become even more open. It is not always necessary to apply multiple layers. If you want to add extra volume to the hairs, apply two, pausing between them so that they dry thoroughly.
Do not forget that the outer edges of the eyelashes should be painted over more saturated.

We paint lips
As you know, gloss or lipstick can be used for this purpose. Our lessons for beginners, accompanied by online video clips, will allow you to decide on the choice of the color you need. Do not forget that when choosing, you need to take into account your whole image and make-up, so that the picture turns out to be organic.
Video for beginners and not only: how to choose lipstick:
Do not use too much gloss or lipstick - apply the product in a thin and even layer, remembering to strive for a natural effect. If you used light-colored cosmetics in the rest of your makeup, do not make your lips too bright, and also do not use rich blush, so as not to create the illusion of soreness and inflammation. However, for naturally too pale skin, blush of warm tones is always a salvation. But do not forget that in such a case, the solution is also a tonal remedy.
Having discussed the main points that beginner lessons include, and having reviewed a number of video examples online, it remains only to add that the world of makeup is huge and almost inexhaustible, and its dimensions are determined by your skills and fantasies. Experiment, learn new things, because there are plenty of opportunities to do it for free today. But most importantly, take care of your health, because the condition of your skin and your overall appearance depend on it. Otherwise, no lessons, no online video recommendations and no cosmetics will allow you to achieve the desired effect.
One of the examples of makeup for a romantic event:
Makeup Lesson #1 Buy Good Brushes
This was the beginning of the very first lesson of the course. Remember one of the important rules: “Your skills are as important as yours,” as they used to say at the School. A good brush actually improves your technique. This is especially true for highly pigmented products - with a good tool, you will avoid unnatural spots, poor shading, and unevenness.
Pros can have up to 100 brushes, and everyone's favorites! But beginners should form a set of 8 must-have brushes:
1. Foundation brush
2. Corrector brush
3. Fluffy powder brush
4. Blush brush
5. Small brush for blending
6. Flat Eyeshadow Brush
7. Angled tassel (cut at an angle) when precision is required
8. Lip brush
There are brushes, but you need to learn how to hold them correctly. The way you hold the brush affects the result of the makeup. The closer your fingers are to the metal part of the brush, the more pressure you apply to the brush, and vice versa. And if there is a task to apply the product most evenly, then keep the brush approximately in the center of the handle.

Makeup Lesson No. 2. For different tasks - different tonal products
Everyone knows that there are three main types of tonal foundations: liquid, powder and cream. But this does not mean that they should be layered on top of each other. Most often, you need one product, depending on the task facing the makeup.
Liquid has better coverage and can be used to completely cover the face. Foundation is not designed to cover the entire face. But it can be applied to the entire face, if you achieve a thin translucent layer. To do this, mix the foundation with a primer (primer) or moisturizer.
There is a misconception that foundation cannot be used on oily skin. This is not true. Just apply the cream on oily skin with a damp sponge.
For dry to combination skin, use a liquid product and apply with a brush. Concentrating on the center of the face. The farther from the center of the face - the less product should be used, and reduce it to "no". 
Makeup Lesson #3: Learn to Hide Flaws
The main clue is the color wheel, it is advised to memorize it at the School. To get rid of an unwanted color, a shade that is located opposite in the color wheel will help. With the right corrective color, you can mask imperfections such as pimples, redness around the nose, bluish circles under the eyes, etc.

It turns out that green corrects redness, and orange-yellow masks blue colors. Beige concealer placed over a patch of color will only create a muddy effect on the skin and should only be used when correcting scars and similar irregularities.
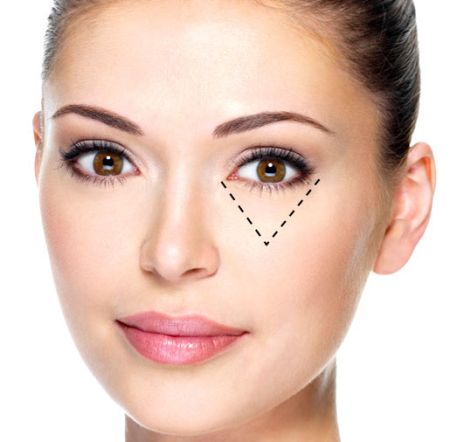
By the way, the usual method of correcting dark circles under the eyes with the help of concealer dots laid out in an arc is not correct. You need to correct the darkening under the eyes with the help of a concealer laid out under each eye in the shape of the letter "V".
Makeup Lesson #4: Learn how to shape your face
Using contouring products is not that difficult. But, learning how to correctly adjust the shape of the face is the main task. Here it is necessary to take into account the shape of the face. And the principle of using products for “sculpting” the face: everything that is highlighted comes to the fore and stands out, and everything that is darkened is made less noticeable.
It should be darkened with a bronzing product, preferably with a matte texture. And you can highlight with a shiny marker that reflects the light.
Makeup Lesson #5: Learn how to shape your eyes
If you understand the principle of facial contouring, then these same techniques can be used to adjust the shape of the eyes. In addition to dark and light shadows, a liner will help in adjusting the eyes. Also use the color wheel to make the eye color brighter: for blue eyes, these are orange-brown shades, and for green ones - terracotta and reddish, for brown ones - blue and purple.

Makeup Lesson #6
Tip one: draw the line in one motion for as long as possible. Start at the inner corner of the eye and draw a line along the upper lashes towards the center. Then draw the eyeliner from the outer corner and lead again to the center until the lines meet.
The second tip concerns how it is more convenient to do "". Always start with the bottom lashes. This will help determine the correct direction of the "arrow". And then the eyeliner of the upper eyelashes is no longer difficult.

Makeup lesson number 7. Lips like Angelina
The School explained which lips are the most harmonious. Your lips will be most beautiful and attractive if the upper and lower lips are equal in size. At least approximately.
I wonder how professional makeup artists do lip makeup. Here is the whole sequence:
1. Apply foundation to lips. This helps to tone down the natural pigments for a clearer lipstick color. And it will be easier for you to understand where the lip contour actually is.
2. Using a white eyeliner, gently blend the natural contour of the lips.
3. Apply a new lip contour with a pencil to match the lipstick. If the shape of the lips suits you, then the contour can repeat the natural one.
4. Apply lipstick with a brush, starting from the center to the edges.
5. Apply a light shade of foundation around the lip line for a more natural contour.
A drop of gloss in the hole above the upper lip is a great technique to create the effect of seductive and fuller lips.

Makeup Lesson #8: Eyebrow Makeup Is Easier Than You Think
Throw away all these schemes and calculations, - they say in the School of Makeup, when it comes to eyebrow make-up. It is not necessary to build all these dots and perpendiculars. You just need to follow the tone and color.
One of the biggest mistakes is the wrong color of the eyebrows and too saturated tone. Dark eyebrows, although they are a sign of youth and good hair pigmentation, they make you look older. Light eyebrows are always more advantageous than those that are darker than the natural tone of the hair.
Filling in the eyebrows with a pencil is also not difficult. You should “draw” the hairs by pressing the pencil at the beginning of the stroke to imitate the root of the hairs. But if you do not own a pencil, then it is easiest to fill in the eyebrows with the help of shadows. And do not load the inner corners of the eyebrows with tone, so as not to make a frown on your face.
Any master class for beginners is carried out step by step and consists of several stages.
- Facial cleansing.
- Hydration.
- Primer application.
- Applying foundation.
- Face shape correction.
- Flaw masking.
- Eye drawing.
- Applying blush and lipstick.
Now let's look at each action in more detail. This is very important, because it is quite difficult to perform professional makeup for beginners, any missed detail can spoil the whole result.
Applying foundation
 A cream or a special base is applied only after cleansing and additional moisturizing of the face. It is also advisable to apply a primer that will help even out the texture of the face and hide minor skin imperfections. You need to apply the tone with a brush, sponge or apply with your fingers (you should choose a more familiar method).
The application technique is always approximately the same and includes three stages.
- We apply the cream pointwise, in small amounts on the nose, forehead, chin and cheekbones.
- With light, slightly patting movements, we distribute the base from the center to the hairline. Be sure to make sure that there are no clear boundaries between your skin and foundation.
- We correct the shape of the face. How to do it at home on your own can be understood by watching the video tutorials below.
Experienced makeup artists say that eyebrows hold the whole face. In fact, this is so. It is especially important to take this fact into account when doing makeup for beginners for every day.
 Correcting the shape of the eyebrows step by step:
- Comb your eyebrows down.
- With light movements, paint over the gaps in the direction of hair growth.
- Especially carefully direct the tails of the eyebrows.
- With a brush, distribute the pencil along the length of the hair.
- Apply fixing gel.
 Shadow technique:
- Using a damp brush, apply shadows along the bottom of the eyebrow and blend towards the bridge of the nose.
- We impose a new portion of the shadows on the top and stretch the tapering tail to the temple.
- Carefully comb the eyebrows with a special brush.
- Fix with gel
Important! All movements should be smooth, you need to fill in the gaps with stitches, imitating your own hairs.
Advice. Makeup for a beginner is best done with the help of shadows, this method makes the natural line of the eyebrows easier and faster.
This video master class clearly shows how to shape eyebrows at home:
Eye makeup
 The design of the eyes can be very diverse. Consider the basic makeup rules for beginners at home:
- You should start with the base under the shadows, it will ensure an even distribution and prevent them from rolling.
- It is necessary to apply shadows pointwise and be sure to shade with a brush.
- You do not need to paint over the eyelid with one color, you should use at least 2 shades.
- The eyes will be more expressive if the space between the eyelashes is drawn with a pencil or shadows.
- Mascara should be applied at the very end.
You should also pay attention to the following video tutorials:
Spectacular evening make-up:
Hollywood makeup:
Applying blush
The natural blush on the cheeks refreshes the face, makes it more youthful and embossed. In order to correctly highlight the cheekbones at home, you just need to adhere to the following rules:

Lip makeup
 This stage completes the master class. For daytime make-up, it is enough to apply gloss on the lips; for evening make-up, you can use bright shades.
Application technique:
- Apply foundation to lips to fill in pits and wrinkles. Then the lipstick will go on smoother and last longer.
- Draw a contour with a brush or pencil (its shade should match the color of the lipstick).
- Smoothly spread the lipstick over the surface of the lips, then apply another layer.
- Apply highlighter or gloss if needed to plump up lips.

The following video master class clearly shows how to do lip makeup step by step at home.
After you watch the video tutorials for beginners, the design of the face will seem surprisingly simple. Now you can make a make-up for any occasion at home: for work, a party, for video and photography. And finally, we offer you to look at bad advice, and maybe recognize yourself somewhere.
In contact with