Types of thread baubles. Weaving patterns for mouline baubles, various types of weaving with photos and a video selection
Multicolored baubles made of floss threads
Baubles are bracelets woven from threads with your own hands. In this article, we will tell you how to weave floss baubles in various ways. For most people, this is just a strong and original accessory, but at one time these accessories were part of the ethnic culture. Weaving bracelets is a simple and exciting activity that anyone can master.
A little about the history of baubles
The tradition of making such accessories dates back to the Indians of North America. For them Fenechka had more symbolic meaning than aesthetic one. First of all, thread bracelets symbolized friendship and love relationships. The jewelry donated by a friend was not removed from the wrist until the thread broke by itself. If a person decided to take off such a bracelet, this could mean the end of friendship and was a serious insult.
 Fenichka with a Slavic sign
 Fenichka do it yourself
 Ukrainian traditional bauble with ornament
In the twentieth century, the tradition of weaving baubles from threads was adopted by hippies, and soon the whole world learned about these original jewelry. Young people also used bracelets as symbols of friendship and loyalty. They were exchanged during fraternization and were even worn instead of wedding rings. Over time, the function of decoration began to come to the fore, but exchange always meant friendship.
Methods for securing threads for weaving
Weaving baubles from a floss always begins with securing the threads in one of the most convenient ways.
 We fix the bauble with a clerical clip
 We fasten the bauble with a pin
 We attach the threads with tape to the surface
 We fix the bauble on a special board with a clip on top
You can choose any, depending on what accessories are at hand.
- The first option is with a clerical clip. You can attach it to a book or other platform. In this case, the threads must be arranged in the order corresponding to the future pattern, and pressed tightly.
- The second option is with a pin. The threads are knotted on one side, placed in the correct order on a pin, and pinned to the fabric in any convenient place.
- The third option is the simplest, the threads are attached with tape to a suitable surface, for example, to a table.
- The fourth option is using a tablet (a special board with a clip on top). For a more convenient fixation, you can put a ruler between the threads and the clamp, fix the weaving pattern and any notes necessary for work in the same place.
The main types of weaving baubles
You can weave baubles from threads in different ways, tying knots in an oblique direction (for an easier way) or in a straight direction (for a more complex one).
 Fenichka oblique weaving
 Beautiful straight weave patterns
 Fenichka - do it yourself
By knitting such knots in straight rows, you can weave beautiful patterns according to patterns. However, the simplest bauble is performed without knots at all, and the threads are intertwined with a pigtail. Let's see how to make a bauble for beginners in simple ways.
In addition to the usual three-part version of the braid, you can make baubles from floss using four or five braids weaving. To braid four or any other even number of threads, in each new step, you need to select the central pair of threads: throw the left thread to the right side, and the right thread to the left. In the case of weaving from an odd number of threads, the leftmost thread is moved to the center, then the rightmost thread, and work continues in a similar pattern.
Types of weaving baubles
Basic knots for braiding baubles
Oblique weaving of bracelets
Mouline baubles for beginners are most often weaved in this way. Let's take a closer look at how to weave a bauble using the example of a simple multi-colored bracelet.
 Birch thread bauble
You will need threads of six colors, from which 12 paired segments about a meter long are obtained. The approximate thread consumption can be calculated by multiplying the desired length of the jewelry by 4. You can weave the bauble a little narrower or wider, the main thing is that the threads are paired. We fasten the threads in any convenient way (we leave the ends 8-9 cm each) and arrange them symmetrically: for example, two blue ones in the center, two yellow ones on both sides of them, and so on.
The weave should start with the thread from the left edge. We slightly move the first thread to the side and cross it with the second, thread the end of the first thread into the formed window. We repeat the same steps again, without changing the thread, for the second part of the knot. Similarly, you need to braid the knot on the right side with threads 12 and 11, but this time in a mirror image (from right to left).
On the left, we continue to tie the knots with the same thread as the first, braiding each thread in turn on the left side. We also weave on the right. In the middle, two working threads meet, we tie a similar knot between them. Now we will tie the knots with a pair of threads of a different color, which turned out to be at the edges of the future bracelet, we repeat the scheme the required number of times. The result is a herringbone-shaped pattern.
At the end of the work, all the threads are tied in a knot, and the remaining ends are braided with a pigtail. An incorrectly made knot can be gently loosened during operation using a needle or a thin hook.
How to weave according to oblique weaving patterns
Straight weaving method
Bracelet weaving patterns in this way are varied and can be very complex: from hearts and rhombuses to inscriptions and portraits. It is in this way that the most beautiful baubles are weaved. Let's analyze in stages how to weave a pattern on a bracelet.
 Beautiful bauble from various patterns
 Fenichka with orange slice pattern
 Multi-colored bauble of oblique weaving
One convenient way to start a straight weave is to fold the threads in half by making a loop at the top. Attach a working thread on one side of the loop. Then we braid the entire loop with knots from a working thread.
After that, we begin the main weaving of the pattern according to the scheme. With the working thread, which is located on the left edge, and should be longer than the others, we braid the warp threads alternately to the right edge. Then we change the direction of weaving to the opposite.
For the pattern, we begin to braid the working thread with the appropriate thread, and, leaving it free, we change the direction of weaving. It is not always possible to calculate the length of the working thread correctly, but there are ways to continue weaving if the thread runs out too quickly.
The algorithm is as follows:
- We bring the rest of the thread to the wrong side, leaving a tip sufficient for tying a knot.
- We also apply a new thread here.
- We tie it with an ordinary double knot.
- On the wrong side, we connect the remainder of the previous thread with the new one. The place of their connection will be invisible.
Straight braid
What can be added to the finished bracelet
Sometimes an accessory woven from threads with your own hands is additionally decorated with rhinestones, spikes or metal chains. The rhinestone thread is simply sewn in the center of the bracelet with a needle and thread of a suitable color.
 Variety of ready-made bracelets
The studs with attachments are also placed in the center. For one bauble, you will need to purchase chrome spikes (5 pcs.), Scissors and a screwdriver. In the designated places, you need to make small punctures with scissors. We thread the screw into the hole and tighten the spike with a screwdriver. We also install the rest.
The chain can be attached to the edge of the bracelet. For this, a floss of the same colors that were used for weaving is suitable. The knot at the end of the bracelet must be untied and tied again with the thread that the chain will be sewn on. Pierce the beginning of the bracelet with a needle, then insert the needle into the first link of the chain, similarly sew the rest of the links. After making 2 stitches at the end, we include the thread in the knot.
In addition, chains can be woven into simple braids for beginners, braiding them on one or two sides. Another interesting solution is the use of medium-sized metal nuts that are put on threads.
Diy Summer Decorations
Weaving patterns according to patterns
Since the complexity of patterns that can be made by direct weaving is practically unlimited, you can find ready-made bauble patterns on the Internet or on our website. Another option is to use a generator or draw by hand. You can also use cross stitch patterns.
 Pattern of a bracelet with a pattern
 Snowman pattern
In any case, a beginner should practice weaving a floss bauble on narrow two-color patterns. The number of cells in the selected pattern will correspond to the number of threads that need to be prepared. Having picked up the threads that are most suitable in color, fix them and get to work.
It is better to take the length of the threads with a margin. Many experienced craftsmen fix the threads without tearing them off the ball, and unwind it as needed during the weaving process. If this method is inconvenient for one reason or another, it is recommended to take threads 1-1.5 m.
How to understand straight weave patterns
Square knot for baubles
This is a simple weaving option that requires four pieces of thread or another multiple of four. The two extreme threads - workers - must be longer than the warp threads. To complicate and diversify this technique of weaving simple baubles from a floss, you can add small beads or beads.
 Smart baubles friendship
 Tri-color bauble with square knots
Stages of tying a square knot (threads are numbered in order from left to right):
- Draw the first thread over the second and third under the fourth.
- We withdraw the fourth under the second and third into the loop formed by the first thread, tighten.
- Again we draw the first over the second and the third under the fourth.
- We start the fourth behind the second and third and bring it up into the loop of the first thread, tighten the second part of the knot.
- You can add beads to your taste by stringing them, for example, on two warp threads.
Basic Lesson: Square Knot
Macrame knots in baubles
Weaving baubles with macrame square knots is quite common. Bracelets can be decorated by adding metal rings, stones, etc. For weaving, you will need 4 m of thread, metal rings or other jewelry, scissors and a needle.
 Bracelet with metal insert
 Bracelet with woven chain
Let's analyze step by step how to weave a macrame bauble:
- We cut the original thread: two pieces of 75 cm, two of 50 cm and one of 25 cm.
- Fold 50 cm segments in half with a loop upward, thread them into a ring on both sides and tighten the resulting knots.
- We put one of the segments 75 cm long under the warp threads next to the ring so that the ends of the thread on both sides are the same.
- We tie square knots as described above, alternating left-handed and right-handed.
- We repeat weaving to the required length.
- We hide the ends of the working thread by threading them into the needle and passing the last 4-5 knots in the middle.
- Similarly, weave the second part of the bracelet.
- Temporarily tie the ends of the bracelet with a small piece of thread.
- Fold the last segment in half and tie similar knots around all 4 threads of the warp. You should get a "lock" of knots about 1.5 cm in length. We also hide the ends and cut off the excess.
- Choose a suitable length of the bracelet, cut off the excess and tie knots at the ends of the warp threads.
Bracelet made of threads with beads
For this accessory you will need about 120 cm of thread, beads or small beads, scissors and a button. The thread needs to be cut into pieces of 70 and 50 cm, the long one must be rolled up, and the short one must be bent. Then knit so that you get 3 ends of the same length (about 35 cm). Multi-colored bracelet with bead
 Original bauble
The buttonhole at the beginning of the weave should be the same size as the button.
- Let's start weaving baubles for beginners:
- We braid the threads with a regular pigtail about 3 cm.
- We put a bead on the left thread, press and cross the middle thread.
- We put the bead on the right thread and cross the middle one in the same way.
- We continue weaving in the same way, pressing the beads to make the bracelet tight.
- At the end, we again braid a section of braids free from beads, end with a knot.
- Put on the button and fix it with a double knot. Cut off the excess thread.
The bracelet is ready! You can experiment with the colors of beads, beads and the type of braids.
Fenichka made of floss and beads
Clasps for braided bracelets
When weaving traditional baubles from floss threads, special fasteners are usually not used. Bracelets, which have a symbolic meaning, are never removed from the hand, so they are simply tied in knots at the wrist, and the tails of the thread are cut off.
 Bracelet clasp
 Multicolor Bracelet with Knot Pigtail
 Tied bracelet without clasp
However, modern bracelets often act as jewelry that you want to change and wear with certain looks. It also happens that a person does not have the opportunity to wear such an accessory all the time. In these cases, it is necessary to make a comfortable fastener. There are quite a few options, although not all of them are practical.
Let's consider how to make fasteners in more detail:
- With a buttonhole and buttons. In order to get a loop at the beginning of work, you need to take threads twice as long as necessary, but in half the amount. The threads are folded in half, leaving a suitable loop width. For beauty and strength, the loop is tied with knots. The button is sewn from the opposite end of the bracelet.
- Another easy way to join the ends of a thread decoration is to sew a button to the ends.
- You can use Velcro in the same way.
- Sliding square knot clasp. For her, the ends of the bracelet are connected and knitted with another thread several square knots (their technique is described above). The most commonly woven "clasp" clasp is about 15 mm in length. Knots are tied at the ends of the main threads, you can also put small beads on them.
- The loop at the end of the weaving can be done with braids: first, we divide the threads into 2 parts and weave small braids, then we connect them together and weave a braid from all the threads. We do the same with the other end of the bracelet. We thread the pigtails into opposite loops and tie.
- You can connect the ends of the baubles with a metal buckle. In this case, on one side, the threads are attached to the buckle at the very beginning of weaving.
Making unique baubles from a floss with your hands is a fascinating creative hobby that is suitable even for those who have a little free time. Weaving can be done in any setting, delighting yourself and your loved ones with stylish bracelets.
How to make a loop on a bauble
Baubles are a unique piece of jewelry that will complement your look.
Fenichka is a symbolic decoration. Since ancient times, the bracelet was woven with one's own hand, as a gift to a loved one. Nowadays, symbolism has lost its position a little, but even today, in this way, many seek to express the depth of sincere feelings, to talk about strong friendship and love. Many people want to learn old handicrafts, but imagination and desire must be supported by basic skills. To do this, first of all, you need to learn to understand the meaning of the schemes of baubles made of floss, ribbons, cords and any other materials.
Weaving rules
The army of fans of hand-made products is growing every day. Someone likes to decorate themselves and their home, while someone wants to take part in the process itself. For baubles made of floss, weaving patterns are needed. Such guides for creating a unique pattern can be found on the Internet, in thematic magazines. Our site contains universal schemes of floss baubles, which can, if desired, be supplemented with your own combinations and elements. Each type of needlework has its own alphabet, having learned the secrets and secrets of exciting work, you can create whole collections of jewelry for yourself, your friends and loved ones.
Baubles will be a great gift for you and your friendsA beginner should learn a few simple rules:
- The choice of the theme of the pattern. Since ancient times, braided bracelets have symbolized friendship. In order to convey a deep thought without words, the theme of the pattern and the color scheme are chosen wisely. Yes, the sacredness of things today is largely lost, many people make bracelets or necklaces from threads rather for themselves, relying on taste and desires. But the pattern should not be chosen by chance. In part, it is determined by the experience of the craftswomen, the materials available, as well as the patterns of weaving baubles from floss.
 In addition to friendship between people, baubles symbolize the interests and preferences of a person.
- The choice of weaving method. Mastery comes with experience. But even at the first stages of acquaintance with art, it is worth knowing that braiding can be done in two ways, direct and oblique. It is not easy to master direct weaving, but having learned the basics of this technique, you can create original ornaments, fantasize endlessly, embodying any creative ideas. The technique of oblique weaving is simpler, even a child will cope with the work on the first try.
 Weaving in an oblique and straight way
Important:
The peculiarity of weaving baubles in an oblique way is the use of geometric ornaments with clear lines and shapes. The most popular patterns are stripes, herringbones, rhombuses.
 Weaving with a herringbone pattern
- The choice of threads. To create patterned jewelry, it is important to be able to choose the right material. The thread should be strong, with a smooth texture, evenly and richly colored in one tone. The aesthetic texture of the pattern depends on the quality of the threads. Fenkoplets with experience give preference to silky, pleasant to the touch, linen threads.
 The weaving of the pattern depends on the choice of threads.
Weaving baubles from floss has a lot of advantages. One of the main ones is the versatility, the fascination of the process. Interestingly, there are representatives of all age groups among the fans of craftsmanship, from a smart kid to an active old woman who has not lost her love for creativity over the years. When we create beautiful bracelets or necklaces, we don't just make jewelry. Each product contains the warmth of our soul, a particle of the heart and a powerful energy charge.
 Beautiful bracelets made of floss threads
We master the basics of needlework
For baubles, the schemes may be different.
 Various ideas for weaving baubles
The following drawings are popular:
- love theme;
- ancient secret symbols;
- company brands, emblems or logos;
- the creation of floral or animalistic patterns;
- beautiful "tartan";
- a bauble with a name or a commemorative inscription;
- musical theme;
- images of cartoon characters, anime or cinema.
 A great gift for your loved ones
Advice:
The choice of the scheme depends on who the bauble is intended for, taking into account the hobbies, aspirations and addictions of the person. To translate a drawing into reality, you need to learn how to read diagrams.
Weave a bauble with hearts
Each, without exception, has arrows that indicate the movement and alternation of threads. There are a number of numbers, where each means the ordinal number of the row, as well as the letter symbols that indicate the threads in the weaving. It is more convenient to use color schemes, where each thread in the figure is colored in its own color, and the arrows in the nodes indicate the correct alternation of combinations.
 Weaving pattern for beginners
For beginners, for convenience in work, you need to choose one of the methods for securing the threads:
- On the work surface. To do this, you can use any hardback book, on which we fix the threads on top with a clerical binder.
- On a tablet. You can purchase a tablet with a clip in a stationery store in advance, on which it is convenient to lay out the threads according to a previously selected pattern.
- On the pillow. On a decorative cushion, lay out the threads according to the pattern, fastening them with a pin at the top.
 Convenient way of securing threads
The whole process is based on the ability to knit the simplest double knots. Beginners should start their acquaintance with art using the oblique weaving method using two colors of floss. Having mastered the simplest combinations, you can proceed to more complex patterns and patterns.
Weaving baubles with an oblique method
Creating patterns in a straightforward way
Unlike the slanting method, where it is difficult to experiment, the direct weaving method is versatile.
 How to create original baubles with a straight pattern
Having mastered the technique of transitions, knitting knots, having learned how to read patterns, you can fantasize endlessly, creating jewelry according to unique patterns. Simple straight braid pattern:
 Straight weave pattern for beginners
- Let's prepare the threads of a floss, the length of each will be about 4 times longer than the product itself. It is always better to take the length with a margin. Fold the threads in half. Let's fix them in any of the ways suggested above.
- We start weaving. We make a loop at the top, separately tie the leading thread to the loop, this will be the beginning of weaving. The leading thread is different in color from the main components.
- We start braiding into a knot of the leading thread alternately with each component. We move along the rows, corresponding to the direction of the arrows, exactly repeating the pattern algorithm drawn in the diagram.
 We start working according to the direct weaving pattern
The process is based on alternately knitting double knots. Any weaving should be started by laying out the threads, using a ready-made scheme, or you can draw your own drawing. The difficulty lies in correctly determining the direction, order, highlighting the components for the background and pattern.
 Baubles are a symbol of strong friendship
Looking at the beautiful jewelry created by the hands of talented craftsmen, it is difficult to believe in yourself. In fact, weaving is much easier than in theory. Undoubtedly, for beginners, the process requires detailed study, so do not hesitate to use ready-made patterns by experienced craftsmen.
Weave baubles with straight weaving
Having comprehended the secrets and secrets of ancient handicrafts, you will plunge into work with your head, fantasizing, experimenting, creating your own patterns of patterns for baubles.
 Having mastered the technique of weaving baubles, learn how to create original bracelets effortlessly
The classic way of weaving "friendship bracelets" is weaving baubles from floss. For beginners, this is perhaps the easiest way, allowing by trial and error to find the basis, with the knowledge of which you can later create wicker items of incredible beauty. There is nothing difficult to weave from a floss, but you will need a lot of patience: an average bauble, one centimeter wide, weaves for at least an hour. And if such terms do not stop you, you can move on to the creative process.
In order to weave floss baubles you will need: 
- Cut 6 threads so that each is 120-140 cm long, divide them according to colors and carefully tie a knot.

- Fasten the bauble with a pin by the knot and separate the two extreme left threads - from them the oblique weaving begins.

- Put the left green thread from left to right on the right one and pass it inside the formed loop. Gently tighten the knot by pulling the right thread up.

- All knots must be double, otherwise the bauble will twist. Tie a second knot like this: this is what you should get. After tightening the knot, the thread with which you tied the second thread should remain on the right.

- Now tie the left yellow thread with the same thread and the same double knot. The green thread remains on the right again.

- Continue to braid the row with the same thread, and when the free threads run out, take a new left extreme thread and tie the next rows in the same way.

- For convenience, when forming a knot, you can fix the loosely hanging threads with your fingers, slightly pulling them.

- This is what a bauble with eight rows looks like.

- So, you have braided the bauble to the length you need. Now we need to fix it.

- Divide the threads into three parts and braid them into an ordinary pigtail. Fix the pigtail at the end with a knot and cut the remaining threads so that it is convenient for you. Do the same on the other side, having previously untied the fixing knot.

- Your first bauble is ready!


- Cut the threads to one length (about 100 cm), tie a knot and secure with electrical tape.

- With the leftmost thread, tie the next two threads in the same way as in the first weaving method.

- Now go to the far right thread. The knot here is the same as usual, except in a mirror image. Put the rightmost thread from right to left on the left one and draw it under the left into the formed loop. Tighten and make a double knot. In this case, the light thread that was on the edge will remain on the left after tightening the knot.

- Tie the second thread in a double knot in the same way.

- You have two light threads in the middle of the baubles. Tie the left thread with the right thread, as in paragraphs 3-4 - subsequently, all middle double knots will be tied with the right thread.

- Repeating the previous steps, weave the second row.
Fenichki are handmade bracelets made of leatherette, threads, beads, ribbons and other materials. Throughout the world, they are also known as "friendship bracelets", since they are usually exchanged with friends and generally made with love and care for your neighbor. Both girls and boys wear and weave them! The most popular are the bracelets made of floss threads, because they are the most versatile, and the process of creating them is as simple and understandable as possible for beginners. Therefore, today we will tell our readers how to weave baubles from thread - let's go!
What is needed for weaving baubles
In order to weave baubles from threads, you need special threads - floss. They are sold in almost any store with goods for needlework and sewing, they come in different colors, types, sizes - depending on the manufacturer. There are skeins 20 meters long at once, and there are skeins and smaller ones - 16, 10, 8 meters. Some floss are brighter, some are brighter and smoother, somewhere a richer palette of colors, some threads are found even in a multicolor, or gradient, when the color from one smoothly passes into another. Choose those floss threads that are more suitable for you in terms of quality, color and price.
If you just want to try to learn how to weave baubles, and not spend extra money on threads for a test bracelet, you can use other materials that you find at home: these can be ordinary threads folded in two or three times, woolen threads, iris threads "," Peony ", etc.
In addition to a set of threads, fenkos need something to fix the fennec on the surface while you weave it. There are several ways to do this:
- Attach the threads with tape to the table, and tie the upper part in a knot so that the threads do not pull out when weaving.
- You can also attach the free top end of the fennel to the book using a clip-on clip.
- Finally, you can tie a knot at the end and pin it to your own knee jeans if you are seated.

Weaving and types of knots
In total, there are two main types of weaving baubles from threads - these are oblique and straight.
Oblique- this is weaving, where the leading threads alternate one after another, braiding each other. But in the case of direct by weaving, there is only one leading thread, and it is she who braids the entire bauble, so it should be much longer than the others - sometimes a whole skein of thread is used for this. Look at the diagrams and photos below, and then the principle of oblique (1) and direct (2) weaving will become obvious:
1.
2.
What do these circles with arrows mean? These are the different types of knots used when weaving thread baubles. There are only four of them:
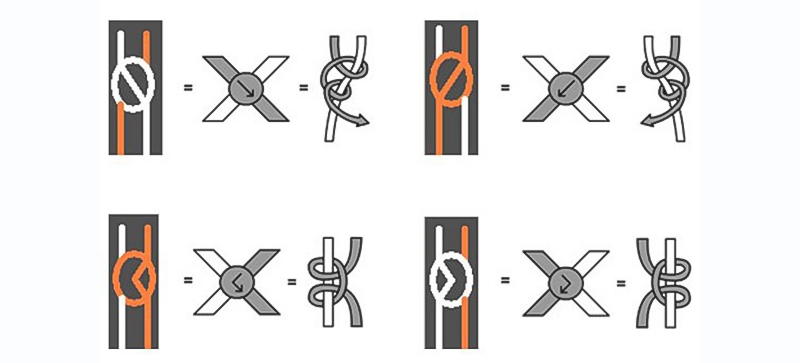
- Right / Right - hold the right thread with one hand and pull it. With the other hand, take the left thread and throw it on top of the right thread to form a loop. We pass it through this loop from below and tighten the knot. Remember that all knots in Phoenix weaving are double! Therefore, we repeat the same knot on the same threads. We tighten the first knot tighter, and the second can be made a little more loosened, so that the bauble will turn out to be more voluminous and beautiful. More details - on the diagram:

- Left / left - a knot, almost similar to the previous one, with the only difference that this time we pull the left thread, and with the right one we form our loop and pull the upper thread through it. We repeat the knot twice, see the picture:

- Tatting left / right-left sounds difficult, but in fact this knot is not much more difficult than the previous ones. Look at the diagram: since each knot, that is, each step in weaving a bauble, consists of two knots, the first knot repeats the "right" one, and the second, upper knot repeats the "left" one. Please note that this does not change the working thread! That is, we pull the right thread, form a loop from the left thread from above, pull it from below and tighten the knot. Next, we throw the same left thread to the right, forming a loop, directed by the end to the left, pull the thread from below into this loop and tighten the knot again, as if it goes to the left. Ready!

- Tatting left / left-right is similar to the previous knot, only now we make the first knot as in the left knot, and the second as in the right. Pull the left thread, pull the right thread through the loop formed by it and tighten; now throw the same thread to the left, form a loop and pull into it from below, as if repeating the knot to the right. Consider the diagram again:

That's all - these are the knots that will help you understand how to weave baubles from thread. When you look at the weaving patterns, you will see that there are baubles where only two knots alternate, and somewhere a third is added, or all four types are used at once. The main thing is to carefully follow the scheme: it happens that just one wrong knot significantly spoils the whole picture, so you should weave baubles from threads in a calm environment where you can concentrate - this is especially useful for beginners.
If you nevertheless confused the knot, or tightened it too tightly, you can loosen it or dissolve it completely with the help of an ordinary needle.
Thread baubles patterns: the simplest bracelet
Let's try to weave the simplest bauble called “Candy Stripe”. It is made by oblique weaving, which is considered easier than straight, while it looks very cute and pretty. You can weave it both as a solid bauble, and as a striped one, using different colors. It will be possible to weave it even from 4 threads, but in this case it will turn out to be very thin, therefore it is much better to weave from 6, and even better - from 8-10 threads.

We will consider the 6-strand option. This bauble is suitable for beginners in that it uses only one type of knot - "left"! A great way to practice it, isn't it? Look at the diagram:

We will be guided by the colors of their given scheme, but you have every right to replace them with your favorite ones. So, we take 6 strands of red, black and white, 2 for each color. The length of each thread should be approximately 70 cm. We suggest measuring this length with a ruler or centimeter for one thread, and then aligning the rest with it 5. You can also take one end of the thread in your left hand, pull it completely to the side and stretch the other end to the right shoulder. This distance is approximately 1 m. This means that you need to measure a little less for 70 cm.

And here are some more beautiful and simple baubles for beginners that you should definitely learn to weave:

After our article, you should not have any problems with how to decipher the patterns of weaving baubles, because we have learned all types of knots! Just learn how this or that knot is woven, which arrow corresponds to it, and start weaving them one by one, as shown in the picture for your current baubles. If you still have questions, feel free to leave them in the comments. In the meantime, we suggest you see how to weave baubles with direct weaving - the video is very detailed and understandable:
We wish you success in fenko weaving!
Baubles, or, as they are also called, friendship bracelets came into the world at the suggestion of hippies. Children of flowers put a global meaning in their baubles - in addition to the idea “all people are brothers” and its confirmation with these bracelets by the color of the baubles, one could learn about a person, if not everything, then a lot. For example, the combination of yellow, orange and blue colors told that a person is keen on esotericism and spiritual development. However, gradually the sacred meaning of the baubles disappeared, and they became a simple decoration for the "free in spirit" people.
Weaving baubles is not only fun, but also useful: working with your hands, plus the ability to create and create, plus repetitive actions - all this not only improves mood, but also helps to relax and move away from everyday activities. For beginners, this effect is possible when weaving simple baubles with multiple repetitions of actions. To weave your first bauble you will need:
- 7 threads (floss or iris, 100-120cm each);
- scissors;
- duct tape, tape or safety pin.

- Arrange the threads in the order in which the colors will go. It is best to take contrasting bright threads - all the knots will be clearly visible on them. Tie an ordinary knot and secure the bauble with duct tape (on hard surfaces), tape (keep in mind that it can stick to and tear threads), or safety pins (good for outdoor conditions).

- Take the two leftmost strands and place the leftmost red thread on the right light thread from left to right.

- Pass the end of the thread from bottom to top into the loop formed. Tighten the knot by pulling the red thread up.

- The knot should be double, that is, you need to tie it on the same thread twice. The red thread after tying should be on the right.

- Tie the second red thread with a red thread in the same way as in the first paragraphs. In a row, these will be the second and third threads from the left. In the same way, continue to tie this thread around the entire row - in the end, it will be on the far right.

- So, the red thread turned out to be on the right, we go back to the left edge. Take the two strands on the far left again. Now on the left is a light thread - and she needs to tie the second row. Put the light thread on top of the red thread from left to right, and thread it through the loop from bottom to top.

- Tighten the knot by pulling on the light-colored thread. In the first photo there is an ordinary knot, in the second - a double one. Feel the difference: after tying the second knot, the thread is automatically on the right.

- Braid the row with a light thread and leave it to the right.

- By analogy, continue to weave the bauble until its length is equal to the length of the wrist, or about 17-20 cm.

- When the bauble reaches the desired length, braid the remaining braids from the bottom and secure with a knot. Do the same on the other side, having previously untied the fixing knot.

- Trim off excess ends. You can admire your creation!
