How to make a beautiful hairstyle quickly and easily. French braid headband. Fast styling "Aurora"
Owners of long hair know how to make different hairstyles with their own hands for any occasion. And if you want variety and inspiration, you can learn how to create a few more hairstyles by following the step-by-step instructions.
A low ponytail is a simple hairstyle that you can quickly create with your own hands. It looks great on long hair and, thanks to its elegance and practicality, is useful for all occasions.

Performance:
- Treat the hair with a styling agent and iron it.
- In front, part of the hair is isolated from the total mass.
- Collect the rest of the hair with an elastic band at the back.
- The separated strand of hair is divided into two parts so that the parting is on the side.
- Close the elastic on the ponytail with the front strands in a crisscross pattern.
Low tail with flagella
This hairstyle will be appropriate both at work and for an evening trip to an event.

Performance:
- On one side of the head at the bottom, you need to select a strand of hair and divide it in half.
- Then the halves are twisted together, while gradually adding new strands to the main bundle.
- Having brought the tourniquet to the opposite side, make a tail out of hair and decorate with a ribbon or hairpin.
- For those who do not want to add ribbons and decorations to their hair, you can elegantly hide the elastic with a strand of hair.
High pigtail ponytail
Very light hairstyle for long straight hair.

You can do it yourself in a matter of seconds, using only a couple of rubber bands and invisibility:
- Well-combed hair is pulled into a high ponytail.
- In the inner part of the tail, a strand is separated and braided into a thin braid.
- Wrap the elastic band holding the ponytail in a pigtail.
- They are fixed with invisibility.
Greek tail
Owners of long, thick hair can try to make a beautiful Greek tail. It is necessary to first wind the curls along the entire length, collect them on the top of the head and into a long tail that falls onto the back, then decorate it by pulling it along the entire length with a ribbon or beads. You will get a classic Greek hairstyle for a special occasion.

There is another, more mundane version of the Greek tail that can be worn to work:
- The hair is parted in half.
- Weakly braid two braids, starting from the temples.
- Tie the braids together at the neck.
- A strand of hair is wrapped around an elastic band.
- Relax the braids by pulling out a few strands.
- Combing the ponytail lightly for volume.
Voluminous ponytail
If you are going to a party or club, you can put your hair into a stylish ponytail in 5 minutes.

To do this, you need a comb, elastic band and 3-4 hairpins:
- Comb the hair well along the entire length.
- Throwing their head back, they collect a high tail.
- To add volume, you need to pull out the hair from the face a little, the temples remain smoothly combed.
- The next step is to hide an elastic band under a thin lock of hair.
- Brush the tail lightly from the inside to add fluffiness and comb well from above.
- Sprinkle with a small amount of varnish.
- To give the ponytail more volume, you can insert 3 hairpins into the base of the ponytail from the inside.
To help the studs hold better, they can be sprayed with varnish before use.
Twisted tail
A hairstyle for long hair, which you can do with your own hands in just a couple of minutes. Despite its simplicity, this styling is perfect not only for weekdays, but also for a special occasion. You can use the whole mass of hair, or individual strands.

Option 1:
- Gather a low tail at the middle of the neck; hair should not be pulled tight.
- They are fixed with a thin inconspicuous elastic band.
- The hair above the elastic is split in half by making a hole above the elastic.
- A tail is passed through it.
- Pull up the elastic and hide it under the hair.
- Slightly loosen the hair above the elastic to add volume.
Option 2:
- To begin with, two small strands are distinguished at the temporal part of the head.
- Fasten them together with an elastic band at the back of the head and twist the tail, passing it through the hole above the elastic.
- New strands are separated on both sides of the head, lower than the first.
- Having fastened them, they turn them out in the same manner as the first ones.
- At the bottom of the head, collect all the remaining hair in a low ponytail and twist it, like the previous ones.
- If you hide the elastic bands with flowers or decorative hairpins, then the daytime office version of the hairstyle is transformed into an evening styling.
French braid
The French braid has not lost its relevance for many years. This styling looks aristocratic and playful at the same time and lasts quite a long time. You can make such a pigtail on both thick hair and sparse ones.

Performance:
- Well combed hair is slicked back. Fine hair should be combed at the roots for volume.
- Separate the upper strand above the forehead and fasten it with an elastic band at the back of the head.
- Parts of the hair of the same size are selected from both sides and begin to braid.
- Alternately, a new strand is captured from each side and woven into the braid.
- Continue to repeat this manipulation with the strands to the end of the head.
- When all the hair on both sides is braided into the braid, continue to weave in the traditional way.
- The end is secured with an elastic band.
- If you wish, you can slightly loosen the pigtail by stretching its tiers with your hands.
- To prevent unruly hairs from knocking out of the pigtail, they should be fixed with a small amount of varnish.
French braid headband
Using the skill of French weaving, you can make a beautiful headband with a little dexterity and patience:
- It is necessary to comb the hair back and in an even parting "from ear to ear" select part of the hair near the face in a wide strip;
- Loose hair is pinned so as not to interfere.
- The selected part of the hair is split into two equal parts with a horizontal parting.
- Weaving should begin at one ear, gradually moving to the opposite.
- The back of the selected strand is the main one when weaving, and from the front, uniform strands are gradually woven into the braid.
- Having reached the other side of the head, the pigtail is continued in the usual way and the tip is fixed by hiding it under the hair.

You can braid a pigtail with classic weaving or inverted.
Dutch braid
A French braid can be braided the other way around - this weaving is called Dutch or purl.
To do this, the strands are crossed not over the middle strand, but under it. The pigtail is turned inside out. Before crossing, you need to gradually add side loose hair to the outer strands. Continue braiding until all of the hair is braided.

Do not forget to wind the strands while weaving under the bottom. When the braid is ready, loosen the strands. It looks very elegant and significantly increases the visual volume of the hair.
Braid "Fishtail"
At first glance, fishtail braiding looks complicated, but in fact it is the simplest braid, which is braided from just two strands. With your own hands, it is very easy to braid this adorable pigtail on long, even hair. This braiding style is also used in sophisticated evening hairstyles.

If your hair is unmanageable, it is better to pre-wet it a little with a special hair tonic, or just water. This will make your hair easier to style and less electrifying.
The braid is braided as follows:
- The hair is split in half.
- From the outer edge of the right part of the hair, a thin strand is isolated and transferred to the middle part of the left half of the hair.
- The leftmost strand is attached to the middle of the right side of the hair.
- Weaving is continued, shifting the extreme thin strands from the sides to the middle. The thinner the strand, the more beautiful the final result will look, but it will take more time.
- At the end of the pigtails, a decorative elastic is fixed, the braid is straightened with hands, stretching the strands and increasing the width of the weaving.
Braid twist
To create such an unusual braid, you first need to pay a little attention to the root volume of the hair: apply styling mousse to the roots of washed and slightly dried hair and dry the hair until completely dry. If you braid your hair that is not dry, the braid will lose its volume.

The twist braid is suitable for all hair types.
Performance:
- A side parting is done and all the curls are thrown onto one shoulder (opposite from the parting).
- At the base of the parting, a strand of hair is isolated and divided in half. It turns out two halves: one closer to the face (front strand), the second further (back strand).
- Turning the front strand slightly counterclockwise, throw it over the back. Now the strands are reversed.
- Add some loose hair to the front strand, scrolling counterclockwise, and throw it over the back. The strands were reversed again. Continue to add loose hair to the strand before each twist, this action gradually thickens the braid. Continue weaving until all the curls are involved in the braid - you get two strands.
- They continue to weave a braid, twisting two strands together. A transparent elastic is wound at the end.
- Finally, use your fingertips to gently fluff the hair at the roots to add volume and relax the braid, gently pulling up the braided strands. Spray your hair with varnish lightly so that it lasts longer.
Four-strand braid with ribbon
Weaving a braid of four strands is not only popular, but also very beautiful, and decorated with a beautiful ribbon is also very elegant. It takes a bit of practice to braid a four-strand braid, but there is nothing complicated about this hairstyle.

The main thing is to stick to a simple scheme:
- As with the French braid, you need to separate a strand of hair and tie a ribbon under that strand at the hair roots.
- Then the selected strand is divided into 3 equal parts plus a ribbon (the ribbon plays the role of a quadruple strand).
- For convenience, you can number the strands from left to right: No. 1, No. 2, insert the ribbon strand under No. 3 and No. 4 - the rightmost strand.
- Strand # 1 needs to be slung over strand # 2 and under strand # 3 (ribbon) and over strand # 4; then No. 4 is thrown over No. 3 and under No. 2.
- Each time, loose curls are added to the extreme strand on each side until all the hair is involved in weaving.
- The end is fastened with a tape and left or hidden, stabbed under the braid.
- The strands above and below the ribbon are given volume by pulling them slightly.
Braid "Chinese stairs"
A new trend - the Chinese braid, although it seems to be a rather difficult job, in reality everything is very simple. To avoid tangling the hair, it is better to do the hairstyle on slightly damp hair. 
Performance:
- Collect hair in a ponytail (high or low, depending on the desire).
- On the right side of the tail, a thin strand is distinguished. They make a loop out of it, tie it around the tail, thread the end into a loop and tighten it (resembles tying shoelaces).
- Another thin strand from the tail is added to the selected strand.
- They make a loop again, tying it around the hair, thread the end into the middle of the loop and tighten.
- Continue in the same way until the end.
Braid crown
There are many variations of the braid crown hairstyle that are pretty simple to do with your own hands. The result will be different if you experiment with different types of weaving and accessories. Styling is suitable for both long and not very long curls.

A step-by-step analysis of the classic hair crown:
- Divide the hair with a parting in the middle into two parts.
- You need to start braiding from the back of the head, gradually moving towards the front. You should get two pigtails that hang forward.
- They put one pigtail on the head and secure with hairpins or invisible ones.
- The same is done with the other braid.
- Release a couple of thin strands around the face.
Spit-waterfall
The spit-waterfall gives the image tenderness and romance. Freely falling flowing curls resemble the jets of a waterfall, which is where the name comes from.

This braid looks great on wavy hair, but works great on smooth hair too.
Performance:
- A small strand is separated at the temple and a simple braid begins to braid.
- First, the top strand is shifted to the middle.
- Then the lower strand is moved to the center.
- Repeat the previous two steps one more time.
- Further, the strand that turned out to be below remains free. Instead, you need to select a new strand from the bottom of the free hair. In the future, this new strand will already participate in weaving.
- A thin strand of loose hair is attached to the strand that turned out to be at the top, as is done in French weaving, and shifted to the middle.
- Further, a new strand from below takes the place of the central one.
- All the above manipulations are repeated: leave the lower strand free, replacing it with a new one.
- Continue braiding like this, leaving the bottom one each time, replacing it with a new one and adding to the top loose hair.
- Repeating all the described actions in turn, continue weaving around the head.
- Having brought the weaving to the opposite side, fix it with an inconspicuous elastic band and hide it under the hair or continue the braid to the end.
Styling with tape in the style of Brigitte Bardot
Retro hairstyles have already become classics, indispensable for a festive event. One of these hairstyles is considered to be a hairstyle in the style of the famous actress of the 60s Brigitte Bardot.

Performance:
- Separate the upper part of the hair, lifting it up, make a bouffant from the inside and spray it with varnish.
- Collect the hair at the back of the head, grabbing the temporal strands. It is not necessary to tighten with an elastic band so as not to spoil the volume.
- Tie a ribbon on top and fasten it again with varnish.
Low elegant bun
Hair styled in an elegant, neat bun will always look flawless in the office and at a festive event. Such a bundle is suitable for women of different ages and does not depend on the thickness of the hair, and the use of various accessories, plaits, braids can turn the everyday usual version of the hairstyle into an aristocratic evening styling.

To create an elegant bun, you need to stock up on a pair of elastic bands, hairpins and a "bagel" for hair made of foam (thick elastic will do).
Performance:
- It is better to treat wavy hair with an iron in advance.
- Then, with the help of a special comb with a thin long end, small strands on the sides are separated and removed so that they do not interfere.
- A low tail is made from the remaining hair.
- Above the elastic that holds the tail, attach a foam "bagel" or thick elastic, piercing the sides with pins.
- Raise the tail up and fasten it with a thin elastic band above the attached "donut".
- Tuck the remaining ends under the foam bagel and fix with hairpins.
- Spread the hair evenly to completely hide the bagel.
- The front free curls are laid over the bundle, hiding the ends and securing them with invisible ones.
- Using decorative hairpins with flowers or pearls will turn your hairstyle into a stylish evening style.
A bun on the top of the head with loose hair
Loose hair with a carelessly gathered bun on the top of the head is a romantic and at the same time slightly hooligan image - a peak in a youth, and not only, style.

Ideal for any hair of various lengths and is done in a few seconds:
- A third of the hair on the crown is separated from the total mass.
- A tourniquet is twisted from them.
- Fold the tourniquet in a ring or bundle.
- Secure with an elastic band that matches the hair color.
- For reliability, add a couple of studs.
Twisted bun of braids in the form of a flower
Usually the bun is made on the basis of the tail, but you can make a beautiful unusual bun from braids:
- The hair is divided into 3 parts: the side two are smaller, the middle part is larger;
- braids three braids.
- A bundle is twisted from the middle braid and fastened with hairpins.
- The side braids are laid around the bundle: one wrapping the bundle from above, and the other from below.

Bunch in the form of a bow
The bow from the bun looks cute and perky in a youthful way.

Its creation does not take much time:
- You need to collect a high tail and, turning the last turn of the elastic, make a loop, leaving 10 cm free from the ends in front.
- Divide the resulting loop into two halves and distribute to the sides.
- The loose ends left in front are led back through the middle of the bow and hidden under it, stabbed with invisible ones.
A bunch of curls
One of the more popular prom or wedding hairstyles is the romantic low bun made from curls.

Performance:
- Divide the hair into two parts at the face and highlight the third - the back part (it is slightly larger than the front).
- A ponytail is made from the back of the hair.
- Curl large curls with a curling iron or iron.
- From the curls, tucked into the tail, they form a sloppy bun and fix it.
- The curls left on the face are attached to the bundle in thin strands in stages.
- The hairstyle is fastened with varnish so that it does not bloom longer.
Bubble bundle
Easy quick hairstyle, suitable for study, home, walking.

All you need is a hair tie:
- Comb the curls and collect the tail so that the ends of the hair remain under the elastic.
- Secure the ends with a hairpin or hairpin so that they do not stick out.
- The elastic can be hidden with a thin pigtail or a hair cord.
Greek with a bandage
There are several options for styling hair in the Greek style. This will require a decorative bandage - an elastic band.
Option 1: hair is curled into flagella and placed under an elastic band.
Option 2: part of the hair is laid under an elastic band, and a tail of curls remains behind.

Option 3: the front curls fit under the bandage, the hair at the back is braided.
Gatsby style
Styling in this style was at the height of fashion in the first half of the twentieth century and today again covered the world of modern hairstyles with a retro wave. Due to the variety of options, hair length does not play any role for creating such a hairstyle. The main thing is the absence of bangs. For home styling, you will need an iron, hair clips and hairspray.

Performance:
- Comb the hair and spray with varnish.
- Separate a strand of hair and grab it with an iron at the roots so that an upward arc is formed in the form of a letter C.
- Move the iron down along the strand and bend it in an arc in the opposite direction.
- They continue to curl in semicircular arcs, alternately bending up and down along the entire length of the strand.
- They fix the formed waves with clips for convenient work.
- At the end, spray the waves with varnish and remove the clamps.
Classic shell
Easy comfortable hairstyle for long hair, which is not difficult to build with your own hands:
- Flip hair to one side.
- Twist the curls on the side into a shell.
- Transfer to the other side and secure.

Lush shell without bangs
This styling differs from the classic shell in a more lush volume and looks more solemn, evening:
- To add volume, you need to throw the hair at the forehead forward and lightly comb.
- Then the combed strand is laid back and attached with invisibility on the back of the head.
- Free curls are twisted into a shell on the side and, shifting to the other side of the head, are stabbed with hairpins.

Collected crisscross hairstyle
Stylish and fun hairstyle for office everyday life.

Performance:
- Hair is divided into 2 zones: front and back.
- The front part needs to be stabbed so as not to interfere.
- A tail is collected from the back of the hair and wrapped in a bun.
- The hair left in the front zone is divided into two parts with a side parting or straight - as it suits best.
- The facial strands are crossed over the bundle and wrapped around it, hiding the ends.
Retro hairstyle with voluminous bangs
Lovers of voluminous bangs can try a retro hairstyle in the style of "Babette", which has not lost its relevance in the modern world.

Performance:
- You need to tie your hair into a high ponytail.
- Then a hair roller or donut is attached under the elastic.
- The ends of the hair are removed under the roller, forming a bun.
- Hair is evenly straightened.
- The bundle is decorated with a ribbon, rim or comb.
Hippie weave
The hippie movement has given the world cute natural hairstyles that do not need much styling, decorated with flowers and colored ribbons.

Any kind of weaving is welcome:
- Two loosely braided braids, with loose strands and decorated with bright ribbons.
- Two fine pigtails braided from the front strands and tied together at the back of the head over loose hair.
Fast curls
You can quickly wind the curls at home, using mousse, foam or varnish, so that the result is pleasing for a longer time, use a curling iron, iron or a simple hair dryer.
Using a curling iron
Performance:
- Gather all the hair on top of the head in a ponytail.
- Divide the tail into 4-8 parts (the amount depends on the thickness of the hair).
- Each part is screwed onto the curling iron.
- Remove the elastic and straighten the curls.
- Fix the styling.

With an iron
Performance:
- Apply mousse to clean hair.
- Twist a tight tourniquet out of a 2 or 2.5 cm thick strand of hair.
- Run the iron over the twisted tourniquet.

With a hair dryer
Performance:
- Brush slightly damp hair.
- Divide the hair into 6-8 parts.
- Twist a tight tourniquet from each part and roll it into a bundle.
- Dry each bunch well with a hairdryer.
- When the hair is cool, loosen the curls.

Making an original hairstyle for long hair with your own hands is quite simple. You just need a desire to look new every day, a little time and skill. And a boring stylish look will delight and cheer up not only the owner of fashionable styling, but also delight others.
Do-it-yourself hairstyle for long hair: video
Quick hairstyles for long hair, see the video:
Do-it-yourself evening hairstyle for long hair, see the video clip:
How to style long hair quickly and easily? What hairstyle to choose for home and for a gala evening?
With a little practice, you can style your long hair neatly and stylishly without the hassle. Most hairstyles can be done in 10-20 minutes. Many styling, if necessary, can be easily turned into evening.
Popular hairstyles for long hair

In your free time, style your curls in different ways, see how it is more convenient to walk at home, what image is suitable for the holiday. You should always have an interesting styling option in 15 minutes "for all occasions."

Learn to do hairstyles that harm your hair less. An ideal look for the home does not require constant use of hot styling devices, a large amount of styling compounds.
Ponytail
Suitable hairstyle for home, office or special occasions. The tail is easy to transform.
The twisted tail looks original.

An interesting option is that the elastic is wrapped in a narrow strand.

For a holiday, curl strands, collect a fashionable sloppy ponytail or tuck part of the length, covering the joint with a strip of hair.

Stylish tails are preferred by many stars for special occasions.

Come to the rescue:
- original accessories;
- banners from ribbons and rubber bands;
- bouffant;
- different heights and volumes.
Advice! Give rest to your hair, make a low ponytail at home. To prevent the hairstyle from looking boring, decorate the elastic with a beautiful bow, satin ribbon, and a cute hair clip. Twist two plaits from the temples or braid two thin pigtails, collect with the rest of the strands in the back of the head.
Tail braid

A simple styling option for everyday life easily turns into an elegant hairstyle. Add bright ribbons, delicate flowers, and you can go to the celebration.

Step-by-step instruction:
- wash the strands, dry, comb thoroughly;
- collect a high tail, secure with an elastic band;
- divide your hair into three sections, braid it as usual. If you know how to weave more complex braids, create an original "fishtail";
- fasten the bottom with an elastic band to match the hair;
- for evening hairstyle, lightly comb the entire length, add volume, braid a soft braid;
- weave a satin ribbon with one of the strands or attach medium-sized flowers to the finished braid to match the dress.
Advice! For home, create an African version: braid their tail 6-8 braids. Decorate the ends with bright elastic bands. A cute look will cheer you up.
Original bundle

This styling is appropriate for a dinner party, going to the office or a wedding with a girlfriend. A bun is a suitable option for a home hairstyle.

With a little practice, you will spend only 15-20 minutes on creating the image. A simple bunch can be done in 10 minutes.

Pay attention to the photo. The design is smoother and more voluminous. The decor from the side braid, thin bundles or pigtails around the bundle looks great.


How to proceed:
- comb clean curls well, collect strands;
- the basis of the styling is the tail on the back of the head or crown, the evening version is the side tail.
You can create a bundle in different ways:
- braid several braids from the tail, wrap it around the elastic in turn. Fix each turn with pins;
- divide the strands into two parts, twist each with a tourniquet, wrap around the elastic, secure with hairpins;
- home option - twist one tourniquet from the curls, also twist around the attachment point. Fix the structure with invisible pins and pins;
- if you have a foam bagel, you can make a smoother or more fluffy bun for 10 minutes. The convenient attachment makes it much easier to create the perfect design.
Advice! The evening version is easy to create by decorating the bunch with original hairpins with pearls at the ends, silk or satin ribbons, several medium-sized buds or one luxurious flower.
Side braid

With this hairstyle you will look stylish at home and at any reception. The original styling is easy to do: a couple of workouts - and in a quarter of an hour the luxurious braid will be ready.

For a special occasion, make the braid more voluminous, emphasize the beauty of weaving, decorate with ribbons, flowers. Lightly comb the curls at the roots and along the entire length for volume.

See how different the images are. A fishtail and a classic braid, voluminous strands and smoother ones - all options look stylish, not boring.


Girls who have mastered several weaving techniques can create a masterpiece on their curls without the help of a stylist. Festive styling will take a little longer, but the results will be worth it.
Unusual hair bow

An unusual hairstyle is appropriate in any situation. Hair bows can be strict and playful, smoother and more voluminous, cute and elegant. The technique is simple, and the effect is fantastic.
If the curls are very long, leave the bottom of your hair loose. The hairstyle will be gentle, feminine. It is difficult to create a bow for fully matched hair from long strands - take this nuance into account.

Step by step:
- think about where the bow will be located. With a narrow, thin face, give up the decor on the crown;
- gather clean curls, make a bun with an unstretched tail;
- divide your hair into two equal parts, stretch to the sides;
- you will get the "wings" of an unusual bow;
- gently tuck the strip of hair peeking out from under the elastic, close the mount;
- fix the structure with pins, adjust the bow's "wings";
- if desired, decorate the lintel with original pins or small flowers;
- be sure to fix the bow for evening hairstyle with strong varnish.
Long curls to one side

This option is suitable for any setting, except an office with strict regulations. Perfect styling for girls who never part with a romantic look.


Procedure:
- wash your hair, dry the strands;
- create curls with a curling iron or curlers;
- comb the entire mass of hair to one side, twist the upper part in the back of the head with a tourniquet, fix it with several invisible ones;
- style your curls beautifully. Sprinkle the festive styling with varnish, fix the decor - flowers, hairpins, an original hairpin.
Note! In the morning you can please your home with cute curls, after dinner you can change a little, but not lose attractiveness. From curled strands gathered to one side, you will braid a lush side braid in 5 minutes.
Classic malvinka

Great hairstyle for the home. What a malvinka looks like, everyone probably knows:
- in front, the strands are picked up, do not interfere with doing business;
- pigtails or plaits are created from the side strands, wound back;
- loose hair remains behind.
Advice! On the weekend, do not curl the strands, let them take a break from the curling iron and styling compounds.

Braid a soft braid from the hair up to the waist and below: this way the curls will not get tangled. Decorate the malvinka with a satin ribbon or a bright elastic band, an original hair clip - at home you can afford it.
For a festive, more voluminous version, pick up the front strands, secure with a hair clip or an elastic band, close the junction with a beautiful flower. Create luxurious Hollywood curls with the innovative Babyliss Pro styler or Magic Leverage curlers.
Weaving - bezel

Depending on the weaving technique, this styling can be casual or festive. The braid-rim looks great, does not fray until the end of the day.

An interesting hairstyle suitable for any type of face. Owners of a round and square face should slightly raise the rim of the braid closer to the crown - this way the oval will visually stretch.

For home, braid a regular spikelet, pick up the front strands in a circle. The styling will be smooth enough. Ponytail the rest of your hair, or braid a couple more parallel headbands at the back.
For a holiday, use the French weaving technique. After completing the work, give the braid a splendor - slightly stretch the "links" in the horizontal direction. This technique allows you to create a beautiful, voluminous braid even from thin strands.
Legendary shell

A simple, comfortable hairstyle is suitable for the weekend and attending festive events. The original styling does not take much time.

For a home, a more modest option is suitable; for a holiday, create a perfectly smooth shell or hairstyle for curled curls. Either way, you will be irresistible.

Step-by-step instruction:
- wash your hair, dry the strands, curl curls for celebration, retreating from the roots 10-15 cm;
- gather the strands in a tail at the back, take them to the left;
- slowly twist the roller to the right, tuck the knocked out ends, hide inside the banana;
- adjust the roller, if necessary, stretch it slightly;
- smooth out the strands or, conversely, release a couple of curls, depending on your look;
- fasten the structure with pins, invisible.
Advice! Sprinkle the evening version with strong varnish, decorate with flowers, a beautiful bow or hairpins with beads at the ends. Make sure the accessories match the dress.
Choose any of the options, experiment, create styling for long hair for the weekend and the holiday. Agree, it's not so difficult to make an original hairstyle for yourself. A little patience, a desire to be beautiful, some free time, suitable accessories - that's all you need to create a spectacular look.
Beautiful hairstyle for yourself: video
An interesting step-by-step version of the hairstyle for herself from two braids:
Part the top of your hair and create a low ponytail. Twist the strands remaining on the sides with bundles and secure them with invisible ones: left - on the right side, right - on the left.
With this hairstyle, you can go to work and study, and if you insert flowers or decorative hairpins between the bundles, then to a social event.
 bloglovin.com
 - Style: everyday.
- Tools: rubber bands.
Pull your hair into a high ponytail. Divide it into three parts and weave a braid, wrapping the bottom strand around the center strand and securing each turn with an elastic band. The elastic strand should always be in the center.
Pull the strands out slightly to create a voluminous braid. Fix with varnish if necessary.
 smashingoutfits.com
 - Style: everyday.
- Tools: rubber bands.
Divide your hair in two. Make a low ponytail and secure it with an elastic band. Comb the top of your hair lightly at the roots. Make a high ponytail and cover the bottom with it.
 kassinka.com
 - Style: everyday.
- Tools: rubber bands.
Separate the side strands on the right and left and connect them with the elastic at the back of the head. Then pass one more side strand through them on each side as shown in the photo. You will get the top of the heart.
Fasten the ends of these strands with an existing ponytail with an elastic band. The heart is ready.
The hairstyle looks romantic - a great solution for a date.
 elle.de
 - Style: everyday.
- Tools: rubber.
Part it vertically by dividing your hair in two. Start braiding under the chin, gradually adding larger and larger strands. When you get to the end, secure the braid with an elastic band. Now do a little trick: take the braid by the tip and throw it over your head to the back of your head.
Such a hairstyle will easily pass the office dress code, and after working with it, you can rush to the concert.
thebeautydepartment.com- Style: everyday.
- Tools: transparent elastic band, hair mousse.
Comb your hair to the side and part it as shown in the picture. To make your hair more manageable, brush it with mousse.
Tie two knots from the selected strands, fasten the ends with an elastic band. Tighten the resulting knots and hide the elastic inside them. Fluff the remaining tail slightly.
 more.com
 - Style: everyday.
- Tools: elastic bands, hairpin or invisibility.
Separate and tie the top of your hair. Secure with an elastic band. Divide the ponytail into two sections. Twist them into tight bundles and twist them together. Fix the tip with an elastic band. Fold the resulting braid in a spiral around the base of the tail and secure with a hairpin or invisible.
 blogpeinadossencillos.com
 - Style: casual, festive.
- Tools: elastic band, hairpins, hair clip for decoration.
Make a low ponytail. Slip your hand under it and use your fingers to poke a hole in your hair. Turn the tail into this hole - this will hide the elastic. Comb the rest of the tail, roll it up with a snail and fix it with hairpins.
You can leave the hairstyle in this form, and then it will be an everyday option, or decorate with a hairpin to add festivity.
ciaobellabody.com- Style: festive.
- Tools: hair clip, elastic band, invisible.
Take strands on the left and right and connect them with an elastic band at the back of the head, but do not pull the hair completely. Divide the resulting bundle into two equal parts: fix the left one for a while with a clip, carefully attach the right one invisibly to the strand that forms the tail. Do the same with the left side. Take a strand from the center of the ponytail and wrap the resulting bow with it to hide the elastic.
 cosmopolitan.com
 - Style: festive.
- Tools: hairpins, invisibility, comb with a sharp handle.
Make an asymmetrical vertical parting. Separate the strand at the forehead and, twisting it onto a comb with a sharp handle, secure the curl with hairpins. To prevent the resulting wave from breaking up, additionally fix it with invisibility. Comb your hair - and off you go to the party.
 irrelephantblog.com
 - Style: casual, festive.
- Tools: hairpins or invisible.
Brush lightly along the entire length of your hair. Then comb them a little with your fingers. Gather your hair in your hand, pull it out and, starting from the ends, roll it up with a snail. Having reached the head, secure the bundle with hairpins and invisible hairpins.
If some strands have broken out of the snail, it's okay. This one should look a little sloppy.
 welke.nl
 - Style: everyday.
- Tools: elastic bands, hairpins.
Make two tall tails. Divide each of them into two strands and braid the braids. Wrap the braids around each other and secure with hairpins.
You will get a beautiful volumetric bundle resembling a basket. The hairstyle is great for work, study and just walking.
 charissecbeauty.wordpress.com
 - Style: festive.
- Tools: elastic band, hairpins.
Make a tail on the side. After securing with an elastic band, lightly comb it. Twist the fluffy ponytail slightly and wrap it in a spiral around the elastic. Secure the bundle with hairpins.
 himisspuff.com
 - Style: casual, festive.
- Tools: elastic bands, hairpins.
Part it vertically by dividing your hair in two. Braid each of them into a French braid, moving from the back of the head to the face. Fix the ends with elastic bands. Raise the resulting braids up, lay them around the head and secure them at the back of the head with hairpins.
In combination with a business suit with such a hairstyle, you can safely go to negotiations, and with a cocktail dress - to a party.
 yetanotherbeautysite.com
 - Style: casual, festive.
- Tools: bezel, hairpins.
Put the headband on top of your head so that the curls hang out from under it. Wrap the side and back strands around the rim - you should get a voluminous low. If necessary, additionally secure it with pins.
If you decorate such a bun with artificial flowers, you get a hairstyle for a prom or a wedding.
On hot summer days, when the air temperature goes off scale far below 30 C, you want to spend a minimum of time fiddling around the mirror, braiding complex braids and stabbing strands that reach into your eyes with numerous hairpins. Such manipulations are optional, making a very beautiful and light hairstyle for yourself is a fairly simple task, you need to arm yourself with a comb, a pair of elastic bands and, of course, inspiration. With such an arsenal of materials, the dumb question “how to make a beautiful hairstyle for yourself” can be solved almost independently.
A bun is a timeless hit of summer hairstyles, a convenient option for the beach when you don't want the curls to stick massively to the back and neck. The process of recreating this kind of styling is a sign of everyone: tie a high ponytail, slightly curling the strands to increase the total volume, nimbly twist around its axis and secure with an elastic band. Just a couple of seconds and a minimum of nimble hand movements, but this hairstyle seems too simple, banal.

Fast in 5 minutes
How to diversify such a simple bun and make a beautiful hairstyle for yourself in 5 minutes?
Advice: if you use slightly damp hair as a basis for a bun, then after they unfold, the curls will curl in neat waves.
This "business knot" is ideal for girls with long hair and those with shoulder-length hair.
- Tie the combed curls into a high ponytail.
- When “packing” hair with an elastic band, you should pay attention that the hair does not need to be tightened to the end, the ends should create a kind of loop.
- Parted hair at the crown of the head.
- The hair loop folds ...
- ... and ends up among the smooth section of hair on top of the head.
- Thus, a volumetric bundle is formed at the bottom of the head. Comb through the parting with extreme care so that it is covered with hair again.
- Fix the resulting hairstyle with a hairpin.

The following photo with step-by-step instructions will simplify the concept of text and help you mentally try on a hairstyle.
Pigtails: tiny details in a pile of hair
Many girls with short hair mistakenly assume that their curls can only be combed, and they are not suitable for more complex manipulations. This is a misconception, if you want to make a beautiful hairstyle for yourself, but do not burn with the desire to be wise with false strands for a long time, then try the option that is available to everyone. Pigtails! Yes, even girls with fashionable haircuts "like a boy" have the opportunity to add a little childish naivety to their image.

Small braids can be woven on hair that is barely the length of the ear. Such babies will look very cute and extraordinary among the rest of the curls. You can fix such mini-hairstyles with baby crabs, hairpins or invisible hairpins. In this form, you can safely walk along the beach and city streets.
By looking at the following photos, you can discover how winning this hairstyle is.
Wreath: how to make a beautiful hair ornament
Flowers in hair are certainly beautiful and feminine, but not always charming representatives of flora are within walking distance. But this does not mean at all that owners of short hair cannot braid a neat wreath from their own curls.

- Part your hair on the side and part your hair in two.
- Twist the strands on both sides of the head, grabbing the next hairs in the process.
- With hairpins (invisible), fix the resulting harnesses on the back of the head.
- Divide the remaining intact hair into two halves, repeating the previous shenanigans, braid bundles.
- Fasten the "pigtail" curls in a crisscross pattern.
Pin-up: a playful cutie from the past
A comfortable hairstyle for owners, because such styling can easily mask dirty hair. The image of a pretty girl from American postcards of the 50s is interesting and easy to perform.
- Comb the bangs back, twist the ends slightly with a curling iron.
- Separate a wide enough curl from the face.
- Twist the tip inward, forming a ring in such a simple way.
- The ring must be laid in the form of a roll, as indicated in the photo.
- Stab with invisible hairpins or hairpins.
- Fluff up the hairstyle with quick movements, adding volume to it.

Fleece: the charm of a young French woman
There are days when you want to look light and at ease, striking those around you with your natural grace and grace of movements. A fleece can give French charm, it will look especially advantageous on a girl with bangs. Therefore, if one day you, standing in front of the pier glass, decided to make a beautiful hairstyle for yourself, try this option.
- Separate a small part of the hair at the back of the head, depict a fleece.
- with sparse teeth, neatly style your hair back.
- It is advisable to fix the fleece, use hairpins or invisible hairpins for this easy task.
- Curl the curls around the face with an iron to make the look softer.
Step-by-step photos of beautiful hairstyles will help yourself to better immerse yourself in the process of creating new designs from curls.
Ponytail: a hairstyle that flaunts your personality
An ordinary combination of strands can surprise you with a variety of types, one of which can decorate not only a girl's face, but also become the final detail in her image. If you want to make a beautiful hairstyle for yourself, then, first of all, refer to the classics.


Scythe
If you think that a classic braid is too trite for a summer walk, here are some fairly simple, but stylish options that will be a great alternative to the traditional hairstyle.Option 1
First, part on one side and start braiding from the opposite temple. Move diagonally, weaving strands from the crown and forehead. As a result, you will get a stylish asymmetrical and not at all hot summer hairstyle.Option 2
This is a very simple and quick technique that will help refine the classic braid a bit. First of all, tie a not too tight tail with a thin, inconspicuous elastic band. Make a gap over the elastic in your hair and thread the ponytail through it. Then, braid your hair with any technique you like. Thus, a simple everyday hairstyle is ready.
Option 3
This hairstyle looks great on long hair. First, tie a not too tight tail on the side. Make a gap over the elastic and pass all your hair through it. Relax a few strands to add volume. Just below, tie another elastic band and repeat all the steps again. The number of sections depends on
Option 4
To get such a sloppy, but stylish braid, you need to wind your hair in light waves and do a pile on the crown. Then braid the braid using whatever technique you know. When the braid is ready, pull it in different directions to add volume. At the end, divide your hair into two parts, tie it in a knot and secure it with an invisible hair on the inside.
Option 5
Separate one side strand at each temple (above the level of the eyebrows). Braid them. Grab a curl next to each pigtail and secure them at the back of the head with an elastic band or hair clip.Repeat the steps, separating the strands near the ears. Braid them, grab adjacent curls and secure at the back of your head. The rest of the hair can be left loose or braided.

Option 6
Part your hair with a side part. Separate the strand near the ear and braid with any technique. Don't braid too tight. Secure the end of the braid with a transparent elastic band. Release the strands from the braid to add volume. The final touch: spray the hair with varnish. This option will look most successful on curly hair. If you have straight curls, spend a couple of minutes curling with your curling iron.
Option 7
Part the side. Part a section at the parting and start braiding, grabbing the hair that frames your face. Use any technique. When you reach the neck, change the braiding technique and weave the remaining hair into the main braid. When you've finished braiding, slide the elastic over the end of the braid. Release the strands, which will make the hairstyle seem fuller. Finally, spray the hair with varnish.In the photo below, you can see a combination of a simple braid and a fishtail. It looks very impressive.

Option 8
A quick and easy hairstyle that even a first grader can handle. Despite all the ease of weaving, the end result is styling that others will find extremely difficult.So, divide your hair into three equal sections. We braid one braid from each part, the ends of which we fix with small elastic bands. Now we take one braid and roll it up into a ball. We fasten it with hairpins at the base of the back of the head. We make balls from the remaining braids.
This hairstyle has only one drawback: the true Rapunzel will have to tinker, braiding their curls. But the owners of medium length hair will cope with braiding in a matter of minutes.

Option 9
An inverted braid seems extraordinarily difficult, but in reality everything is very simple. The braiding technique is surprisingly simple and with its help you will create a unique hairstyle in a couple of minutes.First level: separate one strand above the forehead and make a ponytail. To prevent the ends of your hair from interfering with your work, wrap the ponytail at the top of your head and secure it with a clip.
Second level: grabbing the side curls, we make a second tail. At the same time, we retreat a little from the first tail. Now we remove the clip. We divide the first tail into two halves, between which we draw the second tail. We put the tip of the second tail up and fasten it with a clip. We leave the ends of the first tail at the bottom.
Third level: grab a strand a little lower, connect it to the free ends (from the first tail). We make the third tail. Remove the clip, divide the ends of the second tail into two halves and pass the third tail between them. We fasten the third tail with a clip on the back of the head. We leave the ends of the second tail at the bottom.
We repeat the steps as needed. When finished braiding, secure the end with an elastic band. The final touch: gently release the strands, starting with the very first. The higher the strand, the more volume we give it. It is not necessary to braid your hair all the way - the hairstyle will look gorgeous even with three levels.

If you are looking for an uncomplicated, but original summer hairstyle, an unusual ponytail will be a great option, both for everyday life and for an evening walk.
Option 1
To do this hairstyle, first twist the hair at the ends a little. Tie the tail with a thin elastic band. Make a gap in your hair and thread the ponytail through it. If necessary, curl your hair a little more or separate curls with your fingers to add volume.
Option 2
For this hairstyle, the hair should be straight, so use a flat iron if necessary. Then, divide your hair into two layers: top and bottom. Gather the top layer of hair with a thin elastic band at the back of the head on either side of the head. From the bottom layer, weave a braid on the opposite side. The thickness of the braid depends on your personal wishes. Ponytail the elastic around the tail and secure the end with a small hair clip.
Option 3
To create a more elegant ponytail, you will need hair foam or wax. Part it evenly (center or side, whichever suits you best) and gather your hair on one side. Apply foam to them and divide into two equal strands. And then just tie a knot twice in a row. Secure with a thin invisible elastic band directly under the knot, and twist the ends of the hair a little or make a light bouffant.
Option 4
To make such a stylish ponytail, which is perfect for any kind of summer events, you will need a curling iron or iron, hairspray, invisibility and a little time. First, curl your hair at the ends. Then divide them into 4 parts: at the back of the head, at the crown and on both sides at the temple, and tie them with elastic bands so that they do not mix with each other. Take the hair from the crown and comb it a little from the inside, and then twist it with a flagella and secure with invisible ones. Repeat with the hair at the temples. When the hairstyle is ready, sprinkle it with varnish, for reliability.
Option 5
Very romantic summer hairstyle. To do it, part your hair in two along the parting line. Braid on both sides of the braids, which converge from the temples at the back of the head. Tie them together with a thin elastic band. Then separate a thin strand from the tail and braid it. Wrap an elastic band with it and secure it with an invisible one on the inside. Comb the tail a little with a comb or curl with a curling iron.
Option 6
The ponytail is one of the most popular and versatile hairstyle trends in the world. This option is very fast and original. First, curl your hair at the ends and then part it in two. From the hair at the top of your head, start to weave a loose braid, weaving all the strands into it along the forehead line to reveal the face. The braid should end at the back of your head, and then lift up the rest of your hair and pull it together with a thin elastic band. To hide the elastic, you can wrap a strand of hair around it and secure it with an invisible inner side.
Option 7
Another easy and quick way to make an elegant ponytail. Curl the ends of the hair to create light waves. Then divide them in two. Comb the hair on the crown a little and tie it high with a thin elastic band. Gather the rest of the hair a little lower and also tie with an elastic band. To create more volume at the top of the hair, loosen up a few strands at the crown.
Option 8
This is a great way to transform a regular ponytail into an original hairstyle in a few minutes. Tie all of your hair into a ponytail at the back of your head. Separate a small strand and wrap it around the elastic to hide it, and secure with an invisible inner side. Then tie another elastic band just below. Make a gap in the resulting sections and run your hair through it. Tie another elastic band just below and repeat the procedure. The number of sections directly depends on the length of your hair. To make the tips look natural, twist them a little with a curling iron or iron.
Option 9
Divide your hair into 3 sections (center and two side sections). Secure each section with a rubber band if you are doing your own hair. This will prevent your hair from tangling. Roll the center strand into a rope and wrap it around the side ponytail on the right. Separate one curl from the left strand. Roll it into a tourniquet and wrap the right tail. We also wrap the remains of the left strand into a tourniquet and wrap the tail around it. We fix the hair with an elastic band.This hairstyle has several advantages. Firstly, we do not need to observe clear symmetry (uneven strands give a chaotic gloss). Secondly, the absence of parting allows you to mask some defects: unpainted roots, dandruff, or too thin hair.

Hair band made of ... hair
This is the easiest and most original way to replace a regular headband and remove hair from your face on a hot day.Option 1
First, part your hair in two. Gather the hair at the back of the head with an elastic band so that it does not interfere, and proceed to the strands at the front of the face. Part on either side and start braiding, weaving strands into it along the forehead. When the “headband” is ready, let go of the hair at the back of the head and enjoy the original hairstyle.Option 2
Separate a small section of hair at the neck and braid it into a thin braid. Wrap it around your head and secure it with an invisible one on the opposite side. This hairstyle looks great on curly hair.
Option 3
Part it evenly and separate two strands from both sides of the head. Weave them into pigtails, not too tight, and tie at the ends with invisible elastic bands. Connect them together at the back of the head and fasten them with invisible ones.
Option 4
Having separated the strand in the area of \u200b\u200bthe bangs, we make a fleece. Separate one curl near the ear on the right and form a flagellum, twisting the hair away from us. Secure the end with a transparent rubber band. Take the invisibility and fasten the tourniquet at the back of the head, closer to the left side.We repeat the actions on the opposite side: separate the strand at the ear; we form a flagellum; we fix the tip with an elastic band. We put the second flagellum under the first one and fasten it invisibly.

Hairstyle in 30 seconds
If time is running out and you are in a hurry to an event where you need to be smart - these options are for you!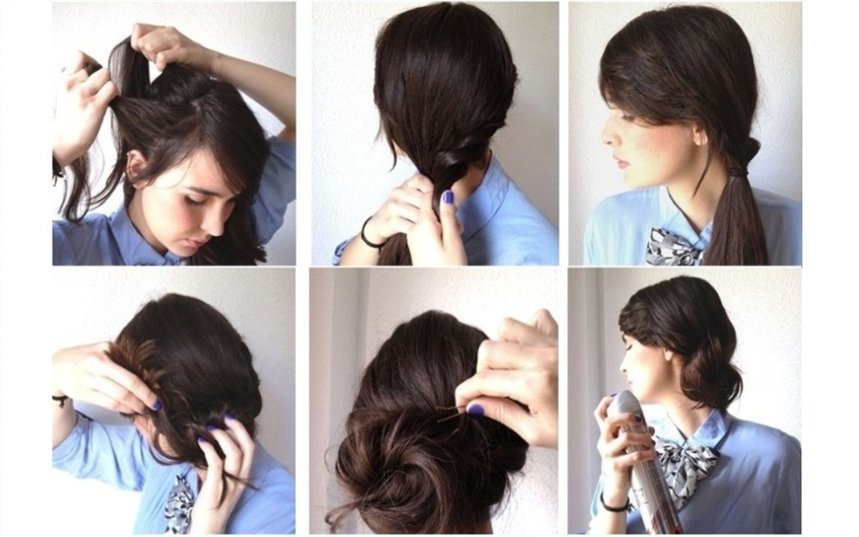
Option 4
Divide your hair into three sections. The average should be larger than the rest. Weave a volumetric braid out of it and roll it into a knot using bobby pins or hairpins. Roll the strand that is on the left into a bundle and run around the knot counterclockwise (bottom). Wrap the strand that remains on the right around the hair in a clockwise direction (through the top). Secure with invisibility or sprinkle with varnish.
Option 5
To do this hairstyle, you need hairspray, invisibility and a little time to practice. First, fluff your hair with your hands to get a good volume, and cover generously with varnish. Then, gather your hair together and wrap it inward to form a shell. Secure your hair with invisibility. You can leave a few loose strands to add a subtle casual look.
Option 6
This is a very easy way to make a nape knot. First, tie the ponytail and divide it into two equal strands. Twist each strand clockwise with a tourniquet. Then start weaving the strands together (counterclockwise). Tie the tourniquet at the end with an elastic band and roll it into a knot at the back of the head, securing with hairpins.
Option 7
Tie the ponytail at the back of your head, not too high. Make a gap above the elastic and pull your hair into it. Then, gently roll the tail with a shell and secure with a hair clip or other accessory.
Option 8
To make a hair bow, you will need a thin elastic band, invisible ones and 1 minute of time. To start, tie a knot high on the crown of your head and divide it in two. Pass the tip of the tail in the middle and secure with an invisible back. This hairstyle is also called "Lady Gaga style bow".
Option 9
This hairstyle will take longer than the previous ones. You will need a foam donut and stiletto heels. Tie a high ponytail, put a "donut" on it and hide the hair under it one strand at a time, securing it with hairpins for reliability. At the end, the hairstyle can be decorated with a bow or other accessories.
Option 10
Curly "donuts" look much more interesting than ordinary round pieces if you like bunches of ballerinas. These "donuts" can be bought in specialized stores or ordered online. The technique of execution is not at all different from the classical options. Hair must be plugged behind the "donut".
Option 11
Pull your hair into a ponytail high at the crown. Divide the tail into two halves, wrapping each with a flagella. Now fold the harness around the elastic. We twist them tightly and in opposite directions (left - to the right, right - to the left). Secure the hairstyle with invisible hair and fix with varnish.
Option 12
Divide your hair in half. Take the first strand, separate the curl at the forehead. We twist the curl away from ourselves, starting at the forehead and ending behind the ear. We tie the first ponytail low at the back of the head. We do the same with the second half of the hair. And now it remains to spin the bagels. Done!
Perhaps the easiest way to escape the heat in summer and at the same time create a sophisticated hairstyle is a Greek headband.
Option 1
Slip the Greek headband over the crown of your head and thread small strands of hair under the elastic. You will have a beautiful hairstyle in just a few minutes.
Option 2
This is a more complex example of how you can use the Greek rim. You will need two headbands for this hairstyle. Put one under your hair, and then back the back of your head. The second - put it on the crown and wrap the strands under it. Voila!
"Malvinka"
One of the fastest and cutest hairstyles we know from an early age, thanks to Malvina - a girl with blue hair. The main difference between this hairstyle: the hair is loose, the upper strands are pinned high at the back of the head.Option 1
A great way to diversify your look if your hair is barely touching your shoulders.Separate the strand over the bangs and brush up. We put a roller under the lock and fix it. Velcro curlers can be used as a roller. They stick better to the hair. We grab the side curls and (together with the combed strand) we fix them on the back of the head with an elastic band. Using any thin object, pull the hair a little from above, giving it volume. A Chinese stick or an ordinary hairpin will do. It is better to pull the strands with your fingers on long hair, but not on short hair.

Option 2
Separate one strand at each temple (above the ear) and secure them to the back of the head with an elastic band. Under the first strand, we grab a curl, draw it over the tail and start it behind the first strand. We repeat from the opposite side: we grab a curl, hold it over the tail and start it under the lock. We connect the ends of all four curls with an elastic band. It turns out a pretty heart.
Option 3
Using a hair straightener, curl the ends on a few side strands. Separate one strand at the top of the head and comb through it. To keep the strand in place, spray it with hairspray. Having styled the combed strand, pin the hair with a hairpin, making a "malvinka". Done!A great option for a romantic date, going to the theater and even for a wedding.

Option 4
Grab a wide strand (from forehead to ear) at each temple. Secure the strands at the back of the head with an elastic band, masking it with a thin curl. Randomly, in no particular order, braid a pair of fine braids. For more bloopers, you can curl the ends of your hair a little.
Option 5
Separate a strand at each temple and make two flagella (turning the strands away from you). Connect the flagella at the back of the head by tying them with an elastic band. From the loose ends of the plait, braid using your favorite technique. For example, ala "fish tail".
Emphasis on accessories
With the help of ribbons and scarves, you can turn even the most ordinary ponytail into a work of art. Someone might think that hair with a scarf resembles a collective farm style. And he will be wrong! It is fashionable and beautiful - even Hollywood stars flaunt in branded scarves skillfully tied to their hair. In summer, a scarf will protect you from the scorching rays of the sun. He also has other advantages: with the help of a well-laid scarf, you can hide hair imperfections, regrown roots, gray hair or a rare parting.Option 1
Loose and comb your hair. Tie a knot around the middle of the scarf. It can be a regular or decorative knot, according to your taste. Place the scarf over your forehead (so that the knot is slightly on the side). Tie a double knot at the back of your head and hide the ends of the scarf behind the base of the fabric.
Option 2
Love trendy pin-up looks? Then you will like this option.Divide your hair into two sections: back (crown and back of the head) and front (forehead). Pull your hair back into a bun You can pre-braid it in a braid to give your hair a hold. Twist the hair in front into a tourniquet, put it in a bagel and secure with invisible ones. The final touch: tie your head with a cute scarf or shawl.

Option 3
Another great version of the image of "pin-up girls". Create long bangs by separating a section over the center of your forehead. Collect the rest of the hair in one or more tails (the ends of which are curled with a curling iron). The most important stage is the formation of the bangs. It is the large bangs that are one of the distinctive features of this style. We wind the front strand on the curling iron. Give it the desired shape and spray with varnish. Behind the bangs we tie a small polka dot handkerchief with a bow.
Option 4
The popularity of The Great Gatsby rekindled interest in 1920s American culture. And, of course, this interest has not bypassed the fashion world. Ladies of that era, going to a party, preferred short hair, and long curls were removed under a flashy headband. However, the headband was also worn on short hair. In addition, the hair was often curled. If you love visiting Mafia clubs or jazz bars, then retro styling will come in handy. Let's take a look at one of the ways to create this hairstyle.Comb your hair to the side and wear a glamorous headband. We pass the hair through the bezel - lock by lock. Voila! We advise owners of short hair to smooth the curls with gel and (where can we do without it?) Put on a headband!

Among these hairstyles, you are guaranteed to choose several for yourself