Make a Christmas tree from paper with your own hands master. Christmas tree of paper. Best ideas and master classes with step-by-step photos
Press the class
Tell VK
We continue to decorate your home to the winter holiday. We have already done various, milled them on the windows and walls. Now we want to give the holiday of symbolism. And this, of course, the main princess celebration is a Christmas tree. I know that many sorry the trees and replace them with artificial analogues. But sometimes you want to make something personally, to get satisfaction from the action and accent in the decor.
All the ideas of the craft are easily carried out with children. To make it easier to perform work, make the base blanks in advance. And try not to skip on the decor. Guide more different beads, ribbons, ribbon, beautiful butchers. Collect small toys from kinders and decorate them. And they will go into business and will not be lying.
You can create beauty from everything that is at hand. The main thing is to attach to this fraction of fantasy and all your accuracy. With modern adaptations, such as a glue gun, you can give the product original forms and secure different textures and materials.
I know that there are corks from wine bottles and sticks from ice cream. Well, we did not have traffic jams at home, and the sticks had long sought different needs, so we turn to the materials that would definitely be at any hostess - macaronam and yarn.
Let's start with macaroni. I know that of them make various snowflakes. It turns out that for the Christmas tree they will also fit.

We need:
- Put Macaron (better take feathers)
- Adhesive Pistol
- Cardboard sheet
- Paint
- Decor
It is better to prefer the form of "feathers" or "spirals". Choose a good manufacturer so that all things are smooth and one length.
First of all glue the cone from cardboard. I make it a simple twisting of the sheet around the hand. So that the workpiece does not break, scrape it with a stapler.

And now you cut the foundation so that the Christmas tree stood smoothly, not crooked.

We always begin with the foundation. The first two rows "Put", i.e. Enclose so that they lay on the surface, so the product will be stable.
And subsequent ranks need to be raised exactly on the previous one by the amount equal to half the "Spirals".

When you finish the top, we begin to cover the entire craft.

You can take green, and you can buy a golden or silver paint in the canister. Only then to spray it is not at home.
I really like the result. There is not much time, but it looks very elegant.

Now it came to the turn of yarn and cord.
To make a Christmas tree out of yarn, you need to wind a thread smoothly over a paper cone. Periodically bonding it with hot glue with the base.

Decorate with decor.

This product is done faster than Macaroni.
You can decorate them with butchers.


We need:
- Wire
- Decor
First select the wire. It should be tough and not fine. Of it we turn the cone-shaped spiral. Check for stability. The bottom can be wrapped twice.

We start riding a wire cord.

Drain and decorate.
Glue will give the design additional strength and will not allow the cord to move the frame down.
Pack of paper
Paper is always the first, with which the word "craft" is associated. And from it can be created not one Christmas tree, but a whole fir forest, in which no tree will repeat!
Suppose we want a paper tree to please us on the kitchen table. Then it is necessary to make it fluffy and volumetric. As well as as sustainable as possible.
So, I picked up several detailed master classes with a clear description of the process.
Option 1
We will need:
- Cardboard cone
- Green paper of different shades.
From paper cut out many circles of one size.
And we begin to glue their edges to the cone, observing the ranks.

The first layer always goes at the base.
Such a drink is available in terms of difficulty, even a two-year-old child. And it looks pretty rich because of the different shades of the same color.
Option 2. Machirovaya Cone Christmas tree
Cut 4 semicircles. Each of them is less than the previous diameter by 2 centimeters.

We glue the workpiece into the cone and cut a little edge around the perimeter to get the volume. Terry edges slightly run.
Now we glue the smaller cone to the largest workpiece. And so towards descending.
That's the whole simple process.
Option 3. Let's make a fir from paper circles
Cut 4 circles. Each of them per 1 centimeter is less than the previous one.

Then each circle we turn 3 - 4 times in half.
From paper, we also make the basis. You can wind up green paper pencil or kebab chopsticks.
We ride round billets on the trunk in descending order.
To give stability, it is possible to put the trunk in the plasticine, wax or wine cork.
Option 4.
We mark 15 circles, each time reducing the diameter per 1 centimeter. Then every circle divide on 12 equal parts, conducting lines through the center.

From the center, we celebrate half of the radius and blacks around. Now cut the lines clearly to the circumference.
At each petal glue the tips.
When you make all levels, start collecting a Christmas tree from the widest row to the smallest.
Like you ideas, I think you will find ideas for yourself.
Crafts from cotton disks for the new year in kindergarten
The child sorrified the task that tomorrow you need to bring a craft to kindergarten? And outside the window, of course, already night. Then you can use the packaging of cotton disks. In most families, they are actively used.

We need:
- Packing cotton disks
- Cardboard for conical base
- PVA glue
- Decor
We are folding the frame of the cardboard, connect the edges by the stapler.
We take a cotton disk and fold it in half.

Then, on harmless glue PVA Sadim two tips of a cotton semicircle.

And we glue the workpiece to the base, it is pre-smeared its fold all the same PVA glue.

So make a number for nearby. Better woven discs glue more to each other, so that there is a minimum of lumen.

It remains only to decorate a gentle beauty!

Children in kindergarten will like your product, and before other parents will not be ashamed.
Crafts with your own hands from napkins
Another very available material - napkins. You can use the most inexpensive and monophonic.
We take white, red, blue and green festive shades.

The napkin is folded several times to get the shape of the square, then cut the place of bend and the cross will be fastened by the sideline.

Now bend each layer by forming a pompon.

On the frame laying out these balls the first row. Then we glue the balls and other christmas decorations on double-sided adhesive.
And fill the entire surface of the frame with napkins.
Everything is pretty fast.
By the way, you can see how to make out the napkins here. Also it turns out very beautiful.
Christmas tree from candy
A wonderful gift will be caught by Candy: Buy a box of good candies in a beautiful package in a grocery store.
It is made of two parts - the basis for candy and trunk.

Bonding the basis of the side 23 centimeters. When cutting out, make indents on the bottom edge and at one edge 1 cm. We will apply glue.

Decorating beautiful paper or film. We glue to its base bottom.

We do the trunk, decorate it and glue with the frame.

Now on hot glue exactly embrace candy, braid or christmas beads.

Use one color range of the basics and sweets.
Make the Christmas tree for the new year from pine cones
Natural material always gives the desired decor's highlight. Immediately smells at home with freshness and resin. Give the symbolic meaning to this winter holiday.
The bumps are also suitable for different crafts.
You can create a Christmas tree with only one cones, and you can dilute them with sisal balls, decorative colors or sprues.
It also looks unusually combination of cones and dried citrus.

We glue the cones on the basis of hot glue. You can not think about the side that you have them. This will give a light fascinating negligence of the product.

We alternate cones with Christmas balls or other decor.

Covered with artificial snow or white enamel from the sprayer.

Everything is easy enough, and the result is incredibly beautiful.
Light Christmas tree of tinsel
Without tinsel, we will not be able to imagine the new year! What is the only decorations on it now: and asterisks with balls, and multicolored tips. She decorates windows, curtains, walls and, of course, used as material for crafts: wreaths and trees.
Since most of the manufacturers of tinsel places it on a thin wire, it is easily amenable to various clashes and forms.
Fir tree is made from it in three minutes!
We need:
- Tinsel
- Cardboard sheet
- Double sided tape.
From the cardboard we make the basis in the form of a cone and glue it with a bilateral scotch.

From the first row, we remove the protective film and begin to glue the end of the tinsel, the foaming frame tightly.
If you have not enough tinsel, then get the end to the tape, and put the next fluffy tape on top of it.
Fluffy beauty from pumps
Pompons also loved our craftsmen. Previously, we made a dog from them, now we will create a fluffy beauty.
The balls themselves can be made in two different ways: wound 20 layers on the plug or use two round blanks.

We will go according to the second way.
Take cardboard or plastic, cut out two identical rings.

Now retreating from the edge of the thread of 5 centimeters, we begin to wind the yarn very tightly.
Then cut the external fold between the billets.

By the left tip, tied up with a middle of the pompon, so as not to lose all the threads.

Now we are looking for a thick wire and turn it into a spiral. The base is left wide. We ride pumpons on it.

If the wire is not found, then we use the experience of previous products and form a triangular or conical basis.
Felt Christmas Ideas
Felt is also popular with our masters. That only from it is neither developing toys and decorations on the Christmas tree. Today I will give a few ideas for creating a spruce tree.
From the simplest options to complex.
Option 1. Cut from felt 10 Christmas trees of the same size. We turn in half and glue a fold to the trunk.
We use branches, spins trees (better than ate or pine).

Option 2. Cut out a lot of identical triangles from the felt.

We glue them to a frame of rows. The upper triangle lies between two lower!

Option 3. Prepare 5 squares of different quantities: 9 cm, 7 cm, 5 cm, 3 cm, 1 cm.
Each size make five pieces.

Now on the thick ride the largest squares, distributing them diagonally to each other so that there are no voids.
Take all the squares.
Christmas Beauty Fabric
And in the piggy bank two ideas of tissue beauties. Ends can be treated with decorative seam thick contrasting thread. On symbolic twigs to sew buttons or beads.

Use several colors of fabrics and textures. For example, take a velvet on one side, and on the other - linen fabric.

You can also pick up different drawings in one color scheme or, on the contrary, play with colors - companions.

You can fill the Christmas tree with a hollofiber, syntheps or cuts, residues from your creativity.
If the product is small, finish it.
My dear, I tried to choose the most interesting and affordable materials for you. I really want to know your opinion in the comments!
Tweet
Tell VK
Today you will learn how to make a bulk tree from paper with your own hands. This master class describes not one bulk tree of paper, but at once several different options for crafts. Make them will help our ready-made patterns.
Tools and materials Time: 20-30 minutes Difficulty: 2/10
- printed Christmas tree templates on A4 format paper;
- scissors;
- glue;
- acrylic paint and brushes;
- fluorescent paint (not necessarily);
- sequins, decorative snowflakes and other decor at your discretion.
The bulk tree of paper is a simple and very original way to decorate your home on the eve of Christmas and New Year!

These crafts are so simple that you can easily connect children of preschool and younger school age for their manufacture! Undoubtedly, you will all have fun to create various compositions from 3D Christmas trees!
Detailed description with photo
We offer you four options for the manufacturer of the paper Christmas tree with your own hands, but if you still have no enough enough, you can experiment with the sizes of trees or create your own template. Features here are endless!
Option 1. Christmas trees with asterisks
The first option includes a large number of trees, so we suggest starting with it.
Initially print below the presented templates on A4 format paper.
Template 1.
Template 2.
The first option suggests that you simply cut the tree along the contour, and then shift in them the grooves on the drawn lines.
Then these strips you need to bend in opposite sides through one. So you have a ready-made bulk tree from paper!
For the second option, also cut the trees along the contour. Drawn lines inside No, which gives you the opportunity to experiment!
You can cut arbitrary lines here at the top, and below to put asterisks using a figure steppler. Or cut thick lines, and between them put asterisks, or cut curves lines, or .... In general, fantasy will tell you, and below in the photo you can see what happened with us!
Option 2. Christmas tree with a deer
If you want to go to more complex compositions, try cutting a Christmas tree with a deer, the template of which is provided below!
Template 3.
For the manufacture of this Christmas tree, first cut the deer, then bend the paper for the Christmas tree in the middle and cut it out. After that, bend the paper for a small tree from the right edge and also cut it along the contour.
If desired, make decorative sprockets and snowflakes on the tree, decorate with glitter, etc.
Option 3. Luminous bulk tree
Print the template provided below on standard A4 paper.
Pattern 4.
- Cut the stars and use them as a template for stars.
- Attract your baby's Christmas tree cutting. Let he cut the tree along the contour and the inner lines. Depending on age, you may need a little help.
- Make sure all lines inside are cut.
- With the help of green or any other, in your desire, paint paint the craft in 2 layers. Between the staining let it be good for both times.
- Fold paper strips inside the tree in opposite sides to create a 3D view.
Stars: In this workshop, for the manufacture of a bulk tree made of paper with a luminous effect, we used glowing in the dark spray paint, which was found in our local craft store. We simply spray paint on paper, and stars cut out of it.
Alternatively, you can buy ready-made paper that glows in the dark and cut the asterisk from it.
Get stars on your Christmas tree.
The bulk tree of paper, created by their own hands, is ready! We hope our step-by-step master class with templates you liked.
Subsequently, you can use this crawl as a small night, but be prepared for what he will serve you very long!
And as a small surprise, you add an interesting video to the master class, in which the professional decorator will tell how to make a somewhat different, but no less beautiful version of the bulk tree made of paper with their own hands.
Today in stores you can see a large number of diverse trees. However, the New Year tree is not at all necessary to buy, it can be made it with your own hands from almost any girlfriend. Of course, without a living Christmas tree at home in the New Year holidays, it's just not to do, and the Christmas tree made by your own hands will perfectly decorate the house or suitable as a gift to friends and loved ones.
Crafts: New Year tree with your own hands
New Year tree from magazine pages
In order to make a pretty Christmas tree of magazine pages you need:
- old magazine;
- pVA glue;
- cardboard;
- pen or pencil.
First of all, it is necessary to make a cone from cardboard and copp it with glue. From the pages of the old magazine, cut neat mugs or flowers are the same in diameter.
Favorite circles need to wrap a pencil. Thus, they will turn out a bit twisted. Next, you can proceed to gluing the circles to the cone, starting below. The mugs should be glued, tightly pressing them to each other in such a way that the cone itself is not visible. From one mug you can make a small cone and glue it instead of the top. Tree is ready.

New Year tree from old magazines.
Video: Crafts New Year tree do it yourself
New Year tree of wrapping paper
New Year's Christmas tree made of wrapping paper is very simple.
To do this, you need:
- wrapping;
- cardboard;
- scotch;
- scissors;
- decorations.
As for most Christmas trees, first of all it is necessary to make a cone from cardboard or tight paper. If the wrapping paper you are going to use sufficiently dense, then you can make a cone from it.
The resulting cone can be fastened with the help of a scotch. Then you need to cover the cone wrapping paper. To do this, it is necessary to put paper on a flat surface with a beautiful face down. Then scotch and attach the end of the paper to the cone, and slowly turning the cone completely wrapped it with wrapping paper.
Examine paper cut with scissors. It remains only to decorate the Christmas tree. To do this, you can cut the asterisks and decorate with sparkles, can be glued on the Christmas tree buttons, beads, tinsel, stickers or lace.

Fir-tree of wrapping paper with their own hands
Crafts with children: Luminous Christmas tree for the new year
Very original and beautifully looks like a luminous tree. In order to make such a Christmas tree with your own hands you will need:
- floristic grid;
- floristic wire;
- cardboard;
- scissors;
- cellophane;
- pVA glue;
- pins;
- decorations.
At first, make a cone from the cardboard. Finished cone wrap the resulting Cone Cellofan. Then cut the floristic grid with small pieces and dear glue. The resulting pieces of grid are glued to cellophane. Secure the resulting structure with pins and wait until the glue is dry. After the cone dries, repeat everything done again. After complete drying of the glue, remove the cellophane from the cone. Fasten the garlands inside cellophane using a pin. You can decorate the Christmas tree on your taste.

The process of making a luminous Christmas tree

Glowing Christmas trees do it yourself
Original Christmas tree from Macaron
In order to make the original Christmas tree of macaroni you will need:
- foam cone;
- gouache, acrylic paints or paint spray;
- pasta of various sizes and shapes;
- pVA glue;
- tassel.
At first, paint the cone from the foam in any color you like, and let him dry. Then go well to the macaroni cone. The design can be absolutely any. Then apply paint to pasta, carefully staining all the details. Cove the paint macaroni is better in two layers. Give your Christmas tree to dry carefully.

Machinery manufacturing process from macaroni

Fluffy Christmas tree made of colored paper
Very elegant, a Christmas tree, made of colored paper ribbons. To independently make such a New Year's beauty you will need:
- tight cardboard cone;
- colored paper;
- pVA glue;
- double sided tape.
Initially, it is necessary to make the basis for the Christmas tree, for this we take a dense sheet of cardboard, turn it into a cone shape, fixing glue. Then make thin strips from colored paper, the same in length and width. Christmas trees made of green, red, silver and gold paper look very impressive. With the help of glue, glue along the edges of the strip, getting off the loops. The resulting loops attach to one side of the scotch, and the other side is secure to the cone in the bottom upward direction. Thus, it turns out a fun fluffy Christmas tree.

The process of making a Christmas tree of colored paper

Fluffy christmas tree with their own hands
Distillary Christmas tree: 40 photos and workshops

Elegant homemade Christmas trees from tinsel and balls

Children's handicraft: Green Christmas tree of cardboard or paper

Christmas handicraft with children: Christmas tree made of cones and balls from fabric or yarn

Multicolored Christmas trees from yarn do it yourself

Children's exercise: Christmas tree from felt and buttons

Flat Christmas trees from dishes - an unusual idea

How to sew an elegant Christmas tree - the idea for the new year

How to evan the Christmas tree from the beads do it yourself

Flat christmas tree from twigs for wall decoration

Beautiful Christmas tree of lace do it yourself

Master class: bulk tree of paper in a quilling technique

Stylish Tree of Jute and Beads

Crafts Christmas tree made of plastic forks and other dishes

Miniature Christmas Tree Beads

Beautiful Christmas trees from ribbons

How to make a Christmas tree from yarn and buttons with your own hands - master class

Little Christmas trees from lace

Crafts - Christmas trees from burlap and spices

Christmas tree made of coffee, beads and satin ribbons

Two chips from pine cones

Knitted New Year tree - Photo

How to sew christmas trees

Unusual Christmas tree of plastic spoons

Idea for a gift: Christmas tree from candies and tinsel

Tree of bead - Beautiful handicraft

Champagne bottle decor in the form of a festive Christmas tree

Tree from satin ribbons for the new year

Flat Christmas Trees from Grimka and Lace

Bright Christmas trees from multicolored balls

Homemade tree of wrapping paper

Fluffy Christmas trees from yarn do it yourself

Little Christmas trees and buttons

Crafts Christmas trees from natural material: cones and feathers

Simple Christmas trees from yarn, beads and buttons

Transparent Christmas trees from Christmas balls suspended in the air

Tree from wine plugs do it yourself

Favorite dealing of all the children - paper from paper with your own handsBut and adult craftsmen will like such creativity, because using a very simple and affordable material, you can get the original element of the New Year decor, a Christmas tree or a gift for your beloved grandmother. You can do at home with children, having fun in a family circle.
New Year tree of paper with your own hands
Piscent new Year tree of paper with your own hands You will succeed in separate circles, they will all be different diameters, so for such a craft you may need a circulation and a simple pencil, which on a green sheet you are out of the necessary items. To cut them, we use scissors, and then glue the elements to the base with the help of glue. As the basis, you can use a pencil, a wooden skeletal or tube for juices.
It will be the first experience with the circulation for the children, so before giving them to the instrument, tell us about the safety technique and the rules of working with it. Then make sure that the child draws several circles on a sheet of different diameters. Their number depends on the desired size and drawing of the finished Christmas tree. Each circle should be of such a diameter so that it is 2 cm less than the previous one. Each circle is one tier of our future handicrafts, so when you draw contours, they should be carefully cut out with scissors, and even if the edges are slightly uneven, it will not affect the beauty of the finished alternatives, because every tier we will be wavy.
Next, it is necessary to add each circle: once in half, then the resulting semicircle again in half, and this sector once again in half. Total we fold every circle three times. We must have clear lines, so in the bends you need to spend scissors.
The corner of each folded circle should be cut off so that in the center of the expanded element it turns out a hole, the diameter of which coincides with the base diameter - tube or pencil. After that, the circles can be repaid.
The basis is also necessary to decorate, glue it with green paper or wrapped with a ribbon. When all the elements are ready, can be collected christmas tree with your hands handicraftsFor this, all the elements should be riveted on the tube: from a larger mug at the bottom to the smallest above.
It remains only to decorate the top, for this you can glue a bead or a decorative red star. On lush "twigs" you can glue sequins, small beerts or sequins.

Tree with your own hands: Craftsman
There is another option, how to make a Christmas tree with your own handsFor which you will need the same set of tools and materials as for the previous craft. Main materials - green leaf, pencil and circula, ruler and scissors, PVA glue. And we will use the wire and needle.
In this case, we will also collect a Christmas tree made of separate elements of different diameters, the contour of which we will draw with the help of a pencil and a circulation. The lowest tier will be the largest diameter, but in this case we need and every carved circle is to spread correctly, because it should be cone-shaped needles, as shown in the photos.
After you draw a circle, inside you need to draw another one by retreating from the edge of half the radius. Then it must be divided by a ruler for twelve identical sectors.

At the next stage, we will need scissors that we will do shorts along each sector. The incision should reach the contour of the inner circle, after which at the end of each sector it is necessary to turn the cone and glue it with PVA glue. When you will drive all the cones on one billet - there should be 12 pieces, you can move to the next workpiece that you need to draw in the same way, cut and glue cones.
In this case, the wire will be collected tree of paper with your own hands, master class It assumes that our air Christmas tree is stable. One end of the wire must be collapsed by a spiral. To make a spiral, you need to wind the wire on the pencil, imposing a layer on the layer, the rest of the cut up.
In the center of each circle, the big needle needs to make a hole, and then ride all the layers on the wire. You can also make as a paper cone.

How to make a Christmas tree with your own hands
We have already performed toys on the Christmas tree do it yourself from paper And New Year's postcards using quilling technique. This time we will not make a flat figure, and with the help of a queen, create a bulk Christmas tree. Strips can be chopped independently or buy a ready-made set for queening.
Strips must be half a centimeter wide. The sheet must be flashed on the strips, and then cut them. Another four strips are one centimeter wide - for the base, and for the decoration - thin stripes are yellow and red. We will perform the elements of the queen without special tools, and we will turn the strips only with the help of toothpicks.

When working with paper to ensure reliable fixation of the elements, it is enough to use only PVA glue, and will continue for a long time.
First we will wink green strips of 5 mm - they will need four pieces of different lengths. 30, 20, 15, 10 cm - they must be twisted on the toothpick, then dissolve a little that the spiral does not turn out and fix the tip on a drop of glue. It is necessary to compress one edge of the spiral to the fingers so that the form of "drops" is, and then take it a bit. As a result, we turned out a "drop", resembling a popular print "Paisley".

Wide bands need to be wounded on the toothpick tight, because it will be the trunk of our future Christmas tree. The tip of the strip must be fixed on the glue so that the helix does not spin.
A strip of 30 cm long we need for the top: it should also be twisted in the spiral, and then slightly dissolve and give it a drop shape.
Although it is done and very simple paper from paper with your own hands, video The lesson can be useful for you to get acquainted with a quilling technique closer, because the newcomer does not yet know how to create elements of the "drop" or "eye", how to twist the strips.
When we collect a Christmas tree, you should use the glue "moment", which ensures the instant fixation of all elements. You can first glue each tier with the barrel, and then collect layers, or vice versa, first glue the parts of the trunk, and then glue the "drops" - twigs. Star on the Christmas tree of paper do it yourself It can also be performed in a quilling technique.
Details of the trunk must be glued together in series, and insert a toothpick to the center, which will ensure the strength of the base. You can then stick the twigs: We will start with the smallest "droplets" that are glued on top, and at the bottom there will be the biggest twigs.
Thin red and yellow stripes we will use to do. This time, the paper can be twisted without toothpicks, but the tip must be fixed on the glue, and then glue balls on the twigs.
Stand for such a Christmas tree We can twist from white stripes, and make drifts using napkins, rolled into lumps, can also decorate the stand can be snowdrifts using wool. We will have the original eulka "Christmas tree in the snow", which will be happy to perform a schoolboy.

Corrugated paper tree with their own hands
We have already considered several original ideas, how can it be done corrugated paper tree with their own hands. Corrugation - the material is ideal for creating beautiful New Year's crafts, it will be interesting to work with him and preschoolers, and adult craftsmen. There are many ideas for performing such aulic, but they all go down to one technique: first it is worth making a cone from cardboard, and then plane this cone with paper elements.

Cone can make any size using a cardboard sheet, watman or a piece of wallpaper. You can twist the sheet into the cone, glue the edges, and then cut off the extra paper below. This option is suitable if you perform a large cone. A small cone can be collapsed, pre-exhausted the foundation. On the cardboard sheet, you need to draw the "sector". A quarter of the circle draw the circulation, to carry out smooth crossing lines by its radius with an angle of 90-120 degrees.

Then cut this sector and glue it on the junction. On the bottom of the junction can be fixed by the stapler, glue the edges of the bilateral scotch. The cone-shaped base for your future Christmas tree can remain a hollow, because the corrugation is a very lightweight material, and an empty base will withstand such a load. To make the basis of the finished look, it is necessary to glue the circle below. The radius of the circle should be one centimeter more than the radius of the cone base. Then the edges of the circle should be kept with a step of one and a half centimeters throughout the circumference. The sand depth should be one centimeter. The resulting cuts get up and lubricate with glue, and incur donyshko into the cone-shaped base.

New Year's toy tree of paper with her hands
If you take a small cone-shaped base, not more than 10 cm high, then you will have the original New Year toy "Christmas tree" from paper with your own handswhich can be decorated for a festive tree. In addition to cardboard for gluing the base, you can also use a plastic bottle. From it you need to cut the neck and bottom, you have a straight cylinder, which must be cut in a straight line on the one hand. The resulting segment of plastic we will twist into the cone.
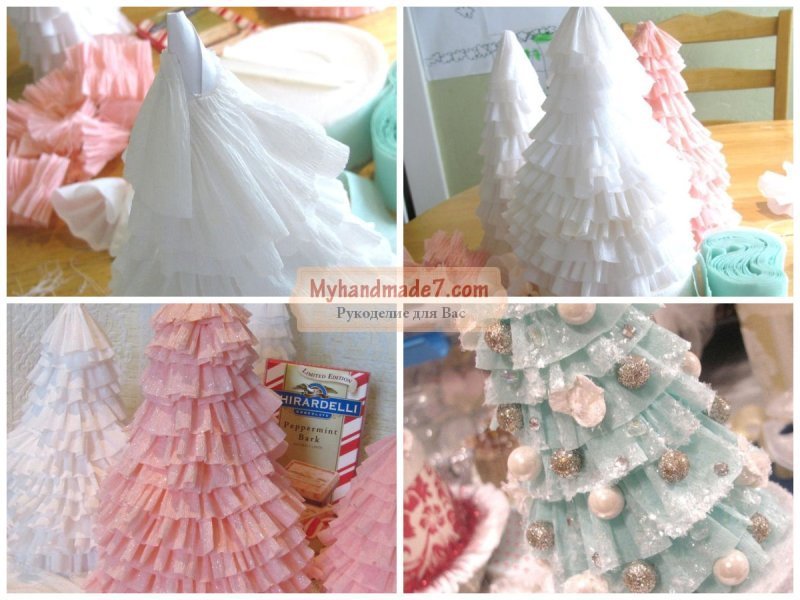
Corrugation should be cut into 5 cm strips. These bands we will be glued to the cone layers, and not on the helix. One edge edge should be made wavy by twisting with your fingers, as shown in the picture. Then the second edge must be primed on the basis, starting from the lowest tier. The second tier should cover the place of gluing the bottom strip. So you must cover the entire cone corrugated stripes, and you will have a fluffy Christmas tree.
The base of the cone can be used for other children's crafts, it can be placed in the technique of transportation, using squares of napkins or corrugations, can be placed by strips of wrapping paper, wrappers from candy or foil.

If you want to hang the toy on a sprig of ate, then you need to stick the satin ribbon on top and make a loop from it, tie a bow on the top.
Useful advice
From paper you can make a huge number of differentchristmas tree , one more beautiful than another. You just need a few simple tools that will find at home or in any stationery store, a little time and imagination.
On our site you will also find:
- 20 small Christmas trees with their own hands that will decorate any home
- Christmas toys do it yourself
Here are some of the most interesting ideas on the transformation of paper in a beautiful New Year tree:
Christmas tree (photo instruction)


Origami Tree (Scheme)


Video instruction:
Tree of paper with your own hands: Cardboard cylinders from toilet paper


Video instruction:
Christmas tree from green paper

Video instruction:
Corrugated paper tree


Crafts "Christmas tree" from paper (video instruction)
How to make origami christmas trees from paper (video)
How to make a Christmas tree made of paper strips with your own hands

You will need:
Color cardboard or colored / wrapping paper green
Ribbon (in this example its width is 6 mm and length 25 cm)
Thin Yershik
1 bright color bead (in this example golden)
Several beads of another color (in this example 12 brown beads)
Scissors
Rule
Pencil
1. Draw and cut out from color cardboard strips 4 cm wide and long: 8, 10, 12, 14, 16 and 18 cm.


2. Cover with scissors or needles Make 3 holes in each strip: 1 right, 1 left and 1 in the middle.


3. Take a thin rash and make a small loop at one end.


4. Start Believe Thin Ershek through all holes in paper strips. Start from the longest strip and add the following descending. Add between each strip 2 beads.
5. When all paper strips are used, add a bright bead on the top of the Christmas tree.


6. At the end of the rash, make a loop so that the craft can be hung. Cut the extra part of the rash.
7. Grind the ribbon through the loop and make it the ends in the knot.
Volume tree of paper for children

You will need:
Scissors
Circle or several round items of different diameters (saucer and plates, for example)
Wooden bead and sandpaper (if desired)
Spaking or any smooth thin wand.
1. Draw on paper several circles of different sizes and cut them out.

2. Fold every circle in half, once again in half and once again in half.


3. Cut the tip of each folded circle with scissors.


4. When all the circles are ready, expand them and start riding a skeleton, starting with a large circle and ending with small.

5. Insert a skeleton into a wooden bead and sandpaper Make the bottom side of the beads more smooth, so that the tree is better stood.
* Instead of beads can be made from cardboard Platform for the Christmas tree. Just cut a square or a circle of thick cardboard and insert a skewer into it. For reliability, you can glue a few cardboard circles and then insert a skeleton in them.
New Year tree made of paper with your own hands. We use old logs.

You will need:
2 magazines
PVA glue
5 Wine plugs (optional)
Aerosol paint (optional).
The video instruction is attached below.
1. Fold each page of the log as shown in the images. Bottom end bend and hide inside.


2. Repeat the process until all pages are bent. You will get half the Christmas tree.
3. To make a full-fledged Christmas tree, take the second magazine and fold its pages in the same way as before.
4. Slit both halves among themselves.

5. If you wish, you can make a trunk of the Christmas tree, for this glue 5 wine plugs and glue them to your paper Christmas tree.
6. You can decorate the Christmas tree by beads on a thin wire, tinsel or other small decorations.
Video instruction
Tree of colored paper (master class)

You will need:
Thick cardboard or dvp
PVA glue, superchalter or hot glue
Color cardboard (can with patterns and ornaments).
1. Cut the rectangle from the cardboard, which should be a little more the basics of the future Christmas tree.
2. Stick the skeleton in the cardboard and secure it with glue.


3. Cut out several circles of different size and color from color cardboard, 3 circles in each group. Make a small hole in the center of each circle.
4. Add a drop of glue into each hole and start riding the circles on the skewer, starting with the largest. The distance between the circles can be up to 1 cm.
5. Cut the star from the cardboard and stick it to the top of the Christmas tree.
Volta tree from old paper with their own hands

You will need:
Cardboard or foam cone
PVA glue or hot glue
Scissors
Pencil
Circle or Round Item (Plate, Saucer)
Decorations (bells, beads, tinsel).
1. Draw on the newspaper several circles of the same size and cut them out.

2. Each circle fold in half and once again in half.

3. To make the basis of the Christmas tree, you need to cut a few squares, fold them into triangles and glue them smoothly to the cone basis as shown in the image.

4. To cover the paper of the cone, just get a piece of newspaper to it (see image).

5. Start shook the cone folded circles from the newspaper, starting from below and moving towards the top of the top (see image).

6. Stick to the top of the bell, star or other decoration. You can glue a tinsel, small christmas toys or just a bright tape or lace.
Beautiful tree of paper with robes for the new year

You will need:
Old newspaper or unnecessary book
PVA glue
Scissors
Beads (optional).
To find out how to make such roses, go HERE .
1. Make a piece of the cone and make many roses - a few large for the base of the cone, medium for the central part, and small for the top.
* If you have purchased a foam cone, it needs to be placed by pieces of newspapers (see image).

2. Start gluing paper roses to the cone, starting from the bottom of the cone and moving towards the top.


3. If you wish, you can glue 1 bead in the center of roses - in this way, you can decorate all roses or only some.
4. You can add one more decoration on the top - it can be part of a tinsel, bell or an asterisk.
* If you want to know how to make an asterisk, go HERE .
Christmas tree (phased)

You will need:
Colored paper, color cardboard, old notebook or unnecessary book
PVA glue
Curly scissors and simple scissors
Thick cardboard
Tassel for glue (optional)
Decorations (sequins, bows, beads, buttons, asterisks).

1. From the cardboard, cut the platform for the future Christmas tree.
2. Insert the sink in the cardboard platform and secure it with glue.
3. Start cut squares from paper. It will be more beautiful if you are cut with curly scissors (they can be found in stationery).
* You need to cut 9-10 squares - first 9 squares with a side of 20 cm, then 9 with a side of 18 cm and so on, reducing each group of squares by 2 cm.
* Choose the total number of squares themselves. You can also choose the size of the squares - if your tree is high, you can reduce the size of the next square of the squares by more than 2 cm, and if short, then less - 1-0.5 cm.
4. Cut out several small squares from the cardboard, which will be between square paper squares.

5. Start riding 3-4 squares from colored paper, between which there will be a small cardboard square.
* If you use 3 squares between cardboard parts, then it is preferred to cut 9 squares of each size.
* You can fix the squares on the skeleton with the help of glue.
6. To decorate the Christmas tree, you can gently apply a brush some glue on the tips of the squares, after which it gently sprinkle on them.
7. You can glue a button with a bow or something else - an asterisk or a bead, for example.
Original Christmas tree of colored Japanese paper with her own hands

You will need:
Colored cardboard
Tight paper with a pattern (can be replaced with color cardboard)
Color or wrapping paper (you can use the page from the old log)
White sheet of paper A4
2 spanks
Pencil and ruler
PVA glue or adhesive pencil
Scissors
Skal needle (if necessary).
1. Cut from color cardboard 14 rectangles 2 of one size. In this example, 2 rectangles have a size 21 x 28 cm, two more have a size of 18 x 28 cm, further (also 2): 16 x 28 cm, 13.5 x 26 cm, 12 x 26 cm, 9 x 25 cm, and 6 x 22 cm.
2. Preparing the basis for the Christmas tree:
Major A4 format paper cut into strips 2 cm. Twist the strip in the circle, add some glue at its end and glue the next strip (see image). Repeat the same action until you glide all strips into one large circle with a diameter of 3.5 cm.

* The greater the circle, the more stable the tree will stand.
3. Take a large color cardboard rectangle and start folding it by the harmonica, 1.5 cm wide. Ends of the harmonica cut rounded shape.

4. Fold the harmonica in half and glue the sidewalls - you got a semicircle.

5. Repeat the same with the second rectangle, then glue two semicircles to form a circle - it will be the branches of the lower christmas tree.

* To secure the halves of one circle, you can go through them thin wire and tighten its ends on the reverse side.

6. Make such images for another 6 levels of your Christmas tree.
7. Take color or wrapping paper and cut out several small rectangles from it, about 2 cm wide, which will be covered with shockings later.
Sucks will play the role of the trunk of the Christmas tree.
8. Grind ships through one big circle. Since there should be about 2 cm between the circles, these gaps need to be hidden, so we will wrap them with small rectangles of colored paper.

9. After each circle, wrap the spanks with colored paper, 2 cm wide, and glue its ends. Continue to repeat this action until all branches of the Christmas tree are put on the ships.
10. It remains to insert the ships in the round base (see clause 2) and secure them with glue.

* Makushka Christmas tree can decorate to taste - paper asterisk, bead or button.
Big Christmas tree

You will need:
Green paper sheets (preferably 2-shades - brighter will be on the top of the Christmas tree, and the darker of its foundation)
Cardboard cylinder 2 pcs. (from paper towels)
PVA glue or hot glue
Scotch (if necessary)
Big bow.

1. From the green sheets of paper you need to twist a lot of cones of about one size. The edges of the cones fasten with tape or glue so that the cones are not spinning.

* Try to make the place of fastening with a scotch or glue with glue all the cones in one place so that when creating the Christmas tree it was not visible.
2. Spread the two cardboard cylinder among them so that the tree can become high.

3. On the cylinders, draw lines at the same distance from each other so that you can smoothly glue cones.
4. Start folding the Christmas tree. Apply glue to the tip of one cone and press it to the cylinder, or rather the drawn line. It is better to start gluing cones from the bottom up.

* Propinate so that the cone hole is from the cylinder side (that is, the tree trunk).
5. Stick the entire series of cones, tightly pressing them to each other and, if necessary, glueing them with each other.
6. Go above and glipe the following series of cones. But it is not necessary to glue cones on the top.

For the top of the Christmas tree, it is best to glue a few cones among themselves. Stick to them a big bow and "wear" all this design on the cylinder. Not necessarily glued it.

