How to knit children's toys. Knitted toys with knitting needles with descriptions and diagrams: master classes for beginners. Modern knitted toys
Do-it-yourself knitted toys always carry warmth and comfort, can be both an ornament and a joy for children's games. A novice craftswoman can also knit a simple toy, starting with small simple schemes and improving her skills.
Knitted toys are usually soft: separate parts are knitted, stuffed with filler and sewn together.
Learning the basics
It is most convenient to crochet toys. There is even a whole direction of knitting - amigurumi... These are funny small knitted toys (animals, dolls, cartoon characters) with filling inside, sometimes with moving limbs (paws).


For a novice needlewoman, it will be quite difficult to knit such a toy right away, but there are several simple schemes for mastering this direction.
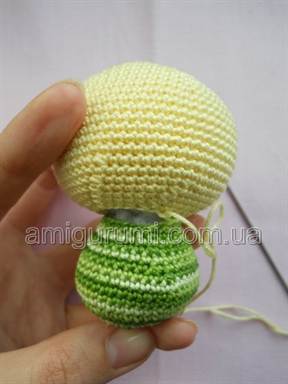
For example, you can link such a bunny:

For knitting you need:
- hook number 1 or 1.5;
- cotton thread (for example, "Begonia" or "Almina") cream, white, orange and green shades.
It is important that the rows are obtained without unnecessary holes and stretch marks, so the knitting will look more accurate, so we knit tightly. In order to understand where a new row begins, it can be marked with a small safety pin.
We knit separately all the details - ears, tail, head, torso, legs, front legs, carrots.
Legend:
VP - air loop;
s / bn - single crochet;
ss - connecting column.
pr - increase;
ub - decrease.
- First we knit the ears. You should get 21 rows. We make 6 single crochets in the second loop from the hook. In the 2nd row, we make 6 increments, i.e. 2 s / bn in one loop. Rows 3 and 4 are knitted with increments (1 s / bn, pr and 2 s / bn pr, respectively). 5-7 rows - 24 s / bn in a circle. In the 8th row we subtract - 2 s / bn knit together, then 6 s / bn and so on in a circle. 9-11 rows - 21 s / bn in a circle. In the 12th row, we again subtract - ub, 5 s / bn. 13-15 rows - 18 s / bn in a circle. From the 16th row, we begin to subtract through the row - dec, 4 s / bn and in a circle; 18 - kill, 3 s / bn; 20 - kill, 2 s / bn. Rows 17, 19, 21 we knit s / bn just in a circle.


- Then we knit a tail - 4 rows. In the 1st row - 6 s / bn in the second loop, 2nd row - 6 pr, 3-4 rows of s / bn in a circle.


- We knit the head - the most voluminous part of the toy. We dial 5 VP.
1 row - 4 s / bn, then in one loop 3 s / bn and in the last loop of the chain on the other side - 3 s / bn, pr;
2nd row - pr, 3 s / bn, 3 pr, 3 s / bn, 2 pr;
3 row - pr, 4 s / bn, pr, 1 s / bn, pr, 1 s / bn and repeat from the beginning;
4 row - 2 s / bn, pr, 5 s / bn, pr, 2 s / bn, pr and repeat from the beginning;
5 row - 1 s / bn, pr, 6 s / bn, pr, 3 s / bn, pr, 3 s / bn, pr, 6 s / bn, pr, 3 s / bn, pr, 2 s / bn;
6 row - 3 s / bn, pr, 7 s / bn, pr, 4 s / bn, pr, 4 s / bn, pr, 7 s / bn, pr, 4 s / bn, pr, 1 s / bn;
7 row - 2 s / bn, pr, 8 s / bn, pr, 5 s / bn, pr, 5 s / bn, pr, 8 s / bn, pr, 5 s / bn, pr, 3 s / bn;
8 row - 4 s / bn, pr, 9 s / bn, pr, 6 s / bn, pr, 6 s / bn, pr, 9 s / bn, pr, 6 s / bn, pr, 2 s / bn;
10 row - 3 s / bn, pr, 10 s / bn, pr, 7 s / bn, pr, 7 s / bn, pr, 10 s / bn, pr, 7 s / bn, pr, 4 s / bn;
9, 11-17, 19 rows are knitted just in a circle.


We fill the head with filler and tighten the thread a little.


- We knit the legs: we collect 2 VP.
1 row - 6 s / bn in the second loop from the hook;
2nd row - 6 ave;
3 row - 3 s / bn, pr;
4-5 rows - in a circle;
6 row - kill, 3 s / bn;
7-8 row - in a circle.

- For the front legs, we also collect 2 VP. In the 1st row we knit 6 s / bn into the second loop. We make an increase only in the 2nd row on all loops. Rows 3, 5-6, 8 simply knit in a circle. We decrease in 4 and 7 rows - kill, 4 s / bn and kill, 3 s / bn, respectively. In the 9th row we do 2 ss, 4 s / bn, 2 ss.


- For the torso, we type 2 VP. In the 1st row we knit 6 s / bn in the second loop from the hook. We make increments in 2 (6), 3 (1 s / bn, pr), 4 (2 s / bn, pr), 5 (3 s / bn, pr), 6 (4 s / bn, pr), 7 ( 5 s / bn, pr) rows. We knit 8-10 rows in a circle. From the 11th row, a decrease begins through the row - 11 (kill, 5 s / bn), 13 (kill, 7 s / bn), 15 (kill, 6 s / bn), 17 (kill, 5 s / bn). Rows 12, 14, 16 are knitted in a circle.


We also fill the body with filler.
- For the muzzle, we type a chain of 4 VP.
1 row - 3 s / bn, go to the other side: 3 pr, 2 s / bn, pr;
2nd row - pr, 2 s / bn, 3 pr, 2 s / bn, 2 pr;
3 row - pr, 3 s / bn, pr, 1 s / bn, pr, 1 s / bn and repeat from the beginning.

- For carrots, we collect 2 VP. In the 1st row we knit 6 s / bn into the second loop. We make an increase only in the 2nd row. We knit rows 3, 5-6 in a circle. We make decreases in 4 (kill, 1 s / bn), 7 (kill, 1 s / bn), 8 (kill, 2 s / bn), 9 (1 s / bn, kill), 10 (kill) rows.
With a green thread, using a needle, we make loops - tops.


Now that all the parts of the bunny are ready, you can sew everything together.


We will embroider the nose and sew on the eyes.


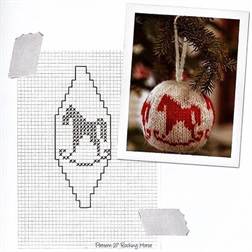
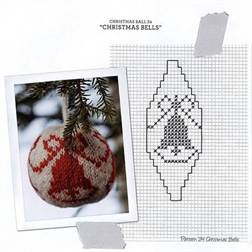
According to the amigurumi principle, you can also knit New Year's toys - balls and figures of animals, Santa Claus and Snow Maiden:


Uncomplicated volumetric herringbone:


You can knit a toy on a Christmas tree in a simpler way - in a circle with beautiful edges like a knitted napkin. This is how you can make snowflakes:


Here are some patterns for knitting such jewelry:


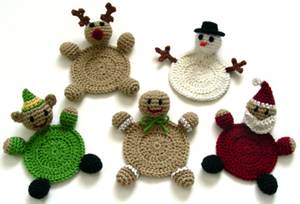
Here are some more simple, "circular" crocheted toys with additional elements sewn on:

In addition, Christmas tree decorations and decorations can be knitted. For example, here are the related cozy balls:


Such balls are knitted according to the raglan principle with stocking needles. 12 loops are recruited and distributed over 4 knitting needles, then loops are added in every second row (on both sides of each knitting needle). Loops are also reduced in every second row.
Knitting patterns for balls:


If you want to please not only yourself, but also your child, you can knit toys for children. First of all, these are educational toys - cubes, figures, balls. They can also be knitted according to the amigurumi principle or simply in a circle, sewn in zippers, sew on Velcro, beads and other items. You can tie boxes or balls and make a rattle out of such a toy.
Here are some photos for ideas and inspiration:


Related videos
You can watch a video on how to knit toys.
Little kids like their mothers For novice craftswomen, it is better to pay attention to round and oval shapes. It can be the sun, ladybug, penguin, chicken, bee, egg, smeshariki, mice, turtles. Gradually move on to more complex models that are connected by patterns, have moving parts of the body. Let's take a closer look at how to tie rattles, soft and developmental models.
Round (for beginners master class)
Rattles in the form of ladybugs or turtles are suitable for babies. To do this, first knit the bottom with single crochet in a circle. Type a chain, close it and move in a circle, adding loops evenly (knit two loops in one base). The bottom diameter will determine the size of the toy. Knit the last row with black thread.
Then, according to the same plan, knit the top of the ladybug. As soon as the circle reaches the same size as the bottom, continue to knit without adding. That is, the top will begin to round off and will look like a hat. Tie the last row with black thread. If the ladybugs are five to seven centimeters in size, then they can be used as New Year's toys (crochet a loop and sew to the body).
Then fasten the bottom to the top and stuff it with padding polyester. It turned out to be a semicircle. Now sew it in half with black threads. Knit small speckled circles, attach to the body.
Ladybugs, turtles
Next, knit an oval-shaped head from black threads, like the bottom for booties. That is, you type a chain of three to five loops and tie it in a circle with single crochets, adding two loops every time. Then fold the oval in half, sew, fill with padding polyester, sew to the body. The eyes can be embroidered with threads or beads.
If you put a bell inside, then the toy will ring. If you fill toys with different contents (buckwheat, peas, beans), then they can be used in the sensory development of children. Having imposed several ladybugs of different colors, you can teach colors with children, and numbers by specks.
Now let's look at how to tie a turtle. The carapace is knitted according to the above-described plan. For larger turtles, add another thread to create spots on the shell. If there are small multi-colored rows. Next, make the paws, tail and head. The principle is the same, only the number of loops is different.
You start by knitting a circle and then with or without increments (tail), decrements (paws, head and neck) create the desired shape. The paws and tail are stuffed lightly, if the yarn is dense, then do not use a synthetic winterizer. Attach all parts to the shell. You embroider eyes and mouth on your head.
Penguin
Beginning craftswomen knit such round toys not entirely, but in parts. Consider the example of a penguin.

Smeshariki
Now let's look at how to crochet the whole toy. Smesharikov is made according to this plan. You begin to knit the body like a penguin, only, having reached halfway, you continue to work, decreasing the loops and forming a ball. So, do Nyusha as follows:
- start knitting with a chain of two loops;
- add six columns in each row;
- make an increase in nine rows;
- knit the next eight rows without increments;
- from the nineteenth row, create a parting on the side of the face, changing threads of different colors;
- from the twentieth row, begin to subtract six columns in each row;
- fill with padding polyester;
- pull the last three loops with a thread.
Separately knit cheeks in the form of hearts, legs, arms, eyes with eyelids, a patch, sew to the body. You can insert a wire into your arms and legs, round the end of which into a loop, wrap it with padding polyester. Then the limbs can be twisted, bent. You make your hair from threads, pulling it through the loops, like a fringe. Plait in a braid, decorate with a bow.
Pattern toys
There are toys that are knitted so professionally that they cannot be distinguished from the factory ones. But even beginners can knit models no worse, the main thing is to know a few nuances. So, how to crochet a toy to get a "shop" look.

- Patterns for sewing soft toys. Select the image you want to link. Find sewing patterns for this toy. Transfer to paper, this will be the template according to which you will knit the patterns. Use regular single crochets or tie stitches. Then you knit or sew the patterns together, fill with padding polyester - and the toy is ready.
- Banners. To get "dimples", "jumpers", you need to pull off crocheted toys. Ready-made toy making kits are sold for beginners. But you can practice on bees, bears and bunnies, and then move on to making dolls. For example, to make toes, you need to wrap the thread from the middle of the palm, insert the needle at the same point and pull the thread.
- Amiguri. These miniature toys are difficult to knit, as they require manual dexterity due to their small size (no more than ten centimeters). But on the other hand, you can get tremendous experience, which you transfer to the manufacture of large models.
Development schemes, description
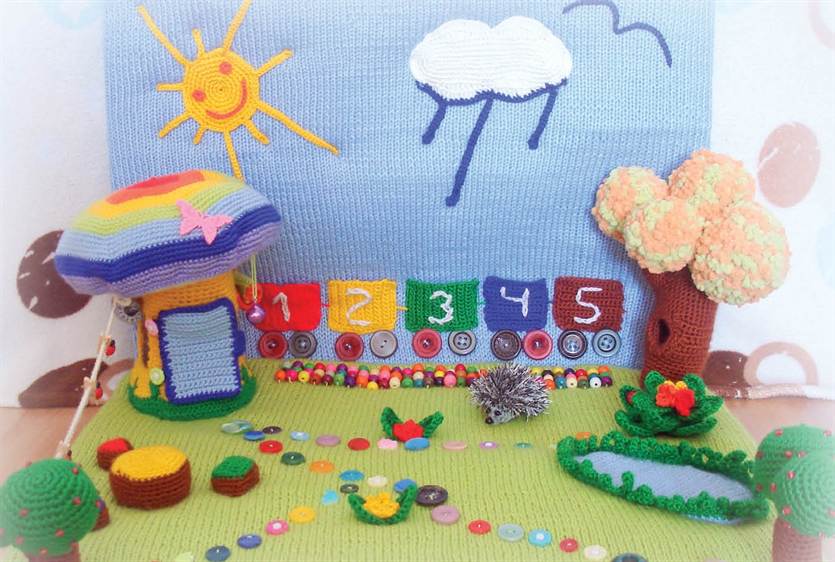
The hook allows you to create a variety of analogs of real objects: animals, plants, food, food, insects, dolls, vehicles, dishes, shoes. Such toys can be used as didactic material for learning colors, numbers, letters, time, for sensory and speech development.

Here's how to make a weather study guide.
- The sun. Knit the halves of the ball as described when making the penguin. Knit the rays with triangles or sew on a special braid. Sew the halves, fill with padding polyester. You embroider eyes, mouth, cheeks.
- Clouds, clouds. Knit large and small circles that overlap to form a wavy cloud. If you need to add colors, then make the edging with blue or gray threads.
- Precipitation. Knit rain with blue droplets, hail with white balls, and snow with snowflakes. By the way, multi-colored precipitation is used as Crochet (select schemes for beginners) to knit a chain of different lengths for each element.
- Rainbow. You make multi-colored stripes, connect them together, insert a cardboard base, sew parts.
Tie all the details by strings to a wooden base or an arc on a baby bassinet. If each element is knitted in large sizes, hands and feet are sewn on, then unusual toys are obtained.
Alarm
Here is another version of the didactic manual - an alarm clock. Crocheting a toy for beginners according to the scheme is not difficult.

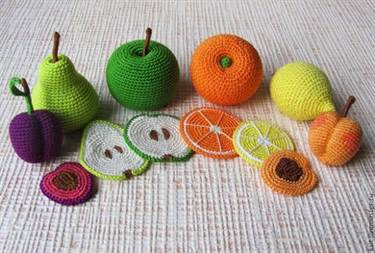
Vegetables, fruits, berries, food
Children are eager to play in the store, and this requires a product. The foam analog quickly falls into disrepair, but knitted products delight with their diversity: sweets, eggs, chickens, sausages, vegetables, steak, fruits, sandwiches, berries, pasta, scrambled eggs, herbs, pastries, cakes, etc. the color of the thread, and you can crochet any volumetric toys (there will be no difficulties with the diagrams).
Chocolate berry cake:
- Cut a circle out of thick foam rubber (from five centimeters thick).
- Divide it into cake pieces and cut.
- Now tie the foam rubber pieces.
- Start at the top. Knit a triangle with a white thread, try on foam rubber. Pass the last row with a brown thread and go to the sidewalls. Try on the pattern periodically and change the thread color to highlight the biscuit layers.
- Finish with a brown triangle, which you knit from the side of the piece. Apply to the template, sew the sidewalls.
- Thus, you knit all the pieces of the cake. Then sew cream from the "cream" edge (separately knit a chain with numerous arches with columns and pico).
- Sew Velcro to the pieces of the cake, which holds the culinary masterpiece together.
If you sew a loop to individual pieces and insert special blanks, you get a keychain. And if made in different colors, then it can be used as original New Year's toys. Crochet (the schemes of berries are given below) knit strawberries, "cream" leaves, flowers and other culinary decorations.
Strawberry
Strawberries are knitted from 12 rows:
- Chain of three loops.
- 6 single crochet.
- Add 3 more rows by three columns.
- Next, add three rows by five loops.
- You should get 25 loops, knit four rows without increments.
- Decrease eight times, reaching 17 columns.
- Decrease five times, leaving 12 loops.
Turn the strawberries inside out, stretch them with your fingers, giving the necessary shape. Fill with padding polyester, pull the thread. Sew on the leaves with a green thread, make white grains with a needle.
Any fruits and vegetables are knitted according to the original. So, a banana consists of a milk core and a yellow peel, which divides into four parts from the middle; carrots are knitted with increments, like strawberries, only elongated; radishes and beets are also similar to knitting a sweet berry, only the base is wider.
Crocheting a toy for beginners will be easy if you mentally divide it into sectors of geometric shapes. For example, divide the apple into six petal parts. When they are sewn together and filled with padding polyester, clearer shapes are obtained. The top and bottom of the apple are pulled together with a thread and decorated with a twig with a leaf. And the cut apple resembles a tortoise shell in shape, only put a cardboard circle in the bottom.

conclusions
Crochet allows you to create products in whole or in parts. Novice craftswomen can start by tying wooden or plastic blanks, then the experience of knitting different geometric shapes will appear. And then you can create different toys yourself. Also pay attention to the yarn. Now it is presented in different configurations (grass, lumps, ribbon-like, pellets, flowers), which allows you to create fantastic images.
Features of crocheting soft toys. Descriptions and schemes of work on cartoon heroes, animals, Christmas decorations.
The world of toys is diverse and unique. A person's fantasy helps him to replenish with new images, characters.
A mother-needlewoman is not only a source of creativity, but also a find for children, relatives and friends. She loves the business in which she is engaged, and always knows how to please a dear person.
Toys are loved not only by children, but also by adults. Therefore, let's talk in more detail about the features of crocheting them.
Crochet amigurumi doll: scheme, master class, photo

To crochet an amigurumi doll, you need to choose its image and prepare materials - yarn of different colors, hair tresses, cardboard for shoe soles, bead eyes, filler, for example, holofiber. The set is dynamic, adjust it to make the doll you like.
The order of knitting is as follows:
- head
- legs with a smooth transition into the torso
- accessories - bag, vest, hat, scarf
- assembly
For a detailed knitting pattern, see the figure below.

And photos of dolls for inspiration.


An interesting master class in the video below.
Video: Amigurumi doll knitting workshop
How to crochet beautiful large soft toys: diagram, description, photo

white lamb - a large crochet toy
A big bear or bunny, tied by hand, will appeal to both the child and the mother. A distinctive feature of large products is the absence of small parts, which are not always possible to connect the first time.
So, you need materials:
- yarn of different colors
- filler
- thread for embroidery in contrasting colors or the same with yarn
Since the coming year will be held under the auspices of the Dog, we will add a detailed description and diagrams for crocheting it.

Knitting a dog

And a photo of a number of ready-made large animals for inspiration.

ready-made large crochet toys - hippo

ready-made large crochet toys - bears

ready-made large crochet toys - cat

ready-made large crochet toys - cow

ready-made large crochet toys - unicorn
For those who prefer to watch and listen, we will add a video master class below.
Video: Big toy Hare with your own hands crochet
How to knit beautiful crochet marshmallow toys: diagram, description, photo

The secret of the beauty of marshmallow toys lies in special bulk yarn. The knitting technique is still the same - amigurumi.
To keep the toy in shape, prepare the required amount of filler.
Below in the picture you will find a diagram and a description of working on a marshmallow sheep.

crochet marshmallow sheep - job description
A selection of photos of finished toys from bulky yarn.


How to crochet beautiful toys from cartoons from yarn?

Crochet antoshka
Cartoon heroes are the object of children's desire. They want to play with them, and therefore ask their parents to buy. A mother-needlewoman can easily replace the store version with her own, made with a hook and yarn.
You should soberly assess your skills and choose the version of the toy that you can knit. Be sure to stock up on decor fittings, if needed, and filler.
It is often easier to tie the toy's body, head, and limbs first, and then the clothing for the toy.
The bright yarn and the presence of image details, for example, beads on clothes, flowers in the hair or on the ears, a striped tail, a cub in paws or wings, make beautiful knitted cartoon heroes.
How to crochet a beautiful soft toy from grass?

Weed yarn adds volume and uniqueness to the knitted toy. After choosing a character, choose the colors and texture of the yarn. For example, for a lamb, take "grass" of white and black or other bright colors, for a lion - several types of yarn leftovers and a little yellow or orange "grass".
- First knit the head, torso and legs. Fill them with padding polyester or holofiber while working.
- Then move on to enliven the toy - add eyes, mouth, nose, and other details that complement the image.

crochet grass hedgehog - description
How to crochet a beautiful soft toy dog?

In general, the technique and order of knitting of toy parts is identical to those discussed above. The difference will be in the style of the dog you choose, yarn and details.
As an example, let's add a job description in the figure below.

long-haired crochet dog - description from the magazine, 1 page

long-haired crochet dog - description from the magazine, page 2
How to crochet a beautiful soft toy cat?

Cats are different both in real life and in a toy. The imagination of needlewomen is limitless, plus it is expanded by cartoon images.
So, one cat can be completely identical to a pet in both size and body structure. And the second is tied like a rectangle with legs, ears and tail. The third is completely tiny - an oval with expressive eyes. The fourth has long legs and prefers to walk only on its hind legs.
Therefore, choose an image, sketch it, decide on the sequence of knitting and create your unique crochet cat. Below, as an example, a description of the work on one of them.

How to crochet beautiful soft toys rattles?

- Prepare some brightly colored yarn, crochet hook and filler.
- Decide on the image. For example, it will be a ring with a beast face or a stick with a ball at the end.
- Tie all the components of the rattle, fill them with cotton wool, holofiber, sew them.
- Add strokes, for example, a smiling mouth, nose, eyes to the head of the animal.
Below is a description of working on a rattle as an example.

How to crochet a beautiful soft toy owl?

The concept of the beauty of soft toys individually. Therefore, there are many examples of finished works. Some people like small cute owls-keychains, tied with a solid canvas, others like toys from the head, body, wings and paws, made as separate elements with subsequent stitching. In the amigurumi technique, owls are like cartoon characters that children especially like.
We add a description of how to crochet an owl as an example.

crocheted owl diagram, page 1

How to crochet a beautiful soft toy giraffe?

funny couple of crocheted giraffes
Cute giraffes of any size will appeal to kids of all ages. Since the animals are smooth-haired, leave the grass and similar fluffy yarn for other ideas. You will need at least 2 colors of thread.
What makes a giraffe interesting is its spots. Therefore, pay enough attention to knitting them. Perform a few rows of knitting cycles for each speck, and then gently sew onto the animal's body. If it's winter outside, add a knitted scarf around the giraffe's neck.
Below is a detailed description of the work as an example.

How to crochet a beautiful soft toy bear?

The amigurumi technique makes it quite easy to crochet any animal. The bear is no exception. The main thing in the process of work is to fill the finished parts of his body with a padding polyester or holofiber and leave long tails of yarn, so that later with their help, sew the paws and head with the body.
Optionally add wardrobe items to the bear, for example, a scarf, or something that matches his image.

How to crochet a beautiful soft toy hare?

cute hare with long ears crocheted
The technique and sequence of crocheting a hare is similar to any one discussed above. An important difference is the long ears. Make them from yarn of 2 colors and sew to the head.
For inspiration, see the job description below in the picture.
photo of a crocheted Tilda doll
Cute Tildas also come to life in the hands of a crochet knitter.
- Choose the one that you or your child likes the most and decide on the scheme of work.
- Then follow the classic amigurumi sequence. And pay attention to the doll's clothes and accessories.
- Pay attention to the creation of hair on her head. If you will be using yarn, use a thicker, thicker thread. A number of needlewomen, in addition to sewing on yarn, practice gluing it. You can combine the two for a secure fit.
Depending on the age of the future mistress or other purpose of the doll, Tilda can be:
- soft
- wireframe, that is, contain wire
- interior
Let's add a description of a play doll with skeleton arms and legs.

How to crochet smeshariki?

The basis of these cartoon heroes is a circle on which paws, hair, horns, clothes, tail are located. It depends on the specific character.
To keep the toys stable, place the cardboard at the base of their paws. Let's add some examples of work patterns.
three crocheted merry Christmas toys lie on the table
Use tying foundations or create soft, cotton-filled Christmas tree decorations. In the first case, the following are suitable:
- old toys
- plastic containers from kinder
- light large beads
In the second case, pick up the image. For example, a tree, a cat, a sock, a bell, a heart, the head of Santa Claus, and so on.
Let's add an example of how to crochet a Christmas tree toy.

photo and description of crocheting Christmas tree angel toys
So, we examined in detail the features of crocheting soft toys from the largest sizes to miniature ones on the Christmas tree. The desire to please their children and relatives is inherent in women by nature. Therefore, arm yourself with yarn and crochet and master basic techniques to create your own unique toys. Smooth loops for you!
Video: how to crochet a soft toy hare?
What could be nicer than a toy, especially one made with your own hands? Since ancient times, mankind has used materials at hand to create such crafts: leather, fabric, clay and plaster, threads and much more.
Today, homemade dolls and animals have become very popular. We bring to your attention crochet toys for beginners with detailed patterns.
What is amigurumi?
Crocheting amigurumi toys has long been a favorite of many needlewomen.
This is the Japanese art of handicraft. With the help of knitting needles or a hook, small animals and creatures that look like people are created. The peculiarity of the technique lies in the process of knitting in a spiral without connecting rows.
Crafts in this style turn out to be very attractive and cute, even despite their characteristic disproportion - the head is larger than the body.
Crocheting toys with patterns is not difficult. The main thing here is to learn how to read them correctly.
Crochet toys: patterns and reading them
Although the amigurumi toys themselves have become quite popular in CIS countries, there are very few schemes in Russian. They are mainly found in Japanese and English. But the main thing is not language proficiency, but the ability to correctly interpret the symbols.
The amigurumi pattern is a picture of knitting and a table that indicates the number of rows and types of loops.
For example, in this diagram, we read that the 9th row consists of 7 columns and addition loops, which must be repeated 6 times.
1. Amigurumi do not fit entirely at once, first separate parts are created, and then they are connected together.
2. The knitting sequence is as follows:
- head - from the back of the head to the neck;
- body - from the fifth point to the neck;
- arm - from hand to shoulder;
- leg - from the foot to the base.
3. After knitting the first row, make sure you pick the right hook and you get tight stitches with no gaps.
4. Fill the product thoroughly based on its degree of stability:
- if the toy has paws and a tail, then the main emphasis is on them;
- if the craft has no limbs (for example, a cloud, a monster, etc.), then add weight to its base.
5. Do not use fabric trimmings or thread trimmings as filler. This significantly reduces the quality level of the toy.
6. Hide the ends of the yarn and thread inside the product.
Required materials and tools
Crocheting toys for beginners is not possible without the use of such basic tools and materials:
- hook (its size should be thinner than the selected thread);
- yarn;
- filler for finished toys (cotton wool, synthetic winterizer, foam rubber and much more);
- decorations for decor (buttons, beads, beads, ready-made eyes, spouts, and so on);
- various auxiliary materials for decorating toys, such as markers, wax crayons and the like.
Also, beginners cannot do without one of the most important things that simplifies crocheting toys - weaving patterns.
The first stage of work
Whatever the shape and complexity of the toy you choose, any will start with an amigurumi ring. By the way, this piece can be used in other crochet techniques as well.
The amigurumi ring is not only a distinctive feature of toys made in this style, but also a prerequisite for high-quality knitting. It guarantees the absence of a hole in the center of the circle, which sometimes appears not only for beginners, but also for experienced needlewomen. Let's take a closer look at crocheting amigurumi toys.
Ring creation schemes:

Amigurumi ring ready. You can continue to knit a toy or make several such blanks for the future.
Crochet toys - simple patterns
For beginners, it is better to start with products that have a minimum of parts. So what can we do to create crochet?
Simple toys:

An example of knitting a cute monster:
- Weave an amigurumi ring, for example, from 6 loops.
- Insert the hook into the face of the ring and hook it onto the working thread. Pull the tab up through the ring.
- Begin row 2. Wrap the yarn around the back of the crochet hook and loop through the loop. This is called a single crochet. Knit another one through the next loop.
- Then, throughout the entire 2nd row, do 2 single crochets in each loop. This is called an increase. Thanks to her, the second row now consists of 12 loops.
- 3rd row - knit 6 times the sequence: 1 single crochet + 1 increase. In total, 18 loops will come out.
- 4th row - knit 6 times: 2 single crochet + 1 increase. There will be 24 loops.
- From the 5th row, make simple loops without increments. Thus, you get the walls of the toy. The number of rows down depends on how high you want the monster to be.
- When you have finished knitting the walls, do not cut the yarn completely, leave a small tail. You will need it for sewing on the base.
- We turn to knitting the bottom. It is made in the same way as the main part from the 1st to the 4th row.
- Stuff the toy with filler.
- Sew the bottom to the body, for this, pull together the nearest loops of the two parts.
- Tie the ends of the thread, cut it shorter and hide it inside the product.
- The face of the toy can be made from threads, pieces of felt, beads or ready-made eyes. You can also come up with additional decorations: bows, butterflies, mustaches, eyebrows, and so on.
Knit Tilda Fatty
This cute doll can become not just a toy for a child, but also a worthy interior decoration. The size of the finished product is about 34 cm.

Explanations for the diagram:
- VP - air loop;
- Sbn or Stbn - single crochet;
- Stsn - double crochet;
- decrease - decrease;
- n - increase;
- ps - offset loop (at the end of the row, knit one column, not counting it, put a mark and from here start counting the next row.
Knitting pattern for the torso and head of a doll (one detail)
We start with a dark thread. We collect a chain of 64 VP and close the circle.
- Rows 1 and 2 - 64 loops.
All increases-decreases should be strictly on the sides.
- 3 row - 1 st, 31 sts, 4 sts, 31 sts (66 loops in total).
- 4 and 5 rows - 66 loops each.
We take a light thread:
- 6 p. - 1 y, 31 sbn (total 64 loops).
- 7 p. - 1 y, 30 SBN behind the back wall (62 loops).
- 8 p. - 1 y, 29 SBN (60 loops).
Dark thread:
- 9 row - 60 loops.
Light thread:
- 10 p. - 1 y, 28 SBN (total 58 loops).
- 11 p. - 1 y, 27 SBN (56 loops).
- 12 p. - 2 y, 24 SBN (52 loops).
Dark thread:
- 13 row - 1 y, 23 sbn, 1 y, 25 sbn (total 50 loops).
Light thread:
- 14 p. - 1 y, 21 st. without crochet, 2 y, 21 Stbn, 1 y (total 46 loops).
- 15 p. - 1 y, 21 st. without crochet, 1 y, 21 Stbn (44 loops).
- 16 p. - 1 y, 18 st. without crochet, 2 y, 18 Stbn, 1 y (40 loops).
Dark thread:
- 17 row - 18 Stbn, 1 y (total 38 loops).
Light thread:
- 18 p. - 38 loops;
- 19 p. - 1 y, 17 Stbn (total 26 loops).
- 20 p. - 1 y, 16 Stbn (34 loops).
Dark thread:
- 21 row - 34 loops.
Light thread:

Dark thread:
- 25 row - 1 y, 13 Stbn (total 28 loops).
Light thread:
- 26 p. - 28 loops;
- 27 p. - 1 y, 12 sbn (total 26 loops);
- 28 p. - 26 loops.
Dark thread, 29 row - 26 loops.
Body thread:
- 30 p. - 1 y, 11 sbn (total 24 loops).
- 31 p. - 24 loops.
- 32 p. - 1 y, 4 Stbn (20 loops).
- 33 p. - 1 y, 3 Stbn (16 loops).
- 34 p. - 1 y, 6 Stbn (14 loops).
- 35 p. - 1 y, 5 Stbn (12 loops).
- 36 p. - 12 loops.
- 37 p. - 2 sts, 3 sbn (15 loops).
- 38 and 39 rows - 15 loops each.
- 40 p. - 2 sts, 4 double crochets (18 stitches).
- 41-45 rows - 18 loops each.
- 46 p. - 5 y, 1 double crochet (12 loops).
- 47 p. - 2 loops (6 loops).
Attach a frill to the 7th row, knitted behind the back wall:
- 1 row - knit with light yarn double crochet, in this case, an increase is made in every 4th loop.
- 2nd row - 3 ch for lifting, 1 stsn and 3 chs to the end (knit a column with a crochet through a loop to make cells).
- 3 row - we knit shuttlecocks along the wall of the cells, we get 3 lines, each with 3 Stbn.
- Tie the 4th row with a dark thread.
Tilda's leg knitting pattern
The sequence of loops in rows:
- 1 p. - Tie 4 loops with an amigurumi ring (thread according to the color of the shoe).
- 2 p. - after each loop, an increase is made.
- 3, 4, 5, 6 rows - 8 loops each.
Break off the thread and attach the flesh-colored yarn.
- 7 p. - 8 loops.
- 8 p. - 1 p, 7 Stbn, make an offset loop.
- 9 p. - 1 p, 8 Stbn.
- 10 p. - 2 p, 8 Stbn, ps.
- 11 p. - 2 p, 10 Stbn, ps.
- 12 p. - 14 loops.
- 13 p. - 1 p, 13 Stbn, ps.
- 14 p. - 15 Stbn.
- 15 p. - 1 p, 14 Stbn, ps.
- 16 p. - 1 p, 15 Stbn, ps.
- 17 p. - 1 p, 15 Stbn, ps.
- Rows 18, 19 and 20 - 18 loops each.
Break off the flesh-colored thread and attach the yarn to match the color of future breeches.

- 21 p. - 18 Stbn, ps.
- 22 p. - 1 y, 7 Stbn, 1 y, 7 Stbn (knit all 16 loops behind the back wall);
- 23 p. - 16 loops.
- 24 p. - 1 st, 7 stbn, 1 st, 7 stbn, ps.
- 25 p. - 1 p, 17 Stbn.
- 26 p. - 2 p, 17 Stb.
- 27 p. - 2 p, 19 Stbn, ps.
- 28 p. - 1 st, 10 stbn, 1 st, 11 stbn, ps.
- 29 p. - 2 p, 23 Stbn, ps.
- 30 p. - 1 p, 26 Stbn, ps.
- 31 p. - 1 p, 13 Stbn, 1 st, 13 Stbn, ps.
- 32 p. - 1 p, 29 Stbn, ps.
- 33 p. - 1 p, 30 Stb.
- 34-38 rows - 32 loops.
- 39-15 rows - Sbn, 1ub, 15 Sbn.
- 40-15 rows - Sbn, 1 y, 14 Sbn.
- 41-15 rows - Sbn, 1 y, 13 Sbn.
Tilda's hand knitting pattern
Start with a thread to match the color of the dress:
- 1 row - 7 columns with a crochet, close in an amigurumi ring.
- 2nd row - make 7 increments.
- Rows 3-7 - 14 loops each (row 4 with a dark thread, row 7 behind the back wall).

We change the thread to the bodily one:
- 8 p. - 1 Stbn, 1 y, 2 times 3 Stbn and 1 y, 1 Stbn (total 11 loops).
- 9-18 rows - 11 loops each.
- 19 p. - 1 y, 10 sbn.
- Rows 20-29 - 10 loops.
- 30 p. - 5 decreases.
We break the thread.
We tie circles to the 7th row.
- 1 row - double crochet (make an increase in every 4th loop so that the sleeve is wider than the arm), and then tie with arches of 3 VP, clinging through one loop (in dark color).
Knitting pattern for Tilda's hair and hats
To make the doll hair, you need to stick a needle into Tilda's body near the shoulders and a few pins in the head along the parting. For convenience, tie one end of the thread to the knitting needle. Start winding your hair with a figure eight on the ends of the knitting needles through the crown. After a few turns, secure the hair at the crown of the head with a needle. Continue winding, laying the threads from the top of the head to the back of the head and securing with stitches all the time. When the entire head is covered with hair, it is necessary to insert a needle and thread into the neck, as if tying low ponytails.
Tie the thread in the place where the knitting needles are (thread instead of the knitting needles), pull the thread up, lifting the hair, and then fasten it with a thread and a needle on the sides so that bunches are formed.

Hat knitting pattern:
Close 6 loops in the amigurumi ring.
- 1 row - 6 increments.
- 2 p. - 6 times 1 sbn and 7 sts (total 18 loops).
- 3 p. - 6 times 2 sbn and 2 sts (total 24 loops).
- 4, 5 and 6 rows - 24 loops each.
- 7 p. - 24 stitches with tight thread.
- 8 p. - behind the back wall (the fields of the hat begin), knit 2 STSn in each column (in total, 48 loops will be obtained).
- 9 p. - tie the fields of the cap with arches of 3 VP, clinging through the loop.