New Year paper products. Simple schemes for creating paper origami for the new year with your own hands. Volumetric paper figures
The last days of December are full of troubles. Each hostess is trying with all her might to create a fabulous atmosphere in her home. But in order for your home to become even more beautiful on New Year's days, it is not necessary to buy a bulky and heaped chinese jewelry. It is enough to arm yourself with scissors, glue, a sheet of cardboard and a pack of colored paper. From these materials you can make very unusual and cute crafts, which will be a wonderful decoration for your home or office. Some products can be used as, while others can be used on their own. Several hours spent on making paper decorations are worth the joyful smiles of your loved ones!
paper christmas tree
original christmas tree with lacing at the edgesChristmas tree - the main decoration New Year's interior. creates a solemn mood and pleases us all winter holidays. Well, a decorative paper tree that will decorate your windowsill can be stored up to next year. To make this craft, prepare:
- 8 Christmas trees cut from thick paper or cardboard
- cutter
- scissors
- hole puncher
- Double-sided tape
- white thread or thin cord
- white sequins
- white acrylic spray
- ruler
- cardboard sheet

Because it doesn't happen Christmas trees without stars on the top, make the top first. Draw the outlines of the figure on the cardboard. Then, using a ruler and cutter, carefully cut out the star. From eight paper blanks, assemble a Christmas tree. Attach it with double sided tape. The edges of the product should be symmetrical, so it is better to fasten the corners with glue.
 Examples of the design of cardboard Christmas trees
 Punch holes along the edges of the craft with a hole punch and paint your product with white spray paint. Make the trunk of the tree 5 cm wide. Then pull a white woolen thread or cord through the holes made earlier. To "stitch" it was more convenient, take a needle with a large eye. Spray the star with white paint and attach it to the top with glue. Decorate the entire piece with glitter. To do this, you can use the golden rain, Christmas decorations or different colored paper glued on the sides of the Christmas tree.
House for sweets
 Such houses will be an excellent package for New Year's cookies.
 You can decorate your home with this craft, hang it on a Christmas tree, or use it as a package for sweets. To make it you will need:
- house template ()
- scissors
- stationery knife
- ruler
- double tape

 Creating a sweep of a cardboard house
 First, print out the house template. You can also draw a similar sketch of your choice. Then cut out the template. For particularly delicate items, use a clerical knife. Bend the blank along the dotted lines using a ruler or a postcard fold tool.
 Step-by-step instruction for making crafts
 Glue the house together using double-sided tape. Decorate and decorate the product at your discretion. Fill the craft with your favorite sweets and you can please the children with it! Well, if you print the templates of houses on colored paper, you will have a motley New Year's town.
Christmas lantern
 Cardboard lantern is ideal for children's creativity
 Lanterns will create a fabulous atmosphere in the house. They can be made from colored paper in just a few minutes! cut the ribbons the same length and width (dimensions depend on the size of the future product). To make one flashlight, prepare about 15 strips of paper. Then put them in a pile and use an awl to make holes at both ends of the blanks.
 Step by step instructions for making a paper strip lantern
 Thread on one side. Tape its end to the strip. Then pass this thread through the second hole. Stretch it so that the paper is bent into an arc. Secure the thread with a knot. It should be large and not slip through the holes. On the final stage straighten the strips to form a ball. Here is our flashlight! Several items look very nice. different colors and sizes hung side by side.
Volumetric snowflake
 The 3D snowflake looks spectacular and is not difficult to create.
 Traditionally, most families use as New Year's decor. They are made mainly of paper and decorate the whole house with “snowfall”: a Christmas tree, walls, windows. There are many techniques for making this craft. For example, you can make an effective volumetric snowflake. To do this, you need to stock up:
- paper (white, color and wrapping)
- scissors
- glue
- stapler
 Step-by-step instructions for creating a three-dimensional snowflake
 Cut out six square pieces. Fold each square diagonally and cut inside with scissors. Open the square and place it on the table in front of you. Roll the first row of strips into a roller and fasten its edges with a stapler or glue. Then turn the snowflake to the other side and similarly connect the two strips of paper that are closer to the center. Turn the product over each time and fasten the remaining strips.
In the same way, fold the remaining five blanks. Connect the three parts of the snowflake with a stapler in the middle. Fasten the remaining three parts in the same way. Now glue these two halves together. To keep the shape, it remains to connect the snowflake where each of the six parts is in contact with the next. Decoration can be made from paper of any color.
christmas angel

The magical spirit of Christmas will always be present in a house decorated with angel figurines. They can be created with:
- colored paper
- PVA glue
- scissors
First, make a patterned snowflake. To do this, prepare a sheet of white paper measuring 20 by 20 cm. Fold it in half, then in half again and fold the two opposite corners together. Cut out with sharp scissors. Can be used instead of paper openwork napkins. Glue half of the snowflake onto colored paper and cut out a semicircle from it.

Thoroughly coat its edges with glue and connect into a cone. Cut out wings from paper and attach to the back of the product. Draw the face of the future angel: eyes, nose, mouth. Hair can be made from cotton. Attach a hanger to the toy so that the Christmas angel can decorate your Christmas tree.
paper star

Origami can be used to create Christmas decorations. From paper squares folded into special order, you can easily make a star for the New Year's table. Stock up on colored paper and patience.
- Fold the paper square in half.
- Bend the right corner of the resulting triangle up.
- Then bend it half down, and then up again.
- Unfold and flatten upper part angle.
- Fold the top corner back as shown.
- Also fold back the left corner.
- Make eight of these elements. Enclose their wide part in a small square.
- Flip over to the other side and fold the small square piece over the large square of the other piece.
Cardboard snowman

What's Christmas without a snowman? However, it does not have to be made of snow. Instead, you can take cardboard or thick paper. Such a craft is suitable for home decoration and gift wrapping, or can be used as a Christmas tree decoration. To make a snowman you will need:
- cardboard
- colored paper
- scissors
- black tissue paper

Glue a cylinder from white cardboard. On one side, make incisions in the form of cloves and bend them inward. Cut out a circle of the appropriate diameter and stick it on the cylinder. This will be its bottom. On the other side, attach a cover of the same size. Top edges paint the cylinder and brim of the hat black. Cut out black eyes and buttons from colored paper, and a nose from red paper. Make snowman arms out of tissue paper strips.
Lanterns, garlands, snowflakes - well-known paper crafts from childhood - will not cease to be interesting and delight kids in the pre-holiday season. Together with the children, you can plunge into the magical atmosphere of the holiday and take a short break from adult affairs.
Paper is the most affordable and easy-to-use material. We have prepared both traditional crafts and unusual ideas, which will allow you to look at creativity in a new way!
For such an asterisk and a Christmas tree, double-sided scrapbooking paper is best: it is dense, beautiful. Kids will love making crafts with it.


A garland of strips of paper is a well-forgotten old thing. How colorful stripes, all the better! This craft is suitable for assiduous children, in addition, its manufacture develops other skills. For example, ask your child to continue the sequence of colors on the garland - two blues, two reds, one yellow...

No one New Year does not do without snowflakes, even colored paper is not required, plain white is enough. We have prepared for you great amount cutting templates.


But big snowflake from strips of paper, it can be used to decorate a door or hang on a wall.

Unusual patterns of snowflakes will be a great decoration for a New Year's candlestick.

Very young children can simply wrap the glasses with colored paper, and then watch the color of the flame change (of course, under the supervision of adults).

New Year's crafts can be made not only from plain paper but also from the toilet. That is, from a tube from her 🙂 Paint the tubes in different colors, draw funny faces, glue eyes.


The vintage star and wreath on the door are made from the same material.

Not only toilet paper can help in creating New Year's decor, you can use juice bags, paper plates, cups.


Beautiful house made of cardboard or paper - creative option for older kids. By clicking on the link, you can download a large number of templates and diagrams.

Crafts using the "accordion" technique give a lot of room for creativity and imagination. See what you can create! 


Very young needleworkers can be given to color the figures of snowmen, grandfathers, frosts or snow maidens. And then cut them out. The result will be visible immediately, because kids do not like to wait so much!

We hope these photo ideas will help you in family preparation for the holidays. good creativity and Happy New Year!

Paper crafts are something that can be done for the New Year of the Dog quickly and easily as a gift to loved ones or just to decorate the house. Paper is always in the house and making it is interesting! We offer best crafts for the New Year 2018 from paper, which you can do with your own hands step by step photo and video.
In addition, consider what else you can do for the new year with your own hands at home from what you eat at hand. For such crafts, you don’t need to spend money on purchasing materials, and the result is interesting and it doesn’t look like completely unnecessary things were used. Let's look at a few master classes, from which everyone will choose what suits him.
📌 Important! Each description contains the colors of materials and a set of decor for those crafts that have already been made and shown in the photo. But it is not necessary to choose the same shades and the same decor. You can take those materials for the New Year paper craft 2018 that you have at home.

A PHOTO: paper garland for the New Year
Several options for a decorative Christmas tree made of paper
Without smart Christmas tree New Year's Eve - nothing. Of course, main character holiday - big fluffy live spruce or a pine tree in the center of the room, or an artificial beauty dressed up in garlands and colorful toys. But you can also make small ones. decorative Christmas trees do-it-yourself paper and decorate with them for the New Year a table or shelf in the office or at home. The following are two master classes on creating such paper beauties.
For each of them we will need:
- A sheet of thick paper for the cone.
- Paper napkins of any color, you can combine several colors.
- PVA glue or pencil.
- Scissors.
- stapler.
- Pencil or any wooden stick.
- Christmas tree decor. Everything you can find at home: sequins, small beads, bells, ribbons, and so on.
And now, in turn, we will consider both options for Christmas trees made of paper napkins.
Option 1 - Christmas tree made of paper roses
- make a cone out of thick paper. We glue it with glue or a stapler.
- now we make roses from napkins. To do this, we fold each napkin in half and in half again, fix it in the middle with a stapler.

- cut out the circle.

- we have a multi-layer circle and you need to take each subsequent layer from above and twist it tightly. We do this with all layers.

- when all the layers are twisted, you need to straighten the rose a little. Thus we make all the flowers.
- cover the cone with roses. It is better to start from the bottom in a circle and go up.

- glue roses should be close to each other so that there are no gaps.

- after the whole Christmas tree is “dressed” in roses, you can decorate it with any decorative elements by simply gluing them randomly over the flowers.

Such a craft for the New Year 2018 made of paper with your own hands is very simple to perform, even a child, a teenager can handle it, and in appearance it turns out to be very effective and beautiful.
Option 2 - Christmas tree made of paper napkins using the trimming technique
A similar very simple version of the Christmas tree. All that is needed for it is listed above, we will prepare everything according to the list and proceed:


- you have to start from the bottom. Thus, we attach all the twisted squares tightly, as much as possible closer friend to friend.

When we glue the whole Christmas tree with twisted squares, we get fluffy beauty, which can also be decorated with any decorative elements.

Using these techniques (napkin roses and trimming), you can create postcards by gluing elements onto a base with a drawn outline of a Christmas tree or other pattern, a snowman, for example.

PHOTO: DIY paper Christmas tree
Christmas trees can also be made from paper using other techniques. By simply gluing circles of colored paper onto a cone, or cutting circled palms from green paper. And you can also make loops from strips of paper and stick them on the cone.

Highly beautiful Christmas trees from paper are obtained using the vytynanka technique. To do this, you need to fold a sheet of paper in half, draw a contour according to the template and cut through all the necessary places. Do the same with the second sheet. After connecting 2 sheets to each other at the fold.

Generally a Christmas tree paper cone you can decorate with anything. The idea is to make a construction paper cone and decorate it.
For decoration you can use:
- threads for knitting, simply wrapping or cone;
- buttons;
- tinsel and sweets, gluing them in rows alternating;
- crumpled paper petals;
- pasta;
- coffee beans and jute rope.
📌 This Christmas tree can be decorated with anything you find at home. You can then cover golden paint the resulting creation or artificial snow or leave as is.
Paper crafts for the New Year in the form of a Christmas tree:


Decorative paper candles
As surprising as it may sound, you can make candles out of paper. Of course, they will not glow, but they can decorate a Christmas tree or a New Year's table.

PHOTO: Craft in the form of paper candles
Let's prepare everything that is required in the work:
- colored thick double-sided paper.
- scissors;
- glue stick;
- ruler;
- marker or marker.
When everything is ready, let's start:
- Cut strips of colored paper. Strips can be taken of any width, optimally 3-4 centimeters. To do this, you need to make marks on one and the other side of the sheet, draw lines along the ruler and cut. For one candle you need 2 strips. They can be made in one color or two shades.
- We take 2 strips and glue the ends as shown in the photo.
- Now we make weaving (see photo) and fix the tips. This is how the candle turned out.
- Cut out a circle from paper. We glue a wicker column on it.
- We cut out the flame of a candle of arbitrary shape with a rectangle at the bottom, for which the flame will be glued to the column.
- We draw a wick on both sides with a felt-tip pen, bend the rectangle and glue it to the post.

Step by step photos for making a paper Christmas candle
The finished candle can be glued to a clothespin and decorate the Christmas tree, or you can leave it as it is and place several of these candles on a shelf or on New Year's table. Such crafts for the New Year 2018 from paper with your own hands can be made to school or kindergarten for the competition!
Santa Claus and Snow Maiden made of paper
The main characters of the New Year - Santa Claus and the Snow Maiden can also be paper. Let's try to make them with our own hands for the New Year of the Dog 2018!

Getting ready for the creative process:
- We will need colored thick paper in blue and red for the cones.
- White paper for finishing.
- Beads, any decor.
- Paints and brushes.
- Glue.
- Scissors.
- Thread (you can take cotton for knitting).
And now let's get started:
- The description will go for Santa Claus, the Snow Maiden is done in exactly the same way, but you can change the base color and decor.
- We make a cone of thick red paper.
- We cut out several (2 or 3) semicircles from white paper and cut them so that we get terry. This will be the beard. We glue in several layers on a cone. For a beard, you can also use cotton pads.
- Eyes and a nose can be painted with paints or beads can be glued: black - eyes, pink or red - nose.
- Now you can make a cap. For him, we will make a small cone of red paper and glue a strip of white on the bottom. Put a cap on Frost and fix it with a drop of glue.
- You can draw or stick any decor on the figure.
- You can glue a thread to the top of the head, for which we will hang Frost on a Christmas tree or attach a white pom-pom to the tip of the thread.
This craft is something that you can do for the New Year with your own hands and give it to your mother, friends, relatives.
📌 Using this technique, you can make more penguins, snowmen, deer, and any figurine in the New Year theme.

Santa Claus, Reindeer and Paper Towel Snowman
For such beauties, you can use ordinary rolls from under paper towels or make a roll of any diameter and height yourself from thick paper.
Before starting the process of creating Santa Claus, we will prepare everything that is useful in the work:
- Roll for the base.
- Felt or colored paper in red, white, light brown, black and yellow shades.
- PVA glue.
- Eye blanks, they are sold in any needlework stores. Or you can use half beads for the eyes, buttons, in the end, just cut circles out of black paper or felt.
- Scissors.
And now let's start making paper crafts for the New Year 2018 with our own hands!
First we make Santa:
- Cut out a strip of red felt whose width is equal to the height of the roll plus 2 cm, and the width is equal to the diameter of the roll.
- Cut out a half circle from felt light Brown color for the face, stick on.
- We cut out an oval from white felt, cut off a recess for the face on one side and glue it over the face detail.
- We cut out the details for shoes from black felt (two ovals connected together). Glue on the underside of the roll.
- We cut a strip of black felt, stick it in the middle of the roll - this is a belt.
- Cut out a buckle from yellow felt. We glue over the belt in front.
- Now we glue the eyes and the circle of the nose.
- Glue the cap on top of Santa.

Now we make a snowman:
- Cut out a strip of white felt whose width is equal to the height of the roll plus 2 cm, and the width is equal to the diameter of the roll.
- We glue the roll with a strip, bend the ends inside the roll from one side and the other.
- We glue the eyes, nose and buttons - circles of felt.
- We cut out a scarf from red felt and cut along the edges, we tie it to a snowman.
- We make a cap. Cut out a semicircle from red felt, glue the sides. Cut out a strip of white felt and glue it along the bottom of the cap. Glue a pom-pom to the end.
- Glue the cap on top of the Snowman.

Next is the turn of the deer:
- Cut out a strip of light brown felt whose width is equal to the height of the roll plus 2 cm, and the width is equal to the diameter of the roll.
- We glue the roll with a strip, bend the ends inside the roll from one side and the other.
- We glue the eyes and nose.
- We make a cap. Cut out a semicircle from red felt, glue the sides. Cut out a strip of white felt and glue it along the bottom of the cap. Glue a pom-pom to the end. But here we still need to cut out the horns from brown felt and glue on the sides of the cap.
- Glue the cap on top of the deer.
Thus, three figures are ready. Such paper crafts can be put under the Christmas tree.


📌 Origami paper crafts video of Santa Claus:
Christmas tree toy from strips of paper
Among the crafts for the New Year 2018 made of paper with your own hands, you must definitely make a Christmas tree toy!

Let's analyze very interesting toys from strips of colored paper step by step, first prepare everything you need:
- Colored paper. For one toy one use two shades.
- Scissors.
- Needle with thread. You can use fishing line, or you can use ordinary sewing thread, but thicker.
- Pair of beads.
When everything is ready, we proceed to the process of creating a Christmas tree decoration:
- Cut the paper into strips about 10-15 centimeters long and 1.5 - 2 centimeters wide. For one toy, you need 9 strips of one color and 9 of another.
- Cut out 2 circles with a diameter of 1.5 centimeters.
- Pass the thread through the needle and fasten the bead at the end.
- Now add all the stripes, alternating colors in a pile. We put on the thread over the bead 1 circle and a stack of strips from one edge.
- Then we fold the strips in half and thread the entire pile from the other edge onto the thread.
- On top of the second circle and bead. We make a loop and the toy is ready.

You can make several of these multi-colored Christmas decorations and decorate your Christmas tree or room with them. This is just one version of a Christmas tree toy made of strips of paper, and you can make a great many of them.
New Year's paper garland - video:
Ideas for New Year's crafts for the New Year 2018:


And they will be very cheap in cost, and in beauty they will not be inferior to the purchased ones. Moreover, this year the trend is the naturalness and naturalness of materials in decorating the Christmas tree and the room. So that forest beauty dressed up paper toys, will be not only beautiful, but also stylish and fashionable.

Snowman with a whisk
📌 Another craft is a snowman, which we will try to make out of paper by simply folding it in a certain way.
Getting ready for work:
- take paper in white, black, orange and blue;
- scissors;
- paper glue.
And now we start:
- We make two circles for the snowman's body. To do this, we take 2 sheets of a larger format and 2 sheets of a smaller one. We fold them with an accordion.
- We bend the accordions in half. On the one hand, we glue the ends with each other, we get a semicircle. We glue together 2 large semicircles and two smaller semicircles. We glue a smaller circle on top of a large one. This is the body of a snowman.
- In the same way, we make small circles for pens and glue them to the snowman.
- Cut out circles for eyes and buttons from black paper and glue them on the snowman.
- We make a cone of orange paper and attach it to the snowman in place of the nose.
- We cut out a hat from black paper, decorate it with a strip of white paper and glue it on the snowman's head.
- We cut off a long strip of blue paper, cut it along the edges and tie it to the snowman as a scarf.
- It remains to make a whisk. Add up white paper accordion and fasten the ends.
- We make an accordion out of orange paper and fold it in half, attach it to a strip of white paper and attach it to the snowman's handle.

With this snowman, you can decorate the wall in the room by attaching it with pins and needles or double-sided tape to the wallpaper.
And if you make such a snowman in a smaller format, then it will be a great decoration for a postcard. Complement the card with paper snowflakes or a Christmas tree made using the same technique, that is, from sheets of paper folded like an accordion and glued in layers.
📌 To create beautiful crafts for the New Year 2018 from paper with your own hands, use the tips given in the article and add an important “ingredient” - fantasy! Then you will get unique crafts that you can decorate your home with and give as a gift. New Year's present friends and relatives, or send the product to school and kindergarten for competitions!
Video craft options:
💖 Happy New Year! 💖
Content
crafts from the very plain cardboard look no worse than expensive designer decor. Finding material is easy in any home, and in the store it is not too expensive. So arm yourself with material, scissors and glue and let's create stylish things. At the very bottom you will find a video tutorial and tips on working with cardboard.
Christmas tree decorations
Cardboard crafts for the New Year can be the easiest to make, but very cute for decorating a house or a Christmas tree.
To create a Christmas tree decoration, we need:
- scissors;
- thick cardboard (you can use an electronics box);
- watercolor paints;
- brush;
- simple pencil;
- twine;
- dry straw;
- beads / pearls / rhinestones;
- ribbons/bows.
First you need to decide what exactly you want to make out of cardboard: a cookie man, a Christmas tree, a deer, a star, a snowflake. Now you need to draw a future craft either immediately on the material, or first on a draft, and then transfer it to cardboard.
Now the blank needs to be cut out, and then with the help of paints and decor give Christmas tree toy completed look. Let's see what can come out:
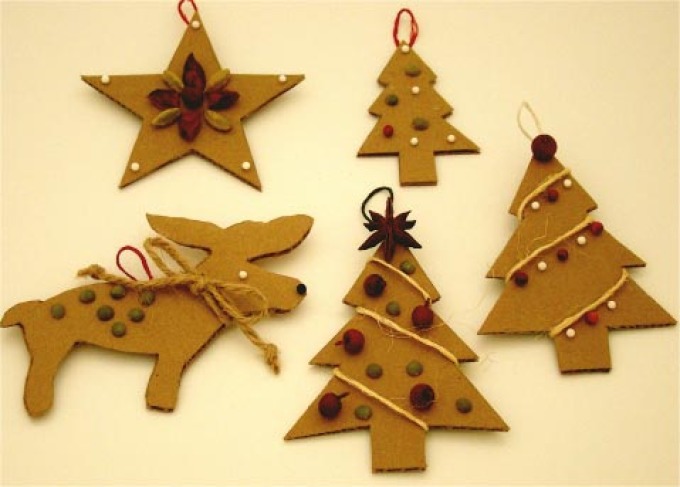
Next year is the year of the dog, so christmas figure already defined

Use twine to decorate a cardboard horse

And a few more toys based on dense material with twine:

Use gold spray paint:

decorative tree
This decoration is from the category of voluminous cardboard crafts for the New Year. Dense material acts here as the basis, and for decoration you will need the following materials:
- twine;
- colored paper;
- beads;
- bows;
- Christmas tree beads;
- threads;
- paints.
Everything is elementary simple - you need to twist a cone from the main material, which will act as the basis for the Christmas tree. Use a glue gun to secure the decor to the cardboard.


Use colored twine to make such an interesting Christmas tree
By the way, pasta, peas, nuts, beans and other materials can be used as a decoration for a cardboard Christmas tree.

Deer made of cardboard
beautiful and stylish craft in the form of a head of a Christmas deer can be hung in the hallway or living room. For such great diy from cardboard for the New Year you will need:
- thick cardboard (box);
- tailor scissors;
- paints;
- brush;
- fir branches;
- cones and other decor.

First you need to draw a template for the future deer: separately draw the head, horns and base for the wreath. Fold the box flat and attach the template to the fold. It should work out so that the nose of the deer will be the connecting link of the two parts of the head.
Now draw in the plane of the horns, which will then need to be inserted into the grooves of the head.
Connect the parts and, if necessary, glue with glue. Now take care of the wreath. From the same material, you need to cut a “donut” of medium width, on which you will glue spruce branches. It remains to completely connect all the details and find a place for the Christmas deer.
You can make a huge interior composition with a deer and a sled.

For such a composition, templates of parts will be required, which you will then assemble together. Volumetric crafts from cardboard for the New Year look very impressive.

Corrugated Cardboard Crafts
Corrugated cardboard itself is very beautiful material and from it are obtained original Christmas decorations. Use corrugated cardboard ribbons and create Snowmen, Santa Clauses, different animals, Christmas trees and other decorations:

Use glue, scissors and paint to bring your crafts to life:

Let's try to create a Christmas tree from corrugated material step by step. You can buy it at a specialty art store or use industrial cardboard.
First you need to cut the cardboard into strips of medium width, twist them into circles and fix them with glue. Do enough circles to connect them into a Christmas tree: the bottom row will consist of 4-5 circles, and then in descending order.

And to make such a bell, you need to take one long strip of red corrugated material and twist it into an oval. Then lightly squeeze the sides of the workpiece to give desired shape. Now we make a bell mold from a separate strip and glue it to the oval. It remains to attach a bead and a rope.
Making decorations out of white cardboard
What crafts from white cardboard for the New Year can be done? Use this material to create interesting "snow" New Year's decorations that can be placed on the windowsill.

It is necessary to cut out Christmas trees according to the template and connect them with a stapler to each other. In the middle you can put a garland on batteries and new Year mood will be provided for whole year. And with the help simple template you can create a whole New Year's town from white cardboard. Use nail scissors, PVA glue and a stapler to create a Christmas craft.

You can not glue the houses, but arrange them on a chest of drawers in a plane:

How to make a "cake"
Originally present a gift or make a "cake" with new year predictions possible with this material. What will be required:
- thick cardboard;
- scissors;
- pattern;
- beads;
- tapes;
- bows;
- colored cardboard or paper.
First you need to print the template:

One template equals one piece of cake. The more pieces you have, the bigger the cake will be. You need to bend the part along the fold line and secure the part with the help of "hooks". The finished cake can be decorated with quilling details, beads, felt toys, Christmas tree beads. In each of the pieces you can put a wish for the New Year.

Such a cake can be presented to the children for the New Year, putting a small surprise in each piece.

You can make several tiers of cakes of different styles. The first tier will contain, for example, 6 large pieces, the next 10 small ones, and the next 12 very narrow ones.

At first glance, it seems that there should be no difficulties, but this material will be easy for you to give in to if you work with it correctly:
- use only sharp scissors or a clerical knife so that the edges of the cardboard are neat;
- use the grooves and gaps to connect the parts. The grooves can be pre-lubricated with PVA glue to keep the structure stronger;
- use ballpoint pen, which no longer writes to mark fold lines. In this case, the cardboard will bend beautifully and not roughly;
- if you use colored cardboard, then select felt-tip pens by color so that you can paint over the folds of the product;
- do not give up needlework if the craft does not work out the first time. Start with something simple, see how cardboard behaves in your hands. And then take on the more difficult work.
We are sure that you will prepare very carefully for the New Year and create coziness and a fairy tale at home with the help of DIY crafts.
And as usual at the end of the article we offer a video master class on creating interesting crafts. This time we are watching a lesson on how to create a Christmas tree from corrugated material:
There are a huge number of all kinds of jewelry that you can do it yourself, along with the children. Further, these crafts can be used to decorate any room - at home, garden, yard, etc. - or to give to others.
About a few simple but original New Year crafts you can find out here. Get inspired, create, use your imagination so that the holiday will be remembered for bright, pleasant moments.
Christmas decorations from damaged light bulbs
You will need:
old light bulbs
sequins
PVA glue
tassel
Fine thread (fishing line)

1. Apply glue to the light bulb with a brush.
2. Start pouring glitter over the glued light bulb.
3. Leave the piece to dry.
4. cut off small piece thread and tie or glue it to the light bulb so that the toy can be hung on the Christmas tree.
New Year paper crafts. Cup of cocoa for the Christmas tree


You will need:
Rolls from toilet paper or paper towels
Plain, Color (Brown), and Wrapping Paper
paper napkins
tubules
PVA glue
Water in a plastic cup
Thread to hang on the Christmas tree
Stationery knife
New Year's craft scheme
1. Prepare a few paper cylinders. The height of one cylinder will be equal to the height of a mini coffee cup, so choose the right size for you.
2. Cut out circles from cardboard. For each cup you need 2 circles: one the same diameter as the cylinder (just circle the cylinder) and the other slightly smaller to fit inside the cylinder. big circle will be the bottom of the cup.


3. Get some brown paper ready and cut out a larger circle than the small white circle you cut earlier. Glue this piece in the middle of the brown circle. Set aside for a while.
4. Prepare a white cardboard sheet. Wrap the cylinder completely with this sheet. Cut off excess parts, but leave 1 cm at the edges to make small cuts and glue the paper to the cylinder with PVA glue (see pictures).


5. Cut out a circle from a white sheet of cardboard to cover the bottom of the cylinder.


6. Take the set aside brown circle glued on top of the large white circle, apply a little glue to the edges and insert into the mug, gluing the blank. Nothing bad will happen if the workpiece sticks unevenly.


7. Prepare a needle and use it to make a small hole in the top of the mug, so that you can then thread the thread and hang it on the Christmas tree.


8. We make a pen. First, prepare a toothpick and cut pieces of the same width from the sheet (in length).
8.2 moisten paper straws in water to make them easier to bend.


8.3 After you have bent the straws into the shape of the letter C, leave them to dry. To keep them in shape, you can attach them with a button to foam or plywood.
9. Take a utility knife and cut the paper cup handles so that they can be easily glued on.


10. We decorate. Crush a small piece paper napkin(you can roll it into a rose shape) and glue it to the cocoa - this will be the cream.
10.1 Also cut off a small piece of plastic tube, glue it first to a sheet of paper and wait until the glue dries.


10.2 Carefully separate the tube and paper circle covering it from the sheet. Now it is very easy to glue the tube to the cup.


The cup is ready, you can decorate a Christmas tree or a room with it.
Crafts for the new year for children. House for sweets

You will need:
house template
Scissors
Stationery knife
double tape
Ruler
1. Print out the house template.
* You can draw a similar sketch of the house yourself and then follow the instructions.

2. Cut out the details you need. Use a utility knife to cut out the windows of the house.


3. Bend the house along the dotted lines. To make it easier, you can use a ruler and a card and box fold tool, but this is not required.


4. Connect everything with double tape.


5. Decorate as desired.

6. Add sweets to the house and you can give it to friends, relatives, guests.
* You can print such a house on paper different color, and you will get many houses of various bright colors.

New Year crafts from felt. Holiday skates.

You will need:
Yarn (thread)
Glue (preferably a hot glue gun)
Scissors
Glue with glitter
Stuffing
1. First you need to draw a shoe and cut it out with a blade on paper.


2. "Separate" the shoe from the blade with scissors.
3. Lay the boot on the felt and cut out the shape (you need 2 halves of the boot). Repeat the same action with the blade.


4. You can, if desired, make pompoms from yarn. For beauty, you can decorate the pompoms with sparkles.


5. In places where the laces should be, add more sparkles. Their location should resemble the letter V.


6. After the glitter glue has dried, glue the two halves of the shoe together by inserting a felt blade between them.
7. Don't forget to cut and glue the heel.
8. Glue pom-poms to the toe of the boot.


9. Start filling the boot with cotton wool or universal filler (sewing synthetic winterizer).


10. You can put small surprises, sweets, etc. on top of the shoe.
New Year's crafts master class. Christmas tree snowflake

You will need:
PVA glue
glue gun
Wax paper
Dish detergent
sequins
tassel


1. Draw a snowflake on paper - you can search the Internet for a simple but beautiful image.
2. Prepare a glue stick, glue gun and wax paper. Lay the wax paper on top of the painted snowflake. Coat the paper with dish soap (you can mix it with a small amount water).
3. Using a glue gun, circle the image of a snowflake (draw a snowflake with glue). Leave the glue to dry.


4. Carefully separate the snowflake from the hardened glue from the wax paper. If some paper remains on the snowflake, try rinsing it under cold water to remove the remaining paper.
* Places where the snowflake may be loose, add more glue and leave to dry. You can also add a second layer of glue just in case, no matter if weak spots or not.


5. Apply with a brush thin layer ordinary PVA glue and sprinkle glitter on top of the snowflake.
6. Glue a loop of yarn to the snowflake so you can hang it on the Christmas tree.


Children's Christmas crafts. We decorate Christmas toys


You will need:
Strand (for stuffing)
acrylic paint
small brushes
Plain plastic or glass balls(no pattern or pattern)
1. Fill the ball with strand.
2. You can color christmas ball as you like. AT this example made a penguin out of a balloon.
3. To draw a penguin, you need to paint one half of the balloon completely with blue paint, and paint the other half as shown in the picture (leaving room for the face and eyes).
4. Draw the eyes. Use thin brushes. Wait for the paint to dry and make the eyes shine by adding some white paint.
5. Draw the beak (small orange triangle drawn upside down).
6. For the paws, draw one more triangle, but more.


* You can draw another snowflake.
Crafts for the new year (photo). Another option for decorating Christmas balls


1. Apply glue to the ball.
2. Sprinkle or "dip" the ball in the salt.


3. Leave to dry.


* You can apply glue in the shape of a snowflake.
