Children's blanket made of plush yarn MK. Blanket: made from different materials in different ways, for adults and children. We knit a warm blanket from thick yarn with our own hands with patterns
A blanket made from pre-purchased thick merino yarn is a fairly popular and common warm type of blanket for the home. This unusual and soft yarn will make even the most ordinary and simple knitted blanket unique and elegant.
We knit a warm blanket from thick yarn with our own hands with patterns
A blanket knitted from large giant yarn will be a wonderful and elegant addition to any interior or room. Making such a cozy large accessory using special large yarn will take very little time.
Merino yarn is a special yarn made from the wool of Merino sheep. This sheep's wool is uniquely soft and of very high quality in use. Products made from such merino yarn are lightweight and at the same time have very good heat-retaining properties.
Depending on the diameter of the threads, merino yarn is divided into several types and types: wide, medium, thin, very thin, ultra-fine.
Merino sheep wool is very often used in the manufacture of sportswear, as it perfectly absorbs and removes moisture that gets on it. This yarn is also very popular in making clothes for everyday use.

Items made from merino wool can be easily washed. However, some caution should be taken not to subject the products to excessive spinning in the washing machine drum.
Before you start making a knitted blanket, think through all the necessary nuances. First, decide on the required color of yarn. Look at the interior of the room where you plan to install your blanket in the future. The finished knitted product can be in harmony in color with the curtains, pillows or carpet in the room.

Determining the size of your knitted blanket also plays an important role. For a chair, you can knit a blanket with dimensions of 130 by 170 centimeters, for a small sofa - 150 by 200 centimeters, for a crib - 170 by 240 centimeters, and for a double bed - 240 by 260 centimeters.
You can knit a blanket from large yarn with your own hands either by knitting or crocheting. Choose the tool that you know best, since this process is very labor-intensive.
We present to your attention a small and accessible master class on making your own blanket from fashionable and popular merino yarn. Thanks to the description presented, you can create a blanket with a large knit and a large perimeter.
Before starting all work on making a warm accessory for home evenings, prepare all the materials and tools you need:
- Knitting needles or hook of large size and diameter;
- Lots of merino yarn.
If you don’t have large knitting needles at home, you can easily replace them with PVC pipes or with your hands. Such large and unusual merino yarn can be knitted even on your hands, and not with knitting needles.

To begin, lay out your merino yarn on the table. Take one end of the yarn and make a small loop. After this manipulation, place another loop on top, but place it slightly to the left of the previous one. You should end up with a shape that resembles a pretzel cookie. Now thread your knitting needle through the first stitch of the pretzel. Then pull the yarn tightly on your working needle.
Now, using a crochet hook, knit an ordinary chain of air loops. All subsequent rows of your knitting should be knitted with a chain of chain stitches. However, the working hook should be threaded through the bottom row of knitting.

To make a warm and fashionable blanket measuring one hundred by seventy-five centimeters, you will need about three kilograms of merino yarn. For a warm accessory measuring two hundred by two hundred centimeters, it will take up to seven kilograms of merino yarn.
If you do not want to shape your knitted product using a crochet hook, then use large knitting needles. If they are missing, they can be perfectly replaced by PVC pipes with a suitable diameter, or simply form a knitted blanket on your hands.
Such an unusual and fashionable knitted blanket in recent years will be an excellent gift for you or for a person near and dear to you.
A selection of videos on the topic of the article
We offer you to study a small selection of videos on the topic of creating blankets from large merino yarn with your own hands. In these materials you will find answers to the questions remaining after reading the article. We hope you find the videos useful. Enjoy watching and exploring.
Some craftswomen prefer to knit large items only with crochet, since the peculiarity of this method allows them to achieve beautiful openwork patterns on blankets, and the delicate, almost jewelry-like work is very much to the liking of those who like to create beautiful things from details.
Crocheted blankets will perfectly warm adults and small children, the main thing is to choose the right yarn. Another important function of blankets is to decorate the home and create the right mood. All this directly depends on the shape and method of crocheting, which we will look at in detail in this article.
Crocheting a blanket with patterns and descriptions
There are a huge variety of crocheted blankets, as are the styles of knitting these warming blankets. Even the simplest patterns look interesting on blankets, and are sure to be associated with one’s father’s home, warmth and care.
But you won’t surprise experienced needlewomen with simple patterns; interesting openwork motifs, patchwork-style blankets of incredible complexity and beauty, thin and delicate bedspreads for newborns, which are so interesting to pore over, have been invented for them. In this type of needlework there is a job for every interest and request. But let's start learning from the basics - the simplest patterns and patterns for crocheting blankets.
Master class for beginners
In any business you have to start somewhere to learn. And to learn how to crochet a blanket, a master class for beginners is ideal. This blanket, completely made in the “granny square” style, will delight both adults and children. Let's look at how to knit it using step-by-step instructions as an example.
Tools:
- Yarn (in this case bright green, yellow and brown);
- Hook;
- Needle.
Abbreviations for knitting pattern:
- VP - air loop;
- RLS - single crochet;
- CCH - double crochet;
- SS - connecting column.
Work progress with step-by-step photos:
You need to start knitting with the main color of the blanket. We close six loops into a ring, then make three VPs and knit two more Dcs into a ring. We make two VPs (photo 1). After this, we crochet three DCs into a ring and make two VPs. We repeat two more times, resulting in a square being knitted (photo 2).


After this, we make three VPs (this is the first CCH) and in the corner in the arch we will make three CCHs, two VPs and again three CCHs (photo 1). We will knit this into the remaining arches. We will finish the last one with two dc and sl st (remember that the first stitch at the very beginning was knitted in the form of three VPs) (photo 2).


We knit a new row of squares and make three VPs from the arch in which we have the hook. We knit two dcs into it. Next we move on to the corner. And we knit into it everything that we knitted in the previous row: three DCs, two VPs and three DCs (photo 1). In the next arch we simply knit three DCs. And so on in a circle (photo 2).


In the corners you will always need to knit the same thing. And in the arches that are located on the sides of the square, we always simply knit three DCs. As a result it turns out to be a so-called granny square. We knit several rows for the desired size of the blanket. And, completing the granny square, we will change the color of the thread to yellow (photo 1). We knit two rows in yellow. And one more row in green. And then we’ll tie the edges. We will knit seven sc in one arch, and one sc in the other. And so we alternate the binding throughout the blanket (photo 2). Let's finish tying it in green. We will make three VPs and knit one sc in each stitch (photo 3).


Plaid decoration
To decorate this simple, but undoubtedly cute blanket, you can crochet a small decorative element, for example, a butterfly. This is how you can create it:
- We knit five VPs and close them into a ring. Next we knit three VPs and another DC. We make two VPs. And two more CCHs. In total we need to knit this eight times. That is, we will get sixteen CCHs.
- Let's move on to the arch from the VP. SS We knit three VPs and perform two DCs here. We perform three VPs and under the same chain we knit three CCHs. This is how we knit under all the arches from VP.
- Now let's attach the brown yarn. We knit six DCs under the VP chain. We make one VP and here we perform six more CCHs. We skip the bottom three dcs and knit a sc.
- And in the next chain we knit everything the same as we knitted before.
- We tie our butterfly with yellow yarn. We knit one sc in the six underlying stitches and one sc under the VP. We make picot from three VPs. And so we tie the whole butterfly.
- Fold it in half and secure it with a brown VP chain. Now you can sew it to one of the corners of the finished blanket.


How to knit a baby blanket with a simple pattern
Very often, people resort to knitting just to create a crocheted children's blanket with an original design for their baby. Many people try to crochet a blanket with a pattern and color that will not look like any other blanket. And this is a completely doable task, because crocheting a blanket will definitely result in an interesting and beautiful product, even if it is made with the simplest pattern - for example, with embossed columns.


Tools:
- 8 skeins of 50 g of wool mixture or bulky synthetic yarn in white (A);
- 8 skeins of 50 g of wool mixture or bulky synthetic yarn in blue (B);
- hook No. 3.5.
Knitting density: 20 loops x 11 rows = 10 x 10 cm (raised stitches).
Size: 75 x 100 cm.
Basic pattern
A raised stitch is crocheted like this: yarn over, insert the hook (from front to back) under the post (leg) of the previous row, pull out a loop, grab the thread and pull it through the first 2 loops on the hook. Grab the thread again and pull it through the remaining 2 loops.
Work progress and knitting pattern


Using white yarn we knit the initial chain of 145 VP.
Base range: 1 dc in 3 ch from the hook, 1 dc in each ch to the end, 144 loops are knitted. 1st row: 2 VP for lifting, *relief. Art. around stitch of previous row, dc in dc of previous row, repeat from * to last stitch, 1 rib. Art. around the loop of the previous row.
Let's turn the work around.
Next we knit 7 rows according to the pattern. Cut the thread (A). We knit thread (B) according to the pattern of 8 rows. Cut the thread (B). Next, knit 8 rows using thread (A) according to the pattern. Repeat the stripes until 96 cm are knitted.
Harness
To tie the edge of the finished product, use thread in color (B).
1st-4th rows(wrong side): 1 VP, sc to end of row. In the corners of the finished product, knit 3 sc in the sc of the previous row.
Then knit 1 row in a crab step (sc is worked from left to right, not right to left) around the entire outer edge of the product.
Finish knitting a double crochet stitch (half crochet) in the 1st sc. Fasten the thread.
Made from soft yarn for newborns
A very responsible job is to crochet a blanket for a newborn. A warm blanket for a baby should be soft, warm and definitely beautiful. The airiness and delicacy of the yarn for a newborn will give the product a special look that will be remembered by young parents for the rest of their lives, because they will remember the baby during discharge from the hospital in this very blanket, created by caring hands. This blanket is suitable for both girls and boys. It can be used both at home and for walks with a stroller.


Tools:
- 325 g of white yarn for knitting children's clothing;
- hook No. 3.5.
Knitting density: one motif = 4.1 x 3.8 cm (fancy pattern in the central part).
Work progress and knitting pattern
central part
It is knitted as follows: a chain of 171 loops is cast on and 73 rows are performed in a fantasy pattern in accordance with the diagram and explanations for the symbols accompanying it. 

Harness
At the end of the 73rd row, without cutting the thread, knit the 6th circle. rows of shells (2 dc (dc), 3 ch (chain loops), 2 dc), making additions in each corner, as shown in the diagram. Replace the last 2 VPs of the 1st and 2nd rounds. rows of 1 hdc (half double crochet), knitted in the 3rd of 3 ch, replacing the 1st dc. Close the 3rd - 6th circle. rows 1 SS (connecting stitch) in the 3rd VP from the beginning, and move forward, knitting additional. SS on the arch of the 1st shell.
After this, knit 4 rounds. a row of arches of 6 loops without increases or decreases, 1 circle. a row of simple shells (1 dc, 5 ch, 1 dc) separated by arches of 5 loops. Make fans of 13 DC in each simple shell. Replace the last 3 VPs of the 7th - 9th circle. rows of 1 dc, knitted on the 1st sc, and the last 4 ch of the 10th circle. row - 1 C2H, close the 11th and 12th circle. rows like the 3rd circle. row, and perform another SS in the 1st arch at the end of the 11th round. row. Complete 1 lap. next to the “crawfish step” pattern, as stated in the explanation, close 1 SS in the 1st RLS and cut the thread.


Openwork of motifs
Lovers of beautiful designer items will love the openwork plaid made from crocheted motifs, which is fun and interesting to work on. The result will be a very beautiful product that will decorate the sofa in the living room or the bed in the bedroom, while warming and giving warmth on cold evenings. For example, you can knit a blanket from large floral motifs, which then need to be combined into a single whole.

Tools:
- Novita Isoveli yarn (75% wool, 25% polyamide, 65m/50g) - 2300g yellow-green color (334) or Novita Napko yarn (50% cotton, 50% acrylic, 104m/100g) - 1800g blue (013);
- hook No. 5-6.
Finished product dimensions: blanket made from Isoveli yarn -140 x 210 cm; blanket made from Napko yarn -110 x 180 cm.
Knitting density: the diameter of one motif is 17 cm.
Work progress and diagrams
The blanket consists of separately knitted full and half motifs. For a complete motive, dial a chain of 6 VPs, close it in a SS ring. 1st row - cast on 3 VP lifts, knit 1 DC, 2 VP, *2 DC, 2 VP* into the center of the ring, repeat *-* 4 more times, close the SS row. Next, knit according to pattern 1 from the 2nd to the 5th rows. Cut the thread and fasten. Knit 104 motifs with Isoveli thread or 67 motifs with Napko thread.

For a half motif, cast on a chain of 4 ch, close it in a SS ring. 1st row - VP, 2 SSN, 2 VP, 2 SSN. Next, knit in straight and reverse rows according to pattern 2 from the 2nd to the 5th rows. Cut the thread and fasten. Knit 8 such motifs with Isoveli thread or 6 motifs with Hanko thread.
Assembly
Lightly steam each motif. Connect the motifs to each other according to diagram 3 (motifs made from Hanko yarn are highlighted in grey). For a blanket made from Isovely yarn, crochet the fringe. To do this, cut the threads 45 cm long, fold them into 3 pieces and tie them at the edges. Make 7 tassels for each motif.

Knitted blanket made of squares
A very fashionable phenomenon that is loved by designers and tasteful housewives is a crocheted blanket made from squares in . There are a huge number of crochet patterns in a wide variety of geometric shapes for patchwork, most of which look very interesting in their mishmash of colors and patterns, while others are elegant in one color but made with different complex motifs. Such a playful and uplifting blanket will look good not only in the nursery, but also in the living room, and in a chair on the balcony. In addition, you can give it to friends or relatives - let them also be happy.
Let's look at this blanket made of squares, which is easy to knit according to step-by-step instructions.

Tools:
- yarn - 200 g dark blue SMC BRAVO;
- 100 g each of beige, orange, red, lilac, green, blue, brown, yellow and pistachio yarn SMC BRAVO;
- hook number 3.
Main pattern - square
Knit a chain of 6 VPs and close it into a ring using 1 SS. Knit a circle. in rows. Every circle. The row begins with 3 VP lifting and ends with 1 SS in the VP lifting of the previous row. Attention! 2 CCH + 2 VP + 2 CCH are designated in the instructions as a group of CCH.
1st circle. row: 3 dc, 2 ch, * 4 dc, 2 ch, repeat from * 2 more times.
2nd circle. row: 3 CCH, in an arch of 2 VPs, tie a group of CCHs, * 4 CCHs, in an arch of 2 VPs, knit a group of CCHs, repeat from * 2 more times.
3rd circle. row: 5 Dcs, in an arch of 2 VPs, tie a group of Dcs, * 8 Dcs, in an arch of 2 VPs, tie a group of Dcs, repeat from * 2 more times, 2 Dcs.
4th circle. row: 7 CCH, in an arch of 2 VPs, tie a group of CCHs, * 12 CCHs, in an arch of 2 VPs, knit a group of CCHs, repeat from * 2 more times, 4 CCHs.
5th circle. row: 9 CCH, in an arch of 2 VPs, tie a group of CCHs, * 16 CCHs, in an arch of 2 VPs, knit a group of CCHs, repeat from * 2 more times, 6 CCHs.
6th circle. row: 11 CCH, in an arch of 2 VPs, tie a group of CCHs, * 20 CCHs, in an arch of 2 VPs, knit a group of CCHs, repeat from * 2 more times, 8 CCHs.
7th circle. row: 13 CCH, in an arch of 2 VPs, tie a group of CCHs, * 24 CCHs, in an arch of 2 VPs, knit a group of CCHs, repeat from * 2 more times, 10 CCHs.
8th circle. row: 15 CCH, in an arch of 2 VPs, tie a group of CCHs, * 28 CCHs, in an arch of 2 VPs, tie a group of CCHs, repeat from * 2 more times, 12 CCHs.
9th circle. row: 17 CCH, in an arch of 2 VPs, tie a group of CCHs, * 32 CCHs, in an arch of 2 VPs, tie a group of CCHs, repeat from * 2 more times, 14 CCHs.
10th circle. row: 19 CCH, in an arch of 2 VPs, tie a group of CCHs, * 36 CCHs, in an arch of 2 VPs, knit a group of CCHs, repeat from * 2 more times, 16 CCHs.
11th circle. row: 21 CCH, in an arch of 2 VPs, tie a group of CCHs, * 40 CCHs, in an arch of 2 VPs, knit a group of CCHs, repeat from * 2 more times, 18 CCHs.
12th circle. row: 23 CCH, in an arch of 2 VPs, tie a group of CCHs, * 44 CCHs, in an arch of 2 VPs, knit a group of CCHs, repeat from * 2 more times, 20 CCHs.
Cut and fasten the thread.
Assembling motifs into a plaid
Knit 54 multi-colored squares. Connect the edges of the squares to each other, working across each other. side 1 row sc with dark blue thread. For the blanket, assemble 6 x 9 squares in the desired order.
Make a circle around the perimeter of the blanket. a row of dark blue thread border. Every circle. start the row with 3 VP lifting instead of 1 SSN (or 2 VP lifting instead of 1 SBN) and end with 1 SS in the last VP lifting of the previous row. Attach the thread to the beginning of the corner square and knit as follows.
1st circle. row: ** 2 dc, * 4 ch, skip 2 base loops, 4 dc, repeat from *, before the next corner knit 4 ch, skip 2 base loops, 2 dc, then tie a group of dc into an arch from 2 ch of the previous row, repeat from **on each side of the bedspread.
2nd circle. row: perform 1 dc in the next loop, ** 4 dc, * 4 ch, skip 4 base loops, 4 dc, repeat from *, before the next corner knit 4 ch, skip 4 base loops, tie a group of dc into an arch from 2 ch of the previous row , 4 VP, skip 4 base loops, repeat from **.
3rd circle. row: ** 1 Dc, 4 VP, * 4 Dc, 4 VP, skip 4 base loops, repeat from *, before the next corner knit 4 VP, skip 2 base loops, tie the Dc group into an arch from 2 VP of the previous row, 4 VP, skip 2 base loops, 3 dc, repeat from *.
4th circle. row: ** 1 RLS, * 4 RLS, 4 RLS, repeat from *, 4 RLS, 2 RLS, 4 RLS in the arch of 2 VPs of the previous row, 2 RLS, 4 RLS, 3 RLS, repeat from **. Cut and fasten the thread.
A knitted blanket is the personification of home warmth and comfort. Such bedspreads not only provide warmth in cool weather, but are also a stylish and bright interior detail. Children's bedspreads occupy a special place among blankets. As a decoration for a crib or stroller, they are very practical and convenient. You can knit such a blanket from yarn of different compositions. The main thing is that it is of high quality, does not cause allergies, and does not fade when washed. A wide selection of patterns allows you to knit both a warm, thick blanket and a light, openwork blanket for your baby. Considering the small size of the product, the ability to choose a pattern of complexity acceptable for your knitting experience, any knitter can knit a blanket with knitting needles, the diagram and description of which are presented in this article. We offer you several interesting options.
Yellow plaid with sheep
This blanket, knitted from cotton threads, is very soft and cozy. By placing it in the stroller, you can always cover your baby in case of cool weather.
Bedspread dimensions: 65cm by 75cm.
We will need:
- cotton yarn, yellow (50g per 115m) – 250g;
- the same, white – 100g;
- the same, black – 50g;
- knitting needles No. 4.
Patterns:
- shawl rice-ok: all stitches in all rows are knitted;
- persons Ch.: in faces. R. - knit, purl. R. - purl.
We knit sheep from the diagram. Please note that when changing yarn there are no long broaches on the wrong side of the bedspread. This is unsightly and, moreover, the child’s fingers can get stuck in these threads.
Density: 16 p. by 16 r. equal 9 cm by 6 cm.
Description
We start knitting an openwork blanket with knitting needles from a set of 83 stitches. We knit: 1 chrome, 5 times 16 stitches of the motif, 1st stitch of the motif and 1 chrome.
Knit 7 times for 16 rubles. motive, then 1 time for the first 8 p. and start the edge. Knit 16 rubles. alternating patterns: 2p. garter stitch and 2p. persons iron, then 5 rubles. garter stitch. At the same time, do 2 stitches on both sides. from the edge (p. knitted stitches), 10 times, 1 addition in each 2 p. Close the received 103p. facial Cast on 83 stitches on each of the other 3 sides and knit the same edge. Connect the edges of the corners.
Children's blanket in patchwork style with openwork inserts “Varvara”: video MK
Color Block Baby Blanket for Beginners
This original bedspread will decorate the room of a child of any age. When it's cold, you can hide with it, and it can also replace a play mat. The simple knitting pattern makes this blanket easy to make.
Dimensions: 101.5 cm by 101.5 cm.
We will need:
- yarn, 100% acrylic (453.6g per 742m) – turquoise color – 450g;
- the same sand color – 450g;
- the same carrot color – 450g;
- the same blue color - 450g;
- knitting needles No. 6;
- needle with a large eye.
Pattern:
- shawl rice-ok: all stitches in all rows are knitted.
Density: on a scarf pattern 14p. for 26 rub. equal to 10 cm by 10 cm.
Knitting motifs
The bedspread consists of motifs. Each one is a square with a side of 20.5 cm and is knitted in one piece from color blocks. We lift the loops for the new block from the previous parts - see diagram.
We connect the next color by pulling a stitch from the outer loop of the previous block. We consider the elongated stitch to be the 1st loop of the row.
Description

For the bedspread you need to knit 25 squares with your own hands. We knit motifs in blocks, following the description and diagram.
First block
Using turquoise yarn we cast on 9p. and knit 17r. handkerchief knot Closed n. We connect a sand thread to the outer loop.
Second block
Rotate the canvas 90 degrees clockwise. With sand yarn we raise 9 p. on the side of the 1st block. We knit 17 rubles. the same pattern. Closed p. Connect the carrot yarn to the outermost p.
Third block
Again we turn the canvas 90 degrees clockwise. Using carrot yarn we raise 9 sts. on the side of the 2nd block and 9p. on the side of the 1st block. Total 18p.
Closed p. Connect the sand thread to the outermost p.
Fourth block
Rotate the canvas 90 degrees clockwise. With sand yarn we raise 9 p. on the side of the 3rd block and 9p. on the side of the 1st block. Total 18p.
We knit 17 rubles. handkerchief rice.
Closed p. Connect the blue thread to the outermost p.
Fifth block
Rotate the canvas 90 degrees clockwise. Using blue yarn we raise 9 sts. on the side of the 4th block and 9p. on the side of the 1st block and 9p. on the side of the 2nd block. Only 27p.
We knit 17 rubles. handkerchief rice.
Assembly
Having knitted all the motifs with our own hands, we carefully sew them together - see the diagram.
Handmade blanket: video master class
Openwork red plaid

Hand-knitted from natural threads, this elegant openwork blanket can serve as a blanket for a crib or stroller.
Dimensions: 65cm by 72cm.
We will need:
- yarn containing 50% cotton, 50% linen (100g per 200m) – 200g;
- knitting needles No. 4.
Density: on the main pattern using knitting needles No. 4 14p. for 23r. equal to 10 cm by 10 cm.
Description and patterns
We cast on with knitting needles No. 4 91p. We knit 11 rubles. persons Ch. Distribution of loops further:
12 rub. (wrong side): 8i., 3l., *3i., 3l.* – from * to * 12 times, 8i.;
13r.: 8l., 1i., 1n., 2p. in 1i., *3l., 1i., 1n., 2p. in 1i.* – from * to * 12 times, 8l.;
14r.: 8i.. 3l., *3i., 3l.* – from * to * 12 times, 8i.;
15r.: 8l., 2p. in 1i., 1n., 1i., *3l., 2p. in 1i., 1n., 1i.* – from * to * 12 times, 8l.;
16r.: 8i., 3l., *3i., 3l.* – from * to * 12 times, 8i.;
17p.: 8l., 2i., 1n., 1i., *1 double broach, 1i., 1n., 1i., 1n.* – from * and to * to the last 14 sts, 1 double broach, 1i., 1n., 2i., 8l.;
18r.: 11i., *3l., 3i.* – from * to * 12 times, 8i.;
19r.: 11l., *2p. in 1i., 1n., 1i., 3l.* – from * to * 12 times, 8l.;
20r.: 11i., *3l., 3i.* – from * to * 12 times, 8i.;
21r.: 11l., *1i., 1n., 2p. in 1st., 3l.* – from * to * 12 times, 8l.;
22r.: 11i., *3l., 3i.* – from * to * 12 times, 8i.;
23r.: 9l., 2p. in 1l., * 1i., 1n., 1i., 1n., 1i., 1 double stretch* from * and to * to the extreme 14p., 1i., 1n., 1i., 1n., 1i., 1 broach, 9l.
Repeat from 12 p.m. 23 rub. 11 more times, then knit again with 12p. 14 rub.
We finish knitting 10 rubles. persons iron. Closed P.
Carefully thread the ends of the threads. After slightly moistening, dry the blanket in a straightened state on a horizontal surface.
How to knit a blanket with knitting needles in a waffle pattern: video MK
Warm openwork blanket
Knitting such a beautiful and warm openwork blanket for your baby with your own hands using knitting needles using the presented description and diagram is a task that can be done even for beginner knitters.
Dimensions: 71cm by 93cm.
We will need:
- yarn containing 53% acrylic, 29% polyamide, 18% wool (50g per 287m) – 150g;
- a little contrasting yarn;
- knitting needles No. 4;
- needle with a large eye.
Patterns:
- fantasy pattern No1: knit according to the pattern;
- fantasy pattern No.2: number of stitches multiple of 16+1 cr.:
1st, 2nd, 3rd: l;
4p.: 1l., *1l., 1n., 6l., 1 double broach, 6l., 1n.* – from * to * repeat until 1p., 1l.;
5r.: i.
Repeat 4 times. and 5r. six times.
Density: on a fantasy pattern No. 1 with knitting needles No. 4 41p. for 57 rub. equal to 20cm by 20cm; on a fantasy pattern No. 2 using knitting needles No. 4 23p. equal to 10cm.
Description
We start knitting an openwork blanket with our own hands using knitting needles from the set 133p. Next we knit pattern No. 1, starting with 1 cr. and 1st point of the diagram. Knitting 82cm, loosely closed. P.
Edging
First edge
We dial 146p. and knit pattern No. 2, decreasing on both sides in every 2nd r. 8 times 1 p. After 16 p.m. knit the pattern 1p. knit on right side and one row in contrasting yarn. We will dissolve this series later.
Second edge
We dial 178p. and knit pattern No. 2, decreasing on both sides in every 2nd r. 8 times 1 p. After 16 p.m. knit the pattern 1p. knit on right side and one row in contrasting yarn. We will dissolve this series later.
We knit the second part in the same way.
Assembly
Sew the edging around the perimeter of the blanket.
Knitting a plush blanket with knitting needles: video master class
Simple crochet blanket for beginners

This practical blanket is knitted from several colors of yarn in a simple pattern. The decoration is a lace trim around the perimeter.
Size: 50cm by 60cm.
We will need:
- yarn consisting of 90% cotton, 10% cashmere (50g per 180m) orange-yellow color (No1) – 150g;
- the same, brick color (No2) – 50g;
- the same, red-orange color (No3) – 50g;
- the same, copper color (No4) – 50g;
- the same, nut color (No5) – 50g;
- knitting needles No. 4;
- hook No.3.
- the main pattern is made on a number of stitches that is a multiple of 2 + 1 stitch + 1 cr. at both sides;
- crocheting: performed according to the pattern for a number of stitches that is a multiple of 4+3 stitches. +1 feed in every corner.
Density: on the “Grain” pattern using knitting needles No. 4.5 18p. for 23r. equal to 10 cm by 10 cm.
Description
The center of the blanket is knitted with one fabric. We cast on with knitting needles No. 4.5 105p. and knit 42p.: 35 loops - “Grain”, 35p. alternating, 6 rubles. rubber band, 6 rubles. persons ch., 35 loops - “Grain”. We knit 42r., changing squares, then 42r. we knit squares like the first ones.
After the last 3rd r. square for the edge, continue with knitting needles No. 4 so. add 1 p on both sides three times. in each 4p.: knit *4p. garter stitch, 2p. persons ch.* – from * to * we repeat twice. Closed P.
We dial 75p. on each of the 3 remaining sides. We knit according to the previous algorithm. Sew the corners.
Knitting a blanket from pompom yarn: video master class
The most tender and beautiful things are for children! After all, how nice it is to surround them with things made with your own hands with care and love - for example, a charming blanket that will warm the child and decorate his crib. It is important that the baby blanket is warm enough for this time of year and pleasant to the touch so that the baby feels a gentle touch.
Today I will show you how to crochet such a beautiful baby blanket - soft and airy, it will make a baby stroller more comfortable. This model is designed for warm weather; it can be used as a blanket in the crib or as a light blanket during walks. It may take beginner knitters more than a week to knit, but believe me, the effort spent will be worth it - look how beautiful it will turn out!

The size of the finished product including the border is 95x90 cm. To knit this blanket I needed 8 skeins of Milk Cotton yarn from Color City (composition: 45% cotton, 15% rayon, 40% milk acrylic, 50 g/150 m), hook No. 2.5 and 4 knitting markers.

So let's get started. We knit a chain of air loops equal to the length of your blanket (excluding the border).
The number of loops must be a multiple of 4 + 1 loop + 2 lifting air loops.
I knitted a chain of 203 chain stitches (200+1+2).

Crochet pattern for a baby blanket:

Legend:

1st row: insert the hook into the 4th loop of the chain from the hook and knit a double crochet,


insert the hook into the leg of the double crochet and knit a cone from two double crochets,


A loop has formed between the top of the stitches and the air loop; into this loop we knit a cone of 2 double crochets.


knit from * to the end of the row.

At the end of the row we skip 1 base loop and in the last 2 loops of the chain we knit 2 double crochets with a common top.

2nd row: we knit 3 air loops of lifting and in the same loop of the base we knit a double crochet,


*again we knit 1 chain stitch and into the next top of the double crochets of the previous row we knit 3 double crochets*

We knit from * to the end of the row. At the end of the row, we knit 2 double crochets at the top of the double crochet of the previous row.

3rd row: we knit 3 air loops of lifting and then in each loop we knit 1 double crochet.

We knit the last double crochet into the 3rd chain stitch of the previous row.

4th row: we knit 2 air loops of lifting and in the next loop we knit a double crochet,


skip 1 base loop and knit 3 double crochets with a common top,


*again skip 1 base loop and knit 3 double crochets with a common top, then knit 2 chain loops and a bump from 2 double crochets*

We knit from * to the end of the row, at the end of the row in the last 2 loops we knit 2 double crochets with a common top (we knit the second stitch in the 3rd air loop).


We finish knitting the fabric next to double crochets and begin tying the blanket,

in the 3rd chain stitch of the previous row we knit 2 more double crochets (mark the middle double crochet of the three with a marker),


then we knit 2 double crochets for each row

and we knit 1 double crochet at the top of the cone,

So we continue to knit this side to the next corner, we knit 2 double crochets on each row and we knit 1 double crochet to the top of the cone.

At the end of the tying on this side, we knit 1 double crochet into the top of the bump, then we knit 1 double crochet into the side stitch and 3 double crochets into the top chain stitch (mark the middle double crochet out of three with a marker), and then continue tying the 3rd side , knitting 1 double crochet in each loop.

Having tied this side to the end, we knit 3 double crochets into a corner loop (mark the middle stitch of the three with a marker). We continue to tie the fourth side in the same way as the second.

At the end of the row, we knit 2 more double crochets into the base loop of 3 lifting chain stitches and close the row with a connecting stitch, which we knit into the 3rd lifting chain stitch. We mark the middle column with a marker.

Let's start knitting the border.
Blanket border knitting pattern:

Legend:

1st row: we knit 1 chain lifting loop and in the same loop we knit a single crochet,


*knit 3 chain stitches again, skip 2 base loops and knit a single crochet*, so we knit from * to the next corner.

Our last single crochet should be knitted into a loop in front of the marker and the number of arches from marker to marker should be even. If you can’t get an even number of arches, skip 1 or 3 base loops in some places.


Then we knit in exactly the same way, 3 air loops, skip 2 base loops and knit a single crochet, and so on until the next corner. Do not forget that the number of arches from marker to marker on each side must be even. In the corners we knit 5 chain loops and knit single crochets, skipping one loop marked with a marker.

At the end of the row, having knitted 5 chain stitches, we close the row with a connecting stitch, which we knit into the first single crochet of this row.

2nd row: we knit a connecting stitch to transition to knitting from an arch, then we knit 1 chain lifting loop and a single crochet into the arch,


*again we knit 3 chain loops and we knit a single crochet into the next arch*

We knit in this way from * to the next corner.

Having knitted 3 air loops and a single crochet into a corner arch,

we knit 5 air loops and knit 1 more single crochet in the same corner arch,

then we knit 3 chain loops and a single crochet into the next arch and continue to knit in the same way until the next corner.

In the corner arch we knit a single crochet, 5 chain stitches and 1 more single crochet. Thus, knit this row to the end.
We close the row with a connecting stitch, which we knit into the first single crochet of this row.

3rd row: we knit 1 connecting stitch to transition to knitting from an arch, then we knit 3 lifting air loops

and in the same arch we knit 3 double crochets,


2 chain loops and 4 double crochets in the next arch,

2 chain stitches and a single crochet in the next arch,

and to the corner arch we repeat knitting from *, i.e. * *


We knit 7 double crochets into the corner arch,


then we repeat knitting from * to the next corner, i.e. * we knit 2 chain loops and 4 double crochets in the next arch, then 2 chain loops and a single crochet in the next arch*. We knit 7 double crochets into the corner arch.

We knit in this way until the end of the row and close it with a connecting post in the 3rd lifting air loop.

The blanket is ready! As you can see, it is knitted very easily, even a novice needlewoman who is barely familiar with the basics of knitting can handle the job. This crocheted blanket is ideal for discharge, and will also come in handy at home in a crib or outside in a stroller.


I also knitted these booties as part of this blanket set. Master class on knitting booties here.

Crochet baby blanket (video).
I wish you creative success! Knit with pleasure!
If you want to receive the latest articles, lessons and master classes from the site to your mailbox, then enter your name and e-mail in the form below. As soon as a new post is added to the site, you will be the first to know about it!
It’s hard to say exactly what a blanket is. This is a large shawl, a blanket, a cape, and a bedspread. One thing in common: the blanket should be warm, soft, not heavy and not parkable. Making a blanket with your own hands is a rewarding task in the literal sense of the word - it will be warm and cozy. And figuratively: a really good branded blanket costs somewhere up to $400, and the materials for the most expensive homemade one will cost half or three times less. Or maybe 10-20 times cheaper. Or for nothing - a blanket can be made in various ways.

A classic knitted blanket can be knitted or crocheted. A large blanket for the entire double bed (item 1 in the figure) is difficult to knit without a machine: you need very long knitting needles and it’s easy to get confused when counting a huge number of loops. By hand, on a free evening at home, it is possible to knit a smaller blanket on knitting needles for a chair (item 2) or for shoulders. It’s easier to knit a large blanket from super-thick yarn (item 3): in general, knitting needles are not needed to knit it (see below), and the number of loops with a width of 1-2 is a number that fits in the average mind. But a thick blanket is not a cheap pleasure, although even here resourceful craftswomen come up with unusual options for reducing the cost.
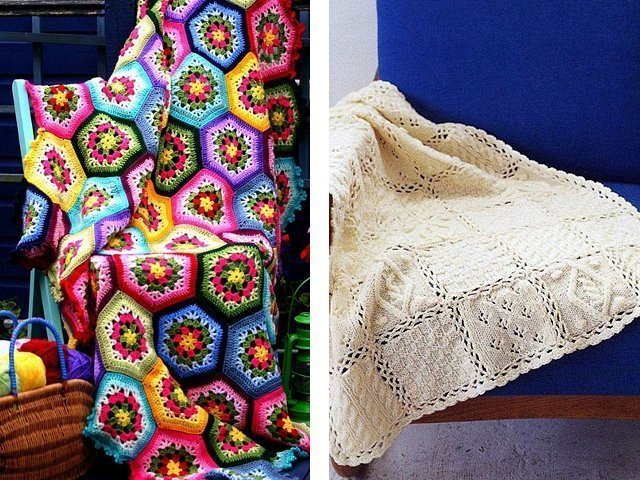
A large one-piece blanket is more convenient to crochet: with this tool it is easier to switch from motif to knitting motif, which allows you to get large, one-piece, fairly detailed items, pos. 4. And at the same time, it is convenient to crochet small fragments, which are then either tied into a panel with the same crochet (pos. 5), or sewn together with threads (pos. 6), or hand-knitted with ties, pos. 7.
The baby blanket is knitted from hypoallergenic yarn (wool is an allergen). It is better to weave a blanket for a baby on a frame (see below) and tie pompoms on it (item 8), there will be both a blanket and a play mat - no matter how you play around, you won’t hurt yourself. A budget option and an easy-to-make blanket for little ones - hand-knitted from fleece, also see below. Such a blanket will not last long, just until the child grows up.

And, finally, an “extra-budget” version of a blanket that is comfortable, durable, but not for show (say, at the dacha) - sewn from old knitted items, see fig. on right. In order for a blanket made from worn rags to serve for a long time, warm well, get dirty a little and warm well, the materials for it need to be prepared, see below.
We knit a blanket...
...knitting needles...
Knitting is not such a complicated science. It’s more difficult to get used to not losing count of loops, which makes the item uneven and can wrinkle. The principles of knitting are simple:
- The loops of the first row (basic loops) are thrown onto the outgoing knitting needle;
- The first basic loop is cast on by hand;
- To cast on the 2nd and subsequent loops, grab a thread of yarn with the end of the knitting needle and pass it into the previous loop until the required number of loops creep onto the emerging knitting needle;
- The second row is knitted by transferring stitches from the outgoing knitting needle to the incoming one;
- When throwing a loop, the end of the outgoing knitting needle grabs the thread, thus forming the loops of the third row;
- Whether the new stitch will be knit or purl depends on which side the outgoing needle goes around the incoming one;
- If the item is large, the second (idle) incoming knitting needle is pushed into the loops of the third row as they are formed;
- When the 2nd row is knitted, the next ones are knitted according to paragraphs. 3-7, only the working and idle outgoing knitting needles change roles from row to row.
To get started, watch a selection of videos, after which (or better yet, during which) you can start knitting:
Video: how to learn to knit
Video: Knitting Basics
Video: types of loops for knitting
Plaid patterns
On the one hand, knitting a blanket is easier than knitting a sweater - you knit a simple rectangle. On the other hand, it’s more difficult: there are a lot of loops, it’s easy to lose count. In addition, the blanket should be larger (to make it warmer) and weigh less. It is also highly desirable to reduce yarn consumption. And the last condition: oddly enough, the blanket should be stronger than a sweater or mittens and have less stretch. Anyone who remembers the times when there was a shortage of bed linen also remembers that over the summer, the sheet used to cover oneself in the hot weather instead of a blanket wore out faster than the same one one was lying on. And if the blanket stretches, it will not warm as well and will wear out more quickly. Therefore, not every knitting pattern is suitable for a blanket.
For beginners, it’s better to knit your first blanket with a bias (see picture):

Bias knitting satisfies all the above requirements, and its motif is simple:
- 6 purl loops - a path between the strands of the braid;
- 3 knit loops – one strand of braid;
- 3 more knit loops - another strand of braid;
- interweaving of strands - single and working outgoing knitting needles change places through a loop (see figure on the right), i.e., while the weave is being knitted, the loops on the incoming knitting needle A are dropped alternately, one at a time, from knitting needle B, then from knitting needle C.
You get a very good blanket if you knit it all with a Canadian elastic band: the tracks are narrow, it’s easy to count the loops, and if it goes wrong, you can see it right away. In addition, this knitting is called an elastic band because it is elastic and wear-resistant (it is used to knit cuffs, cuffs, sweater hems, etc.): a blanket knitted with an elastic band fits very neatly as a bedspread, and you can wrap yourself in it however you like. True, it will take more yarn for an elastic band than for a braid (approx. 3.5 kg versus 2.5 kg for a blanket for an adult). How to knit with Canadian, see next. video clip:
Video: pattern for knitting a “Canadian elastic” blanket
Patterns and motifs for knitting a blanket can be found in abundance on the Internet. If you choose a suitable option yourself, pay attention to the knitting patterns for hats - the technical requirements for them are the same as for the patterns for blankets. Simply, if you are knitting a blanket, keep the number of loops in all rows the same in accordance with the width of the blanket. One loop of regular yarn is 3-6 mm; from here the number of loops in the row is calculated. For example, how to knit a very beautiful, not very complicated and quite economical in terms of yarn consumption pattern for a hat, which is also quite suitable for a blanket, see next. plot.
Video: beautiful knitting pattern suitable for a blanket
Note: in practice, the number of loops for knitting a blanket is not calculated in advance. Knit and knit the first row, counting the loops, until the desired width is achieved. The next rows are knitted with the same number of stitches.
...crochet...
The principle of crocheting is somewhat different from that of knitting: we make a base loop, pull a thread into it, forming the next one in the row, etc. The finished ligature comes off the tool immediately. Crocheting topologically complex things (clothing, gloves, solid furniture covers) is much more difficult than knitting, or even impossible. But as for flat items (unfolded) or small decorative fragments, crocheting them is much simpler and easier than knitting. For example, a blanket is crocheted in exactly the same way as a scarf - the technical requirements for the motif are the same, you just need to give more loops per row:Video: crochet example
Note: You can start crocheting large things only after mastering knitting to the point of automatism - since there is no incoming needle, it is impossible to get the descending loops the same only through effort and attention, the item will go awry.
It is better for beginner knitters to get used to the crochet hook on small decorative details, which can then be sewn onto the same blanket or somewhere else. For example, how to crochet a heart, see the video below:
Video: crocheted heart for blanket decoration
Or, let’s say, the basis of many decorative knitted elements is a circle. How to crochet it, see another video tutorial.
Video: Crochet a circle
Knowing how to knit a circle, there will be no insurmountable difficulties in crocheting flowers. A baby blanket made of flowers for a girl – what little princess wouldn’t be delighted with it? Even if she is a real Baba Yaga on a potty.
Making a blanket for a child from crocheted flowers is not difficult in principle, but the work will be painstaking:
- Prepare a straight (without pattern) knitted base, or buy a ready-made inexpensive thin knitted blanket;
- Knitting flowers;
- When knitting the core, leave yarn tails of 10-15 cm;
- Weave flower tails into the base as a tone (see below).

Another useful knitting operation, which is easy to do with crochet and impossible with knitting, is weaving a tone thread (tone) into a finished knitted item, see fig. below. In addition to decoration, this is a way for literally a “teapot” (sorry, teapot) to perform 2-level knitting (see below), the highest class of knitting skill. More precisely, its imitation: the tone thread is thick, fluffy, but not tenacious - mohair, etc. Dividing after weaving, it will cover the base and create the full impression of a voluminous knit.

This technique is very useful for knitting a blanket for a newborn's crib and stroller. Square fragments of the base are knitted (you can also crochet them); perhaps not very even. You can use cotton yarn for the base - it is cheap and hypoallergenic. A hypoallergenic tone (mohair, padding polyester, etc.) is also woven into each square of the base, and then the fragments are woven (also crocheted) together, see fig. lower right. In the crib, the child’s body under such a blanket will breathe freely. In the stroller it will easily fold as it should along the seams of the plexuses. At the same time, the seams will overlap with a fluffy tone, and there will be no blowing through them.

The simplest way to weave knitted square fragments into a blanket is as follows:
- Binding threads are prepared from the same yarn from which the warp is made, 5 sides of a square fragment long;
- Bend in half;
- The ends of the first connecting thread are crocheted into the first adjacent loops of the base of a pair of squares;
- In the next pair of loops, the connecting threads are drawn crosswise, etc., each time crossing the connecting threads;
- The tails of the first connecting thread and the ends of the second are drawn into the loops of the next pair of squares (2 threads per loop until the tails run out;
- The tails of the last connecting thread in the row are bent to the sides and passed into the transverse loops of the outer squares;
- Weave in the next row of squares in the same way;
- Similarly, the squares are woven crosswise.
...and just with your hands...
Hands without knitting needles or a hook usually knit a blanket from super thick yarn, see below. However, with your hands without knitting needles or a hook, you can also knit an openwork blanket from regular yarn. Very openwork: the woman’s shoulders under it have about the same effect on the stronger half as slender legs in fishnet tights. Keep in mind. How to knit an openwork blanket with your hands without knitting needles and a hook, see video:
Video: hand knitted blanket - without knitting needles or hooks
…very fat

A thick blanket made of unusually thick natural wool yarn (mostly merino) is a recent development: the first samples went on sale 3-4 years ago. In 2016, the thick blanket reached its peak of popularity, which has now noticeably waned and, speaking in modern terms, the downward trend in demand continues. The reason is that it is very expensive, and there is only one advantage over the usual one: a luxurious, catchy look. $400 for a quality thick blanket is still cheap, and prices for products from leading manufacturers start at approx. from $600.
Merino extra thick yarn on AliExpress costs approx. from $40 per kg; for an adult blanket you will need approx. 3.5 kg. In terms of volume it will be as shown in Fig. on the right, so add delivery to the door of easily damaged and dirty cargo: In this case, it is better to keep Rosposhta in mind as a last resort. The total cost is around $200-250 in materials for a thick blanket knitted by hand. Synthetics instead of merino are not an option: it is difficult to knit and creeps in the product.
They knit with super thick yarn by hand using the so-called. giant knitting needles, pos. 1 and 2 in Fig.:
The simplest patterns are possible, for example. braid, see above. How to knit a thick blanket from super thick merino yarn, see video:
Video: knitting a blanket from thick merino yarn
Most often, a thick blanket is knitted smoothly (without a pattern) with your own hands, literally, without knitting needles. The basic loops are thrown over one hand (pos. 3) and transferred to the other (pos. 4 and 5), which serves as an incoming knitting needle. It turns out easier, faster and even smoother than with giant knitting needles. There is only one drawback: suddenly something urgently comes up (the child is crying, the doorbell is ringing) - it will take 3-4 minutes until you get out of these loops yourself. You can watch a visual animation of how a thick blanket is knitted with hands without knitting needles.
Note: Expensive, super thick yarn is the main obstacle to making a thick blanket. Here a woman’s trick comes to the rescue - how to twist ordinary yarn into one suitable for knitting a thick blanket, see another video:
Video: making thick yarn for a blanket
Blanket made of pompoms for children. And not only
If we talk about such qualities of a blanket as sophistication and elegance, a blanket made of pompoms on a woven base provides much more opportunities for their embodiment in a product than a knitted blanket made from super thick yarn. The advantages of a children's blanket made from pompoms are discussed above. And for an adult blanket they are:
- It’s easier to do - you don’t need to have any complex working skills at all.
- Weighs approx. 1 kg less than a fat one of the same size.
- It warms better.
- Thanks to the openwork base, it ventilates more freely and allows the body to breathe more.
- The cost of materials is at least half that of the cheapest ones for a thick blanket.
There are two disadvantages to a pompom blanket. The first is that it is difficult to wash and clean. Therefore, a blanket made of pompoms is mainly for children for little ones or, for adults, for neat owners. Second, it requires some manufacturing equipment to make it. However, it is simple, inexpensive and more than affordable to make with your own hands.
Pompoms
Let's talk a little further about the supporting base of the blanket with pom-poms. In the meantime, let’s talk about the decorative stuff – the pom-poms themselves. Some homemade ones for a blanket are not necessarily suitable, because... You need a lot of pompoms, more than a hundred or even several hundred.
A well-known method for making a pompom on a disposable, removable cardboard mandrel of 2 rings is shown in the figure:

The outer diameter of the mandrel is equal to the diameter of the pompom; the diameter of the hole in it is half of it. However, you can make a pompom for a hat this way. If you need a lot of pompoms and exactly the same ones, then due to the inevitable errors in marking and cutting out the mandrel rings, this method is unsuitable.
Large pom-poms for a blanket or rug should be made on a permanent frame, see figure:

Moreover, the rings must be cut out of durable sheet plastic with a compass drill, and their edges must be thoroughly sanded so that they do not cling to the threads. So that the pompoms do not need to be trimmed, the initial cut of the winding is made with the tips of scissors until the edges of the rings appear. Cut no more than 3-4 threads at a time. The curling is finally cut with a razor blade or, better, a new sharp mounting knife.
Note: remember the pose highlighted in red. We'll need it soon.
It is quite possible that you will also need small pom-poms for the blanket. For an adult - fill the gaps between large ones and thereby make the blanket warmer and more attractive. For children's blankets for the little ones (for example, for a one-piece blanket for a newborn), large pom-poms are not needed at all.
You won’t be able to screw the base of a small pompom onto the rings - they will be too small. There will also be few turns in the braid, and the pompom will come out sloppy. Small pom-poms, 2-3 cm in diameter, are made instead of a mandrel on a 4-pronged dinner fork, see figure:

Warp and knitting
Using the described method, small pompoms can be prepared all at once. Large ones are made one at a time when the base of the blanket is ready. In general, a blanket of pompoms is made in 5 stages: a) making the machine; b) warp weaving; c) tying the base; d) tying pompoms; e) formation of fringe. The stages are simple, but each has its own subtleties.
Machine
The machine for weaving the base of a blanket with pom-poms is a wooden (plywood) board (pos. 1 in the figure) or frame (pos. 2). The frame will require much less material and is much more convenient to work on, but it needs to be made by someone who has at least basic carpentry skills.
Frame material – timber from 60x60. Corner joints are half-timber reinforced with diagonal pairs of self-tapping screws. Nails 100 or 150 are not driven in completely along the contour of the machine in increments equal to the diameter of the pompom. If pompoms are used in 2 sizes, the larger one is the diameter.

Weaving
The base of the blanket is woven from knitting yarn, usually lengthwise and crosswise (orthogonal weaving), pos. 1, 2, 3 and 5). The number of threads in a longitudinal or transverse row is at least 3. First, all the transverse rows are braided with one thread, then all the longitudinal ones, again the transverse ones, etc. The ends of the threads are tied outside the weave, around the nails. If you use multi-colored yarn (3 and 5), you can get a base (the wrong side of the blanket) with color tints.
The base of orthogonal-diagonal weaving (item 4) will make the blanket much stronger and warmer with little additional material consumption. It will be possible to tie small pompoms onto the crosshairs of the diagonal beams, which will enhance the decorative effect. In this case, first knit all the small pompoms, and then all the large ones.
In orthogonal-diagonal weaving, for 1 diagonal thread there should be 2 orthogonal (longitudinal-transverse). To do this they weave like this:
- Cross thread;
- Longitudinal thread;
- Diagonal thread;
- Cross thread;
- Longitudinal thread;
- Thread of the opposite diagonal;
- Cross thread;
- Longitudinal thread;
- Thread along the initial diagonal (step 3);
- etc.
Warp binding
All intersections of warp beams are tightly tied with strong twisted thread, pos. 5. Pom pom ties alone (see below) will not keep the base from unraveling! Knit crosswise. The tails of the binding threads of at least 3-4 cm should fall on the future front side (on which the pom-poms will be, pos. 6).
Pompom tying
Pom-poms are tied while the base is still on the machine, pos. 7. In order for the pompoms to hold firmly, they are knitted while the rings of the mandrel are not yet completely removed (“red” position in the figure with a diagram for making pompoms!) Knit the pompoms onto the base like this:
- When dressing the “waist” of the pompom, leave the ends of the dressing thread (sling) 20-25 cm long;
- The ends of the sling are drawn into the base crosswise from the intersection of its bundles;
- Tighten the sling until the pom-pom fits into place as it should;
- The ends of the sling are tied with a simple straight knot;
- Bring the ends of the sling up (back to the pompom) crosswise from the insertion points into the base;
- Draw the ends of the sling under the “waist” of the pompom crosswise;
- They are brought out over the “waist” and tied tightly;
- Cut the ends of the sling to the length of the pompom threads;
- Remove the mandrel rings from the pompom blank;
- Make the next pompom, etc.
Fringe
Fringing a pompom blanket is very simple. The contours of the machine's nails with warp bundles are cut in the middle, the product is removed - the pom-pom blanket is ready.
Note: For more information on how to make a blanket from pompoms on a frame yourself, see the video below:
Video: example of making a blanket from pompoms
Simple blankets: knit and sew
We connect
For a very young child, for example. for a newborn, and the smallest pompoms on the blanket will seem too big. But soon the baby will grow up and he (she) will need a bigger, thicker, softer and more interesting blanket. In the meantime, mom has no time for complex needlework. In this case, it is better to knit a blanket for a newborn by hand using knots from pieces of fleece - you don’t need any skill, but a little more time and inexpensive material.

The technology is extremely simple (see figure):
- We prepare a template from dense material 10x10 cm with the sides marked by centimeters, pos. 1.
- Cut the fleece into pieces of approx. 20x20 cm each, i.e. with an allowance of approx. 5 cm per side, pos. 2.
- Apply the template, pos. 3.
- We cut the edges of the fringe into ribbons 1x5 cm, pos. 4.
- Remove the corner squares, pos. 5.
- We knit ribbon by ribbon (pos. 6-8) of 2 adjacent squares.
- We tie it square by square in the same way until you get a ribbon as long as the width of the blanket.
- We make the next ribbon (possibly of a different color) and tie it to the first one in the same way.
The ribbons are tied one to the other until the blanket grows as long as needed. You can, of course, tie ribbons from multi-colored squares - it’s a matter of taste and the availability of material. Instead of fleece, flannel, flannel and other fabrics certified for children's wear will be used. You can combine pieces from different materials at random - they will be enough for the natural service life of such a blanket.
Sew
You can sew a blanket that looks unpretentious, but warm, from old knitted items, cutting them into shreds. It is only necessary that later the flaps do not become shaggy and do not crawl under the stitching thread. To do this, things “sentenced” to the blanket need to be prepared - felted. And for things to feel felted, they must be wool with the addition of no more than 10-15% viscose or polyester. Throw things onto blanket material in the washing machine:
- Place in a textile bag for gentle washing. Exactly in textile! If the bag is mesh, fraying can damage the washer. It is quite difficult to repair it yourself, although it is possible.
- The washing machine is set to the longest wash cycle and the items are washed with wool powder. After washing, the fringes are carefully removed from the bag.
- Dry when stretched in a horizontal or slightly inclined position (on a stand, without hanging).
- Shake it out well. On the street, standing with your back to the wind: allergenic dust will fly from the laundry!