Homemade heart. How to make a beautiful heart. DIY coffee tree. Volumetric paper hearts - materials and tools
An origami heart has several manufacturing options; beginners in this art should practice on draft papers.
Watch the video tutorial: step by step making an origami valentine heart. Suitable for beginners.
You will need: a square sheet (for example, 20 by 20 centimeters) of red or hot pink paper.
Having folded a lot of such hearts, you can make a garland by attaching the figures with glue to a cord, ribbon or braid.

The box is a heart. Video
A gift for a loved one can be a box with a heart.
Choose a dense material so that the box holds its shape well. At the bottom you can write a wish or a declaration of love. The manufacturing process is described in detail in the video tutorial:
Beautiful heart with a pattern
The heart will look more interesting if you choose paper with a contrasting color on the sides.

The shape of the paper will need to be rectangular, the length should be twice the width.
- Place a sheet of paper horizontally, fold in half, unfold.

- Bend the lower right corner up to the middle of the sheet so that a triangle comes out. Straighten the sheet, do the same with the rest of the corners.

- A rectangle with two letters "X" came out. Grab one of them in the center, bring your fingers together, press the funnel formed on top so that it folds into a triangle.

- Repeat this action for the second "X".

- Bend the free corners to the center, perpendicular to the fold, lift the resulting triangle. Pressing on the central axis, straighten it so that the square comes out. Repeat for the remaining three triangles.

- Turn the piece over. Take the top corner of the diamond and slide it down to the bottom corner. Turn the workpiece over to the front again.

- Bend the edges of the squares resulting from step 5 from the central axis to their center.

- Bend the corners at the edges back so that the shape now resembles an origami heart.

- Expand the triangles in the same way as in step 5.

Flip the piece over to the front.
The whole process can be seen in the video:
The origami heart with a flower is ready. They can be decorated with a gift box.
Heart-shaped paper bookmark
A bookmark is a quick and easy paper gift.

The scheme of its manufacture is extremely simple:
- Bend a rectangular sheet in half horizontally, mark the middle line.
- Bend the left and right ends up.
- Wrap about a third of the top edge back, fold the corners to form a heart.
A cute bookmark on the corner of the page in the shape of a heart is ready. More in the video:
Volumetric origami heart - video
You will need: a square sheet of colored paper. From ready-made hearts, make a garland to decorate a room or window.

Modular 3D heart
An unusual gift will be a modular origami heart. For it, you will need 428 triangular-shaped paper modules of a suitable color. The process is quite laborious, here is a step-by-step description:
- At the beginning of the assembly process, you need two closed rows of 5 modules, the third - 10 modules.
- Next, insert the modules between the modules and fix them.
- For the next row, the assembly process is standard.
- For the new row, put on the modules as before, but now add two more modules without fixing between the three modules to make the origami voluminous. Do the same on the opposite side. Insert two more modules to the additional ones on both sides.
- The assembly process for the next row is normal.
- In those places where additional modules were added in the bottom row, insert two modules again on both sides to make the heart even more voluminous.
- To assemble the next four rows, 34 modules are needed.
- On the sides, where the thickenings are located, make 8 rows, alternating four and three modules in a row on each side, finish the 9th row with two modules. Connect the rows in an arc.
- With each of the free sides, make 5 more rows.

If you want the modular origami heart to last long enough, string paper modules after lubricating them with glue. Thanks to the cavity inside, the heart can be used as a small gift box.
And another way in the video:
On the eve of Valentine's Day, the issue of preparing all kinds of decorative ornaments becomes especially relevant, which, of course, should symbolically remind of this wonderful day. Well, what is the symbol of St. Valentine's Day, everyone probably knows, right?! Of course, this is a heart, it is on this day that lovers from all over the world exchange the most diverse hearts in the manner of serving. Well, if you want to give your soulmate a not quite standard heart, then this article will interest you, because today we will show various variations of cute thread hearts.
Such a heart made of threads can be a wonderful gift or perfectly fit into a romantic home decor.
It is necessary to take the wire holding the shape, give it the shape of a heart, fixing the ends in the inner folds. Then the resulting workpiece should be wrapped around the perimeter with pink or red threads. After that, you can start creating weaves of threads, you don’t have to try on too much, just throw the thread from one side of the wire to the other. Finally, use the same threads to create a hanging rope. According to this scheme, you can make a whole garland, and decorate a window, door or wall with it.

2. Heart of threads and balls.
You need to inflate two small balloons, fix them at the ends with threads together, then wrap them with matching threads and carefully cover them with PVA glue on top. When wrapping the balls with threads, you need to control the process, and try to adhere to the declared shape in the form of a heart. After the threads have dried, which is about 12-24 hours, take a needle and carefully pierce each of the balls. You pull out the balls through one of the holes and admire the completed work. By the way, after the threads are covered with a layer of PVA glue, the product can be covered with large glosses on top, but this item is optional.


To do this, you need a heart-shaped balloon, inflate it, wrap it with red or pink dense threads, cover the product with several layers of PVA glue on top. Leave to dry for about 12-24 hours, for the convenience of drying, the ball can be put in a jar or glass. Then pierce the ball with a needle and pull it out into one of the holes. Such a thread heart can be decorated with electric garlands, just put a short garland inside, but for this, you need to leave a large hole from below, at the stage of winding the threads, so that it is convenient to place the selected garland in the finished heart.

4. We make a heart from threads and long balls.
Inflate two long balls, tie each of them with the ends together, wrap them with threads, cover with several plentiful layers of PVA glue, leave to dry. After drying, pierce long balls with a needle, and remove them from the thread shell. Then connect the ends of the thread blanks together, as in the photo below, while forming a heart. For strength, the ends can also be glued with PVA glue. The finished heart can be hung on a ribbon, thus decorating a window or chandelier.

5. Volumetric heart made of threads.
Inflate a balloon in the shape of a heart, cut thick threads into short pieces, soak them in PVA glue, and cover the heart balloon on top. Lay the threads not just evenly, but in the form of waves, according to this scheme, it is necessary to completely cover the entire ball. After the threads are dry, the ball can be pierced.

6. Embroidered heart made of cardboard and thread.
Cut out a heart from paper, attach it to cardboard, create punctures according to its outline with an awl or a thick needle. Then, with a thread and a needle, along the prepared traces, we create an embroidery effect, as in the photo below.

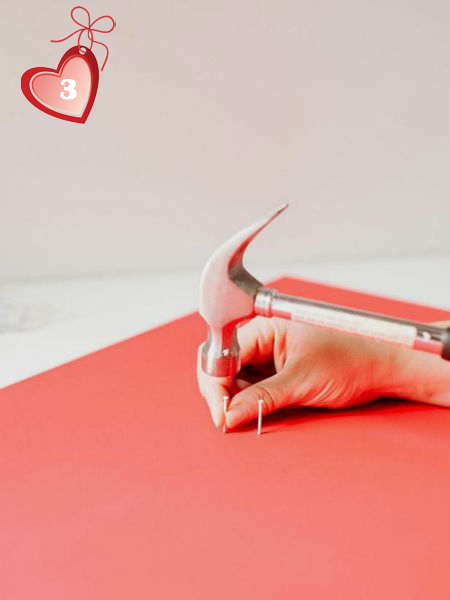
7. Heart of threads and nails.
We paint the chipboard sheet with red paint, cut out a large heart from paper, apply the template to the painted panel, fix it with adhesive tape, drive carnations into the board along the outlines of the heart. We take the threads, tie a knot on one of the studs, and begin to lead the threads from one stud to another, and so on until all the nails are involved. Create the number of layers to your taste, a small amount of threads looks equally beautiful, and, on the contrary, a richly wrapped heart.


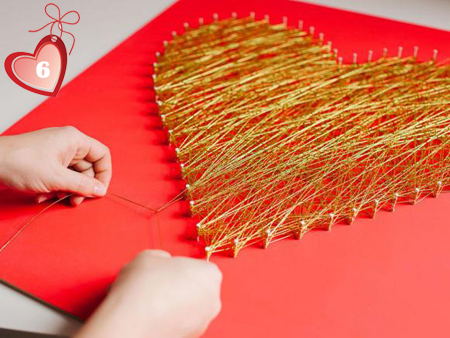
Another example of a heart made of threads and nails.


Today we showed you how you can make a heart out of thread without any hassle, we think that from the examples presented above you will definitely choose the right idea for yourself. Well, you can simply give a finished filament heart to your soulmate or decorate the premises of a house or apartment with it. A heart made of threads, made with your own hands, will definitely please your soulmate!
The "Decorol" website reminds you that you can subscribe to receive news from us, you can do this through the subscription form located in the sidebar.
Many people spend a lot of time choosing a present for a loved one. Despite the huge variety of goods, the best gifts are still those that are made by hand. In this case, you get an exclusive souvenir in which you have invested your warmth and love. Do-it-yourself voluminous paper hearts are a unique and very beautiful gift that can be presented to loved ones for any holiday, be it Valentine's Day or a birthday. What is needed for this? A minimum of materials and a little patience.
Volumetric paper hearts, the schemes of which will be discussed in this article, look very original, they can become not only a gift, but also an interior decoration. They can be made from different paper using a huge number of techniques.
quilling
This technique allows you to create very beautiful souvenirs that can serve as a separate decor or be part of the paintings. To make such a heart, you need to take:
- double-sided colored paper of any color, it all depends on your preference;
- PVA glue;
- twisting device, for example, a pencil or a toothpick.
First, the sheet must be cut into identical strips, each of which will need to be wound on the selected item (we have a toothpick). As a result, you should get a large number of spirals of different sizes. Now you have to glue them together starting from the center to get a heart, the size of which you can choose at your discretion. In addition, you can change the shape of the spiral and bend them, for example, in the shape of a "boat" and only then glue them into the desired shape. Such voluminous do-it-yourself paper hearts can be a replacement for postcards or serve as an interior decoration.
Origami heart
This technique is very popular all over the world. Even in childhood, many made airplanes out of them. These are the simplest crafts, but you can make real masterpieces. For origami paper "Volumetric Heart" you need to prepare a rectangular sheet of any color.
Take a sheet, bend it diagonally so that a narrow strip remains free at the bottom. Now turn it on the other side and bend the bottom strip in half. As a result, from the inside you will have a narrow strip. Then again turn the sheet over and bend horizontally the upper part of the square so that the fold is in the center of the diagonals. We connect the upper edge of the lower strip with the bent edge and turn the half-finished heart over. Now you need to expand the top square, in the end you should see 2 diagonal and 1 horizontal fold. Along these lines, you need to fold the upper square, so that you end up with a triangle, and at its base - a narrow strip. The lower and right corner of the triangle must be bent to the top. The left and right parts of the figure itself are bent towards the center. As a result, you should get a "house" that needs to be bent vertically in half and turned over. We wrap the 2 lower corners up to the center, and at the bottom we get an acute angle. Bend the top one down, and the remaining free ones need to be wrapped, pointing in different directions (left-right). It remains to fill the corners in the pocket. And that's it, the heart is ready. Do-it-yourself voluminous paper hearts made using this method can replace a postcard with
![]()
Volumetric 3d paper heart
Such an original souvenir can be an excellent substitute for the habit of valentine. For her, you need to be sure to print a template that will allow you to get the perfect heart. Paper is best to take thicker. Color, as usual, any, at your discretion. Volumetric paper hearts, made from multi-colored paper with your own hands, can be folded into a rainbow. Such a gift will certainly be remembered by every person. The execution technique can be seen in the picture below.

convex heart
This is the easiest option that even a child can handle. To do this, you need to take a sheet of paper and cardboard, a pencil, scissors and PVA glue.

To get started, make cardboard templates, for this draw hearts of different sizes. After that, circle them on paper and cut them out. On each figure, make a small cut to the center in the middle. Then each of the cut halves must be smeared with glue and glued together. As a result, you should get a voluminous heart. Do the rest in the same way. From ready-made hearts, you can make a composition on the wall, decorate a postcard or a jewelry box.
Hello dear blog readers! Today you will learn how to make a heart with your own hands in a variety of ways. A little romance in a relationship never hurts. You can show your feelings for your soulmate with the help of crafts in the form of a heart.
A young man can present an exquisite bouquet of sweets for his beloved. And a girl can please him with an unusual pillow or topiary.
A marriage proposal will be very spectacular and will make a big impression on the girl if it is done in an unusual way. In order to remember it forever, you can decorate the room with paper hearts or cut out a large and voluminous heart from cardboard.
You can sew a heart from felt material, which is perfect for various cute crafts. From it you can make a small souvenir or make a big toy.
For this you will need:
- felt;
- synthetic winterizer;
- threads;
- needle.
For such a craft, you need to cut out 2 parts from a red material of the appropriate shape and sew them along the edge with beautiful threads (contrasting threads can be used).
Souvenir is stuffed with padding polyester and sewn to the end. This craft doesn't take long to complete. It will make a wonderful gift for Valentine's Day. And also it can be presented to mom or grandmother to use such a pillow for needles and other sewing accessories.
For a child for a holiday, you can sew an Elsa costume from the movie "Frozen". One of these ideas can be seen in the video:
Wedding decorations
Preparing for a wedding is never complete without decorating the wedding hall and car. For these purposes, you can make a unique heart from ribbons. To make it, you need to prepare:
- cardboard;
- scissors;
- glue;
- thread and needle;
- beads;
- lighter;
- stationery knife.
Let's get started with the following steps:
- We draw a heart on a sheet of cardboard and inside it is another smaller one.
- We cut out the figure inside with a clerical knife, and along the outer edge with scissors.
- Take a satin ribbon and glue one end of it to our figure. We wrap the tape around the frame around the entire perimeter and fix the second edge of the tape with glue.
- Let's start making flowers. We cut the tape into segments of 10 centimeters and process the ends with a lighter so that the fibers do not spread.
- We collect the ribbons with an accordion in the form of a flower and fix it with threads and a needle.
We glue the flowers to our frame, and decorate their middle with beads.
This piece can be attached to a car. A wedding hall or apartment can be decorated with balloon hearts, and red paper hearts can also be hung on the walls.
Hearts from napkins will look appropriate on the festive table. To do this, they need to be folded in a special way, namely:
- We fold the napkin in half, connecting the opposite corners so that we get a triangle.
- We connect the left edge of the triangle with the upper corner of the napkin.
- We connect the right edge in the same way with the upper and left corners. Should be a square.
- Turn the square over and bend the top tip down.
- The bottom layer that appears is bent diagonally in different directions.
- We bend the left and right corners of the napkin inside and turn it over.
These themed napkins can be laid out on guests' plates.
Gift in the shape of a heart
You can surprise your young man by making him a gift from the heart with your own hands. If your other half loves sweets, then you can bake a delicious cake with a heart.
A master class on its preparation can be found and viewed on numerous videos on the Internet. A sweet heart will conquer your chosen one, and he will remember this surprise for a long time.
Another nice addition to the gift will be a postcard. It can be made with your own hands from ordinary cardboard. To make it, you need to take:
- a sheet of colored cardboard;
- scissors;
- glue;
- colored paper.
Take a cardboard sheet and fold it in half. It is necessary to draw 2 hearts on both halves of the sheet and cut them out. You do not need to touch the fold points. It turns out the base of the postcard, which still needs to be decorated.
From colored paper, you can cut flowers that will be glued to the right side of the postcard. We decorate the left half with paper flagella. To do this, cut the paper into strips and twist the ends in the form of rolls. We glue such figures with an edge along the edge of the left side of the postcard.

All the happy memories associated with each other are captured in photographs, from which you can make a vivid collage. To do this, you need to draw or print a template in the form of a heart.

You need to choose photos of the most joyful and memorable moments and arrange them on the collage so that each image can be easily seen. The corners of the photo may extend slightly beyond the edges of the template. If you stick a lot of photos on the collage, then your loved one will be able to look at them for a long time, adding to pleasant memories.
You can make a coffee tree for your loved one. For this we need the following materials:
- coffee beans;
- newspaper;
- glue;
- cardboard;
- pot;
- gypsum;
- wire;
Let's start making a tree:
We draw a heart on cardboard paper, and inside there is one more. And then cut it out with scissors.
The resulting base must be made voluminous. To do this, glue pieces of crumpled newspaper to it and fix it with threads.
We make trunks from aluminum wire. We give them the necessary bend, and at the end we make a hook.
We wrap the wire with threads and insert it into the base, fixing it with glue.
Glue the workpiece with coffee beans. You can use a hot glue gun for this.
In a pot, we prepare a solution of gypsum with water and insert a tree trunk there until the mixture has hardened.
Gifts for a girl
For your beloved girl, on the eve of the holiday of Valentine's Day or in honor of the anniversary of the relationship, you can make a heart out of foam.
Styrofoam heart
She can hang it on the wall in the room as a decoration. The figure can be any size. It can be cut from a single piece of foam and painted with red paint. And you can also decorate the figure with openwork elements that look gentle and romantic.
Beloved girl will be happy with a sweet surprise. Therefore, you can present her with a gift from Kinders.
Kinder Surprise
Make it very easy. It is necessary to prepare a cardboard lid or a box of any shape for the base. It must be pasted over with beautiful paper, and double-sided tape should be glued around the perimeter. That's what chocolate bars are for. From above they can be tied with a beautiful ribbon. We put kinders inside the box and the gift is ready.

With the help of a homemade box, you can make a declaration of love or a marriage proposal.
homemade box
You can put a ring or other jewelry in it. First, cut out 2 hearts from cardboard.
One will serve as the bottom of the box, and the second as a lid. Then you need to cut a wide strip with teeth on one side. They will be glued to the bottom of the base. In order for the lid to hold, we attach 2 strips of braid to the base. Glue the other ends of the ribbons on the inside of the lid. Next, the box should be glued with colored paper and decorated.
We have considered many ways of needlework, ways of how to make a heart with your own hands for your soulmate.
Sincerely, Natalya Krasnova.

On the eve of a wonderful holiday, many people have a question - how to prepare a surprise for a loved one? If ordinary postcards are already tired, then you can come up with something more interesting, for example, garlands of hearts. Now we will tell you how to make a heart with your own hands for garlands.
Garland - paper hearts
Very quickly and simply, you can decorate a room by creating a whole forest of garlands that fall from the ceiling. This will be a big surprise for your significant other. And all you need for this is strings and colored paper.

Volumetric hearts - master class
How to make voluminous paper hearts for garlands - you ask? Yes, very simple. For this you need:
- scrapbooking paper or any other thick paper;
- scissors;
- glue stick.
How to fold a heart out of paper? To begin with, we will cut a lot of strips of paper, of different lengths and widths, so that our hearts turn out to be of different sizes.
Then we bend each strip in half, making a bend from each edge and gluing it to the center. It will turn out a slightly wrong letter "B", glue the inside and get a heart.
 |
 |
We need a lot of these hearts. When you glue them, you can show your imagination and glue, for example, with a pattern inside. Those. we need hearts completely different.
In early February, people around the world begin to prepare for the most romantic holiday of the year -. It is celebrated on February 14, the day of St. Valentine, who is considered the patron saint of lovers and loved ones. The symbol of this date is a heart. It is given to each other and such gifts are called valentines.
You can buy an attribute of love in the store. But this will mean that thousands more boys and girls will receive exactly the same gift. Most people think about how to make a heart with their own hands. Then you can be sure that only one person in the world will have this gift - your loved one.
Festive symbols are invented from different materials. Prepare salads and bake heart-shaped cakes. The presentation and decoration of the holiday depends on the desire and possibilities.
From paper
This is the most affordable material for making crafts. How to make a paper heart For this, in addition to desire, you will need quite a bit:
- paper,
- scissors,
- glue.
When designing paper products, a huge number of its types are used:
- white,
- color,
- cardboard,
- newspapers,
- magazines,
- corrugated,
- velvet.
There are many varieties of paper valentines. To prepare them, you can use the following techniques:
- quilling,
- origami,
- application,
- cutting out,
- papier mache,
- weaving.
Before you start creating, you should decide which technique you want to use.

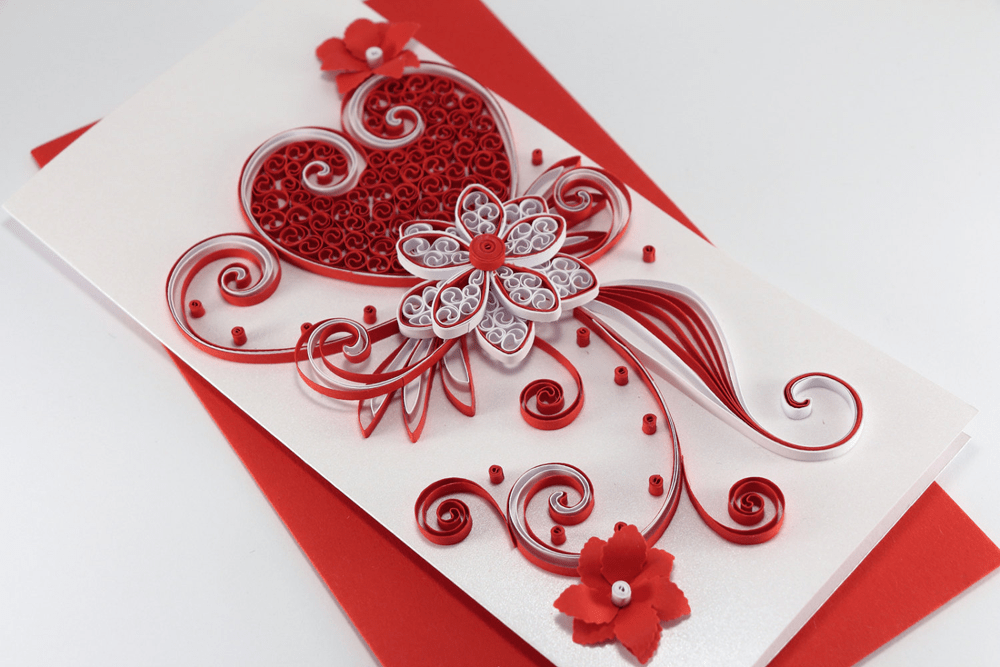
quilling
Quilling - twisting paper. To do this, the sheet is cut into narrow strips, which are wound onto a core object: a pencil, a toothpick, a knitting needle, a thick needle. The resulting spirals are glued to the base prepared in advance in order to form the intended figure. The thinner the object on which the strips are wound, the more delicate the final work will be.
For a Valentine, cut out a large heart from cardboard. It must first be drawn or a template used.
Cut paper strips 1 cm wide and make spirals. Choose the color yourself, but do not forget that a heart in love glows with bright colors. The paper must be colored on both sides. To do this, you can use old glossy magazines.
Arrange the spirals on the cardboard blank as you like. They can be arranged symmetrically in both halves or form an abstract pattern. Glue the curls to the cardboard.
Application
To make a valentine using the appliqué technique, you need to cut out one large heart from thick paper or cardboard and many small ones from colored paper. Small blanks need to paste over a large one. If you use material of different textures, the heart will turn out more original. It can be pasted over on both sides with clippings from newspaper and magazine pages, flowers, photographs.
Small hearts can be folded in half and only one side glued. Then under the other half there will be a place for wishes and kind words.

Origami
Origami is the folding of paper in certain ways to make a conceived figure.
In order to make a valentine using this technique, you need a square sheet of paper. Having conjured with the sheet, giving it the desired shape, you yourself will understand how to make an origami heart. There are a lot of options. The result is an original, your own origami.
Decorate the resulting figure in any way. For example, glue a satin ribbon bow or paint with gouache.
Volumetric heart
A voluminous heart looks especially impressive, and many try to make just such a significant day. If the question arises of how to make a voluminous heart, you must first decide what it will be. They are made from different materials:
- paper,
- fabrics,
- thread.
The easiest option: cut out a heart from paper, make a small incision in the upper part, fold the incised places, giving the figure volume, and glue it together. A more difficult way is to apply the modular origami technique.
The heart is sewn from fabric and filled with special materials:
- cotton wool,
- sintepon,
- holofiber,
- foam rubber,
- feather,
You can put aromatic herbs inside. Then she will become a “aroma heart”.
Any fabric is suitable for sewing a love attribute. Small specimens are excellent from fleece, drape. For large, choose bright shiny satin or silk. Good crafts from chintz, linen, calico. This fabric does not stretch and will be very comfortable to work with.
In order to make a volumetric fabric symbol of love, you need to prepare a paper template. On it, cut out two parts from the fabric and sew them. When stitching, be sure to leave a small gap in order to fill the inside with filler. After filling the heart, carefully sew up the “pocket”.
The fabric, the edges of which do not crumble, can be sewn on the right side. This will give the product originality. The edges of highly free-flowing material must be handled very carefully.
Instead of fabric, you can use a knitted fabric or a present can be knitted or crocheted and also filled with soft material.
Fabric and knitted symbols decorate the room for the holiday, give them to each other. You can make whole "heart":
- beads,
- earrings.
After the valentine is ready, it must be decorated. Use for this:
- beads;
- beads;
- silk, nylon, satin ribbons;
- decorative cords;
- different embroidery.
Having dressed up a gift in festive accessories, you can be sure that the person for whom it is intended will like it.

From salt dough
Salt dough is an easily accessible and plastic material. From it you can mold absolutely any figure.
The dough is prepared as follows: a glass of flour and fine salt are mixed with a glass of water. First you need to dissolve the salt in the water, and then add the flour. Knead the dough until it becomes sticky and soft and sticky. For the strength of finished products, sometimes a little PVA glue or wallpaper glue is added to such “plasticine”.
Roll out the dough with a rolling pin and make objects into molds. You can shape them by hand. Finished products are dried naturally or in the oven. Then, having shown all their creative ability, they need to be painted. If you add gouache or food coloring directly to the dough, the creations will immediately be colored.
box
If the gift for Valentine's Day is not in the shape of a heart, then be sure to create the appropriate packaging for it - a box. First you need to think carefully about how to make a heart box: there are a lot of options. Try making paper.
Thick paper is suitable for the box. Very thick cardboard will be inconvenient to bend and glue, but the packaging will be stronger. Choose the right paper for your heart box.

The box will consist of two parts: the main part and the lid to it.
- First, cut out a heart from paper. This will be the bottom. The size should correspond to the size of the gift for which it is intended. When cutting the bottom of the box, do not forget that small pieces must be provided around the perimeter of the whole heart, to which the side part will subsequently be glued.
- For the "walls" you need to prepare a strip, the width of which will correspond to the height of the box. The length of the strip is equal to the length of the perimeter of the heart.
- The strip must be connected to the bottom of the box, gluing it to the parts cut out together with the heart.
- To glue the bottom and walls of the package, you can use adhesive tape or a stapler. Then you have to decorate the adhesive tape and stapler staples.
The lid for the box is made in a similar way. Only the lid should be slightly larger than the box itself in order to easily close the package. Therefore, the top of the lid must be made a few millimeters larger than the bottom. Accordingly, the strip for the sides will be a little longer, but narrower.
Decorate the box in any way you like. You can paste over all the details in advance with a cloth or bright self-adhesive paper.
Making a heart with your own hands is not difficult at all. You just need to show a little imagination and have a great desire to bring joy to your loved one. Even a lover, far from needlework and creativity, is able to make a Valentine for a romantic holiday.
Holiday of all lovers. There are a few weeks left until February 14th, you can already start thinking about a gift, looking for recipes for delicious dishes for a romantic dinner ... You can get a few sheets of multi-colored paper, scissors and glue and make interesting valentines with your own hands, stylishly decorate a house in romantic colors, beautifully decorate the holiday table.
This article contains the most interesting handmade ideas for the holiday of all lovers. We hope that with our help your significant other will remember this day for a long time. So, we will surprise with all kinds of hearts, let's go!
For these romantic crafts, you will need colored paper, scissors, glue, sometimes even wire and salt (!), but we can promise you that you will not need any special skills and secret ingredients that can only be obtained on a full moon by surpassing through an empty well » is not required!
1. Decorate the house!
Wreath of lovers on the door

We cut out a circle from plain white paper, with a diameter of 30-40 cm. We glue it with cut out hearts. Choose the necessary tonality for yourself - a wreath can be made more delicate using white and light pink hearts, or more passionate by choosing red and burgundy colors. You can make it in a fashionable combination of pink and black or in a gothic style - using black and red hearts. The size of the hearts can also be chosen differently - so the wreath will turn out to be more voluminous and textured.
An interesting option is a wreath of roses.

How to make, see our detailed.
If you want something more cozy and warm on a cold February evening, pay attention to the option.

A wreath can decorate a door, window or hang it on the wall.
Garland of hearts
We string the cut out hearts on a thread. Very simple and beautiful decoration. Please note that hearts can be strung either across or along. If strung across, you get a vertical garland, which can be used to arrange a doorway.

If along, then horizontal - such a garland can be hung on a wall, decorate a bed, a window with it, or drag it across the entire room under the ceiling.


It is even easier to make a garland with clothespins. Then it is better to cut out hearts from thicker paper so that they do not deform due to clothespins. And of course, you can attach romantic wishes, favorite photos, memorable candy wrappers and tickets to such a garland.

Romantic little things
Remember when we were kids growing crystals on sticks in a saline solution? Try to make such crystal hearts by February 14th!
A heart can be made from colored wire, after which it must be placed in a concentrated saline solution (add salt gradually to warm water until it stops dissolving). It remains to wait a few days, and in order for the heart to grow faster, then change the solution to a new one every 2-3 days.

And, of course, candles! Decorate candle holders with hearts, just don't forget about fire safety!

2. We make valentines with our own hands!
The most important paper heart on this day is your Valentine card. And you can make it with your own hands and it will turn out no worse than the store, even more original! For example, you can send...
Message in an envelope
We string 6-8 hearts on a thread and put them in an envelope...

You can write words on each of the hearts, which, as the hearts are pulled out, will add up to a phrase. Do not confuse the beginning and end when putting a message in an envelope, otherwise it will turn out “I love you, I am Zina” instead of “Zina, I love you” :)
A couple more options with envelopes - mini messages with nice words and compliments and an envelope that opens into a heart


Postcard with hearts
And here are easy cute design ideas for romantic valentine cards:

Another idea of a three-dimensional postcard with two hearts flowing into each other - it turns out a very symbolic Valentine. It will take you only 10 minutes to create it - follow ours and here's what you get in the end
And here is a video instruction on how to make a Valentine card with hearts resembling balloons on strings
Subscribe to our youtube channel so as not to miss new master classes for Valentine's Day and February 23
Button hearts
Cool postcards are made with button hearts - bright and cheerful

Valentine cards with photos
Your joint happy photo can be the best Valentine for Valentine's Day. Add a line of wishes in Photoshop, a few hearts and paste it into a pretty frame. Or make a heart out of your little photographs

And also Origami Valentines. Watch this simple video tutorial showing how to make a beating heart out of a sheet of paper.
In the nomination "Last Minute Valentine" this uncomplicated boxed cardboard heart wins. Beloved is almost on the doorstep, but the valentine is not ready? Feel free to tear off a piece of the box and, following this simple video instruction, make a romantic surprise.
3. We have fun colleagues!
To do this, you will need plastic (yes, in principle, any) soldiers! We write heartbreaking requests for help on hearts, such as “Elena Arnoldovna, you killed me with your smile!”, “I can’t fight these feelings anymore!” “I’m dying of love for you”, “Smitten by your look on the spot!”. We “distribute” hearts to the soldiers and arrange the regiment dying of love on the tables of colleagues, window sills and in a cupboard for coffee cups.

4. Have a romantic tea party

Cute tea bags. We have already written about this. You can decorate the whole tea ceremony in a romantic style.
However, you can drink hot tea outside from a thermos and, embracing, look at the romantic sky lanterns flying into the sky in the form of hearts.
How nice it is to receive on Valentine's Day, which is celebrated on February 14 and dedicated to Valentine's Day, a small gift in the form of a heart - the so-called "Valentine"! During my youth, such a holiday was unknown in Russia, and we gave gifts exclusively on February 23 - for boys, and on March 8 - for girls 🙂
But the wonderful holiday of St. Valentine, not tied to any political dates and official celebrations, quickly fell in love with many, and became very popular in our country. Give and receive valentines, notice the symbols of hearts everywhere and plunge into the atmosphere of general light insanity - why not?
Appeal to mothers and grandmothers!
If you are young in soul and body, if you are in love, give and accept signs of attention! If you are young only in soul, and the body no longer wants to fit into the atmosphere of a youthful holiday, spit on his grumblings and take glue and paper in your hands - is your body still capable of this ?! Make a beautiful and unexpected valentine with your own hands, show your children and grandchildren a master class, prove that there is still “gunpowder on our street”!
And even though there was no such holiday in our youth, we knew how to make handicrafts better than the current “generation of computer geniuses”. Hands remember!
Of course, you can buy a ready-made postcard. But is it so pleasant for both the giver and the one who receives the gift? After all, spending effort, thinking about who you are preparing a gift for, creating a surprise with your own hands, you experience unique feelings of joy and anticipation - and this is the same, unique atmosphere of a REAL HOLIDAY!
Moreover, such an amazing thing in terms of its capabilities as the World Wide Web offers us many options and ready-made solutions, even in the photo, even on the video, in step-by-step lessons and master classes, with a detailed description and demonstration of the result.
I have prepared such a selection for you today - choose the most interesting version of the Valentine for you and - forward, to creative success!
Do-it-yourself valentine envelope made of paper - we do it with children!

Such funny animals that give valentine hearts can be easily and simply made from plain paper, along with children - I think they will at least not be bored! After all, you can invent and create absolutely any animal - a bear cub, a kitten, a bunny, and even one that no one else has invented before 🙂 Show imagination in the image and accuracy in work - and you will get a wonderful original valentine in the form of an envelope with a secret message for the holiday February 14, and not only!
What to cook:
- sheet of cardboard or thick white paper
- red paper for a heart
- glue
- colored pencils or markers or paints
- scissors, ruler, pencil
- Take a regular sheet of thick paper or white cardboard.

- Bend in half, make a fold.

- Make a cut along the fold with scissors - we get 2 blanks for our valentines.

- Lay out the rectangle as in the photo. Mark with a ruler with a simple pencil 2.5 cm from the vertical edge two points and connect them with a line.

- Do the same on the other side. It turns out, a kind of field of 2.5 cm wide.

- Now, from above, set aside a line in this way 5 cm from the top edge, putting two points and connecting them with a line.

- Everything above the line will be the muzzle of our character. On the side, you need to outline two semicircles - paws with which he will hold the envelope. Draw the paws below the horizontal line, stepping back from it by about 1 cm. Down

- Here is such a muzzle and paws of the future dog turned out on a sheet.

- We take scissors and carefully cut out all the contours along the lines of the pencil. If you are making a valentine with children, help them cut out difficult places - as in our example, the dog's ears.

- We bend the lower part up - corner to corner. We paint the pencil muzzle with colored felt-tip pens or pencils. You can also make an application from colored paper - here only your imagination will tell you how best.

- We bend the paws on top and draw claws on them.

- From a piece of red paper, cut out a heart of any size you like, and glue it in the center. Be sure to use red - it's traditionally happened on Valentine's Day - for some reason, hearts are always red or pink.

- Now we will make an imitation of an envelope - we will draw diagonal lines from the corners to the heart.

- Open our valentine envelope and draw lines for writing inside our gift with a colored pencil or felt-tip pen.

- You can draw a few hearts - it will be even more interesting. Well, do not forget to write the message itself - after all, any Valentine is a declaration of Love and Friendship!

- Here are some funny little animals you can create. Colored parts can be painted or glued with an additional layer of paper of the desired color.

Do-it-yourself volumetric paper valentine - 3D hearts for Valentine's Day.

Very beautiful, voluminous valentine card with 3d hearts. The postcard is beautiful, but quite difficult for possible beginners due to numerous folds and slots - everything needs to be done carefully, so immediately make sure your hands are clean, press the paper not with your fingers, but with a plastic handle of scissors or another object. You will have to tinker, but we will definitely cope with you, because we have step-by-step photos of the whole process!
To make it, we need to take:
- 2 sheets of beautiful red paper for hearts
- 2 sheets of white cardboard (heavy paper) of a standard size
- black marker or felt-tip pen for tracing hearts
- strips with rhinestones on sticky tape for decoration
- a simple pencil, ruler, scissors, double-sided tape (but glue is also possible)

- We fold each sheet of cardboard in half, precisely combining the corners so that there is no skew.

- We will set aside one cardboard box, we will work with the second - with the base. Lay the folded sheet with the fold toward you and measure a 4 cm high line that is 3.5 cm from the edge. We symmetrically make the same line on the other side. The incision is made exactly along these lines.

- Now we remove the concept of two-dimensional space from our heads and move on to volumetric 3D modeling - we bend the fold between the two slots in the other direction. You should get such a design, as in the photo below.
 This is the outer side, and on the inside (open our postcard, as you open a book) - it turns out such a step. Did you manage? Wait to rejoice, it's still flowers!
- Now let's wrap our step inside the postcard and close it by going to the outside. From the outside, our postcard should look like this. Now we must do a similar procedure with the inner fold of the postcard - set aside from the edges of the fold 2 cm inwards and 3 cm upwards.

- We make cuts again along the marking lines.

- To make it easier to bend the sheet in this place, attach the ruler to the ends of the cuts and wrap the sheet on the ruler, iron the fold line.

 Now open the postcard again and redirect our fold in the opposite direction - to again get a ledge-step on the inside of the postcard.
  Do this on the other side - now we should have 3 steps.
- At this stage, we could already stop, but we are not looking for easy ways. Let's take another step! Along the inner fold, we again set aside the markings for the last cut - 2 cm from the edge and up.

- But we will cut through only one upper fold (and not the entire thickness!).

- Thus, we have another upper small step. Phew, you can exhale, then everything will go much easier!

- We take our first cardboard box - it will be the outer, front side - we need to attach our “stepped” model to it. It is convenient to do this with double-sided tape, but you can get by with ordinary glue - the main thing is not to pour a lot of it so that our valentine does not wrinkle or warp. We glue both parts and get a smooth cover on the outside and a stepped design inside the valentine. Now you need to decorate it with hearts.

- Let's make a heart template - best of all 3 different sizes. Two or three large hearts, many medium and two or three small ones.

- Outline our pencil sketches of hearts with a black marker and cut them out with scissors.

- Now is the time to show your artistic abilities - beautifully and highly artistically, with the taste of a true designer, you need to scatter our hearts on different levels so that it looks beautiful. If you can’t trust your taste, do it exactly according to the photo, perhaps it will be fine.
 It is very convenient to attach hearts to pieces of double-sided tape, but you can also use glue.

- Well, this is how it all looks. Everything already looks elegant, but there is no limit to perfection - let's do the last part of the design - decorate with strips of rhinestones.

Here we have such a “heart-strass” splendor! True, there was no place left for text congratulations, but with such an abundance of red hearts, words would probably already be superfluous! What do you think? 
“Heart in the palms” is a very simple and quick paper valentine. Can be done with children.
What materials are needed:
- red and white paper
- glue, pencil, ruler, scissors
- pink or red pencil (felt pen)
- needle and thread

- We take our (or someone else's!) hand with the thumb pressed, put it on a piece of paper and circle it. Cut out the hand stencil.

- We bend thick white paper (or cardboard) in half and lay our stencil on the fold line so that the “little finger” is along this line. We cut everything to the fold so that the card can open like a book.

- From red, double-sided dyed paper, cut out the same squares, about 6 cm each side. On one of them we make a diagonal fold and draw a half of a heart. This will be our template.

- We also bend the remaining squares, fold them one by one and, applying a template, cut out hearts.

- We sew the resulting stack of hearts with a fold in the middle onto the inside of the fold of our “palms”, leave a knot of thread on the side of the hearts. Then we will close it.

- Glue the halves of the hearts to the palms with glue.

- We also glue together the two halves of the uppermost heart, at the same time hiding the traces of stitching.
- We circle the “palms” with a pink felt-tip pen, not forgetting to paint on the details inside - folds and lines on the fingers. Everything! Our voluminous paper valentine is completely ready - you can give your loved one your heart in your palms!


Making this valentine is very simple, but there are some tools that will need to be prepared. In particular, it is difficult to do without a hole punch - to create the same even holes, and special curly scissors, since cutting all these waves by hand on many details is not at all interesting and cannot be done exactly - but here the sameness of details and accuracy are important.
We will need:
- pink and white paper
- acrylic paints (yellow and white)
- glue
- green pencil or marker
- round head pin
- a piece of pretty ribbon
- hole puncher
- curly scissors
So let's get started!
- We “clone” the heart template of the size we need to the number of 7 pieces from a sheet of pink paper.

- Glue a pink heart on a larger white sheet.

- With the help of curly scissors, we make a beautiful edge treatment, so that a white wavy outline appears around the pink heart, reminiscent of braiding when sewing.

- We need 7 pieces of such blanks.

- Each heart needs to be decorated with daisies. To do this, take a pin with a round head and, dipping it in yellow paint, draw the centers of the flowers - 3 daisies, as in the photo below. Around each middle, draw white petals in the same way.

- With a green pencil we add leaves - two for each flower.

- We make neat holes in each heart with a hole punch. We pass a piece of festive ribbon through them.

- We tie a bow and cut exactly the edges with sharp scissors.

- Our gentle valentine with chamomile mood is ready. It remains to write on the reverse side of the first heart the name of the object of our donation, and on the remaining ones - your wishes, and everything that you would like to convey in words.
Exquisite valentine using the scrapbooking technique - Master class with step-by-step photos.
This is what a closed valentine card looks like.
 Turning the paper lever, we open our postcard and there we see a surprise message.

To make this stunningly beautiful and sophisticated valentine, we will need materials that are sold in craft stores or scrapbooking departments (in bookstores). There you can always find all the necessary parts, accessories and tools. It is good that now all this can be ordered directly through online stores.
What to cook:
- pink and white paper for scrapbooking (can be used for watercolor, or other thick paper)
- semi-beads on a sticky basis
- artificial flowers for scrapbooking
- piece of lace, piece of lace
- rivet with split ends - brads (these are stud buttons with a flat flexible forked leg made of soft metal)
- glue and glue gun (can be replaced with colorless superglue)
- curly and regular scissors
When everything you need is prepared - the process of creating a valentine heart will not cause us any problems - everything is quite simple.
- From plain white paper, we cut out the shape and size of the heart we need.

- According to the template, cut out a heart from pink thick paper.

- Tint the edges of the heart with a slightly pink pencil, of a darker shade, to visually darken the border.

- From red thick paper with a template applied to it, using curly scissors, cut out the blank. Cut out so that the wavy edge protrudes beyond the edge of our template size.

- We glue a pink heart on a red blank with a curly edge.


- Cut out a rectangle from red paper and glue it on top of the pink layer.

- Now cut out a slightly smaller rectangle from white paper and glue it on red.

- And on the corner we will glue another small red heart. Our blank number 1 is ready.

- Now we will transfer the heart template to red paper with a pencil, but we will not cut it out yet. Our task is to make another red heart, a little smaller than our template. To do this, manually draw another one inside the pencil contour - a little less. On it we will make a crop. This will be the second piece.
 This is how it should look like when applying the second blank to the first.
- For the second heart, you need to make a decoration-bouquet. Let's start with the ribbon - make two loops and glue them together at the base.

- From the lace braid we will make one larger loop and place it at the base, on the bottom layer. Glue this beauty on a heart - place it not in the center, but a little asymmetrically, as done in the photo below.

- Now we need 3 flowers. If there is a stalk, cut it to the very root. Attach three flowers to the base of our decoration on the glue gun, covering the cut and fastening points of the braid.

- We transfer one half-bead to our heart, gluing them along the edge of the heart.

- Now we cut out a “lever” from pink paper - cut a strip of paper in the shape of an arrow, cutting off the corners. Glue on the back side of our second blank.

- We combine both blanks and with a sharp knife we make a small hole at the base of the heart.

- Pick up our rivet and insert the legs into the hole from the front side.

- On the reverse side, spread the legs of the brads to the sides and press firmly against the paper.

- So that these legs do not stand out, we close them with an application in the shape of a small red heart.

- Check how our "mechanism" works - the top heart should move easily over the bottom, revealing to us a secret message ... Which still needs to be managed to be written on a small piece of white paper. But that's a completely different story... 🙂

Valentine card with moving rainbow hearts - Master class on video.
The fastest and easiest valentine in 2 minutes!
If you “slept through” the whole of February and realized it only on the 14th, when it’s too late to prepare surprises, and you definitely need to give something .. catch a simple way - How to quickly and easily make a valentine out of paper with your own hands in just 2 minutes. This video clip has been going on for exactly that long, and by repeating all the simple steps behind it, you will definitely cope!
Here are the hearts you can draw yourself or download as ready-made templates.
 |
 |
 |
Download stencils of hearts of different sizes (for cutting out of paper) from the link below - they can be printed on any printer, they are selected in the large size you need for printing.
Tricky question!
PS. Please share in the comments examples of your valentines - what did you give or did yourself, and what did you give? And, by the way, I have had an unresolved question for a long time - what is more pleasant - to give gifts yourself or to receive them from other people? What do you think?
29.05.2018 2 876 0 Anya
skillful hands
It is always nice to receive a heart as a gift. And it’s even more pleasant to make it yourself and with a soul for those you love. Paper hearts can be made in a variety of techniques and have different sizes and different interpretations. In our article you will find several ways to make a heart out of paper, and be sure to choose the right one for yourself.
Content:
simple paper heart

For work, take a rectangular sheet of colored paper. Mark its middle on each side and bend from it as if you were making an airplane. Then unbend. And so repeat on all sides. As a result, the fold lines form a diamond in the center of the sheet. Then, first fold all corners about 2 cm, and then fold the paper along the fold lines. Follow the diagram below and in the end you will get the desired craft.

Such a heart can be used as a postcard, inside which wishes are written.
Volumetric paper heart

To get started, prepare the following materials:
- colored paper;
- simple pencil;
- scissors.
Do the work following the following points:
1. Take colored paper, draw a rectangle so that its dimensions are 2:1. Then fold the paper along the diagonal lines four times. Expand. You should have 2 crosses.

2. First, on one side, fold the paper along the X-shaped lines, guiding towards the center. Do the same from the opposite end of the sheet. As a result, you should make triangles. Turn towards you with the side that is visible in the photo.

3. From the center, turn all the parts towards the top. After that, you need to open all the valves, and tuck one of the sides of the workpiece.

4. Turn the workpiece over with the other side facing you. In this case, the corners must be bent. Then turn over again and open the valves one by one.

5. All valves (8 pieces) must be opened and closed one by one.

As a result, you will get a very original craft with which you can decorate the interior, a gift, or simply hand it to the addressee.
Bookmark heart
A gift in the form of a beautiful bookmark will be appreciated by lovers of reading at their leisure, and simply by those who have to work a lot with books. Moreover, there are such bookmarks that help to fix the desired page, and at the same time decorate the subject of knowledge. Even better, give a set of cute bookmarks made in different ways.
Method 1

Take colored square paper and get started.
- Fold the paper from left to right, and then from top to bottom. Expand.
- The result is a line in the middle, to which you need to attach the bottom edge of the sheet. Turn the piece over.
- Wrap the corners on the bottom side so that they touch the vertical in the middle. You must use this action to make a corner at the bottom. Turn the workpiece over to the front side.
- Wrap the corners up so that the extreme top point of the corner lies in the middle of the top of the sheet. Turn over again.
- Bend the top element on the strip and you will see triangles that will need to be straightened.
- Bend the small corners, and behind them the 2 lower ones.
- Turn the almost finished craft over and wrap the sides away from you. Got a bookmark.

Method 2
- Cut a square paper sheet into 2 identical pieces.
- Take one of them, put the long side down and fold from the bottom up.
- Next, bend from right to left.
- Unfold all folds.
- Bend the bottom 2 corners to the fold line in the center to form a corner. Turn the piece over.
- Bend the third part of the upper edge, and then wrap the corners on both sides on one and the second strip.
- Turn the craft over and see what happened to the heart.
Advice! The corners can bend and cling to the pages at the wrong time, so you can fix them with glue. The same can be done with the middle of the bookmark, where the center line may diverge.
box heart
Method 1

You can put any gift in such an original and cute box: a watch, a soft toy, beads, cosmetics, etc.
Gather the following materials before you begin: high-density colored paper, glue, a pencil, scissors, a ruler.
Having prepared the workplace, proceed to the manufacture of crafts.

1. Print or redraw the diagram below on the prepared sheet of paper.

2. Take the scissors and cut out the workpiece, carefully passing along the contour. Tuck the extreme elements (refer to the photo).

3. Attach the parts to each other in order, having previously smeared the joints with glue.

4. Wait until the glue dries and you can use the resulting heart-shaped box.

The most interesting thing is that such a box can be made in any size, depending on what you plan to put there.
Method 2

You can combine the box with a postcard (2 in 1) to make an original and complete gift.
Take the following items to work:
- high-density colored paper (there is an option to replace with cardboard);
- pencil;
- ruler;
- scissors;
- glue;
- felt-tip pen.

Draw on paper the exact template for the box you want.

Draw the lines of future folds with a dotted line, and circle the contour itself with a felt-tip pen 1-2 tones darker than the color of the paper.

According to the dotted line, make bends and fold the box, gluing it in certain places with glue. After everything dries, write your wishes or just a couple of nice words on the front side. In the middle you can put something suitable in size or sweetness. In this form, you can present a gift to your dear person.
Heart-envelope


If your choice fell on this or that person and you have a recognition for him, then it's time to think not only about specific words, but also about their beautiful design. For this, an envelope in the shape of a heart is the best fit. which you can do by yourself.

Prepare a square sheet of red paper.


Fold the corners neatly to make a triangle. Unfold and fold on the other side. Expand again.

Bend one of the corners to the center so that its top touches the most central point of the sheet.

Turn the sheet over to the other side and wrap it from the bottom so that the bottom top falls on the border of the top side.

Wrap the left side so that its edges coincide with the extreme line of the large triangle from below.

On the right side, do the same. It turned out something like an angular heart.


Turn the wrong side towards you and slightly bend the corners on the sides.


Then 0.5-1 cm fold the corners on top and turn the craft over. Now you can put an ambiguous note in such a thematic envelope.
Heart with wings

A handmade heart with wings will look original as an independent gift.
One has only to stock up on a square-shaped sheet of paper of the desired color (200 by 200 mm). It will make a craft 2 times smaller.
How to do?
- Fold the prepared sheet in half, first on one side, disperse, and then on the other side and unfold again. There are fold lines.
- Fold the top of the material and the bottom so that the edges touch the fold line in the center. Turn the piece over.
- Fold the bottom corners into the center. Flip.
- Fold the strip into the center.
- Bend the upper element of the strip back, smooth out the corners that have formed.
- Make triangles at the ends of the strip by folding them. Turn the piece over.
- On the upper points of the heart, also slightly bend the corners. Enjoy work!

Ring with a paper stone in the shape of a heart

On the hand, such a ring is unlikely to have to be vilified for a long time, but it is quite possible to decorate a marker or a pen.

You should get a ring with a pebble-heart in front.

Paper heart: modular origami
From the many modules you can make a very beautiful gift for Valentine's Day and not only. Such a heart will come in handy at any time and will bring a lot of joy to your loved ones.

Necessary materials:
- paper of any color;
- scissors;
- glue.
We do the following:
1. Build many separate modules from prepared paper, from which you will later assemble a single structure.
Advice! Offer to help the children with this activity. They will be happy to spend time doing an exciting business with colorful elements.
You can find the assembly diagram of the modules below.

2. The most difficult process is fixing the made particles (modules). This will require some physical strength of the fingers and dexterity. You will find an approximate scheme for fastening modules below.

Having caught the essence of fastening elements-modules, you can recreate the heart of any variation.

Paper hearts: printable template


Video instructions
There are many techniques and methods for creating a paper heart. We will present some interesting videos on this topic:
1. Volumetric origami heart:
2. 3D heart:
3. Origami Heart with Wings:
4. Wicker Paper Heart: