Paper bulb. Combining bright colors, patterns on cardboard, using different shapes and sizes, you can make delicious balls for decorating the Christmas tree or at home. Stretch the cord, thread or braid through opposite connections. On the one hand, the thread will be fixed
To make the interior of the house stylish and original, it is not necessary to decorate it with the purchase of things. Decorations can be made with their own hands - it will not only give a pleasant and interesting pastime, but also help create a festive atmosphere in the house with the desired mood. At the same time, the color scheme of the holiday is thought out and it is one decor that comes to this significant day. In addition, purchased jewelry are monotonous, and their own hands are one of its kind.
One of the easiest solutions. The technique of manufacturing these crafts is simple, time will need not so much, the cost of material is small. And paper balls look ambitious - they are filled with all the space, hit the imagination - it seems that it is impossible to do this manually, the balls look so not tremble.
From the history of the appearance of paper balls
China is considered to be China. It has long been there flying paper lanterns, they are very popular and now - they are launched into the air, placing inside oil lamps. Flying into the night sky and endangered among the stars somewhere in the clouds lit by the moon, glowing lights - fascinating sight. Paper Chinese lanterns and ran, in the future, on the idea of \u200b\u200bmaking paper balls. They began to decorate festive events in America and Europe.

Today all over the world in the trend to create interiors with décor from paper garlands, colors and balls for the time of celebrations. Products made of multi-colored and brilliant paper look elegant, fragile and weightless. Premises easily, because paper balls do not weigh anything. In addition, paper is an environmentally friendly material that does not clog the environment, it is subject to recycling, that is, the use of paper jewelry contributes to the conservation of nature. In general, paper balls are one of the directions of modern fashion in the design of festive and solemn interiors.
Types of paper balls
Paper balls are used in the decoration of the rooms, they can be selected by the method of manufacture and colors thematically. For example, multi-colored balls are suitable for a children's birthday, and the wedding hall can be decorated with balls in pastel colors. It is considered to be stylish milking balls of one color, but different sizes. Little paper balls can be decorated with New Year tree. The technique of execution of balls from paper is different, and they look everything in different ways.
Balls make from:
- circles of paper;
- from paper pyramids, stitched together by the ends (in Japanese - "Kushudam").


You can also make a paper harmonica and "ball origami". But for a start it is worth mastering the two simplest techniques on small balls - a ball of paper wheels and a ball of paper stripes.
Preparation for work
So that work immediately began to argue, first we need to stock all necessary for needlework. The following materials and tools will be needed:
- pack of colored paper;
- bilateral scotch or adhesive pencil;
- satin ribbon;
- tight cardboard sheet;
- coil sewing thread;
- scissors;
- sewing needle;
- stapler;
- circul (can be replaced with a cup or saucer and simply circling around them);
- for decoration - brilliant sequins.
When choosing materials, you need to pay attention to some things. Buying colored paper, you should look at the density of sheets - they must be medium density. If the paper is too thin, the ball can be leaned or bore on bends. Too dense sheets are difficult to gently bent over the lines.
Conventional colored paper can be replaced by corrugated - the ball will seem place of openwork and even more air. Interesting crafts are obtained from color paper "Tishya" - such paper goes to the manufacture of Papiros, it is very thin and transparent, it will be necessary to take it in several layers for each ball element. But the balls of quiet look very gently.
Tight cardboard needed for the manufacture of a template (stencil) circle. Deciding with the size of the balls, on the cardboard with a circulation or a saucer, you need to draw the circle of the desired diameter and cut it. For this workpiece - circle circles on color paper.
Satin ribbon in the manufacture of balls is not a trifle at all, and an important accessory who gives the craft complete view. For small balls need a narrow tape. The color of the ribbon should be harmonized with a color gamut ball.
Step-by-step managing of a ball of paper circles

- Take several sheets of colored paper. It is important that they were colored on both sides, then the ball will look beautiful from all angles.
- On the paper on the pre-harvested stencil of the desired diameter to circle a mug. Carefully cut circles.
- Circles should be 48 pieces - 12 circles of four different colors.
- Each circle bend in half to diameter and folded them with a pile on each other.
- A needle with a thread to flash the blank of the ball on the line of the joint with a dense line (you can simply make a staple mug).
- The final stage, the most painstaking: all neighboring semicircles should be gently glue with each other adhesive pencil (easier and faster - pieces of bilateral scotch). That is, so that it was clear if only two mugs bent in half were glued together, they would have to be glued with each other only by halves so that when they were placed, it turned out the basis of a circle with a vertical partition in the middle of the semicircle. And when gluing a ball of 48 laps, all circles must be glued with both halves with halves of adjacent. When the last two circles remain, the workpiece will become like a fan on a round base. When gluing the halves of these last two circles - the aircraft will automatically cover the ball.
- The satin ribbon of the desired length (from it there will be a loop - you can make any length, depending on where the cauldron will be suspended) the edges will be suspended with a sharp red-hot knife so that they do not bloom. The knife can be rolled over the gas burner of the kitchen plate, in the fire of candles or lighters.
Now it remains to straighten the workpiece - so that the "petals" stood apart from each other at an equal distance. Make a hole in one of the "petals", put the ribbon in it and tie it with a bow or neat knot. The ball of paper is ready.
Step-by-step manual manufaction of paper sheets

- Take several sheets of colored paper and cut them with strips with a width of 1.0-1.5 cm (if the ball is small, like a christmas toy) along the length of the sheet.
- You can use the paper of the same color, and you can take different colors - then the ball will be bright, cheerful and elegant.
- Take one strip and connect its ends so that it turns out the ring. At the place of the joint of the ends, it is necessary to make a battery and bore them with a stapler or glue with adhesive pencil (it is possible a piece of bilateral tape). It is easier to work with bilateral scotch, but the adhesive pencil is cheaper. It is even easier to use a stapler, but in a small craft paper clips will be very noticeable, and the ball will look inactively.
- Take the second strip of paper, turn it into the ring as well as in the previous paragraph, and at the right angle to skip it into the first ring. Both rings are made with glue, scotch tape or stapler.
- By adding the ring behind the ring in the same way, form a ball.
- On paper stripes to glue sequins to pour the ball swinging on the ribbon. As an option - you can save the ball with applications, for example, if it is a children's holiday, and the ball of large sizes, figures of the characters of cartoons.
- Through one of the bands to turn the ribbon so that the ball can be suspended.
Oshiving on small paper balls, these two uncomplicated manufacturing techniques can be moved to real creative work - large sizes, try more complex techniques and decorate the interior of the house.

In addition to making paper balls, it is aesthetic pleasure, it also has practical benefits. Taking advancing to make the balls of your child, you can leave it one after this occupation of an hour for two and do business around the house. In addition, the lesson develops a small motorcy of hands and children's fantasy. And if you have balls with children, preparing for the festive day, they will feel more and their significance - after all, along with adults, they took part in the preparation of the total fun.

From the most ordinary strong paper, you can make it easier for very beautiful balls for the decor. Let's learn how to do it.
Master class "Volumetric balls from paper"
First, as always, prepare all the necessary materials so that they are at hand. For the manufacture you will need: a pack of colored corrugated or any other thin paper, two tight white cardboard sheets, two colored marker, adhesive pencil, large scissors and a needle with thread. So, take care!
- With a circulation, draw a circle on a sheet of cardboard. Its diameter should be equal to the desired diameter of the future ball. Cut the resulting circle into two parts. Corrugated paper stacks, cut on rectangles. For a ball of average, 40-50 pieces will be made enough.
- On the second sheet of cardboard, there are one of the color leaf of corrugated. Flomasters draw the vertical stripes on the sheet, located at equal intervals. The number of cells on the finished ball depends on the number of these bands and their density. There are no special requirements here - try multiple different options to understand which one you like more.
- Moving from one mark to the other, swipe vertical lines marked in the figure in blue. This should be done with a pencil glue, holding it a little at an angle.
- Then take the next leaf of corrugated and repeat the procedure, this time connecting the strips marked with pink. Thus, you need to process all the available rectangles. Fold the crossed leaves with a neat stack.
- At the top, attach one of the cardboard semiwesters, press it in order for the top layer of the corrugation to stick to the cardboard, and the outline of it.
- On this line you should cut the future ball folded in half. Use large and sharp scissors, because there are many layers.
- Cardboard is needed for ball gluing. And so that it was not visible on the finished handicraft, it needs to be slightly disguised. To do this, on the other hand, glue the second semicircle is not completely, but pre-cut it in the form of the letter "C".
- In the corner of the crafts, make a hole (gypsy needle or seer), and then skip the thread through it. Do not tighten it too hard, otherwise your ball will not open.
- Purchase and second angle. You can leave one of the threads - you can hang a crawler for it if this simple paper ball will be used to decorate the room. In this case, the thread should be, firstly, rather long, secondly, durable and, thirdly, correspond to the ball in color.
- Now the most responsible moment occurs in the work - you need to reveal the ball. Take the cradle for both cardboard sides and carefully dug them on the sides. Act very carefully not to break a thin corrugation. If you correctly executed items 3 and 4, you will not have special problems with the disclosure of the ball (which is why it is so important to use fresh adhesive pencils). If individual parts did not glue, you can put them down in the course of work.
- That's how your ball looks like this. The cells from which it consists is non-flimsy places on your rectangles from paragraph 4.
- Cardboard joints need to be glued together to make the sphere solid and completely color. As you can see, make a ball from corrugated paper turned out to be quite simple.
- Such two- and even three-color balls can be made for the decor of your living room or children. Such crafts of different sizes and colors will also be very appropriate to look as new year decorations.


Paper
New Year's
balloons
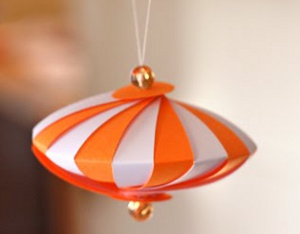
1. New Year's bowl with their own hands (option 1)
For the manufacture of this New Year's decoration you will need colored paper, thin wire, stapler, glue. The ball that you see in the photo above was made of paper of three different colors (pink, blue and blue).
Work plan:
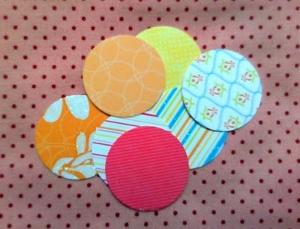
1. Take a small glass or wine glass (Fuuder) and circle it on paper with a simple pencil 12 times. You should have 12 circles (4 circles of each color). Cut mug with scissors.

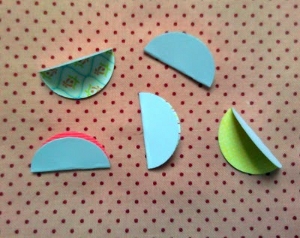
2. Bend each circle in half and fold them with a stacker together as shown in the figure below. In the manufacture of this Christmas ball, we use the paper of three colors (A, B and C). Fold mugs into a stack in the next sequence - abbccaabbcca. If in the manufacture of a New Year's ball, you used the paper of two colors (a and b), then in this case the mugs should be added in such a sequence - Abbaabbaabba.

3. While paper mugs with each other with a thin wire, wrapping it around them along the fold line. Wire ends twist together. If you do not have a wire, then you can bage mug with a conventional stapler.


4. Roll into the circles and glue the adjacent halves of the circles with each other. Each half must be connected to one adjacent above, and on the other - below.

Christmas decoration - decorative ball Honeycomb

2. Christmas balls do it yourself (option 2)

Cut three circles of the same size from color cardboard or tight paper, but different colors. In the first of them, we roll the cross (Fig. A), in the second round, make a horizontal incision in the middle and perpendicular to it two extremia in the direction of the circle to the center of the circle (Fig. B), and in the third - four extremis in the form of a cross Direction from the circle to the center (Fig. B). Circle "In" Schedule in the circle "B". In the circle "A", remove the corners formed as a result of its cut; It turns out a square hole. In it, the grinding circles "b" and "in", after pre-laying them. Then the corners again break (Fig. D). Again to the resulting ball thread.
3. New Year's balls (option 3)
From old postcards or colored paper, these cute Christmas toys can be made - New Year's balls.

It is not necessary to do a big, complex ball, you can make it possible to make a small Christmas ball from a smaller number of parts.


4. Production of the New Year's Bowl (option 4)
Very easy to manufacture New Year's bowl of paper. To make it, you will need colored paper and glue.

Work plan:
1. Cut from the paper of different colors eight identical circles. Although, in fact, the number of circles can be any, but not less than three.
2. Bend each circle in half, the front side inside.
3. Spread the halves of the circles among themselves as shown in the photo below. The glue is applied on the wrong side of the halves of the circle.


4. Before finally, take the New Year's ball, thread through it a thick thread or ribbon. You can also make a wonderful christmas garland from a large number of paper balls.

Note: This new year decoration can be made not only in the shape of a ball, but also any other form.
5. New Year's ball with their own hands (option 5)
For the manufacture of these wonderful New Year's lanterns you will need to cut the colored paper on the strips of the same length and width. Length and width of the stripes depends on the size of the flashlight you want to do. For the manufacture of one paper flashlight you will need an average of 14-16 strips of paper.

In the manufacture of Christmas balls, you can use strips of paper of different colors and beads to decorate the New Year's toys with your own hands.

If the paper strips bend in the middle, then it will be like this Christmas decoration.
6. How to make a New Year's ball (option 6)
Here is such a pretty and simple in the manufacture of a New Year's craft from old postcards. We suggest you do with the child.

1. With a small glass or festo, draw and cut eight characters.

2. With the help of another object with a round base, but smaller diameter, draw and cut two small circles.

3. Fold every big circle in half, and then once again in half. See the photo below.

4. Start four folded large circles for one small circle, the remaining four on the other. As a result, you will have two halves of your future Christmas ball.
It is very important to correctly arrange the quantity of large circles on a small circle. Try to accurately straighten the "pockets" of folded circles and in advance, before glue, estimate the correctness of their location. At the same time, focus on the very first photo on which the ready ball is depicted.

5. Now you can only glue two finished halves together and when the glue dries off, straighten up all pockets. New Year's ball ready!

Production of balls from threads:
1. You will need: scissors, balloons, fat cream (Vaseline), any yarn, PVA glue, bowl.
2. We divor the glue PVA with water, approximately 3: 1.
3. Inflation the ball to the desired size, give it a round shape, tie to the thread.
4. Sharing the required amount of yarn, put it in a bowl and leave minutes to 5.
5. I smear the ball with a fat cream and wind up its yarn, to start leaving a large distance between the thread.
6. Gradually, the distance between the threads is reduced until the ball is wrapped in the yarn and remind a cocoon.
7. Cut the thread and glue to the ball. We leave it to be dried (not less than a day).
8. Gradually, unleashing the air ball, carefully blow it, and then remove from the thickness of the cocoon; We bind to the thread ball on top of the rope for fastening.
9. The ball is ready!

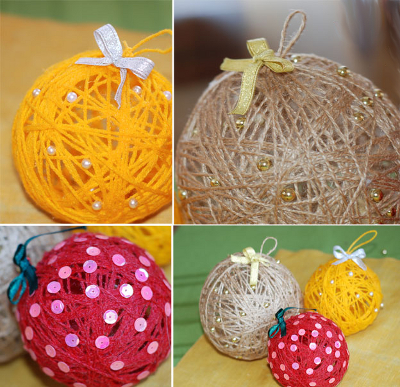
In the manufacture of a ball, you can use yarn (threads) of any color or paint any paint or spraces (spray). Especially for the New Year, you can decorate this nice ball with Mishur, asterisks. Little balls hang on the Christmas tree, big decorate the room. Fantasize bolder!
If you do not turn out to be coated with a thread impregnated with glue, you can wind dry thread, and then be thoroughly impregnated with glue with a brush or sponge.
Instead of glue, you can use sugar syrup or hubber from starch. For the preparation of the Clays, we take 3 teaspoons of starch on a glass of cold water, mix thoroughly and bring to a boil. Instead of a thread you can take a thin copper wire and also winding it on the ball.
9. New Year's hands. New Year decoration
Old Christmas balls can be updated by wrapping each of them into the patchwork of a beautiful fabric and tangling with a ribbon.

Summary: New Year's balls on the Christmas tree. Production of Christmas balls from paper. How to make a New Year's bowl along with your own hands. Schemes of Christmas balls from paper, photo of jewelry on the tree.
1. New Year's bowl with their own hands (option 1)
For the manufacture of this New Year's decoration you will need colored paper, thin wire, stapler, glue. The ball that you see in the photo above was made of paper of three different colors (pink, blue and blue).
Work plan:
1. Take a small glass or wine glass (Fuuder) and circle it on paper with a simple pencil 12 times. You should have 12 circles (4 circles of each color). Cut mug with scissors.
2. Bend each circle in half and fold them with a stacker together as shown in the figure below. In the manufacture of this Christmas ball, we use the paper of three colors (A, B and C). Fold mugs into a stack in the next sequence - abbccaabbcca. If in the manufacture of a New Year's ball, you used the paper of two colors (a and b), then in this case the mugs should be added in such a sequence - Abbaabbaabba.
3. While paper mugs with each other with a thin wire, wrapping it around them along the fold line. Wire ends twist together. If you do not have a wire, then you can bage mug with a conventional stapler.
4. Roll into the circles and glue the adjacent halves of the circles with each other. Each half must be connected to one adjacent above, and on the other - below.
2. Christmas balls do it yourself (option 2)
Cut three circles of the same size from color cardboard or tight paper, but different colors. In the first of them, we roll the cross (Fig. A), in the second round, make a horizontal incision in the middle and perpendicular to it two extremia in the direction of the circle to the center of the circle (Fig. B), and in the third - four extremis in the form of a cross Direction from the circle to the center (Fig. B). Circle "In" Schedule in the circle "B". In the circle "A", remove the corners formed as a result of its cut; It turns out a square hole. In it, the grinding circles "b" and "in", after pre-laying them. Then the corners again break (Fig. D). Again to the resulting ball thread.
3. New Year's balls (option 3)
From old postcards or colored paper, these cute Christmas toys can be made - New Year's balls. Detailed instructions for the manufacture of this New Year's decoration can be found on the link \u003e\u003e\u003e\u003e
It is not necessary to do a big, complex ball, you can make it possible to make a small Christmas ball from a smaller number of parts.
5. New Year's ball with their own hands (option 5)
For the manufacture of these wonderful New Year's lanterns you will need to cut the colored paper on the strips of the same length and width. Length and width of the stripes depends on the size of the flashlight you want to do. For the manufacture of one paper flashlight you will need an average of 14-16 strips of paper. Detailed New Year's master class, see Silete \u003e\u003e\u003e\u003e
In the manufacture of Christmas balls, you can use strips of paper of different colors and beads to decorate the New Year's toys with your own hands. See link \u003e\u003e\u003e\u003e
If the paper strips bend in the middle, then it will be like this Christmas decoration. Link to New Year's master class \u003e\u003e\u003e\u003e
6. How to make a New Year's ball (option 6)
Here is such a pretty and simple in the manufacture of a New Year's craft from old postcards. We suggest you do with the child.
1. With a small glass or festo, draw and cut eight characters.
2. With the help of another object with a round base, but smaller diameter, draw and cut two small circles.
3. Fold every big circle in half, and then once again in half. See the photo below.
4. Start four folded large circles for one small circle, the remaining four on the other. As a result, you will have two halves of your future Christmas ball.
It is very important to correctly arrange the quantity of large circles on a small circle. Try to accurately straighten the "pockets" of folded circles and in advance, before glue, estimate the correctness of their location. At the same time, focus on the very first photo on which the ready ball is depicted.
5. Now you can only glue two finished halves together and when the glue dries off, straighten up all pockets. New Year's ball ready!
7. Paper balls with your own hands (option 7)
Production of balls from threads:
1. You will need: scissors, balloons, fat cream (Vaseline), any yarn, PVA glue, bowl.
2. We divor the glue PVA with water, approximately 3: 1.
3. Inflation the ball to the desired size, give it a round shape, tie to the thread.
4. Sharing the required amount of yarn, put it in a bowl and leave minutes to 5.
5. I smear the ball with a fat cream and wind up its yarn, to start leaving a large distance between the thread.
6. Gradually, the distance between the threads is reduced until the ball is wrapped in the yarn and remind a cocoon.
7. Cut the thread and glue to the ball. We leave it to be dried (not less than a day).
8. Gradually, unleashing the air ball, carefully blow it, and then remove from the thickness of the cocoon; We bind to the thread ball on top of the rope for fastening.
9. The ball is ready!
In the manufacture of a ball, you can use yarn (threads) of any color or paint any paint or spraces (spray). Especially for the New Year, you can decorate this nice ball with Mishur, asterisks. Little balls hang on the Christmas tree, big decorate the room. Fantasize bolder!
If you do not turn out to be coated with a thread impregnated with glue, you can wind dry thread, and then be thoroughly impregnated with glue with a brush or sponge.
Instead of glue, you can use sugar syrup or hubber from starch. For the preparation of the Clays, we take 3 teaspoons of starch on a glass of cold water, mix thoroughly and bring to a boil. Instead of a thread you can take a thin copper wire and also winding it on the ball.
9. New Year's hands. New Year decoration
Old Christmas balls can be updated by wrapping each of them into the patchwork of a beautiful fabric and tangling with a ribbon.