Sewn textile dolls. How to sew a doll yourself with your own hands: patterns, master class. How to sew a beautiful fabric doll: instructions for beginners
Do you like to follow fashion trends? Do you know that hand-made things are very popular now? Read how to make dolls out of fabric with your own hands. These souvenirs can be used to decorate your interior or as gifts. Making interior dolls for sale can be a small part-time job for you and a pleasant hobby at the same time.
Tools and materials
So, if you decide to learn how to make dolls out of fabric, you should start with a list of necessary items and devices for work. You will need the following:
- Beige fabric for face, hands and feet;
- Colored material for clothing;
- Pattern paper;
- Pencil for drawing parts on a sheet;
- Scissors;
- Pins;
- Tailor's chalk or remnant;
- Needle and thread;
- A sewing machine, although you can sew by hand;
- Filler (synthetic winterizer, holofiber and others);
- Mouline threads for face embroidery or acrylic paints with a brush to paint eyes, lips and nose;
- Threads, artificial hair for hairstyles.
As you can see, nothing complicated is needed. If you are sewing, most likely you have the necessary items in stock.
What to sew the head, arms and legs from
One of the most important points in the question of how to make dolls out of fabric is that it is unlikely that it will be possible to buy cotton fabric, for example, beige calico. However, you cannot do without it, since it is needed to make open parts of the character's body - face, arms, legs.
This is where the possibilities of dyeing fabrics with natural dyes at home come to the rescue. Usually they use tea and coffee. You can take onion peels.
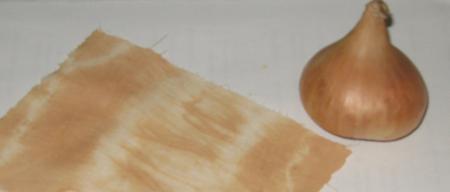
You can read tips on the dyeing process and the possibilities of using this technology.
Face image
When you get acquainted with the technology, how to make a doll with your own hands at home and understand the sewing process, it will not be difficult for you to complete the basis. The most important thing will be the creation of an emotional character. After all, even using one template, you can easily create different characters.
Funny fabric dolls will turn out if you make them a sly smile and eyes, serious or sad with appropriate facial expressions. You can perform eyes, lips and nose in different ways:
- The spout can be immediately provided as a piece of the pattern;
- Some use purchased eyes and eyelashes;
- All details are painted with acrylic paints;
- The expression of the face is embroidered with floss threads.
This can be done before or after sewing. If you make many dolls according to one pattern, it is more convenient to embroider after the patterns of the parts are drawn on the fabric. Hoop the large flap well. With one head cut out, this will be more difficult to do.
You can paint with paints whenever you want. It is worth considering that it is better to pre-apply PVA on the surface so that the paint retains its brightness after drying.

Making a pattern
To master the technology of how to make a doll with your own hands at home, you need to understand the construction of a pattern. Here you can act in one of two methods:
- Take a ready-made template from the Internet and print it;
- Build by yourself.
In the first method, you simply select the image you like and print it at a suitable scale. This is convenient since you don't need to build anything on your own. It is enough just to transfer the printed image to the fabric. By the way, if you don't have a printer, just put the glass to the monitor and trace the parts along the contour on the transparent film.
In order not to waste time looking for a template, it's easy to build it yourself. The simplest pattern is when the whole doll is made in one piece. In this case, the folds are sewn with additional seams, and the filler is not packed very tightly so that it has somewhere to move.
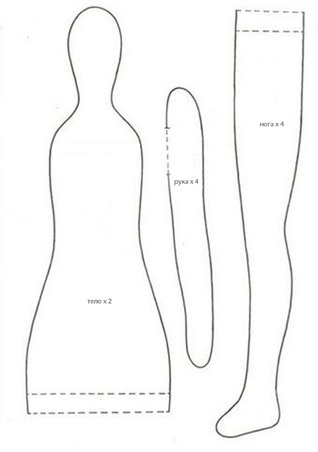
A more complex template is one in which all the parts are sewn separately, that is, you need to build one piece (paper) head, body, arm, leg and cut them out of the fabric in the appropriate amount. For head and body - 2 pcs. (front and back), for arms and legs, two parts for each element.
It is more difficult to learn how to make a cloth doll with a round head. The head is sewn together from details that resemble petals.
There can be four or six of them.

The two face pieces have a spout-like projection.
How to make a doll with your own hands: manufacturing technology
Interior dolls of several types. Tilda and pumpkin heads are especially popular.
Regardless of what type you are going to sew, the sequence of actions will be as follows:
- Carry out a pattern on paper and cut out the details;
- Dye the fabric a beige shade;
- On this flap from the seamy side, lay out the elements most compactly. If you are going to sew several characters at once, arrange details for all;
- Circle along the contour, taking into account the seam allowances;
- Embroider the face if needed;
- Cut out the details;
- Begin sewing the elements on the wrong side, having previously swept or pinned the parts. Be sure to leave a hole for turning out;
- Carefully make small cuts on the seam allowances in rounded parts so as not to damage the seam. This method will exclude the tightening of the fabric after turning out;
- Turn out and fill in the details;
- Sew up the hole by hand;
- Sew the elements together;
- Sew clothes (usually they are not removable);
- Doing your hair;
- Decorating the character.
Using this technology, you can make both a small product and a large-sized interior doll.
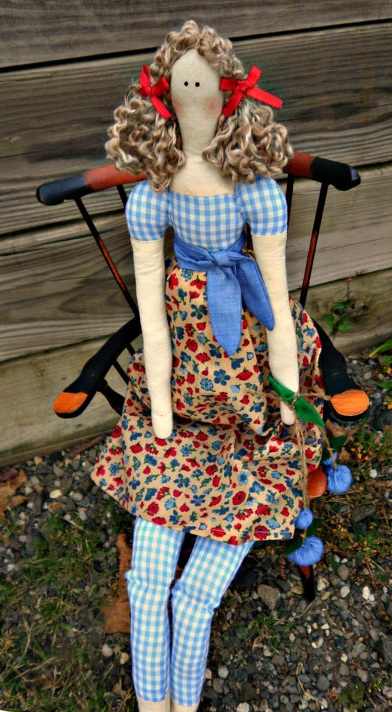
How to sew a doll with your own hands: a master class
In order to make a Tilda, you need to follow these steps:
You will get such a beautiful thing.
Now you know how to make dolls out of fabric. Use any pattern and sew beautiful accessories to decorate your interior. Your guests will not only be amazed at your skills, but also ask you to give them the same cute souvenir.
The doll can become not only a decoration for the house, but also a favorite toy for your child. This article tells the secrets of sewing this product and offers patterns.
Since olden times the doll was not only a toy, but also a talisman for a child. The doll was not brought from the store, but did it yourself... It was believed that a hand-made thing is conspired to achieve a certain result: to make a person happy, healthy, to help him find his own path in life or love.
What dolls - protectors of children, has long been forgotten and lost its meaning. Modern toys are made from different materials: plastic, wood, textiles, porcelain. The appearance of modern dolls is sometimes not only surprising, but even shocking: monster dolls, Barbie dolls, Winx dolls and even zombie dolls.
For those who wish to please the child at any age, to instill in him a love of toys, a love of beauty and give him a "faithful companion" for all childhood, will be useful patterns and advice on how to create a textile doll yourself.
For work, you can absolutely use any textile material from what is at home or purchased in the store: linen, cotton, synthetics, felt, lace and ribbons for decoration. The doll's hair is made of woolen threads, and buttons and embroidery can be used to create facial features.
In such a craft, you can express all your creativity. You can make the doll realistic or create a famous fairy-tale character. Previously it was believed that the doll (in order to become a protector) should mimic your child's features: the same color of eyes, hair, favorite clothes, smile and so on.
IMPORTANT: A simple and understandable pattern will help you plan the work correctly so that you get a neat product.
Patterns for a homemade textile doll, step-by-step creation
Finished products, textile dolls:

 Unusual doll "nanny"
 Realistic doll "gardener"
 Little teenage doll
  Fleece dolls
 Fairy textile dolls
  DIY doll
 Doll "motanka" - a talisman for a child
 Popular Rag Doll Style
 Doll boy
 Textile doll in lace dress
  Fidelina doll
 Waldorf doll
 Video: "Master class" We sew a textile doll "review"
How to sew a beautiful fabric doll: instructions for beginners
Recently, have gained more and more popularity dolls made from combined materials. To create the face and limbs, modern needlewomen began to use flesh-colored nylon... This material easily wraps around the base, the doll acquires the "correct" color, and with the help of the secrets of sewing it can give the necessary shape(even make facial features).
On the other hand, if you are not very experienced with this handicraft, you can use a simple pattern and create detailed features with acrylic paints(dry quickly, resistant to water). You can sew doll patterns using sewing machine- it is fast and efficient. If you don't have one (or just don't know how to use it) all work can be done manually.
Pattern for a textile doll:
 Simple pattern
 Step by step work. First step:
- Print the pattern on a printer or sketch the shapes accurately.
- Cut out a paper pattern and attach it to the fabric.
- Choose nude and beige fabrics to make your doll look natural and aesthetically pleasing.
- Attach the patterns to the fabric, fix them, circle them with a pencil and cut out the figures, leaving room with a margin at the edges.

 Cutting paper patterns
  Cutting out fabric patterns
 Step by step work. Second phase:
- Fold the cut fabric patterns together
- Each pattern should be stitched, leaving one side intact (to fill the doll).
- Use a pencil to turn out handles and legs that are too thin, as well as fill them.
- All parts are turned inside out to the front
- All details must be ironed with an iron
 Sewing fabric patterns
 Turning to the front side
 Ironing details
 Step by step work. Stage three:
- It is necessary to stuff the doll from the head.
- You can stuff the doll with padding polyester, cotton wool and scraps of fabric.
- We stuff the head very tightly and sew with a thread
- A calf pattern should be put on the head and pulled down.
- We sew the little body to the head from the seamy side and only then stuff it.
- After that, the arms and legs are stuffed, sewn neatly to the calf.
- The doll's face is painted with acrylics. You can sew or glue blanks from the store: eyes and sponges.
- The knitting threads are folded in bunches and sewn to the head.
- From the remnants of colored fabric, sew a dress or any other clothes for the doll, decorate with decorative elements: lace, ribbons, beads.

 Step by step doll creation
 How to sew a doll's face?
The easiest way to "make" a doll's face is paint it with acrylics. As already mentioned, they are resistant to water and moisture, dry quickly, leave a rubberized film on the fabric surface, have a large number of colors and are pleasant to work with.
Painting the doll's face with acrylic paints:
 The facial features of the doll, painted with acrylic paints
 Drawing the doll's face with a marker and acrylic paints
 Another way to create facial features is to pull together with a needle and thread. To do this, you first need to decide on the filling of the doll: cotton wool, holofiber, synthetic winterizer.
The doll's head is made of white fabric, the pattern is stuffed. The head is once again covered with a flesh-colored nylon. By squeezing the folds, the needle is threaded through the material, the thread is pulled together and fixed.
How to make a doll's face in stages:

 How to make a face for a doll?
 Painstaking and detailed work to create the facial features of the doll
 Video: "Tightening the face and creating facial expressions of the doll"
How to sew a soft toy doll: pattern, photo
A doll made for a child with his own hands from textiles may well become his favorite soft toy, which he will take with him to sleep, on trips, kindergarten, for a walk. The doll will be able to like the child when it conveys some pleasant emotions or prompts associations.
For example, you can dress up a doll in a dress made from your personal wardrobe item: a bathrobe, an old dress, a blouse. Another option is to sew dresses for the child and the doll from the same fabric.
IMPORTANT: Ask in advance what kind of dolls your baby likes: tall, small, with long legs or baby dolls, fairies, sorceresses, angels, and only then start looking for a suitable pattern.

 Stuffed Toy Pattern: Angel Doll
 Finished Product: Angel Doll
 How to sew a textile toy doll: pattern
Any needlewoman can sew a textile doll. You don't have to buy a lot of materials for this. You can use those that are available at home. You can get a neat and beautiful product only with the help of a similar pattern.
Patterns for textile dolls:

 Pattern for a textile doll, option number 1
  Pattern for a textile doll, option number 2
 Pattern for a textile doll, option No. 3
 How to sew a Russian folk doll: pattern
Folk dolls are very simple to perform. They have very simple patterns, but quite elaborately detailed costumes. You will need to pay attention to every little detail: braids with ribbons, scarves, ruffles on skirts, lace, buttons and bows on suits.
IMPORTANT: If you have the opportunity, choose materials for sewing clothes for dolls, as similar as possible to folk costumes: floral and plant prints, khokhloma, polka dots.
Patterns for sewing folk dolls:
 Simple pattern for sewing a folk doll number 1
 Simple pattern for sewing a folk doll number 2
 Motanka doll, patterns
 Finished products, folk dolls:
 Doll Proskovya
 Simple folk dolls without a painted face
  Motanka doll
 How to sew a large life size puppet: pattern
A large life size puppet is usually used for performances for children. The limbs of the doll can be attached to the arms and legs of a person, as a result of which the doll literally "comes to life".
You can sew a life size puppet according to the patterns of an ordinary toy, but increased several times. You can give the doll any appearance and features of a fairy-tale character. Such a doll is obligatory the head and torso are tightly packed, and the arms and legs should be thin and light enough to be easy to move.

 Large life size puppet
 Video: "How to make a life-size puppet with a human face?"
How to sew a Snow Maiden doll: pattern
The Snow Maiden doll will become a favorite toy during the New Year holidays. She will evoke pleasant associations in the child, she will be able to decorate the house. You can also put the Snow Maiden under the tree. Doll Snow Maiden with a kokoshnik Doll Tilda in a romantic image
Tilda doll blonde and Tilda doll brunette
Video: "Sewing a Tilda doll"

The world of hand-made is vast and multifaceted. This time we suggest you try to sew a textile doll according to our schemes.
Dolls are not just a piece of furniture or a toy. Since ancient times, the doll has been a prototype of man and has participated in a variety of magical rites and rituals. The puppets were given the ability to speak, see, hear and even walk. To be on the guard in the house of the owners, or vice versa, to attract trouble to the house of ill-wishers.
Now, in the age of technology, the seemingly mystical meaning of the doll should have long been lost. However, things are different, and the process of creating a doll from plaster, porcelain, fabric resembles real magic.
Dolls become small human copies
DIY dolls: photo
Sewing dolls in recent years has gained immense popularity along with and. It should be noted that sewing is not an easy task and is not suitable for everyone. Real seamstresses do not undertake every job, but they always do it with high quality, with a soul.
Sewing dolls is a hobby. But many craftswomen, using social networks or in some other way, were able to find demand for their dolls. As a result, a hobby turns into a well-paid and beloved job.


If you want to sew quality toys, then you need good tools and materials. It is definitely not worth saving on these two components, because this is the key to good work. A well-made toy pleases the eye. Therefore, the work is in any case worth the cost of it.


 Little artist doll

Most often, these dolls serve as decorative elements. They fit perfectly into the interior of the living room, bedroom, nursery and even kitchen.


How to sew a doll's head and face: patterns with descriptions and photos
The doll's head can be made in several ways:
- sew from fabric
- mold out of clay
- mold out of plaster
- felted
- molded from special plastic
Other materials are used much less frequently. In this part of the article, we will tell you how to sew a doll's head from fabric. The easiest way even for beginners.


To make a textile doll, all parts must be sewn and stuffed separately. Sintepon is usually used as a filler, less often cotton wool down. The synthetic winterizer wrinkles and crumples less, it is more convenient to work with it. After the parts are ready, they are sewn together. This is how the blank for the future doll turns out.
- Using a pattern, cut out the head.
- Pre-cut the stencil to the size you want.
- Place the stencil on the fabric, secure with safety pins.
- Cut along the contour.
- Sew the seams on the wrong side on a typewriter or by hand.
- Turn right side out, fill with filler and sew.

- Draw the eyes on the finished head with a pencil. nose, lips. Try not to make mistakes, the pencil is not easily erased from the fabric.

 Step 1
 - Using the diagram below, make tightening. They are needed so that the head has volume: the nose, eyes, lips stand out.


- Sew along the contour of the eyes and lips with small neat stitches.

 Step 2
 - From the back of the head, the view will not be the most beautiful. Don't be alarmed. Secure all threads and cut them so they don't stick out.

 Step 3
 - Take acrylic paints, dilute them so that you get a light flesh tone and add color to the eyes, cheeks, nose, lips, chin, eyebrows and under the eyebrows.

 Step 4
 - Sew on the doll a wig prepared in advance.
- With white acrylic paints with a drop of blue so that the eyes are not pure white, paint the whites of the eyes. Note that it is better to draw the eyes themselves just below the line with which we marked them earlier, so that the upper eyelid is obtained, and the eye is half-closed.

 Step 5
 - Using the same acrylic paints over the fabric, paint the iris and pupil.

 Step 6
 - With brown paint, mark the growth line of the upper and lower eyelashes, eyebrows. You can add gold pigment to the paint.
 Step 7
 - Paint a little darker than you painted the eyebrows, paint the eyelashes. You can also use false eyelashes.

 Step 8
 - Add highlights around the pupils to make the doll look more realistic.

 Step 9
 - Paint the lips with light brown (pink, red, or any other color). The doll's head is ready. You can still refine it. This is the easiest option.

 Step 10
 With this step-by-step guide, you can make your own textile doll according to all the rules.
How to make a body, torso for a doll: patterns with descriptions and photos
The body of a textile doll can be made on a frame, or sewn by hand. For beginners, we recommend the sewing method, because it is simpler and less expensive in terms of time and materials.
Algorithm for sewing the doll's torso:
- Cut out the stencil as shown in the diagram below. If necessary, its size can be increased or decreased. The back and front of the torso are the same, so you can only use one stencil.
- Place the cut stencil on the camp and fasten it with safety pins, or circle it with chalk.
- Stencil two pieces of fabric.
- Sew the parts together from the seamy side.
- Turn the garment right over and stuff the torso with filler. The work is ready.


How to sew a doll's legs: patterns with descriptions and photos
Sewing the legs will be somewhat more difficult than the head or torso. And all because the leg consists of three components:
- two parts of the leg
- foot
Algorithm sewing feet not very different from torso sewing:
- The stencil is cut first.
- Then all the details are cut out using a stencil.
- Made stitched together with the following sequence:
- First, two parts of the leg are sewn together.
- Then a foot is sewn to them.
- The product is turned right side up and stuffed with filler.


Advice! To prevent the doll's leg from looking "flipper", make 4 small stitches that will indicate the toes.

How to sew a doll's hands: patterns with descriptions and photos
To sew a textile doll by hand, you need a lot of patience. You can sew an option for advanced ones: with fingers, palms, even nails. And you can get by with a simpler option (as in the diagram), which even beginners can perform.
Description of the execution of a hand for a textile doll exactly the same as the description of the leg:
- A stencil is cut out.
- The stencil is attached to the fabric with pins or chalked around, the blank is cut out.
- The blank of the arm (and the arm consists of two parts) is sewn along the edges, leaving only the upper part for fastening with the body.
- The future hand is then filled with filler.
- After that, you can make fingers with short stitches. All you need is 4 stitches.


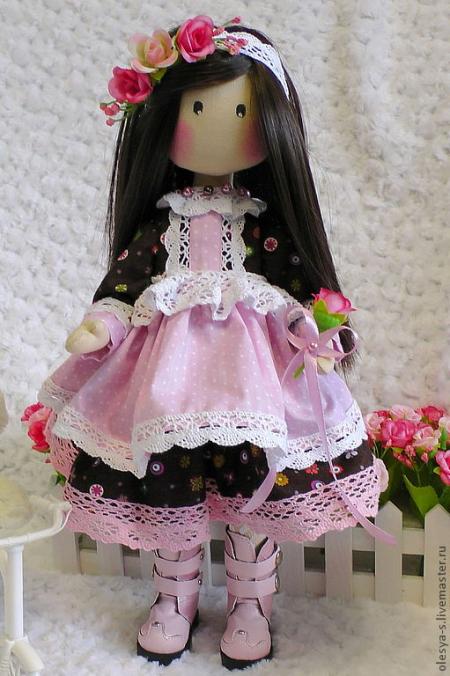
How to sew a beautiful textile doll with a big head: patterns with a description and photo
A textile doll with a large head is most often an interior doll. It is not meant to be played with.
So, to sew an interior doll with a large head, prepare the following materials:
- synthetic filler
- the cloth
- stencil paper
- thread, needle
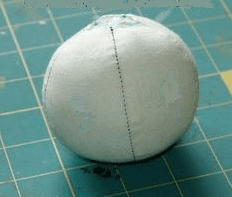
- foam or plastic head ball
The process of making a doll.
- Redraw the stencils onto paper, or print and cut them out.


- Transfer all parts to the fabric, add an additional 2 cm around the entire perimeter of each workpiece.

- Sew the parts together, leaving the dotted lines on the diagram unstitched. Through these holes you will fill the doll with padding polyester.

- Fill every detail of the doll with filler.
- The ball that we have listed in the materials is required for the head. Insert the ball inside through the hole in the top of the head, sew.


- Clip all the pieces together. It turned out the finished doll body.


- Now you can come up with a dress for the doll, put on a wig, draw a face.
The finished doll may look like this.

 interior doll with a big head
 How to sew a beautiful New Year's interior doll: patterns with descriptions and photos
A New Year's doll can be a wonderful gift for a holiday. Including on New Year... But not everyone can appreciate this gift, so before giving someone a similar thing, try to make sure in advance that it will appeal to the new owner.
What is the difference between a New Year's interior doll and other dolls? Perhaps only in an outfit. Therefore, you can take as a basis any of the step-by-step instructions for sewing textile dolls described earlier. Dress her up in a beautiful New Year's dress and the toy is ready!


How to sew a big-legged doll with a solid head: patterns with a description and photo
What is the difference between a bigfoot doll and other textile dolls? This can be understood by the name. The bigfoot doll has disproportionately large legs in relation to its body and head. This is the "trick" of this model. Bigfoot dolls have a kind of charm, the ability to charm. They look very cute, home-like, and create a cozy atmosphere.
Refer to the diagram below to sew a bigfoot doll. All dimensions are shown in the picture.


Parts name:
- # 1 - leg
- No. 2 - stop
- No. 3 - torso
- # 4 - hand
- No. 5 - head, front part
- No. 6 - head, back side
Description of the sewing process of the bigfoot doll:
- Refer to the pattern, redraw and cut out all the details.
- Transfer the details to the fabric by placing the stencils on top of it and securing with pins.
- Cut out the details.
- Sew paired pieces together.
- Fill in the blanks with padding polyester. For the head, you can use a large foam ball.
- Fasten all the details together and sew. How to sew a Waldorf swaddle doll: patterns with a description and photo
The Waldorf doll is very different from other dolls. She does not have clearly defined shapes (waistlines, hips), as is customary for Barbie. Also, such a doll is made of very soft materials that are pleasant to the body. She, unlike interior dolls, is intended exclusively for games. Waldorf doll helps to develop a child's imagination very well, because there are very few details in it.
Sewing such a doll is quite simple. The face tightening scheme, as well as the necessary stencils, can be found below.


 stencils
Fabric dolls are an old type of handicraft that has been breathed into new life by craftsmen from all over the world. A modern doll is bright, stylish and not boring. There are examples of sewing simple dolls and very realistic dolls. Figures based on simple patterns are popular today.
DIY textile dolls are, as a rule, toys not for small children, but for quite adult girls. At least, proceeding from the fact that these fragile pupae can break or become dirty during active handling, and it is not recommended to wash them. After all, textile toys are often tinted, scented, and their faces are covered with acrylics. They are also decorated with numerous accessories in the form of tiny flowers, buttons, brooches and other beautiful little things.
This textile doll will be an excellent gift or a unique decoration for any interior.
It is important for every novice needlewoman who wants to create a textile doll with her own hands to choose her own version among the whole variety of existing types of such toys in accordance with her level of skill.
Let's see what kind of textile dolls exist today.
A simple model does not need sewing either; it can be twisted from multi-colored patches in just a couple of minutes. If you wish, you can sew an elegant sundress for a Russian beauty, and a caftan and boots for her gentleman.
The most ancient in Slavic and Russian culture are these. They were assistants in the most varied affairs of the ancient hostesses. Cabbage, placed on the window, indicated that the girl was ready for marriage, Rozhanitsa helped in childbirth. The well-being of the whole family depended on the special mood of the needlewoman during the manufacture of such a rag doll with her own hands. The head of the amulets dolls has no eyes, mouth and nose. Ideally, they are performed without scissors, the fabrics are simply torn by hand.

Attic (primitives)
Such primitive dolls are distinguished by some aging and negligence, as if they had been lying in the attic for many years. very simple because of the fairly simple shapes. When sewing, the sections are not processed, the toy is given a very shabby look due to tinting. At first glance, it seems that the doll is made of materials that first came to hand. However, this is not the case. Every detail of the toy, with its deliberate shabby, is carefully thought out and carefully executed.


Their appearance is varied: from button or patchwork eyes and an asymmetrical figure to a realistically painted acrylic face and graceful body shapes. This diversity is due to the fact that the author's doll thrives in this environment.
Tilda doll


A special case of a primitive doll. Poorly designed face, but very expressive hair and figure. The Internet is replete with examples of how to sew a doll. This is a textile Barbie with tons of roles and themed clothes. From a flower girl to a princess. Sewing it will bring you a lot of fun. It is best for beginners to start with these dolls.
Waldorf doll

The peculiarity of this pupa is that its body has the correct proportions inherent in an adult or a child, depending on the model. The limbs move at the base. You can't call this baby skinny.
If you follow the technology for sewing such a toy, you get a pretty realistic figure. Inside her head is a tightly packed ball, tied with wire or threads according to a certain pattern, which makes it possible to give the face a relief, in place of the nose there is a bead. A flesh-colored knitted fabric is stretched on top. For gaming purposes, they are very convenient.
Pumpkinhead
The main difference of this toy is because of the head, which consists of five wedges, which is very similar to a small pumpkin. The junction of the wedges is slightly extended forward and forms a neat spout. A wide scope for the master's imagination is represented by the face of a doll, on which eyes and a mouth are drawn with acrylic paints. Numerous designer textile dolls are created on the basis. Below we suggest that you familiarize yourself with a master class on creating a pumpkin head with your own hands.

Snowball
The main feature is large legs with a reinforced foot and eye-points (although there are Snowballs with painted eyes). Thanks to the specially shaped, stable legs and very dense padding, they can stand firmly on the surface.


Tryapiens
Tryapiens came to us from Korea or Japan and have a very graceful physique, small heads with a chic hairstyle, rich and complex outfits. The patterns of such a textile doll are quite simple, closed eyes are drawn on the face. All the skill of the author lies in creating a lush hairstyle and intricate clothing.

Having learned how to make standard dolls, any master comes to the creation of his own author's unique textile doll. He remakes well-known patterns for his work, changes the shape of the body and head of the toy, looks for new options. This is how an author's textile doll appears.

Master class on creating a pumpkin head
For those needlewomen who are fired up with the idea of making a textile doll with their own hands, we offer a master class on creating a droplet-Aprilka pumpkin head.

DIY fabric doll
We offer to sew a doll with your own hands based on the Waldorf one. Our bbw looks like her outwardly. Only the limbs will be fastened with buttons like traditional plush animals. This method is now very popular not only in terms of convenience, but also aesthetics: buttons on the shoulders and hips enhance the decorative effect of the image. We will embroider the face, like from the Waldorfs, borrow the bulge of the nose.

To sew a doll, we need 2 types of fabric: white or beige flannel and thick colored material. In our case, we used jeans, more precisely, scraps from old jeans. Sew in front of the body from the bleached part of the leg. The details of the pattern must be symmetrical in color. The back is darker.

First, we cut out 2 details of the front, then we apply them to the fabric from which we are sewing the back, and pin with sewing pins. Cut out the details and sew the side seams of the torso bag. After that, we chop off the front and back seams, sew with a continuous stitch. We stuff the body so that it is not too hard, but keeps its shape well.


We start sewing the limbs. We transfer the hand pattern to a flannel folded in half, chop off the parts, cut it out. Sew on a typewriter so that an unstitched hole remains on the inner fold of the handle for turning and stuffing. When the parts are full, we sew up this hole with a blind seam. We do the same with the legs of the doll. Leave the hole on the lower thigh. You don't need to stuff your arms and legs too tightly, the doll should remain soft - pleasant to the touch. Everything should be elastic, bend, and not break and bulge.
We transfer the double-folded head pattern to the flannel, chop it off, cut it out. We apply the neck of the doll's body to the lower edge of the head, put 2 marks with a pencil, marking its width. We sew the details of the head, without going beyond these marks, we slightly tighten the threads to make it easier to give the head the shape of a ball. We turn out the part and stuff it very tightly.
To mark the nose, make it convex, tear off a piece of padding polyester, make 3 dense knots on it and push it under the fabric, in place of the nose. We embroider the eyes with black threads and sew the head to the body by hand.

Before attaching the arms, let's make small ruffles out of lace and braid in place of the armholes of our non-removable denim bodysuit. We measure out 10 cm of finishing, sew on a typewriter, gather, pulling the threads from both ends. Sew the lace to the inside of the arm by hand. We sew the same lace on the neck.
To attach the limbs to the body, we need: 4 buttons, a long needle (so that it can be threaded through the body from shoulder to shoulder) and a thread in 4 additions. The knots should be placed under the armpit and on the inside of the thigh. The threads are tied a little, so that the arms and legs do not sag, but the body is not deformed either.
The hair of our bbw is stitches and tassels of bright threads. We've added bright buttons and a ribbon skirt. You can sew a doll sundress, beret, shoes yourself.
You can sew a doll in one evening from materials that you already have at home, by purchasing only flannel and padding. You may want to do more realistic hair, this is also worth thinking about in advance.
Master class from Polina Inyakina

To get such a doll made of fabric with a painted face, you need accuracy and thoroughness, especially when sewing clothes:

Print doll patterns (click to enlarge):


A selection of patterns for textile dolls
Video lessons
It is impossible to imagine our life without such a toy as a doll. The modern doll is bright, fashionable, beautiful. Often the dolls are accompanied by outfits, houses, cars.
But, despite all this splendor, do-it-yourself rag dolls are becoming more and more popular. They are used not only for play, interior dolls and amulets are in fashion now.

Creating dolls, craftswomen put not only craftsmanship into their products, but also their whole soul. A handmade toy will always be a great gift.
How to make a beautiful doll with your own hands, you ask? In our article, we will talk about this.

Doll history
The doll accompanies humanity literally from the beginning of time. Carved from wood or sculpted from clay, dolls accompanied the rituals of shamans and sorcerers, they were animated and deified.

The Slavic peoples made bundles from bundles of straw and scraps of fabric, mainly they were talismans for the home from ailments, evil spirits and misfortunes.
Children's toys, too, of course, have always been. Figures of animals were carved from wood, dolls were sewn from scraps of fabric and stuffed with straw.

Much later, when they began to produce porcelain dolls in luxurious clothes, only very wealthy people bought them, the children of ordinary people played with rag toys.
 Mechanical dolls were first made in the 18th century in China and also cost fabulous money. Now dolls are sewn not to save money, but in order to have something original and exclusive.

Amulet for the house
The most simple doll in needlework is a bundle amulet, made from bundles of straw, threads and pieces of fabric.
Knitting, because the doll is not sewn with a thread, but its details are interconnected. Ideally, even scissors are not used in the work on the amulet, the necessary pieces of canvas are torn off by hand, and the parts of the doll are tied together with threads.
The product will be an excellent amulet if it is sewn from the owner's worn clothes, worn at the best moments in life.

The eyes and mouth are not drawn to the amulet. Outwardly, amulets may differ, it depends on who they are made for, newborns for intercession, newlyweds for happiness in family life, for a home for abundance and prosperity. Charms for wealth and an excellent harvest are decorated with wheat, seeds, nuts. For good health, they make a herbalist doll, filling it with fragrant herbs.

You need to make a talisman in a good mood, sing songs, read prayers, talk about pleasant things.

The doll absorbs good emotions and words, and the same good will exude in your house.

The work on the amulet cannot be interrupted, so prepare everything in advance, find the time so that you are not distracted and finish the work to the end.

To make a knitted doll you will need:
- white flap for making a head
- filler (sintepon)
- flaps of colored fabric (10 * 10 arms, 5 * 8 apron, 9 * 16 skirt)
- floss threads for hairstyling and tying
Wrap the filler with a white cloth and wrap it tightly with a thread, the "tail" of the fabric will be the body.

Note!

Gather the flap of the skirt with folds and tie it to the body, do the same with the apron, without tearing off the thread, wind it up to the doll's head making a beautiful body.

Gather a piece of fabric for hands with an accordion in length and wrap it with thread. Tie hands to the doll's body crosswise. You can put a scarf on your head, or you can make hair from threads.

Sewn dolls
The world of sewn dolls is diverse, here you can find soft cozy toys for children, sophisticated elegant interior dolls and wonderful options not in the correct proportions.

The Tilda doll, which appeared not so long ago, has become extremely popular. Such a doll has disproportionately long legs and arms; only eyes and cheeks are depicted on the face.
Below is a pattern of a Tilda doll, for the realization of your ideas.

The creative potential of each needlewoman is diverse and each sewn doll turns out to be unique.
Note!


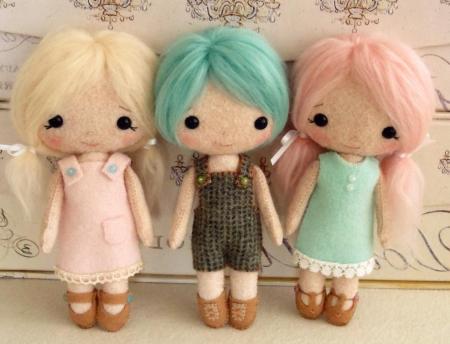
A beginner can start by sewing small dolls made of felt, the clothes of these girls are embroidered from beads and do not let this scare you, such dolls always turn out.

For needlework, prepare:
- felt fabric
- hair yarn
- filler
- nylon threads
- beads

You can use a ready-made pattern, you can draw a template yourself, everything is at your discretion. Transfer the pattern to the felt and cut out the blanks. Embroider or draw a face on one of the blanks.

Now you can embroider, on each of the blanks, a dress with beads. Sew dresses for the doll separately and change outfits regularly. To make a hairstyle, cut the yarn into 15-20 cm and sew on both blanks along the forehead and back of the head.

Note!


The sewing method presented above allows you to create any dolls, and change the patterns at your own will.

Nylon dolls
Recently, dolls made of nylon have become popular, nylon allows you to make any expression on the face of the doll.
How to sew such a gorgeous doll? To create this kind of dolls, experience is required, and we will now imagine a simpler version of sewing from nylon.
You will need:
- nylon tights
- filler
- beads
- threads
- floss threads for hair
- safety pins.

You should start by filling in and creating a form. After filling, tie or sew up the top. To create a face, use pins, for example, when marking the nose, stick the pins in place of the nostrils and stitch between them, as shown in the photo.

- Sew the nostrils and wings of the nose with literally two stitches, each new detail of the face needs to be sewn with a new thread.
- The cheeks are pierced with a pin from top to bottom and stitched in the same way.
- The mouth line is stitched, also after shaping it with pins.
- The doll's navel is outlined with pins and stitched; a basting stitch is used to create the legs.
- Sew beads in place of the eyes, do a haircut on your head by sewing in floss threads.
- Eyebrows and eyelashes are easy to draw, clothes for the doll can be any, at your discretion.

There are many techniques for sewing dolls and types of toys themselves, do not be afraid to experiment and you will succeed. We present a photo of dolls for inspiration.

Photo of dolls with your own hands


