Do-it-yourself New Year's applications angel made of fabric. How to make an angel out of polymer clay? Craft for the New Year
Wrap yourself up in a warm blanket, watch your favorite New Year's movie, drink hot tea and admire the skillfully decorated Christmas tree... What could be better than such a winter weekend? And to make your Christmas tree look even more attractive, decorate it with homemade angel pendants.

To make a Christmas angel you will need:
- linen, coarse calico or burlap,
- hair yarn,
- sewing threads,
- glue "Moment",
- needle and scissors,
- lace,
- hallofiber,
- ribbons, beads, sequins for decoration (optional).
1. Print and cut pattern of an angel and a heart.

2. Transfer the patterns of details to the fabric. Wings, legs and hands you can make from other types and colors of fabric - choose soft and durable.

3. Sew the individual parts of the angel from the eversion, leaving a hole for the filler, turn the fabric inside out. Fill the head, torso, legs (not completely), the arms of the angel and his heart with hallofiber. Sew holes.


4. Sew the head, torso and legs of the angel. Sew lace to the dress. Put the dress on the pendant and pull it around the neck with a thread - this will be the collar.

Sew on your hands. Let the cuffs be lace too.

5. Make a wave out of yarn and sew in the middle on a sewing machine.

Using Moment glue, glue the yarn to the angel's head.
6. Thread your mouth and eyes.

7. Optionally, decorate the angel with beads, sequins, beads, attach a bow to the hair.
Making crafts for the new year with your own hands is pleasant and fun. Look, we have already prepared the main character of Yours - a Christmas angel.

And here is another pattern of a Christmas angel - from burlap.


My friend, do you like to do it yourself? Make such a handsome man for the New Year and give your family a great mood for all the winter holidays.
A figurine of a Christmas angel is one of the indispensable attributes of festive decor in many families. Light, sublime, tender, sweet, magical...
Each in its own way represents the Christmas angel, and therefore their images are infinitely diverse. In this collection - only a part of the possible options. Which one do you like?
Touching and charming
It is difficult to pass by these charming, cozy and cute angels. They exude warmth, happiness, bright joy - everything that makes up the atmosphere of the holiday, the spirit of Christmas.
Yes, only a few talented craftswomen are capable of embodying these ideas with their own hands. But will we admire their work any less?

Such different images... Angels are naive, young, fragile, a little shy...

Delicate, airy - probably, this is exactly what real angels should be ...

“Yes, all this is good,” you say. “Angels are charming and sweet, but I want ideas that I could make with my own hands.” There will be those!
Ideas for needlewomen
Each craftswoman has her own favorite technique. That's why we need a variety of ideas. For example, if you know how to sew, you might like these funny figures:
They are so different ... Wonderful ideas for needlewomen
If friendship with a needle does not work out very well, try to create such a miracle from a nylon mesh, ribbons and small Christmas balls. It's pretty easy to make and looks adorable!

There are options a little more complicated - from scraps of various fabrics. Or maybe it's not that hard for someone else?

For those who know how and love to crochet, you may like the idea of crocheting an angel figurine.

Well, if you are fluent in crochet and know how to create airy lace from ordinary threads, look for ideas for inspiration in the next section of the collection.
Lacy and airy
These are ideas for virtuosos, yes. White lace is the best way to create light, airy angelic images:
There are simpler figures, there are more complicated ones - and each is marvelously good ...

The degree of difficulty depends on the patience of the craftswoman and her skills.

By the way, if you liked the idea, it is not necessary to immediately swing at a large three-dimensional figure - you can first experiment with two-dimensional images by choosing a simple knitting pattern.
Simple but not mundane
If snow-white lace is ideally combined with an angelic image, then linen twine, burlap, unbleached linen are seemingly rough materials. How can figurines of fragile, sublime, tender angels be created from them?
It turns out you can! See for yourself:

Ideas can be very different - both very simple and quite complex in execution.

Modest and refined, concise and rich in the smallest details - many different images are created from the same materials.

But maybe these ideas seem boring to you, not too festive? Perhaps you think that Christmas should be bright? Then take a look at this...
Bright and shiny
Needlewomen who love to work with beads will certainly appreciate the ideas of figurines made of shiny beads and wire.
The degree of complexity is any: from simple crafts to real jewelry. Unfortunately, one selection cannot contain all the variety of ideas - this is just an impetus to your imagination, a hint, a hint ...

By the way, like crocheted, these crafts do not have to be voluminous.
Very simple ideas
Lace angels make you freeze in admiration. Dolls made of felted felt touch and delight. But to create such beauty is not for everyone.
Are there any easy ideas on how to make a Christmas angel figurine with your own hands, even if you do not have special needlework talents? Yes!
From paper
Classic white color, simple technique. But it's beautiful!
Want to be nicer? Let's take a brighter paper, add sparkles.

And here is an idea for musicians with a sense of humor:

Cutting out such figures from paper is not so much a difficult task as painstaking.

But even a child can handle such crafts:

Paper figurines of angels are suitable for decorating the table for Christmas dinner, and for decorating the house, and they can be used as Christmas decorations.
Made of wood or cardboard
And wonderful crafts are made from thick cardboard or thin plywood.
The main thing here is to choose a good template and carefully cut out the silhouette.

The finished product can be painted, decorated with sparkles - or left as is, without hiding the noble texture of the wood (if you settled on wooden figurines).


For those who like to weave from paper tubes:
Another video about paper crafts: papier-mâché angel
Another interesting option is a three-dimensional craft made from 3D modules.
From threads


On YouTube you can find interesting master classes, for example, here is such a wonderful angel made of cardboard, twine, lace and a Christmas ball:
Plasticine angel
Angels are gentle white-winged harbingers of the Christmas miracle. They are the helpers and protectors of those who believe in divine power and try to live by adhering to righteous covenants. Angels are associated with purity, goodness and love. On the eve of one of the most anticipated and revered holidays, we offer, together with the children, to create a wonderful plasticine angel using this master class.

For creative work, prepare:
- a set of colored plasticine;
- nail scissors;
- stacks;
- modeling board;
- toothpick.
We sculpt an angel figurine from plasticine. Step by step job description
Take white and a little pink plasticine, mix until flesh-pink. Divide the plasticine into two parts, roll up a round base for the head from the larger one.
 Blind a small oval nose, stick to the center of the face. With a round stack, highlight the recesses under the eyes and cheeks.
 Make two flat round blanks for the cheeks from pale pink plasticine. Insert them into the prepared places. Smooth the edges with your finger so that the ruddy spots look natural.
 Roll up two white balls, lightly press them with your finger and insert into the eye sockets. Make a blue iris, black pupils and white highlights. Stick all the details on top of each other, as in the picture.
Make a small smiling mouth out of pink or red plasticine.
 Choose a yellow plasticine, add a little golden and mix. Roll up long thin flagella, outline the approximate middle. Roll one end into a spiral along the inside edge and the other along the outside. You should get a kind of twisted "eight", as in the photo.
 Start connecting the curls from the center of the forehead, placing the blanks horizontally. Fill in the first row with curls.
 Stick the second row of curls vertically. The following rows can be stacked in any order, most importantly, try to place the elements closer to each other.
 Make two small flagella, round the ends and stick in the center of the forehead.
 Knead white plasticine, mold a cone-shaped robe and two sleeves. Cut off the top of the large cone and use a large round stack to make a notch, as in the picture.
 Decorate the hem, the edges of the sleeves and the neck with golden plasticine. Connect the pieces of clothing.
 Blind the feet and hands, select the fingers with a toothpick or a stack. Stick the limbs in place.
 Make two parts in the form of a "leaf". Using a sharp stack or nail scissors, cut off the edges to form the outline of the feathers. Apply a wave pattern along the top edge.
 Break ⅓ of the toothpicks, insert in place of the neck. Glue the wings to the back of the figurine.
 Connect the head and body. Plasticine Christmas angel is ready!


What a glorious angel turned out by our joint efforts - miracles! Let him become the guardian of peace and happiness in your home, the guardian of loved ones and relatives.


And two more videos from youtube, how to mold an angel, even from plasticine, even from edible mastic on a cake:

Crocheted angel
Crocheted angels are openwork and airy. On our site there are three knitting.


"Angel". Polyakov Elizar. Work for the competition.
Iris threads, hook number 3, rhinestones for decoration.


From tapes

Video how to make an angel from a ribbon quickly and easily:

fabric angels


"Angel". Khokhlova Daria.
Large wooden bead, fabric, felt, threads, hot glue.

Felting wool
Fairy or angel - dry felting ()


Dry felting tutorial video:
beaded angel
You can make beautiful angels from beads, for example, the simplest ones, as in the video:
Or more complex, according to the schemes. Front view:

Back view: 
From natural materials

Cardboard frame, birch bark, feathers - a charming angel is ready (participant's work):

Video how to make an angel out of straw in 15 minutes:

From cotton wool
New Year holidays in every home are accompanied by the expectation of a miracle. Not only children, but also adults sometimes want a little magic and joyful events. From time immemorial, an angel has been considered a messenger of good news, and we will make it for the New Year tree. The master class was prepared by Svetlana Satina.
 To make an angel, you will need the following materials and tools:
- cotton wool
- white threads
- PVA glue,
- foil,
- stacks,
- puppet face
- artificial hair or from an old doll,
- laminated sheet of paper or cling film,
- Super glue,
- watercolor paints,
- awl
- jute threads
- brushes.
From food foil we form an angel dress in the form of a cone and a sleeve in the form of an arc.


When working with foil, you do not need to compact it too tightly if you want to make the toy weightless.
We separate thin ribbons from cotton wool and wrap them around the body with white threads. At this stage, we immediately fix the hands.

We close the angel's dress with cotton and at the same time increase the desired volume. We separate two thin cotton tapes of the same length and close the handles with them. It's better to start from the end. We twist the cotton wool tightly in these places to give them the shape of mittens. Gradually we wrap the pieces of cotton wool up to the shoulder, where we finally fix it with threads.

In the process of work, the position of the hands can be changed and made in such a way that it is convenient to work. Before the cotton dries, you still have time to give them the desired position. Foil even in cotton wool bends freely.
Approximately such a figure should turn out.

Now let's move on to creating the head of our angel. For this work, a puppet face was used, made of plaster by casting. You can take a purchased head or make a face yourself. If there is no way to find or make it, it is perfectly acceptable to simplify the task. It is not difficult to make a face round from cotton wool, and then draw eyes, eyebrows, mouth and nose on it.
We roll a ball out of foil, make a recess in it and connect it with a plaster blank with superglue.
Then glue the head to the body.

In general terms, our figure already resembles an angel, and you can start raw work.
We dilute the PVA in half with water, tear off thin layers from the cotton wool and begin to cover all the clothes of the toy. To make cotton wool fit better, it is laid in one direction of the fibers and smoothed tightly with a flat brush or finger. In the process of work, immediately form folds on the dress and an edge on the sleeves, adding more cotton wool to the right places.  We take ready-made artificial hair or from an old doll and make an angel's hairstyle. We glue the curls around the face, cover the head with a cotton handkerchief from above. To do this, we cut out a triangle from a thin cotton layer, coat it with glue on one side, smooth it, put it on our heads and bring the ends back.
Sculptures and garden figures have recently enjoyed great popularity in landscape design. Now it is rare to find a garden in which there is not a single garden figurine. After all, thanks to them, the garden is transformed and becomes brighter and more interesting. But not always, and not everyone has the opportunity to purchase garden figurines, because they cost a lot. That is why our craftsmen create them with their own hands from improvised materials. We have already collected a lot of author's master classes on making various garden figurines on our website, from the simplest to the more complex. So today we will consider a very interesting master class on making an angel with your own hands. The author of this master class is Natalia Chusovitina.
Even in the old days, they used and created figures of angels for the garden, and also decorated their home with them. Only very rich and wealthy gentlemen could afford such figures. Now, if desired, anyone can buy or make any garden figurines with their own hands.
A cute angel with funny curls, chubby cheeks, kind eyes and beautiful wings will guard and protect your garden. Probably many of you would like to have a garden angel figurine in your garden, now your dream has come true, we can make an angel with your own hands in your garden.
Angels have always amazed people with their bright and calm appearance, and looking at them is impossible not to feel tenderness. Angels have always occupied a special place in man, because the Lord created them for man, so that they would protect and keep him. Often in souvenir shops you can see various figurines in the form of angels, which means that they are in demand among people. Of course, you need to understand that the figurine will not save us from troubles, this is just the work of a person !!! But for beauty, you can also purchase or make a cute angel yourself. Angels are always created in white, which is why they are often made of marble. Also made of glass, cement, gypsum, etc. Our angel will be created from papier-mâché and cement mortar.
To make an angel you will need:
* Plastic bottle.
* Wire.
* Newspapers.
* Scotch.
* PVA glue.
* Self-tapping screws.
How to make an angel:
First we need to create a framework. We make it from improvised materials. Natalia used a plastic bottle to make the body. We fill it with various unnecessary segments. Then we create a ball from newspapers and fix it with adhesive tape so that it does not fall apart. We fix it on a plastic bottle. We take the wire and make legs and arms out of it and also fix everything on the bottles. Wings can also be made from any available materials and fixed to the frame. Everything, approximately the frame we have made.

Now we need a lot of newspapers. We crush the newspapers and wrap the body of the angel, thus giving volume to our figure. We fix everything with tape. In conclusion, when the frame is almost ready, we use papier-mâché technique with pieces of newspapers on a paste - we sculpt layer by layer, the more the better, continuing to create volume in several passes. Everything, when you see that enough, we remove our figure to dry.

When our workpiece is completely dry, we begin to screw the screws over the entire surface, directly into the paper base.

We take thick, dense threads and begin to braid along the screws, this is necessary in order for the cement to better adhere to the frame.


Now we make a cement mortar, an approximate ratio of 1: 3 (1 part of cement and 3 parts of sand). We also need to make a mass of papier-mâché, but in terms of volume it should be less than cement. We combine the prepared mixtures together and mix well.

To make the solution more plastic, a plasticizer must be added to it. Natalia used "Ferry - for washing dishes", you can take any product. We coat our angel completely with these compositions. If suddenly something doesn’t work out very well, don’t be afraid to fix it before everything is frozen. We fashion the eyes, mouth and nose.


Similarly, apply to the base of the wings. Apply a thin layer so that you do not get heavy and huge. We take stacks or something else and use them to draw a pattern on the wings. Stacks are often found in children's plasticine. When the wings are done, you need to dry them a little.


When the wings are dry, we try them on and fix them in the right place with self-tapping screws, and only then we apply a mass of papier-mâché and cement on top.


Everything, the angel is ready with his own hands. When it dries well, we coat it with finishing putty, and then with a primer, only then we paint it in gray black.

When the paint dries, paint again but this time in white.


Let's make a wreath of roses for our angel. Natalya made a wreath from cold porcelain. At the base of the wreath there is a thick wire, if you have a thin one, then we bend it in half. This is necessary to keep the wreath better. We sculpt roses from porcelain and glue them on a wire with polymer glue (for ceiling tiles). We paint with acrylic paints and cover with several layers of universal varnish.

Also, Natalia made a ball of cement, on which she put our angel. After all, an angel definitely needs some kind of stand or pedestal. The ball is made of two halves, for this we use a 7 liter cauldron.

We close our cauldron with a film and apply the first layer of cement mortar. Then you can put a mosquito net or use a thin metal mesh. We wet the mesh in a liquid solution of cement and lay it on a cauldron. Then once again we will coat with a solution of cement.

The thickness of the walls of the ball at Natalia is about 5 cm.

We connect the two halves together and get a ball.

We also need to decorate it. You can use unnecessary CDs. We cut the discs into pieces of the desired shape and size and glue them onto the ball.


We sit the finished angel on the ball and install it in the right place. Everything, the angel is ready with his own hands. Such garden figurines in the form of an angel will become an incomparable decoration of your garden and will attract all your acquaintances and friends.


Copyright © Attention!. Copying text and photos can only be used with the permission of the site administration and an active link to the site. 2019 All rights reserved.
Markova Julia.
To make an angel we need:
- a piece of fabric (coarse calico) 10 by 15 cm;
- threads;
- scissors;
- needle;
- felting needle;
- holofiber;
- wool for felting;
- tulle 7 cm by 1.5 m;
- beads, bows, wings, etc.;
- ribbon 22 cm;
- blush;
- tassel;
- black gel pen.
 1) Transfer the pattern with a pencil to the fabric, sew by hand or on a typewriter. Be sure to leave a hole for stuffing.
 2) Fill the body with holofiber.
 3) Sew up the hole.
 4) With the help of lace we make a blouse, in the middle it is necessary to make a couple of stitches so that it does not diverge.
 5) We have 2 skirts, the first one will be made of lace, from which we make folds and immediately sew them to the body of an angel.
 6) Draw eyes with a black gel pen. Apply blush with a brush.
 7) For the second skirt, we take a strip of tulle, we collect it on a needle and thread.
 8) We make the assembly, put it on the doll and tie the 2 ends of the thread together.
 9) Using a needle for felting, roll the wool to the head and put it in the hair.
 10) Glue "Moment Crystal" glue wings (can also be cut out of felt), bows, beads, etc., it all depends on your imagination.

We sew a rope. Our angel is ready!

How to sew an angel toy
New Year is the time of miracles, the time of fulfillment of the most secret desires. You can prepare a magical gift for your loved ones, which will serve as a reliable amulet against all failures. A doll with prayerfully folded hands looks touching and tender. It can be used as a pendant. The master class was prepared by Ekaterina Vasilyeva.
Sewing a doll is quite simple, it will perfectly complement the interior of the apartment on the eve of another holiday -.
Materials:
To sew an angel doll, you will need a small amount of materials. Height of the toy: 13 cm. The toy must be designed in one color scheme: white, pale pink, sky blue. It is necessary to carefully consider the details of the finish, for example, for a halo, you can purchase a braid of fluff.
List of materials:
- white chintz (body);
- mesh and lace (dress);
- synthetic winterizer;
- sewing threads;
- woolen threads (hair);
- black beads (eyes);
- sequins, satin ribbon (decorative details of the dress);
- fluff braid, beads (nimbus);
- felt (wings).
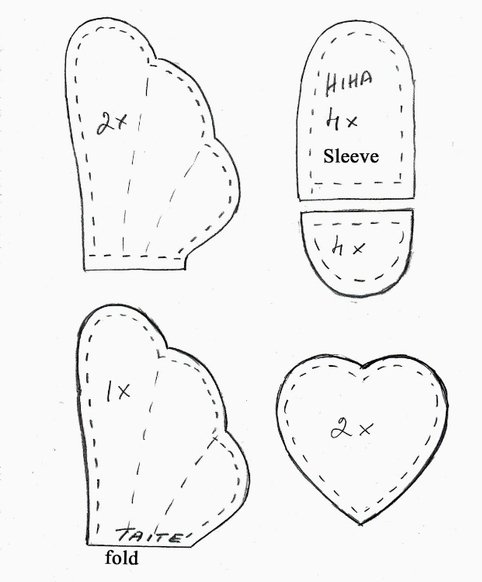
Pattern
1. Print out the details of the paper pattern (photo 2).

Progress
2. Cut out the details from the fabric. The fabric is folded in half with the front side inward, the details of the paper pattern are placed on top, allowances for the seams are left: 0.5 cm. The exception is the front of the head, one detail is needed, so the fabric is laid out in one layer (photo 3.4).


3. Connect the parts of the head. The details of the back of the head are folded with the front side inward and sewn only in a straight line, excluding the places indicated by the dotted line on the pattern. Then the resulting part is connected to the front of the head and stitched along all edges (photo 5).
 4. Sew the details of the body and hands. Body parts are folded face inward and stitched. The neck area indicated by the dotted line remains open. The details of the hands are stitched in the same way, with the exception of open sections, indicated by a dotted line (photo 6).
 5. Turn out the parts. All parts are turned right side out through open sections (photo 7).
 6. Stuff the details. Details are stuffed through open sections, it is advisable to use a wooden stick. All parts of the toy must be tightly stuffed with padding polyester, with the exception of the head. The open section of the back of the head should fit the neck of the doll, so this area should be left free (photo 8).
 7. Sew open sections. The neck area and open sections of the arms are sewn up with hand stitches. The open section of the back of the head does not need to be touched (photo 9).
 8. Connect the head and body of the doll. The neck of the doll is inserted into the open section of the head and connected with hidden stitches (photo 10).
 9. Sew on hair. Hair length can be any, in this case: 30-40 cm (photo 11).

The cut threads are folded in half and sewn along the line of the middle of the head (photo 12).
 10. Form ponytails. The hair is cut and tied with a ribbon (Pic 13, 14).

 11. Sew a dress. A rigid mesh frill is sewn directly to the body of the doll at the waist. Frill size: width - 6 cm, length - 50 cm (photo 15).

A lace bodice is sewn on top. Size of the bodice: width - 3 cm, length - 14 cm. In the neck area, the fabric must be gathered (photo 16).

The seam can be closed with a satin ribbon, it is better to decorate the lace with sequins (photo 17).
 12. Sew on the hands. The details of the hands are connected together in the area of \u200b\u200bthe palms. Then one hand is sewn to the right side of the doll, and the other to the left (photo 18).
 13. Make a halo of beads. You can use a thread of beads or sew each one separately, the result should be a luminous circle on top.
14. Sew on the wings. First, the wings are cut out of felt (photo 19).

Then they are fixed on the back with a pin and only then sewn with blind stitches (photo 20).