Crafts for the garden on the theme of autumn. Beautiful crafts on the theme of Autumn for a school exhibition. Leaf hedgehog and cereal bird: master class
The golden time inspired poets and artists! She is also ready to help us build crafts for the kindergarten on the theme of autumn. I am ready to offer you some ideas!
I will try to tell as much as possible about some of the ideas, show a photo and describe the manufacturing steps. If you liked these works, write, tell us what happened with you.
Pictures on the theme of golden autumn
Let's put the brushes and paints aside. Bright colors and shapes will give us green, red, yellow unusual leaves and seasonal flowers.
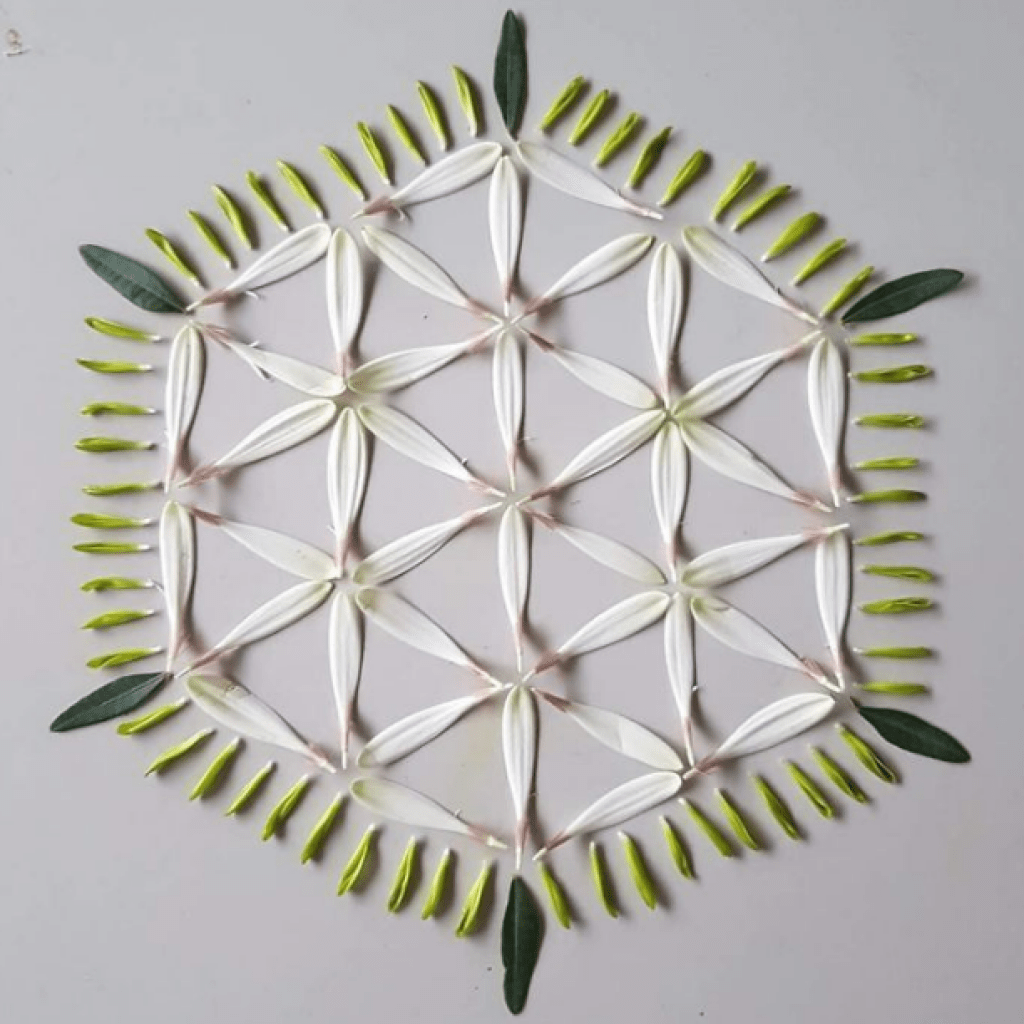
Application
Here in this applique drawing everything is done with the help of this natural material. 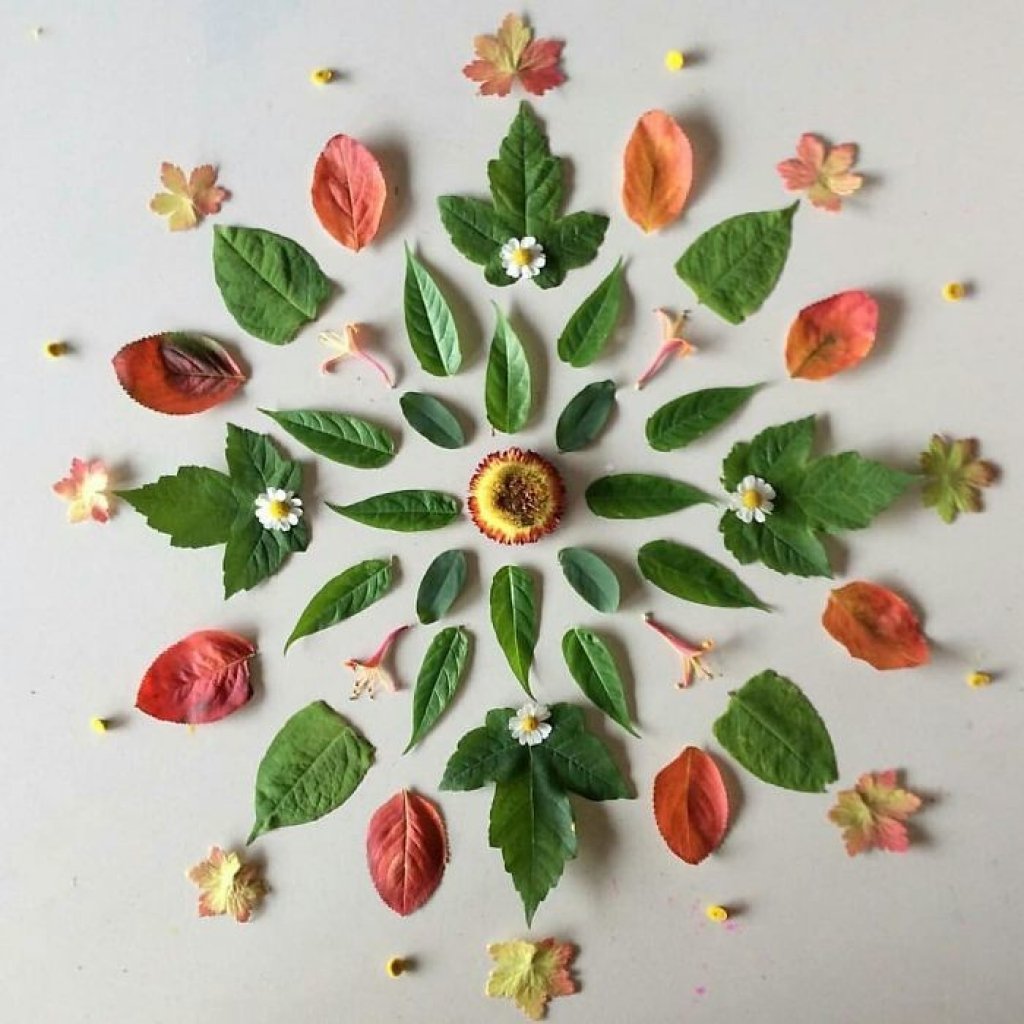
You and your baby will be able to come up with any pattern from different herbs and petals!


Decorative and applied technique
And again the leaves will help us to "draw" the trees. To do this, you need to apply a layer of paint to simple leaves. And then touch the paper with the side where the paint is. And the picture is ready! Before us is a real autumn forest.

A few strokes along the bottom, and we get fallen leaves.
The Golden Cockerel
Now we will also use scissors to cut the desired shape out of material such as leaves.

The picture shows the step-by-step construction of the figure:
- We glue small leaves. One - the body of the cock, it should be oval. The second is round, this is the neck.
- We attach the "tail". It is worth picking up corrugated material for this. If this is not the case, you can cut the desired shape.
- The beak and beard are glued under the head.
- The scallop is also glued to the head. To make the picture look attractive, you should first sketch what is where.
- The head is superimposed.
- It remains to make the eyes, cut and attach the legs of the cockerel.
These children's pictures can be inserted into the frame to make the craft look complete.
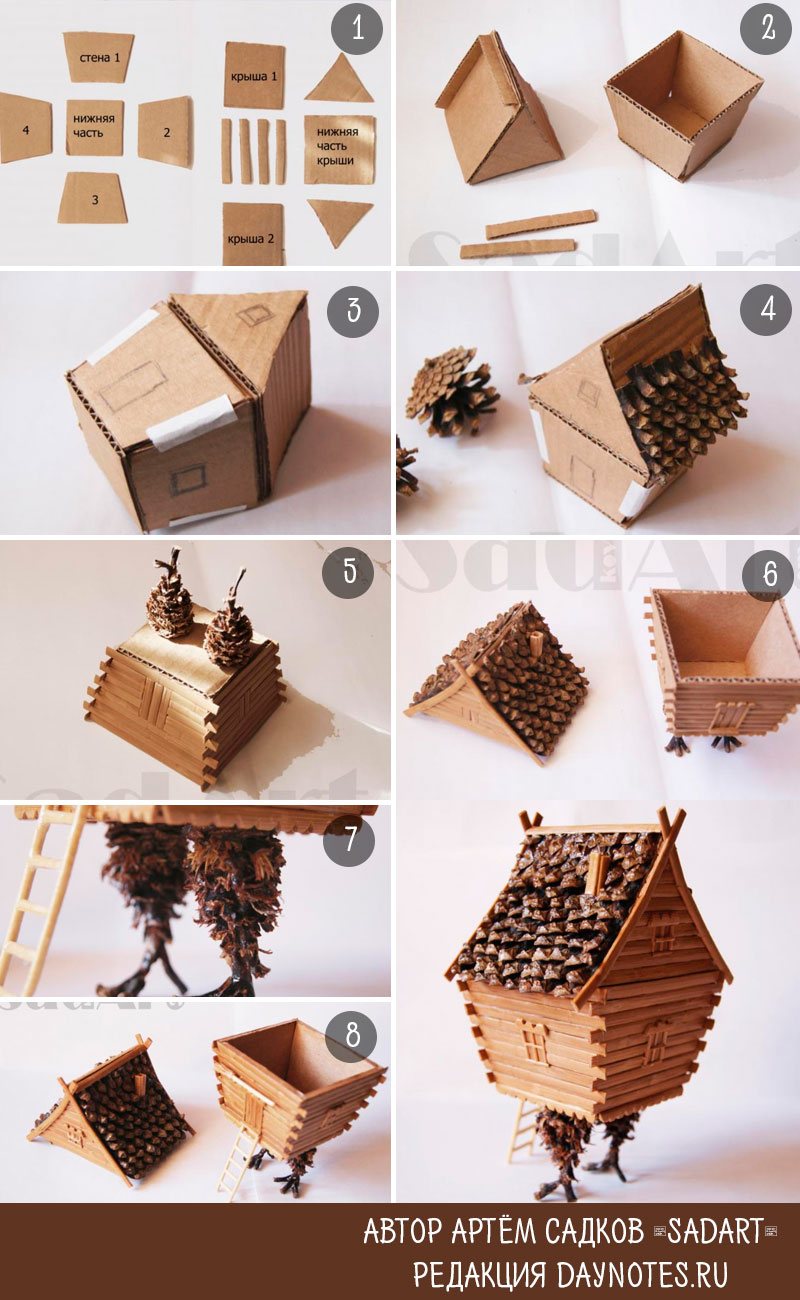
Miniatures
Miniature houses or even whole compositions made of natural material, plasticine, beads look incredibly beautiful. As a basis for such houses, cardboard is usually taken for clear geometric shapes.
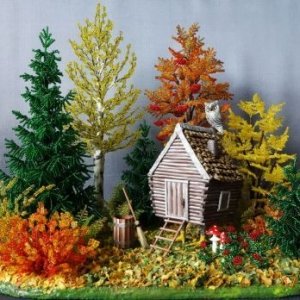

For rounded, uneven volumetric figures, use foil and / or papier-mâché. 
In this case, for a hut on chicken legs, the author uses cardboard and a pine cone. The pine cone makes a great shingle!
Compositions of gifts of autumn
Let's start simple again. Our goal is only to help the kid, so that he himself does the best work on the product.
Floating cup

It looks interesting and unusual. To do it is simple and fast. You just need to stock up on the right decor. With such a craft, you will surprise everyone: children, teachers, and parents. And it's very simple to do. We fix the cup in the desired position on a wire or a regular fork using hot glue. A fork or wire can be decorated with papier mache and painted or simply completely covered with sisal, fruits (you can buy on the Internet or sculpt from airy plasticine, clay), nuts, cones, chestnuts, leaves, and other autumn decor. The main thing is that at the end you cannot see the support on which the cup rests.
Pumpkin vase

All you need is to cut off the top of the pumpkin, take out the middle. And insert the jar inside the fruit. It turns out such a decorative structure that can serve for a long time.
By the way! If you take out all the tender flesh from the pumpkin, you can use it for a delicious porridge or make a healthy drink, bake a muffin. The remaining peel is dense and has a long shelf life. Such a vase will be able to withstand the whole winter. But if you want it to last even longer, paint it inside and out with paint. The external design of the pumpkin can be of different colors and you can even draw a small plot.
Of course, you can make not only a vase from a pumpkin, but you can also make other interesting things: a candlestick and even an organizer for pencils and pens.
Crimson autumn wreath
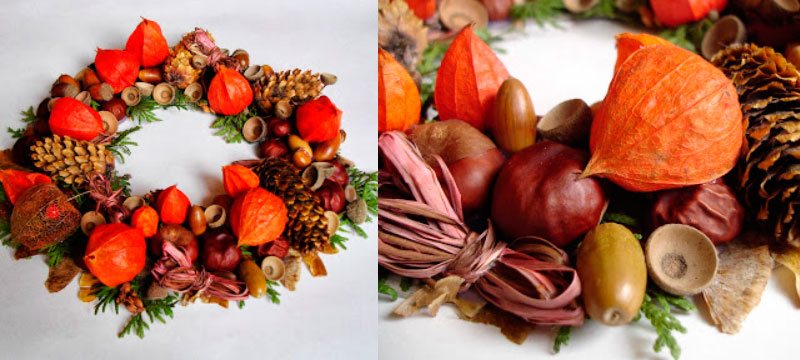
Autumn gives us colorful colors, juicy beautiful fruits and unusual flowers. All of this can be incorporated into your variation of the wreath.
A few words about the design of the wreath:
- The base can be thin branches of willow or birch.
- It is worth making a small loop of decorative tape to hang the wreath.
- On top of the base are attached:
- beautiful flowers of physalis;
- Christmas tree cones;
- acorns;
- thuja twigs.
Of course, this design can be supplemented with what you now have at hand. Toddlers can actively participate in the process.
Funny autumn animals
Hedgehog
Snorts when angry All covered with thorns From head to toe This animal (Hedgehog)
It's very simple to make it:

Squirrel
I walk in a fluffy fur coat, I live in a dense forest. In a hollow on an old oak tree I gnaw nuts. (Squirrel)
The baby himself can make such a squirrel.
- 2 cones;
- 2 acorns (smaller and larger);
- Plasticine.
We master:
- We fasten 2 cones on the stand with the help of plasticine, with their wide sides to each other. One is straight upright (body). The second (tail) is at an angle of 45 ° to the first.
- We glue an acorn to the body, which is larger in size (head).
- We decorate the head with eyes, a nose, ears with tassels.
- We make plasticine legs.
- We put an acorn into the front legs.
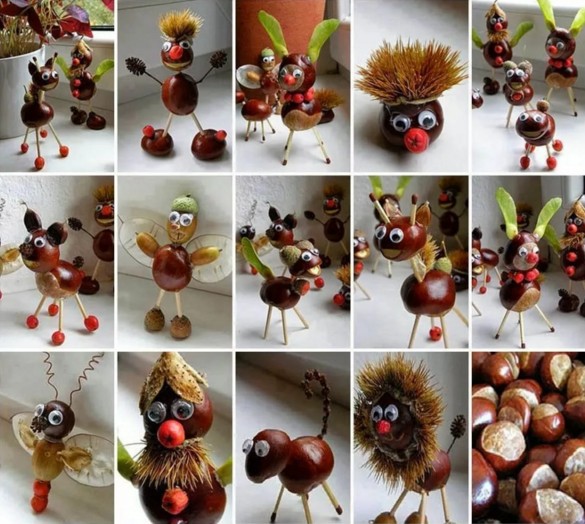
Chestnut freaks
Wonderful animals and chestnut monsters can be of interest to your little one, so take a couple of ideas.
Pictures are enlarged by clicking.


Shell toys
Such toys can also be prepared for decorating a Christmas tree. Moss is sold in craft stores. Mushrooms and fox cubs can be easily made from. When the figures are dry, glue them with glue for a moment.

Owl
A wonderful owl is obtained from a pine cone. Wings and eyes can be made from felt or foamiran.
It's dark in the forest, Everyone has been sleeping for a long time. One bird does not sleep: Sits on a bitch, guards the mice. (Owl)

Fox
They say she is cunning, she takes Chur out of the yard. But the beauty - all the guys like it! (FOX) In the same way, you can make a beautiful chanterelle. Master class author 
Candlesticks
I personally associate autumn with calm, cool evenings. And on such evenings it is pleasant to look at a candle and dream of something. Candlesticks in a sweater look incredibly warm and cozy.
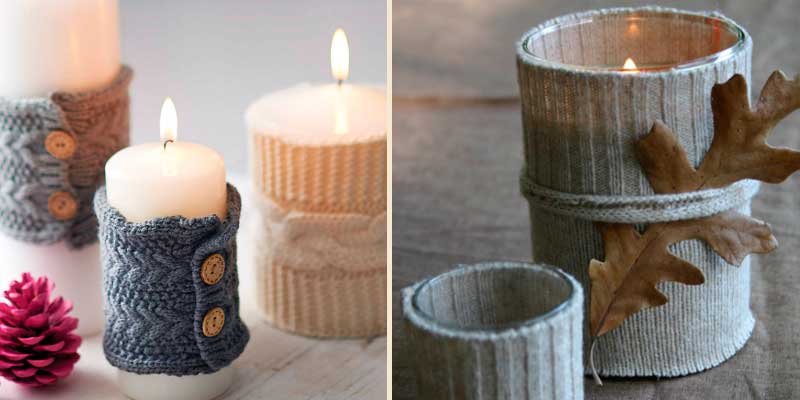
Take an old sweater, cut off the sleeve and put a jar, vase or glass in it. From the bottom, fix the cover with glue or sew with threads.
If you have your own ideas, write! And don't forget to take a look here to see the subscriber response to your proposal. By the way, subscribe yourself! Then do not miss anything interesting that I have on my site!
Outside the window, autumn has already come and everything around has begun to hide with beautiful multi-colored fallen leaves. And until the rain turns this beauty into a wet mess - it's time to get creative! Especially if your kid came from kindergarten or school with the task of making an autumn-themed craft.


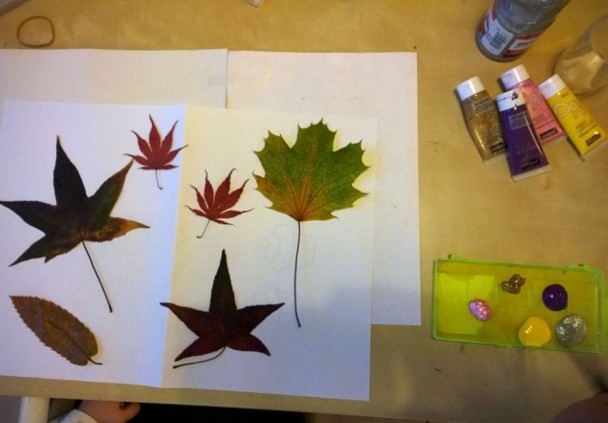
A herbarium of leaves collected in autumn is a whole wealth and raw material for children's crafts. You can think of a lot of options for using such a natural material. Since it is imperative to practice creative activities in creating unusual figures with children, we offer you an interesting idea for creativity.

Only work with dry and fragile material should be very careful.
Practicing such activities, children will eventually independently learn to think creatively and notice the amazing features of natural objects.
If the soul wants something original, we suggest creating an autumn floral arrangement. Namely - the "Autumn mood" bouquet.

The product consists of two elements - a vase and flowers.
For flowers we need:
- leaves of different sizes and colors;
- glue gun;
- wire or thin twigs (for the stem);
- scissors, pliers (for wire).
Be careful with your glue gun when doing leaf crafts with your child. It is better to entrust the kid to select the leaves, arrange them by color, cut them and serve them to you.

As it turned out, more realistic roses (green flower) emerge from leaves with slightly curved edges. Try to wrap the edges of the leaves to avoid sticking out petals. Large leaves can be cut in half. For a rose 8-10 cm in diameter, you will need 15-20 leaf fragments 5-6 cm in size.
Progress:
1. We take the wire, bend the edge.

2. We begin to form a rose from leaves and their fragments. We wrap the first sheet around the ear of the wire and fix it well with glue. We continue to glue the leaves in a circle, filling in the empty spaces.

3. The lowest row is the sepal. Take 5 leaves of a small size and contrasting color. Glue in a circle, thereby covering all the "insides" of the flower. The photo shows small red leaves under the green petals - this is the sepal.
4. The stem of the finished flower can be wrapped with floral tape and a few leaves can be tied to the stem. If you are using twigs, then simply glue a couple of leaves along the stem of the flower. The autumn rose is ready.
To form a beautiful bouquet, you will need several flowers - 3,5,7. Try to make them different in color and size. This will make it look more colorful. You can add several buds to the composition. They will help fill in the empty spaces in the flower arrangement.
Vase for an autumn bouquet
For a themed vase, you need any small bottle (glass or plastic), string, a couple of acorns or hazelnuts. And, of course, a glue gun or any other glue. We wrap the bottle with thread, periodically securing the result with glue. We glue the nuts or acorns onto a small piece of string with glue. We tie the result on a vase.
If you had a large bottle, you can decorate it with an applique made from halves of a walnut shell or, in general, from some kind of cereal. Challenge your toddler to figure out how to decorate the vase. Channel his imagination in the right direction.

Now you can form a beautiful bouquet of flowers and put it in a vase. It will be more convenient if the height of the leg of each flower is different. You will be able to fill the space in several tiers.
Such crafts made from autumn leaves can become not only an original decoration for any interior, but also help you win at any school exhibition.
Nature itself suggests thousands of ideas. You don't need to be an experienced craftsman to create a unique, warm and caring decoration for your home with your own hands. And kids are happy to participate in the creative process and make amazing crafts along with adults. Master class - how to make one - read here.


Why not make a hedgehog with your child from pine cones and plasticine? Autumn colored leaves will add special colors to the work.


Encyclopedias say that hedgehogs live in forests and parks, but sometimes they can also be found in village yards. Thorny animals make nests in woodpiles. At night, individual daredevils or a full-fledged family go out in search of food.
Dried greenery rustles quietly in the beds. At dusk, the direction of the hunters is clearly visible. Hedgehogs are not worried that the owners of the yard see their movement. As a rule, quiet and harmless neighbors are not chased away, sometimes they are even fed with milk.
What does a hedgehog eat? Insects, slugs, mice. This means that it is beneficial to keep such an animal for those who are engaged in gardening.
Such a cute hedgehog turned out from a cone. As a decor, you can decorate the thorns with plasticine or a real small apple, and put the hero himself on a carpet of autumn maple leaves. A detailed master class on how to do this - read here.


By the way, hedgehogs are considered fast animals. They are capable of speeds up to 3 m / s. At the same time, thorny animals jump and swim perfectly.
The resulting hedgehog, unlike the real one, can be safely handled. It will not hiss or curl up into a ball, warning of danger. This hero will not run away from the little owner, but will safely stand all autumn and even winter. The hedgehog from the cone does not hibernate. He is ready to meet winter and New Year's holidays with children.
How to make one - read here.


Such fun is done very simply and quickly. For a detailed master class, see here.


Autumn motives in the home interior
Seasonal flowers and herbs, autumn colorful leaves will be the best home decoration.
How to make a toy goddess of autumn from fabric
Doing something with your own hands is so entertaining and interesting. Well, if it also turns out beautifully, then there is simply no price for such toys. You come to an exhibition of hand-made products - and your eyes just run up. Let's try to reveal some of the secrets of the masters and consider the method of making the goddess of Autumn, which can be presented to children or hung on the wall in your home.

So, we need: acrylic paints for fabric (with gold and silver jars), a set of brushes, cotton fabric, filler, threads with a needle.
Step one. Making a layout
In the layout, we have to figure out how our toy will look like. At this stage, we do the initial sketch, then the pattern, sew the details together.
Our autumn is sewn from a single piece of material. It is only necessary to separately make her legs and one hand (the hand is cut out of another piece of fabric and sewn onto the product on top). When all this is ready, you need to fill the toy with cotton or other material and sew up all the holes.
Step two. Time for creativity
Now we have to draw our autumn goddess. You can completely repeat the drawing of the finished product, which will be given below. In any case, you should use orange, gold, yellow and red colors, because autumn is rich in these colors.

Our autumn holds a large tambourine in its hands, it seems to be convening the whole world so that people, animals and animals rejoice in the last warm days. Next, you need to paint the toy (in order for the paint to hold better, you can apply PVA glue to the fabric).
Step three. We decorate our toy
You can endlessly decorate our beauty. After all, autumn is unique. You can glue a bead to it, add sparkles - whatever your heart desires. Look what a wonderful autumn we have turned out. It's expensive to watch.

Goddess of autumn with her own hands
Physalis in pumpkin
Autumn bouquets can be made not only from fresh flowers, but also from oak branches with acorns, sea buckthorn, barberry, wild rose, viburnum, elderberry, mountain ash, wild grapes, bright lanterns of physalis, ears, etc.
Such compositions look great in a pumpkin vase, wicker basket, tin bucket, clay jug. The vessel can be decorated with ears, decorated with a ribbon.
Wandering lights
Acorns, birch bark, physalis, hawthorn berries, small decorative pumpkins will help to decorate candles in the autumn style. Plain thick candles can be wrapped in birch bark or inserted into small pumpkins where the top has been cut off and some of the pulp removed. Glass candlesticks will look original and festive if you paint them with stained glass paints.
If you drill holes in a thick branch according to the size of candles, decorate with small pumpkins, cones and berries, then the original candlestick for the house is ready.
September wreath
For mood, you can weave a wreath on the wall or front door. Flexible branches are suitable for its basis. Opt for vines, straw, or a wire hanger that is curved in the shape of a circle. Hook received. Decor elements are best represented by leaves, hop cones, grass panicles, tree branches, grapevines, acorns, mountain ash. In any case, it is convenient to fix it to the base with a thermal gun (alternative fixation - by means of a thin wire).
Decorate the wreath in autumnal style, since there is plenty of natural material - bright leaves, thin branches, grapevine balls, etc. Or you can hang the leaves from the frame. An old lampshade or a wooden staircase will work for him.
Falling leaves on the couch
What could be nicer than a cup of fragrant tea drunk on a sofa with soft pillows and a warm fleece blanket? In textiles, it is better to use soft velvety fabrics of the autumn range (brown-red, bright orange, burgundy, marsala color, terracotta, muted green), prints in the form of leaves, vegetables, autumn colors.
It is convenient to cut out the decor in the form of autumn leaves from dense fabric and stitch it to the background in a zigzag pattern. If the leaves are made of felt and the edges do not need additional processing, you can stitch them onto a pillowcase with an ordinary seam - this will give volume and help create a planned composition.
Acorn frame
Cover a mat of thick cardboard with felt, decorate it with a bunch of small decorative elements in autumn style: apples, acorn hats, felt leaves, berries, etc. The bouquet can be made removable, attach a pin to it and use as a brooch.
Offer the children to glue the cardboard frame with acorn caps, insert a thick piece of plain cardboard or burlap background inside, paste in a beautiful leaf or any other gift from nature.
What about the festive table?
Use autumn motives in your table setting. Make napkin clips in the form of an oak bunch: felt leaves, acorn caps with a soft colored nut. Mossy twigs can be collected in a ring and decorated with half a walnut. Don't forget to make small bunches of oak leaves and berries.
The yellow and red leaves can be used as napkins under plates or to decorate dishes. Let autumn bring bright colors and comfort to your home!
Interesting ideas - how to make autumn crafts
... Everything interesting that can only be found in the park, in the forest and in the country is suitable for creating handicrafts.
Note that many of them can be used in interior design (which is perfectly demonstrated in articles and).

You can use fruits, and others. Advice: alternate berries, then in winter it will be possible to brew assorted tea.
Interesting and stylish beads are obtained from acorns:

Interesting beads are obtained from acorns. Photo: 1tv.ru
Do you want the same? Watch a video tutorial from designer Olga Nikishicheva:
Candlesticks and candles made from natural materials
Very original candlesticks and candles are obtained from natural materials. Take a look at these, for example:
Floating candles made from acorn caps. Photo: lostandfawned.com
In my opinion, very interesting candles, like mushroom caps. Of course, they will not burn for a long time, but they will be able to create an atmosphere at the right time. It's easy to make them:
- You need to collect acorns and separate the caps from them.
- Then cut the wicks of the desired size and melt the paraffin (you can wax or any other composition for candles).
- Then we just put the wicks and fill them with liquid paraffin. When the paraffin hardens, you get very original candles.

Candlestick decorated with autumn leaves. Photo: decorwind.ru
Autumn warm and mysterious:

Candlesticks from jars with autumn leaves. Photo: polyvore.com
Or smart and "tasty":

Pumpkin candlestick. Photo: lilacsndreams.com
Instead, or will do. Making such a candlestick is very simple.
Master class: apple candle


We decorate the candlestick with moss and beautiful twigs
And here is another interesting version of the autumn candle decor:

Autumn candlesticks with dried flowers. Photo: pixel.brit.co
You need to take an elegant glass goblet, put a candle in it and fill the space between the walls and the candle with dried flowers, leaves, twigs, cones, nuts or berries. Try not to let natural materials come into contact with fire, otherwise the entire decoration will burn. Especially if these are spruce branches, as in the photo above.
Autumn is the best time when you can collect a large amount of various materials, from which you can make various crafts in the future. What can you create interesting things from? You will think. It turns out that your craft material will be:
- leaves,
- seeds,
- chestnuts,
- bumps.
How to make a bouquet of autumn leaves
Yellow leaves are the most popular material for autumn crafts. Autumn appliques and various crafts are made from the leaves. In addition, they are repainted and truly beautiful masterpieces are created from them. Now we will propose to make an autumn bouquet from fallen leaves.

Progress:
So, you need maple leaves. For such work, not dry leaves are needed, but already yellowed, but flexible ones. So, it is worth making a rose from a maple leaf. First, fold the maple leaf in half for the middle. In this case, the front side of the sheet should be outside. The sheet is folded in half and rolled up into a tight tube.
The middle, which turned out to be, should be supplemented with petals. It is they who will help create the bud. For this work, it is worth attaching an autumn leaf folded in half about 1.5 cm above the middle. Then we wrap the middle with this sheet and tie it with threads. The edges protruding from above must be bent. We make 7 petals for each rose.


Autumn crafts from acorns
On long and rainy evenings, all residents make crafts on the theme of autumn. It is worth saying that such an activity helps to develop thinking. In addition, from such an activity, you can get continuous positive emotions.
In autumn, in the forest or in the park, you can collect a huge number of acorns. And from this natural material, you can make unique crafts that will transform the design of your home.
Not only handicrafts can be made from acorns. It turns out that they can be poured into glassware and used to decorate the house.

And for the next craft, you will need a dry twig and acorns. In this case, acorns must be painted with acrylics and hung on this dry twig. The acorn branch should be placed in an attractive vase. That's all now you just have to admire this unusual decor element.

On a note! To make the craft original, first remove the caps from the acorns before painting. After the paint is dry, stick them back on.

For home decoration, acorns can be felted out of wool. But it is better to glue natural hats to them.

Also, acorn hats are suitable for decorating a picture frame or mirror. You can also decorate the frame from under the photo with acorns. It looks very stylish and at the same time pretty.


Acorns are perfect for festive decor. For example, you can make a bunch of grapes from them. And to make such a craft, you need to take well-dried oak fruits. There is a through hole in the acorns with an awl. Then we put the acorns on the wire. Cuttings of acorns are wrapped in corrugated paper, but acorns are painted with acrylics. Bunches of grapes are harvested according to the principle of weaving a wreath. And the leaves for the brush are usually made of paper. Bunches of grapes will be decorated with them.

What crafts can be made from cones
In this publication, you can see all the autumn crafts made from natural materials. It is worth saying that in addition to acorns, cones are used for autumn crafts. Now you can see how to make a funny spider from cones.
For crafts it is worth preparing:
- 4 branches that will be paws,
- big shot
- plasticine for the peephole,
- thread and superglue.
Progress:
- First, we make a spider's paws. To do this, thread the brush through with a thread, and then bend the threads.
- We attach eyes to the part of the cone that is not fluffy.
- Now it remains to fasten the thread and hang our spider.

Using the same technology, you can make funny monsters out of cones.

Craft from sticks and leaves
You can arrange an autumn starfall in your home at any time of the year. And to make such a craft, you must prepare:

- sticks or cuttings from leaves,
- wire and thread,
- small berries and leaves to be used for decoration.
Hello!
Today I again propose to make crafts in the autumn theme. Look out the window to see how many colorful foliage is already there. Immediately they pick up memories and lines from, for example, these are:
“It suddenly became twice as light,
The yard is like in the sun.
This dress is golden
On the shoulders of a birch .... "
This time of the year is good because there is something to tinker with. Because you can take any and tadam from you, for example, a little man made of cones, or maybe you love? Then, too, you can easily make a souvenir for an exhibition, for example.
You can even take ordinary leaves and make a masterpiece on paper. In general, you can enumerate ad infinitum. Therefore, let me present you with a lot of cool and beautiful ideas on this topic.
I hope you will be imbued with inspiration, and as soon as you decide, you will immediately start tinkering with the children. After all, guys at any age are very fond of such work, be it junior schoolchildren or preschoolers.
In my previous post, we have already considered many options for what you can do with your own hands from various kinds of material, it can be natural, fruits, vegetables and even waste. This time I will show you a few more options, which are also no less beautiful and attractive.
And perhaps I'll start with an unconventional, but paper-plasticine miracle. Take cardboard and make blanks of maple and oak leaves. You will also need glue for ceiling tiles, a CD disk for work.

Take plasticine of different colors in your hand and roll it into a ball.
Advice! You can take modeling dough instead of plasticine.

Roll it out with your hands, as if painting over the surface of the leaves.

Glue the finished blanks to the disc with glue.

Mask the middle with oak leaves, and roll up the red rowan berries. Here is such a cool masterpiece in the autumn theme.

Do you want to build something unusually cool from real rowan berries? I propose to make a picture of a mountain ash in the form of a squirrel. You need to draw an image of a squirrel on cardboard (from under the box, thick), and then cut it out.

Use decorative tape to join the edges of the two cardboards. Or glue it with regular PVA. And then start the image of the animal with berries. Looks original and beautiful! The charming girl came out, didn't she?

The next craft is a vase for flowers, you can do it yourself. Take any glass container and wrap it with woolen thread or twine. In this case, first paint over the jar with glue. You can see the stages of work below in this figure:

Now prepare the bouquet and place it in a vase. And a gift or souvenir for the exhibition will be ready. Good luck!

Now make a funny weirdo in the shape of a sun. Cut a circle out of colored paper, glue the eyes, mouth, nose on it. Or you can draw all these details with a marker.

Then glue over the diameter of the circle with dry leaves.

Also, in order to comfortably hold the sun with your hands, glue the stick. Or, then stick it into a glass that you can also build yourself.
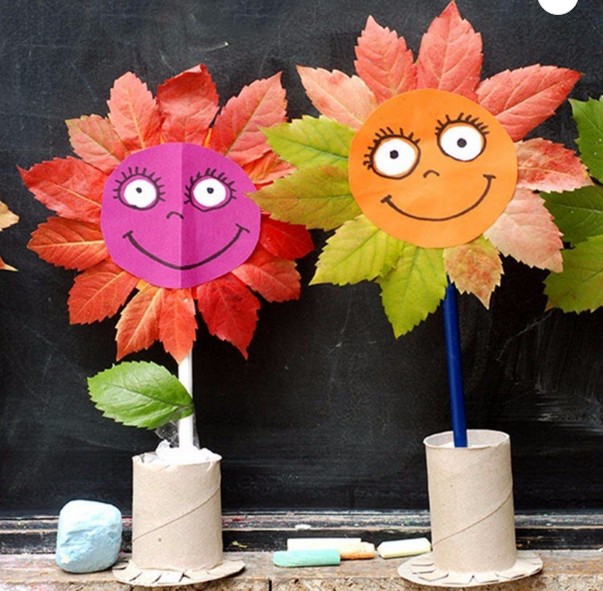
With preschool children in the park, pick up dry foliage and then invite them to decorate them with felt-tip pens, or better with acrylics.

It turns out it's quite wonderful and cool, you can't take your eyes off!

You can go the other way and make a cool bouquet. I remember that I already showed you something like that. But, I repeat.


You can give this to your mother, grandmother, or your beloved teacher.
DIY crafts for kindergarten on the theme "Autumn" (all new items)
With children of preschool age, you can simply dream up. Take and put magic colorful trees from plasticine balls. And there will be a golden autumn.

In addition, you can also use paints and cotton swabs for hygiene, they can create paintings and plots on any topic.

Agree, there is nothing difficult in this, sit dipped and put on a sheet of paper.

Another fun work from scrap materials, made at home, such as millet, is what the author suggests.


You can also build pictures of rice and semolina, or pasta in the same way.


Everyone knows that kids love to play with seals, so why not take advantage of that. Dip dry leaves of sob early from the ground and dip in liquid paint, an excellent print will come out.

You see how brightly and elegantly you can decorate any drawing.

Or you can go the other way, put the leaves (either real or paper) and use them as stencils, that is, paint directly on them, you get prints.


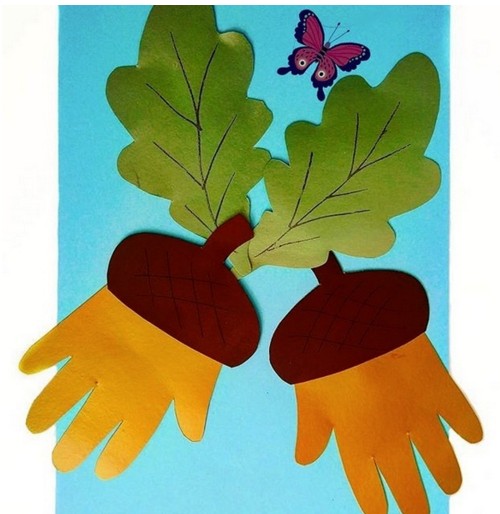
Works from palms are popular. Well, let's use this idea.

You need to take a disposable paper white cup and repaint it green. Make a barrel out of the toilet sleeve and glue it to the plate.

Draw children's hands on cardboard and cut out.

Glue one of them brown on the trunk.

And then, in this order, all the others.

Alternatively, you can do the work in the form of acorns and even squirrels, cool!

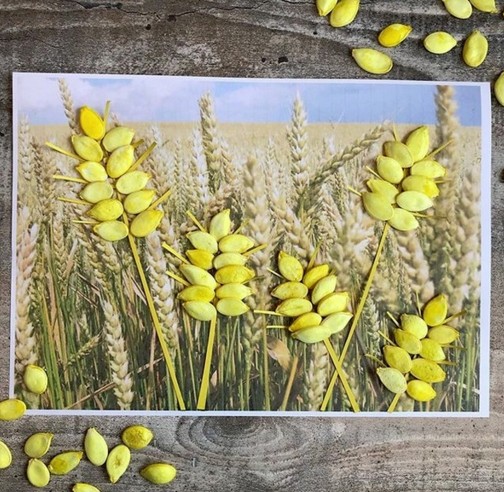
Also, kids love to use natural material in their creations, for example, you can get by with pumpkin seeds. Print a picture of wheat or rye on A4 sheet, and decorate it with such twigs. Doesn't it look creative? And the main thing is simple and charming!
A ready-made description with materials and descriptions, read below:

Do you want to use only colored paper? So you will need to cut strips of different colors and a couple of circles. Determine the size yourself.
Bend each circle in half.

Then draw the trunk and make the crown of the tree, cut it like shown in the photo with scissors.

Glue the trunk on white paper, and the crown, that is, two circles with each other, only asymmetrically.

What is missing, of course, is the colorful leaves! Cut them out in red, yellow, and green.

So, what else, but what. You can take disposable paper plates, these are sold in a fixed price list or in any hardware store. Color them in the desired color, such as brown, and then let dry. Cut out the body of a hedgehog or other animal from white cardboard, draw parts of the body, and let him hold a bump or acorn with his paws.

Probably the most primitive, but also so bright will be a souvenir made of cotton pads. Dilute the paint in a glass beaker and take the pipettes. Use them to color the discs carefully. Let them dry.

And then glue on any background, wow, pretty! And the mood even rose, so bright and cool!

In my classmates, I met another such landscape, only it was made in a different technique.

Original works of cones and acorns
Of course, forest material or waste is always in great demand. Especially in the autumn period. Because the gifts of nature can be found on the paths and in the park, forest. If you have a desire to create something brilliant from ordinary bumps, then here's an idea for you, go for it.
Pour acrylic paint into a cup and dip each piece. After dry it, put it on any tray covered with oilcloth.

Then, from durable cardboard, you can even use a box, cut out the ring and decorate it with bumps, they are glued with a glue gun. Just be careful not to burn yourself.
Perform this procedure only with adults.

Try to stick the cones tightly to each other so that there is not a lot of space between them.

Here's a wreath for you, cute? I really liked it. By the way, you can use it like

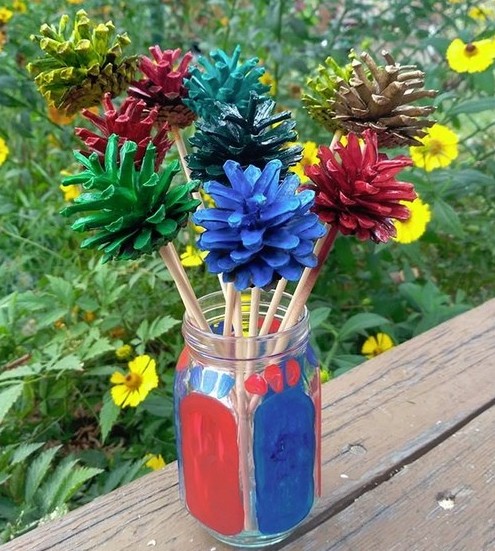
You can also make a bouquet of them, who would have thought, but it looks so great, moreover, if the vase is created by your own hands.
There are a great many ideas of what else can be done on this topic, I recently showed you here. It can be bunnies, hedgehogs, owls, chanterelles, etc. and any other animals. Here are a few more ideas for inspiration.


I would like to show one more video. In it you will see a bunch of new products this year. Happy viewing.
As for acorns, there are also options for creations. Usually people or animals are made, but also cutlery and cups. A plus to everything is used matches or twigs.

Well, if you want to excel, then make an original thing, this is a brooch. Good luck.
Crafts "Autumn fantasies" for school (grades 1-4)
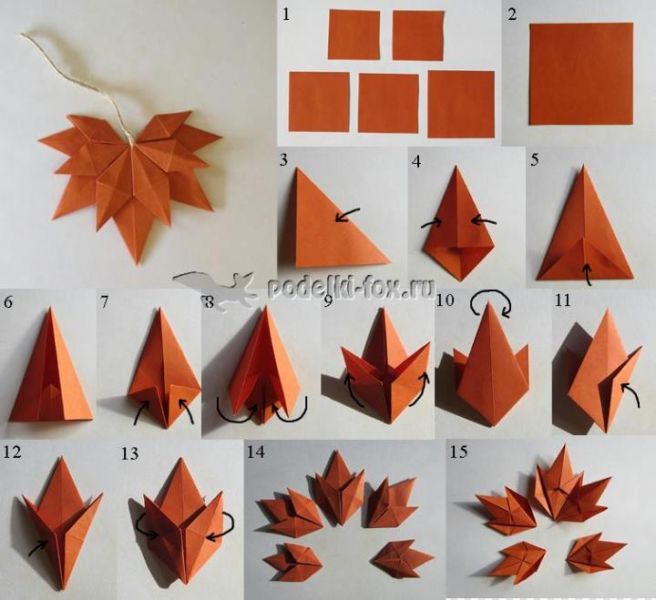
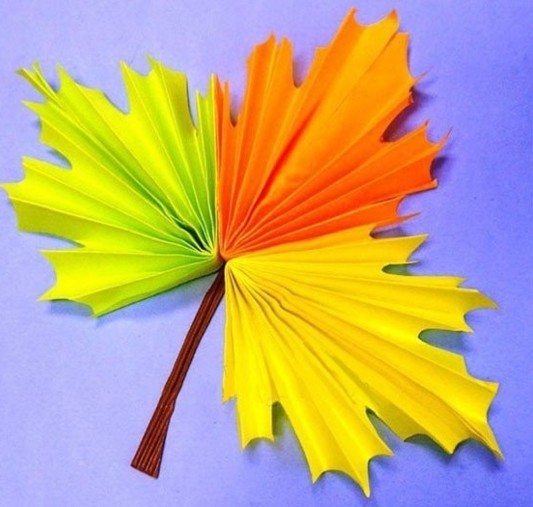
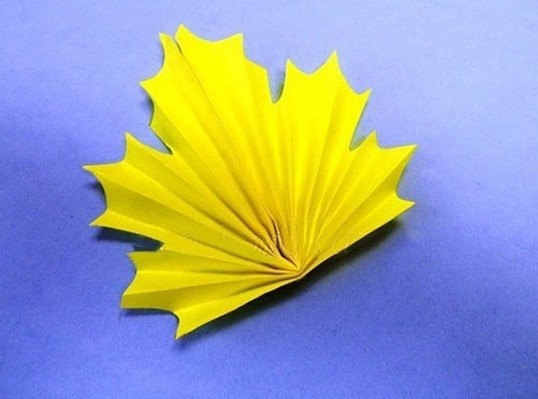
And now I propose to complete the craft according to this master class in the style of modular origami. Wow, for a long time they asked me to show how you can quickly and easily make such maple leaves out of paper. So take note, because it is with such blanks that you can decorate the interior in a group, class, and even at a solemn event, matinee.
And then please, take it and fantasize. This is how the Country of Masters was decorated on the website.

The next option that younger students love is of course the main character - the hedgehog.
In order to create it, you will need everything that you see in the picture below. This is colored paper, glue stick, felt-tip pen.

Take brown colored paper and fold it in half. Cut along the fold with scissors to make two rectangles.

Then glue them together to form a stand.

After the glue is dry, draw and make round edges on the piece. Cut along the line. Using pink paper, also draw a semi-oval shape.

It is also necessary to cut out ears and legs of a round shape from it. Place the parts in the correct ratio as shown below and glue to the base. Scatter real dry leaves or cut them out of colored paper.

Now it remains for the hedgehog to make thorns, make cuts along the edge of the brown paper.

Draw the eyes and face. Your fabulous little animal is ready.

Use the accordion to do the work in the form of trees. See how original it looks.

Also one of the favorite characters of children at any time of the year remains. I propose to make it this time from a CD disk. And again, the paper will have to be folded like an accordion, in general, see the instructions in the pictures and get creative.


What an unrealistically charming sun turned out, the mood rises directly at the sight of it.

And if there is no colored paper, then use napkins, though take them in a solid color. Cut into small squares and roll balls from each blank.

Draw any still life, in this case the author depicted trees and a river. And painstakingly sit and glue each bead until the whole image is folded.


The next idea, work from cotton swabs, which, as you can see, are painted initially, their heads, in the desired color.

And for those who want to comprehend quilling, or are fond of it closely, I want to propose to consider such a masterpiece.


Here's another mesmerizing idea, look how cool the author came up with. Do you want to implement? Then let's get down to business. Straight living corner will turn out.


And if this is too difficult for you, then take a regular package and follow the photo description.


Beautiful souvenirs from natural materials and vegetables
I think that every time you visit such exhibitions, you always rejoice. Because it's always fun at such events. Thanks to positive and creative work. Which are made of all sorts of things.
You can take absolutely any vegetables and fruits and build from them

The simplest and easiest idea is a basket with such characters. As you can see, the author used a ton of vegetables that are found in any home.


And even build the heroes of Smeshariki and Minions, catch the description:


Here are a few more thoughts that will push you to the next creation. The rest you can see here. By the way, you can also create from! There would be a desire.
Well, I want you to build a crocodile Gena. Moreover, when there is an instruction with a description. We don't need so much: carrots, cucumbers, tomatoes and toothpicks.

Cut off a piece of the carrot with a knife in the shape of a cylinder, and then make something that looks like a fungus.

Cut off the tip of the cucumber, and cut the vegetable itself in half, but not completely.

Connect the resulting parts with a toothpick. It turned out the head of a crocodile.

Then make the eyes, from the pulp of the cucumber and black olives.

Stick them in the head using wooden sticks as well. Cut the tongue out of the tomato.

For the torso, use a slightly rounded cucumber, and arrange the legs like this.

You can also build an accordion from the pulp of greenery, but this is optional.

Put the weirdo on a plate and run to school or kindergarten to amaze everyone.

And here are such faces, oh, when I saw them, I was really scared). And you?

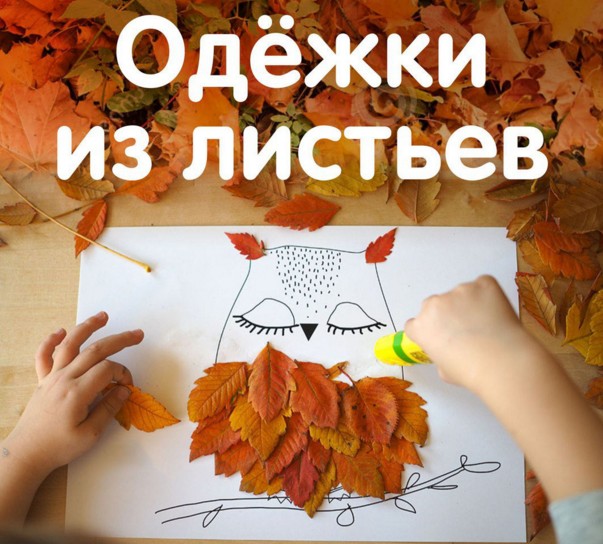
How to make an applique from leaves: quickly and beautifully
For such works, you can take absolutely any character and easily decorate it with dry leaves that you collected in the park. For example, you can lay out funny owls using cardboard and paper.

Or you can directly make a whole huge owl out of leaves.

Or put the birds on a twig decorated with bunches of mountain ash.

You can take any face, better than some animal, cut it out, and then decorate it.

And what, of course, leaves. Gather them up and place them on a piece of newspaper to prevent them from shrinking when drying.
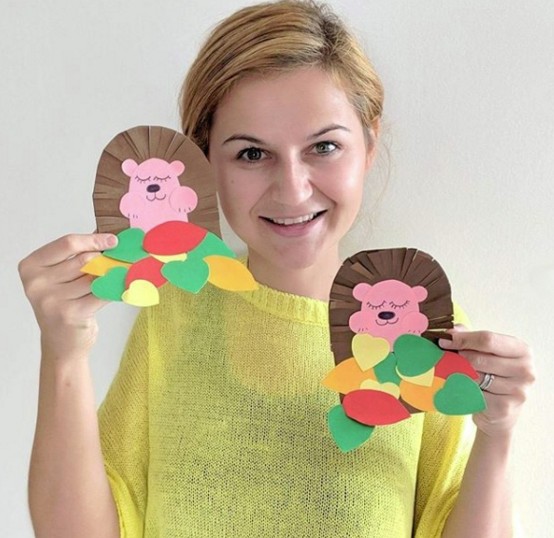
Maple leaves are best suited for decoration, for example a lion.

Or perhaps you will be interested in the work in the form of a little lion cub.

Today my children and I made such creations. And in general, we sat down to do it, and then my mother remembers that she forgot to buy glue. I’m thinking what to do, mine will ruin now))). It's good that there was plasticine. And that's what happened.


You can easily build a vase using a balloon.

Or make an applique of seeds and plasticine.

Or you can imagine the work in the form of a volumetric toy.


Autumn paper crafts for kids with templates
So we got to another subtopic in which you can safely take templates and print them on a printer. And of course, to create, to receive new masterpieces, bringing some zest of their own.
If you use this drawing, then later you can color it, or you can safely make a greeting card and write in it

You can take absolutely any piece of paper you like as a sample, you can draw it yourself with a pencil. Fold a blank sheet in half, and then cut out an image of the workpiece on one side. Cut into small squares from office colored paper.

Scatter them in a chaotic manner and glue with a stick of glue.

This is how the postcard looks mysteriously.

Now let's dwell on one more master class in more detail, before that I already gave you some instructions, but this is a more understandable and different technology.

You need to cut 10 squares.

And then fold each of them like this.

This kind of work takes a little time, don't worry, you can do it in 20 minutes.

And then you have to glue each piece to each other.

Of course, looking at the pictures, everything becomes clear.


Do not forget about other options, by the way, such a craft looks like something


You can fold the leaf into a butterfly shape.

Also difficult, as you can see, there is nothing, fold it like an accordion and glue it.


And you can do absolutely different forms, here you can connect your imagination.


You can build it even more interesting so that the leaf turns out to be tricolor.


Or bookmark a book using thread.


In addition, you can make a pumpkin out of paper if you cut a bunch of long strips with scissors.


And how will you decorate it, it's up to you, you can use a toothbrush.

Well, and finally, take these ideas, dress your favorite cartoon characters and fairy tales.


Well, according to tradition, I give you some coloring pages, they will suddenly come in handy at your leisure.


Or use an anti-stress coloring book for creativity.

That's all, dear creators! I wish you a creative approach to business. And let the autumn crafts win your heart and you will want to do more next year. I wish you success and patience! Bye.
Best regards, Ekaterina