Volumetric tree made of paper drawing. DIY Christmas trees
DIY paper tree instead of a fluffy forest beauty? Why not, such crafts will decorate your home and office, you can give them for the New Year to friends and acquaintances. How to make Christmas trees from scrap materials, is it difficult? We offer different options, and you choose the one that you like best.
How to make a Christmas tree out of paper with your own hands?
What is good about a DIY paper Christmas tree? She just has a lot of advantages: by showing imagination, you can come up with original models and create small masterpieces with your own hands.
In addition, your craft does not require special financial investments, because cardboard, colored paper, glue and scissors can be found in any home.
And also making Christmas trees is an exciting activity for both adults and children, plus it is extremely useful, developing and uniting.
It's such a great joy when beautiful crafts are obtained in the process of joint creativity. Even the smallest family members can actively participate in preparing for the New Year.
For example, it's funny and fun to make Christmas trees using children's hands:
Who would have thought that DIY colored paper Christmas trees could be so different. See what beauties you get if you make them using the origami technique:
And here is a beautiful do-it-yourself Christmas tree from modules:

How do you like such a tree with your own hands? The paper craft turns out to be delicate, airy and weightless, although we use a dense material - cardboard.

Such beauty can be made using handmade templates, or you can find and print ready-made ones. First, cut out the patterns with a clerical knife inside the openwork tree, then the outline and stand.
DIY paper tree - master class
If you have not been fond of crafts before, then it is better to start with simple options. And if you like it and get a taste, then you can choose a more complicated technique.
Let's learn how to make a New Year's beauty - it will do-it-yourself volumetric tree made of paper.
What you need to cook:
- green paper;
- pencil;
- compass;
- ruler;
- scissors;
- glue;
- wire;
- a needle.
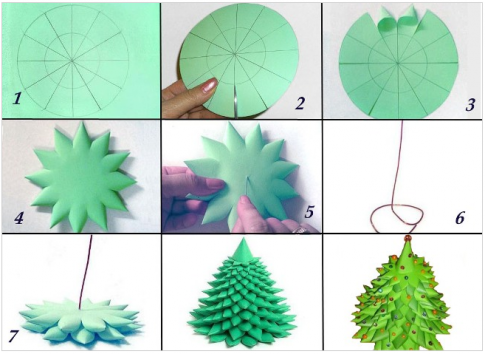
Here are our steps step by step:
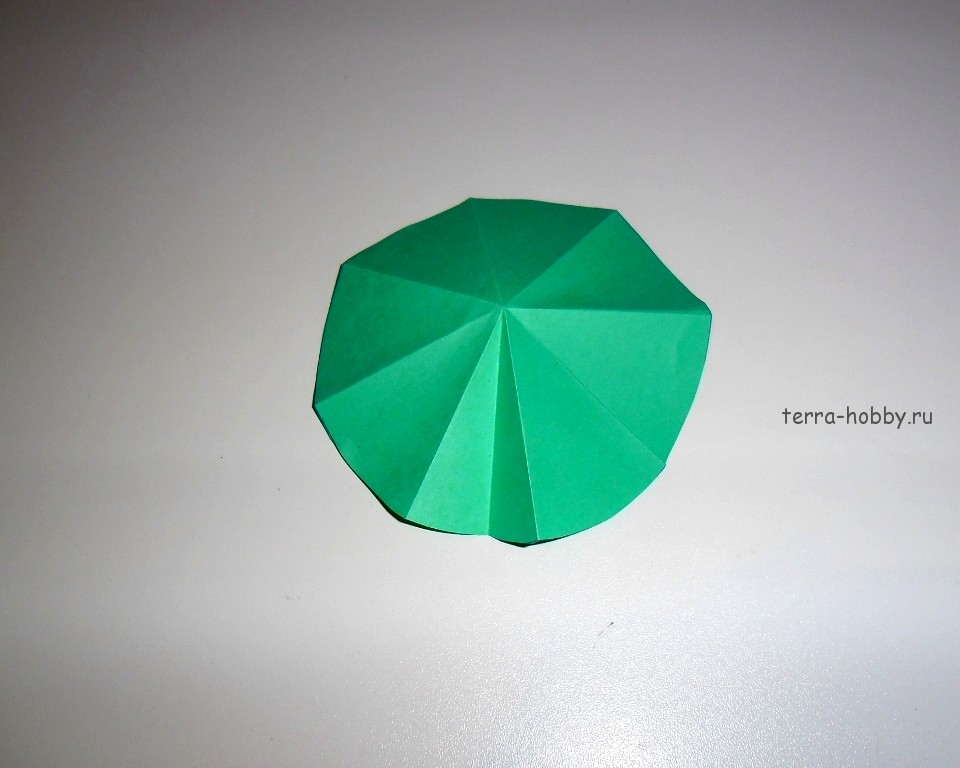
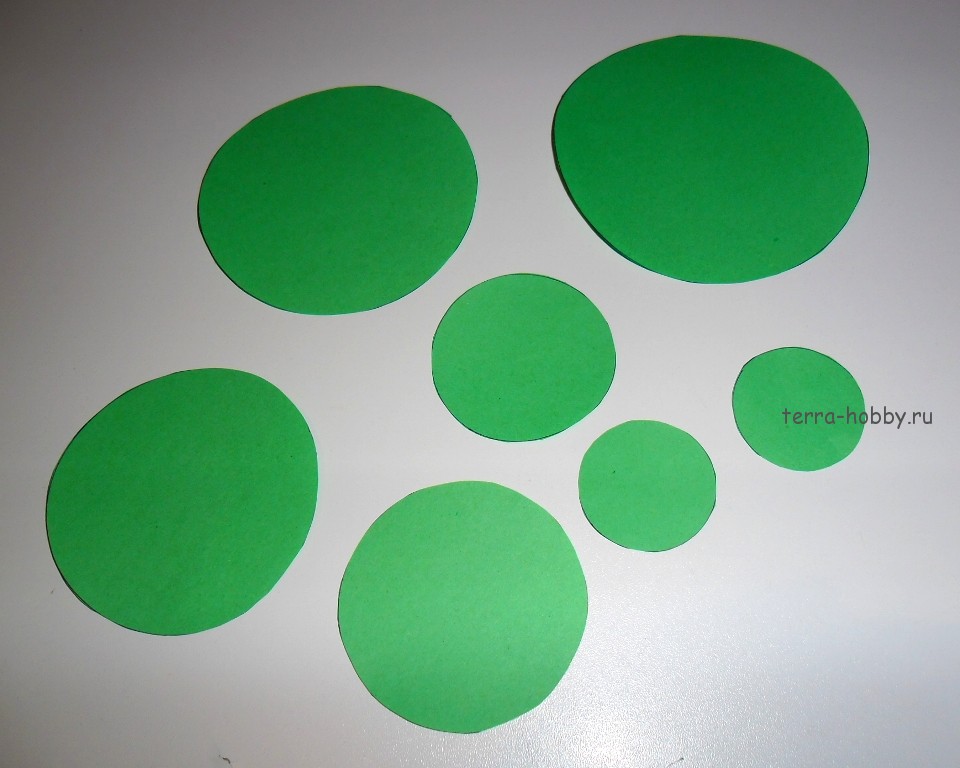
- We draw a circle of the required size on a sheet of green paper using a compass, depending on whether you want a large tree or a smaller one. The circle will be the bottom tier of the herringbone.
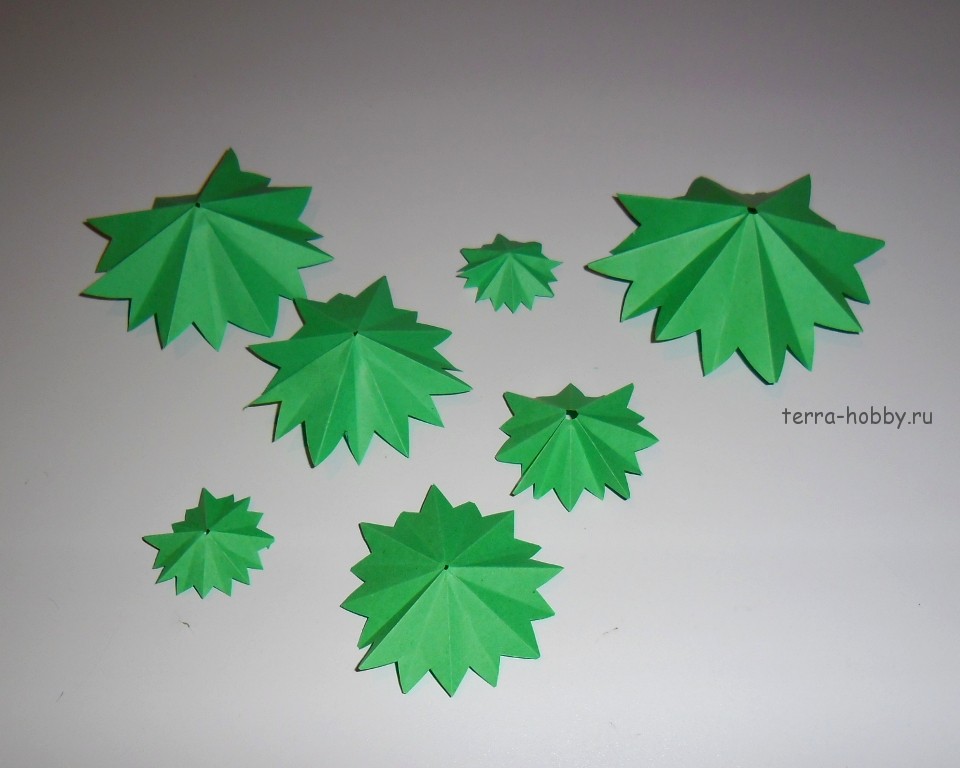
- Draw another circle inside it - you need to retreat from the outer contour a little more than half the radius. Divide the circle into 12 sectors with a ruler.
- We make an incision along the lines - from the edge to the inner circle.
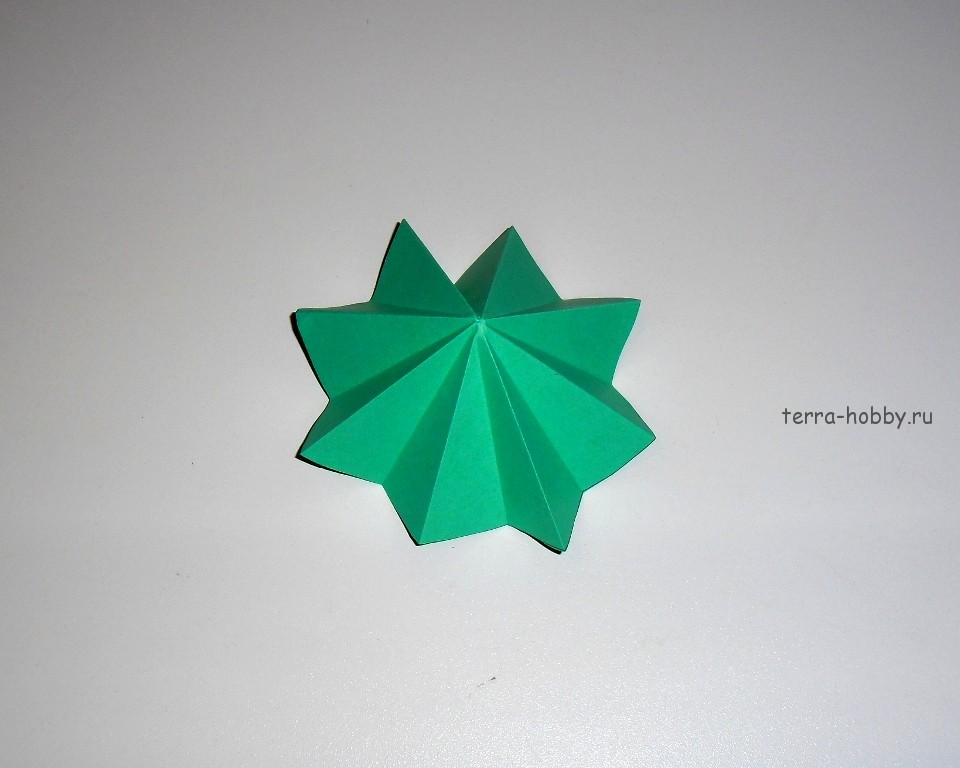
- We fold the sectors with a cone and fix them with glue.
- Using the same scheme, we will make all the other tiers of the tree, reducing each next in size.
- Use a needle to make a hole in the center of each workpiece.
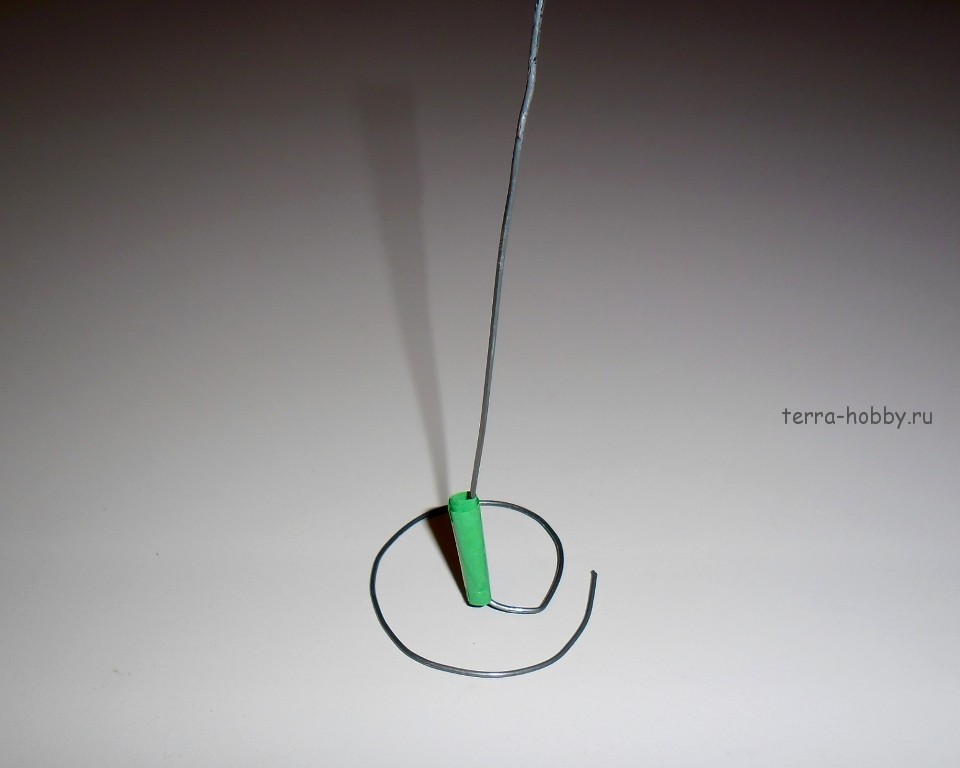
- We roll the bottom of the wire in the form of a spiral - this is the base of our craft.
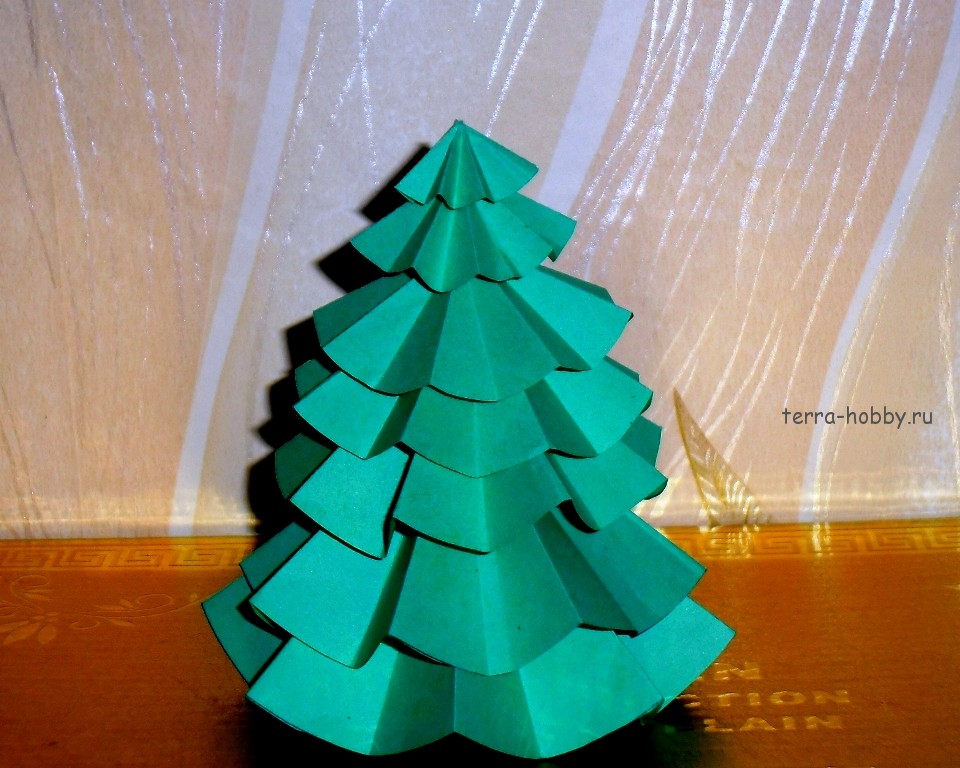
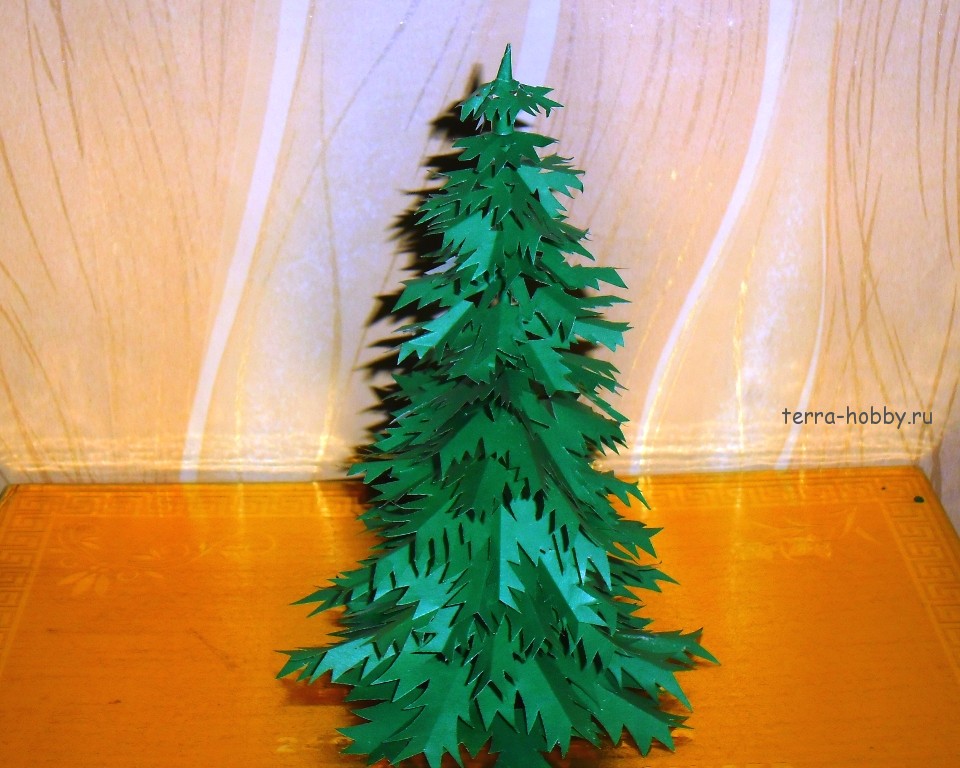
- And now we collect the tree, stringing the tiers on the wire, fix our tree on top with a cone, this will be the top.
That's it, Christmas decoration for your home or office is ready. It is done simply, but it looks pretty cute. You can decorate the Christmas tree with beads or sequins.
Quilling to help us!
Haven't heard of the quilling technique? Don't be intimidated by an unfamiliar word, there is nothing super complicated in our next craft. This will be a cute DIY Christmas tree made of colored paper.
Let's prepare for work:
- several green paper strips 5 mm wide, 10, 15, 20 and 30 cm long;
- 4 green stripes 1 cm wide;
- stripes of yellow and red, their width is 3-5 mm;
- toothpicks;
- instant glue and PVA.

The sequence of actions will be as follows:
- Pre-cut narrow strips (5 mm wide) alternately twist with a toothpick, remove, let them unwind a little. We glue the PVA to fix the tip of each strip, giving the resulting spirals a droplet shape. To do this, you need to pinch and pull one of the ends of the spiral up.
- We wind wide strips of green color around the toothpick tightly enough, gluing the tip so that it does not bloom. So we get the trunk of the future tree.
- We make a drop from a green strip 30 cm long - this will be the top of the tree.
- We insert a toothpick into the tree trunk and start attaching the branches using instant glue.
- First we glue the smallest branches at the top of the tree, there will be 4 rows of branches in total, on four sides of the trunk.
- A do-it-yourself Christmas tree made of colored paper is almost ready. It needs to be decorated - we will make toys by twisting pink and yellow stripes. You will get small cylinders if you twist tightly and glue the tips, or you can give them the shape of droplets and stick them on branches.
- Each tree has a crown - carefully glue the drop at the top of the craft.
- The final touch - at the very top of the crown, we fix the decoration with glue and admire our creativity.
And if you also want to make a stand for the Christmas tree, then you can make it from nine curls of white stripes. We glue the curls together and fix the Christmas tree with glue.
And here is another version of the Christmas trees
New Year is a holiday loved by both adults and children. A hand-made Christmas tree made of paper will become a unique home decoration for the holiday.
In addition, such a craft can be created together with the baby, who, of course, will be happy to help, because bringing a fairy tale into the house is so easy!
You can decorate the interior not only with a living, but also with a cute paper tree. You can make several of them, placing them in different rooms, put small trees on the windowsill, decorated with a flashing garland. In the festive hall, Christmas trees will look elegant, suspended from the ceiling or chandelier.
Idea: after making several paper trees, present them to friends as a souvenir, who will surely appreciate the efforts.
Such crafts are even suitable for creating a garland that can be used to decorate stair railings. There are a lot of options. What materials to use? First of all, you need paper.
It can be ordinary white, then you need to paint it with gouache, thick cardboard of all kinds of green shades, corrugated paper and colored thin are also suitable.
For decoration: all kinds of ribbons of different shades and widths, beads, beads, small glass balls, polystyrene, cotton wool, pieces of lace, fabrics and everything that can be found in a needlewoman's basket.
Even such unusual things as wooden skewers and cocktail tubes can be used. From the tools you need to prepare scissors, glue and paints will come in handy.
Manufacturing master classes
When all the necessary materials are prepared, you can start working directly. It is not necessary to strictly follow the tutorials below.
It is encouraged if the craftswoman adds her own flavor to the product, changing the stencil pattern, decor, color and texture of the paper, taking, for example, from each lesson only the moments she liked. As a result, you will get a unique volumetric tree made of paper, unique of its kind.
Lesson 1
For work you will need the following materials:
- green paper;
- compass;
- cocktail tubes;
- glue.
Using a compass, draw 5-7 circles on paper. Each next circle should be 1 cm less than the previous one. Fold each blank in half three times.
Spread them out and make a hole for the tube in the center of the circles. String all the circles on the barrel (tube) from largest to smallest. Decorate the top with a bead.
Lesson 2
For work you need:
- green double-sided paper;
- needle, scissors;
- a piece of wire;
- glue;
- compass.
Draw a circle on paper. This is the lower tier of the tree. Draw another circle inside it, stepping back about 2.5 cm from the edge. Divide the circles into 12 halves (like a cake). Roll each half into a cone, glue. Thus, you need to make 12-15 blanks, gradually reducing the size of the circles.
Puncture a hole in the center of each tier with a needle, string everything onto the wire. Roll the bottom of the rest of the wire so that the Christmas tree becomes stable. Roll up a suitable cone from the same paper and secure it at the top.
Lesson 3
Everyone probably made a Christmas tree in this way in kindergarten or school, so the process will not take much time, but will only be a joy!
 For work you need:
- thick green paper or cardboard;
- scissors;
- Scotch;
- additional decorations (bows, beads, cotton wool, sparkles).
Cut a sheet of cardboard in half. Next, fold the halves again, and draw a part of the Christmas tree on one of them. Carefully cut the blanks. There should be two trees. Make incisions. Assemble the Christmas tree, holding the halves together, using tape for greater strength. Decorate the finished craft with cotton balls, bows, sparkles, stars cut out of paper, circles.
Lesson 4
An unusual origami Christmas tree can be made from an old magazine. It looks very nice and cozy. For work, you need to take a regular magazine. If the cover is hard, it should be removed.
For each page, do the following:
- Bend the upper right corner by 45 degrees.
- Bend the sheet diagonally again.
- The corner that goes beyond the border of the magazine - bend inward.
Lesson 5
You can even create a cute Christmas tree from paper napkins! For work we take:
- cardboard;
- glue;
- scissors;
- green napkins.
Tip: The tree will look better if you use napkins in several shades of green, as well as white (for snow).
Construct a cone of the desired size from cardboard. Cardboard can be replaced with plain paper, since the napkins are light, then the craft will be stable.
Cut the napkin into four parts and glue it with an asterisk, as shown in the photo. Lightly crush each workpiece and glue the cone. Steal to your liking: a laconic bow at the top, a garland of beads - there is no limit to your imagination.
As a result
How wonderful it is to create something with your own hands! On New Year's Eve, creative thinking wakes up, under the influence of imminent magic you want to create!
Pleasant chores, preparing gifts, decorating the house - all these are integral attributes of the holiday, and a voluminous Christmas tree made of paper, made with warmth, will be a great addition to a cozy interior.
For the New Year, everyone decorates a Christmas tree at home. But if you do not have it, then you can easily make a Christmas tree out of paper with your own hands. Moreover, these Christmas trees are so easy to make that even a child can easily cope with it. Depending on your baby's age and skill, you can choose any of these options. For each Christmas tree, you need to prepare a wire that will serve as a frame for it, circles of different diameters cut out of green paper, and rolled up pieces of paper 5 mm long, they are put on the wire between all layers of the tree to add volume and height.
Simple do-it-yourself paper tree
 The first option: a simple paper tree
Cut 6-7 circles of different diameters out of green paper.

Fold each circle in half, then fold it two more times in half.

Expand. You will have a circle with eight sectors.

Press each fold well so that it protrudes to the right side. Now bend each sector in half, making a hollow.
You will have 16 sectors, 8 protruding folds and 8 trough folds.
Each circle has become like an umbrella. Make a small hole in the center of the circles (except for the last circle).

Put a paper tube fastened with tape on the wire. Make it 1.5 cm long. It is needed so that the lower circle keeps its shape and is not flattened.
Put on the largest circle, then the paper tube, and the next circle on it. Thus, collect the entire tree.

How to make a Christmas tree out of jagged paper
 Second option: paper tree with jagged edges
Cut 7-9 circles of different diameters from green paper.
Fold them as in the first option. Without unfolding, use scissors to make the edge in the form of teeth. Cut off the very tip of the corner.

Expand. Press all folds to the right side. Fold each of the eight sectors in half, making an additional fold that should look inward.
Put a paper tube on the wire, and the first "umbrella" on it.


Collect all the parts from the largest to the smallest. Hide the end of the wire under a small narrow cap.

How to make a Christmas tree from snowflakes
If you did a good job with making the first two trees, then you can also make this tree without much difficulty.
Cut out 13-15 circles of different diameters.
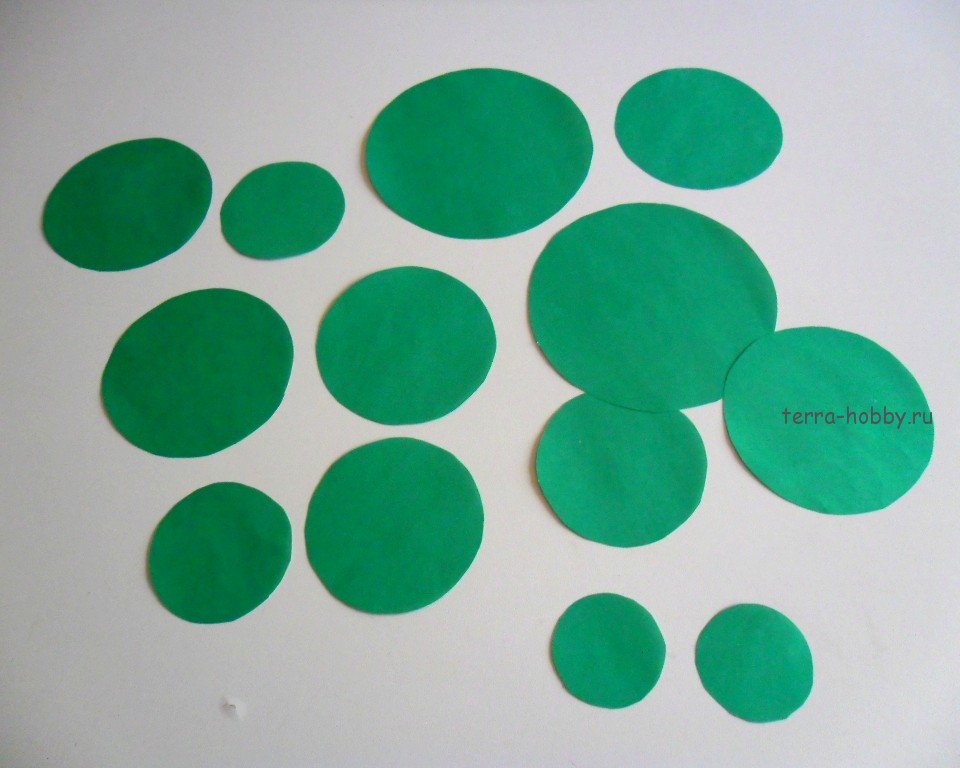
Fold each circle in the same way as in the previous cases: first in four, and then in half again.


Now you should cut out the snowflake. Practice on white paper to figure out which pattern you will get. The photo shows an approximate example of how to draw a blank and cut it out. Places that are cut out are painted over. You can make another drawing according to this principle, but the corners in the pattern should be sharp, because they imitate needles. Try to keep all the snowflakes similar to each other, the final look of the Christmas tree will depend on this.
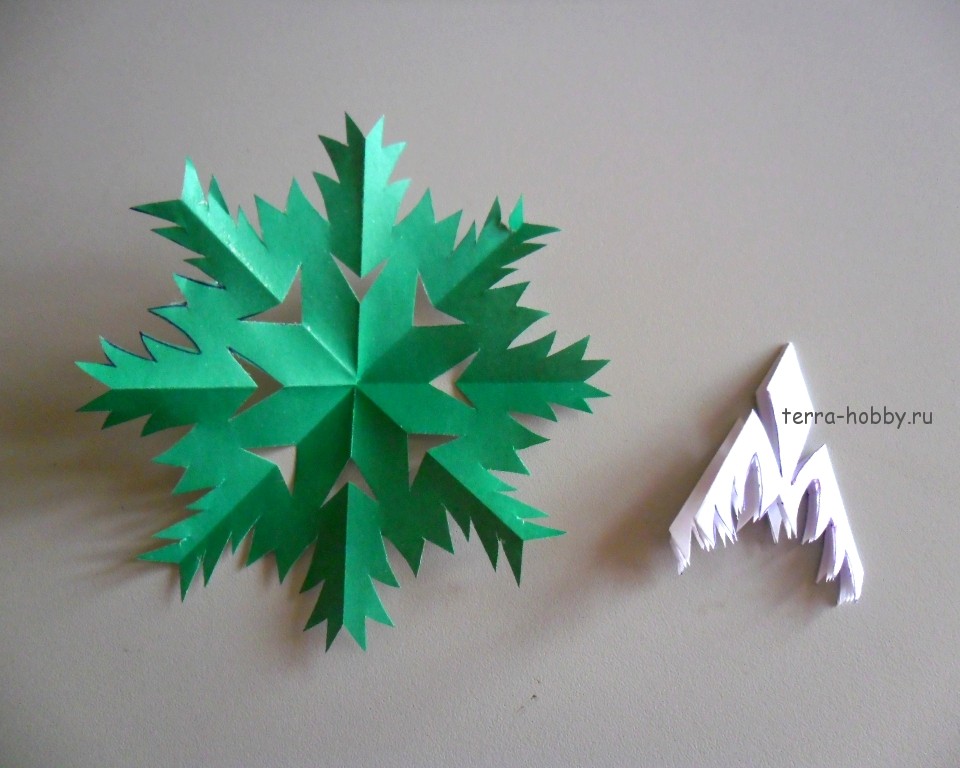
Cut out all the snowflakes. Do not forget to make a small hole in the center.

First, put a 1.5 cm long paper tube on the wire. Then put all the snowflakes on the wire, alternating with short (5 mm long) paper tubes.


Here's a Christmas tree you can get.

Each of these trees can be decorated with "rain", balls cut from colored paper, or serpentine.
To create a festive mood on New Year's holidays, a festive atmosphere in the family and at home is very important. Various decorations of your home will definitely help to tune in to the New Year's motive. Tinsel, garlands, candles and other trinkets are perfect for this role. But what about handicraft lovers? They just should not sit still, because the winter holidays provide a huge scope for ideas and hand-made crafts. In our master class, options for ideas for a festive beautiful Christmas tree made of paper will be considered. How is a volumetric Christmas tree made of paper on your own at home? You will find out by reading a master class with photos and diagrams.
There are a lot of ways to do this, so we need:
- Paper (depending on the method);
- Pencil;
- Ruler;
- Glue;
- Stapler;
- Scissors;
- In some models, compasses.
Model No. 1 - Volumetric tree made of paper
To begin with, we make a base in the form of a cone. If you plan to make a very large one, then make a diagram of this idea from Whatman paper. In the center of the wide side, we find the center and mark it, from this point we draw lines to the two lower corners, mark and cut off, not forgetting to leave allowances for gluing, cut off the semicircular base and glue it. Be sure to check if the edges are even. On this basis, several options can be performed.
Option number 1.
In order for the cone to look like a Christmas tree, it is necessary to make needles from colored paper. The choice of color depends on your imagination. We mark the rectangles: for the lower layers, the width of the rectangles is 7 cm. Cut out and make trapezoids from them, cut off the upper sides. We fold the wide side with a triangle and fasten it with glue or a stapler, it is convenient to glue the top to the base. Glue the needles in rows from bottom to top. Every three rows of needles, we reduce their size. The top can be decorated with a small cone. Further, you can decorate it at your discretion.
Option number 2.
We make a cone base. Then, from colored paper, we cut strips that are not very long, and wind each of the strips onto a pencil. After this action, the stripes become twisted. If you have the skills, you can twist the strips with scissors. After twisting, glue the strips to the cone. We decorate the Christmas tree at will, relying on our imagination.
Option number 3.
Glue droplet needles onto the cone. We make them from strips of green or any other paper of your choice, glue the ends of the strips so that you get a drop. We begin to glue from the bottom up, from the bottom more, and up we reduce their size.
Model No. 2 - Papercraft Christmas tree
It is necessary to cut circles of different diameters, they must be drawn and cut. We align the needles and string the finished tiers onto the rod. We decorate at our discretion.
Model No. 3 - Folding herringbone
We cut several circles of different diameters. Fold each circle in half 4 times, unfold and straighten. As a barrel, you can use an old pencil, a cocktail straw or a wooden stick - we wrap the chosen one with colored paper. In the center of each circle, cut a hole smaller than the diameter of the trunk. We string the tiers onto the trunk starting from the bottom. The stand can be made from cork, plasticine, or any item that fits the size.
Model no. 4 - Origami Christmas tree
In the modular origami technique, assembling a Christmas tree is not at all difficult. Due to the fact that it consists of individual branches, it looks very beautiful.
We make the module according to the scheme:
![]()
Then we start connecting the parts:
- We need to take modules of one or more colors. Parts-modules measuring 38 * 60 mm. We need 637 of these parts (391 dark green, 246 light green).
- We collect. Take two modules (long side up), insert two near corners into two pockets of the third module.
- It turned out that there are two modules in the first row, and one module in the second. If the branch is short, then you can start it with one module, and if it is long, then we recommend starting with two modules.
- We make the third row, put two modules on the corners of the second row module. We insert the corners into those pockets that are closer to each other. The outer corners should stick out freely to the sides.
- We collect the twig further, alternating, then one module, then two.
- We collect 12 rows of dark green modules, the last two rows of light modules. Tip: if you put on the modules not too deep, then they will hold better. In places, it is advised to squeeze the connection on the sides, bend the finished branch.
- To make lateral processes - collect a twig from five rows.
- We retreat from the beginning of the three modules-needles and put on the fourth two resulting lateral branches.
- We collect the bottom row from 5 such branches, each branch contains 35 modular parts, they are connected - if you take another module and insert it into the nearest pockets.
- We connect the entire row, we close it in a ring. In the same way, only by connecting 6 branches, you get a snowflake, but for it you should use cold white and blue colors and their shades.
- The row spacing of large branches will be divided by intermediate rings, for which it is necessary to connect 7 modules of the first row and 7 of the second row, thus we close it in a ring, we need four such rings.
- The next row will be made up of smaller branches. 12 rows - central branch, and 3 rows each side.
- We connect 5 branches in a circle and the next circle is again smaller (10 rows plus side of three)
- Two small circle without side branches, 8 rows and 6 rows, we also connect
- The herringbone ends, of course, with the crown, going like a twig of eight rows, on the sides of which two modules are inserted for splendor.
- We get a set of blanks (and if it were white paper, it would look exactly like snowflakes)
The tree is assembled in the following order:
- We take a wooden skewer for the base trunk;
- We fix the barrel in a vertical position (for example, insert it into an eraser);
- Big circle;
- Intermediate ring;
- Next circle;
- Intermediate ring;
- … Circles and intermediate rings in decreasing sizes;
- We put on the crown;
Conclusion
Such easy-to-manufacture, but beautiful volumetric Christmas trees will be a wonderful decoration for an apartment or a festive table, they can serve. the role of a cute symbolic present, or they can simply become an exciting pastime for those who have a lot of free time. creative people are always looking for inspiration and fresh ideas, I hope this master class will be useful. Also, I recommend watching the videos below, because they clearly depict the creation of a voluminous New Year tree made of paper.
The family holiday New Year is approaching - the time to receive and give gifts, joy, care, good mood. This event brings families closer together, brings peace and comfort to their homes. The attributes of the New Year are multifaceted. Perhaps one of the main symbols of the holiday is a fluffy beauty and a gift-keeper - a Christmas tree. Especially valuable is a spruce-craft made by the hands of a child. I suggest you spend productive time with your child and "create" together an original paper Christmas tree for the upcoming New Year.
Christmas tree made of scrap paper
Such a Christmas tree can be made together with preschool children, and younger students can be entrusted with independent creation. It is even better if children of different ages take on the manufacture of this jewelry. Co-creation develops thinking and creativity, as well as strengthens relationships.
For work we need:
- scrap paper of green shades - with large and small ornaments in six colors;
- scissors for paper,
- glue,
- double sided tape,
- stapler,
- two sticks for sushi,
- decoration for the top of the Christmas tree.
First you need to prepare paper. Disassemble the colors, alternate a large drawing with a small one, bright colors with dull ones. For the "interlayers" we take a neutral color (we have it on blue paper).
For the first layer, we take a full sheet of paper, for the second, we cut off a couple of centimeters from the side, for the third, another couple of centimeters, and so on.

We fold our blanks with an accordion, find the middle and also fold. Cut out four stripes about 3.5 cm wide from blue paper.

Now we fix the edges of the accordions, opening our "fans" in a full circle. We fasten it with a stapler or glue it together, but be sure to leave holes in the middle for putting on sticks.
We twist the strips into tubes, but do not glue them together.

Now we start assembling. Lubricate the middle of the largest (bottom) layer and glue the bases of the sticks. At the very "root" we wrap the "trunk" with duct tape once, and on top - with one of the blue tubes. Glue the edge.

We repeat the same with the rest of the layers - we put on a corrugated circle, fix it with tape and a tube. After the last, topmost layer, the tube is not needed, you just need to decorate it with a snowflake made of foil, a decorative paper clip (like ours) or mold a star from sculptural plasticine and paint it with shiny paint. The Christmas tree will look even more festive if you spray it with a special shiny hairspray.

Such a Christmas tree can be used to decorate a window sill at home, a shelf in a library, or you can take it to a kindergarten for a festive exhibition.
Elegant Christmas tree made of paper by the hands of a child

You will need:
- whatman;
- white sheets of paper A-4;
- double-sided colored paper (2-3 colors);
- mother-of-pearl beads;
- green rain;
- PVA glue;
- stapler;
- pin;
- scissors.
Completing of the work:
1. You need to decide on the height of your future product and cut out a rectangle from whatman paper of the appropriate size. My size was A-4.
2. Fold the resulting sheet in half and draw half a drop, so that, as a result, a cone (without a bottom) can be made from the cut out blank by twisting the paper like a homemade seed cup and gluing the edges with glue.

3. The cone must be "turned" into a pyramid by pressing it to the surface, then again perpendicularly to get 4 sides of the figure.

4. Cut off the "antennae" from the rain - the more, the fluffier and brighter your tree will be.

5. From white sheets A-4 we make an "accordion" (you need one for each wall). Place the paper horizontally with the longer side.
6. Glue the accordions to the sides of the pyramid, applying glue only to the extreme sections of the paper.

7. The result is a figure that is not at all like a Christmas tree - it is too voluminous and not assembled. For the result, you need to beautifully distribute the accordions and fix the paper with glue at the top of the cone, pressing it down with a clothespin for a couple of minutes.
8. It's the rain's turn - brush the blank with a brush with glue and sprinkle on top with plenty of "needles". If necessary, repeat again over the already attached tendrils for density.

9. You can decorate the finished Christmas tree in different ways. In the presented version, double-sided colored paper of pink and yellow color was cut into squares, then it had to be shaken, a pearl was attached inside and such an ornament was glued to the Christmas tree. They did the same with candy wrappers, only without beads. It turned out unusual.

My assistant was a 4-year-old son - the child really liked it, he got carried away and even made a sled for Santa Claus at the end according to his own project.

In every house for the New Year, people decorate spruce and pine trees. You will not surprise anyone with a living tree or plastic, but you can complement the interior with an original analogue made from scrap materials with your own hands, and especially valuable - with the hands of a child.
Preparing for the New Year is the most fabulous time for children and adults. Create an atmosphere of a fairy tale, decorate a house, write a letter to Santa Claus, and, of course, spend time with children. Prepare crafts for a gift to grandparents, relatives, decorate the parents' office table.
Christmas tree made of green corrugated paper
Such a Christmas tree will be a good decoration, create a festive mood. Materials that will be required for work:
- cardboard,
- green corrugated paper,
- glue stick or PVA,
- scissors,
- pencil,
- compass,
- hot glue,
- beads,
- sequins,
- hair fixation spray,
- large brush for painting.

The basis will be cardboard, its color does not matter. Using a compass, draw a circle; the height of the Christmas tree will depend on its size.

Expand the corrugated paper, cut a piece corresponding to the size of the cardboard circle, apply glue to the base and glue the green layer.

Now you need to make the future needles of the forest beauty. Cut the paper into strips from 1 cm wide, roll them up, cut. Grease the edge of the paper with glue so that the scroll does not unfold. For convenience, you should use a pencil, wrap a cut strip of paper 2-3 times around the rod, this will be enough.

The width of the needles (strips) should increase downward of the cone so that the craft looks harmonious. For the bottom row of needles, you need to make wider strips so that the needles are larger. You can use several shades of green, alternating light with dark.

Grease the base of each scroll with glue, press it well against the cardboard. Allow time to dry. After that, straighten the paper strips. It remains to decorate the Christmas tree, give it a festive look.

Warm up the heat gun, insert a stick of glue. Apply 1 small drop of glue to the side of the bead and glue. Spread the decoration evenly throughout the tree.

Sprinkle the tree with hairspray. Dip a brush for painting in glitter and apply them to the craft. Then use hairspray again. This will fix the shine.

Beautiful origami christmas tree made of paper
This workshop will show you how to make a paper Christmas tree using the origami technique. A simple scheme and an elegant tree will appeal to all lovers of clear lines and symmetry.
To work, you will need very few materials and tools:
- colored paper;
- scissors;
- Ruler and pencil.
We measure out the workpieces.
Cut out squares from colored paper. 2 squares of green and light green colored paper with a side equal to 19.5 cm. The remaining five squares are cut out of green paper with sides of 17.0 cm, 14.5 cm, 12.0 cm, 9.5 cm and 7.0 cm, respectively ... If there is a desire to make the Christmas tree large and there is a larger colored paper, then you can independently set the size of the squares, simply reducing the length of the side by 2.5 cm.

We fold the blanks of the Christmas tree.
Fold the green square diagonally.

Without turning the sheet, bend the corners of the square to the center.

Turning the square over, fold it in half twice.

Turning the sheet over again, fold it out of it and fold it into a smaller square base. This square is the basis of many origami products.


Having expanded the sheet, fold each side of the square to the middle of the square and bend only the fourth part of the line on the right side as shown in the photo.


We fold the base square. We lay the corners marked with a cross inside the resulting trapezoid.


We make the trunk of the Christmas tree.
From a large square of light green color, add a square base in the same way. To make the trunk narrower, we additionally bend the sides of the base square to the diagonal in one direction.

Having expanded the square completely, fold each side of the square to the middle from the middle of the square and bend the eighth part of the line on the right side as shown in the photo.

We fold the base square again and bend the sides to the diagonal. We lay the corners inward to make a trapezoid.

The result is the trunk and six parts of the tree crown.

We collect the tree from the details.
Insert the tree trunk into the largest green detail.


Similarly, like a pyramid, we collect the entire tree.

So the green paper tree is ready. It can be decorated and presented for the New Year, made two-color or multi-colored, or artificial snow glued to the branches-shelves. By increasing the size and number of blanks for crown details, you can make Christmas trees of different heights.

Christmas tree with a surprise made of paper and cardboard

New Year's mood spreads around the world, capturing large city squares and small children's crafts. A beautiful Christmas tree made of colored paper will help to present a pleasant surprise to friends, parents and neighbors. In honor of the festive mood, the evergreen beauty is ready to change her usual colors to any other fun and fantasy shades.

Necessary materials:
- Thick paper in two contrasting colors;
- A piece of cardboard for a template;
- Scissors;
- Hole puncher;
- Double-sided tape;
- Pencil and ruler;
- Attention and desire to make a surprise.
For growing paper spruce, we choose bright and beautiful shades. We will make a base from one color of paper, and the second will serve as an additional lace decoration.
The miniature craft should have neat and clear lines. Therefore, we begin by making a template. Using a ruler and a pencil, draw an isosceles triangle on the cardboard. The size of the blank depends on the parameters of the intended gift.

Based on this template, we construct an inner part for the Christmas tree, which consists of two triangles connected by a transition 2-3 cm wide. Cut out a solid symmetrical figure.

We cut the additional Christmas tree robe by 0.5 cm at the top and bottom to reveal the color of the paper of the main sheet. Then carefully cut out a pair of spruce paws on each side with scissors. The branches can be located at different heights. Small deviations from strict symmetry will add visual mischief to the Christmas tree. And a few clicks of the hole punch will give our Christmas tree stylized Christmas balls.

We fix the additional paper layer on the main one with double-sided tape. Cut off two oblong strips for gluing an additional layer with the main one and one small piece for connecting the tops. If there is no suitable adhesive tape at hand, then you can connect the parts with glue or a stapler.

Everything is ready, it remains to add a present: a sweet surprise or a New Year's wish, or maybe something else. Beautiful multi-colored Christmas trees on New Year's Eve can be placed throughout the house so that everyone can accidentally stumble upon an original little gift.

If you find an error, please select a piece of text and press Ctrl + Enter.
The Christmas tree is one of the main attributes of such a large-scale holiday as the New Year. No one forgets about her, acquiring live or artificial Christmas trees to his home and decorating it with various outfits, souvenirs, garlands. We will make a Christmas tree out of paper, which can be placed somewhere in the apartment (for example, on a table), or it will not even be a shame to give such a craft to relatives or friends. Next, we'll look at several ways to create paper Christmas trees.
How to make a Christmas tree out of paper (1 way):
You will need green paper, a ruler, compasses, glue, scissors and a pencil (or a tube for juices, cocktails).

1. Using a compass, draw several circles on paper. Each next circle is 1-2 cm smaller than the previous one. Choose the number and size of circles yourself, depending on what size the Christmas tree you want to see in front of you as a result.
2. Fold each circle in half once, twice and a third time (that is, fold each circle in half three times). To make the fold lines clear - draw along the edges with scissors.
3. Straighten the circles. Cut out a hole in the center of each that matches the diameter of the pencil or tube (whichever we are going to use). It is also worth saying that the circles are the tiers of our future Christmas tree.
4. Paste the pencil or tube with green or brown paper.
5. Now we begin to collect the tree. We string all the tiers on a pencil.
6. Decorate the top of the Christmas tree with a beautiful bead or star. You can decorate the tree, if you wish, with sparkles.

How to make a Christmas tree out of paper (method 2):
You will need green paper, scissors, pencil, glue, compasses, ruler, needle, wire.
1. On green paper, draw a circle with a compass, the size of the lower tier of the future Christmas tree. Next, draw another circle inside the first circle, departing from the first a little more than half the radius. Using a ruler, divide the circle into 12 sectors.
2. Along the lines of cases, an incision to the inner (second) circle.
3. We fold each sector into a cone, which we fix with glue.
4. In the same way we create the rest of the blanks, gradually decreasing their size.
5. Make a hole in the center of each workpiece with a needle.
6. Turn the bottom of the wire into a spiral.
7. We collect all the tiers of our tree for wire. We fix a cone made of paper on top.

How to make a Christmas tree out of paper with your own hands using the quilling technique (method 3):
You will need: green paper strips 5 mm wide and four stripes 1 cm each, red and yellow stripes 3-5 mm wide, toothpicks, glue (instant and PVA).
1. We use four green strips having a length of 30, 20, 15 and 10 cm. Using a toothpick, twist them. Remove the part from the toothpick and let it bloom a little. We fix the end of the strip with PVA glue. We give all the spirals a drop shape by holding and slightly pulling one of the ends of the spiral up.
2. Tightly wind wide green stripes on a toothpick and glue the tip to them, without giving it the opportunity to bloom. This will constitute our tree trunk.
3. For the top of the tree, make a drop from a green strip with a length of 30 cm.
4. Now we begin to collect the Christmas tree, securing its elements with instant glue. We glue the details of the barrel and give the glue time to dry.
5. Insert a toothpick inside the trunk and glue our droplets-twigs. We start glueing with the smallest ones, which we glue to the top of the tree.
6. We make toys from yellow and pink stripes by twisting the paper without using a toothpick. You can fasten the ends until the paper is unwound, or you can make the toys a little looser and shape them into small droplets. Glue the balls to the branches you like.
7. Glue the drop at the very top (do not forget about it), and the decoration on it.
8. You can make a stand if you want. To do this, you will need to make nine curls from white paper strips. Glue the curls tightly together. Now we fix the tree on a snowy white stand with glue.

How to make a Christmas tree out of paper with your own hands (4 way):
You will need: green cardboard, glue, scissors, scotch tape, colored paints, pencils, felt-tip pens. Stickers, sequins, etc. can be used as additional decorations.
1. Bend a sheet of cardboard in half and cut it along the fold line.

2. Fold the parts in half again.
3. Draw a half of the tree on one of the cardboard halves opposite the fold (see illustration).

4. Place the sheets together and cut with scissors along the drawn line. As a result, you will end up with two trees of the same size.
5. Imperceptibly mark the middle of each tree using a ruler.
6. Make an incision in one tree from the top to the middle, and on the other from the bottom (base) to the middle.

7. Insert the trees into the cuts so that you end up with one volumetric tree.
8. To give the tree more stability, use an adhesive tape - use it to glue the lower and upper halves.

9. Use pencils, markers, glitter and other materials to decorate the tree. You can use a hole punch to make small multi-colored circles, which are then glued to the Christmas tree. An asterisk can be glued to the top of the head with tape.

How to make a Christmas tree out of paper (5th method):
You will need: colored cardboard, glue, scissors, a hole punch, a small stick with a diameter approximately equal to the diameter of the holes that are obtained from a hole punch, ornaments to taste.

A rectangular cardboard is taken, folded several times as shown in the picture above, and then pierced in the center with a hole punch. Then this cardboard is cut at an angle so that the craft does not end up looking like a Christmas tree (see picture). We drag our stick into the hole, and if it does not hold firmly, then it can be fixed with glue. Decorating the Christmas tree. Decorations can be attached with glue. Such a Christmas tree can be put somewhere (if you make a basis for it), or you can hang it somewhere.

How to make an origami Christmas tree (6 method):
The material for such a tree will be one large magazine or several small magazines. If the magazine has a hard cover, you can simply remove it.
For each page, do following procedure:
1. Starting at the top-right corner, fold the page to a 45-degree angle.
2. Fold the sheet in half diagonally again.
3. The corner that extends beyond the magazine's bottom should be tucked up.
4. With the rest of the pages, we also do this procedure and, as a result, we get a beautiful origami tree.


How to make a Christmas tree out of paper using the origami technique (method 7):
First, you will need to make triangular modules, from which the herringbone will begin to fold. It's easy to make them. You just need to know how to do them and be careful when creating them.

How to make triangular modules was discussed on our website in the article -? (look in the middle of that article for information on this if you don't know how to create them).
1. Add the module
2. We collect twigs
3. We begin to collect the Christmas tree
See also other videos on how to make a Christmas tree out of paper:
Now you know about many ways to create a Christmas tree out of paper. Happy crafts!
With the help of templates, it is easy to make original volumetric Christmas trees out of paper, which are equally good as New Year's interior decor and homemade Christmas tree decorations.
For work, you will need paper or loose cardboard, a template and scissors.
Volumetric Christmas trees made of paper: 3 options
1. Option
Despite the schematic appearance, the herringbone looks beautiful and interesting. To make it, you need a rectangular piece of paper that needs to be folded in half.

The width and length will depend on the desired size of the Christmas tree, but it is important to take into account the data of the template so that it fits into the area of the paper folded in half.
Print the template and cut it out.

Then you can already make a Christmas tree. But, this is if you have plain paper. A Christmas tree made from cardboard should be done as in my example, since not every printer can use thick paper. That is, circle the printed and cut out template on cardboard and cut again, but this time a cardboard blank. As an option - redraw.

Note that the straight dashed line should be on the fold of the paper. The lines should also be cut from the fold side.
You will get such a blank Christmas tree.

Open it for further work.

Then the cut strips need to be directed through one to the other side, making folds on the sides. That is, first bend the second strip inward.

After that, leave the third unchanged, but direct the fourth strip to the other side.

Repeat the steps until you run out of stripes. Watch the side folds, preferably straight. The smallest can be bent with a thin object - a rod from a pen, a barbecue stick, etc. At the very end, bend the sides slightly. You will get such a voluminous Christmas tree made of paper, stable on the surface.

Option 2
Another cute Christmas tree that is easy to make using a template.

Fold the paper in half and cut along all but the dotted lines.

Open the workpiece.

Bend to the other side of the strip, alternating them through one.

The tree is ready.

3. Option
The template is not much different from the first. The difference is that the lines are straighter here.
Use a template.

Cut out a piece of paper.

Open it and direct the stripes to the other side, alternating them through one. Bend the sides.


These are the volumetric Christmas trees you will get from paper.

They can be decorated with paper toys, a wide variety of New Year's decor, stickers.
You and your child will love how easy it is to make it yourself and how adorable it can look.
Christmas tree made of paper plates
To make a Christmas tree out of paper plates, we need to paint them bright green. After the paint has dried, cut the plate into pieces.

We collect a Christmas tree garland from fluffy wire and beads.

Glue the pieces of the disposable plate onto the background sheet of paper, starting from the bottom. We have a herringbone applique. We decorate the Christmas tree with beads and a star. We complement the applique with cotton wool snowflakes.

Christmas tree made of paper "accordion"
Considering how simple the proposed by us is in execution, absolutely any child can make it with his own hands.
So what you need:
- a sheet of thick green paper (for example, scrapbooking paper);
- hole puncher;
- two wooden skewers or Chinese sticks;
- bright narrow braid, cord, foil and other decorative materials;
- glue;
- scissors;
- thick brown cardboard for the trunk.

Cut out a triangle from green paper - this will be the herringbone. We fold it like an accordion,

in the center of which we make a large through hole with a hole punch.


Give the accordion a triangle shape.

We insert wooden sticks into the hole, collect the Christmas tree a little.

We wrap the lower part of the sticks with brown cardboard tape, glue it well - you get a stand. A small souvenir is ready!


On the folds of the Christmas tree, we glue a gold cord, braid, foil or colored paper - like garlands. Decorate the top with a star, bow or snowflake.


Christmas tree made of paper strips on a cardboard roll
A very simple but effective Christmas tree can be made from paper and toilet paper roll.
Cut out wide strips from green paper. We cut these strips from one side.

We put glue on the strip and wrap a cardboard roll with it. We do the same with the rest of the strips.

We make the last strip a little already the previous ones. We glue it to the very top of the cardboard roll.

We glue the paper cone.

We cut it at the base.

We glue the cone to the top of the cardboard roll. This will be the top of the tree. The craft is ready!

Christmas tree made of pieces of colored paper
A voluminous Christmas tree made of pieces of colored paper looks very impressive. To make it, cut out a semicircle. Use a pencil to separate one segment of the circle.

Cut small squares out of thin colored paper. A craft made of green paper of different shades will look beautiful. Apply PVA glue to the semicircle base. We wind a piece of green paper on a pencil and glue it on a semicircle. We glue green pieces of paper one by one, leaving the segment separated by a pencil unfilled.

After the entire semicircle is filled, roll it up in a cone. Glue it in a place not filled with pieces of paper (we separated it with a pencil at the beginning of the work).

We take a cardboard cylinder from toilet paper. We cut it from one side. We paint it brown - this is the future trunk of our Christmas tree.

We glue the top of the Christmas tree to the cardboard roll. We decorate the craft with any bright New Year's materials - pom-poms, beads, rhinestones or decorative buttons. Christmas tree made of pieces of paper - ready!

There are many options for how to make a Christmas tree out of paper, so you can invite your child to make their own choice and make the tree that they like best.
Curled corrugated paper herringbone
For example, a very elegant Christmas tree can be easily made using green corrugated paper or napkins.
Making a white cardboard cone

we wrap it in green colored paper.

You can immediately make a cone out of green cardboard. You can fasten the cone not only with glue, but also with tape or a stapler. If scotch tape is used, it must be glued from the inside so as not to complicate the subsequent finishing.
Cut the tissue paper into thin strips and make a fringe on one side. Twist each strip with any wooden stick. It is convenient to use matches, toothpicks or barbecue skewers for this purpose.


Gently paste over our cone with curls.

We make bows from red tissue paper, which can be decorated with white beads or buttons.

We glue the bows to the Christmas tree, complement them with golden beads.

Decorate the top with a golden bow.

You can make a simplified version of such a craft.
Herringbone made of strips of corrugated paper

We fold the cardboard cone.

Cut the paper into long strips.

We wrap the cone with strips of paper, while forming folds. One strip - one row.

Having wrapped the Christmas tree, we decorate it with bright beads and decorative stars.

The Christmas tree has already been made of paper with your own hands!


For younger children, this option will be more affordable.
Herringbone made of paper circles
A very beautiful Christmas tree is obtained from paper, usually used for wrapping gifts.
We cut such paper into small circles or parts of a more complex shape, for example, resembling duck's feet.