Lacing laces. Nice lacing - nice shoes! Skip lace-up
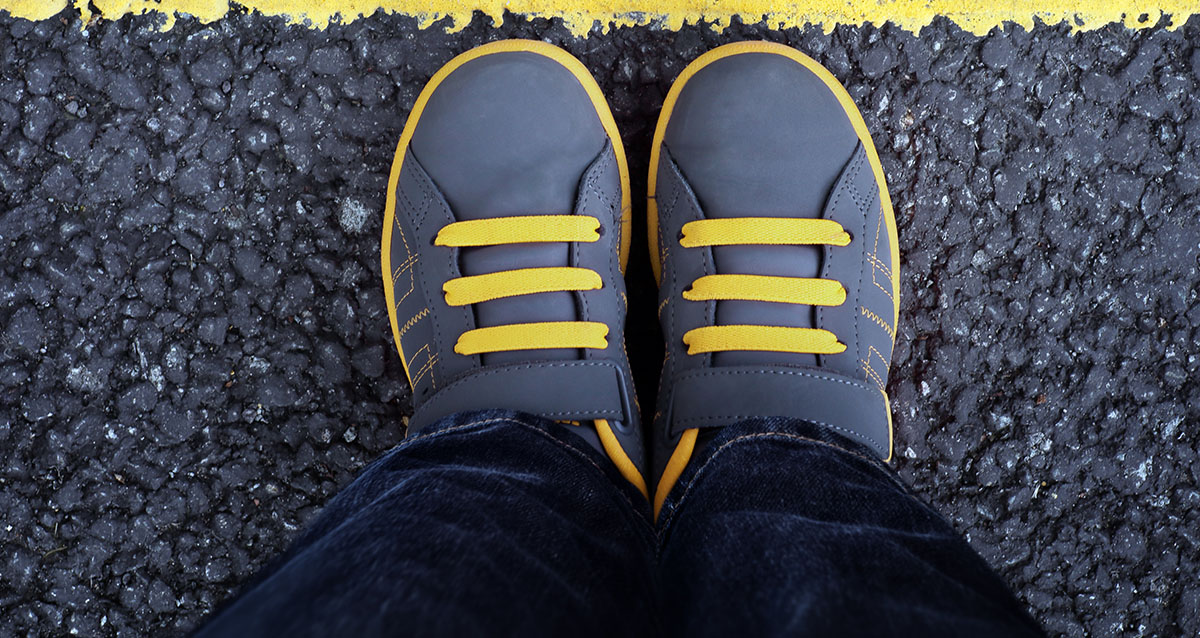
Sneakers and sneakers have long ceased to be just sports shoes and have not disappeared from fashion collections and must have lists for several seasons in a row. Their wild popularity is understandable - these shoes can be made friends with a summer sundress, and with a strict suit or bright overalls. The shape, color, decor open up a huge field for experimentation ... But there are still different ways of lacing! To find out how to lace up your sneakers in an unusual and effective way, read our article soon!
Simple but interesting schemes
European way
One of the most popular and stylish ways. It takes a minimal amount of effort to lace up your sneakers in a European style:
- Thread the lace from outside to inside into the bottom loops.
- Now thread one part of the lace from the inside into the hole diagonally higher.
- In the meantime, pull the second part of the lace in the same way, but one hole higher.
- Pass the end of the lace brought out to the outside into the hole at the same level inward.
- Continue to lace up alternately until the end of the holes.
Smooth lacing
Ideally, if a sneaker or a sneaker has an even number of holes, then you don't have to leave the top loops without a lace.
- Thread the lace from outside to inside, starting from the bottom holes. In this case, one part of the lace should be slightly shorter than the other.
- One end of the lace is threaded from the inside into a loop above on the same side.
- The other end is threaded outwards by two loops on your side.
- The lace in this method always goes into parallel loops, from the outside to the inside.
- It is not customary to tie bows in even lacing, hide the laces in sneakers.
"Butterfly"
In this method, the ends of the lace are crossed on the visible part and stretched inside, so the lacing visually resembles a bow tie. The method is convenient and practical because it gives the feet enough space in the sneaker and relieves pressure.
- First you need to insert the lace from outside to inside on the bottom rings.
- Stretch the lace up, bringing it to the next "floor" of rings.
- Then the laces are crossed on the front side.
- Repeat these steps from the bottom to the very top ring.
Original schemes are more complicated
Sawtooth way
Try this lacing when you're done with the previous ones. She looks cool and effective.
- The lace is passed through the bottom loops from the outside to the inside.
- A portion of the lace on one side is inserted into the loop above from the inside out and through the parallel hole on the other side.
- The other end of the lace is inserted diagonally with the obligatory skipping of one hole.
- The first end now follows the movement of the second, but one hole higher.
- Continue until one end of the lace ends.
Diagonal or "commodity" way
Such lacing is rarely used, but it is very practical: it can be tied and untied quickly with proper skill. Learn more quickly:
- Insert the lace into the bottom rings from outside to inside. Remember that one end should be much shorter than the other.
- Insert the short end of the lace into the top hole on the opposite side.
- With the other end of the lace, thread all the loops diagonally to the very top, tie a bow.
"Lightning"
The name of this method refers to the familiar zipper. Repeating this lacing is difficult enough, but you can do it!
- Pull the lace through the bottom loops and pull out to the sides on both sides.
- The ends of the laces are tucked up to the ties on the same “floor” and brought out into a pair of loops from the inside.
- The ends of the laces are crossed on the front side, passed under the ties of this level and rise to the "floor" higher.
- Similarly, lace up your sneakers all the way to the top holes.

4-hole lacing methods
The easiest and most familiar option is to tie the laces in a crisscross pattern on the front of your sneakers or sneakers. To do this, simply insert the lace into the bottom rings from the outside, take out from the inside, cross both ends and thread into the loops again.
5 hole lacing methods
5 loops is the most common number of holes on a sneaker. Here you can come off with experiments. Try one of the most original yet simple 5-loop lacing!

"Knot"
- Insert the lace from the inside into the bottom holes and thread it out. Make sure that the length of both parts of the lace is the same!
- Twisting one end of the lace around the other, scrape the parts of the lace and thread them again into the loops of opposite sides.
- Repeat these steps, each time threading the lace into the loops from the inside out.
6 hole lacing methods
Here you will be able to really "roam"! When you have mastered the methods described above, get down to unusual and intricate lacing. Trust me, it's worth all the effort!

"Shop lacing"
- Thread the lace through the bottom holes from the inside out.
- Now insert both tips into the upper holes from their sides from the inside.
- Each end of the lace is looped to an adjacent end and pulled up again into the next hole.
- Repeat these steps to the very top.
How to tie bows on sneakers and sneakers in an unusual and beautiful way?
How many ways of tying laces in bows do you know? Probably no more than two. But besides the traditional knot of eyelets and simple tucked-in ends of the laces, there is an uncommon solution - to tie a bow on the side! Sneakers or sneakers will immediately look more feminine and cuter.
- Repeat all points for even lacing.
- When you reach the top holes, insert both ends of the lace into the lower and higher holes on the same side.
- Tie a nice bow on the side and hide the remaining ends of the laces in your shoes.
Laces play an important role in the look of punks / skinheads. Each color means something. Their value depends on the region / country where they are worn, but there are more or less average values, which are given below:
New ways of lacing boots
You probably can't even imagine that for an ordinary boot with 6 pairs of holes, mathematics suggests almost 2 ... TRILLION(1,961,990,553,600 !!!) different lacing methods! Even if we discard all purely hypothetical possibilities (remove mirror-identical horizontally or vertically options lacing), take into account the passage lace through every hole boot only once, take into account, among other things, that usually boots start lace up from the top pairs of holes, what laces can be done in various ways weave and bind between themselves by various nodes between the holes.In addition to all of the above, taking into account the ordinary realities of life, that the passage lace through each hole should subsequently help to pull the halves boot together, not only to promote them decoration; what lacing we have to tighten and relax, and this should not take too much time and effort; lacing should retain its shape and look beautiful. Even with all these complex queries, the expert laces and lacing Ian Fieggen confirms a possible figure in 43,200 different lacing options for a regular boot with 12 holes.
This article provides 38 original ways of lacing for boots.
So, let's start describing how the most traditional and super extravagant shoe lacing techniques including and lacing methods for footbag:
1 Traditional cross lacing method The lace is passed through the bottom holes and pulled out at both ends. The ends are crossed and then passed from the inside to the outside through the holes. Go to the top holes and tie the laces. This method is easy and convenient; crumples a shoe, not a leg. |
2 Cross over lacing Ian Fieggen's Favorite Scheme If on a boot odd the number of pairs of holes, start lacing from the inside (as in the photo of the boot), and if even- then from above (as in the diagram). This is a very beautiful and simple way to reduce wear and tear on your laces! |
3 Simple straight lacing One end of the lace extends directly to the very top, and the other goes through all the holes. Suitable for boots with even the number of pairs of holes. It is quite difficult to align the ponytails of the laces to tie them, but the lacing looks very neat. |
4 Lacing for woodland or cycling Reverse fifth lacing It does not look very good, but the lace knot, due to its location on the side (inside for the forest or outside for cycling), does not cling to or untie for anything. |
5 Shop lacing One end of the lace is immediately passed into the upper opposite hole, and the other end gradually laces up the entire boot, making a kind of spiral. This method can be modified by skipping one end not obliquely, but hiding it as in a simple straight lacing (3 way to lace up shoes from this article). |
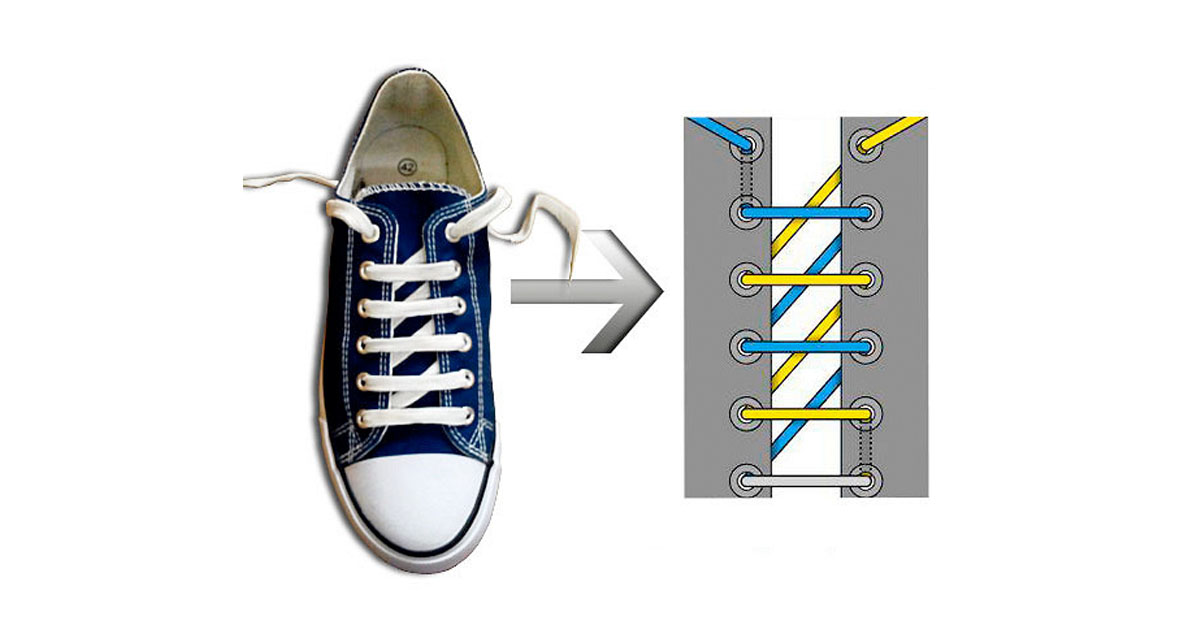
6 Lacing World Wide Web Very decorative lacing, especially for tall boots or boots, using laces in a contrasting color. Follow the diagram carefully so as not to get confused (start with the gray section, the middle of the lace, then one end is shown in blue, the other in yellow). |
7 Double reverse lacing A more economical modification of the second lacing method For him, a little shorter laces may also work. |
8 Butterfly lacing Named for its resemblance to a bow tie. If on a boot odd number of pairs of holes, then first make a straight stitch along the top (as in the diagram), if even- below (as in the photo of the boot). Butterfly crosses can be made on areas of the boot that need to be pulled off, and skips can be made where the foot can be given a little freedom. You can use relatively short laces! |
9 Military lacing This is a reverse bow-tie lacing. Named military because this is how the soldiers of the British, Dutch, French and Brazilian armies lace up their boots. And what, it looks good, and the laces do not need long ... |
10 Lacing Railroad It is very similar to the previous method, only on the wrong side the laces do not go diagonally, but straight. This lacing method is only suitable for thin or flat laces because the laces go through the holes twice. This is why the lacing is very strong, but difficult to tighten. |
11 Double helix lacing Beautiful and fast lacing that reduces friction and prolongs the life of your laces. The left and right boot can be laced up in mirror image for symmetry. |
12 Lacing Lattice This lacing is difficult to tighten, but it is nevertheless very popular for its decorative effect. To make it easier to work, first weave all the laces with one end, and then pass the other end of the lace through the wire mesh. Such a lattice can only be woven on boots with 6 pairs of holes or a large number of them. |
13 Lattice lacing In fact, the same lacing as the previous one, but laces and a little shorter will work for it. An economical option. |
14 Lacing Zip This lacing is very difficult to tighten, but it is very strong, which is ideal for lacing skates and rollers. Moreover, it looks like a huge zipper. |
15 One-hand lacing You don't even have to tie a bow, just a knot at one end of the lace is enough. At the top, the lacing is tighter, and at the bottom it is completely loose. Best used with small holes and thick laces. |
16 Segmental knot lacing You can make the top and bottom halves weaker or tighter at will. With such a lacing, however, it is difficult to fit your foot into the boot, as the knot in the middle will get in the way. |
17 Hidden Knot Straight lacing stitches look even more original if the bow is not visible. This method will allow you to hide your bow! |
18 Two-tone lacing Very, very beautiful and original lacing. The only but - discomfort from the knot (maybe sew or fasten the laces with tape, and not tie them in a knot, and this will help the cause?). Ideally, you want to cut two long laces into slightly unequal pieces so that the ends are the same length in the end. |
19 Double two-tone lacing A very creative way of lacing, which can be used to match the colors of the flag of your country or your favorite team. The 4 ends of the laces can also be creatively tied. If you have boots with odd the number of holes, then you will need laces of different lengths. |
20 Reverse loop lacing A beautiful option for lacing, which, however, has its drawbacks. First, the criss-cross loops tend to slide out in the middle. Second, friction increases the wear on the laces. |
21 Knot lacing An additional knot at each step of the lacing increases its strength and improves its appearance. The method is ideal for lacing ski boots, rollers, etc. It is very problematic to loosen the lacing. |
22 Twisted lacing Nice strong lacing, which is also difficult to loosen. The weaves look especially decorative with thick round white laces on boots in a contrasting dark color. |
23 Roman numerals Looks especially beautiful on boots without a gap between the halves. You can vary the number and location of XX and II depending on the number of holes in your boots. |
24 Footbag lacing For playing footbag, it is convenient to create a kind of bowl out of your boots, so that it is easier to control the ball being thrown and caught. Of course, the boots lose their shape in this case, but for the sake of the interests of the game, you can suffer! This is one of at least four lacing options, three more will be presented below. |
25 Footbag (soks) lacing method All four lacing methods combine long stitches at the edges that pull the boot halves outward. The top of the lacing can be done in another way, not like in the diagram and photo. |
With this method of lacing, the edges of the boot diverge wider than when using the first two. To further increase the opening, you can start lacing not the third pair of holes from the bottom, but even higher (and not use it, skip the third or another pair of holes at all). |
With this method of lacing, the edges of the boot diverge in the same way as in the previous one, that is, wider than when using the first two options. Lacing methods are suitable not only for footbag, but also in the case of overly tight or narrow boots. |
28. Almost the most common way, perhaps your shoes laced up exactly. |
29. The lacing goes through the boot twice, so you will need longer laces! |
30. Quite simple but effective nonetheless lacing method... The bow is in the middle, not on top. |
31. Simplicity meets elegance in perpendicular segments lacing outside and oblique inside. |
32. Quite an economical way, you don't need too long laces... It looks very simple and concise. |
33. Original design: perpendicular lines lacing on the outside combined with a zig-zag on the inside. |
34. Do not be discouraged if you have not found long laces... It is enough to buy a pair short laces for each shoe! True, you will have to spend twice as much time on lacing every morning! |
35. The original way"Merezhka": and laces long is not necessary, and it looks quite interesting. |
36. The method can be called puzzling :) |
37. Method for keen macrame :) Looking for long laces and a lot of patience. |
38. Well, this is a separate song altogether! Lacing without beginning or end. Weave from laces canvas, and you will never have to tie them again! :) |
17 different ways to tie your shoelaces
Everything node diagrams, which you will see below, are facing you, as if in front of you is your own leg with boot where you tying your shoelaces... One end of the lace (left) is colored blue and the other (right) is yellow. Exclusively to make it easier for you to understand schemes!1.
The fastest, most convenient, beautiful and reliable way. Make a loop with each of lace ends and at the same time bring them through each other, thereby instantly forming a knot.   |
2. Safe node Make two loops and push them through the "hole" in the middle. Ready knot in addition to strength, it is also beautiful, symmetrical, two curls entwine it laces.    |
3. Standard node, or "Around the tree" Something like this is taught in childhood tie shoelaces, this is the most common way you can tie the laces on the shoes. 
|
| 4. Two-loop knot (knot "Hare ears") Make a loop from both ends (they look like ears), and just tie them into a knot. In my opinion, in Russia it is this one, and not number 3, knot is the most common (their tying results are completely the same).  No matter how simple this knot, this is its execution is wrong, such a node is unbalanced and your boots will be all the time untie("Grandma's Knot").  But this position is correct, lace knot will hold on tight:  |
5.Two step knot
|
6. Surgeon's node Common, but not the best of reliable nodes... At first, you act as if you were tying a standard knot on your boots, but wrap the yellow end of the lace around the knot again.  |


When the look of the shoe gets boring, you can freshen it up with the help of the original lacing. Today there are many ways to tie the laces beautifully on sneakers, boots or other shoes that are easy to braid yourself.
Ladder
A beautiful way to tie your shoelaces called "stairs" will look spectacular on various types of sneakers. The lacing is clearly visible in the silhouette of the stairs. To weave it, you need to follow these steps:
- From the inside, pull the lace through the bottom holes, pull the ends up to form two identical pieces: A (orange) and B (red).
- Pass each of them through the hole from the outside opposite.
- Interlace so B is above A and the two halves are under the sides.
- Walk in the same way to the upper holes on the shoe.
- Finish the lacing by tying a nice, tight bow.
This beautiful lacing is difficult to tighten and is very sturdy. Often these lace-tying methods are used for rollerblades and skates. In appearance, it resembles a large zipper:
- Pass the string through the bottom holes from the inside and pull up at both ends, you should get two identical parts.
- Pull both halves under the loop, interlace so that B is above A.
- Next, pull each part through the second holes from the bottom, then weave again, as in the previous step.
- Repeat steps 2 and 3 up to the outermost holes on the shoe.
- Tie a bow at the end to secure this beautiful weave.

Decorative lacing that looks especially good on high boots or boots. Often this method of tying shoelaces is practiced with contrasting ribbons. In order not to get confused, carefully follow the proposed scheme:
- Pass the ends of the lace (eglets) down from the outside through the second holes from the top, two equal parts should form.
- Interlace them so that A is above B.
- Pass each half through the fourth hole from the top from the outside.
- Interlace both parts again, only so that half of B is above A.
- Pass both parts from the outside into the extreme lower ones, then into the second holes from the bottom from the inside.
- Finally, pull each half into the top empty holes, first the third and then the first.
- Tie a tight, pretty bow to keep the laces from coming loose.

Reverse loop
A creative way of lacing that can be played with different colors. If you have boots with an odd number of holes, then in this case you will need beautiful laces of different lengths:
- Pass the egglets from the inside through the bottom holes, pull up, make two equal lengths.
- Weave both halves as shown in the photo, then each part of the lace should be located only on one side of the sneaker.
- Work up to the top by threading each hole from the inner side, weaving both sides at the same time (point 2).
- After finishing weaving, tie a beautiful bow.

Saw teeth
As the name suggests, lacing looks like saw teeth. On the opposite shoe, for showiness, you can make a mirror image of the weave or lace up in one way:
- Pass the lace through the bottom holes from the outside and line up both pieces.
- Pull A to the outside of the second from the bottom, and then through the outside of the second hole opposite.
- Pull half of B diagonally under A, pass through the third hole from the bottom from the inside, then into the third hole from the outside opposite.
- Walk to the very top of the shoe, applying steps 3 to half A and steps 2 to B.
- Finish this pretty lacing by tying a tight bow.

Unusual interweaving "mishmash" will suit lovers of original decor. The lacing resembles a series of rhombuses with elongated edges. To tie your shoelaces this way, follow the instructions:
- Pass the Eglets through the bottom holes from the inside, pull up, align both parts.
- Weave so that B is on A.
- Pass both eglets through the fourth holes from the bottom from the outside, then into the third from the bottom from the inner side.
- Repeat steps 2 and 3 all the way to the top of the shoe.
- The ends can be tied with a beautiful bow or hidden in a boot.

The method of tying shoelaces called "twisting" is performed with additional knots, which increases the strength of the weave and improves its appearance. These types of shoe lacing are also ideal for inline skates and ski boots:
- Thread the lace through the bottom holes from the inside, pull on the ends, align both parts.
- Weave them together (make a full turn).
- Pass each part into the second holes from the bottom from the inside.
- Continue steps 2 and 3 until you reach the top of the shoe.
- Finish this beautiful lacing method by tying a tight bow.

Net
Sophisticated but beautiful lacing of sneakers, which is very popular due to its decorative effect. To simplify weaving, you can first thread one end, then pass the other through the mesh. This method can only be tied on boots with 6 pairs of holes or more:
- Pull the flat lace Eglets from the inside through the bottom holes, pull on both ends, align the pieces.
- Bind so that half of A is over B, then thread each hole through the fourth holes from the outside from the outside.
- Interlace the parts again (step 2), then pass through the second holes from the bottom from the outside.
- Pass the egglets through the top holes from the inside, tie a nice bow.

Beautiful and original two-tone lacing looks good on sneakers. The only negative is the presence of a node. To get rid of it, you can carefully sew or glue parts of the laces:
- Prepare two laces of different colors, for example orange (part A) and red (part B), while B should be 25-30% longer.
- Tie both laces tightly, carefully trim the ponytails.
- Pull B starting from the bottom right side to the top through the holes as shown in the photo.
- Starting from the second hole on the bottom right side, follow the same steps as in step 3 in relation to A.
- Tie the ends with a bow to complete this beautiful lacing.

This type of lacing is based on the "mesh", only for weaving it is used instead of a thick and flat lace thin and round. Thanks to this, gaps are formed between the parts, and a so-called lattice is obtained:
- Pull the thin round lace egglets from the inside through the bottom holes, pull on the ends, align the pieces.
- Bind so that half of A is over B, then thread each hole through the fourth holes from the bottom from the outside.
- Pass both Eglets through the fifth holes from the bottom from the inside opposite.
- Interlace the parts again (point 2), then pass through the second holes from the bottom from the outside.
- Pass both halves through the third holes from the bottom on the inside opposite.
- Re-weave, following the structure of the previous binding.
- Thread the egglets through the top holes from the inside.
- Finish this off with a nice bow.

Video
Who remembers, recently we studied beautifully.
This article will help you figure out how to tie your shoelaces beautifully! Check out the 25 schemes and real-life examples here, and make sure everyone pays attention to your shoes later!
They came up with a name for each scheme, prepared a schematic drawing of laces and a photo of really tied laces.

This technique allows the laces to be significantly shortened. The lace is inserted into the top hole from above and goes in a zigzag pattern through three holes to the third hole. When you reach the penultimate hole, just go to the last one and go to the opposite side.

The whole secret of this lacing is hidden inside, and the lacing itself can be multi-colored. You insert the lace from the bottom into the hole and go out to the opposite side, then skip one row of holes and do the same further. When you reach the end, change the light and fill in the missing rows in the same way.

This lacing alternates oblique lines with straight lines. First, insert the lace from the bottom and move into the parallel hole on the other side, then down to the next hole outward.

Such lacing consists visually of large and small crosses. First, threading the lace from below, you make a zigzag, bypassing one row of holes, then, reaching the end, fill in the missing rows.
Straight (fashion) lacing:
The lacing is very precise and beautiful. We do not have to see anything but the inner drawing. For such a lacing, we insert the lace inward on one side and insert it into the hole on the other side in parallel, forming a straight line. Then, bypassing one row, we go out with a lace into a hole on the same side. Having reached the end, fill in the empty rows in the same way.

The beauty of lacing is that nothing is hiding inside. First, we thread the lace inside and make a parallel line, then bypassing the row of holes - we make the next one. Having reached the end, we repeat the same thing and fill in the missing rows.

This lacing can be called a pigtail. Its secret is that we do not reach the last row of holes with a lace of one of the colors, thereby we thread it into the lace of a different color. The lacing itself is typical. We go in a zigzag through one row of holes, then fill in the gaps with a lace of a different color.

This lacing contains a pattern that will look good on tall shoes. First, we go in with a lace from below, bypassing a row of holes, and on the same side we exit through one. Having reached the end, we make a cross and repeat, alternating crosses with stripes.

Lacing is very simple. We put the lace in the hole on one side inward and go out into the next hole on the same side. Then we move on to the next row of holes on the opposite side and again stick the lace out of the next hole on the same side. Having reached the end, we repeat the procedure in the missing rows.

This lacing helps to make a bow in the middle if you want to focus on it. The secret is to slip in the middle with a lace and alternate the stripes on top and zigzags on the inside to go to the next hole.

This lacing simulates a ladder. First, we go in a simple zigzag through one row, releasing the lace constantly outward, then, reaching the end, we pull the lacing loops to the holes.

This lacing, while it seems complicated, is actually quite simple. First, insert the lace into the top hole, then release the lace up to the opposite side into the fourth hole and lead into the third. A line has formed. Next, we make the same parallel line through one row and repeat the operation in a mirror image.

This lacing is made in a zigzag pattern, bypassing one row of holes. When you reach the end, you fill in the missing rows in the same way.

This lacing is often found and fully reflects how beautifully you can tie your laces! This lacing is done only once, then you will have to put on shoes using a spatula. First, we make a simple lacing in parallel lines, not bypassing a single row of holes. Then he performs the pattern with a lace of a different color, running it from above the previous lacing, then from below.

This lacing makes you peer into the pattern. First, we go in a zigzag, leaving out straight lines, and from under the bottom, bypassing one row - oblique. When you reach the end, do the same in the missing rows.

This lacing is very fast. First, we thread the lace inward on one side, and exit with the lace on the other side diagonally. We make a straight line from above, and again diagonal inside. At the end, we return to the upper empty hole.

Very beautiful and delicate lacing. We go in with a lace from above and immediately throw on the loop. We pass one row and do the same. Then we reach the end and do the same work on the opposite side.

To begin with, we make a figure eight lacing on one side: insert the lace into the top hole down, and in all the next from above. Having reached the end on one side, we do the same on the second side, threading the lace into the loops of the first row.

This lacing has a central element -. First, you should make three parallel lines, and after reaching the end, make the same three lines in the empty rows of holes, braiding the lace between the existing first three strips.

This lacing looks like several diamonds in a row. First, the lace is threaded into the top hole inward on one side, goes into the fourth hole on the opposite side, then we exit into the third hole on the same side. Then to the sixth on the opposite side again to the fifth on the same.

Lacing is fairly easy and it is best to start from the end. We bring both ends of the lace up in the last holes. Then we wind the laces one after the other two times and insert them again into the next holes and so on.

The lacing looks pretty impressive. First, we zigzag through one row of holes, then we do the same in the missing rows. We alternate the lace inside along the second row: we pass it under the existing one, then along the top.

This lacing looks great with different colors of both laces. It is recommended to start lacing from the bottom, releasing the laces up and intertwining them horizontally, and so on to the very top.

This kind of lacing is quite common, except that it creates an interesting element exactly in the middle - a pretty knot. When using colored laces, the knot looks extremely unusual. We lace up the shoes in the usual way, and when we reach the middle, we make a knot and continue on.

This lacing fits two short laces. We begin to lace up one lace from the end, we reach the middle and make a bow. Then we let in the second lace and reach the very top, making a bow at the end.
The important thing is not how to tie your laces nicely, but how clean your shoes are. Often, the first thing the interlocutor looks at the shoes, so do not forget about their cleanliness!
For sure lacing Your boot, sneaker or sneaker does not differ in particular originality.
I want to offer you a simple and cheap way to transform your shoes! To do this, you may only need new, longer laces!Without being a mathematician, one might assume that ways to lace up your shoes enough. But in fact, there are a lot of possibilities for lacing boots or sneakers in different ways!
You probably can't even imagine that for a regular boot with 6 pairs of holes, mathematics suggests almost 2 ... TRILLION (1,961,990,553,600 !!!) different lacing methods! Even if we discard all purely hypothetical possibilities (remove mirrored horizontally or vertically identical options for lacing), take into account the passage of the lace through each hole of the shoes only once, take into account, among other things, the fact that usually boots begin to lace up from the top pair of holes, that laces can be weave in various ways and tie together with various knots between the holes.
In addition to all of the above, taking into account the ordinary realities of life, that the passage of the lace through each hole should subsequently help to pull the halves of the shoes together, and not only contribute to their decoration; what lacing we have to tighten and relax, and this should not take too much time and effort; the lacing should retain its shape and look beautiful.
I present to your attention a series original ways of lacing boots.
1 Traditional cross lacing method
The lace is passed through the bottom holes and pulled out at both ends. The ends are crossed and then passed from the inside to the outside through the holes. Go to the top holes and tie the laces. This method is easy and convenient; crumples a shoe, not a leg.
2 Cross over lacing
If on a boot odd the number of pairs of holes, start lacing from the inside (as in the photo of the boot), and if even- then from above (as in the diagram). This is a very beautiful and simple way to reduce wear and tear on your laces!
3 Simple straight lacing
One end of the lace extends directly to the very top, and the other goes through all the holes. Suitable for boots with even the number of pairs of holes. It is quite difficult to align the ponytails of the laces to tie them, but the lacing looks very neat.
4 Lacing for woodland or cycling
It does not look very good, but the lace knot, due to its location on the side (inside for the forest or outside for cycling), does not cling to or untie for anything.
5 Shop lacing
One end of the lace is immediately passed into the upper opposite hole, and the other end gradually laces up the entire boot, making a kind of spiral. This method can be modified by skipping one end not obliquely, but hiding it as in a simple straight lacing (3 way to lace up shoes from this article).
6 Lacing World Wide Web
Very decorative lacing, especially for tall boots or boots, using laces in a contrasting color. Follow the diagram carefully so as not to get confused (start with the gray section, the middle of the lace, then one end is shown in blue, the other in yellow).
7 Double reverse lacing
A more economical modification of the lacing method. For him, a little shorter laces may also work.
8 Butterfly lacing
Named for its resemblance to a bow tie. If on a boot odd number of pairs of holes, then first make a straight stitch along the top (as in the diagram), if even- below (as in the photo of the boot). Butterfly crosses can be made on areas of the boot that need to be pulled off, and skips can be made where the foot can be given a little freedom. You can use relatively short laces!
9 Military lacing
This is a reverse bow-tie lacing. Named military because this is how the soldiers of the British, Dutch, French and Brazilian armies lace up their boots. And what, it looks good, and the laces do not need long ...
10 Lacing Railroad
It is very similar to the previous method, only on the wrong side the laces do not go diagonally, but straight. This lacing method is only suitable for thin or flat laces because the laces go through the holes twice. This is why the lacing is very strong, but difficult to tighten.
11 Double helix lacing
Beautiful and fast lacing that reduces friction and prolongs the life of your laces. The left and right boot can be laced up in mirror image for symmetry.
12 Lacing Lattice
This lacing is difficult to tighten, but it is nevertheless very popular for its decorative effect. To make it easier to work, first weave all the laces with one end, and then pass the other end of the lace through the wire mesh. This lattice can only be woven on boots with 6 pairs of holes.
13 Lattice lacing
In fact, the same lacing as the previous one, but laces and a little shorter will work for it. An economical option.
14 Lacing Zip
This lacing is very difficult to tighten, but it is very strong, which is ideal for lacing skates and rollers. Moreover, it looks like a huge zipper.
15 One-hand lacing
You don't even have to tie a bow, just a knot at one end of the lace is enough. At the top the lacing is tighter, and at the bottom it is completely loose. Best used with small holes and thick laces.
16 Segmental knot lacing
You can make the top and bottom halves weaker or tighter at will. With such a lacing, however, it is difficult to fit your foot into the boot, as the knot in the middle will get in the way.
17 Hidden Knot
Straight lacing stitches look even more original if the bow is not visible. This method will allow you to hide your bow!
18 Two-tone lacing
Very, very beautiful and original lacing. The only but - discomfort from the knot (maybe sew or fasten the laces with tape, and not tie them in a knot, and this will help the case?) Ideally, you need to cut two long laces into slightly unequal parts so that the ends are the same length in the end.
19 Double two-tone lacing
A very creative way of lacing, which can be used to match the colors of the flag of your country or your favorite team. The 4 ends of the laces can also be creatively tied. If you have boots with odd the number of holes, then you will need laces of different lengths.
20 Reverse loop lacing
A beautiful option for lacing, which, however, has its drawbacks. First, the criss-cross loops tend to slide out in the middle. Second, friction increases the wear on the laces. It will look gorgeous if you make it two-tone.
21 Knot lacing
An additional knot at each step of the lacing increases its strength and improves its appearance. The method is ideal for lacing ski boots, rollers, etc. It is very problematic to loosen the lacing.
22 Twisted lacing
Nice strong lacing, which is also difficult to loosen. The weaves look especially decorative with thick round white laces on boots in a contrasting dark color.
23 Roman numerals
Looks especially beautiful on boots without a gap between the halves. You can vary the number and location of XX and II depending on the number of holes in your boots.
24 Footbag lacing
For playing footbag, it is convenient to create a kind of bowl out of your boots, so that it is easier to control the ball being thrown and caught. Of course, the boots lose their shape in this case, but for the sake of the interests of the game, you can suffer! This is one of at least four lacing options, three more will be presented below.
25 Footbag (soks) lacing method
All four lacing methods combine long stitches at the edges that pull the boot halves outward. The top of the lacing can be done in another way, not like in the diagram and photo.
26 Option lacing for footbag (soks)
With this method of lacing, the edges of the boot diverge wider than when using the first two.
To further increase the opening, you can start lacing not the third pair of holes from the bottom, but even higher (and not use it, skip the third or another pair of holes at all).
27 Well, this is a separate song altogether! Lacing without beginning or end.
Weave from laces canvas, and you will never have to tie them again! :)
28 Way for keen macrame :)
Looking for long laces and a lot of patience.
29 The lacing goes through the boot twice, so you will need longer laces!
30 Quite simple but effective nonetheless lacing method.
The bow is in the middle, not on top.
31
Simplicity meets elegance in perpendicular sections lacing outside and oblique inside.
32
Quite an economical way, you don't need too long laces.
It looks very simple and concise.
33 Original design: perpendicular lines lacing on the outside combined with a zigzag on the inside.
34 Do not be discouraged if you did not find long laces.
It is enough to buy a pair short laces for each shoe! True, you will have to spend twice as much time on lacing every morning!
35 The original way"Merezhka": and laces long is not necessary, and it looks quite interesting.
36 The method can be called puzzling :)
For the not weak in spirit. But if you don't get confused in the process lacing, get a very beautiful result!
And now imagine how great it would be if, in addition to the original lacing method, you also use the original bright laces! Your sneakers or boots will simply not be recognized!