Do-it-yourself flower-semitsvetik from different materials: master classes with step-by-step photos. Do-it-yourself flower-seven-flower: five best product options
To create a beautiful designer thing, it is enough to arm yourself with the simplest materials for work. You can make a decoration for the room or just a nice craft that you can do with your child. An excellent option for creativity with children will be a seven-color flower. This is a very exciting activity, and the result is striking in its beauty.
How to crochet a semi-flower with your own hands
This unusual flower can be crocheted. It consists of lush columns. Such a floral motif fits quite easily. Since the seven-flower flower has only seven petals, seven single crochets should be knitted in the first row. In the next row, their number is doubled, and in the third row there will be 21 columns.

Operating procedure
- Knitting begins with a slip stitch. Then it is reinforced, an air loop is made and seven single crochets are knitted.
- The sliding loop is tightened and, with the help of a connecting post, is attached to the first post.
- In the second row, an air loop is made and two single crochets are knitted from each column. There should be 14 columns in total.
- In the third row, just a column is knitted and seven times 2 columns out of 1.
- When the center of the circle is tied, you can start knitting petals from cones.
- 6 air loops and a cone of 5 columns with 3 crochets are knitted.
- With the help of 6 air loops, you need to go down back to the starting point, from where the petal began to knit. This process takes place on one column, and two air loops will be knitted between each petal.
For convenience and clarity, a diagram will help. It simplifies the work, because it shows all the stages of work.

How to make a semi-flower with your own hands from colored paper
You can make such a flower from colored paper. It is good to do this craft with children, as this work is very simple, but quite exciting.
You will need:
- album sheet
- Scissors
- colored paper
- simple pencil

Manufacturing process
The album sheet will serve as the basis, since the entire application will be made on it.
- A circle is drawn on a sheet of yellow colored paper and cut out with scissors. It will serve as the center of the flower.
- To make petals, you need seven colors of paper. A strip 1 cm wide is cut across from each of the sheets. The ends of each strip are glued together, forming figures resembling droplets. These are blanks of petals for the future flower.
- A stem and leaves are cut out from a sheet of green colored paper.
- The middle of the flower and all seven petals are glued onto the album sheet. It turns out a magnificent flower.
- The stem and leaves are glued in the right place. It turned out to be a beautiful voluminous application.
How to make a semi-flower from felt
The original solution would be to create a semi-flower from felt. This work can be done either with a sewing machine or by hand.
For work you will need:
- Felt 7 colors
- Sintepon
- Scissors
- Cardboard
- simple pencil

Manufacturing process
- At the first stage of work, a template is made according to which all the petals will be cut out so that they do not differ from each other in size and shape. To do this, the borders of the petal are marked on a sheet of cardboard, and this part is cut out with scissors.
- The template is applied to each of the seven colors of felt and outlined in pencil. Each piece is cut in duplicate.
- Two identical yellow circles are cut out. They will serve as blanks for creating the middle of the flower.
- Two identical parts of the middle of the flower are applied to each other and sewn along the edges with a manual looped seam, leaving 1 cm unfinished in order to fill the middle with synthetic winterizer. After the workpiece is filled with padding polyester, it is sewn completely, leaving no open edges.
- By the same principle, all the petals are sewn together and filled with padding polyester.
- All petals are connected to the middle of the flower. The result was an airy, voluminous and beautiful flower.

By the same principle, you can make a seven-color flower from fabric. It is enough to replace the felt with a cloth, and all materials and
Leave the manufacturing process the same. You can watch videos that clearly show the technique and methods for making such flowers, and also show how to properly perform a manual buttonhole seam.
How to make a seven-flower flower out of cardboard
To create such a flower out of cardboard, you will need simple materials. But the result will be amazing, because the output will be a voluminous flower that can be used as a decor or put in a vase.
For work you will need:
- colored cardboard
- Scissors
- hot glue gun
- simple pencil
- Wire or orange stick

Manufacturing process
The borders of the template blank are drawn from white cardboard. Cut out the pattern using scissors. It is applied to each of the seven colors of cardboard and circled with a pencil.
Cut out seven petals of different colors. A circle is cut out of yellow, which will serve as the basis of the flower. Using glue, all the petals are connected to the base.
A wire is taken and thin strips of green cardboard are alternately wound onto it. It turns out a beautiful stem, which is glued to the bottom of the base of the flower with a hot glue gun. Pre-prepared green cardboard leaves are glued to the stem, and the flower is ready.
All manufacturing options are good in their own way and unique. There are many photos that confirm this. They depict various techniques and options for making crafts from a variety of materials.
Video on the topic of the article
The semi-flower is a flower of extraordinary beauty, which is very similar to chamomile. It has a thin stem and seven petals, their colors match all the colors of the rainbow. Everyone definitely read a fairy tale about him and remember that he fulfilled wishes. Let's try to make a semi-flower with our own hands. It can be used not only as a decoration, but also to make a nice gift to your friends and family for any celebration. After all, everything that is done with your own hands and with love will definitely carry your positive energy. There are many ways, consider a few options.
Crochet
This option will be interesting for needlework lovers, we will tell you how to crochet this flower.
It consists of lush columns. The flower has seven petals, so we knit seven single crochets in the first row.
Each subsequent row is doubled. Accordingly, in the third row you should get 21 columns.
Operating procedure:
- We start knitting with a sliding loop. Then we reinforce it, make an air loop and knit seven single crochets.
- We tighten the sliding loop and by means of a connecting column we join the first column.
- In the second row we make an air loop, from each column we knit two columns without a crochet. As a result, we get 14 columns.
- The third row we knit just a column and seven times 2 columns out of 1.
- When the center of the circle is ready, you can start knitting petals from cones. 6 air loops and a cone of 5 columns with 3 crochets are knitted.
- Then, with the help of 6 air loops, we descend back to the starting point, from where we began to knit a petal. We do this on one column, and between each petal we knit two air loops.
For convenience and clarity, you can use the diagram. It will facilitate the work, since all stages of work are visible on it.

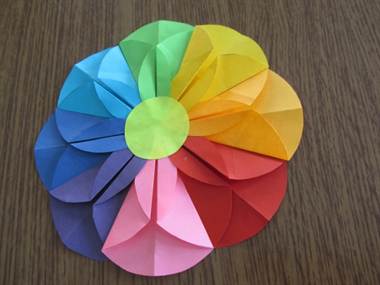
Colored paper flower
First, let's prepare everything you need for manufacturing: 8 sheets of colored double-sided paper, a simple pencil, scissors, a ruler, glue.
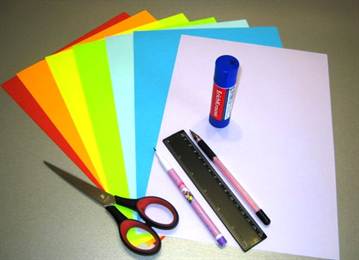
Let's start our work with the manufacture of blanks. To do this, take colored paper of eight colors and cut out 8 circles with a radius of 5 cm and one circle with a radius of 1 cm from it, we will use its central part of the flower.


The next step is to make petals. We take our cut out circle and fold it in half once, and then again. Then you need to unfold and make wings on both sides, turn over and fold, as shown in the figure.
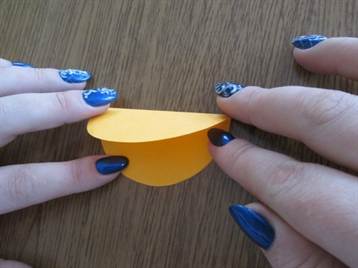
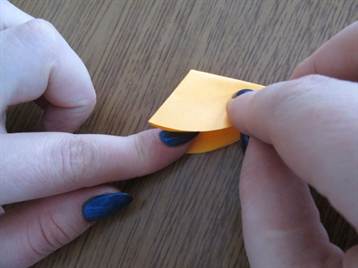


The petal of our flower is ready. We make other flower petals in the same way.
When all the details of our creativity are ready, we begin to collect a seven-color flower. We take a circle of any color you like, draw a dot in the middle, this will be our basis.

Now we begin to glue the petals on the base, glue the core of the flower to the center, as in the photo:


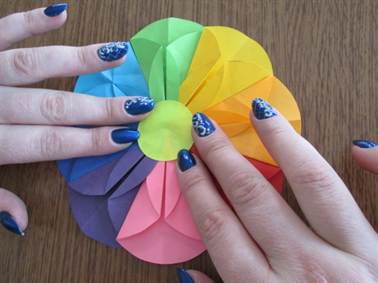
And here is the result of our work! An excellent semi-flower!

With children, you can also do this craft. The execution process is simpler, but quite exciting. What we need for this:
- album sheet;
- scissors;
- glue;
- simple pencil;
- colored paper.
The basis on which our application will be made will be the landscape sheet. For petals, take seven different colors of paper and cut out figures that resemble drops in shape. Fold each petal in half. Cut out the stem and leaves from green paper. Glue all seven petals onto the landscape sheet, gluing one half.
Get a voluminous flower. It remains to add the stem and leaves to it. Volumetric application is ready!

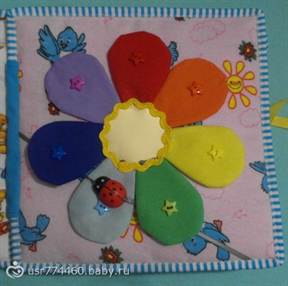
Semitsvetik from felt
You can sew an excellent educational toy for children. Such a craft, due to the different filler of the petals, will perfectly develop the fine motor skills of the child, help teach him how to count and different colors. What to prepare for work:
- cardboard or plain paper;
- felt (material for needlework) of different colors;
- adhesive tape or glue;
- beads for decoration;
- cereals;
- pieces of synthetic winterizer or holofiber.
To begin with, we will make stencils of petals from cardboard or paper, choose any size. If you want the petals to be more rigid, then glue the stencil to the felt, this can be done with double-sided tape or glue, and then cut out.
You can just reinforce them with interlining. Our petal will consist of two parts. When all the blanks are made, we proceed to stitching the elements. The edges can be overcasted or simply stitched along the contour without sewing the bottom edge.
Turn all the petals right side out and fill them with various fillings. It can be any cereal, peas, beans, buttons, pieces of a rustling package, holofiber or synthetic winterizer. In general, everything that is at hand. In the same way, you can make the core of the flower. After that, sew all the details into a flower. When everything is ready, you can decorate our miracle flower with beads or sequins.

fabric flower
To create this flower, no specific sewing skills are required - even a novice needlewoman can handle the lesson. We prepare materials and proceed to implementation:
- scraps of fabric of all colors of the rainbow and always yellow for the middle of the flower;
- scissors;
- paper;
- synthetic winterizer;
- threads;
- sewing machine.
We make a stencil of the core of the flower. On a sheet of paper, using a compass or any round object (plate, lid), draw a circle of the desired diameter and cut it out. Divide it into 7 equal parts, this will be the width of our petals. Attach this blank to the fabric, circle and cut out two parts, leaving a small allowance for the seams. Fold them right sides and sew on a typewriter, leaving a small hole. We turn it on the front side, fill it with synthetic winterizer or holofiber and completely sew it up.
Now we will make a petal pattern, draw a stencil on paper, cut it out. We circle the stencil on the fabric (in the amount of two pieces of each fabric) and cut out seven parts of different colors, leaving an allowance for the seams. Further, the same actions as with the core. The petals can be filled as you wish, just with a padding polyester or, again, with various cereals, buttons, etc. We sew the petals to the core, and your craft is ready.

Cardboard option
We bring to your attention one of the easiest and fastest ways to make such a flower. You will need:
- colored cardboard;
- scissors;
- glue;
- wooden skewer.
Preparing petal patterns. We draw petals on colored cardboard (the size is up to you) and cut them out, in the amount of seven pieces of different colors. Next, we make a stem, cut out a strip of green paper about 15 cm long and 5 cm wide, and use a skewer to twist it into a tube.
Lubricate the edge of the tube with glue and glue. Cut out a circle from yellow cardboard, this will be the core of our flower. We make an incision in the center and put this round on the stem. We glue our petals on it. On top, you can stick another yellow round element. The flower is ready.
The topic of our conversation today is a seven-color flower and how to make it with your own hands, including crocheting. In doing so, I use a variety of materials. Here you will learn about the options for making a flower from felt, fabric, paper and cardboard. The article is accompanied by photos of finished works, step-by-step instructions, diagrams and video tutorials that will help in mastering this art.
We knit a seven-flower flower with our own hands using a crochet hook
For girls who are fond of crocheting, it will be easier than ever to make a beautiful flower with your own hands. It can be a great addition to your interior. For a seven-flower, we need threads for knitting in different colors, a hook, a needle, 2 white buttons, soft filler, patience and a good mood. The last point is one of the most important in the whole work. Knitting will take place in rows, and all the elements of each row will be strictly indicated.
Let's start knitting from the very middle:
First we make an amigurumi ring;
1 row: we knit 7 columns without a crochet in an amigurumi ring;
2nd row: we add a single crochet to each of the previous row (total we have 14 of them), as well as a connecting column to the first single crochet.
We make a connecting column in any column from the last row of our middle, 19 air loops and 3 lifting loops;
1 row: single crochet in 5th chain, 1 double crochet, 3 single crochet semi-columns, 2 single crochet, 2 connecting sts and another connecting st in the next middle crochet;
2 row: you need to turn knitting. 2 connecting stitches, 2 single crochet stitches, 3 single crochet half stitches, 3 single crochet stitches;
3rd row: turn our petal again. 3 chain stitches, 2 double crochets, 3 half double crochets, 2 single crochets, 2 connecting stitches and another connecting stitch to the next middle crochet stitch;
4 row: turn knitting. again. 2 connecting stitches, 2 single crochet stitches, 3 single crochet semi-columns, 3 single crochet stitches;
5 row: 7 columns with one crochet in the same air loop as the previous one. We lead the connecting column between the second and third rows of the petal. 7 columns with one crochet in the air loop between the first two rows of the petal. Connecting column to the original chain from the air loop.
For greater confidence in your actions, it is recommended to use the scheme:

We make all the other petals by analogy with the first one, all the petals start from the middle. Further, to make the plant voluminous, we make a second blank, leaving from each petal a long thread of the corresponding color.
When the blanks are ready, sew them with the threads left in advance, without completely sewing. Where there is still a hole, insert filler into this work of art and sew the toy.

In order to somehow separate the center of our product, you can sew a white button there, according to size.
Let's try to sew a bright seven-color flower out of felt with our own hands
Our "Miracle of Nature" can be made not only by knitting, there are many more ways. There are as many as you can imagine. For example, you can make it from felt - a material for needlework.
For our entertaining toy, in this case, we need:
- contour for fabrics
- scissors
- felt eight colors
- glue gun
- synthetic winterizer
- free time
To begin with, cut out the petals along the contour (2 of each color) and the yellow center. As soon as everything is ready, let's start stitching all the elements (important, you need to sew everything separately) and in the process fill the details with padding polyester.
Upon completion of all preparations, sew all the details into a flower. For young children, you can make an exciting game, such as these butterflies, which must be arranged by color:

Let's make our "Fairytale Plant" from ordinary colored paper

To make a seven-flower flower, you will need double-sided colored paper in seven different colors, green corrugated paper, glue and scissors.
First, let's make the petals for the flower:
1) cut out 7 identical squares 10 by 10 centimeters from our double-sided paper;
2) fold diagonally into a triangle, and fold its ends straight to its upper corner.
3) Expand the same parts. Forming wings from them, and we open the same wings by gently sticking a finger into them.
4) We fold the extreme triangles of the resulting figure down so that they are on the surface.
5) Fold the wings exactly in half, while their lower part should lie on the top.
6) Lubricate the inside of the figure and glue it.
So we make 7 petals of different colors, we make leaves from corrugated paper. And glue everything together.
Video selection on the topic of the article
We present to your attention video tutorials for better mastering the techniques and ways to create beautiful gizmos!
The topic of our conversation today is a seven-color flower and how to make it with your own hands, including crocheting. In doing so, I use a variety of materials. Here you will learn about the options for making a flower from felt, fabric, paper and cardboard. The article is accompanied by photos of finished works, step-by-step instructions, diagrams and video tutorials that will help in mastering this art.
We knit a seven-flower flower with our own hands using a crochet hook
For girls who are fond of crocheting, it will be easier than ever to make a beautiful flower with your own hands. It can be a great addition to your interior. For a seven-flower, we need threads for knitting in different colors, a hook, a needle, 2 white buttons, soft filler, patience and a good mood. The last point is one of the most important in the whole work. Knitting will take place in rows, and all the elements of each row will be strictly indicated.
Let's start knitting from the very middle:
First we make an amigurumi ring;
1 row: we knit 7 columns without a crochet in an amigurumi ring;
2nd row: we add a single crochet to each of the previous row (total we have 14 of them), as well as a connecting column to the first single crochet.
We make a connecting column in any column from the last row of our middle, 19 air loops and 3 lifting loops;
1 row: single crochet in 5th chain, 1 double crochet, 3 single crochet semi-columns, 2 single crochet, 2 connecting sts and another connecting st in the next middle crochet;
2 row: you need to turn knitting. 2 connecting stitches, 2 single crochet stitches, 3 single crochet half stitches, 3 single crochet stitches;
3rd row: turn our petal again. 3 chain stitches, 2 double crochets, 3 half double crochets, 2 single crochets, 2 connecting stitches and another connecting stitch to the next middle crochet stitch;
4 row: turn knitting. again. 2 connecting stitches, 2 single crochet stitches, 3 single crochet semi-columns, 3 single crochet stitches;
5 row: 7 columns with one crochet in the same air loop as the previous one. We lead the connecting column between the second and third rows of the petal. 7 columns with one crochet in the air loop between the first two rows of the petal. Connecting column to the original chain from the air loop.
For greater confidence in your actions, it is recommended to use the scheme:
We make all the other petals by analogy with the first one, all the petals start from the middle. Further, to make the plant voluminous, we make a second blank, leaving from each petal a long thread of the corresponding color.
When the blanks are ready, sew them with the threads left in advance, without completely sewing. Where there is still a hole, insert filler into this work of art and sew the toy.

In order to somehow separate the center of our product, you can sew a white button there, according to size.
Let's try to sew a bright seven-color flower out of felt with our own hands
Our "Miracle of Nature" can be made not only by knitting, there are many more ways. There are as many as you can imagine. For example, you can make it from felt - a material for needlework.
For our entertaining toy, in this case, we need:
- contour for fabrics
- scissors
- felt eight colors
- glue gun
- synthetic winterizer
- free time
To begin with, cut out the petals along the contour (2 of each color) and the yellow center. As soon as everything is ready, let's start stitching all the elements (important, you need to sew everything separately) and in the process fill the details with padding polyester.
Upon completion of all preparations, sew all the details into a flower. For young children, you can make an exciting game, such as these butterflies, which must be arranged by color:
Let's make our "Fairytale Plant" from ordinary colored paper
To make a seven-flower flower, you will need double-sided colored paper in seven different colors, green corrugated paper, glue and scissors.
First, let's make the petals for the flower:
1) cut out 7 identical squares 10 by 10 centimeters from our double-sided paper;
2) fold diagonally into a triangle, and fold its ends straight to its upper corner.
3) Expand the same parts. Forming wings from them, and we open the same wings by gently sticking a finger into them.
4) We fold the extreme triangles of the resulting figure down so that they are on the surface.
5) Fold the wings exactly in half, while their lower part should lie on the top.
6) Lubricate the inside of the figure and glue it.
So we make 7 petals of different colors, we make leaves from corrugated paper. And glue everything together.
Video selection on the topic of the article
We present to your attention video tutorials for better mastering the techniques and ways to create beautiful gizmos!