How to cut a word out of Styrofoam. For what cases do they order volumetric styrofoam decorations? Create a lettering in the primary color of a wedding celebration
More and more hand-made decor elements are found in modern interiors. One of the fashionable novelties of steel volumetric letters, which act as an independent decoration or add up to compositions of different words. In this article, we'll talk about how to make volumetric letters with your own hands to decorate the interior.
How to make 3D letters from textiles?
The easiest way to create a wonderful home decoration that any woman can handle is to sew letters from textiles. This trend is especially fashionable in families with small children. Mothers of needlewomen sew whole names for their little ones from voluminous soft letters. After, these decorative elements can be actively used as sofa or floor pillows.
To make three-dimensional letters from textiles, you need to do the following:
- Choose a fabric. It can be matched to the overall interior of the room, or it can become a bright accent that differs from the style of the room.
- It is necessary to make stencils of the letters that you plan to make from cardboard.
- Attach the stencil to the fabric and circle.
- Cutting should not be along the lines drawn, but departing from them by 1.5–2 cm. It should also be taken into account that when outlining the stencil, the second part should be made mirrored.
- Sew two halves. This can be done with a regular needle and thread, or sewn along the lines with a sewing machine.
Leave a hole in one place. - Fill the letter with cotton wool or any other filler through it. Sew carefully.
How to make three-dimensional letters from cardboard?
To make volumetric letters from cardboard, you need to prepare:
- corrugated cardboard;
- scissors;
- pencil;
- glue;
- paper tape.
The work of making letters is as follows:
- Draw the desired letter on corrugated cardboard and make two identical blanks.
- Now cut a strip from the same cardboard, bend 2 cm on each side of this strip.
- Apply glue to the folded edges of the strips. With their help, connect two letter blanks.
- Glue the corners with paper tape and decorate the letter.
Ornaments can be: threads with which to wrap a letter or glue the finished letter with corrugated colored paper. A little imagination and your homemade letter will turn into a wonderful decorative element.

How to make 3D letters from Styrofoam?
Styrofoam makes excellent lightweight volumetric letters. Moreover, their manufacture is not very laborious. Before starting work you need:
- choose foam of the required size;
- prepare a sharp construction knife;
- choose paint for the letter.
Now let's get down to work on creating a masterpiece.
- A blank stencil is made on paper. It can be a single letter or a whole word.
- Stencil, transfer the contours of the letter to the foam.
- Using a sharp knife, cut out a letter or a word from the foam along the lines.
- Paint the finished letter.
It is advisable to apply the paint in two layers. Then the porosity of the foam will not be so noticeable. Foam volumetric letters are decorated with lace, threads, small flowers, burlap, etc.


How to make three-dimensional letters from plaster?
Gypsum is an excellent material from which you can make wonderful decorative elements in the form of letters. Before you get started, get a plaster of paris and get started.
- First you need to make a form. Cardboard is perfect for her. Cut out plates from it, from which to fold the desired letter.
- It is advisable to glue the joints of the form with tape, then the gypsum will not "run away" anywhere.
- According to the instructions, dilute the gypsum powder and pour it into the prepared mold, distributing it well over it so that there are no voids.
- Leave the mold for the plaster to harden. Usually 5 hours is enough for this.
- Remove the plaster letter from the mold and sand all surfaces with sandpaper.
- Paint the letter in the desired color and you can decorate the interior.

Volumetric letters are always beautiful and attractive. Try to make such a decorative element with your own hands using any of the above methods. So you will bring a drop of comfort to your home without spending a lot of money.
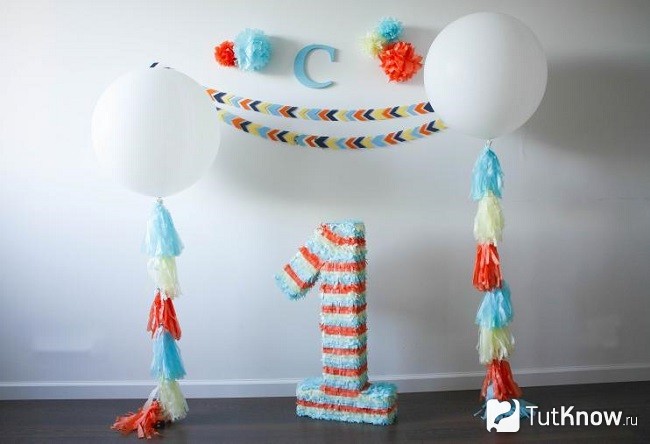
Volumetric figures are decorated with a variety of materials, using corrugated paper, threads, napkins for this. But the base is made of cardboard. If you want to make the number 1, then with your own hands you first need to make a blank for it.

The diagram below shows the recommended sizes for this number. You will need 2 of these parts - one for the front, the other for the back, cut them out of cardboard. Decide how thick the number will be, this width you need to cut a strip of cardboard.
It is better to make further manipulations together. Start at the top, first attaching a strip of sidewall to the face with masking tape.
Please note that where there is a bend in the number, the adhesive tape must be cut evenly so that it fits well in this place.
After you fix the strip of cardboard on the front of the number, you also need to glue it to the second side of the given number, which will be the back.

It remains to glue one edge of the strip to the second at the top, after which you can tell yourself that you could make the number 1 with your own hands.

Let's see how to craft the base for the next number. To make the number 2 out of cardboard, transfer the presented template onto it with your own hands. To do this, you can use squared paper to then draw larger cells on the template, thus transferring the drawing.
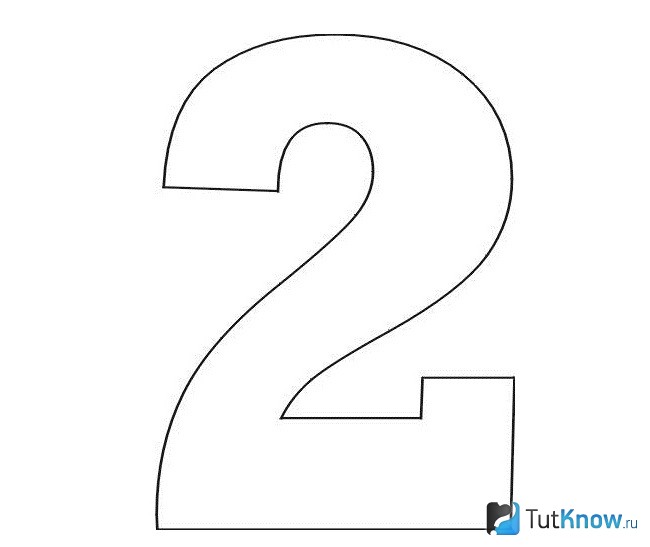
You can also draw it by hand, repeating the lines and bends of this figure. As in the first case, to work you will need:
- digit pattern;
- cardboard;
- construction tape;
- scissors.

Now attach the other half of the number.

As you can see, for this it is not necessary to glue the tape over the entire surface, you can attach it in small pieces, fixing it perpendicular to the surface.
Surely, you have already understood the technology of how to make a volumetric figure out of cardboard. By the same principle, you will make all the other numbers, if the events to be marked require it. Now check out the different options for decorating such numbers.
How to make a fringe to decorate letters and numbers?
To do this, you can use various types of paper: corrugated, colored, we will take in silence. In another way, it is also called papyrus, wrapping. When you buy shoes, it is often in this thin translucent material that they are wrapped.
To make a volumetric figure according to this principle, you will need:
- tissue paper of different colors;
- scissors;
- PVA glue.

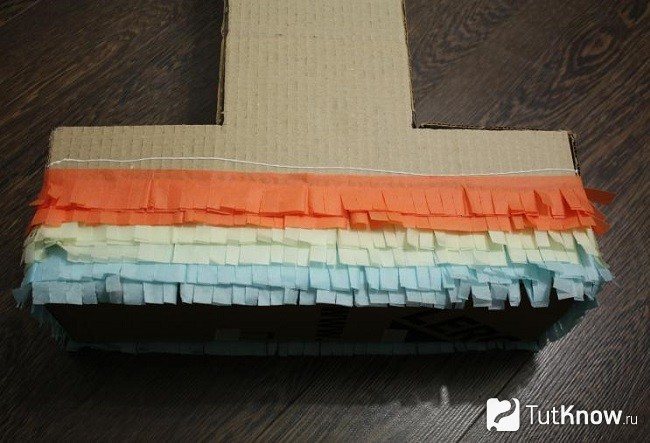
The long edges of these blanks with scissors need to be cut with a fringe. To speed up this process, fold several strips at once or fold each to make 4-5 layers.

Apply numbers from PVA cardboard to the lower part, glue a strip of prepared paper here. Since it is very thin, it is better to glue two tapes at once. If you use colored paper or corrugated paper instead, then attach in one layer. The second goes a little higher, being located above the first.

Combine colors to make the number more effective.
After you completely decorate it, decorate the corner of the apartment in the same colors.
Paper for bulky letters and numbers
Look at interesting design options for numbers from it.

To embody such a masterpiece, take:
- colored paper;
- scissors;
- double-sided tape or glue gun;
- compass or round object.

- Using a compass or circular template, draw a circle on the back of the colored paper.
- Cut a small segment outside, as long as it will be, the petals of the flower will become that wide.
- Starting from here, cut this circle in a spiral, working from the edges to the center.
- When this part of the work is done, take the outer edge of the flower in your hand and begin to twist it.
- Fix the middle with a drop of glue, also attach a small circle to this solution to the back of the flower so that the structure does not unwind.
- Glue these blanks to the cardboard numbers, placing them rarely or often.
- For this, you need to cut out only one blank from cardboard, then decorate it. To do this, cut the paper into strips 5–6 cm wide, glue the edges of the number with them in order to decorate the front and back sides at the same time.
- Now we begin to twist flowers from these strips. Fold the edge of the paper about 2 cm here to create a bulky edge.
- Bend the corner, make a turn, then bend the workpiece, make a turn again, bend the flower again, and so on.

See how to make paper roses, a master class will help you with this. Such a flower can be made not only to decorate voluminous figures, it is also suitable for other occasions. But then you will need to additionally create a stem.
To make corrugated paper roses, take:
- a sheet of cardboard;
- pencil;
- ruler;
- scissors;
- corrugated paper;
- a toothpick;
- glue stick.
Then attach this cardboard assistant on top of the folded sheets of corrugated paper, cut along the contours.

Straighten the resulting part, starting from the left edge, screw it onto a toothpick with a cut sharp end. In this case, a wire is used for this, take this idea into service when you make a flower from paper with a stem. Tie with thread at the bottom.
When making a blank from corrugated paper, twist the inner petals tightly, and the outer ones more loosely.
Having made several such blanks, decorate the cardboard numbers with flowers.

The master class will also help you to make other roses from corrugated paper.
- Cut a strip 6 cm wide from the paper. Fold it in an accordion manner.
- Use scissors to make the top edge rounded. Expand this detail. Start rolling it so that the wavy edges are on top.
- Tie a thread around the bottom of the rose.
- To make the petals look more picturesque, wind each one with a toothpick.

To make an openwork flower, take:
- corrugated paper;
- scissors;
- threads.

Thus, arrange the entire edge of the strip, such tucks are similar to those you make on dumplings, holding their sides together.

Now twist this ribbon, giving it the shape of a blossoming bud. Tie with thread to secure.

Here is another option, it is very simple to implement.
If you want the corrugated paper flower to have a double color, then cut a strip of white, and the second, which will be wider, from a tape of a darker color.
Place two strips one on top of the other so that the narrow one is on top. Roll them in accordion widths. Take this prepared canvas, starting at a narrow edge, and twist it into a flower shape.

The next idea will require the following materials and accessories:
- corrugated paper;
- cardboard;
- compass;
- scissors;
- glue.
Manufacturing instruction:
- Roll the cut paper strip across several times to immediately cut a certain number of identical petals.
- Draw a circle on the cardboard, cut it out. Step back a little from the edge of this workpiece, glue the petals, placing each subsequent one on the edge of the previous one.
- Having completed the first outer row in this way, make the second inner one, if you want, then close the middle of the flower with petals.

The last master class in this series will tell you how to make the number 1 using colored paper.
- You already know how to make a template. Now cover the cardboard with colored paper. You need to cut strips of paper, their width will be equal to the radius of the flower.
- Fold the first strip of paper, starting at the small edge, in an accordion manner. Now put some glue on this edge, attach the second small edge to it to turn the strip into a circle.
- Close its core with a small circle made of the same or another colored paper.
- You can make large and small flowers, arrange them on the number as in the photo.

It's time to switch to a different type of material, maybe you are just now thinking how to make number 2 using yarn?
Knitting threads for decorating letters and numbers
They are used to decorate volumetric figures. You can use one or more yarn colors. For such a decoration you just need:
- preparation of a figure from cardboard;
- threads;
- PVA glue;
- brush.

When you're done with yarn of the same color, glue the loose tip to the cardboard. Next, attach the end of the thread of the second ball. Decorate the volumetric figure in a different color. When the number is completely covered with yarn, you can admire the excellent results of your work.

In skillful hands, knitting threads will quickly turn into. You can make them with a fork, a semicircle made of cardboard or in another way.
Step by step photos will also help you make thread pom poms.

- As you can see, you first need to cut two identical rings out of cardboard. Put the thread inside.
- The yarn from the ball is wound around the rings, gradually filling them. Then cut along the outer circle, passing the scissors between the two cardboard blanks.
- Pull the string and the fluffy pompom is ready.
- Thus, make several different sizes using different yarns.

Decoration of volumetric letters and numbers with ribbons
This material will also help solve the question of how to make volumetric figures.

To format the number 2 in this way, take:
- red satin ribbon;
- white beads of various diameters;
- glue;
- scissors.
A glue gun will help fix the beads of different diameters. They can be sewn to fabric ribbons, but this work is more painstaking.
To implement the second variation, you need:
- braid of the same width, but different colors;
- scissors;
- glue.

If you have enough free time, you have patience, then you can make, decorate with them the entire figure or only individual fragments.

If you want, use the already known master class to make such flowers or make them according to a different principle.

As you can see, you need to periodically bend the corners of the tape, fix them with a basting seam. When it's done this way, twist it up to give it a rose look. Secure the workpiece with a thread and a needle.
The zigzag braid is the ready-made base of the flower. It is enough to collect it on a thread, pull it, shape it into a circle, fix it with a thread.

You can make more than one circular row of such turns, but several. Each subsequent one will be slightly smaller than the previous one in diameter. Sew a button in the center and you can sew or glue the flower onto the number.

It can be not only flat, but also voluminous. To do this, you will need the same wavy braid. Cut two strips from it. Match them, as it was done in the photo, sew along to connect. Now you will twist this ribbon so that it turns into a round flower. How to combine these two stripes can be seen in the next photo.

Do-it-yourself roses and other flowers from napkins
For the next master class, you will need:
- napkins;
- circle pattern;
- stapler;
- scissors.

Lay several napkins, without unfolding, one on top of the other. Place a circle on top. Cut out your napkins using this pattern.

In the center, these blanks need to be fixed with a stapler. Lift the first layer, roll it up in the form of an inner still unblown rosebud. The second row of petals will be looser. Thus, decorate the entire rose.
Here's another idea. You need to take 8 napkins or papyrus paper, roll up like an accordion. For this method, thicker multi-layer napkins are suitable. You should have a solid rectangle. Cut off the ends to make them rounded. Now start straightening the blanks folded with an accordion, making them in the form of a flower.

To make the number 1, you need to glue these roses over the entire surface. See how beautiful flowers of different sizes and colors look.

- will also allow you to create blanks for the design of numbers. To do this, you need to cut the paper into squares, put a pencil in the center of each, twirl.
- Without removing this square from the pencil, attach the blank to the cardboard base of the number, having previously greased this area with glue.
- The trims must be glued close to each other in order to create the effect of a single volumetric surface. It will also be appropriate here to combine different paper colors.

You can use plasticine instead of glue. It is necessary to lubricate the surface of a cardboard blank with it, or roll a small ball out of plasticine, and wrap each end face with a half of a toothpick, insert such blanks into plasticine balls. Then, attach to the cardboard base.
If you plan to hang the number on the wall, then you can make it out of polystyrene foam. In this case, the trims are attached to a toothpick, then stuck into the foam. If a sheet of this material is not very thin, then you can make volumetric figures and put them. They are more durable than thin foam.
How to make 3D letters?
You will create them according to the same principle. To do this, you need:
- cardboard;
- pencil;
- scissors;
- paper towel tube;
- White paper;
- hot melt glue.

Decide how wide the letter will be. Cut the rings from the paper towel tube this wide.

Stick them on one half of the letter, then glue the other on top, pressing it down a little.

Cut sheets of white paper into strips, glue them over the sides of the letter, and then all of it.

You can paint such a letter with acrylic paint or glue flowers from paper or napkins, or decorate them with satin ribbons or threads. See how to make letters on cardboard, declaring them in cloth. You already know how to make a dense base. Glue strips of fabric on it with PVA, and lace tape on the outer corners.

From these letters you can add a word to arrange a photo session on your wedding day.

If you are celebrating the anniversary of this event, then place one or two numbers next to the letters indicating how many years of marriage you are celebrating.
You can paste over the letters with paper or wallpaper that was left over from the repair.

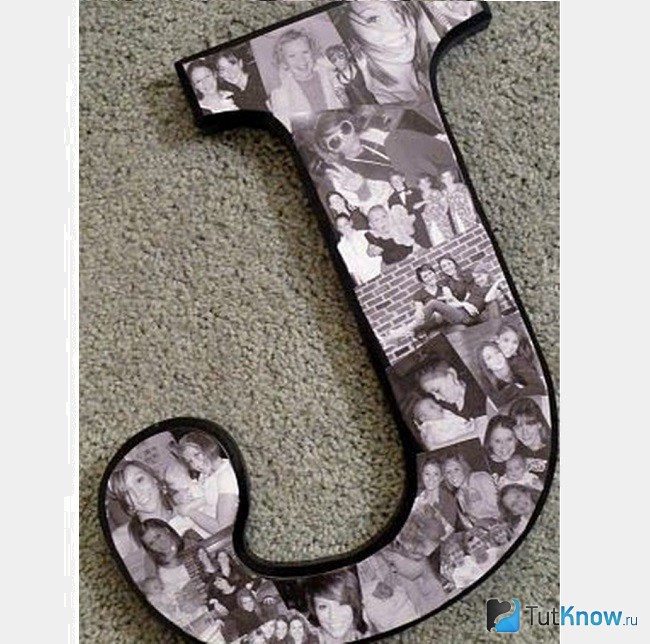
An original, at the same time touching decor will be the design of such a letter with family photographs.
If the birthday boy loves the forest or you want to decorate a room on this topic, then glue birch bark and moss or maple leaves onto the base.

If you want to make letters quickly, then wrap a bulky cardboard blank with thick yarn or jute rope.

You can make a wire base, wrap it with yarn.

The resulting videos will help you better understand how to make three-dimensional numbers and letters.
And the letters will not be simple, but elegant, with rhinestones.
Polyfoam is a cheap, durable and very malleable material. It is often used to decorate rooms where a holiday, party or wedding is planned. DIY styrofoam letters can be used to create inscriptions, monograms, logos.
The technology for making letters from foam is very simple. It consists in the fact that a contour is first applied to the foam, then the desired letter is cut out, and then it is decorated in various ways. In this workshop, you will learn how to cut letters from Styrofoam and make a lettering or logo out of them to decorate a room. So let's get started.
We will need:
- letter templates (it is more convenient to print on a printer and then cut out);
- a sheet of polystyrene 2-5 centimeters wide;
- cutter or ordinary knife;
- marker;
- glue.

Personalized monogram
Do you want to decorate your front door or room with an original personalized monogram? Polyfoam is perfect for this purpose. The technology remains the same. First, create letter templates out of paper by choosing a font and printing them.

The personalized monogram is ready. Now you need to decorate it. How can you paint the foam letters? Any paint you have on hand. It is most convenient to do this with spray paint. It remains to place the monogram of letters on a suitable background, and the craft is ready.
If you have enough time, you can decorate the letters from the foam with a cloth. To do this, you need to attach letters to a piece of fabric, circle them along the contour and cut out the details. Don't forget to leave an allowance! Lubricate the surface of the letters with glue and wrap them with a cloth. Wait for the glue to dry and enjoy the result.
The other day we told you about decorative letters at a wedding, as an original way of design and mentioned that such letters can be made of various sizes and shapes from any material you like: cardboard, fabric, metal wire, flowers, etc. Today we want to continue the conversation on this topic and show you the volumetric letters made of foam.

Why are Styrofoam letters so good?
1. Low weight. Styrofoam letters can be made as large as your imagination and possibilities allow, and at the same time you do not need to think about how to rearrange them from place to place, because foam is a very light material!


And you can safely hang such letters from the ceiling and not be afraid that they will hurt someone if they suddenly fall down.

2. Volume. Styrofoam is suitable for those who like voluminous rather than flat letters.


3. Moisture resistance. Paper letters are also quite light in weight, but they are afraid of water, but with foam letters any unexpected cataclysms like sudden rain or sleet are not scary (just do not forget to insure yourself with waterproof paint if you paint them).

4. Manufacturing. You can make your own styrofoam letters.

5. Low price. Compared to letters made of wood or flowers, styrofoam letters are quite cheap. Moreover, they can be made from the material left over from the purchase of household appliances.

6. Long service life. After the wedding, the letters made of polystyrene can serve you for more than one year as an element of decor or props for photographs - you can even lend them to friends, or even give them to friends who have decided to play their wedding.


How to make letters from Styrofoam with your own hands
In order to make letters from foam with your own hands, you will need the following materials:
- Styrofoam;
- marker or felt-tip pen;
- a ruler or straight rail, along which you can draw lines;
- a clerical knife (or any other knife suitable for cutting foam);
- sandpaper (not necessary if you paste over with newspapers);
- PVA glue or others. (Attention! Moment glue is not suitable for foam plastic!);
- newspaper for pasting;
- any materials for decoration - paint (acrylic is suitable), fabric, colored paper, ribbons, threads, beads, buttons, etc.

The order of work is as follows:
1) Choose a foam of suitable thickness, and if not desired, glue it from several thin sheets.

2) Using a ruler and marker, draw the letters you want. At this stage, it is wise to use a template, for example, cut from thick cardboard.
Today, almost no solemn event is complete without a photo session, and for this, the organizers arrange beautiful thematic photo zones. There are many decorating ideas, and one of them is large foam letters that can help you to remember the pleasant moments of your life. This material is easy to work with: it is easy to decorate, it can be stored well and looks beautiful. The designers of the site will conduct several original master classes on making unusual letters, which you can do with your own hands in just a couple of hours. To do this, you need to prepare foam, decor and give free rein to your imagination, so that the result will delight your loved ones and guests.
Polyfoam today is one of the most demanded materials for decoration; it is used for decoration:
- exhibition expositions;
- carrying out promotions;
- for outdoor and indoor advertising signs;
- special events: for example, weddings;
- decorating photo zones.
Polyfoam has gained immense popularity due to its undeniable advantages:
- you can make letters and compositions of any size and shape;
- Styrofoam is beautifully decorated, giving solemnity to the event;
- foam compositions are lightweight, thanks to which they are easy to fix in any space;
- workpieces processed with special compounds will last quite a long time, they are not subject to the negative effects of the external environment.

Styrofoam letter shapes, sizes and designs
Polyfoam is a convenient material, from which you can make blanks of different sizes and shapes. If necessary, several sheets should be glued together to make the final version more voluminous. The following layouts are most often chosen:
- separate elements for organizing photo sessions;
- advertising wall signs;
- long inscriptions in the form of hashtags;
- small table letters;
- floor compositions for which thickness is important - this way the decorations will look more voluminous. For large sizes, additional weighting will be required so that the inscriptions can stand on their own.

Blank design
Additionally, you should consider the design of the letters, as well as their colors. It is important to know here that not every paint is suitable for polystyrene foam, since many compounds can simply corrode the surface. Therefore, the layout should be pre-primed, and only then the required tone should be applied. The paint should be of high quality and not stain the clothes of the guests of the event.
If the lettering will be used in long-term outdoor decoration, for example, in advertising, an additional protective coating will be required. Most often it is liquid marble, which makes the structure 3 times heavier. It is advisable not to hang such letters on a wall or an advertising sign, but to use the floor version.
And also for decoration they use colored threads, self-adhesive film, LED garlands, individual flower arrangements - everything here depends on the imagination of the performers, there are a lot of options.

DIY Styrofoam Cutting Tools
The main difficulty in making letters and numbers is cutting the foam. There are several options here:
- you can cut the sheets with an ordinary construction knife, after preparing the vacuum cleaner, since the whole room will be filled with debris. Next, the product is sanded first with coarse, then fine sandpaper;
- it is used for cutting, only instead of a nail file you need to take a knife. Due to the high speed, the material is cut practically without debris;
- use a special machine to cut the foam at high temperature. You can do it yourself.

Making a machine with your own hands
If you plan to work often with foam, it is better to make a machine - with it the whole process will go with less waste and much faster. There are a lot of options for manufacturing equipment, each is based on a fixed nichrome thread, which is heated using a low-power power supply unit. Thanks to this, the foam is cut by melting.
You should know this! When working, it is important to observe safety precautions, children and animals must be at a certain distance from the equipment.
We chose the simplest option for making a machine, for work we need:
- power unit;
- switch;
- nichrome thread;
- 2 self-tapping screws;
- plywood frame.
The sequence of manufacturing a machine for cutting foam.
| Illustration | Description of action |
 | Make a frame from a sheet of plywood, cut a hole in it for the switch button. |
 | Screw in self-tapping screws along the edges of the frame in order to tighten the nichrome thread between them. |
 | Install the switch button in the hole, and screw the wires to the self-tapping screws. |
 | Connect the wires to the switch - you will need a soldering iron to work. |
 | Pull a nichrome thread over the self-tapping screws. |
 | Fasten the wires to the base of the frame with a glue gun, then connect them to the power supply. The device is ready for use. |

How to make with your own hands volumetric foam letters for a wedding
Beautiful lettering will help make your wedding more memorable. The following blanks are suitable as an idea:
- initials of young people in Russian or English;
- common surname;
- day of celebration;
- equation using initials;
- the word "love" in Russian or English;
- the word "married";
- cool inscriptions: "Happy together", "Caught at last", "Let's light it up";
- and you will also need hearts, arrows, frames for decorating tables and a candy bar.
Here, all the design depends on the imagination of the young and their creativity.


Create a lettering in the primary color of a wedding celebration
One of the most common holiday decoration ideas is initials. First you need to draw letters on large sheets of polystyrene, cut them out with a clerical knife, jigsaw or hand tool. After that, prime them or cover them with newspapers. Then they start staining.

How to add volume to a foam blank
To give volume to the letters made of foam, you can paint the end walls in a lighter or darker tone, they will look more advantageous in photographs.

Workshops on making foam letters for a photo shoot
To make letters for a photo shoot, it is advisable to use thicker foam - this way you don't have to glue the sheets to increase the volume.
Important! Do not use Moment glue in your work, as it corrodes the surface.
LOVE lettering for a romantic photo shoot
Words of love will be needed not only for a wedding celebration, they are often used to decorate a photo zone.
For work we need:
- foam sheets;
- newspaper for pasting figures before painting;
- PVA glue and a trimming knife, you can use clerical;
- scissors, ruler;
- a simple pencil and markers or felt-tip pens;
- dye;
- decor.
Let's start making the inscription.
- Cut the foam into 4 pieces according to the number of letters.

- Draw letter templates on a sheet of A4 paper, cut them out and transfer to foam. If a large size of layouts is required, it should be drawn directly on the Styrofoam.

- Use a sharp clerical knife to cut the letters along the marked lines. Movements should be clear and even; if irregularities are formed, they should be smoothed out, then the edges should be sanded with sandpaper.
- Since the foam absorbs paint, it is necessary to pre-glue the blanks with newspaper using PVA glue.

- The simplest decoration is coloring with bright paint, you can use beautiful wrapping paper.

- The use of additional decor will help hide flaws in the work, for example, beautiful ribbons are used for the sidewalls.

Decorating letters for a photo shoot
If the letters are decorated with three-dimensional decor, you can skip the thorough grinding procedure - you just need to smooth out large irregularities. An interesting option is obtained using yarns of different thicknesses and colors. In this work, the main attention should be paid to the density of the winding: it must be strong and uniform throughout the letter.

How to make original letters from Styrofoam
An additional unusual decoration makes the foam letters original and memorable. We suggest that you familiarize yourself with the basic decorating techniques.
Young Avengers themed letters
To make letters for a thematic photo shoot, you will have to work a little longer on the decor. For work, we will additionally need:
- acrylic paints in blue, yellow, red and white;
- printed letters on a printer;
- cardboard;
- sandpaper.
Let's get down to a fun creative process.
| Illustration | Description of action |
 | Cut letters out of paper. |
 | Transfer the template to the foam, and cut out the letters with a clerical knife. |
 | Sand the edges with sandpaper. |
 | Draw a thematic drawing on each letter. |
 | On the letter A - hammer. |
 | Next, draw a shield. Draw logos on all letters in the same way. |
 | Mixing paints with a brush, paint all the letters in the appropriate theme. |
 | Vibrant letters will be the centerpiece of an avengers-themed party. They can be left on the table or attached to the wall. |
In more detail, the master class can be viewed in the video:
Festive styrofoam lettering decoration
The more unusual the decoration of the letters is, the more interesting the memorable pictures will be. We offer another master class on decorating blanks.

Floral lettering foam decoration
It is very convenient to work with polystyrene, you do not even need professional skills for this. Beginners will be able to cut out simple lettering and decorate them with floral decorations. The surface allows you to attach any decor to it. We suggest that you familiarize yourself with the most successful works.
1 of 6
