What can be drawn on the New Year postcard. Beautiful New Year postcards do it yourself. Snow-covered postcards with sequins
Predated on New Year's Eve People exchanged congratulators or sent them native by mail. Unfortunately, with the development of digital technologies, people almost ceased to give each other postcards, as a last resort, send its digital version by e-mail. But it is so cool to get a real postcard, to hold in your hands and fill the heart with warmth of attention. It is especially nice if the New Year's postcard gives children, almost independently creating it with their own hands. Made Handbook Create Create Create good New Year spirit And bring joy to the author and addressee.
There are many options for creating new year postcards, let's look at several step-by-step descriptions Making a wide variety of postcards.
For the smallest kids, we propose to create a postcard with a bright (can be multi-colored) garland from clear fingerprints. Or using a little palm imprint to create a fun frost grandpa.
Step 1. On any flat object that does not absorb paint, make a rectangular frame from insulating tape or tape for a future greeting card. For these purposes, you can use a baking sheet.
Step 2. To the smooth layer, apply paint on my palm and cotton stick Create Santa Claus or any New Year's drawing.

Step 3. Reprint the drawing on the postcard attaching a postcard to the paint.
See video: Christmas greeting card with your own hands with a footprint or child's hands.
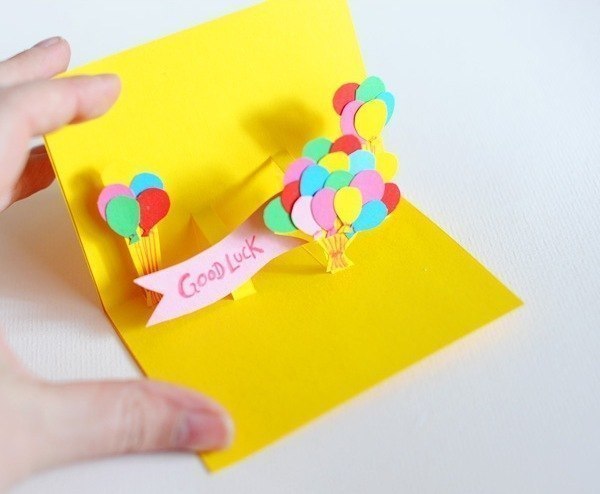
New Year card with snowman in 3D format

Take a white tight cardboard and cut three different circles. Let off the edge of the edges of the chiffel pencil, so the snowman will acquire a favorable form. Glue the circles one on one, so that the smaller one is top, and the biggest bottom, then stick them to the postcard. From color cardboard Cut the triangle-nose, handles, circles - eyes and buttons, rectangle - scarf.
New Year card with snowy snowdrifts
Creating this postcard will turn into an amazing fabulous ritual for your child. Any kid will be happy to help you and as much as possible can manifest your talents.

Necessary materials:
- Thin double-sided cardboard, all sorts of shades of green;
- Dense cardboard for postcard;
- Sequins, beads, sparkles and other decorations;
- Scissors;
- Normal white list;
- Glue.
Step 1. Cut different Christmas trees from colored green cardboard.
Step 2. Tight cardboard fold in half.
Step 3. White Sheet Cut the depth of the created postcard. Fold it in the form of harmonica.
Step 4. The ends of the white harmonica are sticking to the bottom, the inner part of the postcard, and the Christmas trees are glued to the drifts.
Step 5. Decorate the postcard.
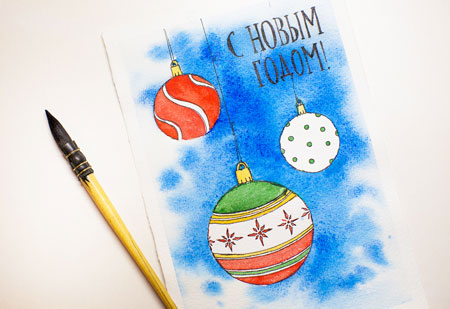
Christmas card with balls

As a gift, you can make a postcard not only with the image of the Christmas tree, but also with bright colorful balloons. You can use bright colored paper or even glossy sheets of old logs. Cut those sheets with thin stripes of different widths And glue on a white sheet. From the resulting striped leaf cut out different balls and stick to the postcard.

Decorate Christmas balls on a postcard tied to a bow of bright ribbons.
To create balls, you can also use flat buttons.
New Year's postcard with bulk balls

Necessary materials:
- Multicolored cardboard for balls;
- One cardboard sheet for postcard;
- Pencil;
- Scissors;
- Glue;
- Stapler (thin wire).
Step 1. Cut out the same circles from multicolored cardboard so that they come out the same use a circus or any flat round item that circle the contour pencil.
Step 2. Cut circles secure the stapler (wire) together in the center.

Step 3. The resulting flat ball ride the postcard and bend the circles in half.
Step 4. Decorate a bowl bow and sign a postcard.
Greeting card you can also decorate multicolored flags From fabric or paper and attach or sew to a postcard.
Postcard with applique

Such a postcard is easy to fulfill and bring joy to any addressee. As a material, take the grains of rice. Use long grains to lay out herringbone, snowflakes or star. Round grains are remarkably suitable for imitation of snow.

Take the dark cardboard and stick to it carved white snowflakes. You can accommodate one large snowflake In the center of the postcard or use several snowflakes different size. Such a picture looks very smart and festively.
Christmas tree is a constant attribute of New Year's celebration, and a christmas card is excellent gift. Create such a postcard is very simple, so be boldly starting to create with your children.
On the Scandinavian style postcard will be depicted a Christmas tree created from paper strips.

Necessary materials:
- A4 format cardboard or dense paper;
- Glue;
- Colored paper (better bright), you can also use braid or paper for scrapbooking and is also suitable for color tape;
- Scissors.
Step 1. Take paper or cardboard, fold in half and place a Christmas tree on the "face" part of the postcard, and the wish can be written inside. You can not fold the sheet, then the greeting card will be single (for such an embodiment, you can take a cardboard format A5).
Step 2. Cut with scissors from colored paper thin strips, from short to the longest, ascending. You also need to cut a rectangle for the future trunk.

Step 3. Stick strips to the cardboard in the shape of a Christmas tree.

Step 4. Optionally, decorate your Christmas tree, for this you can cut the balls and an asterisk on the top.
See video: Scrapbooking. New Year's postcard in Scandinavian style.
One more thing:

Required materials for manufacture:
- Cardboard (dense paper);
- Pen or pencil;
- Scrapbooking paper;
- Glue;
- Decorative details (beads, buttons).

Step 1. Cut the paper for scrapbooking with different rectangles, and the width of the rectangles should be the same in all, and the length of each next is a little more than that of the previous one (about 1 cm).

Step 2. Tightly twist the cut-off tubes with cut-off, winding them on a pencil or handle. Pipes fix with glue.


Step 3. Spread the formed tubes with each other in the shape of a Christmas tree, from a longer to a short tube. Stick the resulting Christmas tree to paper (better relief) or prepared cardboard.

Step 4. Decorate the Christmas tree with bright beads or buttons.
Create a Christmas tree made of bright purchased stickers will be even a small child, like decorations you can use multicolored bright flat buttons.
A older kids can embroider a Christmas tree on a dense cardboard, a hole is better to pierce in advance.
It is very easy to create a postcard if you embroider a triangle with a star on the top and a small rectangle - trunk.
The option is more complicated if you do the perimeter of the triangle to do holes opposite each other, and then secure them with threads, use sequins to decorate.
It is possible to embroider threads all that you want - and a modest Christmas tree, and a small deer and sock with gifts.

Little children can also create an applique from a sheet of ordinary cypress or fern and decorate with it beads, beads or sequins. The main thing is that simple in the manufacture of the postcard will bring great joy to the baby and grandfather or grandmother.
Creating a bulk new year postcard
Volume cards look very beautiful and solid. Such a postcard is always nice to get and donate. The bulk postcard can also be given to your favorite teacher or educator.
Postcard 1.

For the manufacture you will need:
- Dense paper or cardboard sheet;
- Glue;
- Billets Christmas tree (can be printed);
- Stapler (you can take a thin wire).
Step 1. Download, print and cut out the workpiece of the future Christmas tree. (You can also cut triangles yourself from color dense paper).

Step 2. Connect the part of each other in the stapler (or wire).
Step 3. Stick the resulting Christmas tree to cardboard or paper. Sit in half all the triangles of the Christmas tree, except the lowest. Sign, if you wish, add decorations, for example, in the form of sequins or beads.
Postcard 2.
Very easy in making a postcard, even a first-grader.

Necessary materials:
- Scissors;
- Glue;
- Dense paper (cardboard);
- Colored paper.
Step 1. Take color, better green, paper and cut rectangular stripes. Cut the rectangles in descending order, and the longest band should be wider than the rest, and short - already.

Step 2. Cutted strips fold the harmonica. The smallest band is folded more often and the greater the strip the greater the fold.
Step 3. Printe a Christmas tree on a folded double cardboard sheet. We glue the Christmas tree inside the postcard, on the formed bend.

The easiest option to create a postcard when you can fold the harmonic carved green triangle. Printed into cardboard and make a barrel and a star on the top.
Postcard 3.
This very easy thing in the manufacture, bright and beautiful postcard will enjoy all children.

For the manufacture you will need:
- Two leaf of thick paper (cardboard);
- Scissors;
- Different minor decorations;
- Pencil.
Step 1. Take one sheet of cardboard, bend it in half, then break and draw a conventional Christmas tree on the fold line.
Step 2. Bend the cardboard with a painted christmas tree so that the drawing is on top and carefully cut the drawn tiers of the Christmas tree.
Step 3. Extinguish into the opposite side the resulting Christmas tree.
Step 4. Take the second cardboard and take a cardboard to it with a Christmas tree along the contour. Decorate the christmas tree and sign the postcard.
Postcard 4.

The original card for lovers of Origami technology is very easy to perform.
For the manufacture will be needed: cardboard, paper for scrapbooking, scissors, circus and glue.

Distribute a circle on paper, draw the diameter and cut both semicircles. Fold the Christmas tree as in the photo and glue. Decorate and sign a postcard.
Postcard created in the technique of rainbow folding
Iris Style Folding or Rainbow Folding Can Reflect Your original ideas Creating a New Year's present. As a result, a very beautiful card with a spiral spiral effect.
Necessary materials:
- Cardboard (dense paper);
- Color paper, it will be necessary three colors;
- Glue;
- Iris-template (you can download it and print or build yourself).
To create this postcard, it will be necessary to build an Iris-template, it will be based on an equifiable triangle with a base of 14 cm long and a height conducted to the base equal to 16 cm. Take a rotation step 1 cm. Dimensions can be changed at their own way.

Step 1. From colored paper cut strips. Strip widths are made two times more than a step and add an allowance to 4 mm. Thus, for this postcard, cut out strips with a width of 22-24 mm. The first strips make a little wider, as they have to close the contours of the Christmas tree. Prepared bands will need to be very much, so cutting them along the creation of the postcard.
Step 2. Sliced \u200b\u200bstrips fold in half.

Step 3. Take the paper brown color and cut out 5 strips (preferably different shade Brown) size 35 by 20 mm. These strips also fold in half.

Step 4. Draw a silhouette of the Christmas tree on a dense cardboard and cut it very carefully (you can use the stationery knife). We make an Iris template or print ready.

Step 5. Attach the prepared template with invented side Cardboard with clips. Nothing terrible if the silhouette of the Christmas tree is more than the template. We will continue to work with the wrong side.
Step 6. Fill the trunk. We start gluing prepared brown stripes. To do this, smear the glue strip on the right side of the slot and glue so that the fold cut strip falls on the template line. Next, lubricate cardboard from above and below as well as the first strip and glue the second strip.

Step 8. Stick the biggest first color strip at the beginning of the template, try to fold coincided with the line on the template.

Step 9. Sharpen the second large strip of the second color with opposite side Template.
Step 10. Sharpen the next major strip of the third color along the bottom edge of the template.
Step 11. Very neatly glue the next strip of the first color near the first strip of the same color. Glue use very carefully, only setting small points.
Step 12. Through the template line, we glue the strip of the second color, carefully aligning that the fold coincided with the line.


Step 14. Turn the postcard and, if desired, decorate the resulting Christmas tree. Sign and can hand new Year's gift Created by hand.
For greater visibility, see also the video, it is although in English, but the essence can be understood without words: Iris Folding Tutorial Papermart.
The tradition of sharing cards due to significant events and holidays has already for more than two centuries. Despite the fact that our life entered modern information Technology: mobile communications and the Internet, we still rejoice, receiving as a gift from close man colorful postcard By the new year do it yourself.
but modern postcards They look quite different than those that we got twenty years ago. We no longer want to congratulate each other faceless printing industries, which stamped them unlimited circulations.
Card came to the replacement of boring standard cardons, artfully made by their own forces in which the smart man invested their soul particle, warmth and care. One of the most beloved of our holidays has always been a new year: it is with him that we associate our dreams and hopes for the best future, exchange gifts with people close to us.
The postcard made by your own hands can be a pleasant addition to the gift. Make it quite not difficult because materials for its manufacturer ( colored paper, cardboard, satin ribbons, bright Loskutka, Beads, sequins, braid) will be found in every home. The task will even be easier if you purchase a special set for scrapbooking in the store (this is exactly the art of the manufacture of postcards).
In addition to the materials, we may need a curly hole punch, openwork scissors or zigzag scissors, a set of decorative stamps.
The original card for a man can be pockets in which invested new Year's congratulations. In recent years, appeared fashion trend Be sure to link the congratulatory text with the patron saint of the upcoming year - one of the twelve animals of the Chinese horoscope.
Finding on the Internet a suitable poem, add all that we want to wish you a dear person and print the text on the home printer. Of course, for this we need a leaf of dense cardboard, the edges of which can be toned acrylic paints And decorate the ornament using suitable stamps.
How to make a postcard-pocket?

For this we will need:
- Listic tight gift paper with "male" pattern.
- Small details (you can some knight attributes taken from the children's game).
- Several sisal fibers.
- Small snowflakes.
- Carnation (spice, several pieces).
- Thread of artificial pearls.
- Artificial berries and imitation of a fir branch.
- Battle of silver ribbons.
- Silver braid.
- From gift paper simulate and glue the original envelope-pockets.
- The edges of the pocket are gentle by a narrow silver braid.
- In the lower left corner of the pocket, you create a beautiful composition of sisal fibers, beads, berries, snowflakes and fir branches. Fragrant carnations It is advisable to accommodate among artificial needles: they will be imitate spruce shishk, At the same time, flavory card.
- In the foreground of the composition, fix minor parts (imitation of weapons, shield or fragment of knightly armor).
- In the top of the sheet with congratulations, they fix a small, but spectacular bug of silver braid, decorated with snowflake and bunch of artificial berries.
- Insert beautifully decorated congratulations on ready-made pockets.
 Festive postcard for the new year, made with their own hands and intended as a gift a woman can be a volume imitation of a cozy winter window. Below you can learn how to make it easily.
We will need:
- Dark blue cardboard sheet.
- Gift paper striped.
- Trimming guipure, tulle or lace.
- Silver braid.
- Tape narrow lace.
- Picture with the image of a beautiful winter landscape.
- Trimming ceiling tiles or thick felt.
Sequence of execution:
- Blue cardboard sheet bend in half.
- We accumulate the inner part of the postcard coated white paper with beautifully decorated corners and in advance printed congratulations.
- Facial design gift paper Striped: It will imitate wallpaper on the wall surrounding the window.
- We stick a beautiful winter landscape (it will be visible from the window).
- From the strips of the ceiling tile or thick felt, we make imitation of the window frame and stick over the winter landscape.
- From pie ribbon lace We make lambrequen and fix it on the top of the frame.
- Curtains Mastery from trimming of Tulle or Guipure, we stick over the sides of the window, we intercept the narrow tapa and tie it with a bustard.
- Under the window, placing the strip with a beautifully executed greeting inscription. It can be printed on the printer or cut out of the old card with the help of curly scissors.
 Even the simplest postcard with the applique, made by the hands of the child, will be a very expensive gift for his mom.
Give the kid bent in half a sheet of cardboard and a fern leaflet (or any dried plant, whose leaves are reminded by a Christmas tree).
- We stick leaflets by facial Postcards: It will be the basis of the New Year's Christmas tree.
- Decorating the Christmas tree with finished glitter or mugs of confetti, which a child can independently make from color foil or glossy magazine pages.
- Taking thin brush And white gouache, you can portray snowflakes, circling around the Christmas tree.
- I make imitation of the snowdrifts from wool pieces and stick them under the Christmas tree.
- Congratulatory inscription (if a child can already write) can be made by hand.
- The same applies to the text of the congratulation: performed by touching children's doodles, it will warm any mom to the depths of the soul.
A completely small child can please her mother with a postcard decorated with purchased stickers. These stickers are sold to sets and are in the form of stars and various geometric figures. Suggest their baby and help him make simple applique in the form of a Christmas tree.
 Postcard with a Christmas tree made by the hands of a child will be no less road and his dad. Pretty original she will look with a Christmas tree made from paper tubes. What will required for this?
- Color fat cardboard.
- Paper for scrap.
- PVA glue.
- Beads, sequins, beads.
Sequence of execution:
- Bend cardboard in half.
- Place the future postcard, we are determined with the sizes of the Christmas tree.
- Paper for scrap cut into rectangles, roll and glue the tubes from them. The length of the tubes must be different corresponding to our preliminary markup.
- Making sufficient number Tubes, start sticking the Christmas tree to the cardboard. Down put the longest blanks. With each new tier, their length should decrease. We sample tubes with each other.
- Finished Christmas tree decorate ready-made glitters, beads and beads.
- Together with the child we write congratulations to your favorite dad.
 Beautiful postcard made in unusual technician, I will be a pleasant surprise for your favorite friend. On the front side, you can cut the round window and arrange it in the form of a beautiful Christmas tree decoration.
We will need:
- Tight cardboard leaf.
- Gift paper.
- Large silver snowflake.
- A piece of bright colored felt.
- Narrow silver ribbon.
- Round paper napkin with carved edges.
- Paper spruce branches.
Sequence of execution:
- We make the basis of the postcard: fold a sheet of cardboard in half. The front side is saving a beautiful gift paper.
- With the help of a circulation or any rounded item, the circle for the future window. The diameter of our circle must correspond to the diameter of the snowflakes you have (it can be bought in the department trading in Christmas tree decorations).
- We close the window with a piece of silver metallized cardboard.
- The edge of the cutting window is decorated with paper napkin With lace edges (cut the napkin to the same diameter).
- Volume edging of the window, we perform from a thick felt: making the necessary markup, cut the ring and stick it over paper lace, like the frame.
- The edges of the felt frame can be decorated with gel with silver blasts.
- In the center of the window, place a snowflake and glue it to a silver cardboard.
- At the top of the received we have christmas tree ball We glue the imitation of the metal fastening made by all of the same silver cardboard.
- On both sides of the "fastening" we strengthen paper spruce twigs (ready or carved on your own).
- Center "Fastening" Decorating a bows of silver ribbons.
- The finished card from the inside is saving beautiful paper and write on it the most warm wishes.
 You can please a friend with a cheerful postcard depicting a smiling snowman.
Necessary materials:
- Tight green cardboard.
- Picture depicting a cheerful snowman.
- Bilateral volumetric tape.
- Simple bilateral scotch.
- Ready voluminous stickers.
- Halves of pearl beads.
- Slice recalent ribbon.
- Stampik.
- Glue "Titan".
Stages of work:
- We fold a postcard, place and cut out the window with the front side of it.
- In accordance with the size of the window we select suitable picture And cutting it out by making an additional point of 0.5 cm on each side (it is necessary for fastening the picture to the volumetric tape). All markings are made with a simple pencil. Cutting a picture, erase the auxiliary lines.
- At the edges of the front side of the picture, we attach small squares of bilateral tape and glue the image of a snowman to back side Future postcard. At the same time, the impression should be created as if the snowman looks out in the window.
- At the bottom of the postcards attach a piece of the rep a ribbon (using double-sided adhesion).
- The edges of the ribbon hide under the volumetric stickers.
- Applying a few drops of glue, we attach the sequins to the ribbon in the form of snowflakes.
- These sequins make up the top corner of the postcard.
- The upper right corner of the window decorate a bright tissue bows.
- In the left corner, we have and glue halves of pearl beads.
- Insert for the inner part with chiskers from paper for scrap, cutting the square desired size and processing its edges with curb oil.
- We glue the liner for bilateral ordinary tape.
- Using the acrylic stamp, perform the print lettering.
 New Year's postcard with the applique from buttons will be a pleasant surprise for his beloved grandmother. Bright, unusual and very simple in manufacturing, it will become the center of admiring attention at the time of the solemn presentation of gifts.
Necessary materials:
- Tight white cardboard.
- A large number of large and small buttons of different color.
- Beads, beads, sequins.
- Pruning felt.
- Tangles of multicolored woolen yarn.
- Glue "Titan" (for ceiling tiles).
- Bending the cardboard in half, prepare the basis for the postcard.
- With the help of a simple pencil, we make a lung sketch of the Christmas tree.
- We lay out the image of a button of buttons, tightly filling them with a drawn outline. We glue butchers, alternating them in color and sizes, not leaving spaces and gaps.
- We decorate the Christmas tree with small beads and sequins.
- In the top of the top, we strengthen the stars carved from a bright felt.
- From pieces of felt cut out a large number of Squares and rectangles that will mimic gifts at the base of the Christmas tree. Each "gift" bandages an elegant bow made of woolen yarn (some threads before taking a bow can be skipped through a small button).
- Beautifully grouping "Gifts" under the Christmas tree and glue them.
- We write touching congratulations inside the postcard.
 Another gift for the grandmother can be a draw card from the threads. Taking fluffy yarn green color, We post a thread silhouette of the Christmas tree and take a tight cardboard with a curly edge. In the center we glue three large buttons. The original postcard is ready!
 An expensive grandfather can make a postcard, something resembling traditional, but only former times and with an indispensable modern "highlight".
What do we need?
- A piece of dark cardboard.
- Picture depicting Santa Claus (carved from magazine or old postcard).
- Several paper strips for scrap or page from the glossy magazine.
- Golden braid.
- Decorative tambourine.
- Artificial sprigs and berries.
Sequencing:
- In the center of folded in half, the cards are stuck a picture depicting Santa Claus. You can pre-attach a narrow rectangle of monophonic colored paper to it, placing it closer to the top corner of the postcard.
- At the bottom edge of the picture, we attach several glossy paper tubes with beaks, tied with gold bows: This is an imitation of congratulatory scrolls. They can be additionally decorated with paper sprues.
- The side side of the picture (slightly above the "scrolls") decorate the volume of the gift tied with a golden thread with a tiny bubble.
- You can additionally decorate it by cutting out a pair of snowflakes from an openwork paper napkin.
- Congratulatory inscriptions perform from hand using glitter with glitter (or cut out from the old postcard).
 Mama-needlewoman can please his beloved daughter with a picture of beauties - Snow Maiden.
Necessary materials:
- Tight cardboard leaf.
- Cardboard with silver beaks.
- Picture depicting Snow Maiden.
- Gel with glitters.
- Woolen yarn.
- Finished silver snowflakes.
- Satin braid, strip of floristic grid, beads, sequins.
Sequence of execution:
- We fold cardboard in half. To the front side with a sewing machine, we admonish the leaf of beautiful dense cardboard with silver beaks. Thanks to this applique, the postcard will be stronger and solid.
- With a simple pencil, we make the markup of the circular window (the edges of the circle can be made figured). Cut the window with the help of a stationery knife.
- In order for the postcard to acquire the original look, you can select the window with beautiful frame. For its manufacture, take beautiful cardboard And make an edging of arbitrary shape. We glue it with the help of the "Titan" glue.
- The external and inner edge of the frame will circle gel with silver glitter.
- We will issue a frame from one edge with snowflakes, an elegant bow made of braid, woolen yarn and a floral grid.
- The inner side is covered with light paper and write New Year's congratulations.
 For your favorite son, you can make a postcard in the popular Software Quilling technique. Skirfully made mittens will clearly demonstrate how great the desire of mom is pleased to please your child.
Necessary materials:
- Blue cardboard.
- Narrow strips of red and white paper.
- Beads and sequins.
- Satin ribbon.
- Printed on a color printer and cut-cut on figured scissors.
Sequence of execution:
- From the blue cardboard we make the basis of the postcard.
- From dense white cardboard Cut the image of a pair of warm mittens and tightly fill them with red paper ribbons twisted in a spiral. The edge of mittens perform from strips white color, and their middle decorate sequins.
- Finished mittens We place in the heart of the front side, connecting them with an atlantic ribbon and tolding it with a bow.
- Top corners decorate with elegant white flowers imitating frost patterns. In the middle of the colors we glue the blast.
- In the lower corners, we perform "frosty" curls decorated with transparent beads.
- Under mittens attach congratulatory inscription.
 The bulk card for the new year of the goats (sheep) is a wonderful reason to please your favorite girl, giving her a postcard-chaff, depicting a cute sheep - the patron saint of the upcoming year. To make it need no more than half an hour and a modest set of materials. So, we will need:
- Sheet of white and dense textured paper.
- A piece of black half-cup.
- Ready eyes for toys.
- Scissors: Simple and curly.
 Production sequence:
- We fold on white textured paper and diameters on it with a circle with a circulation or any object of a round shape.
- Cut the circle with curly scissors, leaving a untouched a small piece of bend so that the postcard can open.
- Of the white paper trimming, an oval hat and a small round tail.
- On a sheet of black half-cup, we conceive a face, a couple of ears and four legs. Cut all the details with conventional scissors.
- Before assembling the postcard, lay out all the details, achieving the greatest expressiveness of the image. Our postcard will stand, so it is necessary to arrange the legs so that they coincide.
- Gently glue all the details, removing the excess glue with a soft cloth.
- Our postcard-charm is ready. You only need to write the most nice words Inside and hand your girlfriend together with the New Year's gift.
 Make a card for a brother completely little baby. Of course, if an adult family member will be helping. Let's find out how to do it in fashion technique called Cardmaying.


Our postcard will be a bright picture with edging from cardboard base. To fulfill it, we need:
- A sheet of very thick cardboard (21/15 cm in size).
- Set of color velvet paper.
- Bilateral volumetric tape.
- Sequins-stars.
- Metal chain (22-25 cm long).
- Several acrylics or metal suspension And rings for fastening them.
- Singrytegone or cotton.
- Glue "Titan" or adhesive pencil. In extreme cases, the usual stationery glue.
- Conventional scissors and zigzag scissors.
- Special press lubrase and three lover.
Stages of execution:
- From blue velvet paper, zigzag scissors cut the rectangle in size at 18/11 cm and glit to the white card sheet: this is the background of our postcard.
- The same scissors cut the triangular (with the parties 6/9/9 cm) a Christmas tree of green velvet paper. We decorate it with sequins-stars.
- To the reverse side of the Christmas tree, attach the strips of the volumetric tape and place it on the postcard.
- From red velvet paper, two New Year's boots for gifts and fix them with the same scotch.
- In the same way, cut out and stick a house.
- In three places we make holes with the help of a press-lover. Using rolling rings, attach to the postcard chain and decorate it with funny suspensions.
- To simulate snow, we use cotton lumps, attaching them to the roof of the house, boots and the base of the Christmas tree.
 A beloved little sister can please the very gentle and original postcard from Beads. It will take no more than a quarter of an hour, but the result is a very pretty addition to a gift.
Needed materials:
- Tight blue cardboard.
- Three pieces christmas paper With a pattern of similar color scheme.
- Pearl white beads of different diameters (preferably three sizes).
- Flat double-sided tape.
- Narrow caproic ribbon.
- Hot glue.
Sequence of work:
- We fold from the cardboard a square shape card.
- The front side is issued by squares and rectangles of Christmas paper, arbitrarily positioning them on cardboard and gluing with double-sided tape. The most important thing is that the composition is original and harmonious.
- A simple pencil make a light sketch of the silhouette of the Christmas tree and begin to stick the beads of the bottom row using hot glue. In the process of sticking, we alternate beads in size, trying the smallest of them to place in the upper tiers of the Christmas tree.
- Climbing the Christmas tree, at the bottom of the postcard we make an elegant bow of translucent kapron tape. To do this, the sharp stationery knife make a small incision on the bend, we felt the tape in it and tie a bow. (3 Votes, Average: 5,00 Out of 5)
Preparation for the new year has already covered the whole country! New Year's postcards do it yourself 2018 in the photo and video instructions are not difficult to do, but to give them - incredibly nice! Everyone is in a hurry to consider the decoration of rooms, work premises, menu for the New Year's table, outfit and gifts. As you know, a gift in the form of a postcard made by your own hands is doubly pleasant. After all, this is not some kind of chosen faceless trough, but made with the love of the address gift.
We will analyze in the article how to make one of the most favorite gifts - a postcard. We will look at many options for creating New Year's postcards with our own hands to meet 2018. Next, tips on their creation, the choice of materials and the plot for registration, as well as the options for signatures and wishes.
Materials to create a postcard or what can come in handy
Experienced masters handmade already know that for the New Year's postcard made by hand by 2018, suitable any material. Turn on fantasy!
What may take to work on the postcard:
- The base is dense paper, better than A4 format, rolled in half, but you can and any other format.
- Glue. It is better to use PVA production "beam", it does not leave yellow traces. For fixing ne. paper decoration The glue "moment of gel" or "crystal".
- Decorative elements. It can be clippings from old postcards or logs.
- Satin ribbons, lace.
- Flowers of paper or fabric.
- Semobusins, cabochons, rhinestones, sequins, suspension.
- Any decorative elements in the form wooden snowflakes, bugs, christmas trees and so on.
- Paper: a strong, tracing, color, corrugated, any decorative, old postcards or clippings from magazines, pages of old books.
- Sizal, thread, foil, jute rope.
- Buttons, buttons, rivets, leather stripes and so on.
All that remains from any jewelry, accessories, old spoiled postcards, can be carefully saved and used again to create a new masterpiece.
Step-by-step instructions for creating cards for the new year
Create any New Year's postcard you need, following a specific algorithm. The success of creative undertaking depends on this.
Before you start, it is important to consider the idea and size of the postcard, to determine the necessary material, select everything that will be needed in the work from the entire variety of decorative elements and materials.
Now follow the plan described below:
- Think up the postcard plot that it will be depicted and the size of the base. There is only an A5 format, that is, folded in half a sheet A4, but you can choose any other format at discretion.
- Next you need to think flower palette postcards. Color and combination of shades plays a huge role in general perception Ready work. The following are the variants of the combination of shades and a special New Year palette in the photo. If there is no special fuss and knowledge of the combination of colors, it is better to use the palette.
- Next, we think over the composition and location of the parts. This can help special ready-made patterns or sketches, but it will be further in the article. For a successful composition, it is important to choose the center and the main, greater element in size. Next, consider where small details will be located, you do not need to fill the entire area of \u200b\u200bthe postcard, let them create beautiful shape. It is important to combine the entire composition on a greeting card with a common color idea and composite idea.
- When everything is thought out and the idea is clear, you need to prepare all the elements. Cut, paint items. Pick up beads, cabochons, ribbons, lace, snowflakes, flowers and so on.
- Now you need to make a background.
- After gluing the main element.
- Next, we place all the small details into place.
- We decorate if necessary.
Patterns and sets for postcards, individual materials for the embodiment of our own ideas
To create postcards, including New Year's, by 2018, you can use various templates and sketches. They help to decide on the composition, and the idea of \u200b\u200bthe postcard. The following are photos of similar sketches. They can be printed on paper or use for clarity, creating their own postcard, leaning on the template.
Postcards may contain different elements: Christmas tree, balls, stripes, beautiful decoration Background, snowflakes, glued semobusins \u200b\u200band so on. Of course, each template can be changed to yourself in your own taste, but in general, templates are thought out from the point of view of composition and colors.
The Christmas tree is the main element of the decor. Different methods and materials for its image
On New Year's postcards, you can most often see the image of the Christmas tree. We can do it using various materials:
- Buttons, rhinestones, semi-graysins.
- Ribbons and lace.
- Paper or paper napkins.
- Openwork small snowflakes.
- Felt, old postcards or packaging paper rolls.
Postcard templates:


The Christmas tree can be placed on the front side of the postcard or inside and beautifully reveal.
Video:
Three options for creating a Christmas card with a Christmas tree
Option number 1
For this stylish New Year's postcard with Christmas tree will need:
- Beautiful cardboard and corrugated cardboard of a stylish metal shade and strip.
- Colored paper in tone cardboard.
- Decorative lace.
- Glue rhinestones.
- Scissors, glue, ruler and simple pencil.
We make a postcard like this:
- On white paper, draw templates of all parts (as in the photo);
- Cut the template and transfer to cardboard and color paper, cut out;
- Fold neatly B. right places all the details, glue the decor;
- We place rhinestones, attach a lace and a postcard ready.
Option 2.
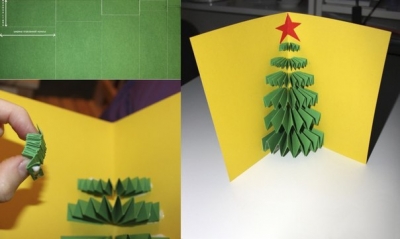
This postcard is performed from colored paper rolls. Manufacturing technique something resembles quilling. For work it will be necessary:
- Decorative cardboard with pattern and white.
- Colored printing print in new Year's topics and color scheme.
- Decorative buttons, rhinestones.
- Smooth round pencil or wooden wand.
- Glue, ruler and scissors.
Getting to work:
- Cut out the squares of the colored primed paper of different sizes (as in the photo);
- Twist them in rolls and fix glue;
- Glue the rollers among themselves in the Christmas tree in the form of a triangle (see photo);
- We put the base from white cardboard and glit to it a Christmas tree made of rolls;
- Decorating the Christmas tree with rhinestones, buttons.
The postcard is ready, it remains to make a congratulatory inscription inside.
Step-by-step photos
Option 3.
This option is postcards on New Year 2018 is done on bright cardboard using corrugated paper. For work, we need:
- Decorative cardboard of a bright red shade for the base.
- Corrugated paper green.
- Bilateral scotch and glue.
- Decorative satin ribbon with a New Year's print.
- Beads and small beads or braid, cabochon in the form of an asterisk.
We start to create:
- Make the basis for a cardboard card, gently bent it in half;
- Stick the decorative braid from above and below the edge of the postcard;
- Seam a pencil outline of the Christmas tree and place two-way scotch (see photo);
- Cut from corrugated paper strips of different sizes and scattering a bit, stir up on top of the bilateral scotch bands. So we got a Christmas tree;
- Adhesive beads, beads and a star into place.
These are the options for New Year's postcards with the main heroine - Christmas tree. Next, consider how to make a postcard yourself with a symbol of the year - a dog.
Dog - symbol of the year on the postcard
You can make a postcard with the image of a dog - a symbol coming year. There can also be many variations. Make a postcard in the form of a face of colored paper. The following are step-by-step photos with the manufacturing process.
In addition, you can make a postcard in the form of a taxa. For her you need:
- Color dense paper shades: blue and white for base, golden and brown for dog. You still need some black paper for eyes and spout.
- Glue, scissors and ruler.
We make a postcard like this:
- cut from blue paper rectangle. This is the basis. We fold it in half, then one front part is still in half.
- cut from white paper rectangles of such sizes so that they are imposed on each of the parts of the bent base, we glue out of the base.
- cut the taxi. Long oval body so that it fit on the entire decomposed postcard. Cut your paws, head, ears, tail, eyes. Every small detail duplicate from brown and gold paper.
- we stick the body to the entire postcard, the paws and the muzzle to it, after all the small parts.
- so we got a dachshund, the head of which on the front bent half, and the end of the body on the half of the postcard, which is not bent. Closed postcard is obtained with a short dog, and an open card with a long dog.
The postcard can be pasted inside the greeting inscription on a separate square or flag.
Step-by-step photos of creating cards for the new year 2018 do it yourself in the form of a dog:
Step-by-step photos of postcards:
Simple cards with a good mood
Today it is fashionable and stylish - it does not mean difficult. You can make an excellent New Year's postcard in a couple of minutes with your hands 2018, which will have a style and a good mood.
Option number 1.
- Take bright cardboardFold in half.
- From white paper Cut the outlines of the beard and mustache of Santa Claus, glasses and several stars.
- Stick small parts on the front side of the postcard.
Option 2.
On white cardboard, folded in half, draw diagonally a beautiful thin line with curls. It will be the basis of the garlands. After in some places marked on the garland, draw multicolored mugs - light bulbs.
Option 3.
Postcard S. funny snowman - view from above. To do this, cut several circles of different diameters and stick them to each other, you can lay a dense cardboard. Next, you will add minor details and inscriptions.
Option 4.
Use buttons. Here you can withstand a postcard in minimalism, it will acquire a special style and charm from it. There are enough pairs of white buttons to create a snowman, which is supplied with a red tape-scarf and a black braid - a hat. Or a few bright buttons, which will depict Christmas balls. They draw a rope and let's take a beautiful inscription below.
Postcards in various techniques
Very interesting and beautiful greeting cards for the new year 2018, made with their own hands in the technique of quilling or extent. In order to create such a miracle with your own hands, you need to make a lot of effort, be neat and attentive. These are quite complex techniques that to achieve good result Requires limit accuracy and concentration.
Postcards in Quilling technique can be with the image of the Christmas tree, dogs, winter patterns. For their execution, color paper strips are needed, which twist into the rolls and give them the desired shape. After from these rollers are laid out intricate drawings.
The technique of the dutnanka implies cutting out of several layers of paper plots and impose them to each other. These postcards fascinate with their grace and beauty.
Also to create a New Year's postcard with your own hands you can use threads and techniques of nitcographic or embroidery. To do this, on a separate square, the paper is embroidered with a cross or smooth or laid out in the technique of nitkography conceived pattern. After this square is placed on the basis for the postcard.
The postcard pattern can be performed from felt, such as carved deer, snowman, mistletoe or Christmas tree flowers, which are after attached to the basis for a postcard.
If you fly a postcard with a child, then wonderful new Year's option There will be a drawing performance on the 2018 New Year's postcard with the print of the baby's palm. To do this, you need to paint the child's palm in white paint. The baby will be delighted with such a classes! Immediately on the harvested color foundation for postcard from cardboard you need to print palm.
If you print it with your fingers down, then after you can try Santa Claus, your fingers will be a beard. And if you print with your fingers up, the palm itself will be a snowdrift, and draw your fingers and turn in the snowmen and Christmas trees.
And you liked our New Year cards, which can be done with your own hands in 2018 on step-by-step photo?
Video:
Want to make a nice gift to your relatives, friends, acquaintances? Beautiful postcard is always needed.
To pleasantly surprise the one you cook a postcard, you can make a postcard with your own hands, decorate how you like more and give it.
There are many ways to make a beautiful postcard with your own hands, and somewhat simple, but very beautiful and the original are here.
Choose what you like more. You can try to make one of the proposed options or borrow an idea to do something your own.
In any case, such a gift will be pleased to get anyone.
New Year's postcards handmade. Corrugated paper Christmas tree.

You will need:
- corrugated paper
- scissors
- Decorations, at will

1. Fold a sheet of tight paper in half.
2. Indicate the place where you will glue corrugated paper, or simply draw simple pencil contour of the Christmas tree.
3. Corrugated paper cut out several rectangles of different sizes.
4. Enclose each rectangle, as shown in the image.
* If you wish, you can decorate a postcard with an asterisk (finished or cut out of paper), stickers, sparkles, etc.
How to make a bulk postcard
Very beautiful new Year's pallet With their own hands, affordable preschooler, - the Living Christmas Card "Firby". The Christmas tree is made of paper stripes rectangular shapefolded by harmonica. But there is one nuance here. If you carefully look at the photo, you will see that the tiers near the Christmas tree are made of paper bands of different widths: downstairs the widest thing, the closer to the top - that already. In addition, the depth of the harmonica currency is also different. The lower strips of paper are folded into a harmonic with a large "step". The higher to the top, the fact that the depth of the fold is less.


Another bulk New Year card. Again, this New Year's handicraft for children is attractive not only externally, but also ease of manufacture.

To make such a New Year's postcard with your own hands, print on two sheets of cardboard or dense paper templates (template-1 and tempo-2) and take advantage detailed instructions From photos below. Better if the sheets of cardboard are different colors.


At the end, decorate the Christmas tree in your liking. Volume New Year's postcard is ready!

How to make new year postcards do it yourself
New Year's postcard "Snowman"

From white paper cut out a wide strip with a curly edge. It will be a snowy hill. Stick it to the bottom of the postcard. Attach white acrylic letters to the center of premedized snow.
Postcard "Congratulations to Santa Claus"

The basis for this postcard will serve paper with a pattern. Cut the face elements of Santa Claus from paper of different colors. Glue them. Pink chalk tinkering Santa Claus cheeks. Stick your face to a drawn of thick paper. Postcard Start on folded paper with drawing bigger sizeSo that the drawing looks like edging in the right and bottom of the postcard. Write a congratulation.
Postcard "Christmas tree in the style of" retro ""

Stretch the edge of the Christmas tree made of thick paper, on the sewing machine. Decorate the Christmas tree with snowflakes. For a simpler version of the postcard, check the Christmas tree with an extra layer of thick paper to get a voluminous image.
Scrapbooking. New Year cards.

You will need:
- Dense colored paper or color cardboard
- scrap paper
- PVA glue
- handle, felt-tip pen (or other similar object)
- Decoration

1. First you need to know exactly what size the tree will be, and, pushing out from this paper scrap, cut several rectangles of different widths.
2. Using a handle or other cylindrical object, twist each rectangle into the tube (width). Secure each tube with glue, so as not to unwind.

3. Glue the tubes with each other.


4. Prepare the base for the postcard and stick your pre-cooked Christmas tree to it.

5. Decorate to taste.

Children's New Year cards

You will need:
- Cold cardboard (green and red color)
- Sequins or rhinestones
- wrapping
- black handle or marker
- scissors
- Stapler
- Decoration

1. Make a Christmas tree. Prepare green paper and cut it in half (across).

2.
Make a blank by folding a tight sheet of paper (of any color) in half - it will be the basis of the postcard.
3.
From one half of the green paper, make the harmonica, which will play the role of the Christmas tree. Create one end of the harmonica and glue the Christmas tree to the greeting card.

4. Prepare wrapping paper And cut out a small rectangle from it, he will play the role of stump.

5. Decorate to taste.

Beautiful New Year cards

You will need:
- Dense colored paper or color cardboard
- stationery knife or shaped hole punch (for an asterisk)
- Igole
- pencil and ruler (to mark the place of threads)
- Piethi


Making new year cards. Origami Christmas trees.

You will need:
- Colored paper (cannut paper)
- Color cardboard (for the basis of postcards)
- Button, ribbon and other decorations to taste.


Creative New Year cards. Tree from ribbons.

You will need:
- Cold cardboard
- scissors
- stickers (in this case in the form of stars)
- Decorative ribbons, scrap paper or clippings from bright magazines

1. Fold a sheet of colored cardboard in half to prepare the basics of the postcard.
2. From paper brown cut the trunk of a tree.
3. Stick the trunk to the base (in the middle).

4. Start chopped ribbons from colorful paper On several pieces of different lengths.
5. Stick all the pieces on the barrel (from above), starting below, from the longest piece.
6. Decorate the Christmas tree at will.
New Year Cards in Technician Quilling

You will need:
- Cold cardboard
— paper strips For queening (preferably a few shades of green)
- scissors
- White corrugated paper or napkin
- Toothpicks (for winding paper strips)
So let's start making a postcard:


How to make a New Year's postcard from round napkins

You will need:
- Cold cardboard
- scissors
- Round napkins (or double-sided colored paper)
- Double-sided tape
- Decorations to taste

1. To make a Christmas tree, you need half a circle. For this, fold round napkin Fun and cut.
2. Fold the semicircle as shown in the image.
3. With the help of bilateral tape, glue the layers of the Christmas tree.
4. Get the Christmas tree to the basis of the postcard
5. Decorate the Christmas tree to taste.
Postcards New Year's volumetric

You will need:
- Cold cardboard
- scissors
- Pencil and ruler
- Decoration


1. Cut the triangles from color cardboard - it will be your Christmas trees.
2. Prepare two tight paper sheets. Both fold in half - one will serve the basis of the postcard, and its other inner part.
3. The diagram shows how from the sheet for the inside of the postcard you need to cut the "steps" to which you need to stick the Christmas tree.

4. After you glued the Christmas trees, decorate them and the rest of the taste.
New Year's congratulations. Postcard from circles.

You will need:
- Colored paper
- stationery knife
- Cold cardboard

1. Take a sheet of paper A4 (Simple or Color). Circle Draw a large circle on it.
2. Cut the circle.
3. Fold the circle in half and make cuts in a checker order (see picture). Cuts need to do in a circle - start from the fold line and move to the point slightly on the middle.

4. Expand the circle and stick to the top of the thread.
5. Circle stick to a color cardboard folded in half (the basis of the postcard).
* You can stick to the small red mug to the thread so that they hide from the trees of the Christmas tree down.
6. Decorate your taste postcard.
Now this postcard can not only be done, but also decorate the New Year tree.
New Year's postcards (master class)

You will need:
- Cold cardboard
- Buttons
- Red ribbon
- pencil or pen
1. Prepare the basis for a postcard, folding in half a color cardboard.
2. Draw on the basis of a circle using a circus or pencil and any small round item.

3. Prepare buttons and start them gently glued along the drawn circle.
4. Cut a piece of red ribbon and get it where you like more.
Ready! Everything is very simple, but at the same time beautiful and neat.
Design of New Year cards. Bright lanterns.

You will need:
- scrap paper (or ordinary dense paper)
- scissors
- Paints (watercolor)
- Brush
- Set of markers
- Simple pencil
1. Prepare the basis for the postcard. Fold a dense sheet of paper in half.


2. Simple pencil draw a wavy line on one side of the postcard. You can add curls.
3. Now draw lanterns on the line.


4. Coloring lanterns with paints or multi-colored markers.
5. Add the inscription, for example, "Happy New Year!".
New Year cards with snowflakes
Another idea of \u200b\u200ba New Year's postcard do it yourself - a postcard, decorated with snowflake cut out of paper.

If you have paper lace napkins at home, then you can cut the snowflakes of them.

Postcard with new year embroidery.

Such a postcard will not leave indifferent even most arring recipients. After all, here you invest your strength and soul not only to collect ready-made details and give them festive view, but also create these most details own. For embroidery, you can choose any scheme corresponding to the topics of the new year. It can be Santa Claus, a cheerful snowman, festive Christmas tree, new Year's balls, Symbol of 2017 is a fiery cock and more.
To create such a New Year's craft, you will need: glue, scissors, embroidery, satin ribbons, others decorative items, optional.
As in the first version, first prepare the basis of the postcard and give it the desired form. Then we stick the embroidery and design the edges of the picture. It can be done in the following ways: Use satin ribbon, semi-grays, rhinestones and sparkles. Such a postcard itself is already finished product And does not require a special addition in the form of sparkles and fuels, but if it seems to you that they will only complement the general view, add. If the postcard is intended for a girlfriend, sister or mom, you can use a bow from satin ribbon, such a decor will give the product a lot of pretty.
Colored thread card
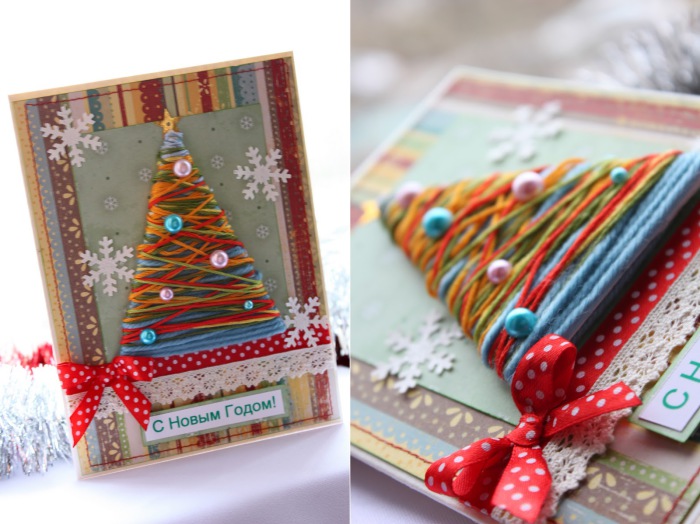
 Handmade Postcard with new Year's Christmas tree From colored thread
 Forest beauty is the main symbol of the new year. And in such an unusual incarnation, she will appeal to adults, and children! To create crafts you will need:
- three sheets of cardboard or tight paper
- scissors
- pVA glue
- double-sided tape
- dense threads of different colors
- colored handles
- rule
- decorative beads
- paper snowflakes
- tape
Color cardboard or tight paper bend twice. It will serve as the basis for the postcard. Cut the rectangle from the paper of another color, get it closer to the top card. From the third sheet of cardboard cut the triangle. Wrap it with multicolored threads, fixing them on the back side of the cutting. Dress the Christmas tree shiny balls From multicolored beads and glue the village to the postcard. Decorate the cradle of an elegant ribbon and do not forget to print and stick a congratulatory inscription.


Content
If you have already prepared everything for the new year (and if not, you need to read our articles) and you have left some ending strokes from the series: Postcards to School, to school, kindergarten And so on, you also do not prevent you from reading our articles. And, more precisely, this particular article, which we completely decided to devote beautiful postcards for the new year. Ideas for us, as always, car and small cart. So stockday, materials and let's create together.
Options for postcards
With drawings
As usual, let's start with a simple version - these are drawn postcards. All that will need is a dense cardboard or watman, pencils, glitter glitter, paint, markers, wax pencils. In general, any option of applying a picture that you or your child likes.
You can bend a rectangular sheet in half and apply a certain drawing on the front side. You can use the template and decorate the drawing.
Do not forget about funny inscriptions both on the front side and on the wrong one. Use a special stencil or tools for calligraphy so that the inscription is beautiful and smooth.

Draw something touching and cute, you can even without the inscription "Happy New Year". In the drawn postcard you can combine several techniques: something partially can be drawn, and something volumetric, made from some material, as in the photo. Either the drawing can first be applied on paper, then glue paper to thin foam, and then glued this design directly to the postcard and it will turn out to be volumetric.
We offer you several images that you can use as a template for the future New Year's postcard 2018 do it yourself:


Textile
Collect all sorts of fabric pieces, residues from sewing, old jeans, pillowcases, pajamas, socks. Of all this, elegant products may turn out. Note that even the size of the postcard can be made of the material, see the photo example:

Make a postcard from textiles easy enough. For example, in this case, the parts are used from felt, but you can take any other material. From the wrong side you can sew something like a lining, which will serve as a kind of sheet for wishes for the new year 2018.
For the product you can use cardboard basiswhich you will with the help of glue-gun attach textile parts. Different beads, buttons, lace, ribbons, natural material are also suitable as decor, the threads for knitting is very beautiful and unusual.

Similar crafts for the new year can be given to mom, teacher at school, girlfriend, colleague for work. Congratulations inside can be written with a handle or cut letters from the fabric, it will look quite original.
Scrapbooking
This option is more complicated, because it is not just a postcard, but a whole album. In it, we can invest photos and some tickets to the theater or movie where you went with the recipient of scrapbooking.

In general, scrapbooking is the last time a whole movement, a fairly popular design technique for postcards and creating memorable diaries. Literally, the word "scrapbooking" itself is translated as a "Book of Cleaning". Special sheets and materials are sold to create such a book. They are strong enough, because the book is designed for long-term storage. But the postcard in the scrapbooking technique we can make from the girlfriend, the main thing is to be cool and impressive.
Use bulk parts to arrange the front side. ScrapBuging involves the use of various pockets, converters for storing tickets, photos, dried colors, sweets, labels. In general, everything that can attain pleasant memories and give joy, see photo:

The most important thing in this technique is correct and correctly arrange the details of the decor so that the postcard is beautiful, unqualified. You can use some creative details, well, say, nails, screws, nuts, if a congratulation is intended for a motorist. Or the letters from the keyboard, parts of the diskette (if you find) if the postcard will receive a person associated with computers. You can use buttons, pins, clothespins, disposable dishes, newspapers. Mass and themes will depend on the interests or work of the recipient of the gift.

3D postcard
So we approached another interesting idea of \u200b\u200bcreating a postcard for the New Year with our own hands in volume technique. 3D is, of course, it says loudly, but something like that, you can create, i.e., a volumetric card. What do you need:
- many color cardboard;
- colored paper;
- pVA glue or stationery glue;
- the pencils;
- markers;
- transparent cover from sour cream;
- beads;
- paints.
This is a list for several postcard options. For example, we will make it with a bulk pattern inside. Take a rectangular cut of paper, make small cuts in it so that you can put forward a kind of support for the future composition.
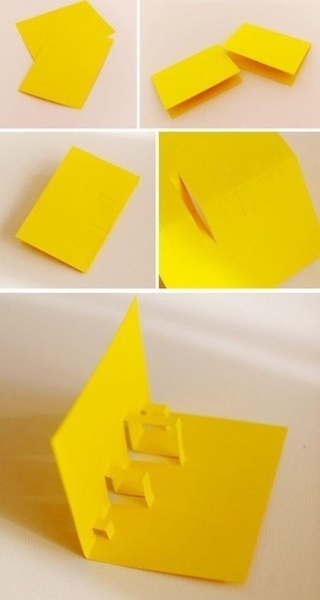
Now prepare the decor of the composition itself - it can be something plot, and there may be flowers, patterns, hearts, even photographs.
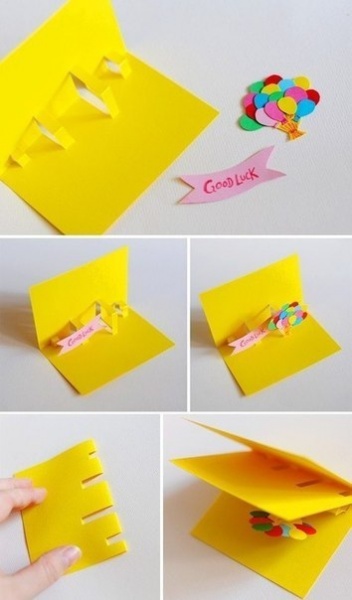
After you attach the decor elements, the workpiece itself must be inserted into the main pages of the postcard and glue well, look at the photo that it can work out:

You can not cut the base with peculiar supports, and cut the pattern itself directly from the sheets for the postcard. Volumetric postcards look original and delight not only children, but also adults.

And here is the template for such a card with your own hands:
And a few more wonderful ideas of volume congratulations do it yourself for the new year:
With elements of Kvingliga
Cling is also quite popular in recent technology. From twisted thin strips of paper are pretty original volumetric drawings. This technique can be used to decorate the postcard with the New Year.
To make such beauty in the technique of focus, of course, the skills and experience will be needed. But the very simple options It is even devils to the kids.
For more complex option In the technique, the focus you will need a little more skill and special tools. At the end of the article you will find useful video Master class on this topic.
More ideas of original postcards
The most amazing thing is that to create a postcard for the New Year 2018, you need only a little fantasy, a good mood and minimum of materials. In addition to color cardboard and paper, it can be newspaper or journal sheets. For scrapbooking, in general, everything is suitable that bad in the house lies. For children's postcards, good pencils or markers. And if something from the past needlework is left: felt, wool, natural materials, it is all possible to put on the creation of a gift for the new year 2018.