Paper products modular origami. Modular origami. Japanese magazine with master classes
Hi all. Today I want to upload a beautiful collection of modular origami crafts. To help folk craftsmen in modular origami - both for mothers who want to please their children, and for leaders of children's art circles. I must honestly admit that I myself am not fond of this modular design - this requires a separate time in the day, and with two jobs this is hardly possible. But I am fascinated by voluminous paper crafts. And so in this article, I want to help you find NEW IDEAS for your next modular work.
If BEGINNERS came across this article, then for you I will give you a paper module assembly scheme and the principle of connecting modules to each other (this will be a little lower in the same article).
So, for those who are thinking about the question “What else can be done from modules?” we are starting a review of the cutest paper sculpting crafts.
modular origami
CRAFTS from modules of ONE COLOR.
Usually crafts are made from special colored office paper. It is denser, the module is STRONG, keeps its shape well. The paper is not glossy, rough, does not slip out of the grooves.
Office colored paper for printing are sold in sets - one color in a pack. For example yellow - 100 or 200 sheets. They can be cut into squares and then in the evenings make blank modules. If you are a novice modular origami master, then you will not risk spending money on several packs of different colors at once. And so you will start creating with one color of paper. Here's an idea for crafting ONE COLOR modules. These are characters (giraffe, chicken, duckling, squirrel) of small size - just the kind that do not need very many modules. And that means you will FAST get the result and pleasure. You need to start small - so as not to disgust yourself with an overwhelming task.


And the easiest way to start your experiments in modular origami is with simple WHITE crafts from thin office paper. And for example, to collect such a lamb. For horns, you don’t need a lot of colored paper, and the one that is contained in a regular school set is enough.

How to calculate the number of modules for crafts from her photo . Let's take this lamb as an example. We count the number of modules visible in the photo. And multiply by three. And minus 15 percent of the resulting amount. This will be the approximate number of blanks for crafts. Check it out - and write in the comments if this formula works in your case.
Here is a pink paper craft - FLAMINGO. beautiful tender bird made of paper modules. In our special article you will also find examples of bird crafts using the same technique.

MODULAR ORIGAMI
CRAFTS from paper TWO COLORS.
It is convenient to buy colored paper of the same color and plain white office paper. And then you can already make crafts that will be zonal painted in contrasting zones (the white breast of a green frog, the white apron of a black penguin, the zones of the muzzle, ears and breast of a fox). Here's what you can do with modular origami.


modular origami
Origami
DIFFERENT COLORS.
At the bottom, when you have accumulated leftover paper in different colors, it will be convenient for you to share bright multi-color crafts. The brightest crafts are, of course, BIRDS. Feathers can be of different colors - the play of plumage defies our imagination.


Even a duck can be multi-colored - after all, its wings also shimmer with shades of gray, blue, green, blue.

Make a parrot - it can be small, it can be bigger.


Peacocks, firebirds and swans are GORGEOUS BIRDS with magnificent tails.


For beginners, I do not advise you to take on a bulky project - make a small swan to start. Here's one. It won't require many hours of work from you - and you will get pleasure for a small labor contribution.

Modular origami crafts
CAT + MICE
Here I found a cute kitty craft. Based on a simple round assembly of modules, you can make this beautiful cat. Glue ears, eyes, paws, nose and mustache - just like paper applications. And of course you need some colored paper for one circular row (in the middle of the calculation) - to get the cat's collar.

Mice are also an ordinary circular assembly, only we fill the central hole at the end of the work with a lump of pink paper - imitating a spout.

You can make the cat bigger. Or it will be a MOM-CAT who will teach a KITTEN-BABY to catch cunning white mice. Wow, and a fun game will begin here - there will be no time for cartoons.

DOGS AND DOGS
From modular origami.
Cute stupid puppies, loyal dogs, reliable fighting dogs are the dream of every child. If you can't get a live dog just yet, make a modular one out of origami triangles.


The smaller the modules you use, the more even and solid the craft will seem - the smaller the module, the less roughness. And the toy will look like a living thing. Here it wags its tails and rushes to your arms.


modular origami
Crafts HARNIES and RABBITS.
If you have pink paper left, you can make more of these cute hares with ears using the flat assembly technique.


And here is the craft bunny in a vest and with a watch - a character from Alice in Wonderland. Very small and therefore quick to make crafts. You can think about how to continue this series and try to sketch a visual sketch in a draft Hatter(also mini size), Alice, Queen, round Trulya-la and Tralya-la. And of course the famous blue caterpillar smoking a hookah on a tall mushroom cap. And the main cutie of Wonderland - Cheshire cat.
Will you take it? Dare? I challenge your skillful hands and design brains. I really want to see Carroll characters in the comments to this article.

Oh my god, my ears, my ponytail - how late I am. The duchess will be furious.
LITTLE CRAFTS
From modular origami
FOR BEGINNERS.
I specially publish here such small crafts - because it is miniature assemblies that have great charm. In modular origami, large crafts look bulky and clumsy (like large fur toys from Soviet childhood - heavy gargars). But small crafts they look more cute (as well as fur toys - the smaller, the more cute).
Therefore, do not aim at large projects. Choose small jewelry designs. Do not make modular heffalumps - this already looks not like art, but like clumsy rough work. For some reason, this is the effect. But it's for the best, no need to waste paper.
Here is a cute parrot and little tiny modules. Nyashny and cute.


And here is a hedgehog who dreams of becoming a butterfly. Look at its proportion in relation to the coin next to it.

And here is a tiny dinosaur with a flower around its neck. He believes so much in a miracle, he is so eager to learn about this world and find friends in it. Maybe he will meet a butterfly hedgehog and befriend him. They have similar souls - childish, dreamy and open to new things.

Your children will enjoy playing with these toys.
And here are the cute puppies. Kids in funny costumes. These cutie crumbs will become your daughter's favorite dolls. They will have to create a whole world for them - modular origami beds, an armchair and tables.


DELICIOUS CRAFTS
From modular origami
FOR BEGINNERS.
Easy-to-make crafts of just a SMALL SIZE are food. Watermelon slices are easy to make. This is a straight linear flat assembly - row by row, like assembling a mosaic in a kindergarten.

But round fruits are also collected simply in a circle, as in the usual schemes for beginners. We will show them below.

But paper cakes - a simple and easy modular origami craft that you can do with your children in school art circles.

At the top, you can roll a cherry from a lump of paper napkin soaked in PVA glue - we sculpt a ball from such a soaked napkin, dry it and paint it with gouache (sprinkle it with hairspray on top to fix the gouache).

The cream can be two-layer - that is, two-color.

And to store all this beauty, you can assemble a shelf in several tiers. Although the shelf can be made of cardboard without using modules.

You can create any origami yummy.


Assembly diagram
ORIGAMI MODULE.
Here is a diagram showing how to fold the paper to get the correct module. The size of the leaflet can be any, but the ratio of its sides should be 2x3.
That is, it can be leaves 4 by 6 cm, maybe 6 by 9 cm, or 8 by 12 cm, and so on.


Modules can be stacked by laying them on the short side, or laying them out on the long side.
Below we see the modules lying on the short side - and 2 legs of two modules drive into the leg of the third module. According to this principle, they are attached to each other.


Depending on the method of adhesion, they give a different pattern of the canvas.

FLAT crafts
from modular origami.
For starters, simple flat crafts are suitable for you, here you need to collect everything like a mosaic - on the same plane of the table. It can be a LADYBUG craft or a BUTTERFLY craft.


Craft FISH - assembly diagrams can be found on the Internet.


But what flat crafts-MANDALS can be made with your own hands and hung on the window.

These are the beautiful ideas you can bring to life - out of paper, patience and perseverance. Beauty is the work of human hands and inspiration from nature. Everything has already been created before us, look around, find what makes you feel beautiful and put it in paper modules.
Olga Klishevskaya, especially for the site ""
If you like our site, you can support the enthusiasm of those who work for you.
Swan master class "Black Prince"
Swan master class "Black Prince"
It took me 1478 modules, a hot glue gun, black alkyd spray enamel and a little patience to make this swan...
1. We make the body of a swan. To do this, we begin to assemble a chain of modules, as shown in the photo:
2. We close the chain in a circle, we get 2 rows of modules: 43 modules in each row.
3. Lay out the third row, putting on the modules in a checkerboard pattern.
4. We continue to lay out the rows: there are 12 rows in the body
5.. Now we start making the breast: the base for the breast is 9 modules (in the photo they are marked with a black felt-tip pen)
6. Next, lay out the rows of breast: in each next row, 1 module less.
7. The breast ends with 3 modules.
8. We pass to the wing. The part of the module from which we begin to make the wing is marked with a black felt-tip pen on the right.
9. We turn the modules over with the other side and start putting them on in a checkerboard pattern: 12 modules in total.
10. A number of wing modules from the breast goes down, and at the end of each row we increase one module, putting it on the last module with one left pocket, the right one remains empty.
11.. Inside view:
12. Thus, we lay out 12 rows, in each row there are 12 modules
13. From the 13th row, the decrease will go from two sides.
14. View from inside.
15. We finish the wing with one module.
16. In the same way we make the second wing.
17. We begin to make a tail. At the base of the tail are six modules turned upside down. We increase the rows up. In each next row, 1 module less. We finish the tail with one module.
18. View of the tail from the inside.
19. Now back to the breast. On 3 modules (this is how the breast ended), we begin to make the neck of a swan. We will alternate rows: 2 modules-3 modules.
20. Thus we lay out 19 rows. The neck is ready.
21.Now we make the head. We turn over the modules and put them on in a checkerboard pattern: 3 modules, next row 2 modules
22.. Then again 3 modules, and again 2 modules. The head is ready.
23. Now we will make the back. There are 15 modules at the base of the backrest.
Each next row has one module less. We finish the back with one module.
24. Now we make a stand for our swan.
The stand consists of a chain of modules closed in a circle: a total of 3 rows of modules, 61 modules in each row.
25. Now the swan needs to be painted. Before painting, give the wings and neck of the swan the desired curve. I paint the swan and the back with black spray enamel, leave the stand white (it is better to paint outdoors, because alkyd enamel vapors are poisonous, so as not to be poisoned by them, take all safety measures) Here is what I got after painting:
26. Now we will make white plumage. To do this, we connect two modules: from the breast and from the wing with a white module.
27. We continue to put on the white modules along the edge of the wing, going up, connecting the white and black modules.
28. Then we also make the white plumage of the breast and tail.
29. We make a beak from one white and one red modules. With a glue gun we glue the back with a wide part to the breast from the inside, and with a narrow part to the tail; then eyes; glue the swan on the stand. The swan is ready.
In the world of needlework, there are a lot of ideas, the implementation of which allows you to make simple crafts for the New Year or for another holiday to please yourself and your loved ones. Modular origami for beginners is a very interesting activity. A person can learn how to create small figures from modules quite quickly, it's easy. There are simple schemes on the Internet, the description of which will allow you to make a rooster out of paper, a temple, a flower, etc.
Modular origami for beginners is a very interesting activity
Step-by-step instruction:
- There is an option to purchase separate paper for modular origami in the stationery store. But for assembling a rooster, plain colored paper is also suitable, however, it is thinner. It is recommended to use yellow material.
- A square sheet of paper is folded in half. The resulting side strip should be folded and cut along the fold line.
- The paper is then folded in half to form a rectangle.
- It is important to ensure that the top and bottom edges match. The fold line should be ironed.
- After that, the sheet unfolds. The square is folded again, only this time on the other side.
- The paper is folded vertically, that is, from left to right.
- After the fold is made, the leaf unfolds. If everything was done correctly, then there should be a cross in the center of the sheet.
- The upper right corner is applied to the lower left corner. Then a fold is made. The action is repeated, but only on the other side.
- The right bottom side of the paper with the crease is folded towards the center. The resulting square is folded into a rhombus. In this method, triangular leaf shapes should not be obtained. If the figures of triangles were formed, this means that the needleworker did not follow the plan correctly.
- The corners of the figure must be collected towards the middle. The top corner is adjusted to itself. Next is the fold. Three other folds are folded back.
- The top corner of the square rises up along the fold line. The other two folds fold inward.
- The upper edges of the sheet are folded inward. You need to straighten them out.
- The outer edges of the resulting diamond are folded in the center. The right fold folds towards the left.
At the last stage, the figure is flipped, and the top corner of the bottom layer is folded to the top corner.
Gallery: modular origami (25 photos)


Modular origami for beginners: swan (video)
Herringbone using modular origami: step by step instructions
Such a three-dimensional creation, like a paper Christmas tree, can decorate pictures, stands or wooden decorative boards.
So, detailed technique:
- The Christmas tree should be made of green paper. You can use both colored and plain paper. If the choice fell on the usual one, then you should use paints so that the material acquires a green tint.
- Collect the Christmas tree should be from a square sheet. Fold lines are made in height, width and diagonals. The paper unfolds.
- Then the basic model of the figure is formed - a triangle. A fold line is outlined in the figure. The right side turns towards her.
- Next, use the fold line so that the right corner of the figure is centered on the base of the triangle.
- All corners are wrapped.
- Then you need to use scissors so that the Christmas tree then becomes voluminous. Three cuts should be made on the right and on the left side.
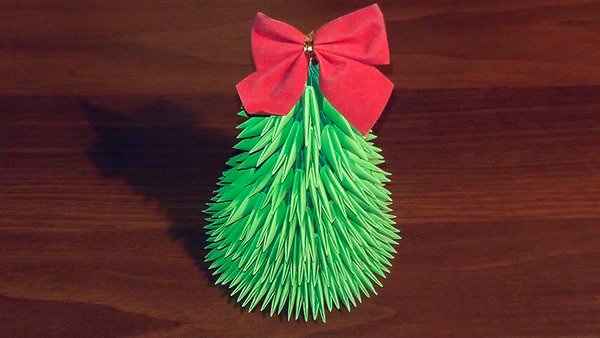
Such a three-dimensional creation, like a paper Christmas tree, can decorate pictures, stands or wooden decorative boards.
At the last stage, the resulting segments are bent to the sides.
Small human figurine: a simple description and diagram
For each detail of the little man, you can use paper of different colors, for example, make the top yellow and the pants blue. But to simplify the task, it is better to use a single-color material. A pencil is not needed to create a little man.
- So, the square material is bent in half, then the side corners of the figure are bent.
- A zipper fold should be made at the bottom of the sheet. The corner drops at the top. Then the figure is flipped.
- The corner is slightly bent. You do not need to bend it too much, just slightly outline the fold line.
- After that, you need to carefully flatten the "pockets" of the resulting figure, bending the resulting triangle.
- One half of the product is bent back.
- The corner is pulled up, part of the paper is pulled out. An elongated figure is an almost finished little man.
- After pulling the shape up, only the "nose" of the triangle should remain visible.
- The corner bends inward, and the man's head rises up.
- The remaining upper corners are bent inward on each side.
For each detail of the little man, you can use paper of different colors.
At the end, the arms and head of the little man should be glued to the body.
Tips for those who are engaged in modular origami
- By connecting several origami with a thread, you can decorate a room with this. Lots of ideas! For example, you can hang crafts on a nail by the door. It looks very nice, especially if the origami is multi-colored.
- A beginner who wants to improve his skill can experiment with different materials and colors.
- Thread origami through the thread must be very careful not to damage the paper.
- In such work, it is recommended to use thin paper designed specifically for modular origami. Why? It is thinner and easier to work with. Although people who fold paper very intensively can tear it, but if everything is done carefully, then the craft turns out to be very beautiful.
- Origami is a great gift. By the new year, you can make a Christmas tree, and by February 23 - a tank.
- There is an alternative material for creating modular origami - this is foil. From it, crafts are more durable, besides, they are shiny.
- In order to follow an environmental plan for preserving the environment, you can use not new, but recycled paper.
- If a person plans to donate origami, then the last step of its completion is recommended not to be done in advance, but before delivery. So the craft will not look "rumpled".

By connecting several origami with a thread, you can decorate a room with this
To create a beautiful craft, the main thing is to make smooth edges. That is why it is not recommended to use poor quality material. If the sheet is torn, then elegant origami will not work.
How to make modular origami in the shape of a heart?
- Take a sheet of square paper. The colored side is turned upside down. The top left corner folds towards the center. The edges should be evenly attached to each other.
- The action is repeated with a different angle. As a result, the material should have several fold lines. There is no need to unfold the leaf after this.
- The bottom of the material is folded towards the center.
- Then the leaf is completely straightened and turned over to the other side. If before that everything was done correctly, then a bulge should form in the center of the sheet.
- Next is a horizontal fold.
- The sheet is turned over again.
- The two edges of the paper are folded towards the center. The edges of the shape should touch.

Such a gift is very romantic.
What do you need to prepare for work?
- Paper. For modular origami, specific thin paper is sold. But if this was not found, then you can use the usual material. The main thing is that it should be square.
- Flat surface. It is convenient to work on a flat surface on which the paper will lie flat.
- Ruler. A ruler is used to give the folds an even look. However, it is not necessary to use it.
Paper strawberries for beginners (video)
If you follow the instructions correctly, you can make the most beautiful modular origami with your own hands. The main thing is to have a desire, and then it will be possible to create even the most complex paper products.
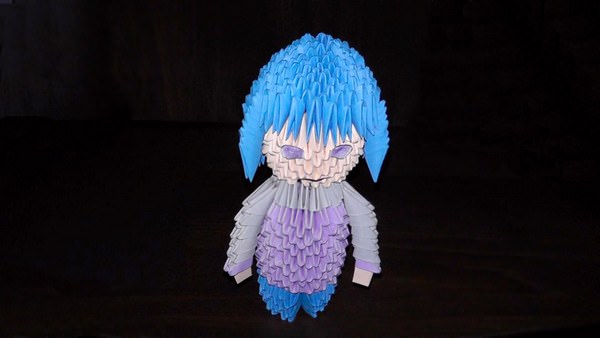
For the upcoming new year, we suggest you put together a wonderful snow maiden from the modules. Such a craft can become not only a wonderful gift for your relatives and friends, but also an original element of the decor of the New Year's interior.

In many countries, the main attribute of the New Year and Christmas holidays is, of course, a slender green spruce. This is a symbol of life, fertility and well-being in the family for the whole next year. It is the beautiful Christmas tree that children rejoice most of all, it is under the Christmas tree that gifts are placed, and it is next to the fragrant Christmas tree that they make their most cherished wishes. Today we will fold the Christmas tree from triangular modules. And the master of modular origami Campean Petru Razvan will help us with this.

We continue to delight you with cute characters from the famous game Angry Birds. This time, we suggest you fold Chuck from the modules, he is simply Yellow. He first appeared in 2009 in the first episode of the first game. Chuck is best friends with Red (Red), another main character in the game.

Surely many people know a character named Red (Red) from the popular game, and now a full-length cartoon, Angry birds. Today we invite you to fold the model of this interesting character from triangular modules. The model will turn out to be voluminous and very realistic. Hope you enjoy. The author of the assembly scheme is the famous master of modular origami Campean Petru Razvan.

Let's move away from complex complex models a little and put together a cute panda with a bamboo branch from triangular modules. The author of the assembly scheme for this model is Campean Petru Razvan, already known to us, who is famous for his realistic multifaceted modular crafts. Shall we start?

The Chinese dragon is a symbol of the beginning of yang and the Chinese nation as a whole, which is strongly associated with the element of water. According to Chinese beliefs, the moon dragon lives in lakes, rivers and seas, but is able to soar into the sky. Numerous rain-making rituals in ancient times were not complete without images of a dragon. Due to its association with the element of water, the Chinese dragon is often depicted in green or blue colors. We will assemble one of these dragons from triangular modules.

Avid Pokemon lovers will definitely recognize this thing. Today on our site pokeball from triangular modules. You can combine the classic Poké Ball with the lowest catch rate, or the special white and yellow park ball that the captured Pokémon cannot escape from. Let's get started.

Children always demand attention. When choosing activities for children, many are interested in creativity and are looking for interesting ideas, including modular paper origami schemes for beginners. In social networks, finding a master class in the origami technique is not a problem. Experienced craftsmen explain in detail how to create a triangular module and design schemes for various crafts.
Step by step instructions for modular origami for beginners contains a method for manufacturing a triangular-shaped module and diagrams of three-dimensional figures using the origami technique.
Folding three-dimensional figures from identical paper parts is called modular origami. This activity is very time-consuming, but at the same time exciting. Being engaged in the technique of modular origami, children develop not only fine motor skills of their hands, but also mental, creative abilities.
First learn how to fold the module. Take sheets of A4 paper and fold in half until you get 16 rectangles. Cut the sheets along the lines obtained into 16 parts.

For the manufacture of crafts, schemes are used that contain information about how many modules need to be made and what color they should be.
Mounting methods
The module has 2 corners along the edges and 2 pockets on the fold line. These parts of the triangle are involved in attaching the modules to each other. Triangles are placed in two ways - on long or short sides . Binding options:
- Take three elements. Two elements are placed next to each other with long sides and 2 corners are inserted into the pockets of the third element, which is on the short sides.
- Two elements stand on long sides, insert 2 corners of one triangle into the pockets of the second.
- Two triangles stand on the short sides, one triangle is inserted with corners into the pockets of the other triangle.
white paper fantasies
Modular origami for beginners made of white paper looks very impressive. It is used to make a bunny, a dog, an owl, a rose, a camomile, a dove, a white swan.
White Rose
 Take a sheet and fold it into 32 parts. Blanks are folded from small rectangles, a total of 110 white blanks.
The first 3 rows are made up of 18 blanks. In the 1st row and in the 3rd row, the modules are placed with the short sides up, the 2nd row - with the long side up.
Take 8 modules, insert the short side down. The top of the modules is pressed against each other, and the rosebud is ready. The cocktail tube is glued with green paper and glued to the rosebud.
The first crafts from the modules
Small origami figures from modules are not inferior to large structures, they are also beautiful and interesting. Beginners easily collect a Christmas tree, lemon, strawberry, flower, watermelon peel, small swans.
Step-by-step instructions for constructing a Christmas tree:

To make a small lemon, you need to make 96 dark yellow, 16 white, 16 yellow modules. Each row of a modular lemon consists of 16 blanks, which are placed with the short side up. The bottom of the lemon consists of three rows of modules. Yellow blanks are placed in the first row, white in the second row and dark yellow in the third row. After that, 5 more rows of dark yellow modules are made. The lemon is ready.
Flower for beginners
Master class for beginners: a simple daisy flower.

The masters offer beginners step-by-step instructions on how to make a modular paper origami swan. You can make a small white swan, a large swan and the Swan Princess.
Diagram of a small figure
To make a baby swan, requires 22 dark yellow triangles, 120 white and 1 red triangle. The first circle and all subsequent circles of the small swan figurine are made up of 15 blanks.
 The body of the swan is made up of 3 rows of elements, then the product is connected and raised with the corners of the triangles up, 4. 5, 6, 7 rows of blanks are inserted from top to bottom. After finishing the 7th row, they begin to fold the wings. The wing is assembled anywhere in the workpiece of 6 elements.
The wing begins to be made from 1 dark yellow element, 4 white, again 1 dark yellow. In the future, each row of the wing is reduced by one white element, while the dark yellow modules remain at the end of each row. The work is completed when only 1 dark yellow module remains. The second wing is made in the same way. The neck is folded, putting on a triangle in a triangle 15 white pieces and at the end 1 red beak. The finished strip is inserted between the red modules. Usually they put together a whole family of small swans.
Great white swan
A white large swan is made up of 355 white modules and 1 red one. When working on a craft, make sure that the direction of the modules matches.
The body of the swan begins to build according to the scheme:

To make the Swan Princess, you must definitely follow the step-by-step instructions and the assembly diagram.
For the construction of three-dimensional figures it is necessary to have diligence and perseverance. DIY crafts are the most valuable and expensive! It is the best gift for family and friends!
Attention, only TODAY!