Felt dresses made by March 8. New design for familiar objects. Gifts for mom
Dear bloggers, handicraft friends! 🙂 We are pleased to present to you the first action, with the help of which, over the next month, we will prepare together for spring and International Women's Day. This MK has prepared for us Evgeniya Artemieva - a wonderful mother blogger and a talented needlewoman.
We are also pleased to announce that the "Magnificent Eight" campaign will initiate a new section on "Mom Blogs" - it will be named the same as the nomination in the New Year's campaign, namely -. Give a lot of beautiful creative posts in the community that will inspire all of us to create beautiful creativity for and with children. 🙂 And now we pass the floor to Zhenya.
DIY felt brooch: master class
Walking through the Internet, I saw a photo of a beautiful felt brooch without a description of the manufacturing method. I liked the decoration and decided to make it.
You can make this brooch from felt of any color and thickness, in just an hour. The decoration is perfect for a woolen coat and as a decor for a bag.
I give the basic standards in the manufacture of a product, and if you add your creative mood, then you can modernize the decoration. Such a brooch will become a wonderful souvenir by March 8 for a lady of any age - from a very young coquette to a grandmother.
Materials:
- felt,
- rhinestones,
- cardboard,
- glue "Moment" universal (transparent),
- glue for rhinestones,
- gold paint or spray with gold,
- scissors,
- Press.
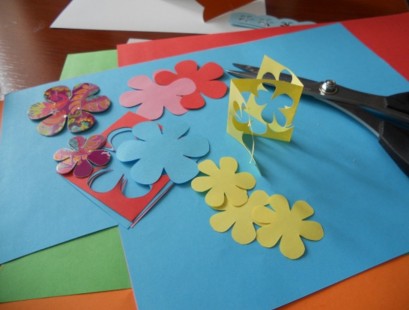
We cut out three forms from cardboard: a circle of Ф10 (for petals), a circle of Ф3 (for a core) and leaves (Fig. 1). You can choose the size of the jewelry yourself.
We take felt. In my case, I used 1mm red and green felt and 3mm green core felt. We put patterns on the fabric, outline and cut out. Circumference Ф10 - 4 pcs., Circumference Ф3 - 2 pcs., Leaves - 2 pcs. (Figure 2).
The photo shows that there are several small circles of different colors - this is in order to pick up the core.
We take blanks from red felt and add 4 petals. To prevent the leaves from opening, I applied glue to the inside of each petal and put them under the press (Figure 3-6).

We take the red circle Ф3 (back base), put glue on it and glue the folded petals (Fig. 7 and Fig. 9). Glue the leaves on top (Fig. 8 and 10). In fact, already during the manufacturing process, I realized that I could simplify it a little. First, glue the leaves on the back base, put them under the press, and only then glue the petals and put the entire workpiece under the press for 20-30 minutes.

We have almost got a brooch (Figure 11). Take the spray and cover the jewelry with gold. We give a little time to dry, then glue the rhinestones (Figure 12).

And our decoration is ready! At the final stage, we decide what kind of decoration it will be. If the pendant is on the bag, then we sew (glue) the braid, if the brooch, we sew (glue) the brooch clip, or we sew the felt decoration on any wardrobe item with which it is combined. I decided that my decoration would become a brooch, and I attached it to a drape coat (the last rice is a ready-made decoration).
I wish you creative success!
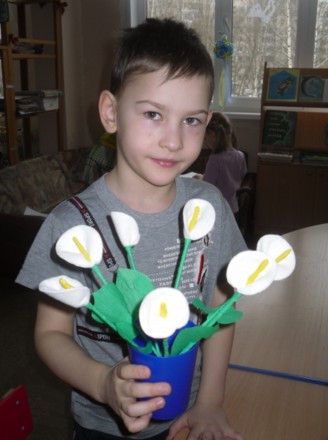
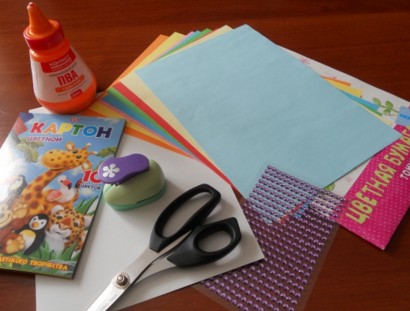
A bouquet of flowers made of felt by March 8 can be presented to a teacher at school, a kindergarten teacher, present to your beloved mother and grandmother, or to decorate the interior design of your cozy home with it, creating a spring festive mood in it. I would like to suggest that you create delicate felt flowers in the simplest and easiest way. The most important thing that you will need for work, in addition to felt, is zigzag scissors for decorative processing of the edges of flower petals. Watch the workshop below and get inspired to create a handmade floral gift.

- felt of delicate pastel shades - pink, yellow, blue and light green,
- zigzag scissors,
- floristic wire, you can use barbecue sticks,
- threads,
- needles,
- floristic green tape (if necessary and at will),
- small bucket, decorative planter or flower pot,
- ribbons or braid for decorating the bucket,
- foam ball or floral oasis,
- hot glue gun.

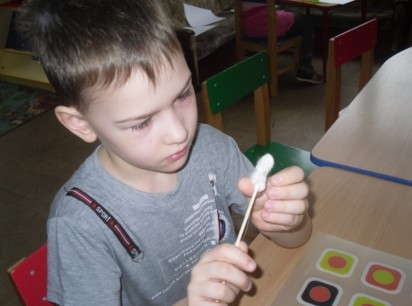
Let's get to work, having prepared all the above materials. To create one flower, we need to cut out a zigzag circle from felt with scissors with a curly edge, 8 cm in diameter. Mark the center of the cut out circle and thread it with a needle. Next, fold the circle in half and twist this half into a cone, as shown in the photo below.

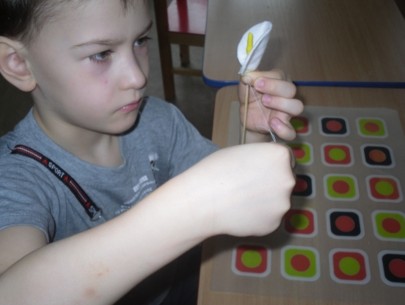
We fix the leg of our flower-cone with threads and put it on a floral wire or a barbecue stick. To create a sepal, cut out a circle with a diameter of 4 cm and cut off the third part, which will be the sepal for the flower. We glue it with hot glue or sew it on.

To make a bud, take a half of a circle with a diameter of 8 cm, cut out with curly scissors, and twist it into a tight cone.

Now we cut out leaves from light green felt, up to 8 cm long and up to 2 cm wide. Glue the leaves to the stem with hot glue.

To create a decorative flower arrangement, insert a foam ball or a floral oasis into a small bucket and stick our flowers into it. We tie the bucket, decorate with ribbons, braid or lace.

That's the whole master class. As you can see, everything is very easy and simple. Happy Holidays!
Hello everyone who came to my blog today! How is your mood? I hope it's fun and you're doing well. After all, another season will soon come, and with it will come the spring holiday International Women's Day. And we will be happy to congratulate all women on this day.
Let's present mothers and grandmothers with beautiful and original crafts that will be done with care and love.
Of course, you can make a bunch and shower them on your favorite girls and sisters. And you can make gorgeous bouquets of flowers or make original postcards and souvenirs. You will learn all this from this article, so let's go ...
What can you make crafts from? Of course, from the materials at hand that you always have at hand, let it be paper, cotton pads and a bunch of napkins. After all, the main thing is to come up with, and then realize the idea in reality.
I really liked this kind of craft that you can give your mom - this is a flower. Moreover, it is made of paper, but look how magical it looks in this pea.
You will need corrugated paper, and it will need to be cut into small squares, they should all be the same.

And then glue it to the base using the facing method. You can also make the base from a long strip of paper, twist it into a tube and glue it. After that, twist each piece of paper prepared for this case on a rod and glue it to the base.

Make petals and take any flower pot, you can fill it with plaster or come up with something else.

Be creative and you will succeed.

Using this technique, you can make a different look.

If you want to find a more delicate option, then make the number 8 out of satin ribbons and you can even hang it on the wall. Here, of course, certain skills are needed to perform such beauty in the style of a kazanshi.

Using the quilling technique, you can also build a real spring masterpiece, see for yourself.

Such a work looks awesome and very original, even your teacher will be delighted to receive such a gift.

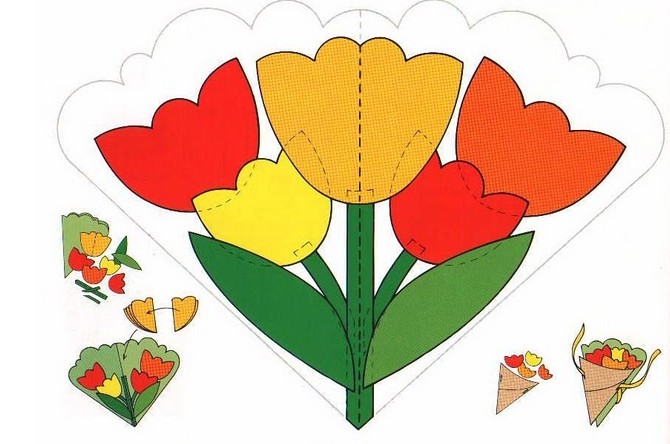
The most common children's souvenir is a postcard in the form of tulip flowers or some other.

I also liked this basket-magnet on the fridge, cool, don't you think?
Or a small multi-colored meadow like this.

Of course, it was not without vytynanka, my favorite type, who needs a template, write, I will send it for free. So gorgeous and not at all difficult, literally five minutes and your masterpiece in the form of an openwork figure eight will stand on the table and you will not take your eyes off it.

There is an even easier option, from ordinary strips you can make such a wonderful bunch, both a kindergarten child and a schoolchild can do it.

You can use an applique, make a vase or basket template, decorate it with leaves and flowers.

Dads, remember they gave them when they were preparing for February 23, you can overpay this idea here. How do you look at it?

For the next great idea, you will need material, namely felt, a needle and thread, and scissors. You can create such a magical and bright bouquet.

First, make a base like this, you can also use a satin ribbon for fixing.

Cut the flowers out of felt, and the bead will be the center.

In principle, instead of a bead, you can use something else, multi-colored pebbles or sparkles.

I was also captivated by such a soft pink charm, and why go to the store when you can make a miracle yourself. It looks like an orchid, well, just cool!

Volumetric postcards made of paper and cardboard
On this day, all daughters and sons delight their mothers and grandmothers with glorious gifts, present them with postcards that they made themselves in labor lessons or in kindergarten. These can be done quickly and at the same time beautifully.
I suggest you make such a nice greeting card out of corrugated paper with the children, it will also look voluminous, take a note. You can use this step-by-step master class in the senior, preparatory group or primary grades. You will get a bunch of roses or wildflowers.

We need:
- cardboard
- corrugated paper
- satin tape
- openwork baking napkins

Stages of work:
1. Take cardboard, preferably blue, light blue or green. Then glue a napkin to it below the center.

2. Cut strips out of corrugated paper and place it on a pencil or pen and start curling, as shown in this photo.

3. And then draw out, pull off the pencil, like an accordion.

4. Spiral to make something that looks like an open bud.

5. Unscrew the product with your fingers, fluff it up.

6. Glue your colorful creations onto a napkin.

7. Cut the leaves out of green corrugated paper.

8. And decorate them with a craft.

9. Make a satin ribbon bow and tie the bouquet.

10. Pretty good and I would say it looks charming. Creative success! Do not forget to learn a poem on this topic.

You can also make such a creative product.

With preparatory tools, you can make just such a beauty from an openwork napkin and cardboard - chamomile.

If you are looking for a simpler option, for example, for the smallest from 3-5 years old, for example, for the middle group of the kindergarten, then this hint will probably push you to the right thought.

For the younger group, make a common huge plasticine craft, literally 10 minutes and you're done. See how great you can make from balls.

Or a violet.

For schoolchildren, you can make a product from threads, such as embroidery. No glue is used in the product itself, the threads pass through the holes.

I found the idea of making a number 8 quite interesting and using a music disk as a stand.

And this is what can be obtained from these materials.
The most beautiful souvenir ideas
First of all, I want to offer you this video for viewing, how do you like that idea? Be sure to write your opinion at the bottom of this note after viewing.
With the arrival of spring, you can see not only flowers, but also the arrival of birds and insects. Therefore, let's make a clearing with a bee, wow, and it all looks well, just great and very beautiful.
We need:
- toilet roll
- double-sided tape
- kinder surprise mold

Stages of work:
1. Take the sleeve and double-sided tape, wrap it around the entire diameter.

2. Then glue the sheet of paper onto the double-sided tape.

3. Wrap the unwanted remnants of paper inside.

4. Take sheets of green paper of different tones, fold them in half, and then cut them into strips, as if you were making a bookmark.
5. Using a stapler, wind the blanks onto the prepared base and secure.

6. Get tempting leaves or weed. The base of the sleeve must be wrapped with paper again to hide everything you do not need.

7. Or do it like this.

8. Then in the store buy figures for decoration or make such yourself, butterflies, bugs, spiders, etc. Unleash your imagination and in an original way and apply them to the grass.

9. After that, make a blank of butterfly wings, which will be made from a case from a kinder surprise.

10. Do not forget about the eyes and possibly a mouth that you can draw with a marker. Here are the tones of spring beauty that will decorate any house or apartment.


Use the materials at hand, lids, cocktail straws and you will surely have an insight.

There are a great many options, I never cease to admire and be amazed at times.

See, even an egg carton was used here. And of course they used ordinary pasta to make another masterpiece.

As the saying goes, who is good at what, and what have you come up with? Or are you still searching and don't know what to accomplish?

Well, then perhaps you will be interested in making such a souvenir using ordinary disposable spoons, and indeed tulips came out, only unusual ones.

Undoubtedly, a basket or pot will emphasize the originality of this simple idea.

The other day I saw this kind of work at school.

By the way, even dandelions or chamomile can be made from cotton swabs and plasticine, to whom does this work resemble which flower?

Well, this is definitely a dandelion here.

And here most likely asters.

Or chamomile.

Using paints and brushes, you can draw a plot and congratulations.

Skillful craftswomen can make a product from beads, it is certainly difficult, but for those who are fond of this it will not be difficult.
For most, the palm is the most beloved card. How simple, but you can even take it to a competition or an exhibition.

We make crafts for kindergarten with children
With the children, first of all, you can make all kinds of drawings for this international day. Use something unusual, like drawing with a crumpled piece of paper or a cotton ball.

Well, for joint activities, you can make such a gift to mothers and grandmothers and place it near the group on booths with congratulations.

We need:
- paper napkins red
- corrugated paper
- scissors
- stapler
- tassel
- cardboard

Stages of work:
1. Take an ordinary paper napkin, see the diagrams from left to right. Fold it in half, then again, connect in the center with a stapler. Then cut out a shape that resembles a circle. Make small cuts along the entire diameter, and then fluff the product.

2. Cut out the shape of the bouquet from cardboard and wrap it with corrugated paper, tie a bow.

3. Make leaves and let the children stick the resulting flowers in any order.

4. Here is such a weird and magical creation, well, it just looks amazing, as if a real bunch of roses.

We give flowers to mothers on March 8
In this article, I will not go deeply on this topic, at the very beginning you have already seen some ideas, now I will show you the simplest ones, and in the next issue there will be new items and very cool options for flowers for this women's day. So, do not miss a new note, add this to your bookmarks so as not to lose.
From pieces of paper for notes, you can make small bags, look and then glue them in a circle, that's what you get.
By the way, you can give such a charm to your beloved teacher).

Nothing special, but it looks cool.

Or you can use this video:
Also use coloring pages, because children love this business very much. Any mother will be pleased to receive such a drawing.

You can use pictures with animals, you can just use some colors.


Or, at the same time, even arrange them in the form of messages and wishes.

Choose any template you like, print on the printer and congratulate!

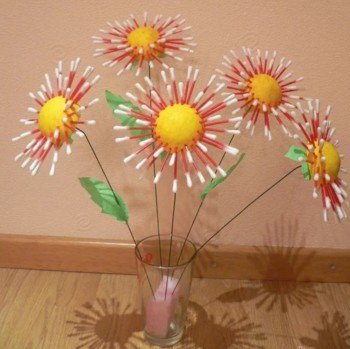
We need:
- cotton pads
- scissors
- threads
- tassel
- gouache paint
- skewer or stick
- corrugated paper
Stages of work:
1. Put a cotton swab on the stick, you can stick it with glue.
2. Then paint it yellow, and then wrap a cotton pad around the entire circumference of the stick, while using a thread so that it does not fall.
3. Decorate the stick with corrugated green paper, you get a stem, cut out the leaf and also wind it on the stem.

4. These flowers will turn out to be white and at the same time smart, pretty beautiful and cute, super!
Master class for primary school students
I want to offer you an unusual craft that will be made of yarn. You will also need a vase and your good mood, because you will get bright yellow and everyone's favorite flowers, called mimosa.
Next time in another post, you will find instructions in this paper mimosa.

Well, now let's make just such a twig from yarn threads. Here all the steps are shown at once, you just have to repeat.
Now let's create a box, or such a miracle can serve as a candy bowl or a vase, 3 in 1, and this can be done from cardboard, toothpicks and woolen threads.
1. Cut a heart out of cardboard and stick toothpicks into it. But first of all, first make holes on the cardboard with a needle and drip glue into them, and then stick in the toothpicks.


3. Here's what happens over time, you can add beads or seed beads.

4. And of course you can play with the shapes, make them round or square.

Well, how do you like this idea? If you don’t like it, then go to the next type of a voluminous greeting card, so to speak 3d.
We need:
- cardboard - 1 pc.
- colored paper
- PVA glue
- scissors
- punch design
- rhinestones or scrapbooking kit
Stages of work:
1. Take a white piece of cardboard and fold it in half, make two cuts in the center, 5 cm wide, as shown in this photo.

2. Now bend with your hands to make it look like a ladder, this will be the base on which you will glue the craft.

3. Draw a basket out of colored paper and cut it out.


5. Determine the number of products yourself.
6. Now, using a special hole punch, make a decoration, for this take a strip 2-3 cm thick.

7. Glue this decor on the sides, and the basket in the center.

8. Then decorate with flowers and butterflies, as well as rhinestones or sparkles. In general, the fact that you have at hand of jewelry.

You can use this pattern and make extremely expressive and cute gerberas.

To do this, print the flowers, and then glue them one by one so that it comes out quite lush and voluminous.

I also liked the work in the form of a fan with tulips on it.

Or such a postcard.

Also, such a cute wire product can be an excellent option for schoolchildren.

Or fold such a souvenir from paper strips.

That's all for me. I wish you succeed in everything conceived. Success, inspiration and all the best and positive! Bye bye everyone!
Best regards, Ekaterina Mantsurova
Master Class. Postcard - a magnet made of felt with a pocket with your own hands with step-by-step photos.
Meshcheryakova Elena Vladimirovna, primary school teacher, MBOU Secondary School No. 108 of the Sovetsky District of the Urban District, the city of Ufa, Republic of BashkortostanDescription: this master class is intended for children from 9 years old, teachers, teachers of additional education, educators, parents.
Purpose: decorative magnet - a bunch of felt will be an excellent gift for March 8th.
Target: execution of decorative felt decoration.
Tasks:
to introduce felt to the material, improve the skills of working with scissors, a needle, a hot glue gun;
develop skills to freely use the techniques "stitch back to the needle", "buttonhole seam", sewing on buttons, develop fine motor skills, imagination, eyes;
to educate accuracy in work, attentiveness, perseverance, diligence, instill an aesthetic taste;
to form the ability to use the knowledge gained in work and life.
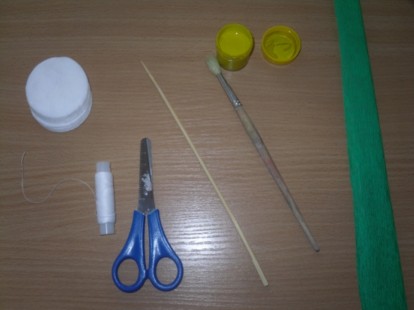
Materials:
felt (green, white, light pink and red);
buttons (5 pcs.);
threads (yellow);
needle;
magnets (2 pcs.);
pot and flower patterns;
floss threads (green and shades of pink);
hot glue gun;
scissors;
ruler;
pencil.

Templates:

Safety rules when working with a needle, scissors and a hot glue gun.


The tradition of giving flowers originated before our era. Because it is impossible not to pay attention to the beautiful plants that surrounded a person, not to admire, and not to betray your admiration through flowers to another person. In ancient Greece, flowers were presented to the winners of the Olympic Games, philosophers and poets as a sign of their deification, because flowers were also placed on the altar to the gods as an offering and to appease them. This is also the origin of the tradition of giving flowers to beautiful women as a sign of admiration for their beauty, which the gods awarded them.
On International Women's Day, our elementary school students can donate a bunch of felt flowers.
Felt- dense compressed woolen mass, which is cut into sheets of certain sizes. Density is achieved by treating the wool with hot steam. Felt is a close relative of felt, but the more delicate wool or animal fluff is usually used for its manufacture.
Pros of felt:
has a wide range of colors;
produced in sheets of various thicknesses;
easy to sew on and stick on;
does not have a front and a seamy side;
the edges of the felt do not crumble, there is no need to bend them;
ideal for making jewelry, accessories and decorative items for the interior.
Today we offer you to make a bunch of flowers made of felt on a magnetic base with a pocket for wishes or a gift.
During work, skills will come in handy:
1. Seam "Back to the needle"

Algorithm:
- Draw a line on the fabric. Bring the thread to the front side at point A, slightly stepping back from the end of the drawn line.
- Pass the needle through point B at the end of the marked line and draw it out at point C. The distance from point A to point C should be the distance from point A to point B.
- Pull up the thread
- Pass the needle through point A and bring it out at point D. The distance from point C to point D should be the distance from point A to point C.
- Continue sewing in the same way, making sure to sew the same length.
- To finish sewing, pass the needle to the wrong side through the hole at the beginning of the previous stitch. Pull up the thread and secure it.
2. Looped seam(edge processing)

Algorithm:
- Bring the thread through the fold at point A.
- Pass the needle through point B under the hem until the point of the needle is behind the square of the fabric. The thread should be under the needle.
- Pull up the thread. Pass the needle through point C under the hem and sew a second buttonhole. The thread should be under the needle.
- Continue sewing in the same way. After the last stitch has been sewn, pass the needle over the buttonhole and through the fold. Pull up the thread and secure it.
Master class progress:
1. We outline the hand on the felt, so that the fingers are slightly open. Cut out. We also outline and cut out 2 parts of the pot, 5 large and 5 small flowers.
2. We compose a composition: we put flowers, buttons on our fingers, we put a pot.

3. We sew buttons and flowers on the fingers - the basis of our work


4. We apply the finished bunch to one part of the pot. Cut off the excess length.

5. Sew two pieces together.


1 part of the product is ready.
6. We draw a pattern on the second part of the pot. We chose diamonds and straight lines. This will be the wrong side of the product.

7. We embroider with floss using the back stitch technique


2 part of the product is ready.
8. We connect our finished 1 part of the product with 2. Sew the edges of the pot using the "loop" stitch technique.


9. Using a hot glue gun, glue the magnet onto the pot so that the thread seams are not visible.

Cut out small rectangles from the second magnet and glue them on the fingers, closing the threads from the sewn buttons.

Our magnet is ready! We put a small sweet gift and a beautiful poem for mom in the pocket.

Here are more options for magnets - bouquets for a holiday:
The bouquet is made of paper and cardboard. Children 4 years and older can do it.

The bouquet is made of felt, half beads. The parts are glued together with a hot glue gun. For children aged 7 and over.
Hello everyone, hello !! Today, everyone's expected topic is on the agenda - crafts for International Women's Day. Indeed, immediately after February 23, we begin to prepare for March 8. Therefore, dear educators, teachers, parents and children, we will rather start viewing this post, choose a gift and start tinkering !!
Let me remind you that there is already a selection for making spring postcards for March 8, so if you missed it, let's take a look. Well, in this article we will analyze the most popular hand-made crafts and it will not only be flowers !!
We will start with the newest ideas for making congratulations. Indeed, on this wonderful spring day, we really want to please our mothers, grandmothers, sisters, girlfriends, teachers. Therefore, for you, a small selection of the most interesting photos for the current year !!
How do you like such green horseshoes for good luck, decorated with flowers made of ribbons and beads ?! Isn't it very beautiful !!

Or such voluminous beaded flowers ?? But here you need special skills in beading.

But gentle felt eights are also very useful.

Look what a delicate basket of flowers made of satin fabric, it looks very festive !!

Volumetric eights made of paper are always in place, especially if you know how to work with such delicate patterns.

Well, this beauty is made using the quilling technique, it looks amazing !!

Awesome firebird that brings happiness to your home !!

Or a simple chamomile in a pot. Such a present is easy to perform and very harmonious in appearance.

And what lovely lilies of the valley from buttons, I think you will definitely surprise those around you with such a gift.

I also really liked the idea of a needle bed, and we get not only a needle bed, but also a jar for storing various little things. Look how easy it is!

Of course, the female sex is very fond of sweets and flowers. I decided to combine these preferences and make such a nice present.
- Basket of flowers
We need: a box of chocolates (preferably with chocolates), colored paper, cardboard, colored table napkins, scissors, glue stick.
Manufacturing process:
1. Use a whole rectangular box of chocolates as a background.
2. Take two sheets of colored paper of different shades of brown, cut them into strips 1 cm wide.
3. Now weave stripes of different shades perpendicular to each other (fig. 2).

4. Cut an oval 13 cm long and 10 cm wide from cardboard of any color.
5. Glue this oval to the woven rug from the wrong side (fig. 3).

7. If the ends protrude from the canvas, then tuck them in and glue them to the oval from the wrong side. You should have our basket.
8. Stick it on the candy box.
9. Now take 6 napkins of different colors and, when folded, cut out circles with a diameter of 4-5 cm. Glue these circles, make a circular cut.
10. And out of yellow paper, cut out circles with a diameter of 1-1.5 cm and also make a circular cut. These centers need to be glued to the center of the flowers.
11. Using the stencil given below, cut out 9-10 leaves and stick them on the basket (fig. 5).

12. Stick flowers between the leaves and your congratulation is ready!

How do you like this idea ?! In my opinion, it is very excellent and original, as they did it with their own hands, they also treated it to sweets.
Crafts from paper and cardboard from the first to the senior group of kindergarten
I cannot aside leave creativity for our children. As always, paper and cardboard are popular materials, well, and various additions. In general, I will not torment for a long time, now you will see everything with your own eyes !!
Excellent butterflies-flowers made of folded paper in a fan, the background can be painted with watercolors.

But the original bouquets, make a base tube of green cardboard and glue the cut out buds and leaves on it.

Or such cute hearts. For pots, you can use sour cream jars.

And here is an interesting clearing of ordinary straws for juice and colored paper.

And these eights are made from a toilet sleeve, cut off, glued on the cardboard bottom, and decorated. By the way, if you do not connect the circles, you will get caskets.

Craft from paper plates, looks very impressive.

Well, how can you do without voluminous postcards, I think you have already learned how to make them !!

These beautiful paper flowers can be framed and you get a picture.

Again cute, amazingly beautiful pots !!

Or you can make postcards from colorful napkins.

And do not forget about origami, in the picture is a diagram of folding daffodils.

And if you want something special, then I suggest making such a paper cake.

We will need: colored xerox paper, colored paper napkins, beads for decoration, a stapler, glue.
Manufacturing process:
1. Make cakes out of paper, folding them like an accordion, then folding them in half and gluing them together. One cake will need 6 sheets.

2. Make three cakes in total.

3. Make flowers out of napkins.

4. Large peony.

5. And small roses.

6. Connect everything together by decorating with beads.

Here is such an inedible beauty!
We make souvenirs with our own hands from corrugated paper
Also, do not forget to make handicrafts from corrugation, from it all the actual bouquets are obtained as living, real !!
I do not give a detailed step-by-step description, if you are interested, go to the article, there you will find master classes for bouquet and flower products. And now a small selection and video plot.


And as promised a small video on how to make a bouquet of roses with your own hands from corrugation.
The most beautiful crafts for March 8 from felt
Well, those who love to sew and are familiar with such an amazing material as felt know that there are a huge number of different souvenirs for the spring holiday. Look at what I liked, maybe you can sew something from the proposed options.
- Multicolored flowers

- Cute birds

- Heart Keychains

- Cheerful bouquet

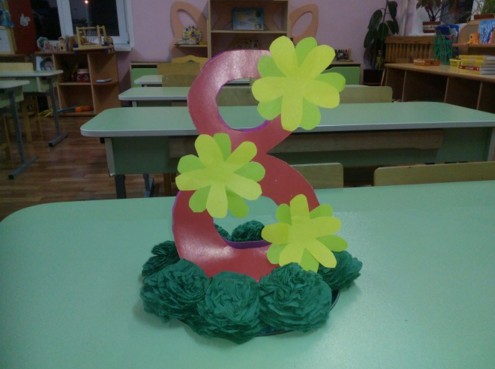
- Red eight

- Ladybugs Charm

- Photo frame made of flowers

And you can also sew the following potholders:

Or make a needle cushion in the form of this insect))
We need: red and black felt, threads, cotton wool or synthetic winterizer for filler, thread, needles.
Manufacturing process:
1. Cut out the template and transfer it to the fabric. Make felt blanks.

2. Sew together all parts, leaving a small hole.

3. Fill the cow with litter and sew up the rest.

4. Your needle bar is now ready.

And here is the template for making it:

Master class on making a gift for mom from salt dough
Do you remember that I once told you about making and how you can make a large number of souvenirs from it, including for March 8 ?! So, if you missed this article, then be sure to stop by, take a look, maybe choose interesting ideas for congratulations.
Well, now I suggest that you make such lovely presents for our mom and remind you of the technology for the production of salted dough. 😉
- "A present for happiness"
We need: flour - 2 tbsp., Salt - 1 tbsp., Water - 1/2 tbsp., Gouache, colorless varnish, ribbons, templates.
Manufacturing process:
- Use the recipe above for the salty dough.
- Roll out a layer from the mass and cut out a heart and a horseshoe according to the template.
- Decorate souvenirs according to your imagination.
- Next, let the crafts dry. Ideally, let them sit for 5 days.
- Then paint with gouache, let dry again.
- Cover with colorless varnish, insert the ribbon.

Let's see what else you can sculpt with this great creative material.
Multi-colored eights, decorated with flowers and sparkles, you can glue a magnet and get a great gift.

You can make a bouquet of any flowers, it is also always relevant.

Heart with an inscription, decorated with buds of your favorite flowers.

Simple photo frame. This kind of work is within the power of little guys.

Spring suns, very funny and warm !!

The real picture !!

But the funky candlestick looks insanely beautiful !!

Or maybe you like cute cats or a bunny ?!


Or are these little angel girls ?!

And how do you like such a dog with a gorgeous bouquet ?!

In general, it all depends on your imagination, and the rest will work out !!
Video plot on how to make roses from cotton pads
And don’t say, but the main gift on International Women's Day are flowers, and most often they give roses and tulips.
It turns out that beautiful bouquets can be made not only from paper, but also from cotton pads. And this is done very simply, I think you will be convinced of this when you look at the following plot:
Well, impressed ?! And now we will see what types of flowers can still be made from this improvised material.


I would never have thought that such masterpieces could be made from ordinary cotton pads !!
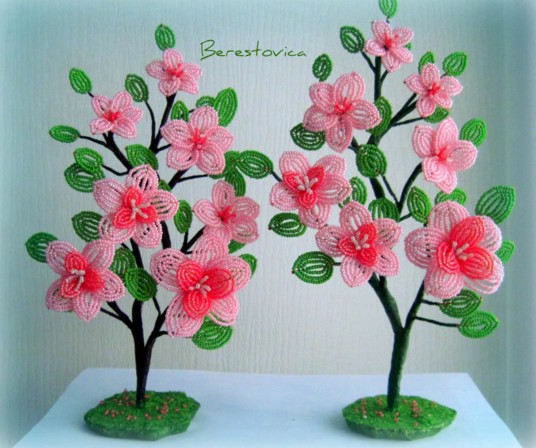
DIY bead crafts for children
You know, I also remembered how as a child I weaved various baubles, bracelets, chains and pendants. And I thought that unusual and festive souvenirs could be made from beads.
I studied the Internet and it turned out that flowers are the most popular in beading on March 8, who would doubt it !! I have selected the most attractive work options for you.
You can weave such a bunch of mimosa from a thin wire.

Such an eight made of ribbons, decorated with blossoming flowers.

Here is such an original decoration.

Or a cute heart-shaped topiary.

A simple postcard: we spread the drawing with glue and lay out the beads.

You can also weave such a basket, it turns out a real gift.

Floral applique option.

How do you like such cute jewelry ?! In spring, wonderful !!

A bunch of not blossoming tulips !!

Here is such a charming selection of bead crafts !! Beauty in one word !!
Interesting ideas for congratulations from threads
While doing this article, I came across very magical and soft-looking work made from threads. Mostly they take fluffy threads for knitting. The manufacturing technology is simple, it is either applique or bundling and cutting to the desired shape.
Here's a look at how you can make such a yellow dandelion in stages.

On the basis of cannons, you can also make a sprig of mimosa.

Or applique: draw a plot on the basis, and, winding threads, glue along the contour.


And if you know how to knit or crochet, then make just such a lovely box and decorate with beads.

DIY templates for March 8
According to the tradition that I have developed when preparing similar articles, in the end I offer different options for stencils and templates. So hold, circle and get creative !!
- Paper flower

- Wreath with butterflies

- Birds. Can be made as an applique or sewn from felt

- Flower vase

- Apron postcard

- Floral mug card

Well, that's all my dear friends and lovers of creative work. Hope you enjoyed the 8 March craft ideas. Write your reviews, I will be glad !! And see you !!