Crochet pineapple scarf diagram and description. Knitting patterns for the legendary pineapple pattern. Lace "Pineapple" skirt
Beautiful shawls with "pineapples" (and not only shawls) do not cease to be liked by women for many, many years. Indeed, despite the fact that this pattern is quite simple to perform, it is very beautiful and looks harmoniously in any product. Especially in shawls. It is as if it was created especially for them.
I decided to show you two beautiful shawls with a pineapple pattern. Despite the fact that in one and the other case a similar pattern was used, and even both shawls are tied with pink yarn, they are completely different, and their patterns are very different from each other.
Knitting of the first one starts from the bottom corner and expands upward, the beginning of the second is the central part of the upper side. The first is decorated with tassels, and the second is completely unnecessary, since the corners of the “pineapples” themselves form a beautiful openwork border. On the first shawl, the motifs of the pattern seem to stretch up, and on the second, on the contrary, they go down and to the sides.
Knitting the first shawl
The size of the original is 180 × 90 cm, but you can knit a shawl larger or smaller, depending on your needs.
For knitting the first shawl, 800 g of cotton yarn (200 m / 100 g) and hook No. 4.5 were used.
Start knitting with a ring from 3 vp. and continue to knit according to the pattern to the desired size. Decorate the sides of the shawl with tassels.

Knitting a second shawl
The size of the second shawl is 240 × 102 cm, for it was used half-woolen yarn (50% wool, 50% acrylic, 780 m / 100 g) in three folds - 600 g, and hook number 2.5.
Start knitting with a ring of 6 vp. (center of the upper part) and continue knitting according to the pattern until the width of the shawl reaches the required size (in the original 240 cm). Then, knitting to the row marked on the diagram with an asterisk, finish knitting each "pineapple" separately. Tie the edges of the shawl with one row of sc.

The pink-tied pineapple shawls are certainly very good.

But believe me, they will look just as good in any other color. And the most elegant ones are obtained from white yarn, delicate shades of blue, green (light green), lilac and even yellow.
A shawl is a unique wardrobe item that can be worn with pleasure all year round. She will equally well complement a winter kit and warm you on a cool summer evening. One of the popular patterns for shawls is "Pineapples" (crocheted), the scheme of which is very simple. It remains only to decide whether to use a ready-made pattern or create your own using this element.
Choosing a project
By itself, "Pineapple" is just a small element that can be combined with other patterns or simply fill the space with a mesh. First of all, let's decide on the form of future work. crochet pattern "Pineapple" can be triangular, rectangular, square. Semicircular shawls look the most elegant: when you wrap yourself in such a shawl, the effect of wings is created. When developing a project, it should be borne in mind that from a triangular shawl it is not always possible to obtain a scheme for a square one.
With the help of modern technologies, you can easily create your own scheme by composing several images of the same scale. This can be accomplished by overlaying and removing excess parts. When using this method, be sure to tie the pattern to check the accuracy of the pattern.
Shawl yarn
After the choice fell on the shawl is ready, you can proceed to the selection of yarn. If you use a ready-made pattern, the recommended yarn or its density is most often written there. But this does not mean that you should be looking for this particular thread. Let's take a quick look at the main types of yarn:
- Mohair is a thin fluffy yarn of goats. Especially delicate and soft thread marked "kid" means that only young goat wool was used for the production.
- Angora - down yarn It is very soft and fluffy.
- Merino is spun on the basis of wool cut from the withers of a special breed of fine-wool sheep.
- Alpaca is the wool of animals related to the llama. Six is very durable. A distinctive feature is the characteristic shine, which remains for a long time on the finished product.
- cotton thread is perfect for knitting a summer shawl. Working with cotton is very convenient and easy to care for the finished work.

Reading the schema
If this is the first time you crochet the Pineapple shawl, the diagram must be carefully disassembled before starting work. A square product can start at a corner, center, or bottom. Triangular can also have 2 options: go from the corner and gradually expand, or, conversely, start with a straight line and converge with an angle. A semicircular shawl always starts from the upper middle and diverges in a semicircle to the bottom.
Row numbers are usually written on complex patterns, this is very helpful for novice knitters. Often the beginning of work is simply marked with a conventional sign. Simple patterns are usually not presented in full (only a few rapports), and then knitting follows the pattern. If you've just mastered a few simple loops and tackled a big job for the first time, this may seem daunting. To overcome your inner fear, add a few more rows of the diagram yourself. This will help you understand the basic principle.

Crochet: shawl "Pineapple"
The knitting pattern for this shawl does not have complex loops or columns, but it is still worth considering the basic conventions. They are the same in most circuits.
- The dot or circle represents the chain loop and the lift loop.
- A cross indicates a half-column.
- A stick is a single crochet or single crochet.
- A stick with one crossbar - a column with 1 crochet.
- A stick with 2 crossbars - a column with 2 yarns and further by the number of crossbars.
- Sticks with one base mean that all stitches are knitted from one loop.
- Sticks with one top - sticks with one top. A loop is not tied in each column, it remains on the hook, then they are all knitted with one loop.
- An arc indicates several air loops. Usually there is a number under it indicating their number, or it is read according to the previous scheme.

Sample
Before you start "Pineapples", the description on the threads must be carefully read. The recommended hook size is always written there. We take a hook of the right size and knit 1 rapport. A rapport is a schematic element that is repeated several times.
Having knitted a small square, you can stop. We measure the resulting sample and count the number of rapports in the circuit. Multiplying these two numbers, we get the size of the future product. You can compare this figure with the span of the arms: the shawl should not be much larger.
If the result suits you, you can blunt knitting. If not, take a larger or smaller hook, but this will also change the knitting density. The size can be changed by decreasing the rows or by attaching an additional rapport. We continue the selection until we get a satisfying result.

Edge binding
You're done crocheting the Pineapple shawl, but you still feel like you're missing something? Despite the fact that the scheme is provided in full, needlewomen love to bring their own flavor to the work with the original edging of the product.
"Pineapples" is an openwork pattern, you should not choose too heavy and dense edging for it. Most often, additional strapping with a half-column with the addition of pico is sufficient. Pico is a small protrusion of 3 closed air loops into one. "Fans" is also a fairly simple pattern that looks great with "Pineapples".
Fringe and tassels
Shawl "Pineapples" crocheted (the diagram is presented in the article) knitted of wool, ideal with tassels. On the cotton version, a long fringe is appropriate. For both fringes and brushes, the first thing we do is cut the threads of the same length, this is easy to do by winding the yarn on a rectangular cardboard and cutting on one side. Do not wrap a thick layer over one place, this will result in different lengths of threads.
To make a brush, we tie several threads in the middle, fold in half and fix with a knot under the base. You can attach the brush using the upper thread.

Fringe is made much easier, but more painstaking. You will have to work with each piece separately. Take the hook and pull the thread in the middle through the loop of the shawl. We draw both ends through the formed loop and tighten, it turns out a knot. You should not put a fringe in each loop: it turns out to be too lush. Fringe or pretty edging is a graceful finish. Shawl "Pineapples" (crocheted) will look much better and more festive.
The scheme of the product is very simple, even a beginner in crocheting can handle it. But the finished work looks impressive and elegant. And the pleasure from wearing your own product is much more than from a thing bought in a store.
Now you can buy almost everything in stores. Therefore, the creation beautiful things do it yourself seems amazing and, as sometimes it seems from the outside, a difficult task. Incredible tapestries of the past centuries, the oldest handmade Persian carpets, jewelry and lace clothes are exhibited in museums and admire the talent of needlewomen and craftswomen of that time. And how great it is that in the modern world such a wonderful type of needlework and creativity as crocheting helps to embody the fantasies and creative ideas of the craftswomen of our time into reality. You can decorate your home, wardrobe, in general, your whole life with magic loops.
An openwork blouse, a lace floor-length skirt or an original napkin will surely add uniqueness and elegance to your wardrobe and make your home environment feel cozy. There is a wonderful magic wand for all this - "Pineapple". There are many variations of this beautiful pattern. There is a “Pineapple” for everyone, for beginners - simple and easy, for masters - more difficult. The main thing is that any little thing will be unique.
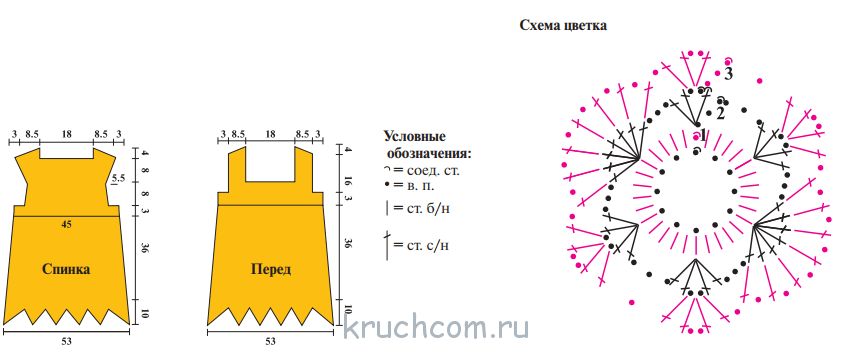
Summer top with a yoke made with a "Pineapple" pattern.
Perfect for a hot summer. 100% mercerized cotton thread, hook number 1.5-2. The work is knitted in a circle. The diagram shows a model in sizes 40-42.

Beginning of work.
- Cast on a chain of 192 stitches and close into a ring.
- Knit arches from (1 item without crochet, 5 air loops, 1 item without crochet) in every 4th loop of the previous row. Complete the first row of conn. Art. Total 48 arches
- Start the 2nd row by knitting the 3rd connection. Art. into the loops of the arch of the previous row. Next, knit arches as in the first row.
- 3 row knit in the same way.
- The fourth row starts with 3 connections. Art. in the arch of the previous row, * 1 tbsp. without crochet, 2 air. loops, then in the next arch of the previous row, knit the next (2 tbsp. with a yarn with one base + 2 air loops + 2 tbsp. with a yarn), 2 air. loops, 1 tbsp. without a crochet (in the next arch), 2 air. loops, 6 tbsp. with a crochet (in the next arch), 2 air. loops *. Knit to the end of the row from * to *. End connection Art.
- Knit according to the basic pattern up to the 32nd row. Each circle contains 12 “pineapples”.
- At a distance of about 17 cm from the beginning of knitting, make marks for the armhole.
- Tie a chain of 20 air to the end loops of the armhole. loop. Knit the sleeves in a circle (scheme 2) to the desired length.
- Top from armhole down continue to knit in a circle according to pattern 3.
- Start with 1 connection of the column to the arch of 3 loops of the previous row, 1 air. lifting loops, * 3 air. loops, knit in the next arch (2 tbsp. with a yarn, + 1 air loop + 2 tbsp. with a yarn), 3 air. loops, 1 tbsp. without crochet into the next arch *, knit to the end of the row from * to *, finish connecting. Art. in 1 lifting loop.
- Knit (according to scheme 3) 1 and 2 rows down by 10 cm.
- Then knit rows 3 and 4, narrowing the fabric by reducing the amount of air. loops between st. with a crochet.
- Tie the bottom of the top (according to scheme 3) 5 row.

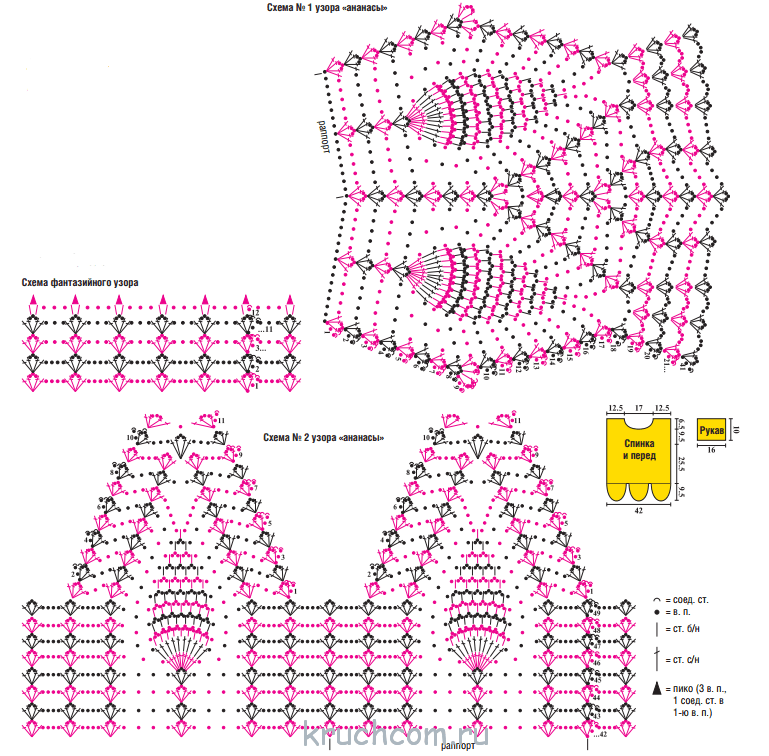
Lace "Pineapple" skirt.

The skirt is knitted from 100% mercerized cotton, crocheted number 2. For size 38-40, you will need about 700 g, for size 44-46, about 950-1000 g. Before starting work, it is advisable to tie and steam a small sample. Then it will become clear how many loops will need to be dialed initially. The numbers in the diagram indicate the number of loops in the arch.

In general, the knitting pattern is quite simple. The only trick is adding pineapples. They need to be done 3 times, 2 "pineapples" in the process of knitting. It should be knitted like this. After knitting a row where 1 arch of 5 air remains. loops, in the next row it is necessary to knit a composition (2 tbsp. with a yarn + 3 tbsp. loops + 2 tbsp. with a yarn) in (arch of 3 air loops + arch of 5 air loops + arch of 3 air loops) instead of arches from air. loops.

At the end of the work, tie each pineapple with single crochet posts with a picot.

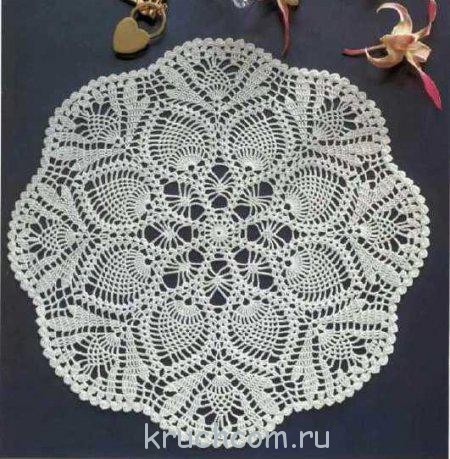
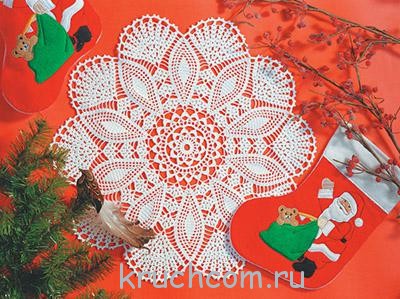
"Pineapple" can decorate not only clothes. Using this pattern, you can create very beautiful napkins that will undoubtedly decorate your home.
You can knit napkins, in principle, any color you like. Starching the finished product is also optional. In the latter case, it is worth giving preference to cotton yarn, since products made of acrylic and other synthetic threads do not starch.
The beauty of a crocheted napkin is that even a beginner can make it. There are no hard-to-understand stitches or knitting techniques. And of course, the consumption of threads for a napkin with a diameter of 20-30 cm will be minimal. Hooks should be taken No. 0.3-1 and knitted with thin threads, then the product will turn out to be very airy and very beautiful.
Thin openwork gossamer napkin.

The numbers in the circle on the diagram indicate the row number. And the inscription 4 sts the number of air. hinges in the arch.

- Dial a chain of 6 air. loops and close into a ring.
- Start the first row with 3 air. lifting loops, * 3 air. loops, 1 tbsp. with a crochet *. Knit from * to * 6 more times, 3 air. loops, finish the row of connections. Art. into the 3rd lifting loop.
- The second row is knit in the same way, but instead of 3 air. loops between st. knit with a crochet 5.
- Third row. Start with an arch of 5 air. loop, 1 tbsp. without a crochet in the arch of the previous row, an arch of 5 vp, 1 tbsp. without a crochet in st. with a crochet of the previous row. There should be 16 arches in total.
- All subsequent rows start with 4 air. lifting loops. And knit according to the pattern. End each row with a connecting post.
Napkin.

The numbers in the circle represent the row number. Inscription 6 sts number of air. hinges in the arch.

- Start work at 6 air. loops closed in a ring.
- First row. 3 air lifting loops, 15 tbsp. with a crochet in a ring.
- Second row. 3 air lifting loops, * 1 air. loop, 1 tbsp. with a crochet in st. with a crochet of the previous row * knit from * to *. The number of loops has doubled. A total of 32 loops.
- Knit further according to the pattern.
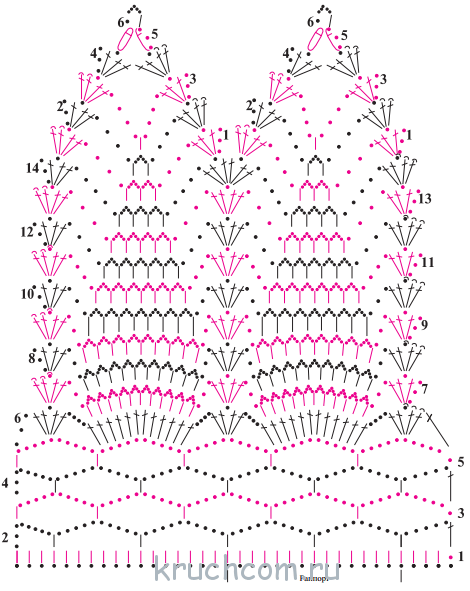
“Pineapples” do not have to be used only for summer clothes. You can knit a very beautiful shawl or scarf with this pattern.


Below are a few diagrams. The main feature of a shawl with such a pattern is that the work starts from the bottom from the corner and gradually expands to the size that you want.


"Pineapple" is considered one of the most common openwork patterns in crochet needlework. The whole point is not only in the relative simplicity of its knitting, but also in the end result of the process - the "pineapple" pattern made according to any of the numerous schemes turns out to be truly magnificent!
What is the pineapple pattern? The specified openwork crochet element is used both in the classic wedge-shaped form, and in a modified form - improved in shape, degree of density and size. At the same time, any “pineapple” scheme will contain three main components:
- the leg is a fan-shaped solid base, all the columns of which have a common origin (can be st. b / n, st. s / n, or with several crochets). It can be short (knitted from 1-2 rows) or modified (elongated), including up to 15 rows and giving the pineapple an elongated shape;
- the central triangle is the decorative part of the “pineapple” with the main pattern (it can be solid or openwork). It is knitted from a sirloin mesh, arches from air loops, lush columns, "bushes" and many other patterns;
- framing is a kind of “pineapple” frame, which is often knitted from “bushes” and is the common border of combining adjacent pineapple motifs.
The size of the future "pineapple" depends on how many double crochet stitches at the base, more stitches - more pineapple. There are plenty of options for knitting pineapple - they knit such a pattern in the usual way, in a checkerboard pattern, in a spiral, with and without the expansion of the canvas.
Scope of application of the "pineapple" pattern
Pineapple is ideal for knitting flat or expanding fabrics. That is why it is often used in knitting models of women's and children's clothing (blouses, skirts, dresses, tunics, capes, shawls, boleros), as well as for creating original interior decoration items (napkins, tablecloths, pillows, bedspreads, curtains and curtains). 
You can quickly learn how to knit a pineapple pattern. We recommend starting with knitting the simplest items - kitchen napkins, after mastering which you can move on to more complicated projects. We offer several detailed master classes on knitting pineapple patterns using an example: butterfly napkins, an original Christmas tree garland, an exclusive collar, as well as two stylish models of women's wardrobe - a bright vest and an elegant blouse. 
Abbreviations for the text:
- VP - air. a loop;
- Runway - air. lifting loop;
- Art. s / n - double crochet;
- Art. b / n - single crochet;
- pet. - a loop;
- chain. - chain;
- OL - previous. row;
- SS - connecting column.
A simple pineapple pattern using a butterfly napkin as an example
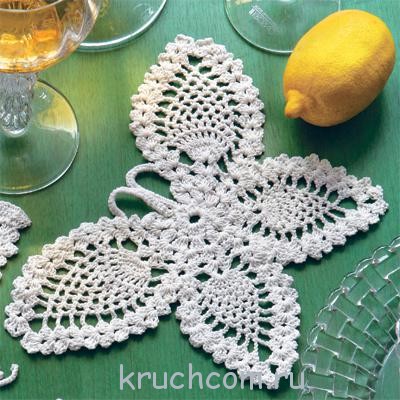
Knitting pattern:
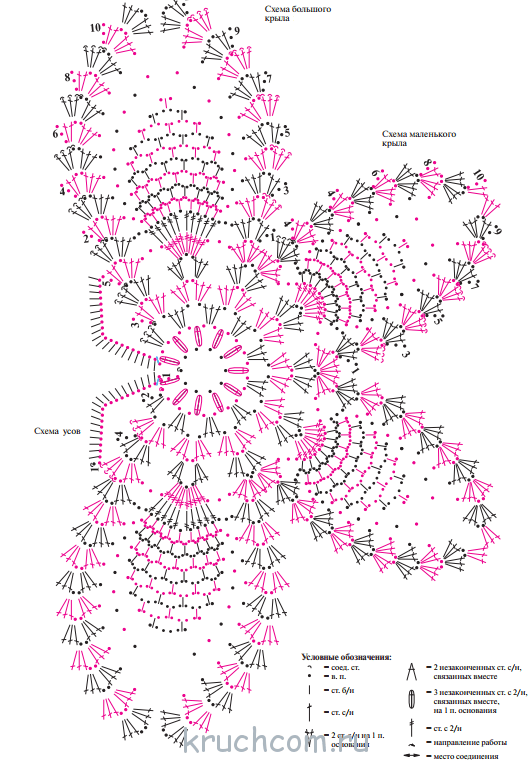
Knitting steps:
We collect the chain. for 10 VP, in the SS ring.
Row number 1: 3 runways, 2 illegal. Art. s / n, united by one vertex with the last. Runway, in the first runway - we knit 2 more VPs. Then there are 11 rapports: “3 illegal. Art. s / n, united by one vertex, tied into a ring from a chain-base + 2 VP ". SS. We knit in the direction straight and back.
Row number 2: 3 runways, 2 st. s / n in the arch of 2 VP PR, 2 VP, 10 rapports: “3 st. s / n in the next. arch from 2 VP PR, 2 VP.
Row number 3: 3 runways, 2 st. s / n in the arch of 2 VP PR, 2 VP, 3 tbsp. s / n in the same arch, 10 rapports: “3 st. s / n in the next. arch of 2 VP PR, 2 VP, 3 tbsp. s / n into the same arch. "
Rows No. 4-5: we knit according to the scheme. Cut the thread.
We start knitting the wings, knit each separately, attaching the thread to the right place. Knitting direction: straight and back.
We knit two large wings according to the scheme, rows No. 1-11, two small wings we knit according to the scheme of a small wing, rows No. 1-10. We finish the SS. Cut the thread, carefully hide it.
We knit the antennae according to the scheme: we collect the chain. from VP, we tie them to Art. b / n.
An openwork butterfly napkin is ready. All that remains is to starch it well and iron it with a hot iron to give it the correct shape.
Openwork Christmas tree garland of pineapple motifs
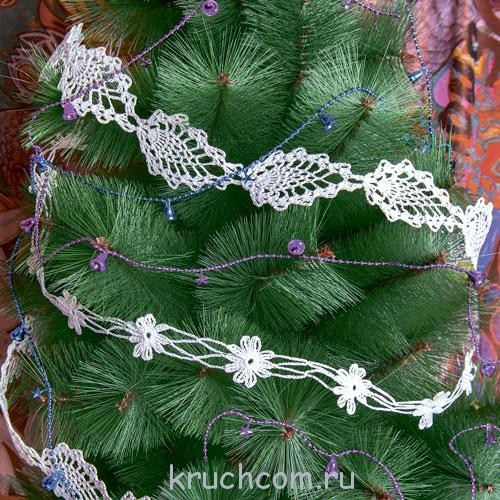
Knitting pattern:

Into a ring of closed SS of 6 recruited VPs, we knit:
Row number 1: 3 runways, 1 st. s / n, 3 rapports: 2 VP + 2 tbsp. s / n in the ring. We knit straight and back.
Row number 2: 5 runways, 2 st. s / n in the next. arch of 2 VP PR, 2 VP, 2 tbsp. s / n in the same arch, 3 VP, 7 tbsp. s / n in the next. arch of 2 VP PR, 3 VP, 2 tbsp. s / n in the next. arch of 2 VP PR, 2 VP, 2 tbsp. s / n in the same arch from 2 VP PR.
We continue to knit according to the pattern until the garland reaches the desired length. Starch the finished decoration properly, stretch it and iron it with a hot iron.
Ornate pineapple collar

Knitting pattern:

Progress:
We collect the chain. of 5 VPs (2 VPs + 3 VPs).
Row number 1: 2 st. s / n in the 4th VP chain., 3 VP, 3 tbsp. s / n in the same VP chain., 3 tbsp. s / n in the next. VP of the basis of the chain., 3 VP, 3 tbsp. s / n in the same VP chain.
Row number 2: 4 runways, 3 st. s / n in the arch of 3 VP PR, 3 VP, 3 tbsp. s / n in the same arch, 5 VP, 3 tbsp. s / n in the next. arch of 3 VP PR, 3 VP, 3 tbsp. s / n into the same arch.
Row number 3: 4 runways, 3 st. s / n in an arch of 3 VP PR, 3 VP, 3 VP., 3 tbsp. s / n in the same arch, 5 VP, 1 tbsp. s / n in the next. arch of 5 VP PR, 5 VP, 3 tbsp. s / n in the next. arch of 3 VP PR, 3 VP, 3 tbsp. s / n into the same arch.
Rows # 4-94: knit according to the collar pattern. We do not cut the thread, we leave it for tying.
We tie the collar in a circular manner, in three openwork rows (the diagram is also attached). Sprinkle the finished collar with a starch solution, stretch it to size, iron it and leave it to dry.
Bright women's vest with a pineapple pattern

Stylish vest with a yoke, knitted with a pineapple pattern and decorated with a lush knitted flower, will surely appeal to the fair sex. The knitting process is not so complicated, especially since we provide everything you need for this: a pattern, a knitting pattern for a vest fabric, as well as a flower.
Knitting pattern:

Knitting order:
We knit a yoke: we close the SS in a chain ring. from 160 VPs.
Row number 1: 3 runways, 159 st. s / n in the next. 159 VP of the basis of the chain. SS. We knit in the direction straight and back.
Rows №№2-3: 3 runways, 159 st. s / n in the next. 159 Art. s / n PR.
We divide the loops by number, mark for convenience with markers:
- 65 Art. s / n - to the front;
- 15 Art. s / n - on the right armhole;
- 65 Art. s / n - on the back;
- 15 Art. s / n - on the left armhole.
We continue from the back.
Row number 4: 3 runways, 64 st. s / n in the next. 64 Art. s / n PR. SS.
Rows # 5-9: knit like 4th row.
Rows No. 10-14: knit st. s / n, we make decreases on both sides of the back - we remove the 1st st. s / n, by the end of the 14th row we get 55 pet. Do not forget to finish each row with SS.
From the 15th row: we knit at the same time the back, the front part with armholes.
Row number 15: 3 runways, 54 st. s / n in the next. 54 Art. s / n PR, 40 VP, skipping 15 loops in the area of the right armhole, 65 st. s / n in the next. 65 Art. s / n of the third row of the front part. Again 40 VP, skipping 15 loops in the area of \ u200b \ u200bthe location of the left armhole. SS. It is advisable to mark the points of the beginning and end of the armholes with a knitting marker or colored thread.
Rows number 16, 18, 20: knit st. s / n, we knit over the marked points in 4-re unfinished. Art. s / n, united by one vertex. We finish each row with SS.
Rows No. 17, 19, 21: knit with s / n columns. We process the free edges of the yoke (neckline and armholes) in a circular manner using the "crustacean step".
We start knitting the main part of the vest with a "pineapple" pattern.
We attach a thread to the yoke, evenly distribute the loops in a circle with markers for ten repetitions of the main "pineapple" pattern, take 16 columns of s / n into the calculation of one rapport.
We continue knitting according to the above scheme, in a circular manner, along the 35th row. We knit each scallop separately.
Knitted flower for decorating a vest:
From closed in a circle connection. Art. chains for 12 VP we knit:
Row # 1: 1 runway, 29 stitches extended. in a circle. SS.
Row number 2: 3 VP, 1 st. s / n in the first runway, 2 VP, 2 st. s / n in the same VP, 3 VP, 7 tbsp. s / n in the fifth will be extended. pet. OL, 3 VP, 2 tbsp. s / n in the 5th stretch. pet. OL, 2 VP, 2 tbsp. s / n in the same pet., 3 VP, 2 tbsp. s / n in the 5th stretch. pet. OL, 2 VP, 2 tbsp. s / n in the same pet., 3 VP, 7 tbsp. s / n in the 5th stretch. pet. OL, 3 VP, 2 tbsp. s / n in the 5th stretch. pet. OL, 2 VP, 2 tbsp. s / n in the same loop, 3 VP.
Row number 3: 3 runways, 1 st. s / n in the first runway, 2 VP, 2 st. s / n in the arch of 2 VP PR, 1 VP, 1 st. s / n in the next. 7 tbsp. s / n PR, between st. s / n - we knit along the 1st VP, then - an arch from 1 VP, 2 tbsp. s / n in the next. arch of 2 VP PR, 2 VP, 2 tbsp. s / n in the same arch, 1 VP, 2 tbsp. s / n in the next. arch of 2 VP PR, 2 VP, 2 tbsp. s / n in the same arch, 1 VP, 1 st. s / n in the next. 7 tbsp. s / n PR, between st. s / n - along the 1st VP, again an arch from the 1st VP, 2 st. s / n in the next. arch of 2 VP PR, 2 VP, 2 tbsp. s / n in the same arch, 1 VP.
Finishing the vest: sew the finished flower to the product, if desired, decorate with a decorative bead or rhinestone.
Fancy summer blouse with a yoke and pineapple scallops

Knitting progress:
Knitting of a blouse moves from top to bottom.
At the beginning of the front, back and sleeves are knitted in one single piece.
We collect the chain. on 160 VP, we close it in a ring with the help of SS.
Row number 1: 3 runways, 1 st. s / n in the first runway, 3 VP, 2 st. s / n in the same VP, 5 VP, we continue to knit with rapports (we repeat the next combination 20 times): “2 tbsp. s / n in the 8th VP of the basis of the chain., 3 VP, 2 tbsp. s / n in the same VP, 5 VP ". SS.
Rows No. 2-4: 3 runways, 1 st. s / n in the arch of 3 VP PR, 3 VP, 2 tbsp. s / n in the same arch, 5 VP, 20 rapports: “2 st. s / n in the next. arch of 3 VP PR, 3 VP, 2 tbsp. s / n in the same arch, 5 VP ", SS. Row number 5: 3 runways, 1 st. s / n in the arch of 3 VP PR, 3 VP, 2 tbsp. s / n in the same arch, 3 VP, 10 st. s / n in the next. arch of 3 VP PR, 3 VP, 10 rapports: “2 st. s / n in the next. arch of 3 VP PR, 3 VP, 2 tbsp. s / n in the same arch, 3 VP, 10 st. s / n in the next. arch from 3 VP PR, 3 VP ". SS.
We continue to work according to the scheme No. 1 of the pineapple pattern, in this way we knit rows No. 6-23.
Then we divide the fabric of the blouse into 4 parts:
- 2 rapports - on the right and left sleeves;
- 3 rapports - on the back and front. We do not cut the thread.
We knit the back and front part with a single piece.
Row 24: back and front rapports. We close the parts in a ring and continue to knit according to patterns No. 1-2 of the "pineapple" pattern. We knit, inclusive, row # 49. We finish each of them with SS.
We knit each of the six “pineapples” separately, in the straight-and-back direction (according to the scheme No. 2, 11 rows).
We tie the bottom of the blouse in a circular fashion with a fantasy pattern (the diagram is attached). SS.
Sleeves: attach the thread to the bottom of the armhole, knit in a circular fashion with a fancy pattern (rows 1-12).
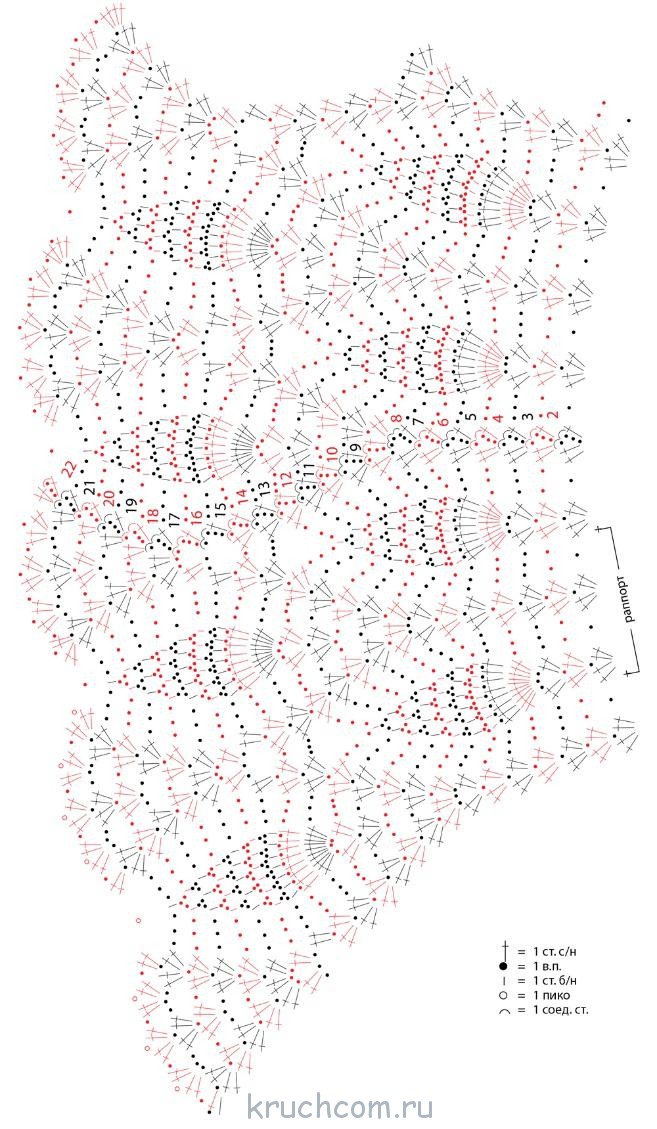
Knitting patterns for the "pineapple" pattern
With the help of the pineapple pattern, magnificent openwork products are created, such as dresses, tunics, panamas, napkins, bedspreads, pillowcases and much more. There are a lot of varieties of crochet pineapple knitting patterns. Such a motif can be created in various ways, the only requirement is that regardless of the chosen knitting, you should get a pattern that resembles a pineapple. 


We bring to your attention a large selection of all kinds of knitting patterns for such a pattern:
1. Openwork napkin:

2. Pineapple collar:

3. The original New Year's napkin:

4. Snow-white top with a “pineapple” yoke:

5. Summer cape-cardigan:


6. Turquoise blouse in "pineapple"


7. Luxurious shawl with large "pineapples"

The pineapple pattern is one of the most widespread and most beautiful crochet patterns. With its help, beautiful openwork products are created, such as dresses, tunics, panamas, napkins, bedspreads, pillowcases, etc. Crochet pineapple pattern is not one. This motive is created in various ways. The only requirement remains - regardless of the method of execution, a pattern similar in shape to a pineapple should turn out.
Crochet pineapple pattern for beginners
It is best to learn to knit pineapple crochet # 1-2 and cotton thread "Iris". For a looser knit fabric, you can take a lower crochet hook.
The following diagram shows the variants of the pattern.
At first glance, it may seem that tying pineapple is very difficult, but this is not so. If you patiently understand the diagram and its symbols, then even a beginner can cope with this task the first time.
You should start with square motives. Here, knitting will take place in a circle from the center to the edges. The result is a wonderful napkin or bed cover.
Crochet blouse
When the technique of knitting the pineapple motif has been mastered, you can proceed to more complex tasks - for example, knit a blouse. To do this, it is enough to know where to add and subtract loops. For clothing size S, you will need about 300 grams of yarn. In order for the product to fit its figure perfectly, you may have to redo the work.
You should start with simple patterns, and in the course of acquiring knitting skills for this pattern, move on to more complex ones. For example, to knit a summer blouse, the hand must be worked out so as not to tighten the loops too much. Then the canvas will turn out smooth.
Pineapple pattern scheme
Such blouses are crocheted in a circle. Knitting always starts at the neckline. We collect a chain of 199 air loops, and then we perform three rows of chains of 7 loops in this section. You should end up with 50 small chains. Then we knit as the diagram shows until the fabric gains a length of 19 cm.The result will be 15 rapports and 5 full rows. This is the backrest element. Next, we continue to knit the motif in a circle - we make 2 rows, we make a decrease and knit 3-4 rows.
Now we separate the loops that go to the sleeves and knit the sleeves themselves. To do this, at the level where the notch is, we collect 22 loops and connect the edges. Then we continue knitting in a circle, as the diagram shows.
The tunic is knitted in the same way, only after the waist it is necessary to increase the number of loops so that it fits well on the figure.
Crochet top from motifs with pineapples: video master class
Elegant crochet dress with pineapple pattern
Let's try to knit a beautiful turquoise dress that will attract many enthusiastic looks. It fits perfectly to the figure and favorably emphasizes its benefits.
Finished product size 46.
For work we need:
- about 700 g of turquoise cotton yarn;
- hook number 3;
- 3 beads.
We will knit from top to bottom. We start with a yoke. We collect a chain of 180 air loops and knit, as shown in diagram 19
We determine the length of the skirt of the dress ourselves. The longer it is, the more magnificent the dress will turn out. We design the lower edge of the product according to the scheme 19b
We carry out the sleeves according to scheme 19, and finish their bottom in the same way as the dress.
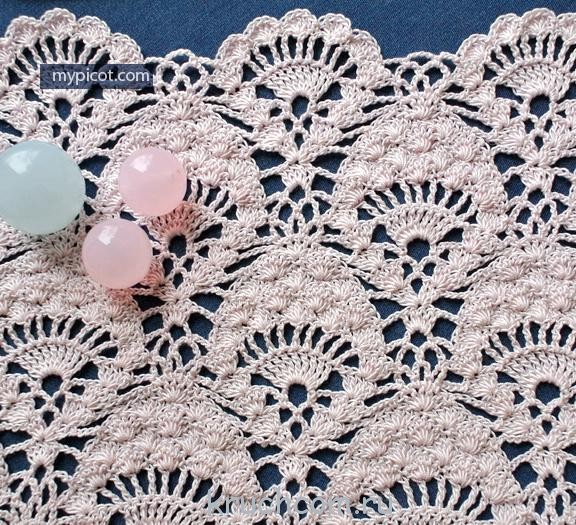
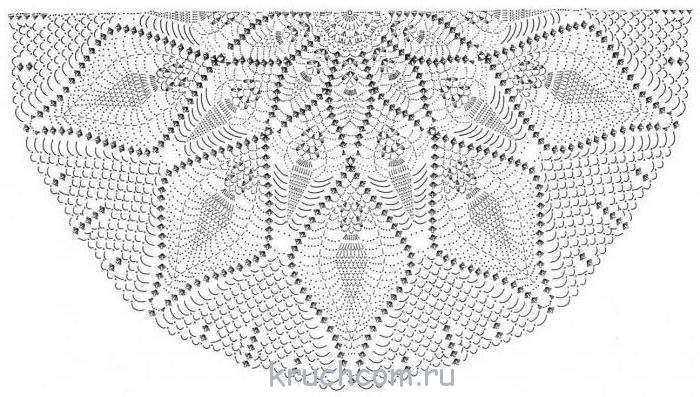
Two crochet shawls with pineapple pattern
Knitted capes will always be in fashion. They perfectly complement the image, emphasizing the femininity of their owner. Despite the fact that both shawls are made in the same color and with a similar pattern, they look completely different. You can take absolutely any color. White and pastel shades will look more elegant.
We knit the first shawl. The size of the finished product is 180 * 90 cm.
For work we need:
- 800 g of cotton yarn;
- hook number 4.5.
We collect a chain of 3 air loops, close it in a ring and continue knitting to the desired size as the diagram shows. Decorate the sides of the shawl with tassels.
We knit the second shawl. Its size will be 240 * 102 cm.
Now we you need to cook:
- 600 g of semi-woolen yarn (50% wool, 50% acrylic) in three ply;
- hook number 2.5.
We collect 6 air loops and close the chain into a ring. This will be the center of the top. Then we continue knitting as shown in the diagram until the desired width is reached (240 cm).
When we tie it to the row marked in the diagram with an asterisk, we finish each pineapple separately. The edges of the cape must be tied with a single crochet.
Boots - crochet. Pineapple openwork pattern: video mk for beginners
Summer openwork top with pineapple pattern, crochet
A delicate top, made in a loose knit, will not leave indifferent any woman. This model is more suitable for experienced knitters.
Finished product size - S-M
For work we need:
- 250 g of white cotton yarn;
- hook number 2.
Before you start knitting, you need to make a full-size pattern.
We will knit with a single cloth from top to bottom as shown in diagram 1. At a height of 25 cm, it is necessary to divide the work into two parts and knit the back and in front separately according to scheme 2. At a height of 72 cm, finish the work and proceed to assembling the product by completing the side seams.
Crochet summer hat
Now we will knit a summer hat and use a pineapple pattern. It looks gentle and airy, but at the same time protects the head from the sun's rays.
The diameter of the finished product is 55 cm.
For work we need:
- white yarn of the "Lily" type;
- hook number 1.5 -2.0;
- decor.
The hat consists of 34 rows, which we will knit in 2 stages. Top first, then margins
Whiten the finished product, starch, steam, and then decorate, as your imagination prompts.
Using the pineapple pattern, you can create different masterpieces, whether it be a wardrobe item or an interior. It is important to learn how to knit it correctly, and then your imagination will tell you where it is best to use it. Good luck and inspiration to you, dear needlewomen!
How to crochet a shawl “Pineapples”: video instruction


