Craft a Christmas tree made of sweets in the garden. Christmas tree made of sweets: the best ideas, photos and master classes
By the New Year, many of us are wondering how to surprise and please our family and friends on this wonderful holiday.
In order to make a bright, spectacular, and most importantly delicious candy composition, you absolutely do not need to go to expensive courses in floristry and design, because making this beauty is very easy and simple, and you do not need to have a lot of free time and spend a fabulous amount of money funds.
Christmas tree made of sweets
DIY Christmas tree made of sweets
 One of the options for making a Christmas tree from sweets can be the use of an ordinary bottle as a base. To make a sweet Christmas tree, you can use - an empty bottle, or you can use a bottle of delicious champagne or wine.
 So, using the most ordinary thin stationery tape, glue the candies in layers to the bottle. The thicker you glue, the richer and more magnificent the New Year's sweet beauty Christmas tree will turn out.
Christmas tree made of sweets
DIY Christmas tree made of sweets
 Another option for making a Christmas tree from sweets can be to use a cardboard cone as a base. Use a sheet of thick cardboard from which to roll a neat cone (see photo).
Now glue the candies to the cardboard cone layer by layer. You can use hot glue or double-sided tape.
Decorate the finished Christmas tree with New Year's beads.
Christmas tree made of sweets for decorating desserts and cakes
DIY Christmas tree made of sweets
 Each hostess will definitely prepare a delicious dessert for the New Year's table. And the dessert, as everyone knows, should be not only tasty, but also beautiful. That is why, we want to offer you an option for decorating a New Year's cake with small chocolate trees, which can be made from several chocolates and sugar glaze.


Christmas tree made of sweets
 This option is suitable for those who want to present delicious sweets as a gift.
 Cut out strips from a sheet of thick green paper, which fold, as shown in the photo. Put candies in beautiful wrappers into the finished triangle. Secure the composition with decorative tape or bow.
Christmas tree made of sweets
DIY Christmas tree made of sweets
 A wonderful and unusual way of serving sweets to the festive table.


 Make a kind of three-tier stand out of several cardboard round boxes. Dividers, in which cardboard triangular partitions will serve, in appearance resembling branches of a Christmas tree.
 Fill the cardboard structure with beautiful candies.
An article on how to quickly and unusually make a Christmas tree with your own hands. This craft will be an excellent home decoration or a gift for your loved one.
A handmade gift is considered more and more relevant. With great interest, parents make crafts in kindergarten, school with their children, give unique things to relatives, colleagues and friends. Naturally, a Christmas tree made of paper, sweets, tinsel glasses or napkins is considered the most optimal New Year's decoration at home.
Today we will get acquainted with some of the ways with which you can make an unusual, but very beautiful Christmas tree with your own hands. We will use the simplest and most inexpensive materials.
DIY Christmas tree made of sweets and improvised materials: photo

List of materials:
- Base (cone),
- Candies,
- Tinsel,
- Glue,
- Scissors,
- Decorations (bows, balls, stars).


For the base, you can take everything that will hold the cone:
- special foam shapes
- cardboard
- colored paper
- an empty box of the same chocolates that you plan to use as decoration
- Everything that comes to mind and falls under the hands
A variant of a Christmas tree with a cone made of plain paper and sweets: diagram, description

- We take any colored sheet, fold it to make a cone, fix the edge with glue and remove the excess with scissors. The base is ready.
- Let's move on to tinsel. Starting from the base, we pass with glue in dotted movements and from above, we wind the tinsel spirally to the very crown. If there is an asterisk suitable in size, then you can fix it.
- Candy is attached to the tree around it with glue or thread. It is advisable to use 1-3 colors of candies so that it is harmonious and not clumsy.
- If there are any balls, bows or other decorations, then we attach them at the very end. Specifically fixing in those places where the space was visually formed.
This is the fastest way to make your own Christmas tree. The approximate production time is up to 10 minutes.
- The base of the tree can be decorated with cotton wool, thus creating a "snow effect".
- For lovers of American style, red bows around the perimeter are ideal.
- We do not limit our imagination and do as our inner voice tells us.


This is a gorgeous New Year's gift for your grandmother, teacher, aunt, sister. The greatest demand is for sweets such as raffaello, ferreroche although from regular caramels it also turns out to be a sweet, cute Christmas tree.
DIY Christmas tree made of colored paper: photo, description
 DIY Christmas tree made of colored paper
 To make a paper tree, we need:
- Paper (the more paper the better),
- Glue,
- Scissors,
- Pencil or pen
- Decorative materials for decoration.
- We cut out a circle from paper, with which we make a cone for our Christmas tree.
- The easiest option would be to paint the tree with any colors and
add a few beads for volume, securing them with glue.
The tree is ready.
Also, after we have made the cone, we can cut a huge number of small circles, each of which we attach to the tree with glue, smearing only half of it, and bending the other a little. As a result, we get a voluminous tree.


How to make a cute Christmas tree from paper snowflakes and skewers for a mini barbecue: instructions, photo
A variant of a Christmas tree made of paper snowflakes and wooden skewers for a mini-barbecue.
- Cut out snowflakes, as shown in the picture below, of different diameters. The top one is the smallest, and then we increase the radius of the circle by 1.5 - 2 times. How do you like the splendor of the Christmas tree. The more we increase the diameter, the more magnificent the tree is.
- Cut the snowflake to the center of the circle. Cut out a segment at the upper snowflake 1/3 of the circle. Cut out 1/4 of the circle from the second (middle) snowflake and cut out 1/5 of the circle from the third (bottom).
- We glue the edges of the snowflakes so that we get cones, as in the picture below.
- We string snowflakes on a skewer and get beautiful Christmas trees that are suitable for decorating a festive table and interior.
- The skewer can be stuck into fruits, dishes, into a piece of styrofoam, as in the picture below. It all depends on your imagination.

Christmas tree made of paper palms: instructions, photo
An interesting and unusual one can be called a "Christmas tree made of palms". These can be the pens of family members or students of a school, a particular class or group.
There are many options. The ideological goal of such a tree is to unite a certain number of people.


In order to make a Christmas tree out of palms, we need:
- glue,
- felt-tip pen,
- scissors and
- several sheets of paper (the number depends on which tree we want to see in the end). Small - up to 7 palms, medium - 12-15, large - more than 20.
We take a person's hand, draw a contour, cut it out and stick it on the wall, drawing paper, cone or something else. We do this until the size of our tree suits us as much as possible.
For the top, you can cut out a star, and decorate the entire perimeter with tinsel or small balls made of a contrasting color of paper. This will create the effect of an ornate Christmas tree.
From these palms, you can make various figures to decorate houses, kindergartens and schools.

 Craft - a Christmas tree from the pages of a magazine
 Another unusual craft is the "tree from a magazine".
A magazine with at least 200 pages and glossy pages is ideal. The thick cover can be removed. Now patience and time.
- We fold each upper right corner of all pages towards us at 45 degrees.
- We wrap all the lower corners that go beyond the boundaries up.
- We add the further pages of the magazine in the same way.
- It turns out an accordion. When it comes to an end, we see an interesting Christmas tree that can decorate any office all year round.

Christmas tree from old unnecessary children's coloring pages: a description of the manufacture, a photo


You should not rush to throw out your child's already painted magazines, because the New Year is ahead and everything will be useful to us. So,
- we take the usual paper cone, which we already love,
- glue,
- scissors and
- coloring, which we cut into the longest strips, 3 cm wide.
We will now make a garland out of it. We fold our strips and glue them together horizontally, after which we make vertical cuts along the length of the entire garland in half the width and with a frequency of no more than 5 mm.
Create a "comb" effect and then simply glue it around the cone of the entire tree. Thus, the "teeth of the comb" turn into "prickly needles" of our tree.
There are a lot of ways to make a Christmas tree with your own hands from paper, we have considered the simplest and, at the same time, the most unusual.


DIY Christmas tree topiary from napkins: instruction, photo


I want to say right away that a Christmas tree made of napkins always differs from other crafts with its visual airiness and tenderness. Some people do not immediately manage to understand what material it is made of.
Fans of topiary will like this option of creating a Christmas tree with their own hands. In order to make a topiary Christmas tree, we need the following materials:
- Napkins,
- Styrofoam cone,
- Glue gun,
- A decorated rod that will hold our tree (they often take a regular tree branch and disguise it under decorations),
- Small pot,
- Gypsum (gypsum plaster will work too)
- Beads on a string or other jewelry.
- We mix the gypsum with water, pour the mixture into a pot, fix the holder for the tree in it and put the cone of our tree on it.
- Using templates, draw circles on napkins and turning the edges, make "mini-roses" from each napkin.
- Next, we apply each decoration to the cone using a glue gun and fill the entire space.
- You can put a few of these "Mini-roses" on top of our pot to arrange our entire craft in style.
- We wind tinsel (beads on a string) around the entire perimeter of our tree, anything that looks beautiful will do.
Our do-it-yourself napkin tree is ready.

Napkins for such e The lacquers can be of the same color, or you can take 2 colors and combine them beautifully. Incorporating your imagination into this project will give great results.
If you are not a fan of topiary, then a napkin tree can be made on an ordinary cardboard cone, completely repeating the above process. Another version of the napkin tree.
DIY Christmas tree from a bottle of champagne: photo

 DIY Christmas tree from a bottle of champagne
 For manufacturing we need the following materials:
- A bottle of champagne,
- Tinsel,
- The glue gun and the glue itself.
A simple gift can be decorated in an original way, if you take a bottle of champagne, glue tinsel with glue and decorate with additional accessories.
We will succeed, inside which there will be a surprise - a bottle of champagne.

Making a Christmas tree from plastic bottles: photo, diagram and description of manufacturing
At home, the most common method is to make a Christmas tree from plastic bottles. List of necessary items:

 Making a Christmas tree from plastic bottles
 - Green plastic bottles,
- Paper,
- Glue gun and glue stick.


- We roll up the sheet with a tube to get a diameter of 1-2 centimeters.
- We cut the bottle into strips 2-5 centimeters wide and no more than the length that will wrap our paper tube.
- We cut the plastic strips perpendicularly to get the "comb effect".
- We dig a smooth edge with glue and attach it around the paper tube.
- The longer the needles of our Christmas tree, the more beautiful.
- It is advisable to calculate the length so that the bottom is wider than the top, keeping the proportions of a real tree.

The craft can be left like this, or you can decorate with additional accessories made of paper, cardboard or other materials.


You can hang real Christmas balls on such a tree, only of a small size, so our craft will look more real.
In conclusion, I would like to say that there are many ways to make a Christmas tree with your own hands.
The main thing is to show imagination and try.
Self-made gifts always delight much more than ordinary figurines bought in a store.
Making crafts together with children brings not only joy, but also real benefits, because during such activities, mutual understanding between parent and child is formed, tactile sensations develop.
DIY creative Christmas tree ideas from scrap materials: photo


 DIY Christmas tree options from plastic bottles
 Decorative Christmas trees are a beautiful and modern interior decoration. They can be hung from the ceiling in the nursery, placed on a table or mantelpiece, or brought to the office as a reminder of the upcoming holidays. In addition, such crafts are presented to friends or family members as New Year's souvenirs. We offer several options for products from various materials.
Beautiful Christmas tree made of paper: do it yourself
Such a craft will turn out to be voluminous, which means that it can be decorated with beads, garlands, ribbons and other decor, almost like a real Christmas tree.What do you need for work?
- base-cone (you can take a ready-made form from foam or make it yourself from cardboard);
- beautiful paper for the Christmas tree;
- scissors;
- glue;
- a candle, pointer or other cylinder-shaped object;
- decor (small balls, berries, buttons, stars, etc., if desired).


Corrugated paper herringbone
To make a corrugated paper Christmas tree with your own hands, follow the steps below step by step, and you will definitely have a charming New Year's beauty.
- cardboard;
- corrugated paper;
- glue;
- white thread;
- needle;
- ribbon, balls and other decor.

Airy Christmas tree made of napkins
These trees are easy to make, and materials for them can be found in almost every store. This means that this decoration can be made even if there are only a couple of hours left before the New Year.What do you need for creativity?
- openwork napkins of three different diameters (you can take, for example, 9, 10 and 12 cm or others);
- small light beads;
- glue that dries quickly, or a glue gun;
- skewers for kebabs;
- decor;
- scissors.


Herringbone made of cardboard
This interesting craft will surely give you a New Year's mood.
- 2 sheets of cardboard;
- glue;
- scissors;
- pencil;
- scotch tape (optional).

Simple tinsel herringbone
Those who love sparkling and bright decorations will definitely like the Christmas tree made of tinsel, you can make it with your own hands in just a quarter of an hour.
- thick cardboard for the base or just a foam cone;
- a long ribbon of tinsel (it is better to use two-color tinsel, it will make a more beautiful Christmas tree);
- glue;
- additionally, you can use Christmas decorations, sweets, tinsel of a different color and other decor.


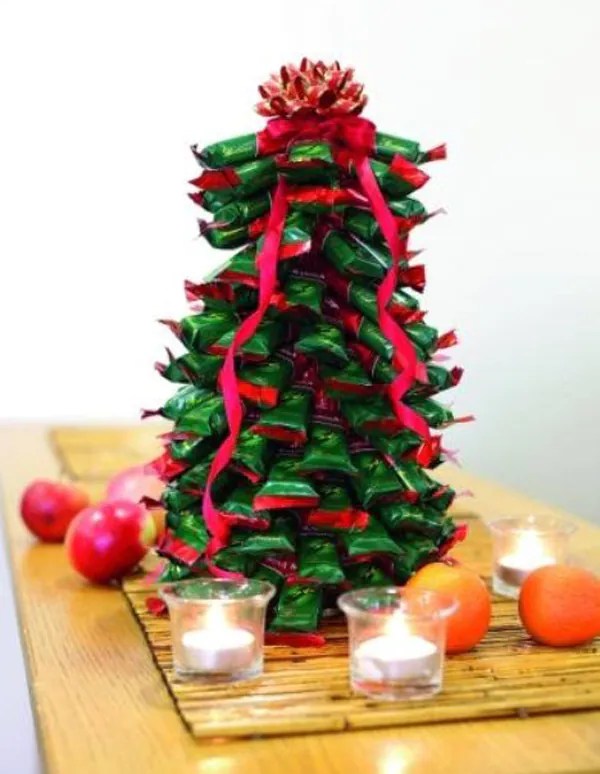
Christmas tree made of sweets
We offer you to create a Christmas tree from sweets with your own hands; even a child can make it with step-by-step photos. The hardest part of this job is not to eat gummies while you are creating.Materials and tools:
- colored gummies (it is better to take green candies as a basis and add a few other colors to them, but you can also come up with your own version of the pattern);
- toothpicks;
- base made of polystyrene foam, expanded polystyrene or similar material.

- We take a toothpick and put the marmalade on it. If it is too long, cut or break it in two.
- We stick the second part of the toothpick into the herringbone, creating a pattern.
- We repeat the steps until the whole Christmas tree consists of candies.
Pine cone mini herringbone

- large and even bump;
- paints. It is better to use acrylic, but you can also use gouache. In the latter case, it is better to varnish the Christmas tree;
- fast setting glue; bows, ribbons, beads, glitter and other decorative elements.

- We take the green paint and paint the herringbone cone. If you want to make the branches "snowy", you do not need to paint over the tips. After the main color has dried, paint the remaining fragments with white.
- After complete drying, decorate the Christmas tree with a garland thread, and then glue bows and beads on it.
- You can install the Christmas tree on the bottle cap. It is also pre-painted or pasted over with paper. The Christmas tree is fixed with plasticine or glue.

Simple Christmas tree made of old papers
How to make a Christmas tree with your own hands for the New Year from old newspapers or books? This is the last master class. This vintage style craft is very easy to make and looks stylish.
 How to do?
 To keep your Christmas tree stylish, use moderation in your decorations. There shouldn't be a lot of shiny elements. After applying varnish and glue, let the craft dry well, make sure that the edges do not sink under the weight of the jewelry.
 Happy holidays and interesting ideas!
Christmas trees are very beautiful, stylish and of course very tasty! It is not at all difficult to make them, but it will be required patience, work and accuracy! You can involve in the process children- they will be delighted!
I have Christmas trees middle size - 35 cm in height not counting the spire. You can change the size of the Christmas tree, candy and decor at your discretion, and I will just share two basic principles of making them. So let's get started ...
You will need:

Basic:
Whatman paper - 1 pc.
Simple pencil + eraser
Glue gun (or polymer glue)
For ROYAL FIRING:
Sweets in a Golden wrapper "Autumn Waltz" - about 1.4 kg
Tip "Star" 10 cm high (I have Fuchsia colors)
Gold acrylic spray paint (or in a jar + brush)
Christmas beads 3 m long (I have Fuchsia colors)
For the GREEN Herringbone:
Sweets in a green wrapper - about 900 gr.
Tip "Star" 10 cm high. (I have Violet color)
Tinsel with medium pile length 2 m.
PROCESS:
THE FOUNDATION:
1. Let's make from whatman paper base for the future Christmas tree - cone and the bottom (for greater stability). We cut the standard Whatman paper into 2 parts: we put one of them aside - we will no longer need it. On the rest of the Whatman paper, draw with a ruler (or a compass if the Christmas tree is small) half a circle with a radius equal to the height of the Christmas tree. Those. I have a tree high, so I took the radius 35 cm... Next, we cut out our workpiece and cut it in half - we will make 2 cones out of it at once. Glue the cut parts so that we get a cone. From the bottom, you can fasten it with a stapler for greater reliability. I use a hot gun because it's quick, simple, and simple enough. If you use polymer or any other glue, then you will have to squeeze the glued surfaces for a while and wait until they set.

2. From scraps of whatman paper we make the bottom for the cones. To do this, we circle the circle of the resulting cone or draw a circle with a compass (by measuring the radius of the cone). Then we draw another circle, retreating approximately 1.5 cm from the boundaries of the first circle. Cut out in a larger circle and cut these 1.5 cm with a thick fringe. Bend fringe and glue the bottom into the cone so that the curved fringe is inside cone.

That's it - our workpiece is ready. Now choose the Christmas tree you like and start making it.

ROYAL FIR-TREE:
1. Let's color the cone in Golden color with acrylic spray paint. The best thing to do is outside, for example on the balcony. Before spraying, the spray paint must be carefully shake up... It is better to spread a newspaper under the cone so as not to stain everything around. Spray the paint evenly onto the cone from a distance of about 15 cm (see instructions) and let dry out... If there is no aerosol, then you can apply a brush with gold acrylic paint, gouache, etc. or decorate the cone with wrapping paper, cloth, ribbons, etc.

2. Begin to glue candies on the cone in a circle with a glue gun. If the candies are heavy, then scotch tape, PVA glue, etc. they will not cope here - you need a strong fast-acting glue.

3. We continue to peck the candies on the cone in rows almost to the very end (I left about 5 cm for the spire).

4. Glue the tip to the top of the tree. Since I have a tip on a long leg, I pasted it on top with another row of sweets.

5. The Christmas tree is almost ready, all that remains is to dress it up. Gently glue the Christmas tree beads on top of each row of sweets, close each row into a ring, pruning beads (Ie, do not spread the beads in a spiral, so that it is neat).
