DIY figures from boxes. How to make simple cardboard crafts quickly and beautifully: examples of work for all ages (59 photos)
After shopping, not only pleasant emotions remain, but also cardboard boxes from under shoes and other accessories. Many of them do not have an attractive design, but you can fix this even without being a professional decorator. Indeed, in ordinary cardboard boxes they can decorate the interior, and become convenient storage systems for which it is convenient. We have collected ideas, after which they definitely do not want to be thrown away.
What can be stored in cardboard boxes?

Small resealable boxes are a godsend for owners of small sizes, where the issue of storage systems is acute. They are compact and easy to use, they can be hidden under the bed, put on a wardrobe, put away in a niche or mezzanine. Their advantage is their small size and spaciousness.
Here is a small list of what can be stored in cardboard boxes:
Kids toys. Especially constructors and puzzles with small details.
Cosmetics, jewelry, hair accessories. This idea will be rightly appreciated by girls who love to take care of themselves.
Charging from phones, tablets, laptops... Often, these items do not have a specific place, and so they will always be in one place, which will reduce the time spent looking for the right charge.
Towels, baby clothes, diapers. In the nursery of a newborn, such boxes are irreplaceable. They organize the storage of baby's personal hygiene items. True, it is better to sew a textile cover for such a box, which can be removed and washed.
Supplies for creativity. Creative people always have many tools to implement their ideas. For artists, these are pencils, paints, sketches, brushes, paper, for lovers of sewing and knitting - scissors, threads, yarn, needles. You can keep all these items in order with the help of cardboard boxes.
Shoes. As paradoxical as it may sound, you can store ... shoes in shoe boxes! For example, in winter, put summer sandals and sandals there, and in the warm season, hide boots and shoes.


How and with what to decorate cardboard boxes?

Not all boxes have an elegant design and are suitable for interior decoration, but this is quite fixable. Anyone who has a little free time, patience and inspiration can make a cardboard box exclusive.
For this, the most common materials that can be found in every home are suitable:
Wallpaper and wrapping paper. Remnants of wallpaper are in every apartment, where at least once there was a renovation. When working with wallpaper, you need to stock up on double-sided tape and PVA glue.
Textile. An unnecessary sweater, an old skirt, stretched pants - all of these garments will also come in handy when decorating boxes. And skillfully using them, you can turn unnecessary things into an exclusive piece of decorating art.
Burlap and jute. Not everyone has these materials, but they can come in handy if you need to decorate a box in an ecological or Provencal style.


A few tips for those who decide to decorate cardboard boxes with their own hands:
Before starting all work, you should immediately think over the design of the boxes, try on wallpaper or fabric on them that will be used for decoration.It is advisable to decorate the boxes at a spacious table that is well lit. Ideally, it is located by the window and natural light enters its surface unhindered.
The working person should not be disturbed by foreign objects on the table.
Tools that may come in handy: transparent and double-sided tape, scissors, PVA glue, threads, paper clips, stapler, scissors, stationery knife, ruler, chalk, simple pencil.


There are many more interesting ideas that will help to rationally use the space in the apartment and make it more functional. To verify this.
Cardboard boxes that sell juice or milk are great for kids' creativity. After all, they can be used not only as seedling pots. It is enough to show quite a bit of imagination. they are easy to make from juice; special skills are not required to create them. Plus, it's the perfect excuse to have fun with your child. You can make good toys from boxes that will allow your baby to develop, or original accessories. What can be done?
Improvised lock
Girls very often dream of a castle for their dolls. You can do it yourself. To do this, you will need:
- Scissors.
- Several juice boxes with a volume of 1 liter.
- Several boxes with a volume of 2 liters.
- Scotch.
- Glue.
- Stickers, pencils, paints.
- White paper.
Carefully remove the lids from the juice boxes. Glue containers with a volume of 1 liter on all sides with white paper.
Cut two-liter juice boxes from the larger side on the side, and then join them. This can be done with scotch tape. The result should be one big one. Cover it with white paper as well. You can connect all three boxes as you like best.
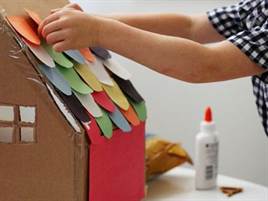
After that, you can cut out all the necessary windows and doors, and paint the house itself with original patterns or glue stickers to the paper. From the remaining pieces, you can make various ladders and rungs. To make the product look more like a castle, decorate the tops of the towers with strips of white paper with cut out teeth. Even a child can make similar crafts from boxes with their own hands.

Bird Feeders
You can make more interesting crafts out of boxes, such as bird feeders. You can make such a product together with your child. To make the simplest feeder, you will need a juice box, string, scissors. First, wash the container thoroughly and dry it. And then carefully cut the cardboard from one side, leaving a small side. Thread a string from above to secure the feeder. Such crafts from juice boxes allow you to teach a child to take care of the world around him.
If you wish, you can decorate the feeder by pasting it, for example, with white paper, and painting it.

Tea bag house
Crafts made from can become not just a decoration, but also a very useful accessory. To complete a tea house, you will need:
- Juice box with a volume of 1 liter.
- Colored cardboard or paper. Self-adhesive tape can be used.
- Stickers or pictures for decoration.
- Scotch tape, glue and scissors.
It is advisable to do crafts from juice boxes with a child. This will allow you to spend time together and be creative. So, to make a house for you, you need to thoroughly wash the box and dry it. After that, a hole must be made in the container through which you can easily remove the tea bag. Better to do it at the very bottom. You also need to cut off the top of the box and make it openable.
Carefully glue the juice container with paper. You can use pure white or colored. That's all, new crafts from the boxes are ready! Pictures can be used to decorate a teahouse. This will make it even more original.
To make the product stand firmly and not wrinkle, you can glue it over with tape.

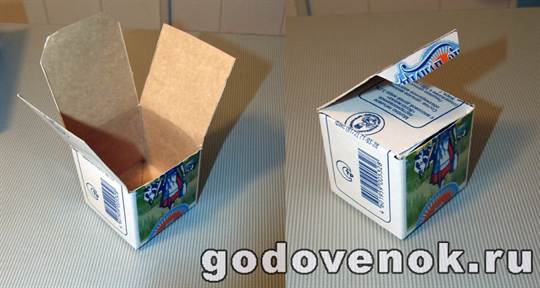
Cubes
Juice boxes can be made into cubes that can replace a store constructor for your child. To make them, take the containers from the drink and wash them thoroughly. When the boxes are dry, cut off any excess edges and flatten the top. Glue the top with glue or tape.
Your cubes are almost ready. It remains to glue them over with colored paper or self-adhesive tape. To keep them in shape more, wrap them with duct tape. For decoration, you can use stickers and a variety of pictures, such as numbers and letters. It is worth noting that these cubes are ideal for building.
Where to store pencils?
Crafts from juice boxes can replace some accessories, even for a desk. If you are still worried about where it is better to store children's pencils, then the answer is simple. Make a pencil holder from the available tools. To make such an accessory, you will need:

How to make a pencil holder
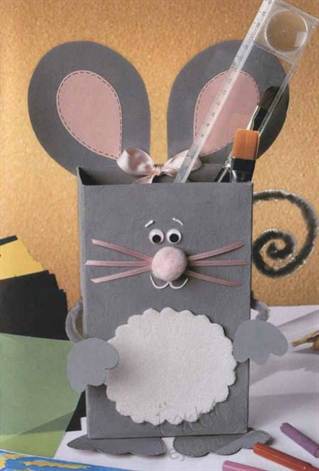
We begin to create original crafts from boxes. Animals as a form for a pencil holder in this case are just perfect. Therefore, we will make a beautiful cat out of an ordinary box, which will become the keeper of pencils.
First, thoroughly wash and dry the juice container. Then tape the outside and inside of the box with gray paper. Cut an even circle out of cardboard of the appropriate color. This will be the face of the cat. Cut out the ears from the same cardboard. Stick them on top of the circle. In the center of each lug, glue white paper pieces that are similar in outline to the lugs, only smaller in size.
In the middle of the muzzle, glue the cat's nose. It can be made in the shape of a heart. Make eyes above the nose. They can also be cut out of paper or replaced with regular buttons. Don't forget your cheeks. Cut out two small circles of pale pink paper and glue them with the spout between them. It's hard to imagine a cat without a mustache. From the tip of the spout to the cheeks, stick along a white string so that each of them forms an arc. Above each thread, punch holes in several places and push the wire through. This will be the antennae. Cover the top edge of the juice box with lace fabric. Fasten the face in front so that most of it is above the top edge of the container.
Cut out two front legs and two back legs from white paper. These details will make your cat look more attractive. Stick the front ones at the bottom at the very bottom, and the back ones on the sides of the box. After that, decorate the cat with red bows. They can be fixed on the sides, as well as in the front under the face.
That's all, the pencil holder is ready. To make the craft more attractive, it is better to use textiles instead of paper. This will make the cat look more alive.
Finally

Crafts for children from boxes can be a real decoration. Children very often see beauty in things that adults do not even notice. Creativity allows the kid to realize their ideas and make dreams come true. Parents, on the other hand, can help their child find exactly the activity that he will like. At the same time, remember that the child must develop not only physically, but also emotionally. Experts have proven that children who began early to engage in creativity, in the future, react to what is happening around them more pronounced than others. And the joint creativity of parents and kids makes the bond between them even stronger.
DIY crafts from boxes are easy to do with the children. The process of work will help develop the child's imagination, and the result will pleasantly please.
Different boxes - large and small - can be used to create various items, both for play and for everyday life, for example, candy boxes or pencil cups from a milk bag. The proposed master classes will give ideas and tell you what can be made from different boxes.
Best ideas
DIY crafts from cardboard boxes for children are useful for the development of fine motor skills, imagination, attentiveness, abstract thinking. Of course, when working with sharp objects - a clerical knife and scissors - you need to be careful and control the child's actions. All "dangerous" work can be undertaken by adults, and children can be entrusted with the design and decoration of crafts.
So, let's look at what entertaining crafts can be made from different boxes.
Egg box cells easily transform into animals, birds and flowers. Here's a good idea:

The simplest craft is chickens and cockerels for holding eggs. For crafts you will need:
- egg tray;
- scissors;
- paint (preferably acrylic);
- brush;
- glue;
- felt or thick colored paper for decoration.
How to do:
- Cut off the cell along with the protruding part from the tray;
- Trim the cell so that it resembles a rooster with a bushy tail;
- Paint the workpiece with acrylic paint of any color (you can also draw feathers) and leave to dry;
- Cut out a beard, comb, beak from paper or felt and glue to the workpiece;

- Draw or glue the eyes and, if desired, decorate with feathers.

The second craft - flowers - is a little more complicated. You will need:
- tray;
- glue;
- dye;
- wire;
- scissors.
Flowers can be made in many different ways. The easiest one is to cut off the cell and cut out the "petals" along the inner folds. Then the blanks are twisted and inserted into one another (you can also supplement with separate petals).

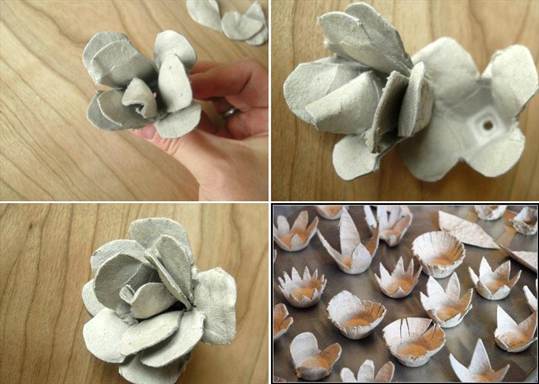

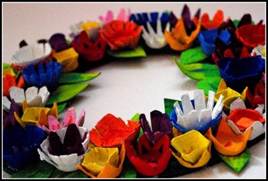
Fix the finished corollas on a wire or glue to the base. They can be used to assemble a wreath or bouquet.

A milk bag is a very functional material. It is used to construct bird feeders, pen holders, toys and houses.

It is proposed to make a simple toy - cubes. For this you will need:
- milk or kefir boxes (volume 1 liter);
- stationery knife;
- ruler;
- marker or pen;
- double-sided tape or glue;
- pictures or photos 7 × 7.

How to do:
- Wash and dry the boxes;
- Measure from the base along the edges twice 7 cm each and draw lines;
- On one edge, set aside another 1.5-2 cm from the top line and cut off the upper part of the box along it;
- Cut along the edges to the bottom mark and fold the cube like a regular box (the longest side is the lid);
- Glue prepared pictures or photographs to the edges.

Another option for how to fold a cube is to put two bases in each other.
In order for the pictures to stick well to the surface of the box, the finished cube can be pasted over with scraps of newspaper dipped in glue.
To fix the finished craft, cover it with decoupage varnish on top.


Rattles can be made from cubes by putting peas or other “noisy” objects inside.
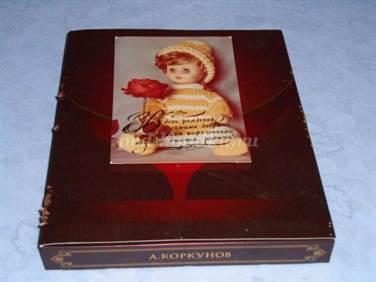
From boxes of chocolates you will get a beautiful frame, a convenient box, the basis for a panel. Some boxes are quite sturdy, beautiful in shape and close conveniently. Such boxes can be simply pasted over with wrapping paper or wrapped in cloth to make a full-fledged box for small things.

Let's try to make a postcard frame out of a flat candy box. For this you will need:
- box-book;
- a photo or a beautiful postcard in A5 format;
- A4 postcard or colored paper;
- PVA glue;
- corrugated cardboard;
- ruler;
- pencil;
- scissors;
- stationery knife;
- double sided tape;
- ribbons, lace and other decor.

Progress:
- Put a postcard or photo on top of the box and trace around;
- Step back inward on each side by 1-2 cm, draw and cut out the window (it should be slightly smaller so that the photo does not fall out);
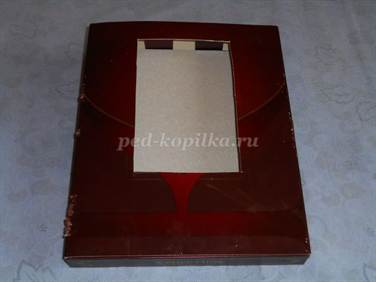
- Cut out all the necessary parts from corrugated cardboard to the size of the box inside and outside;


- On the back of the lid, stick a photo on the tape so that it looks out the window;

- From the inside, glue the tapes to the lid and side and close them with a postcard and corrugated cardboard;


- Decorate the lid with ribbons and other decor;

- Glue a congratulation inside and put a gift (you can leave sweets).


Summary: Crafts from cardboard boxes for children with their own hands. We make children's crafts out of cardboard and paper. Craft from garbage or from waste material.
Every day we throw away a large number of different unnecessary things, including boxes. Large and small, multi-colored and monochromatic, from under sweets, shoes, household appliances. The list is endless. And few of the parents thought about what beautiful and original crafts are obtained from this waste material. You just need to show creativity and imagination. Children love to make crafts from cardboard boxes. The versatility of this material allows you to fully reveal your creativity. Believe me, even now, when everything ready-made can be bought in the store, our children will take up crafts from the boxes with no less pleasure. Note: A glue gun comes in handy when making crafts from boxes.
1. Crafts from cardboard. Crafts from cardboard boxes
From large and small boxes, spending very little time and effort, you can make furniture and household appliances for children's games. Stove, refrigerator, washing machine, doll bed, wardrobe - all this is easy to make from cardboard boxes.
Buttons, burners, control panels, handles - all these parts can either be drawn on cardboard or made from old, unnecessary CDs, plastic bottle caps and other junk material. The sink will be replaced by an iron bowl built into the box.
Of course, toys can also be bought in the store. Only the benefits from them will be less than from homemade ones. After all, the very process of creating crafts (toys) from waste material contributes to the development of creative thinking and imagination in a child. In addition, games with homemade toys, substitute toys also develop the child's imagination much more than games with ready-made toys. Playing with homemade toys, the child is forced to think out something, to imagine, because such toys are not an exact copy of real things. The baby has more opportunities for creativity. One and the same cardboard box today can be a stove, tomorrow - a table for dolls, and then - a TV. And the child himself, in his inner world, endows the box with the details that are missing for the game.


A doll's bed can be made from one box, figuratively cutting out the sides from it, or from two boxes, gluing them together. In the second version, you get a bed for a doll with legs.


A handicraft useful for the development of coherent speech in children is a homemade TV out of the box. To learn how to make this craft out of cardboard, and then how to use it for developmental purposes, read the link.

2. Crafts for children from boxes. Crafts from cardboard and paper
From a large cardboard box, for example, from a refrigerator, you can make a children's house. Make a door, windows in it, lay a rug inside the house, decorate the house with cheerful curtains, paste over the walls with beautiful pictures, stickers or children's drawings.


An interesting idea is to decorate the children's house with an LED garland.

Smaller cardboard boxes can be used to make a dollhouse or a knight's castle.


If you have accumulated a large number of small boxes, then you can make a whole city out of them. Read more about how to make beautiful houses out of cardboard boxes.


Toilet rolls and cardboard boxes can be used to make a car garage or parking lot.

3. Crafts from waste material. Crafts from boxes
The fantasy of a kid who climbed inside it can easily turn a large cardboard box into a typewriter, plane or ship. Mom and Dad can help the kid organize an interesting and useful game by supplementing homemade vehicles with the necessary details. Steering wheel, wheels, headlights - all this can be done from improvised things, the main thing is to show your imagination.


If you make a car or airplane out of a medium-sized box, and then attach straps to them, you get a car / airplane suit. Wearing such costumes, children can play, pretending to be cars or airplanes. Boys will especially like these games.


4. Crafts from boxes with your own hands. Garbage Crafts
The question of what can be made of cardboard and paper arises quite often. There are several reasons for this. First, these materials are readily available. It should be noted that we are talking not only about paper and cardboard, which can be bought in office supply stores, but also about newspapers, magazines, boxes and boxes available in every home. Secondly, these materials are easy to work with, so that even the smallest craftsmen can use them to make various crafts. Thirdly, despite the numerous products sold in modern stores, I would like to have original and unique things in the house, and their full uniqueness can only be claimed if the item is made with your own hands.
How to get "design" from ordinary cardboard and why is it needed?
If you start listing what you can do out of cardboard with your own hands, then a few pages may not be enough. First of all, these are interesting things, among which there can be both home decorations (garlands, lanterns, toys, etc.), and useful items (boxes, vases, furniture for dolls, etc.). However, each of these crafts will look much more interesting if it is not just white, but has an interesting design, which, by the way, is not at all difficult to obtain.
For the manufacture, you will need sheets of cardboard, kitchen three-layer napkins of interesting colors (in fact, only the upper decorative layer will be used), scissors, gauze and an iron. First you need to iron the napkin well, there should be no folds, and then separate the top layer from it. Next, put cardboard on the ironing surface, which is covered over the entire area with cling film, then with a napkin, and then with gauze. After that, with an iron heated to the maximum temperature, all layers are ironed, special attention should be paid to the edges. Then the cardboard must be turned over, the edges of the napkin and film must be cut to the level with the sheet and ironed from the wrong side, and then again from the front. The result of the work will be a beautiful blank. But what can be done from this kind of cardboard will not be difficult to come up with.
made of cardboard
Neither adults nor children can imagine their life without a holiday. This is a new year, a birthday, anniversaries, and many others. And what is a holiday without special attributes? One of the most popular objects with which the holidays are associated are hats, this is especially true for children, although adults often do not refuse these peculiar hats, especially if they are decorated in the theme of the holiday. But first things first.

For people who decide to give their holiday more brightness, the question of what can be made of cardboard and paper with their own hands no longer arises, but another one appears in its place - how to make a cap out of cardboard? For work, you will need thick paper or cardboard, glue, scissors and an elastic band or narrow tape. These materials for making a cap are quite enough, but others will be needed for decoration, depending on the theme and age category of people present at the holiday.
Roll a sheet of paper or cardboard 30x45 cm in the shape of a cone, cut off excess paper, and glue the edges together. In order for the product to hold better on the head, it is necessary to attach a tape or an elastic band to it, punching holes on both sides in the lower part of the cone. You can decorate the cap at your discretion with corrugated paper, rhinestones or various figures cut out of colored paper.
Cardboard box
Every home has a lot of little things that are often in a mess, as there are not enough separate boxes for them. However, everything changes after a child or an adult learns that an original box can be made of cardboard. This will require cardboard, pencil, scissors, tape, glue and cloth.
First, using a pencil and a ruler, draw a quadrangle on the cardboard, which will be the bottom of the future box. Then continue each side of the square as long as the finished product should be. Draw the lid for the future box of the same dimensions on the cardboard, except that the sides extending the quadrangle should have 2 cm. Cut out both schemes. And also draw and cut out four rectangles that would have the same width as the sides of the future box, but were 2 cm higher. Next, you need to bend the sides of the drawn square and fasten them together with adhesive tape, do the same with the lid. Paste over both products, as well as 4 rectangles with a cloth. After that, insert the latter inside the box along its perimeter and fix it with glue, after which the box can be closed with a lid. To decorate the product, you can use various applications, rhinestones, lace and other decorative materials.

Appliques from paper circles
Of course, making caskets, caps and many other useful things can be difficult for a child. Therefore, parents often wonder what can be made of cardboard and paper so that the baby can do it. Making an applique from circles can be a very interesting activity. So, you need to stock up on cardboard, standard white sheets, colored paper, scissors, glue and compasses or objects that can be put on a sheet, circle and get circles of various sizes. First you need to draw and cut circles of different diameters from different paper, and then, taking a sheet of cardboard, give free rein to imagination and create all kinds of pictures and whole figures or their halves.
For example, if you fold the halves in a circle and glue them to cardboard, and attach a small circle in the middle, you can get a flower. The leaves of this plant can be the same figures, only green. The stems can also be folded from very small circles or their halves, and use half of a large circle as a pot, gluing it upside down.
Cardboard sofa for Monster High doll
Today Monster High dolls are one of the most favorite toys of many girls. They can play with them for hours without interruption. Therefore, it is not at all surprising that children are wondering what can be made of cardboard for Monster High dolls. A great addition to this toy will be homemade furniture for it, for example, a sofa.

For the manufacture of this type of furniture, you will need a cover from a small cardboard box, glue, cardboard, scissors, cloth, and sponge napkins. Cover the surface of the box with a cloth. Then glue together all the sponges necessary to cover the area of the box and also paste over with a cloth. Then attach the "mattress" to the "frame". Cut out the back and sides of the required height from cardboard and "upholstery" with sponge napkins using glue, and then with a cloth, after which the back and sides are glued to the base of the future sofa (cover with sponges). At the discretion of each owner of the Monster High doll, the sofa for her can be decorated in the desired way, for example, with beads, sequins or embroidery.
Frame for a photo or painting made of paper and cardboard
To decorate the interior of a room, modern people often use photographs or paintings. The latter can be embroidered, beaded or painted, but in order to hang them on the wall or put on the table, a frame is needed. I am glad that you can make a very original frame out of cardboard and paper with your own hands. So, you need cardboard, glue, pages of a glossy magazine.

First, a sheet of cardboard - the basis of the future frame - must be pasted over with magazine pages. While the base is drying, you can start making tubes to decorate it. To do this, a sheet of glossy paper with a pencil must be twisted into a tube and glued so that it does not unfold. Next, you should glue the finished tubes to the edge of the base along the perimeter, trimming their edges at the junction at 45 degrees. The following rows must be glued in the same way. There should be as many rows of them until they cover the entire surface, except for the part where the picture or photo will be placed. The finished frame, if desired, can be coated with acrylic paints.
Snowman made of paper and cardboard
Almost every child loves to sculpt a snowman in winter, but few people know that it is possible to make an equally beautiful figure out of cardboard and paper, and this is possible not only when there is snow on the street.
To make the craft, you will need cardboard, standard white and scissors. First, it is necessary to cut three stripes of the same width from white paper and glue them into a ring, while each circle should slightly decrease in diameter compared to the previous one. Next, cut a square slightly larger from the cardboard than the largest cylinder - this will be a stand for the future snowman. Then glue the largest paper ring to the cardboard, turning it over to a horizontal position, glue a slightly smaller one on top and on the very top - the smallest - the snowman's head. Hands can serve as thin twigs, which must be attached to the middle cylinder. The eyes, mouth, nose and buttons can be drawn with a felt-tip pen. Now the child will know what can be made of cardboard with his own hands. A photo of the finished snowman can be seen a little below.

"Paper" sun - an interesting craft for children
The "paper" sun craft is interesting and easy to make. It will be an excellent choice for those who have long thought what can be done from cardboard and colored paper with their own hands. So, you need glue, yellow colored paper, thread, scissors and cardboard, preferably yellow, if it is white, then it will have to be pasted over with colored paper or painted.

To begin with, you need to cut out two identical circles from cardboard, 6-7 centimeters in diameter. Next, cut 20-25 strips 12-14 cm long and 1 cm wide from yellow paper. Bend each strip in half and glue the ends. The resulting elements should be volumetric, not flat, that is, at the top point, the strip does not need to be doubled by smoothing. The blanks must be glued along the entire length of the circle next to each other - these will be rays, and from above, close the surface with a second circle. With a felt-tip pen, you can draw a mouth and eyes to the sun, or decorate in any other way. Fix the thread for one of the rays and hang the craft in the desired place.