Making beautiful butterflies for home decoration. How to make a beautiful butterfly with your own hands from paper, fabric and other girlfriend materials
This is not so difficult, as it may seem first - make a paper butterfly with your own hands. This task is forces to adult to man and the child, there is this not quite a baby. Butterfly can be hung on a string, it will soar in the air in your room, it can be sown to a branch of the New Year tree, it is also very beautiful.
For the manufacture of butterfly-origami, a sheet of paper will be required, and our video tutorials are several ways to manufacture original paper crafts. Our master class on the monitor will tell in every detail and show you what needs to be done so that the paper sheet turns into a beautiful air being, the present decoration.
These multicolored butterflies are made of colored paper, sliced \u200b\u200bby squares of any size. Now we will tell you how to make a butterfly of colored paper:
- we fold a square sheet of paper alternately in two diagonals - it is necessary for marking;
- other The same folding for marking will be spent by folding the square into a rectangle, now in the crossbar of the curves you will have already a four lines;
- the sides of the square on bends are refilled inside, two triangles are obtained, which we fold in half;
- if you wish, it is possible to cut one of the angles of the resulting triangle, while the butterfly will turn out more beautiful, with rounded wings ends;
- on one side of the butterfly, rounded tips flex to the center, on the other hand, we flex a sharp tip and fix it.
The last operation gives the volume of the stranded butterfly wings, it can be planted on the table, and it will look like a living, going to take off.
Video lesson:

Such an Origami paper bulk butterfly can be used to decorate a greeting card or for interior design. The butterfly is made of colored paper from which a square of 15 x 15 centimeters is cut. We start working:
- the sheet of paper is folded in half and the inflection line is cut into two identical rectangles;
- one of the rectangles fold in half and to the resulting line of the markup we sweep the ends of the rectangle;
- we fold the leaf with the edges inside and start collecting the edge of the paper on both sides in the harmonica - it will be the top wings of the butterfly;
- the second rectangle without bending the corners several times folds in half to markup, then also folds with the harmonica;
- both harmonica add up in half to determine the middle, fold together and tied with a shoe.
After tingle, the long ends of the lace are trimmed and become butterfly toasts. It remains to straighten the wings - and the butterfly is ready.
Video lesson:

We will tell you and show how to make a paper butterfly, quite complicated, but very beautiful. Take a leaflet of one-sided color paper with a size of 20 x 20 centimeters, lay it in half and fit into the midline both sides of the received rectangle.
The leaflet two more folds in half, after that we press the bends inside, getting neat pockets. Next, on folded paper, there are lines of future folds and are praised by any not very sharp subject. Further folding of paper is quite difficult, and it is necessary to simply repeat the actions of the instructor, followed by a detailed story.
If all reproduced exactly according to the instructions, it turns out a butterfly with multi-tier bulk wings, which are held together with a rented small corner. Due to the bends, the abdomen of butterfly is formed, which the finger is attached to a more accurate rounded form.
Video lesson:
Making butterflies from paper with your own hands
The paper butterfly will be able to become a decoration for walls or clothes, it will suit and as a gift. These crafts are always in fashion and relevant for holidays. Make a paper butterfly with your own hands. It is enough to arm the necessary tools and materials, find out a few secrets and include your own imagination.
Stencils butterflies for cutting
Openwork paper butterflies especially attract attention. They are beautiful and unusual, so perfectly suitable for decorating the room. For the manufacture of such a product it will be necessary stencil. It is easy to make it yourself. To do this, a silhouette is drawn on cardboard, and in the middle it creates a drawing to your own discretion. First, the butterfly itself is cut on the contour, and then the pattern inside. Thus, it turns out a stencil that can be used repeatedly. It is enough to attach it to paper of any color, circle and cut.
On a note! In the manufacture of the stencil, cut out gently, otherwise all flaws will constantly reflect on finished products. To do this, it is convenient to use a small sharp knife. To give the volume, you should not precisely adhere to symmetry. You can make wings a little different, but so that it is not too strung in the eye.
To date, on the Internet there are ready-made sketches of butterflies for cutting. First, they will have to download and print, and then transfer to cardboard, as in the previous case.


Another option is to purchase ready-made stencils.

On a note! An openwork handicraft will look more interesting if you cover it with sparkles.
Paper butterflies pattern
In fact, the template is the same stencil. But sometimes it takes an ordinary sketch for it, without an internal pattern. Templates are used similarly to stern. They can be created manually by connecting fantasy.


On the Internet there are ready-made patterns that will get rid of the need to exercise their artistic abilities.

Cut the butterfly on the contour of the template
First, they need to be attached to paper for the manufacture of the product, cover the contour, and then cut on it. So you can make products of completely different sizes. In the process it is recommended to connect children, it will seem interesting to them.
On a note! With the help of such products, you can make a layout, decorate the wall, curtains, duck with them floor, fill the vase. Find them the use of a person with an unlimited fantasy will be easy.
Way to make butterfly by origami
The multi-layer bulk craft is obtained using the origami method.
Step-by-step product is performed as follows:
The paper square is folded in half (horizontally and vertical), and then diagonally on both sides.
The billet folds into the triangle.
The upper part of the triangle is bent to the top of the top.
The billet turns over so that the top of the triangle looks down. Then she bends so that he passed for the base.
The result is a small end of a triangle that will be slightly looking out. It is necessary to bend it and secure glue from the reverse side.
The product is almost ready, it remains slightly modified to get the desired form. For this, the cauldron bends in half from the other side where the little triangle is located. A mustache can be made of wire.
Perhaps immediately understand the whole principle of action will not be released. For clarity, a photo of step-by-step execution is presented.

About how the original design it turned out, shows the drawing below.
Using the origami method, you can make the harmonica. To do this, you will need:
- ultrathine rash;
- thread (depending on the idea);
The following alternateness is performed:
A square sheet of paper is folded in half, resulting in a triangle.
From the middle of the figure you need to start creating a harmonica by folding the material. Similar actions are repeated with another paper square.
The resulting harmonica add up and wind in the center of the Yershom. It is necessary that it serves not only by a fastening element, but also used as a mustache.
"Wings" slightly unfold so that they get more in size.
The pictures below will help visually submit the process of manufacturing such "accordions".

From a variety of such elements, you can make a beautiful garland. For this, they are connected by the thread that passes in the center of each craft.
Video: How to cut paper butterfly
Below is a short video showing how to cut the paper butterfly.
And one more video making unusual crafts for wall decoration
From paper sometimes you can make unusual and beautiful things. To this end, the Internet is filled with master classes, video instructions and other material that will help in this craft. For those who do not want to start with Azov, ready-made patterns that are significantly simplifying the task are proposed. With the help of them, it is possible to create figures of flowers, turtles, cats and much more. In the future, the product can be made to their own discretion. Some use lacquer for this, others - paints, others are placed with a cloth. In this case, there is a lot of fantasy. Paper butterfly refers to simpler crafts, which require a minimum of experience and time.
Elena Kandakova
Dear friends and guests of my page, I propose master class of volumetric butterflywhich we and the children we did for collective work. I will write about this lesson in the next publication. And now look and try together with us.
So for our work need:
colored paper of different color shades,
simple pencil
template butterfly.
1. For the main pattern take the carved butterfly From a piece of old wallpaper.

2. We fold the pattern in half and get on a white sheet paper. We for butterfly It is necessary to prepare three templates of different size. Dotted lines make the contour of a smaller template, retreating from the edge of 0.5 cm.

3. That's what we should get. Three templates for butterfly.

4. Templates in the deployed form.


Another option with a big butterfly ...

Colored tornado ...


Paper butterflies in the interior and decor. Photos from www.handmadespark.com
Sometimes you want to decorate anything with decorative butterflies. For example, I need a butterfly for crafts, a bouquet or just want to imagine that the room is a summer lawn. You can buy decorative butterflies in the store, but much more interesting to make them from paper or thin plastic.
In order to imagine how to make paper butterflies, you need to decide on their purpose (suspended, on the wall or butterfly on a bouquet) and the attachment method, this will determine the shape of the wings and fasteners. Butterfly magnet for the refrigerator, for example, should have a strong magnet and durable wings, because these butterflies are often taken for the wings and rearrange, attach the notes, etc.
The butterfly magnet for a bouquet can be less durable, but it should be very easy - after all, its magnet lasts only for the bracket, which brought the decorative wrapper of the bouquet. For the butterfly, the pin should be additionally strengthened - it is glued with a tape, a ribbon or second paper layer. For making paper butterflies, you may need:
- Paper (thin, dense, one or multicolor)
- Illustrations from journals with butterflies or just bright pictures
- Photos of butterflies (you can do print on the printer)
- Oscal (Multicolored self-adhesive film)
- Ribbons, wire (to strengthen the Taurus and manufacture of mustaches)
- Wide scotch, glue, scissors, a bug knife, a pencil, a stapler, a ruler.
- Material for fastening: Pins, adhesive gun, small magnets.
- Decor: Paints, Shorts, Rhinestones, Color Wire or Foil, Transparent Films
Butterfly from Fantikov (Colored Paper)
The easiest way and loved by the children is a way of making butterflies - from multicolored foil candies from candy or sliced \u200b\u200bon rectangles wrapping bright paper.
- Falki fold the harmonica, the width of the strip is approximately in the centimeter (this is done by children's fan)
- Two strips fold, tie in the middle thread or sew a stapler
- Remove wings-fan.
You can collect butterflies from different in color or the size of the candy, make a dressing in the middle of the candy (then the upper and lower wings will be equal to) or just below the middle (then the upper wings will be more).
Falkers can be cut, giving the wings shape, or make wings with multi-layer, cached.
Photobobic
In the choice of shape of wings and design, technology, how to make paper butterflies on the wall photo of living butterflies can have tremendous help. Actually, the easiest way:
- Print on photo paper Photo Butterfly
- Carefully cut down the butterfly along the contour, bend the wings. If the butterfly is needed with a small bend of the wings, it is just a little bend. If the wings need a constant bend, make a two-layer butterfly, gluing the upper and lower layer so that they hold the corner of the wings.
- Put fasteners from the inside - magnets or pierce the butterfly by the tailor pin. If the pin is pierced with a butterfly through, it is important to further strengthen the torso with a belt with an inside.
If necessary, as in the cartoon, "close a stain on the wallpaper", the butterfly can be performed directly on the wall in the technique of appliqués on the glue, or glue the wall ready.
Butterflies-drawings and butterflies-collages
If you want unusual and exotic, you can make fantasy butterflies. Such a butterfly can be made as a magnet, suspension or closed on the basis.
- Cut pattern-wings of any like shape made of thick paper, photos of colors or, for example, precious stones.
- Decorate wings in scrapbooking technique and appliqués with paper or oracal
- Additionally, you can paint the wings with paints.
- Cove the wings of paper butterflies with transparent nitrocellulose varnish. While the lacquer is not quite dry, you can sprinkle it with sparkles ..
- You can tighten the butterfly with scotch. This method is more suitable for small crafts.
- If you wish, pierced in the wings of the hole with decorative holes, tie in them the filament of the New Year's "Rain" or label the edge of the butterfly
- Straceing on wings
- If necessary, bend the wings
- To smear the edge of the wing with glue. Shuffle
Openwork paper butterflies
 Actually, who said that the house for the new year should be decorated with snowflakes? It is quite suitable snow-white openwork butterflies. How to make paper butterflies with your own hands, the paper structure itself can suggest.
 Fine office paper A4 is well suited for openwork, rubber butterflies sticking on the glass. Openwork butterfly suspension is better cut from dense glossy or matte photographic paper.
- Butterfly draw on a sheet (you can just find the contour on the Internet and print it on the Internet)
- Put paper on a sheet of thick plywood, fasten it with a scotch or buttons. So as not to be shifted.
- Carefully cut the inner drawing on the wings along the lines of the dummy knife. The knife must be kept on straight lines almost horizontally, the curvilinear is slightly more hot. If it is impossible to cut forward right through the long correct line, it is better to cut short and deep, exactly according to the scheme, leaving small "jumpers" between the cuts. Then these cuts are easy to connect. Scissors can be applied to cut out an external circuit, and the internal sectors need to be cut only with a knife.
- Carefully erase pencil lines if they can be visible.
- Cut with scissors outer contour of the butterfly. If you first cut out the outline, the internal sectors in it will cut more complicated.
Openwork butterfly suspension with colored inserts
- Make two openwork butterflies from photographic paper, as described above, or one openwork and one solid. The contour of them may be the same, and the inner drawing of the slots on the wings can coincide, and may not coincide.
- Cut from the wrapping film with the laser effect of the same butterfly, and slightly reduce, cutting off with scissors, the size of its wings.
- Put the openwork slit butterfly with a glossy layer down. To impose on it on top of a butterfly from a wrapping film with a laser effect on a slit butterfly and fasten with scotch or glue. Naturally, it is possible to put on such a slot to any material - colored paper, foil fictional, atlas, foil. You can make a separate color insertion for each slot, it turns out the stained glass effect.
- Wing to miss the edge of the wing (it remains free from the film) glue, insert a loop from threads (it will be a hanging thread) or stationery clip and paste a second openwork butterfly. If the second side of the decorative insert is ugly, you can stick just a white butterfly, without slits.
- The wing will be three-layer - white streaks, color foil, white wear. Rounding on the suspension thread, the butterfly looks very decorative
Butterfly with a three-dimensional effect on a magnet
- Prepare butterfly pattern.
- Cut the template on the photo paper and cut an openwork butterfly, leaving the outer edge of the wing with a thickness of no less centimeter, for durable gluing.
- Note the wings fold lines (if the butterfly is planned with raised wings).
- Cut the template on a sheet of fine transparent flower film. The butterfly from the film is cut, retreating from the contour inside with 0.5 cm. Make bends in the same places as on a paper butterfly.
- To smear glue the inner edge of the wing of an openwork butterfly and glue the film to it. If it sticks not very tight, it is not scary, since later the edge of the wing will be punctured additionally. This is the "top item".
- Cut the butterfly pattern on the second sheet of photographic paper or fine cardboard, and duplicate it twice by reducing and increasing per 1 cm (as the allowance on the seams are made when the tissue is taken). The first cone is a border for plying the decor, the second outline will indicate the edge for gluing, the third is the edge of the trimming. Cut the item on the largest contour.
- Disclaiming the place of bend. It turned out the "bottom item".
- On the bottom item in the center of the butterfly body paste a magnet. If the magnet is strong, it will keep the butterfly and through paper, but it will be imparable outside. But you can, using glue-gun, glue a magnet and outside to the ready butterfly.
- To the entire inner part of the bottom of the bottom (within the inner contour), impose a slightly crumpled food foil or crumpled and smoothed wrapping paper with a laser effect, stick to the base of bilateral scotch.
- Bend the wings of the bottom part below the desired angle. Since the crumpled foil volume, the wing will turn out to be "Tolstoy".
- Slip out the outer two-chamber edge of glue and impose an upper part. It is less than the bottom item, so the laying allowance will allow you to choose such a position of the wings, which I like it.
- Glue your wings by fixing the desired angle. He will never change.
- When the wings are dry, carefully crop them along the contour of the upper part, removing unnecessary already "allowance" bottom blank.
- You can make the edge of the wing of the festral and with the sparkle, the main thing is that the gluing remains wide and durable.
Fixtures for fastening paper butterflies
Bashed butterflies on the wall is the easiest whole glue, bilateral tape, pins, power buttons and magnets, these methods are the most "non-making" for walls. The pin, as a rule, sticks into paper or textile wallpapers, practically without leaving traces. Washing wallpapers perfectly hold bilateral scotch. Magnite requires naturally a piece of metal. You can solve this problem:- Waving in the right place to the furniture stapler of the bracket (they are unlikely and leave inconspicuous traces after neat removal)
- Gently cauting the cross with a cross, bend them, stick or glue the usual button to the wall, close it with wallpaper and flush.
- Having a small carnation in the wall
- If the wallpaper is washable, you can put the metal bilateral scotch to them.
For suspended butterflies, it is possible to glue between the layers (gluing paper on the bottom side of the body) of the hinge-pendant or a little protruding over the "head of the butterfly" of the stationery clips. The clip pasted into the butterfly allows you to fix it with a magnet, fixed on a decorative basis. For example, such a butterfly "attaches" to the curtains, if on the other side the curtains opposite it to place a magnet. At the same time, the curtain is not damaged, as it sometimes happens from the pin, and the butterfly is always easy to move.
Summary:Craft butterfly. Paper butterflies do it yourself. How to make a butterfly from paper. Origami Butterfly Scheme. Butterflies master class. Butterfly pattern. How to make a plastic bottle butterfly. Crafts from plastic bottles.
In the spring, as soon as the sun prigerates, the first spring flowers and insects come out of their winter houses begin to appear. Butterfly - one of the most beautiful insects, the appearance of which reminds us of the coming spring and the upcoming long-awaited summer. In this article we will tell you about how you can make a butterfly crafts with their own hands. Butterflies from paper, origami butterfly, butterflies from plastic bottles - all this you will find on our website. We also tell you interesting facts about the life of these insects.
1. About butterflies for children. Life cycle butterfly
Butterfly - insects with complete transformation, as the larva (caterpillar) is completely different from an adult individual. Their life cycle consists of 4 stages: egg, larva (caterpillar), doll and adult insect.
Before starting to multiply, the butterflies must find a partner of their kind. After mating, the female of the butterfly must perform their main life function and postpone eggs. From eggs appear larvae - caterpillars. They are actively feeding, grow and accumulate substances for the following transformations. Caterpillars have a rodent rotted apparatus and, most, feed on the leaves of various plants. Caterpillars grow rapidly. Gradually, the outer covers (cuticles) of the larvae becomes too close for her, and they must be changed. A link occurs, which is preceded by a growth period. Most larvae have 5 or even more. With the last molting of the caterpillar turns into a doll.

The pupal stage lasts a few days, in some species - up to three years. The duration of the pupa's stage largely depends on the external conditions - temperature and humidity. When the doll bursts, a butterfly comes out of it. Binding to the light, she first's looking for a place where you can freely straighten your wings. Then the butterfly dries them for several hours. Gradually, the wings lose elasticity and stronger. Now you can make the first flight. Most butterflies appear from the pupae early in the morning, when it is not hot and the air is dominated by dew. Stripe and dry the wings at this time is much better than at noon, when the sun is palette. When the butterfly is ready for the flight, she rushes in search of a partner. After mating, the female lays eggs, and the life cycle is repeated from the very beginning.
Almost all butterflies typically winter eggs, caterpillars or dolls, and the urticaria and lemons are adults. Therefore, as soon as it is warm enough, we first notice them. The first wakes up the urticaria - bright, pesting butterfly. Shels have bright orange with black and yellow spots. Do you know why the urban is so called? It is named by the urticaria for the fact that only her caterpillars can eat burning nettle.

Later, ten days after the urticaria, lemongrass wakes up. What do you think, why was it so called? This butterfly has a wing of yellow, like a lemon, so it was called it. Lemon with folded wings notice hard: it looks like a yellow leaflet. And this butterfly has an interesting feature: if you suddenly disturb it, then it falls on the ground, folding the wings, and presses the legs. Try, notice such!

What do butterflies eat?
Some butterflies feed on the nectar of colors, others - juice of trees and biting fruit juice, others do not mind to eat litter and tears of animals, as well as mud to fill the lack of mineral salts after mating.
It is curious that even the butterfly "vampires" exist. Most Kalitr dwells in the tropics of Asia, where they drink the blood of buffaloes. Interestingly, the blood drink only males - so they receive substances necessary for breeding. Caliprats prefer fruit juice.
2. Crafts from macaroni "Life cycle of butterfly"

For the manufacture of this craft from Macaron, you will need a macaronica of three species: a spiral (it will be a caterpillar), shell (\u003d doll) and a macaroninka in the shape of a butterfly (\u003d adult individual). The egg will replace rice grains. Take the usual paper plate, divide it into 4 sectors. On one sector, glue a twig with a leaflet that attach rice grains. On the 2nd sector - a twig with a "across" leaves and a macaronish spiral - caterpillar. On the 3rd sector, glue a twig with a seashell-shaped doll (doll). At the last sector, stick the butterfly and flower macaronish. Crafts from Makaron ready!
3. Butterfly crafts. Paper crafts butterfly
Let's start with the easiest crafts of butterflies with whom they will cope, under the guidance of an adult assistant, even kids.
Option 1.
From the cardboard tube from the used roll of toilet paper, you can literally in 5 minutes to make a pretty craft of a butterfly with your own hands. To do this, from the site KROKOTAK.COM print the butterfly pattern on a dense paper and get it on the cardboard. See DIY template for reference \u003e\u003e\u003e\u003e
Option 2.
From a cardboard roller and corrugated paper, you can make this bright volumetric spring applique "Butterfly".

Option 3.
If your home has food dyes, a paper towel and a cinema (fluffy) wire for children's creativity, then you will not be difficult to make a bright, colorful butterfly, as in the photo below.
To do this, it is necessary to fold a paper towel in half, then once again in half, also again. Food dyes of different colors are casting with water, each color in a separate container. The resulting small square of a paper towel is briefly lower each corner into its container with a dye. Expand the towel and dry it.
Now collect it in the middle and tie with wire. Craftshot Butterfly ready! Detailed instructions with step-by-step photos, see.
Option 4.
See which cute butterflies can be made from corrugated paper and wooden clothespins. It's great that this spring crawler will be able to make her own hands even a very small child. Bowls are made from the portno pins.

Option 5.
Feature butterfly from natural material - trees leaves. Just, quickly and beautiful!


Option 6.
Origami butterfly for kids. See step-by-step instructions How to fold this craft from paper on the site BabyLessons.ru

Option 7.
Another original caretaker paper from paper from the site BabyLessons.ru - butterfly on the mirror.
Create a solar mood for yourself and your loved ones, decoring the mirrors in your house with these bright spring crafts. Draw on thick paper half the calf and the butterfly wing. You can also download the ready-made butterflies templates on the link \u003e\u003e\u003e\u003e Cut the butterfly pattern strictly in half, pull it out from two sides and attach it to the mirror with a scotch. Spring handicraft, butterfly ready!
Work on this craft is developing not only artistic taste and motility in children, but also spatial thinking, forms them the concept of what symmetry is.
Option 8.
Another worker, the butterfly will help children understand what symmetry is.

Download the butterfly pattern on the link \u003e\u003e\u003e\u003e Print and cut it out. Bend the butterfly pattern in half. Apply the paint on one side of the butterfly, and while the paint did not dry, fold it. Now expand. You have a completely symmetric pattern.
Option 9.
From the macaroni in the shape of butterflies, you can make the original spring applique.

Option 10.
These bright beautiful butterflies are made from ordinary cardboard disposable plates.

4. Butterflies do it yourself. How to make paper butterfly
For the manufacture of this craft you will need thin colored paper. Well suitable paper for scrapbooking or crepe paper, corrugated paper. You will also need a wire, or better cinema wire. You can buy the latest, for example, in the online store Read.ru

Cut two squares from paper. Round them the sides. See the photo below. Fold their accordion. The larger the number of times you fold the paper by the harmonica, the better.

Now take a piece of the cinema or ordinary wire, bend it in half, twist a little to form the insect caller.

Invest between wire wings, twist it again. Give the shape of the mustache, straighten the wings. Butterfly paper ready!
If you use a regular wire for the manufacture of butterfly, you can put on her beads for her beauty.

5. Feathering butterfly. Origami Butterfly Scheme

To make these cheerful Origami butterflies, you will need two-sided colored paper for wings and color cardboard suitable color for the body and head.
First, make wings, or rather, one wing, and you will do the second on your own sample.
Origami Butterfly Scheme:
1. Prepare a square paper sheet. Bend it to diagonally in half.


2. Bend it once again in half as shown in the photo below. Then expand. Thus, you outlined the middle line of the triangle.


3. Bend the angles of the base of the triangle to its vertex.

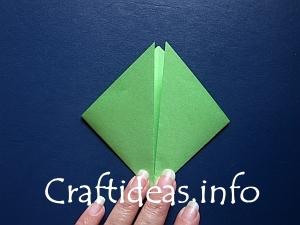
4. You got a rhombick. Now you need to partially bend corners back in such a way that the parties that are now parallel to the middle line of the Rhombic, put on its lower sides.


One ward for butterfly is ready. By the same principle, fold the second wing. Now, under the raminer wings, make the tank and the head of the butterfly from the colored cardboard. Enclose wings on the back of the body. Craft Origami Butterfly is ready!
6. DIY DIY Butterfly
You can choose in the forest or park twigs of trees and put them at home in the water. After some time, green leaves will be blown on the branches. Decorate the twig homemade butterflies from paper. Butterflies can be downloaded by link \u003e\u003e\u003e\u003e

7. Butterfly crafts. Butterflies master class
Option 2. Butterfly paper handicraft. Mobile "Butterfly"

Download paper craft template \u003e\u003e\u003e\u003e
>>>>
Your version of the spring crafts for children from paper - Mobile with butterflies offers the Disney FamilyFun website.
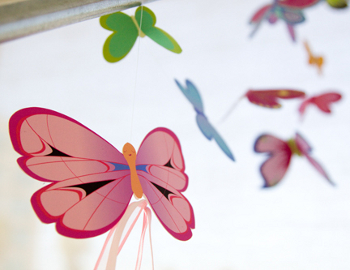
Print sheets with butterflies as many times how many butterflies you need. Bend the sheets in half on the dotted line. Calcitate cut butterflies. Now take a ribbon, fishing line or a fishing of suitable length. Stick butterflies on it in an arbitrary order as shown in the instructions (see the last sheet).
Option 3. How to make paper butterfly
Craftshot Butterfly on a flower will serve as an excellent gift for a close man who will make her own hands. The caretaker is quite complex (with many small parts), designed for younger school age and older. Her child should do together with an adult assistant.

Download paper butterfly pattern paper and flower from paper \u003e\u003e\u003e\u003e
Download Assembly Instructions \u003e\u003e\u003e\u003e
Epson offers its version of paper butterflies. This cannon is easier than the previous one, so it can be tried to do with the children of senior preschool age. See Butterfly Pattern and Instructions for Link \u003e\u003e\u003e\u003e

8. homemade collection of paper butterflies
Consider the photos of various butterflies with the child. Pay attention to their size, shape and color of the wings. Create your collection of paper butterflies. You can copy existing types of butterflies, so come up with your own. Before drawing a butterfly, fold a sheet of paper in half, then draw only one half insect. When you snatch a cradle, you will have a completely symmetrical butterfly.

Another interesting handicraft is a panel of paper butterflies. To make this crawler with your own hands, you will need to cut a lot of identical butterflies from paper, or use a special curly punch "Butterfly". Start butterflies to a dense cardboard, insert it into the frame.

You can still pre-crack a sheet of paper with paints of different colors, after which, when the paint gets dry, cut out butterflies from it. It turns out very beautiful!


9. Butterflies of plastic bottles
Plastic bottles - suitable material for the manufacture of children's crafts. There are a large number of crafts from plastic bottles. Here we will split you about one of them - butterflies from plastic bottles.
How to make a plastic bottle butterfly?
Take a plastic bottle of any size, cut off the upper and lower parts from it. The resulting cylinder is cut to obtain a rectangular sheet of plastic as a result. Find butterfly stencils on the Internet, select your favorite, print it on the printer and copy to plastic. Cut the butterfly. Now it remains only to paint it. For coloring, acrylic paints or nail polish are suitable. In some instructions for the manufacture of butterflies from plastic bottles, they recommend them in front of the painting to open sandpaper, so that the paint is better lay on the plastic. You can decorate the finished handicraft of sequins and beads.

Material prepared: Anna Ponomarenko