Original crocheted toys with descriptions. Knitting toys. Photos of famous works: ideas for inspiration
2809
Amigurumi is a technique for crocheting small animals. It was invented in Japan. Lately this activity has been very popular. Schemes describing how to crochet toys are necessary for choosing threads and creating a quality product.
Scroll:
Scroll:

Start knitting
You need to start crocheting toys by studying the description and diagram.
To do this, you need to know the basic conventions:
- VP – air loop;
- ss – connecting column;
- sc – single crochet;
- ps – half-column;
- dc - double crochet;
- ss2n – double crochet stitch;
- inc – knit 2 sc in one loop, triple – 3 sc;
- dec - make a sc in the next loop - there are 2 threads on the hook, again a sc in the loop next to it - there are 3 threads on the hook. We pull the main thread through 3 loops. This way the two loops are combined.
- *2sc, inc*. Repeat *2 times (8) – two single crochets, in the next column, etc. Repeat twice. This makes only 8 loops.
Some components
The amigurumi technique involves knitting on both walls. Increases and decreases are used to give the toy its shape. You can’t just skip a stitch to decrease, as this will create a hole. To make the toy heavier, small beads are used and sewn into the fabric.
When starting to crochet toys, you need to familiarize yourself with the descriptions and diagrams in advance. All abbreviated names of loops should be clear.
Ring: diagram and description of amigurumi knitting
Typically, most models start with a circle with a hole inside it. The amigurumi ring technique will help solve this problem.
Detailed diagram:
- Make a loop at a distance of 2.5 cm, the thread is between the index and middle fingers;
- Insert the hook into the loop and pull through;
- Grab the working thread, pull it through the loop and tighten;
- Pull the hook under both threads (warp and tail) at the same time;
- Grab the main thread with a hook (2 loops on the hook) and pull through the loops. The result is the first sc of the ring;
- Knit 6-10 sc and tighten the thread of the remaining ring. The result is a semicircle of sc;
- Insert the hook into the first loop and knit a sc.
Teddy bear - a simple diagram with a description for beginners
The height of the toy will be 8.5 cm, knit with brown and white iris, hook 1.15 (for a beginner 1.0). 
The details are knitted separately:
- Head
- Nose - white threads
Scheme:
- 2nd row - *pr* repeat 6 times (12);
- 3rd row - *2 sc, inc*, repeat 4 times (16);
- Row 4 – *3 sc, inc*, repeat 4 (20);
- 5 – 7 rows as 4th (20), sc for offset;
- Row 8 – 20 ss, do not knit stitches too tightly.
- Take brown thread. 9th row - 2 sbn, inc, 1 sbn, inc, 1 sbn, 3 increases, 2 sbn, 3 increases, 1 sbn, inc, 1 sbn, inc, 2 sbn (30);
- 10 – 12 row - * 4 sc, inc *, repeat * 6 times (36);
- 13 - 15 row - * 5 sc, inc *, repeat * 6 times (42);
- 16 – 17 row – *5 sc, dec*, repeat * 6 times (36);
- Row 18 - *4 sc, dec*, repeat * 6 times (30), sc for shifting knitting;
- Row 19 - *3 sc, dec*, repeat * 6 times (24), sc for shifting knitting;
- Row 20 - *2 sc, dec*, repeat * 6 times (18), sc for shifting knitting;
Fill this part with padding polyester and give the head a neat shape.
Face design: Using black thread (floss or simple thread folded in several rows), we embroider the nose in a triangle, with two hook-shaped stripes running from it to the sides. Sew on beads for eyes and embroider eyebrows.
- 21 row - *sc, dec*, repeat * 6 times (12);
- Row 22 - *dec*, repeat 6 times (6). Close the hole, hide the thread and fasten.
Ears: Knit an amigurumi ring from 7 loops. Pull the thread to close the hole. 6 times inc, 1 ss (13). Leave the thread to attach to the head. Tie 2 ears. Choose the color of the yarn yourself (brown or white).
Torso:
- 1st row – amigurumi ring of 6 loops;
- 2nd row - *pr*, repeat 6 times (12);
- 3rd row - *sc, inc*, repeat 6 times (18);
- 4th row - * 2 sc, inc *, repeat 6 times (24);
- 5th row - * 3 sc, inc *, repeat 6 times (30);
- 6 – 10 row - * 4 sc, inc *, repeat 6 times (36);
- Row 11, 12 - * 4 sc, dec *, repeat 6 times (30);
- 13.14 row - * 3 sc, dec *, repeat 6 times (24);
- 15,16,17 row - * 2 sc, dec *, repeat 6 times (18);
- Row 18 - *sc, dec*, repeat 6 times (12); Fill with padding polyester.
- Row 19 - *sc, dec*, repeat 6 times (12), 1 ss
Leave the thread for sewing.
Lower paws:
- 1st row - 6 ch, 4 sc, start from the second loop, 3 sc in the last loop, 4 sc, right in the same loop (13).
- 2nd row - inc, 3 sc, 3 increases, 4 sc, 2 increases (19).
- Row 3 and a half - inc, 5 sc, * inc, 1 sc *. Repeat * 3 times, 5 sbn, * inc, 1 sbn *. repeat * 3 times, 7 sc (26). Change thread color.
- Row 4 – 26 sc behind the back wall for paw stability.
- 5.6 row - 9 sbn, 2 increases, 4 sbn, 2 increases, 9 sbn (30);
- 7th row - 9 sc, 6 decreases, 9 sc (24);
- 8th row - 8 sc, 4 decreases, 8 sc (20), sc for offset;
- 9 – 16 row – * 3 sbn, dec*. repeat * 4 times (16);
- Sc for offset;
- Row 17 - * 2 sc, dec *. Repeat * 4 times (12).
- Fill with padding polyester.
- Row 18 - * 1 sc, dec *. Repeat * 4 times (9).
- Row 19 - * 1 sc, dec *. Repeat * 3 times (6). Leave the thread for sewing the legs to the body. Do not stuff the top of the paws too much, otherwise the paws will stick out.
Upper paws:
- 1st row - cast on 2 ch, 6 sc in the second loop from the hook (6);
- 3 – 6 row – * 3 sbn, inc*. repeat * 3 times (15);
- 1 sc for offset knitting;
- 7 – 15 row – 3 decreases, 9 sc (12);
- 2 sc for offset knitting.
- Row 16 - * 2 sc, dec *. repeat * 4 times (9);
- Row 17 - * 1 sc, dec *. repeat * 3 times. 1cc (6);
Leave the thread for sewing the legs to the body. Do not stuff the top of the legs too much.
Tail:
- (6);
- 2nd row - *pr*. repeat * 6 times (12);
- 3rd row - *sc, dec*. repeat * 4 times. 1cc (8).
- Leave the thread.
Assembling the bear: Along with descriptions and diagrams, crocheted toys must be carefully assembled. This is a difficult stage and skill comes with experience. Pin the lower legs with pins. Sew the paws to the 6-7th row of the body. Sew the upper paws between the last and penultimate rows. Sew on the tail so that it does not interfere with sitting.
Chicken - a simple diagram with a description for beginners
Use hook No. 2, yarn of yellow, orange, blue, lilac colors.
 To crochet toys, you must follow the description and diagrams.
 Head (yellow threads):
- 1st row – amigurumi ring of 6 loops;
- 2nd row - 6 inc (12);
- 3rd row - (1 sc, inc)*6 (18);
- Row 4 - (2 sc, inc)*6 (24);
- Row 5 - (3 sc, inc)*6 (30);
- 6th row - (4 sc, inc) * 6 (36);
- Row 7 - (5 sc, inc)*6 (42);
- 8-13 row - 42 sc;
- Row 14 - 7 sbn, (1 sbn, inc)*3, 15 sbn, (1 sbn, inc)*3, 8 sbn (48);
- Row 15 - 7 sbn, (2 sbn, inc)*3, 15 sbn, (2 sbn, inc)*3, 8 sbn (54);
- 16-18 row - 54 sc;
- Then there will be a decrease, so between the 14th and 15th rows sew on the button eyes;
- Row 19 - (7 sc, dec) * 6 (48);
- 20 row - (6 sc, dec) * 6 (42);
- 21 row - (5 sc, dec) * 6 (36);
- 22 row - (4 sc, dec) * 6 (30);
- 23 row - (3 sc, dec) * 6 (24);
- 24 row - (2 sc, dec) * 6 (18);
- 25 row - (2 sc, dec) * 6 (12);
- Row 26 - 6 dec (6).
Stuff the body with holofiber and tighten the thread.
Beak - orange thread:
- 1st row - 5 sc in amigurumi ring;
- Row 2 - (1 sc, inc)*2, 1 sc (7);
- 3rd row - 7 sc;
- Row 4 - (2 sc, inc)*2, 1 sc (9).
Sew the beak between 16 and 20 rows, filling as you sew. Embroider eyebrows and eyelashes with black thread. Next, depending on your imagination, make a forelock and tint your cheeks.
Body – yellow thread:
- Fill with holofiber as you knit.
- 2nd row - 6 inc (12);
- 3rd row - (1 sc, inc)*6 (18);
- Row 4 - (2 sc, inc)*6 (24);
- Row 5 - (3 sc, inc)*6 (30);
- 6th row - (4 sc, inc) * 6 (36);
- Row 7 - (5 sc, inc)*6 (42);
- Row 8 - (6 sc, inc)*6 (48);
- Row 9 - (7 sc, inc)*6 (54);
- Row 10 - (8 sc, inc)*6 (60);
- 11-18 row - 60 sc:
- Row 19 - (8 sc, dec)*6 (54)
- 20-21 row - 54 sc;
- Row 22 - (7 sc, dec)*6 (48)
- 23-24 row - 48 sc;
- 25 row - (6 sc, dec) * 6 (42);
- 26 row - (5 sc, dec) * 6 (36);
- 27 row - (4 sc, dec) * 6 (30);
- 28 row - (3 sc, dec) * 6 (24);
- 29 row - (2 sc, dec) * 6 (18);
- Row 30 - 18 sc.
Leave the thread and sew the head to the body.
Tail:
- Yellow threads, does not fill
- 1st row - 4 sc in amigurumi ring;
- 2nd row - 4 inc (8);
- 3rd row - 8 sc;
- 4th row - (1 sc, inc) * 4 (12);
- 5 row - 12 sc;
- Row 6 - (2 sc, inc)*4 (16);
Fold and connect sc. Sew to the body at the level of the 8th row.
Wings – yellow thread, do not fill:
- 1st row - 6 sc in amigurumi ring;
- 2nd row - 6 inc (12);
- 3rd row - 12 sc;
- Row 4 - (1 sc, inc)*6 (18);
- 5-16 row - 18 sc.
- Fold and connect sc. Knit two parts. Sew at the level of the 24th row.
Legs – orange thread:
- Feet. Fill as you knit.
- 1st row - 6 sc in k.a.;
- 2-4 row - 6 sc.
- Cut the thread. Knit three parts. It turned out to be fingers.
- To connect, knit 2 sc on the first finger, knit the 3rd stitch of the first finger and the 1st stitch of the second finger together with a single crochet (i.e. we make a decrease), 1 sc, 3rd stitch of the second finger and 1st stitch knit the third finger together, 4 sc, knit the 6th stitch of the third finger and the 4th stitch of the second finger together, 1 sc, knit the 6th stitch of the second finger and the 4th stitch of the third finger together, 2 sc. You will get 14 columns.
- Row 6 - (5 sc, dec)*2 (12);
- Row 7 - (2 sc, dec)*3 (9);
- Row 8 - (1 sc, dec)*3 (6).
- Close the hole and hide the thread. Knit two parts.
- 1st row - 6 sc in k.a.;
- Row 2 - (1 sc, inc)*3 (9);
- 3-14 row - 9 sc.
Fold and connect the edges of the sc. We knit two parts. Sew the foot to the leg. Use the edge that was connected to the sc to sew the legs to the body.
Easter egg - blue yarn:
- 1st row - 6 sc in k.a.;
- 2nd row - 6 inc (12);
- 3rd row - (1 sc, inc)*6 (18);
- Row 4 - (2 sc, inc)*6 (24);
- Row 5 - (3 sc, inc)*6 (30);
- 6th row - (4 sc, inc) * 6 (36);
- Row 7 - (5 sc, inc)*6 (42);
- 8-16 row - 42 sc;
- Row 17 - (5 sc, dec)*6 (36);
- 18 row - 36 sc;
- 19 row - (4 sc, dec) * 6 (30);
- 20 row - 30 sc;
- 21 row - (3 sc, dec) * 6 (24);
- 22 row - 24 sc;
- 23 row - (2 sc, dec) * 6 (18);
- 24 row - (2 sc, dec) * 6 (12);
- Row 25 - 6 dec (6).
Close the hole and hide the thread. Cut the tape and glue it to the testicle. Tie a flower. Sew a bead to the flower and glue it to the egg.
Dog - a simple diagram with a description for beginners
Hook No. 1, orange and white acrylic yarn. 
Head:
- 1st row: in 1 v.p. - 8 sc.
- 2nd row: 2 sc from 1 loop.
- 3rd row: sc
- 7th row: sc
- 8th row: 2 sc from 1 loop, 4 sc
- Row 9: sc
- 10th row: 2 sc from 1 loop, 5 sc
- 11th row: sc
- 12th row: 2 sc from 1 loop, 6 sc
- Rows 13,14,15,16,17: sc
- 18th row: from 2 loops - 1 sc (dec), 6 sc
- 19,20,21,22,23 rows: sc
- 24th row: dec, 5 sc
- Rows 25,26,27,28,29: sc
- Row 30: dec, 4 sc
- 31,32,33,34 rows: sc
- Row 35: dec, 3 sc
- Row 36: dec, 2 sc, insert eyes between rows 22 and 23, stuff with toy stuffing.
- Row 37: dec, 1 sc, dec, close the knitting, thread the thread inside.
The head is ready.
Nose. Two details:
- 1st row: in 1 v.p. - 8 sc
- 2nd row: 2 sc from 1 loop.
- 3rd row: sc
- 4th row: 2 sc from 1 loop, 1 sc
- 5th row: 2 sc from 1 loop, 2 sc
- Rows 6,7,8,9,10,11,12: sc, cut thread.
- Fold 2 pieces edge to edge, knit 12 loops, connecting 2 rows.
Upper part of the nose:
- Rows 1 and 2: sc, tying the outer edge.
- 3rd row: dec, 2 sc
- 4.5 rows: sc
- 6th row: Dec, 1 sc Insert nose over eye, stuff
- Row 7: decrease, knitting 1 sc from 2 loops to the end. Sew the nose to the head.
White spot on forehead:
- 1st row: 15 v.p., 1 v.p. skip, 3 sc in 1 loop, knit until the last loop, into which you knit 4 sc
- 2nd row: you need to make 4 increases at both ends.
- 3rd row: where the increase was made, 2 sc in 1 loop, between them - 1 sc
- 4th row: entire row ps. Close knitting.
Eye sockets:
- 1st row: in 1 v.p. - 8 sc
- 2nd row: 2 sc from 1 loop.
- 3rd row: sc
- 4th row: 2 sc from 1 loop, 1 sc
- 5th row: 2 sc from 1 loop, 2 sc
- Row 6: ps whole row
- 1st row: 8 ch.
- 2nd row: 1 v.p. skip, knit sc, knit 4 sc in the outer loops (inc).
- Knit subsequent rows, adding where the row is visible in the previous rows. A total of 4 increments on each edge. in the last row you should get 9 sc
- Last row: sc without increases.
Sew the ears to the head so that one ear is raised.
Paws:
- Start knitting in white.
- 1st row: in 1 v.p. - 8 sc
- 2nd row: 2 sc from 1 loop.
- 3rd row: sc
- 4th row: 2 sc from 1 loop, 1 sc
- 5th row: 2 sc from 1 loop, 2 sc
- 6th row: 2 sc from 1 loop, 3 sc
- Front legs - knit 4 rows sc
- Hind legs - Knit 6 rows sc
- 1st row: dec, 3 sc
- 2nd row: dec, 2 sc
- 3rd row: sc
- 4th row: psbn
The result was pads: larger for the hind paws, smaller for the front paws.
Switch to a red thread. For the front paws: 2 rows of sc, on the 3rd row - dec, 2 sc Next we knit 4 rows of sc. Close knitting. For the hind legs: 7 rows sc. Stuff your paws. Connect the 2 hind legs with a connecting loop and make a harness. 12 rows sc. You should get approximately 49 stitches.
- Row 13: dec, 5 sc
- Rows 14,15,16,17,18: sc
- Row 19: dec, 4 sc
- 20,21,22,23,24 rows: sc
- Row 25: knit the front legs from the bottom side, where the armpits are.
- Row 26: knit the paws from the top side, where the shoulders are.
- Row 27: sc. Close knitting. Stuff and sew the body to the head.
Tail
- 1st row: in 1 v.p. - 8 sc
- 2nd row: 2 sc from 1 loop.
- 3.4 rows: sc. Close. Stuff and sew.
Embroider mustaches, eyebrows, eyelashes. The dog is ready!
Kitten - a simple diagram with a description for beginners
The threads are white and gray. 
Head:
- 1st row - amigurumi ring of 6 loops;
- 2nd row – inc, (12)
- 3rd row – sc, inc (18)
- 4th row – 2sbn, inc (24)
- Row 5 – 3 sc, inc (30)
- 6th row – 4 sc, inc (36)
- Row 7 – 5 sc, inc (42)
- 8 row – 6 sc, inc (48)
- 9 – 14 row sc (48)
- Row 15 – 6 sc, dec (42)
- Row 16 – 5 sc, dec (36)
- Row 17 – 4 sc, dec (30)
- Row 18 – 3 sc, dec (24)
- Row 19 – 2 sc, dec (18)
- Row 20 – sc, dec (12)
- 21 row – 4 dec (6)
- Fasten the thread.
Torso:
- 1st row - Amigurumi ring of 6 loops
- 2nd row – right (12)
- 3rd row – sc, inc (18)
- 4th row – 2 sc, inc (24)
- 5 – 8 row sc (24)
- Row 9 – dec, 2 sc (18)
- Row 10 – dec, sc (12)
- Fasten the thread and leave for sewing.
Hind paw (2 pcs.):
- 1st row - Amigurumi ring of 6 loops
- 2nd row – right (12)
- 3rd row – sc, inc (18)
- 4 – 5 row – sc (18)
- Row 6 – sc, dec (12)
- Row 7 – 2sc, dec (9)
- 8-9 row - sc (9)
Fold in half, stuff and sew. Leave the thread for sewing.
Front paw (2 pcs.):
- 1st row - amigurumi ring of 6 loops
- 2nd row – right (12)
- 3-4 row – sc (12)
- 5th row – 6 dec (6)
- 6 – 9 row – 6 sc
Stuff and leave thread for sewing.
Ears:
- 1 row – 5 loops amigurumi ring
- 2nd row – 5 sc
- 3rd row – right (10)
- 4th row – 10 sc, inc (15)
- Close and leave thread for sewing.
Tail:
- 1st row: in 1 v.p. - 6 sc
- 2nd row: 2 sc from 1 loop.
- 3.4 rows: sc. Close
The next stage: sew all the parts, sew on beads-eyes, embroider eyebrows, mustaches, claws with black threads.
Crocheting toys is not difficult if you check the description and diagram. Detailed instructions help you get the job done quickly and efficiently.
Chicken toy - knitting pattern and description
Knitting details:

Knitting begins with making the head and body. The parts are made separately: beak, 2 legs and 2 wings. After assembling them, the crest and tail are formed. The final stage is decoration. A flower is placed on the chicken's head, the neck is decorated with a pendant, and the cheeks will become brighter with the help of blush.
Bunny toy - knitting pattern and description
Knitting details:

Knitting time: approximately 2–3 hours. Work on the toy must begin with making the head. Crochet toys with descriptions and diagrams are easy to assemble. To get a finished bunny, ears are sewn to the head, which are done separately. Knitting is completed by sewing in eyes, cheeks, nose and mouth.
Elephant toy – knitting pattern and description
Knitting details:

Making an elephant begins with creating the head and body. Knitting the ears, trunk and legs is required separately. All parts are alternately sewn to the body and head. The final stage of working on the toy is sewing in the eyes, mouth and bows.
Kolobok toy - knitting pattern and description
Knitting details:

You should start knitting Kolobkov from the body. When the base of the toy is ready, eyes, mouth and hair are sewn onto it. The decor for a girl will be bows, and for a boy - blush on the cheeks.
Mouse toy – knitting pattern and description
Knitting details:

Making a mouse begins with creating the head and torso. The paws, tail and tongue are knitted separately and sewn on at the end of the work. The nose and eyes made of buttons are sewn to the head.
Piggy toy - knitting pattern and description
Knitting details:

You need to start knitting pigs from the head and body. Paws, ears and heels are knitted separately. They are sewn to the finished base of the toy. The final stage of work is decoration. The pigs should have hair, eyes, funny clothes and slippers.
Toy Cat with Bunny - knitting pattern and description
Knitting details:

You should start making toys by knitting the head and body. With descriptions and diagrams it is not difficult to assemble crocheted toys. Ears, tails, paws, scarves and mittens are created separately and then sewn to the body and head.
Toy Cat - knitting pattern and description
Knitting details:

Creating a toy begins with knitting individual elements: head, body, paws, ears and tail. The final stage of knitting is assembling the finished elements. For decoration, a bow and wire whiskers are sewn to the cat.
Snail toy – knitting pattern and description
Knitting details:
- The snail measures 10 cm in height and 5 cm in width (7 cm in body volume).
- The body and head are peach-colored yarn.
- Shell - orange yarn.
- Flowers - emerald-colored yarn.
- For the eyes you need 5 mm beads, and to decorate the shell - 15 pearl-colored beads.
- Knitting time: does not exceed 3 hours.


Making a snail begins with creating the body and head. When the base of the toy is ready, a separately knitted shell is sewn onto it. Then details are added: horns, flowers, beads and eyes.
Toy Elk - knitting pattern and description
Knitting details:

Knitting should begin by creating the base of the toy - the head and body.
The knitting is completed by assembling the finished moose. Handles and legs, horns and ears, knitted separately, are sewn to the base.
Panther toy - knitting pattern and description
Knitting details:

First of all, the head and torso are created, which will serve as the basis for the future toy. It is necessary to sew alternately the hind and front legs and tail to the finished base. The muzzle and ears are placed on the head. All parts for assembly are knitted separately. The panther is decorated with sequins embroidered in the shape of a heart.
Sheep toy - knitting pattern and description
Knitting details:
- The dimensions of the sheep are 15 cm in height and 5 cm in width (body volume is 8 cm).
- Head and body - white yarn.
- Legs, hooves and coat - pink yarn.
- Shoes – purple yarn and pink beads.
- For the eyes you will need 2 small black beads.
- Pink polyester is required for the skirt.
- Knitting time: no more than 4 hours.


Knitting begins with the formation of the head and body. When the head and torso are connected, the limbs are sewn to them. The head is decorated with eyes, nose and mouth. The shoes are decorated with beads. A fur coat is put on the finished toy.
Toy Teddy Bear - knitting pattern and description
Knitting details:

The basis of the toy will be the head and torso, which are knitted at the beginning. Handles and legs, made separately, are sewn to the body. The head is decorated with ears, muzzle and eyes.
Little Dragon toy - knitting pattern and description
Knitting details:

Knitting begins with the formation of the head. Following this, the body is formed. With the description and diagrams, it will not be difficult to assemble a finished crocheted toy from many parts. Handles and legs, a comb, and wings are attached to the body using a rope method. The head is formed by nostrils, eyes and ears.
Pony toy - knitting pattern and description
Knitting details:
- The size of the pony is 33 cm in height and 11 cm in width (body volume is 14 cm).
- The base of the head and body, ears and legs are made of purple yarn.
- Hooves, crest, tail - lilac yarn.
- The muzzle is pink yarn.
- For the eyes you will need black, white and blue yarn.
- Knitting time: no more than 4 – 5 hours.


You should start knitting by creating the head and neck. Then the torso is formed, as well as the legs one by one. The assembly completes the knitting. The head is formed by ears, eyes, nostrils and mouth. It is attached to the body using a neck filled with filler. Legs and decorative elements are sewn on: mane and tail.
Toy Doll - knitting pattern and description
Knitting details:

Knitting begins with creating the basis for the future toy: head, torso and legs. The handles are knitted separately and attached with thread fastening. The final stage is decorating the doll with hair, dress and shoes.
Amigurumi Kitten toy - knitting pattern and description
Knitting details:

You need to start knitting from the head and neck. Then the body of the toy is created. The work is completed by assembling small parts: legs, tail and ears. The finished kitten can be decorated with a bow.
Duckling toy - knitting pattern and description
Knitting details:

Knitting begins with creating a head and body with a tail. Wings, paws, straps and beak are sewn onto the finished base of the toy. Decorating the straps with buttons completes the job. When crocheting toys, it is important to rely on patterns. With their help, the toy will exactly match the description.
Do you want to please your baby with a unique gift? What if you crochet toys, spending very little time and materials on it. Let's create exclusive things together that will bring you and your loved ones an incredible amount of warm and tender emotions. We'll show you simple and affordable DIY toy knitting patterns, we’ll tell you about the unique umigurumi technique and reveal the secrets of the wonderful art called handmade.
You probably know that handmade toys are much better than store-bought consumer goods. When you create a thing, you fill it with love and positive energy, which is very important when creating children's toys. Children love to touch, smell and taste all the surrounding objects, so it is better to give them toys that are soft, natural, and most importantly, completely safe for the baby’s health. So caring mothers and grandmothers happily get down to business, creating crocheted knitted toys.
We have prepared this wonderful master class, during which we will tell you in detail how to knit a funny little chicken using the Japanese amigurumi technique. This knitting is the easiest for beginners, since the chicken is very tiny. But he is so charming - let's start knitting quickly.
First stage: knitting the head 

- First row: knit 6 single crochets into an amigurumi ring.
- Second row: add another 6 tbsp. without a crochet.
- Third row: add another 6 tbsp. without a crochet.
- Fourth row: add 2 tbsp. single crochet in one loop x 6 times.
- Fifth row: + 3 tbsp. single crochet in one loop x 6 times.
- Sixth row: + 4 tbsp. single crochet in 1 loop x 6 times.
- Seventh row: + 5 tbsp. single crochet in 1 loop x 6 times.
- From the eighth to the fifteenth row we knit 42 single crochets.
- From the sixteenth to the nineteenth row of the row we decrease the loops in the same order in which we added them.
- We thread the ends of the threads and fill the product with padding polyester.
Second stage: knitting the body

- For the first row we make an amigurumi ring of 6 single crochets.
- From the third to the fifth row we make an increase, as when knitting a head.
- From the sixth to the eleventh row we knit 30 single crochets.
- We knit the twelfth and thirteenth rows in decreasing order.
We finish knitting with a connecting stitch, leaving a long edge of the thread, with which we will connect the head and body. We fill the head with padding polyester and tie the parts together.
Third stage: knitting wings

- We knit an amigurumi ring from 6 single crochets.
- Add 6 single crochets.
- Let's make one more addition.
At the end there is a connecting post. Leave a long thread and fold the circle in half.
Stage four: knitting the beak

- The first row is a standard ring of 6 columns.
- The second row is an addition of 3 columns.
- Third row - knit 9 single crochets.
Fifth stage: knitting the paws
- Ring.
- Addition of 6 columns.
We knit 2 parts. Sew the legs and beak to the body. Let's make eyes.
Stage six: knitting a flower

- First row: we knit a chain of 39 chain stitches and close the ring with a connecting post.
- Second row: knit 39 single crochets.
- Third row: single crochet, skip 1 single crochet from the previous row and knit 5 double crochets from one loop and again skip a single crochet from the previous row. We do 10 such repetitions.
Seventh stage: knitting a pot

- From the first to the sixth row we knit in the same way as we did the torso and head.
- Seventh row - make 36 single crochets behind the back wall of the loop.
- Eighth row: add 11 single crochets in one loop 3 times.
- From the ninth to the twelfth row we knit 39 single crochets.
- Thirteenth row: we knit 39 single crochets behind the front wall of the loop.
- We knit 39 single crochets.
We complete the knitting with a connecting stitch. The bottom of the pot can be strengthened by gluing a circle of cardboard.
Eighth stage: knitting grass 
We will tie the green threads to the pot, behind the back walls of the thirteenth row.
- We make 5 air loops.
- In the second loop from the hook we make a connecting post.
- We make a single crochet, and then a half double crochet.
- We knit a double crochet.
- To complete the triangle, we make a connecting post in 3 half loops.
- We knit the next 5 chain stitches and repeat the whole process.
- We knit 13 triangles around the entire pot.


All the elements of our amazing toy are ready.
In order to better practice and make crocheted toys yourself, we suggest you watch several video instructions with detailed step-by-step descriptions.
Crocheted toys with patterns and descriptions
Handmade products always look exquisite and exclusive. That's why both kids and parents love them so much. We have already talked a little about the preferences of children, it remains to add that adults are also not averse to receiving a unique toy made by themselves as a gift. A small product can be worn as a keychain or talisman, but it is better to sit a soft cat or a medium-sized hare in front of a computer monitor or on a shelf near books. Let it please your heart, eyes and soul. And to make your hands happy, we have collected crocheted toys for you with patterns and descriptions, with detailed photos and video instructions. You will receive all this knowledge completely free on our page, and very quickly you will be able to turn it into reality. Learn to make unique things and delight your loved ones with unique gifts!

For example, these small pumpkins can become a unique decoration or serve as symbolic gifts for Halloween. Please read the instructions and start creating right now.


If you lack bright colors in your life, a rainbow baby elephant will come to the rescue. Try knitting a unique gift with your own hands.


And with the help of this detailed master class you will learn how to knit a cute raccoon.


And for all cat lovers - an exclusive tutorial on knitting soft, playful kittens.
Crochet toys for beginners: the simplest patterns
And we want to present you with the simplest crocheted toys: you will also find diagrams and descriptions for them in this section. Enjoy the process and the result.


If you still can’t make large and complex products with many elements, try making these cute emoticons. They will definitely lift your spirits.


This cute penguin with big eyes is very easy to knit and looks great.
 Do cartoon characters often come to visit you? Try knitting a cheerful character named Krosh, and your child will have a new wonderful friend.


Crocheting toys: ideas for needlewomen
Crocheting toys is such a fascinating activity that can “draw” the whole family into its network. After all, looking at these wonderful pictures, you just want to make everything at once. We are sure that your baby will be very happy when he begins to be born in his mother’s skillful hands. charming dolls, funny trolls and good fairies, fluffy cats will purr and exclusive dolls will appear that you will not find in any store. We present to you an exclusive collection of crocheted toys with patterns and descriptions. Explore, create, play with your kids! 
Knitting toys is quite a fun and positive activity. And many, having knitted their first knitted toy, then simply cannot stop. In this section you will find crocheted toys, these can be both small toys - amigurumi, and quite large toys (bears, hares, dolls). And you can knit toys even for the little ones, because you can knit a mobile for a crib or stroller. Or bright and cheerful knitted baby slings. We also have a special section on our website with master classes, where you will also find a lot of knitted toys.
Tags:
Crocheted flowers are one of the favorite themes of needlewomen, because with the help of such a decorative element you can transform many things, from clothes to interior items. The crocheted rose is the queen of flowers not only in nature, but also in crocheted needlework. There are simply an incredible number of variations in crocheting roses; perhaps this majestic flower has won the heart of more than one noble craftswoman!
Tags:
Knitted toys are the best thing you can give to a child. Hand-made toys are not only truly exclusive, but also, importantly, absolutely safe for the baby’s health, because they are made from high-quality materials.

Tags:

It doesn’t matter whether you belong to the category of professional craftswomen or just beginning needlewomen, each of us should try our hand at crocheting soft toys! It’s so nice to give your favorite kids soft toys made from environmentally friendly materials, and even knitted with your own hands! These toys are absolutely safe and therefore suitable for children of any age. What can we say, many adults would not refuse such a nice gift. There are really a lot of patterns for knitted toys, so we decided to dedicate today’s selection of step-by-step instructions to man’s friends – dogs.
Tags:
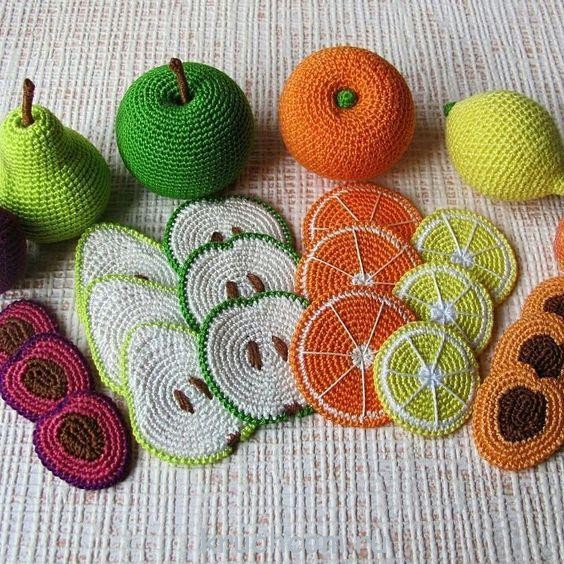
Our needlewomen are becoming more and more interested in the Japanese skill of knitting cute little animals, dolls and other toy items called amigurumi. This is not surprising, because amigurumi toys are incredibly cute, colorful, and attract the attention of both children and adults. Amigurumi that are popular today are adorable bear cubs, cats, giraffes, various cartoon characters, as well as “delicious” toys - cakes, donuts, pieces of cake, vegetables and fruits.
Tags:

Competition entry No. 32 – Bright knitted cat ()
Good afternoon, I have been knitting for myself and my family for quite a long time, now I am a craftsman. I can’t imagine myself in my free time without knitting needles or a crochet hook in my hands.
Knitted items are comfort, individuality and beauty. Even simple things in my opinion look stylish and interesting.
This bright cat is knitted according to the Amineko cat pattern, to achieve the size I needed, I made changes as I knitted it, my cat is 30 cm tall.
Yarn Alize sekerim bebe batik, hook number 2

Competition work No. 30 - Lunar Siamese ().
Hook. On the frame. The head and tail rotate and bend.
Cotton yarn, hook No. 1.3

Competition work No. 28 - Kitten in a skirt ().
I think this is my first completed crochet work, because... the occasion was lucky and urgent J. In a short period, when my daughter had already begun to stand up in the crib, but was still not holding up well, I wanted to protect her from falls and falls. A playpen was purchased, and in order to brighten up her stay in it during the moments when her mother was forced to leave, it was necessary to put something preferably soft in it. So, among other things, a kitten settled in the playpen.


Competition work No. 32 - Developmental cube (Polina Tugunova)
Yarn: Vita Cotton Coco, Alize “Miss”, “Acacia”, “Australian Merino”.
Additionally: felt, beads (plastic, wooden), polymer clay.
Hook No. 2. 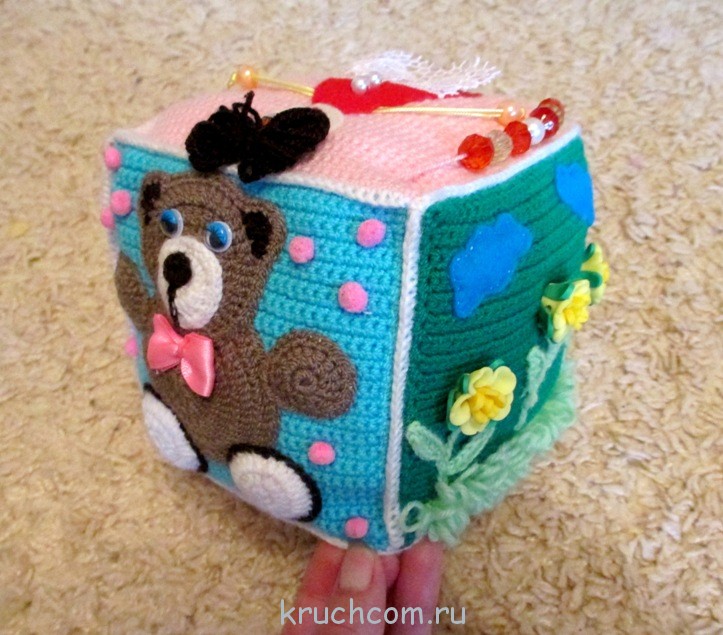

Knitted toys have always been popular with both children and adults. You can create wonderful products with your own hands: small pillows, Christmas tree decorations or simple and funny toys for children.
You can knit it from yarn (leftovers) as a gift, or sew it using any material.
Often, needlewomen combine these two techniques: they knit some product and then decorate it with felt inserts, for example. We will teach you how to knit toys with patterns and descriptions using crochet and knitting needles, provide you with the simplest patterns for beginners and effective and useful master classes with detailed descriptions. And your child can help in this matter - the process will go faster and more fun!
DIY crocheted and knitted toys
Do cute gift it’s very simple for your loved ones. Crocheted and knitted toys very common on the Internet, very often they post detailed master classes with descriptions. It is enough to knit some animal with your own hands: a mouse, a bear, a kitten, using special “patterns” - knitting patterns. If you follow the advice on how to do this correctly, then the process it will go very quickly. Today we will look at two methods: Crochet And knitting needles . There is no easier or harder method - choose the one that works best for you. And, if you are a beginner, then clear and detailed tutorials with pictures and videos await you.
Crocheted toys with patterns and descriptions for beginners
First, you need to decide what you will knit. To do this you can look different schemes on the Internet or choose one of those , which we will provide below. If there are a lot of different options from which you must choose the one you like. Finding them on the Internet is quite easy, so if you want to find such a section, it is on almost every site about knitting.
Most often, beginners are offered to knit a toy - house
, since it is the easiest to knit, and you need to fill your hand before doing complex work! Need to tie 6 side faces of the house
(6 squares of the same size as high as you like), make a roof
And sew all these parts into 1
. Fill with padding polyester or filler, and then decorate the walls: make a door where guard dogs can sit, flowers in the windows, curtains, and so on. The knitted house is ready!
This is such a master class! 


We crochet toys: step-by-step master class with photos
When we knit toys crochet, it is very convenient to work with diagrams and simple descriptions. We will tell you how to create a beautiful knitted monkey , which can later be used as brooch or how keychain , or sew it somewhere. For it you will need: brown and beige yarn, hook, needle, black thread and beads for eyes. If you want to make a brooch out of it, then take a brooch mechanism. This crochet master class can be interpreted in different ways.
Popular articles:

Now let's proceed step by step to preparing the rear part
. It is performed in exactly the same way as the front one, only the thread does not need to be changed!  To tie a muzzle
– take a thinner thread and use a thin hook so that it is not bulky.
To tie a muzzle
– take a thinner thread and use a thin hook so that it is not bulky.
- 4 V.P., 2 S.B.N. in the 2nd loop, 1 S.B.N., in the last loop 3 S.B.N.
The next step is to knit from the reverse side of the chain: 1 S.B.N. + 1 more in the first stitch. 

We do not cut the thread, because... need to start front design
, to which we sew the muzzle itself. Don't forget to fill the toy. Sew on eyes, nose, mouth and decorate with a flower.
We crochet toys for kids
Kids like it bright soft toys , which can be touched, pulled by the tail (if there is one). A good choice would be monkey, lamb or bunny. Also suitable Teddy bear, giraffe, bear, mouse, fox and mother - fox, butterfly with colored wings, Pinocchio, Minion (described below in the article), penguin, elephant, kittens– whoever modern craftswomen don’t knit! You can come up with small animals on sticks for a puppet theater: easy crafts will not leave anyone indifferent . By the way, this could be Smeshariki or the popular Luntik.
With the help of such toys, you can teach your child about various animals, show how they differ, especially since tactile sensations for children are very good. The child will be able to learn to distinguish animals much earlier. You can also make something like educational games with your child using such toys.
And for newborn babies, you can knit small toys for children's mobile . Let funny hares, puppies and birds help your child fall asleep better!
Master class on creating this cutest kitten . It can not only be sewn on mobile , but also make it keychain , sew on a backpack, create unusual brooches, attach to a cap or jacket.
You can, in addition, to knit such a cat, make a hello kitty hat the same way (or other cool models) for girls:
Crocheted toys with patterns and descriptions: video
Do-it-yourself knitted toys with descriptions and diagrams
Let's connect the wonderful Moidodyra
knitting needles for your child! You will need acrylic thread in the following colors: white, blue, yellow, hook, knitting needles, felt for eyes, or ready-made ones, cube-shaped box and wire.
One strip required stockinette stitch , i.e. where the front rows are the front loops, where the purl rows are the purl loops. The second stripe will consist of half purl stitch And second half – facial. These resulting strips need to be sheathed around the perimeter of the box, you can insert wire.
Collect like this: glue eyes, mouth, wire nose, mouth and shell. To knit a towel like the one in the picture below: knit 10 stitches in stockinette stitch to the length you need. If you want, you can do it stripes And fringe at the ends.
For the pelvis, dial 6 V.P. crochet into a ring. Next: 8 S.B.N. Knit, doubling S.B.N. Knit the next three rows evenly, then double again, then knit evenly. The mouth is made according to the diagram below.

Knitting toys: master class with one canvas
This knitting technique is considered one of the simplest. . In principle, even a diagram and description are not required for it. This is the most common option for beginner needlewomen. The video below will show you how to knit such a product. If desired, you can download it, just like the diagram from the Internet. It's not at all difficult to make, it just takes a little effort. Young children will especially love it!
How to knit a toy for beginners: the easiest thing in the video
Knitted toys: photos and knitting ideas
Knitted toys for beginners and professionals
– the most interesting thing with us! This year they are especially popular pandas, pigs, Easter bunnies, hedgehogs, bees and many other animals.


Crochet miniature amigurumi toys
Knitted toys amigurumi crochet stitches are very popular on the Internet, you can easily find diagrams and descriptions for them, and more than one master class. The art of amigurumi is beautiful and cute animals (for example, a pig, cats and cats, a fox, miniature dogs, a bunny, a snake, a chicken, a monkey, a frog and others), endowed with human properties . It could also be, for example, ice cream or some sweets in the form of cupcakes. They must have a face/muzzle with sparkling eyes and a friendly look! We have more than one photograph of them in the article, so you won’t pass by.
Knitted beautiful toys for a gift
As a gift you can knit absolutely any animal
, but are now very popular knitted seals
. For it you will need white and gray threads, filler, gray felt and black threads, you can take floss. H To glue the felt to the cat, use glue or a glue gun. It can be crocheted or knitted, but with different patterns and descriptions. White
dial 6 V.P. Start with the 2nd loop from the hook, 4 S.B.N. behind the back walls of the loops. 3 S.B.N. to the next S.B.N. To work further, unfold the product and 5 S.B.N. into the front walls of the loops. Below is a photo of what the canvas should look like after the first circle.
White
dial 6 V.P. Start with the 2nd loop from the hook, 4 S.B.N. behind the back walls of the loops. 3 S.B.N. to the next S.B.N. To work further, unfold the product and 5 S.B.N. into the front walls of the loops. Below is a photo of what the canvas should look like after the first circle. 

Making paws for a toy gray
: amigrumi ring made of 5 V.P., P.R. + 1 S.B.N. + P.R. + 1 S.B.N. + P.R. At 3, 4 and 5 R. = 8 S.B.N.  Take white threads
and start knitting from the back leg: 4 S.B.N. from the front + 5 V.P. Next 4 4 S.B.N. the same on the front of the legs. Gets a circular row of 34 loops:
Take white threads
and start knitting from the back leg: 4 S.B.N. from the front + 5 V.P. Next 4 4 S.B.N. the same on the front of the legs. Gets a circular row of 34 loops:

Two ears gray
: 3 S.B.N. in amigurumi ring, 2 S.B.N. in every S.B.N.
The tail is also gray: 5 V.P. in the ring, from 2 to 10 row 5 S.B.N.
Crochet a minion: diagram and video
Now you don't need to buy Cartoon minion
- Can tie him up yourself
! In order to do this, take the following materials: thread(yellow, blue, black, white), hook, stuffing for toys, beads for eyes and any other decoration and accessories(decor depends on preference). So, let's start creating a designer gift! 
First, let's connect the base, that is, the body and head of the minion.
- 6 V.P. tie into a single ring
- Increase 6 times (increase, hereinafter P.R. - we knit two stitches in one loop). There should be 12 loops
- 1 single crochet (hereinafter referred to as S.B.N.) + P.R = 6 times
- 2 S.B.N., P.R. = 6 times
- Three S.B.N., P.R. = 6 times
- 4 S.B.N., P.R. = 6 times
- 5 S.B.N., P.R., = 6 times. You should have 42 stitches on this row!
- 6 S.B.N., P.R. = 6 times
- 7 S.B.N., P.R. = 6 times
- 8 S.B.N., P.R. also six times.
- From row 11 to row 31 inclusive, knit 60 stitches.
- Row 32 (hereinafter – R.) 8 S.B.N., decrease (decrease – we knit two stitches together, hereinafter – U.B.) 6 times. (further from steps 32 to 40, all stitches with decreases are knitted 6 times.)
- 33 R. - 7 S.B.N., U.B.
- 34 R. – 6 S.B.N., U.B.
- 35 R. – 5 S.B.N., U.B.
- Don't forget to fill your toy with filler as you knit!
- 36 R. – 4 S.B.N., U.B.
- 37 R. – 3 S.B.N., U.B.
- 38 R. – 2 S.B.N., U.B.
- 39 R. – 1 S.B.N., U.B.
- 40 R. – W.B. six times . At this stage there should be 6 loops.
Start knitting a minion
- this is his head, and end
- will be located under the overalls, which we will now make! Take blue yarn. 

- 14 S.B.N.
- 1 V.P., 14 S.B.N.
- 1 V.P., U.B., 10 S.B.N., U.B.
- 1 V.P., 12 S.B.N.
- 1 V.P., U.B., 8 S.B.N., U.B.
- 1 V.P., 10 S.B.N. There will be 10 loops left at the end.
You should tie the resulting shorts for the toy
. On the side of the back - down 5 S.B.N., 16 S.B.N., we lift from the side to 5 S.B.N. + 23 V.P. Next we need to return to the place from which we came: 22 S.B.N., we go up the barrel 10 S.B.N. and 23 V.P.
Again we go back with the help of 22 S.B.N., down 5 S.B.N., 16 S.B.N. and rise - 5 S.B.N. At this point the little thing is finished, you can cut the thread.
Can be added on top pocket
, you don't have to do this. We'll explain this step in detail, but you can skip it! A ring of 5 V.P. that does not need to be closed. Next, knitting will be done using rotary loops. ETC. 5 times, 10 S.B.N., 7 connecting posts (hereinafter referred to as S.S.). 
We will make black threads shoes
: 6 V.P. into the ring. ETC. 6 times, 12 S.B.N. (entire 3rd and 4th rows), 4 S.B.N. + W.B. 2 times. From the sixth to the ninth rows, 10 S.B.N. Next, we sew the leg directly to the boot in blue. We type on it 12 S.B.N., 3 S.B.N., P.R. 3 times, and 15 S.B.N. in the last fifth row. 
Cuff and hand
. Hand
consists of black and yellow thread. Let's start with the first one. 6 V.P. in the ring, P.R. 6 times, (rows 3 to 5) 12 S.B.N., 5 U.B. After this we tie a yellow thread: 7 S.B.N. on the back wall, (from 8 to 16 R.) 7 S.B.N., in the last row 2 U.B. 
To link cuff
we knit two rows: 2 S.B.N., P.R., S.B.N., P.R. and 9 S.B.N.
For the eyes we knit two circles with white and black thread. Glue or sew a bead into the middle. To connect them together, dial 45 V.P. and 44 S.B.N. at two R. 
This will be a strap for them! All is ready! Don't forget to sew or glue all the pieces together! You can make his hairstyle out of black threads.
You can see how it does talented needlewoman on your YouTube channel. She has absolutely different approach , but the result is also great!
Photos of famous works: ideas for inspiration
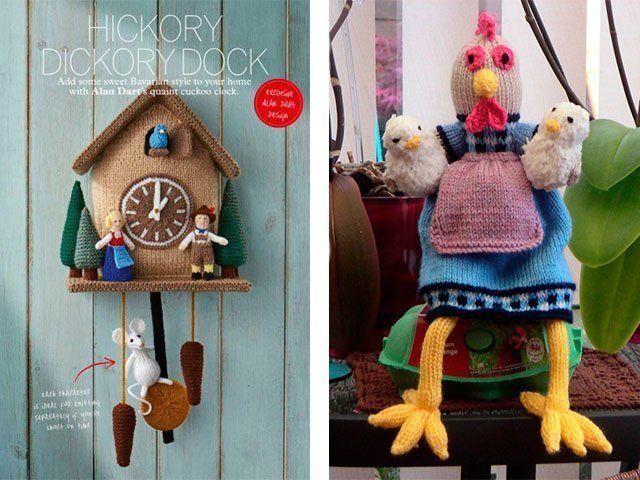
There are many famous needlewomen , and not only among women who can show off your amazing knitting projects . We invite you to evaluate the work Alana Darta, Mary Jane, Susan Hickson, Elena Belova. Beautiful works will help inspire you and give you the strength to create more. Just be warned: this work is not for beginners, it is very complex and requires a lot of effort and time.
Knitted toys from Alan Dart


Knitting toys by Susan Hickson

