Plastic bottle caps. Wall or fence decoration. Crafts from plastic bottles step by step: from flower pots to a fabulous tower
If desired, the tracks can be made with your own hands, and such an unusual material as corks from plastic bottles is suitable for this. Use your imagination and follow the advice to create a unique and practical art object in your country house. And you need very little for this: hard work, free time and our advice.
When it comes to waste material, many believe that it is much easier to work with it with construction material. This is not entirely true. If you want the garden path to become not only a practical element of landscape design, but also its business card, you need to follow some rules. They primarily relate to the choice of material and its preparation.
Choosing a material
They say that plastic does not decompose until after 100 years. This is great! Indeed, in this case, it is ideal for garden paths (for the garden). The palette of plastic covers is quite extensive.
To create beauty, the following can be used:
- caps from plastic bottles of different sizes;
- lids from tetrapacks, eggplants, and cans;
- metal bottle caps;
- wine corks.
The main requirement for plastic lids is high density. After all, the tracks have a serious load. And it will be a pity for the effort spent if the coating does not last long.
You will need a lot of this material for the track. You can make the calculation yourself:
- measure the diameter of the cork, in 1–2 liter bottles it is 3 cm;
- 1 meter fits 33.5 plugs;
- 1m 2 will need 1122.5 plugs;
- multiply this figure by the area of \u200b\u200byour walkway and you get the total number of caps.
One family will not be able to cope with such a number of drinks, even if you collect all the caps from bottles and cans, including water, beer, yoghurts and even medicines. Connect everyone you can to the project:
- announce your decision to create an extraordinary element of garden design to friends, acquaintances and neighbors;
- give a cry for collecting caps on social networks;
- try to negotiate the supply of material with the employees of the nearest cafe.

How to make
Plugs can be laid in different ways:
- face up (the result is a flat surface);
- ribs up (this path can be used instead of a massager);
- inner side up (the coating is textured).
The latter option is only suitable for small areas under a canopy. Otherwise, during precipitation, water and dirt will accumulate in the grooves of the plugs. And such an uneven surface is difficult to care for.
He will acquaint you with the varieties of crafts from cans.
Mosaic laying scheme
This is the most creative part of the job. Before you start paving directly, you need to decide exactly how your path should look like. You can lay out the lids in even rows, regardless of the color. As a result, you will get a multicolored scattering of colored highlights in your garden. Such a path is eye-catching and looks impressive.
But if you want something more extraordinary, choose a pattern for your track yourself. Cross-stitch patterns will help you with this. Tracks with colored geometric patterns look good. If you are confident in your abilities, you can choose the drawings more difficult. Some summer residents create real story panels under their feet in their garden. It is in the country that such decorations are popular. 
Tools and materials
Despite the cheapness of the material, the approach to creating tracks from traffic jams must be serious. Sometimes it is advised, before laying the cork mosaic, to simply level the ground and start creating, sticking the caps directly into the ground or a layer of sand.
A carpet like this won't last long. Not only will the lids not hold out for a long time and will begin to fly out one after the other, so also the grass will hasten to germinate between them. Better to spend more time, but do it well.
You will need:
- covers of different colors;
- cement;
- sand;
- building glue or ceramic tiles;
- wooden blocks and boards for formwork.

To build a track you need:
- decide on the area of \u200b\u200bthe track and make a markup;
- remove sod and topsoil;
- dig a trench 10 cm deep;
- drive in supports along the edge of the recess;
- make a wooden formwork, and nails need to be hammered from the inside of the structure;
- install spacers for reliability (the optimal distance between them is 1 m);
- fill in a layer of crushed stone, gravel, broken brick;
- prepare a solution of cement and sand (4: 1) and add one part of the glue to it, the mass should be of medium consistency;
- pour a small amount of the solution onto the prepared area;
- quickly lay the covers, according to the chosen scheme, slightly press them into the cement;
- the solution should almost completely cover the lids;
- after the cement has hardened, brush over the top layer with a stiff brush to remove excess cement.
The mortar hardens quickly, especially in hot weather, and the installation of the mosaic is time-consuming. Do not fill the entire track with cement. Work by sector. Break your drawing into pieces or conditional squares and fill in small areas.
Dignity
- The coating performs an aesthetic function not to the detriment of practical.
- The material does not require material investments.
- Plastic tolerates temperature extremes well.
- Such paths do not lose their aesthetic appearance for a long time.
- Paths made of unusual mosaic are easy to repair: any cover can always be replaced.

Disadvantages and methods of dealing with them
But such tracks are not ideal, they have serious drawbacks. But knowing in advance what difficulties may arise with them, you can easily avoid them.
- Plastic paths from the lids become very slippery after rain. Such coatings should not be installed on the central paths. Their place is in the garden and near the recreation areas.
- An icy path becomes dangerous. If you need to walk on it in winter, it is better to combine mosaics made of plastic lids with patterns made of cement, ceramics or wood.
Other options
Coatings from combinations of plastic lids with broken ceramic tiles look good. The small size of the elements allows you to lay out fancy and extraordinary patterns. The result is a distinctive track of bright elements. Such a garden patchwork will decorate the garden and place accents on the site.
Drawings can be varied with metal covers. Ecodesigners will love the wine cork paths. Cork is a noble material with unique properties. 
Health track from different covers
Homemade massage paths in the garden have become quite popular. They are loved by children and adults. After all, walking barefoot on a textured surface is not only pleasant, but also useful. For such paths, you will need a cement base on which different materials are laid.
Lids for juices, glass jars, corks, buttons, sticks are suitable. All this stuff is sorted by color and size. Then a sketch is developed. Here you can play not only with color and texture, but also with the way of styling. Lids laid on the end will create a convex surface, and glued with a notch down - will give a smoother surface.
From bottles
This material can serve as a wonderful material not only for manufacturing, but also for arranging exclusive paths in the garden. For this, whole bottles or parts thereof are used.
How to make from plastic bottles
Empty bottles cannot withstand severe stress. Therefore, before building a path, they need to be filled with sand, fine gravel or dry soil. If you want to diversify the color of the bottles, put colored paper, foil or pour a little dye inside, and only then fill in the sand. When the material is ready, start laying it. 
A cement pad is indispensable in this case as well. Only the hole for it needs to be dug deeper - by 1.5 bayonets of the shovel.
- Gravel is poured at the bottom, formwork is erected.
- Bottles are laid sideways in a trench and filled with cement mortar.
- Consolidate the masonry. To do this, put a board on the path and walk along it.
- After drying, the formwork is removed.
- Decorate the edges. Any mosaic is suitable for this.
You can make interesting paths from the lower parts of the bottle. For this, a trench is prepared with a depth of about 15 cm.
- Cut off the bottoms of the bottles (leave 1/5 of the height).
- Make the formwork and concrete pad.
- Put the bottom in the wet solution.
From the remains of bottles, you can build interesting garden sculptures or greenhouses for seedlings.

Greenhouse for seedlings from a plastic bottle.
How to lay paving slabs is described.
How to make from glass bottles
The technology is in many ways similar to the previous one. Glass bottles alone do not need to be filled with sand, although sand will give them extra strength. It is better to take bottles of champagne or wine, but beer bottles are also suitable.
They are installed mainly with the neck down. For such a path, a fairly deep trench is needed. Therefore, lane bottles are often cut and only the bottom is used. The styling technology is the same as that of plastic.
Such a backlit track looks very cool. To do this, you need to mount small bulbs under the bottles. Better to take LEDs - they are durable and economical. The bottles are also suitable for building walls, fences and curbs.
Video
On the video: do-it-yourself tracks from traffic jams.
Regular caps are a cheap and practical material. They are well suited for paving paths of varying degrees of curvature. Surfaces decorated in this way look cozy and colorful. And so that they do not stand out from the general style of the site, complement the garden with bright mosaic sculptures and panels in the same color scheme.
Bottle caps are ideal for doing all sorts of crafts, useful things for giving. They have different colors, are inexpensive, and work is easy enough.
- Decorate rafts, boats. The process requires persistence and skill. But the end result is original products. You can put the covers on the watercraft in different ways.
- Carports. By fabricating a canopy using multiple bottle caps, you can protect your vehicle from direct sunlight. First, a wooden or wire frame is made. Then the lids are attached. Then they are simply painted with paint.

- Furniture for a summer residence. You can decorate benches, ottomans, sofas, beds with covers. In a country house, cleaning will have a lot of trouble. By using plastic covers instead of traditional fabric upholstery, problems can be avoided. Cork tables and chairs for outdoor use look especially good.
- Making plant pots. It is enough to take ordinary pots, glue colored lids on them.
- Gates, fences and fences. You can save a lot of money by making a fence at your summer cottage with your own hands. In this case, a mosaic of covers is laid on the finished frame of the structure.
- Flower bed decoration. Landscape installations: figurines of planes, birds and animals. Anyone can do such crafts.

Pergolas decorated with bottle caps
It is not necessary to make crafts from the lids. You can do something more meaningful, like a gazebo. At the same time, you can significantly save money.
The frame can be made from any material. Experiment! The shape of the structure may not be standard rectangular, but also hemispherical. After the construction of the frame, covers are attached to the walls with nails or self-tapping screws. You can use regular glue.
Various ornaments can be laid out with the bottle caps. So you diversify the colorless walls.
First, a frame is made of dense wooden or other sheets. Then it is formalized with the products in question.

Manufacturing of lamps
You can also save on the purchase of lamps. You will need: a canister of household chemicals, a cartridge with a light bulb, lids.
- The neck is cut off from the canister.
- A cartridge with a lamp is installed inside.
- Lids are glued to the canister as a decor.
The lamps of the presented type look very nice. Shades for country lamps are made in the same way.
How to decorate a dacha with plastic corks (video)
Despite the fact that at first glance it is quite simple to decorate a country house using bottle caps, there are some rules that should be taken into account.
- It is better to "sit" the lids on the cement mortar.
- Cement does not react with plastic in the same way as brick, so it is recommended to pre-make holes in the caps.
- Plastic is destroyed by heat and frost. This must be taken into account.
- Bottle caps can also be used for roof decoration. In this case, the products are attached to self-tapping screws.
- If there is a brick or wood structure on your site, you can easily decorate it with plastic covers by laying out any ornament you like. These can be: images of animals, geometric patterns, cartoon characters, flowers.
Corks are especially popular when creating country decor. From them, you can create entire installations in the form of volumetric and flat figures of plants and animals, borders and flower beds.
- The contour for a flower garden in the form of a ladybug, laid out from the covers, looks original.
- Among other things, covers are actively used to create garden paths. It is very simple to make them: cement is poured (immediately give it the desired shape), and then multi-colored or plain plugs are stuck into it. Due to the grooved sides, they are firmly bogged down in the material. You can make tracks in the form of original panels.

- If we talk about installations, the easiest option is to make a Christmas tree. A shape is cut out of plastic bottles. And then the Christmas tree is decorated with multi-colored caps connected in garlands. You can make miniature Christmas trees from green corks.
- The lids can also be used to decorate the interior of the house. Curtains, panels, screens and partitions - all this can be done by hand. You will definitely not see similar products from anyone.
- Rainbow curtains made of corks of various colors look modern. Even a child can collect them.
Ideas for giving from traffic jams (video)
Almost anything can be made from bottle caps. Many summer residents skillfully use this. It is recommended to use corks of different colors, shapes, then the design creations will look more original. You can combine the use of caps with plastic bottles and other seemingly unnecessary things. The main thing is to connect imagination and everything will definitely work out. The work will require patience, so you can connect your family and friends. It's more interesting to act together!


Reviews and comments
(3
estimates, average: 4,33
out of 5)
Alisa 08/26/2015
Recently I began to work on Hade-made and my attention was attracted by plastic lids from bottles and jars from under the children's attention. Such pictures are obtained!) I decorated the whole dacha, the neighbors just gasp and go for pictures) And most importantly, it turns out beautifully and effectively)
Stanislav 01/20/2016
How many interesting ideas there are, I would not even have guessed. I just found a use in creating a walkway by simply pushing corks into the sand, and my wife and I made the curtain. But to make a small picture on the wall with some kind of image - this is now our task, we only collect the covers.
Olga 24.05.2016
And I am somehow indifferent to crafts made from plastic bottles and caps. Although, some works are certainly worthy of attention. But already as art objects 🙂 Still, I prefer to decorate the summer cottage with more natural materials - wood, stones ...
Olenka 06/14/2016
Great! I would never have thought that such beauty could be created from such a material as lids. The downside is that the work is painstaking and it takes a long time to assemble the covers. And one color. But then no one will have such a decor in the country. And the child should also like such an activity. We will try!
Add a commentat 28.05.2017 120,981 Views
Many useful things for the garden and summer cottage can be made from plastic bottles.
While lovingly equipping the city dwelling, we are no less touching about our summer cottages. We try to refine them, create comfortable conditions for ourselves and add special notes of attractiveness to the even rows of beds and berry bushes. Many summer residents have chosen the most affordable and flexible material for their creative experiments - ordinary plastic bottles. We will talk further about what products from can be made for a garden and a summer residence!
- House made of plastic bottles
- Country crafts from plastic bottles step by step: palm tree from plastic bottles
- Master class from plastic bottles step by step
Plastic crafts: a few tips

Wonderful hanging cactus pots from plastic bottles

Resourcefulness in ways to place many plants in the garden

Plastic bottles in skillful hands will be a wonderful decoration for your landscape

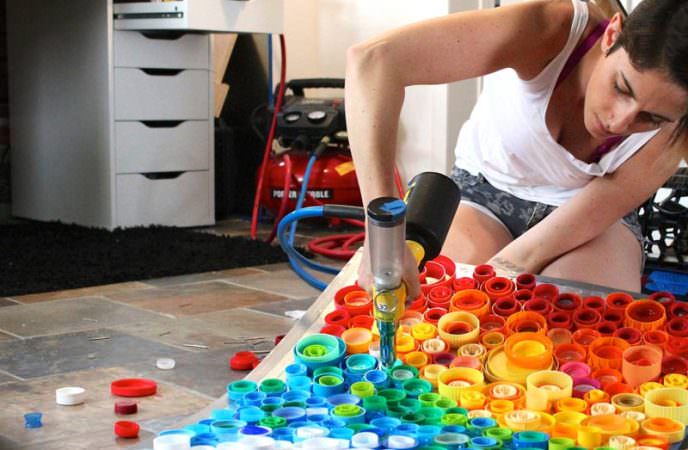
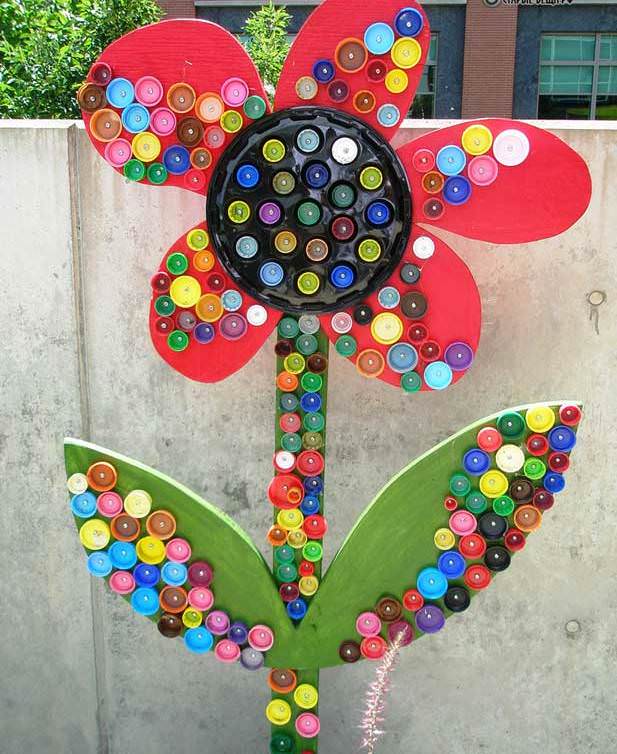
Beautiful flower made of plastic lids
Crafts from plastic bottles step by step: from flower pots to a fabulous tower
The idea of \u200b\u200bmaking useful tools and decorative pieces from plastic containers is not new. The first attempts led our grandparents to build low railings for walkways. Having appreciated the plasticity and cheapness of the material, the craftsmen from the people went further. And now the summer cottages were decorated with full-fledged fences, funny figures and unusual devices made of plastic bottles.

A wonderful pet-container ostrich cannot but please your children!

Thanks to imagination and such an excellent material as plastic bottles, we have almost limitless possibilities for creating crafts for every taste, of any complexity and direction.

Pictures from the caps of plastic bottles and other containers have grown into a whole art direction

Plastic bottles have long been in great demand among gardeners.

Gorgeous orange pet-container flowers
Crafts and decorations for the garden and the garden from plastic bottles do not require the use of complex tools and specialized skills. The main thing is that there is time and desire, as well as enough material. Those who turned out to have both, convincingly proved the limitless possibilities of such needlework, and we have prepared a review of the best examples of crafts.
DIY furniture, flowerpots and a vase from a plastic bottle

Comfortable and very stylish chair made of plastic bottles
A sheet of plywood, sixteen one and a half liter bottles, scotch tape - and a comfortable and durable coffee table will appear on your site. Plywood can be replaced with plastic or hardboard, old countertops or plexiglass. From the same materials, by slightly changing the design, you can make a garden bench. Some diligent and patient craftsmen manage to collect full-fledged sofas and armchairs from bottles.

You can even make a base for a full-fledged sofa from plastic bottles, if you firmly and neatly fasten them together

Hanging flowerpot or base for planters
DIY ottoman from plastic bottles

How to make a pouf from a pet container
House made of plastic bottles
There are real builders among summer residents who know that you can build whatever your heart desires from plastic bottles. They collect gazebos, toilets, sheds and even from plastic bottles. The only difficulty of such structures is not in assembling them, but in collecting the required number of bottles.

House with a roof of 7,000 bottles

Plastic bottles are a good base material for building walls of a summer cottage, greenhouse, shower, toilet or other partitions

Greenhouse walls from containers on a wooden frame

The bottoms from plastic bottles will help you arrange garlands for the garden
Playground: flowers from plastic bottles and toys from plastic bottles

Crafts from plastic bottles will help decorate the playground
All kinds of crafts from plastic bottles (photos of their various variations for the garden and vegetable garden can be easily found on our portal) are especially attractive for decorating a playground. Absolutely safe, they can become the basis for toys, and for funny decorations, and for creating plot compositions. Funny elephants, bees, rabbits and hedgehogs, bright flowers, funny lanterns will turn a suburban island of childhood into a fairy kingdom.

The whole plot for the playground from the caps of plastic bottles and cans

Together with children, you can make small crafts and large plot mosaics from the caps of plastic bottles
Doll from a plastic bottle

Examples of a variety of crafts that will help the gardener with placement, easy transportation and plant care

Piglets from large plastic bottles - stable stands for germination of seedlings or small plants

Craft for garden or lawn decor: pet-container parrot
Crafts for the garden and useful things

Colorful turtles will be a great element of your garden decor.
With what ease the "crazy" hands of summer residents turn used plastic containers into useful summer cottages, you can see by walking through suburban areas. Here, on the trunk of the tree, a washstand was comfortably attached, and in the next yard, the gazebo was decorated with multi-colored ones with fragrant primrose and ampelous geraniums. We have also prepared for you several descriptions of crafts from plastic bottles for the garden and vegetable garden.
Do-it-yourself bird from plastic bottles

DIY painted garden owl lanterns
Birdhouse from a plastic bottle

A birdhouse from a plastic bottle is very easy to make

When cut in half, plastic bottles will make cute flower pots, but it is important to color them carefully. It is also advisable to take opaque bottles for this.
The ever-confusing and stuck seedling twine will stop tormenting you if you hide the ball in a plastic bottle. Just cut the bottle in the middle, put the ball in the top part, pass the end of the twine through the neck, join the parts, secure the cut with tape - and your comfortable storage is ready.
Drip irrigation from plastic bottles
Your seedlings will not wither, even if you are away for a few days: install semi-automatic irrigation. And again, plastic bottles come into play. Cut off the bottom of the bottle, about 2/3, drill 4-8 holes in the cork, close the neck, bury the bottle with the neck down, pour water - and the seedlings are provided with moisture during your absence. Such a vegetable garden made of plastic bottles (a photo confirms this) will significantly save your time and financial resources.

Automatic irrigation "Aquasolo" is a tapered nozzle for a bottle with a thread, which does not require wasting time drilling slots, digging into the ground, and so on.

Anthurium with a convenient automatic irrigation system "Aquasolo"

Space saving as much as possible: hanging one above the other plastic bottles with a cut tube with water passing through them
- For the same seedlings, excellent containers are obtained from plastic bottles. After cutting the bottle in half and taking the bottom, pour the prepared substrate into it, plant the plants and place them on a bookcase nailed from wooden planks. This design is also suitable for decorating the house with flowers.

Beautiful hanging pots made of plastic bottles will not only decorate the interior, but also make it unique

An excellent pot from a bottle of shampoo with your own hands

Arrangement in the country for compact placement of seedlings or small plants
Bird feeder from a plastic bottle
Some crafts from plastic bottles for the garden amaze with the ingenuity of the owners. Putting a bottle on a hose and making a lot of holes in the bottom, you get an excellent diffuser for watering your garden. From a five-liter container, you can build an elegant lamp on the veranda, and a container from under mineral water is suitable as a bird feeder.

Bird feeder from a plastic container

Simple and handy hose splitter for garden irrigation
- Plastic bottles can help you save trees from pests. Cut the bottle lengthwise into two halves, fill it with a pest-friendly mixture with the addition of insecticides, and dig in at the base of the trunk.
- Bottles can be used to create a magnificent decorative all-weather and all-season flower bed. Just paint the bottoms of the bottles in different colors and make a wonderful carpet out of them, sticking them open side into the ground. The carpet design can be reproduced on paper beforehand.

Pet-container decoration of flower beds has become very popular.
- A Brazilian engineer did the calculations and built a solar collector out of plastic bottles. The structure can be placed in a summer cottage, connected to a storage tank, and you will always have a warm shower.

Solar collector device made of plastic bottles

Automatic watering of seedlings and ornamental plants in your absence using a plastic bottle dug in next to the roots with small holes drilled in the neck or cap

Cut plastic containers suspended one above the other are the fastest and most economical way out of a situation when you need to germinate a lot of seedlings in a confined space

Making an owl from a plastic bottle with your own hands

Vertical bottle garden for germination and winter overexposure of plants - an opportunity to save space and ensure good irrigation and drainage
Products from plastic bottles: artistic masterpieces

Gorgeous pet-tare dandelions will never cease to delight you and your guests
The imagination of folk craftsmen is so diverse that it leads to the appearance on summer cottages of strange animals, characters from fairy tales and cartoons, and exotic plants, and original thematic compositions.

We glue the bottom of a plastic bottle or cup with dry twigs and get an unusual candlestick protected from the wind

Rainbow decor for garden, workshop, garage: a fountain of spirals cut from multi-colored plastic bottles

Plastic bottles are used not only for garden decoration, but also for home decoration.
Country crafts from plastic bottles:
If you have a small body of water on your site, you can arrange it with a plastic palm tree. Making it is not at all difficult. You will need:
- 10-15 brown plastic bottles (for the trunk of a palm tree);
- 5-6 green bottles (preferably long);
- iron or willow rod;
- awl or drill for making holes;
- a sharp knife or scissors for cutting bottles.

A palm tree made from plastic bottles looks very beautiful
Now we start making jewelry.
- Cut all brown bottles in half. We take the lower parts and make holes with an awl in the bottom of each of them, equal in size to the diameter of the rod.
Advice! You can also take the tops of the bottles, then you do not have to make additional holes.
- For green bottles, cut off the bottom by about 1 cm. We leave one of the blanks with a neck, for the rest we cut it off to make a loop.
- Carefully cut the green bottles lengthwise into three equal parts all the way to the loop.
- Cut all brown bottles in half. We take the lower parts and make holes with an awl in the bottom of each of them, equal in size to the diameter of the rod.

Making palm leaves


The connection of the trunk and leaves

Assembling a palm tree from plastic bottles
Using several rods of different lengths, you can create a real oasis. As you can see, it is not so difficult to make crafts for the garden from plastic bottles with your own hands, the main thing is to find a sufficient amount of material and take one of the proposed ideas as a basis.

Part 1

Step-by-step guide: making fabric pots from plastic bottle bases. Part 2

Hedgehog from a plastic bottle and twine rope: growing seedlings and small creeping plants
Crafts for giving from plastic bottle caps

Real masterpieces can be created from plastic lids
Don't throw away bottle caps. Decorative crafts from plastic bottle caps for a summer residence and a garden can also be beautifully fit into its landscape. They will serve as an excellent mosaic material for decorating fences and walls of a country house.

Bright compositions of plastic covers will help make your landscaping more fun.
Master class video (from plastic bottles of standard capacity):

A path made of plastic lids is not only economical, but also very beautiful

Large-scale red and blue mosaic of different sizes of lids
Having conjured a little with a pattern, having painted and drilled holes in the sides of the covers, you can assemble a curtain on the door from them. A great option for protecting against insects!
The lids can be transformed into a beautiful worktop or a practical doormat. Use them for decorative interior decoration.

Gorgeous curtains for doors made from plastic covers

Sun-scattering carport

Beautiful lanterns in Hawaiian style
Before starting work, remove the labels from the bottles and wash the container thoroughly.
Fill bottles with sand or small pebbles to stabilize vertical structures.

Dragonflies from corrugated plastic bottles

An ingenious device for collecting fruits from trees

Hanging pet containers with the image of animals will perfectly fit into the interior of the children's room
Choose bottles of different softness for crafts. For example, for the body of a dog or elephant, take a sturdy base, and for the ears it is better to use softer plastic.
Master class from plastic bottles (step by step):


There is no limit to human fantasy. How many crafts from plastic bottles are invented? No less interesting ideas are embodied in the use of corks from such bottles. Only finished products with lids are found less due to the fact that it is not very easy to collect a large amount of such material. But, if a person is interested in this, then he will involve the whole family, relatives, friends, neighbors, work colleagues in the collection of lids. As a result, he will have enough material to bring his masterpieces to life.
What is the difference between crafts made from plastic corks?
For those who have never been interested in handicrafts and recycling, plastic bottles, along with corks, are ordinary garbage, which it is advisable to take out of the apartment in time. For creative and homely people, this is an invaluable material for realizing their fantasies and creativity. Caps can be used to make interesting and useful items, toys, ornaments that delight others. Crafts from plastic corks differ:
- the amount of material used;
- the method of connecting the lids to each other;
- shape, color, size;
- purpose;
- the complexity of the pattern or ornament.
 toys made of plastic corks
  plastic cork mosaic
  crafts from plastic corks
For beginners - the way to create unique masterpieces!
How to fix?
There are several ways to attach covers to products. For paintings, children's toys, a special glue for plastic, "Moment", superglue is suitable. Such a connection is appropriate for gluing to the base of corks with the front and back sides and even sideways. Fastening to a wooden base can be carried out with nails with a wide head or gasket, self-tapping screws. In order for the thing to be strong and reliable, the covers are connected to each other with a fishing line. In this case, from 2 to 6 holes must be made in them. The design of the 2 holes in the middle is similar to sewing on a large button. 4 holes on the sides will ensure a reliable connection with a fishing line or nylon thread. This type of wire attachment will contribute to the integrity of the structure. Such fastening is used in the manufacture of fences, enclosing products, arbors.
Application
Crafts made from plastic corks can have different directions. They are most often intended for a summer residence, a summer kitchen in a private house, a bathhouse. But they are also acceptable for apartments and even offices. Watches made of a small number of covers of different sizes look spectacular. Original coasters will decorate the tea table. Lids can be used to decorate a mirror, create protection from water near the sink. In the country, you can hang a homemade cork chandelier, a spectacular curtain. A table and chairs with a metal frame and cork cover can stand outside the whole summer. Such furniture is not afraid of humidity and sunlight. A beautiful rug made of multi-colored covers can be placed at the entrance to the house or in the bathroom. If the mat has a strong, reliable and secure attachment, then it can serve as a massage tool. The elements for the massage mat are fastened with a fishing line, having previously made 4 holes in each cover with a hot awl.
 use of covers for activities with children
  wall decoration with plastic covers
  cork crafts
  track
track
Surely in every home, the question often arises of what to do with the accumulated plastic bottles and caps from them. Many people just throw them away, not even realizing how much benefit can be derived from this beautiful handmade material. It's not a secret for anyone that plastic bottles can be used to make decorations for a garden. On our website, you can familiarize yourself with. But how to use plastic bottle caps to create something useful out of them, we will tell you in this article.
Crafts from plastic bottle caps with children and for children
Plastic bottle caps are very bright elements that can be found in at least three uses to make crafts for your child or with him.
Magnets
From plastic lids, you can make beautiful magnets for a refrigerator or a blackboard in a children's room. To do this, you need the following material:
- As many multi-colored covers as possible;
- Small magnets (you will need to purchase them);
- Double-sided tape or quick-drying glue (ideally, use a glue gun);
- Medical alcohol (for degreasing the surfaces of the lids);
- Markers, colored paper, pencil and scissors.
From this set of materials, you can make an alphabet on magnets for your baby, which will look like this, as a result
What should be the sequence of your actions:
- Prepare all plugs for work - degrease them with rubbing alcohol from all sides. This is necessary so that the desired material can be easily glued to the surfaces of the lids, in our case it concerns colored paper and magnets.
- Now, at the outer part of the lid, we glue the magnet using double-sided tape or quick-drying glue. Of course, we recommend using glue to securely attach the magnet to the lid.
- Cut out circles from colored paper that will fit the caps in size and glue them to the inside of the cork. Then, on these circles, draw a beautiful letter of the alphabet or a mathematical symbol with a felt-tip pen. By the way, instead of the usual drawn letter or number, for example, you can use a cut out symbol from decorative paper, and glue it in exactly the same way. You do not have to spend money to buy such educational toys for your child.
Immediately, we note that you don't even need to stick magnets to the covers. Their purpose will not change, just instead of putting words and mathematical examples on the refrigerator, the child will be able to do all this at his desk.
Lid magnets can be made in a different format - in the form of funny fruits or emoticons. To make them, you will need thin wire, beads, quick-drying glue, and green knitting thread.
To make a cherry, such as in the picture, you need to process the lid in the same way as for the alphabet, then glue white beads to it - these will be the eyes of the cherry. You can draw the pupils with a felt-tip pen or cut out small circles from colored paper and carefully glue them to the beads. It remains to make only stalks and leaves. To do this, take a small piece of wire and wrap it with green thread, and then twist it so that it looks like a stalk with a leaf. To attach the resulting element to the lid, you can make a small hole in it, pass a wire through it and twist it. As you can see, nothing complicated.
It is even easier to make a smiley - attach the beads as a peephole to the processed lid in the same way, and then make different smiles from the prepared small pieces of wire and attach them with quick-drying glue to the corks.
There is another very original idea for creating magnets from lids. They will represent the faces of cartoon characters or any animals, birds or fish.
To make such products, you will need, in addition to all the materials mentioned above, to purchase thick colored cardboard. It will be easy for you to make a face, all the more, using the example of a smiley, we have already told you what to do for what. There is another nuance here. You will need to attach the magnet itself not to the lid, as in previous cases, but to the cardboard on which you glue the resulting cork product.
Toys
Next group dIY plastic lids for those who are ready to work hard, but make a real work of art for their baby. If you have a lot of corks in your bag somewhere, take them out urgently and create beauty, for example:
These are the usual volumetric applications on paper. To make them, you need the following material:
- Colored cardboard;
- Covers;
- Fast drying glue;
- Beads or beads;
- Stationery: scissors, pencil.
From these simple materials, which can certainly be found in the portfolio of any student, you will make an original craft. To do this, you need to follow this procedure:
- Cut out the base for the future applique from colored cardboard - it can be any geometric figure, flower, sun and so on. In the photo, the author immediately made a base from colored cardboard in the form of characters - a lamb, a hedgehog and a doll.
- We prepare the lids (we treat them with medical alcohol), if necessary, we glue them together with quick-drying glue. You can see an example in the picture with a picture of a sheep and a doll.
- We attach the covers to the base with glue, and then decorate the entire applique. You can use whatever decor materials you have here. In this case, the main thing is to show imagination.
Master class on how to make a snake
To make such a bright and beautiful toy, you will need:
- Multi-colored plastic lids (preferably the same size and shape) and one plastic egg from under the chocolate kinder surprise;
- Strong rope;
- Screwdriver and awl (you can also use a screwdriver).
Having prepared everything you need, you can literally make a fascinating little thing for your child in just 30 minutes. This will especially help you out if you came to nature, and left the package with toys at home. How to make such a snake:
- Pierce the middle of each cover with an awl. In order not to get hurt, you can heat the tip of the awl well. The high temperature will melt the plastic cover where it touches the awl and you can easily pierce it.
- Divide the plastic egg from the kinder in two. Use one to create the head of the snake, and use the other to complete its tail.
- Thread the prepared covers onto a rope, pressing tightly one to the other.
- Tie the ends of the rope in a knot on all sides. From the knot that forms from the side of the head, you can make the tongue of the snake, and carefully trim the other.
- On the head of the snake, you need to either draw eyes and a nose, or cut it all out of colored paper and glue it with quick-drying glue.
Master class on how to make a robot
You will need to use thick wire as the base for this toy to keep it stable. In addition to the wire, of course, you will need covers (about 20 pieces, but more is better), an awl and a permanent marker.
To make such a robot, using the same technology that we recommended you for creating a snake, pierce each cover in the middle with a hot awl or nail. We recommend that you immediately prepare the parts of the robot's body in such a position in which they will then be attached to each other. You design each detail separately. When they become one, you can use a marker to paint the resulting robot or glue the necessary additional elements to it. For example, as in the picture, you can make fingers (using trimmings from the covers).
Master class on how to make little men
To make such a toy, you can use all the materials that were proposed for creating a snake and a robot. Your little men can be mobile (if you string the caps on a rope) or motionless, but stable (if you string plugs on a wire). Manufacturing technology is no different from the previous ones. The only thing that you may need additionally is plastic eggs from kinder surprises of different colors. If you don't have them, you don't have to buy candy to get the material you need, you can replace it with something else - matchboxes, items from your child's old plastic toys.
Mosaic
To decorate the place where your child often spends time in the yard, you can make a beautiful mosaic of plastic covers in the form of fairy-tale characters, characters from cartoons. If you know how to draw, the task becomes much easier for you. You just make the outline, and then completely cover it with plastic bottle caps, glueing them with a glue gun. By the way, you do not have to lay out the lids in a specific color, especially since it is not so easy to collect monophonic ones in the right amount. You just then paint the caps with a spray can or regular paint in the desired color.
However, experienced needlewomen recommend not to plant lids on glue, since this is not a very reliable way to keep work in the open air. They recommend that you first draw your chosen pattern on the surface on which the mosaic will be placed. Then, to the contours of this drawing, at the same distance from each other, make marks - to nail in the nails. All caps from plastic bottles will need to be strung on threads using the technology you already know, and then, in accordance with the drawing, attach them to the wall, tying each end of the threads to nails on one side and the other. You can screw all the covers to the wall at once using self-tapping screws.
Crafts from lids from plastic bottles for home interiors
You may find it strange to use plastic covers in your home interior, because they are too bright and do not fit in many cases with the overall design in your home or apartment. Yes, but you can make a lot of original items for a summer residence, where any product, no matter what it is made of, will always come in handy. We suggest you make the following household items from plastic bottle caps:
Door curtains
To create such an original curtain, you need to collect a lot of covers. All of them need to be pierced with an awl, strung on a fishing line with a length corresponding to the height of your doorway, and then tightly attached one after another to a piece of wood, which will play the role of a kind of cornice. This cornice will be easy and simple for you to nail to the top of the doorway using nails. You can use self-tapping screws. Or you can take a real cornice, and attach a hook to each "garland" of lids, for which it will be attached to the cornice. Then you will be able to fully use such curtains, being able to move them in different directions if necessary.
Clock
If you have a movement from an old watch, you can give it a modern look that is now very popular in home furnishings. With the multi-colored plastic lids and quick-drying glue, you can create a design similar to the one shown in the photo. It's very simple: by matching the color of the lid, you glue them together so that you get a pattern around the clockwork.
Flower pots and vases
A very simple technique for making such products - on a finished base, be it a flower pot or a vase, you glue the lids with the inside. You can make a drawing from traffic jams or create some kind of abstraction along the way. As a result, you will get a voluminous bright decor of already old and faded household items.
Baskets
To create a basket of this design, you need to make 4 holes in the plastic lids. Then, in each hole, you need to thread a wire so that you can connect several covers to each other. As a result, you will get a voluminous, but small basket for various household items. His handles in the photo are wire, but you can think of something original to decorate them.
This version of the lid basket will require your patience and special skill. Despite the fact that only two main materials are needed to make it - these are lids and quick-drying glue, you will have to work on it a lot to get a beautiful product. Here it is important to evenly line up and glue each layer of the basket together so that everything looks very organic as a whole. Such a basket will look very impressive in white, but you can use any other lids, even multi-colored ones. For example, as in the photo below. The author of this masterpiece chose to make a trash can out of the lids. But the brightness of such a product attracts attention very much, so it is worth using it for some other purpose.
Rugs
Plastic lids can be used to create an excellent massage mat of any shape and even pattern, which can be turned into a luxurious stand for hot meals. To do this, you need to glue the covers together with a glue gun, edge to edge. If you turn the rug with the masonry surface on the floor, then you will have an excellent means for massaging your feet, if you turn it over, then a reliable stand.
Chandeliers
Of the many options for creating chandeliers from plastic covers, we will offer you two of the most simple and at the same time original.
Option number 1
What you need:
- Plastic covers;
- Thick cardboard;
- Wire;
- Fast drying glue.
How to do:
- Cut out several rectangles from cardboard, glue them together to make one long paper strip.
- Make a circle out of wire, which can be any diameter. It will depend on what size the shade of your future chandelier should be.
- Now wrap the wire in a circle with a cardboard strip.
- Having secured the base, you can start gluing it with plastic covers.
Option number 2
What you need: everything is the same as for the previous product, but instead of wire, it is better to use a nylon thread and prepare old beads for a change.
How to make:
- Pierce all the covers so that each has two punctures on the rib (the punctures should be parallel to each other).
- Then string the caps on a string, alternating them with beads. You should have at least 10-15 such "garlands".
- Cut a small circle out of the cardboard. Make as many holes along its edges as you have garlands.
- Attach one garland to each hole (just tie them).
Furniture
All old furniture in your home can be given new life by decorating them with plastic covers. For example, you can update the old tabletop in this way. You need to lay out all your lids in any order around its entire perimeter with a smooth surface up. When done, fill them with acrylic resin. When dry, you will have a beautiful, bright and sleek table.
You can not fill the surface with acrylic, but fix the covers on the surface of the table or old chairs with quick-drying glue. It will turn out well too, for example, as in the photo below:
Courtyard
This category of products requires a special talent from the craftsman, because, in addition to the ability to create beautiful things from unnecessary things, such as plastic lids, for example, he will still have to learn how to knead cement mortar, if he did not know how to do this before. When will such a talent come in handy? When you decide to decorate the facade of your house in the form of an extraordinary mosaic with plastic bottle corks.
Perhaps you will like this idea for decorating your balcony. The manufacturing technique is the same as for a mosaic panel.
You can make a bright path in the yard from plastic covers, which will become an unusual decoration for it.
In other words, there are a lot of options where you can use corks from under plastic bottles. If your home quickly builds up these wonderful handicraft items, then try to get the most out of them. Create beauty from simple things - be original!