Basting seam scheme. The seam is manual. Hand seam. Handmade decorative stitch
Sooner or later, in the hands of any housewife, there is a thread with a needle, and with them there is a need to hem something, overcast, darn or outline manually. One of the most popular types of manual processing cotton fabric is an overcast seam used in cases where the household does not have a sewing machine. Read more about this and other types of seams in our article.
Types of hand seams for joining fabrics and hemming
Not everyone can boast of having a sewing machine in the house. Fortunately, this useful gadget can be partially replaced by manual processing, and it will look no less neat. First, let's talk about the seams that are used when joining and hemming fabrics.
Basting stitch. One of the simplest, used to fasten parts or to create assemblies. Stitches (from 0.2 cm to 5 cm long) are laid from right to left at intervals. The stitch length depends on the density of the fabric. For example, if you are processing wool or coarse linen, then the stitch should be longer and the thread with the needle thicker. And for such delicate materials as or thin, you should use small stitches and thin needles.
Hem seam. With its help, the hem of the sleeves is fixed and the bottom of the dress, shirt, skirt or shorts is hemmed.
Subtypes of hem stitches

- Secret- we sew the fabrics from right to left, not tightening the stitches too much. We grab a few threads on the fabric that is on top and the edge of the top fold on the bottom layer.

- Velvet stitch(cross-shaped, "goat") - they process dense, non-flowing fabrics: tweed, velvet.

Hand stitch (aka stitch stitch). Outwardly, this type of processing looks like on a typewriter. The stitches are arranged from right to left without gaps. The thread must be laid in the place where the needle exits, as if returning back after the previous stitch. You can study the stitching patterns in the figure, and you will also find a video at the end of the section.

Seam "by the needle" similar in appearance to the previous one with the difference that spaces are provided between the stitches. This stitch is ideal when you need to baste striped fabrics or join decorative plaid fabrics.

Shtukovka- serves when fastening dense fabrics, such as, drape, etc., when it is necessary to join materials butt-to-butt. Also, such stitches are often sewn on the skin so that the stitching is not visible from the front side. Stitches are made through the edges of the fabric, pulling them together.
Hand seams for finishing the edges of the fabric
If there is a basting stitch, then there must be a manual basting stitch, and this is what will be discussed further. There are different subtypes of overcast seams.

- oblique- it is performed from right to left over the edge of the fabric.
- cruciform- we perform an oblique seam in two directions at once.
- Looped- we lay the thread in the form of a loop around the needle, from left to right. The length of the stitch should be no more than 0.4 - 0.6 cm.

For processing the edges of napkins, tablecloths, sheets and other home textiles use buttonhole stitches. How to make a line from buttonholes, look at the video.

Another seam used to finish the edges of frills or flounces is called round or twisted. To create such a stitch, the fabric is twisted and stitched with frequent stitches of an oblique overlock seam.
Hand stitching for marking fabric
Hand seams are used not only for finishing edges and fastening fabrics. Sometimes the master needs, for example, to designate the middle of the product, and for this he uses cushioning seam.
Designed for an inconspicuous connection of the elements of the product, the hidden stitch is performed only with manual sewing. The main feature of this work is that the stitches remain barely visible from the outside of the finished item. Using this technique, you can connect the necessary parts, make soft toys by hand, neat hem.
What is a hidden seam and why is it needed
Performing a blind seam by hand requires maximum accuracy and accuracy. In the absence of experience, detailed instructions will help. You need to work in one thread, using a thin manual needle. It is not so much the execution of the stitch itself that is important, but the result - the impeccable appearance of the product. If the fabric is variegated and loose, laying an inconspicuous line is not difficult. Another thing is the processing of the bottom of the clothes from a thin, plain fabric, on which puffs easily form.
Do-it-yourself hidden stitches for an inconspicuous connection of two elements are used when something needs to be carefully repaired or processed. This line is used for:
- finishing the bottom of trousers, skirts or dresses;
- completion of the production of a soft toy;
- minor repairs of an expensive product damaged on the front side;
- fastening the sleeves of the blouse.
How to hem pants by hand with a blind seam
Before making a blind seam by hand, you need to carefully measure the desired length of the trousers, turning the edge on the person. A margin of at least 3.5 cm should be set aside down in case you need to lengthen the thing. To cut the legs evenly, fold them along the entire length, pin with pins. For a high-quality hem, you need to stitch the tape, process the edges with an overlock. The remaining ends of the threads can be hidden with a hook.
To hem your pants with your own hands, do the following:
- Turn the item inside out.
- Poke with pins a fold 1 cm from the cut.
- Insert the needle into the overlock stitch.
- Grab 1-2 threads of the canvas.
- Bring the needle back to the hem. The stitch pitch should be no more than 1 cm.
- Sew both legs.
- Turn the item right side out.
- Iron the seam allowance inside the leg.
- Iron the arrows on the front side using a cloth.

How to make a blind stitch for toys
Making plush crafts is not complete without a hidden stitch. Blind stitching is done by hand like this:
- Insert the thread into the needle.
- Tie a knot.
- Insert the needle into the open hole in the fold from the inside so that the knot is not visible.
- Move the working tool to the opposite side.
- Grab 1-2 fibers by gently tightening the connection.
- Insert the needle back into the fold of the side where you started.
- Grab a couple of fibers, remove the tool by pulling it forward.
- Sew up the hole to the end.
- Fasten the thread, cut it short with scissors.

Connecting seams. Edge seams. Finishing seams, folds, edges.
Household belong to lockstitch machines. On them, you can basically sew stitches and zigzag stitches. Lockstitches are formed by upper and lower threads intertwined inside the materials to be sewn (Fig. 32).
The most common machine stitch is the seam stitch. The zigzag stitch differs from the stitching stitch in that the threads are arranged in a zigzag pattern on the front side (Fig. 33).
The zigzag stitch can be with a frequent, narrow or wide zigzag, depending on the length and width of the stitches.
The zigzag stitch is more elastic, therefore it is used to secure sections from shedding, as well as to join fabrics end-to-end or with an overlay seam (Fig. 34 a, b), for overcasting.
Depending on the purpose, the seams are divided into connecting, edge and finishing.
Connecting seams. Stitch seam- the most common. A stitched seam with an iron (Fig. 35) is used to fasten the details of the top. Depending on the model, a seam is used with an iron (Fig. 36). It is also used in thin fabrics and in the processing of lining.
Topstitch- a kind of stock. In this case, the seam allowances are laid out on two sides and fixed with lines (Fig. 37). It is used for those fabrics where it is impossible to iron out, but it is necessary to fix the seam, as well as for finishing the details of the product.
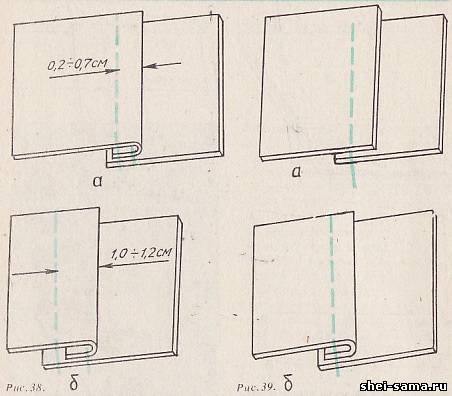
Stitch stitch performed with open sections (Fig. 38 a) and with one closed section (Fig. 38 b). It is mainly used in outerwear, with open cuts - in products made from non-shrinking materials. In products without lining, the seams are overcast.
seam available with open and closed sections. A false seam with open sections (Fig. 39 a) is the simplest connecting seam. It is used to connect gaskets, which are then closed with a lining. A false seam with a closed cut (Fig. 39 b) is much more difficult, it requires preliminary basting of one part or ironing. Then the prepared upper part is superimposed on the lower one and connected.
It is mainly used to connect coquettes, patch pockets with the product.
Linen seams the most wear-resistant, since the products in which they are used are subjected to frequent washing. double seam used in the manufacture of bed linen, sometimes summer products (Fig. 40). The first line of the seam is performed by folding the parts inside out, stepping back from the edge of 0.3 - 0.4 - cm, the second line is performed after turning the parts inside out, stepping back from the edge of 0.5 - 0.7 cm.

Stitching seam used in the manufacture of bathrobes, jackets. The most acceptable is a narrow stitching seam, as it is more economical. A wide backstitch is thinner and more elastic (Fig. 41).
Edge seams. Edge seams are divided into edging, hem and obtachny. Edging seams are performed using a braid or a strip of fabric cut along the oblique.
Open seam(Fig. 42) are treated with a strip of fabric, first with a seam 0.5 cm wide, then the strip is folded over and a second line is laid next to the first seam. The width of the strip is 2 - 2.5 cm. In a seam with closed sections, the width of the strip is 3 - 3.5 cm. The strip is pre-ironed in the middle and connected with the first line to the product with open sections (Fig. 43). Then the strip is fixed with the second line. If the strip is single, then one side of the strip is sewn to the product, the strip is folded over and the second line is adjusted (Fig. 44).

Taped seam(Fig. 45) are used mainly for finishing parts of outerwear with the help of a special device or with a preliminary basting.
Hem seam with open cut(Fig. 46) is used in products made of non-shrinking materials.
Hem seam with closed cut(Fig. 47) is used in products made of easily crumbling fabrics. Hem seam width 1.0 - 4.0 cm.
Overlap seam in piping(Fig. 48) is used to process the edges of parts. The joining line of the parts in the turned seam is displaced to form a piping.
Framed seam(Fig. 49) has one line, which fixes two layers of one and one layer of the second part.
Finishing seams. Finishing seams include various folds, relief seams and seams with piping.
Folds there are one-sided and two-sided, finishing and connecting. With a large number of folds in the product, they can be finishing and a small part of the connecting one, since it is desirable to always place the stitching seam of the panels in the fold.

Finishing folds located on the same piece. The required number of one-sided folds is calculated, the middle and sides are marked (Fig. 50 a), they are bent in the middle, they are basted along the marked lines, they are grinded to a certain length (Fig. 50 b), they are ironed and, if necessary, according to the model, they perform the finishing line (Fig. .50 in),
So, if the depth of the fold is 5 cm, mark the middle and set aside 5 cm on both sides, that is, the allowance for a one-sided fold in this case is 10 cm. Accordingly, for folds with a depth of b or 7 cm, the allowance for the fold will be 12 or 14 cm .

Bilateral folds outline in the same way as one-sided, only symmetrically to the center (Fig. 51 a). They bend in the middle, baste, grind, iron, placing the folds in different directions (Fig. 51 b) and, if necessary, according to the model, perform the finishing line (Fig. 51 c).
Connecting one-sided folds are performed in the same way as finishing ones, but a seam is provided here (Fig. 52 a), which is the middle of the fold. The location of the seam not in the middle of the fold can give a defect in the product - the fabric will bulge. From the seam, mark the depth of the fold, bast, grind (Fig. 52 b), iron, if necessary, perform a finishing line. In double-sided connecting folds, the inner part is calculated depending on the depth of the folds, the distance between them and the seams per connection (Fig. 53).
So, if the depth of the folds is 6 cm and the distance between them is 5 cm, then the width of the insert is: (fold depth x 2) + (seam X 2) + distance between the folds. In a specific example, the width of the insert is (6 x 2) + (1 x 2) + 5 = 12 + 2 + 5 = 19 cm.

Raised seams used as finishing, they are performed by stitching the fabric at a distance of 0.1 - 0.3 cm from the kink along the front side (Fig. 54), or, laying the fabric from the inside, make two parallel lines with a distance between them of 0.5 - 0.7 cm and pull the cord (Fig. 55).
Seams with piping are used mainly to emphasize the details of the product (flaps, collars, sides, coquettes). For high-quality performance, a braid or a strip of fabric 2.0 - 3.0 cm wide (depending on the finished type of edging) is folded in half and stitched along the line of the finished part (Fig. 56 a). Then the top and lining of the part are folded face inward and they are turned along the line for attaching the edging or for the line for attaching the edging, then it will not be visible from the face (Fig. 56 b). The part is turned inside out (Fig. 56 c).

In coquettes, patch pockets, cuffs, the piping is first sewn, then the upper part, pre-ironed or swept up, is sewn with a patch seam (Fig. 57).
When making products with two edges, the processing sequence is preserved, only the edges must be pre-connected (Fig. 58). The use of two edges in turning parts is difficult due to the complexity of processing, and in straight parts you can first stitch the first edge, then fasten a strip of the second edge along the stitching seam of the first edge from the inside, putting it on the front side (Fig. 59 a). Then bend the second edge and fasten with a line to the required width (Fig. 59 b). This processing is somewhat more difficult, but the edges are clearer and the seam is thinner.

To reduce the thickness of the seam with edges, their inner sections can be carved with a step, leaving from 0.4 to 0.8 cm (Fig. 59 c). Summer women's and children's products can be finished along the edge with edging and edging at the same time. Kant- a narrow strip of finishing fabric, embedded in the seam or adjusted to the seam. Edging - a strip of any width for finishing the edge of parts - open cuts, armholes, bottoms, etc.
Strips for edging and edging should be cut out at an angle of 45 °: for edging - up to 2.0 cm wide, for edging - 2.5 - 3.0 cm. 0.5 cm, then a line is laid from the inside next to the first one, at the same time a strip of edging is placed from the bottom flush with the cut (Fig. 60 a). The edging goes around the cut, folds over and tucks in, from the face it is fixed with a line at a distance of 0.1 cm from the edge (Fig. 60 b). The use of piping and edging in different colors gives an interesting, elegant effect.

Braid, artificial and natural leather (stripes) can be used as finishing in upper products. Pre-basted braid is adjusted to the part (Fig. 61 a) or to the seam (Fig. 61 b). If the braid is wider than required by the model, it can be pre-sewn on one side, then folded over and stitched on both sides, leaving the excess width inside (Fig. 62). In products without lining, the seams can be stitched on the front side, ironed and closed with a finishing tape (Fig. 63). Or a strip of fabric, cut at an angle of 45 °, is placed on the face when stitching the seam (Fig. 64 a), then it is folded and stitched on both sides (Fig. 64 b), the seam in this case is obtained by ironing. A double-folded strip of twill can be used as a finish (Fig. 65), the probability of the finish falling out in this case is the least.
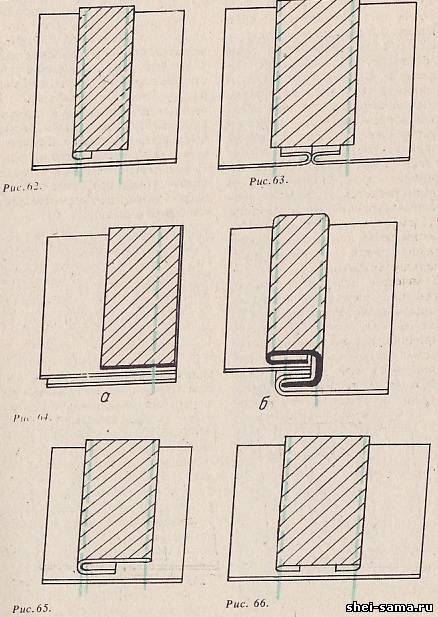
It is recommended to soak the braid before use so that it shrinks naturally before work. It is not recommended to cut strips of fabric along the shared thread, as they will shrink during operation. Stripes cut along the oblique are the most elastic. When finishing with artificial leather, the base may not be in color, then it should be folded (Fig. 66). The stitching of artificial or natural leather is performed without preliminary basting, as there are punctures from the needle, therefore certain skills are required, in this case, outlined lines are needed, which serve as a guide when leading the line.
The sewing machine cannot yet completely replace hand seams. Any clothes for fitting are swept by hand seams. Also, you can’t do without a manual seam to sew on a button or hem the hem of the bottom of a coat, skirt, not to mention needlework and embroidery.
Hand seams have different ways of forming a stitch, but unlike needlework, tailors most often have several types of hand seams, and a basting hand stitch is most often used, for example during the first fitting of a dress.
Hand stitches are mainly used for needlework and embroidery, sometimes for decorative decoration of clothes. Tailors use only a few types of hand stitches. Mainly for basting garments and hand-hemming the hems of garments. Sometimes they are used to designate tucks, folds, reliefs (snares).

This hand seam must be able to do every seamstress. With the help of such a seam, cut details, linings are swept away, folds, gathers, etc. are temporarily connected.
Choose needles for hand sewing that are not long and thin, the threads should be elastic and not thick so that they can easily pass through the fabric without leaving marks from the needle puncture.
The length of the stitches of a hand basting seam can sometimes reach several centimeters, but as a rule it does not exceed one centimeter.

The slip stitch is similar to a basting stitch. It is used for drawing lines of reliefs, tucks, the middle of the details of the product. A cushioning seam is usually performed on one layer of fabric. Stitch length 1-3 cm, distance between them 0.5-0.7 cm.
Silky or copy hand stitch

Silky or copy stitch is used to accurately transfer the lines of darts, pockets, reliefs, etc. on the same paired details of the cut. For example, in order to determine the location of the tuck on the shelf of a women's blouse, it is enough to connect both shelves with snares along the contour of the tuck, and then cut this stitch between the shelves. The remaining pieces of the contrasting color of the thread will show where the tuck line will be chalked.
It is carried out as follows: the parts of the product are folded together with the front side inward. Running stitches are laid along the marked lines with a distance of 0.3 - 1 cm from each other. It differs from a simple running stitch in that the thread is not tightened, but loops are made 1 - 1.5 cm high, depending on how thick the fabric is. After basting the entire contour, the details of the product are moved apart, and the thread loops are cut in the middle.
Currently, copy hand stitching is almost never used, since there are other ways to transfer contour lines.
A round seam is used to finish the edge of the parts.

A round hand stitch can be used to finish the edge of a frill, frill, bottom of a knitted skirt, etc. If you have an overlock that performs a rolled seam, then it is much more beautiful and easier to make such an overlock treatment. The section is bent towards the wrong side by 0.3 - 0.5 cm, 2 - 3 threads of fabric are gathered near the bent section and 2 - 3 threads at the fold. It is not necessary to tighten the thread after each stitch; to speed up work, you can do this after 30 - 45 stitches. Seam density - 3 stitches per 1 cm.
A stitched hand stitch resembles a machine stitch

Often there are situations when the sewing machine cannot make a high-quality shirt, for example, when replacing a zipper in a leather jacket. In this case, a small section of the skipped seam can be sewn with a hand stitch. There is no space between stitches. The needle is pierced from top to bottom. An injection is made at the exit of the previous stitch.
Hand stitch "by the needle" (marking)

This hand stitch is sewn in the same way as a hand stitch, but there is a small space between the stitches. A needle prick is made at half the distance between the input and output of the previous stitch.

Furriery hand seam is performed with simple stitches over the edge from right to left with a small step between stitches. Stitch forward, stitch in place, in the same holes from the needle, and again stitch forward, stitch in place, etc.
Experienced furriers make sure to repeat the stitch, that is, the needle always passes twice into the same hole. Stitch density (0.3-0.5cm) and stitch height (0.3-0.8cm) depend on the thickness of the leather. The thicker the skin of the fur, the higher the stitch, and vice versa.
Sewing is a wonderful and rewarding hobby, but it doesn't come without some challenges. Which actually are not and can be completely solved even with minimal tailoring skills. And today we will raise a question that baffles most beginners in the sewing business.
What are we talking about?
Every novice craftswoman worries about one significant point. Being engaged in tailoring almost any product, one has to deal with such an important operation as seam processing. They perform it in different ways, but most often thanks to a device called an overlock.
Neatly executed on the overlock line, without a doubt, pleases the eye. The product at the same time looks downright "branded". And in general, this technical device can make life easier for any craftswoman.
Unfortunately, not all of us have this expensive device. Meanwhile, any seamstress wants to do all the work from beginning to end beautifully and accurately.
What to do?
Don't let the lack of an overlock fool you. You can perform overcasting. This is not as difficult as it might seem at first glance. Of course, you will have to spend much more time, but the result outwardly can look very decent.
What is an overlock seam? We use it for the final processing of fabrics in the sewing process. At the same time, they can fasten individual panels. Thanks to this, you can get a very neat tissue cut. And there are several ways to perform overcasting seam manually. And in our article we will try to touch on some of the subtleties of this work.
How exactly does a hand-made overcast seam look in the product, the photo below demonstrates quite clearly.

Let's get started
So, we don't have an overlocker. Before doing the overlock stitch by hand, let's estimate our resources. We take the highest quality needles, preferably from a well-known manufacturer. It is best if it is a needle with a special coating in the region of the hole, which in this case is called the "golden eye". Thanks to him, the thread will be easy to thread and slide smoothly through the fabric.
The numbering of needles used in hand sewing has a gradation from 1 to 12. What do these numbers mean? This is a tenfold increase in its largest diameter in millimeters.
Never take a needle for work if it is dull, bent or rusty. And do not forget about the consistency of its thickness and thread. After all, the larger the diameter of the needle, the more serious the effort required to push through the fabric. Accordingly, the thread must be thick enough.
What else you need to know
In addition, you should not take an embroidery needle that has a blunt, that is, specially rounded tip. It will not be possible to make an overlock seam manually with its help. Its purpose is only to draw cross-stitch patterns on the canvas.

It will be useful to use a thimble. It will protect your fingers and nails from accidental damage. Yes, and the sewing process with it will go faster.
It is easiest to process those materials that have a high density and do not crumble very much. Working with them is easy even for beginners. With thin and loose - a little more difficult.
Overlock seam by hand - how to start?
Getting started, insert the needle from the wrong side to the front side. The knot tied on the thread will remain on the back, that is, the wrong side. Then, stretching the thread, bring the needle back (away from you) to the wrong side. With further pulling of the thread, leave a small loop and pass the needle through it along the edge of the fabric without piercing the material.
The loop must be carefully tightened, holding it with your free hand. After which the procedure is repeated. You pull the needle towards you, then back, insert it into the loop and gently pull it up. The result is a series of neat, strong stitches.
What else can be hand overlock seams? There is a so-called twist, it is used as a finishing, making out frills and cuts. When sewing a product in the studio, it is changed to

What does it look like?
Overcasting seam manually in this case is performed as follows. First, a thin, tight roller is twisted from the fabric. Then he gently pulls on the left hand (on her index finger), while holding the middle and thumb of the same hand.
A needle with a thin thread must be prepared in advance. With its help, the roller is tightly wrapped with a thread - stitches, which should fit together as tightly as possible. The direction of the puncture with a needle is towards yourself. The thickness of such a roller should not exceed a millimeter.
What is a loop stitch?
Sections of the product can be processed by the so-called manual To make a loop, you need a thread of sufficient length, it should be enough to process a whole loop or at least half.
The procedure in this case is as follows:
- Having built the first loop, we thread the beginning of the thread into it and tighten it. Then the thread is carefully laid on the side surface of the cut.
- In the case when the thread is already running out, leave its end and use a new thread to make the next stitch without tightening the loop.

- The end of the old thread and the beginning of a new one are threaded into the loop formed, after which the loop is tightened. Both tips should be laid on the sidewall of the cut.
- Similarly, the desired number of stitches is performed. The ends of the threads are pulled up and cut off.
- The last of the stitches is repeated twice in the same place, with the fabric turned inside out. The needle is brought under a couple of last stitches, pulled out and cut with scissors.
Having gained some experience, any of the novice craftswomen herself will find out which of the seams is more convenient for her to perform and what exactly comes out neater. Then she will be able to decide on the preferred method of processing tissue sections.
Other hand overlock stitches
There are other varieties of such seams. One of them, called oblique, is quite simple. When processing the fabric, the stitches do not tighten much, arranging them obliquely so that from 3 to 4 pieces are placed in each linear centimeter of the cut. In this case, the length of each of the stitches should be about half a centimeter or a little more.

Slightly more difficult is the overcast seam, called the cruciform. It is done almost like the previous one, but, having reached the edge of the cut, you should turn around in the opposite direction (without turning the fabric over) and move in the opposite direction. The stitches overlap each other crosswise.
As a result, the cut of our product is decorated with a row of neat crosses. It should be ensured that throughout the entire seam the uniform height of the stitches, the step between them, as well as the same angle of inclination are observed - the stitches must be parallel, otherwise the work will not look neat.
More options
How to make an overlock seam manually in a more complex version, with imitation of overlock processing? They work similarly to the case with a buttonhole, but at the same time, the needle should be pulled through the top of the triangle of stitches twice.
The same technique must be used when processing the corners of the product. The needle must "visit" each apex of the triangle at least twice!
Let's hope that this short article turned out to be useful to our hardworking readers, and now it is clear to everyone that small difficulties in the sewing business are quite surmountable. Good luck to everyone in the development of this beautiful form of creativity!