Do-it-yourself goldfish using papier-mâché technique. Master class with step by step photos. Pasta goldfish DIY pasta fish
Children's crafts are a fertile field for an adult, because the kid is interested in everything that can be touched without fear of spoiling or creating something on his own. Any handy material found in the bins of your house can give room for such a pleasant work: buttons, beads, cotton wool, colored napkins and even ordinary pasta. How many interesting things can be done with pasta and noodles: a Christmas tree, a snowflake, a car, a flower or a cartoon character. Craftsmen-dreamers have long noticed and use this material for their work. Moreover, now a wide variety of shapes can be found in the store: shells, curls, spirals, stars, or even ready-made figures of small dolls, cars, Christmas trees, etc. You can decorate and revive any simple craft with pasta. Today we will do this with the Golden Fish applique.
Let's start with a blank background, on which we glue the yellow body of the fish, then define the head and eye on it.
Now let's begin to carefully lay out and glue the pasta like fish scales. For better work, you should first just lay out the drawing of the scales, and then, adjusting so that they do not look over the edge of the fish's body, glue it. 
We will make the fins from two small paper fans, assembled with an accordion and glued together on one edge. In the same way we will make the tail, only of a larger size. We also carefully glue them next to the body. 
Now all that remains is to arrange the seabed. To do this, we use shell macaroni, laid and glued along the bottom edge of the work, and with algae threads made using the "curved accordion" technique: we collect a long tape into an accordion not in even assemblies, but randomly, and then, completely assembled, cut with one " with a wave of "scissors into two halves. Then we glue the algae, to add volume, glue only their tips with glue. 
The goldfish is a symbol of good luck in many countries. And everyone knows that we ourselves are the smiths of our own happiness. Therefore, today we will learn how to make a goldfish with our own hands and will not expect it from someone as a gift. This article contains the most interesting and simple ways to make a goldfish, you just have to choose the most suitable one for yourself.
Of unnecessary material
From junk material, you can make an excellent goldfish that will decorate your home or become the central figure on any postcard or painting. We will now show you how to do this.
What we need to take:
- small thickness cardboard;
- acacia leaves or maple seeds;
- ordinary PVA glue;
- a can of gold paint;
- scissors;
- adhesive tape with double-sided adhesive surface;
- regular pencil;
- medicine blister pack;
- black button;
- hairdressing varnish;
- shiny ribbon.
The first thing we need to do is draw the outlines of our fish on cardboard. The larger the seeds, the larger the fish should be. We cut off the excess cardboard so that we only have the working form of the fish. Starting with the tail, cover the form with glue and put leaves and seeds on top, leaving no gaps between them. These materials will act as fish scales.
Next, we need to tackle the head of our craft. We form the head from the same cardboard. At the point where the eye will be, we make a hole and attach a plastic mold from the blister there. Do not forget to put a button in the blister - it will serve as a pupil.
The first stage has been completed. Next, cover the product with gold paint and let it dry. Now let's finish working with the head of our fish. We glue the blister with a button inside on double-sided tape to the head of the fish. See how it is done in the photo. Draw on cilia with a regular pencil. You can also paint on a mouth or a few scales for the fish. The final stage: so that the paint does not get dirty, we cover the fish with hairspray. We tie a shiny ribbon on the tail.
The master class is over, our fish is ready. It remains only to find a use for it.
Unusual solutions
Pasta fish is made very simply and very quickly.
A shape is cut out of thick paper or cardboard. The eye and the outlines of the head are drawn.

Dry pasta is covered with transparent strong glue and applied to the mold.

By bending small pieces of paper in the shape of a fan, we get the tail and fins of our fish. We glue the parts to the places where they should be.

We decorate the rest of the canvas with paper in the shape of algae. You can also use pasta of a different color as decoration, they will become pebbles. Or attach real beads or pebbles to the bottom of the painting.

The pasta fish is finished. Such a picture can definitely be suitable as a craft for a kindergarten or as a decoration for a children's room.
Video, how easy and simple it is to crochet a goldfish, even if you do not know how to knit. The lesson provides a detailed diagram and description of the knitting process.
DIY beaded fish:
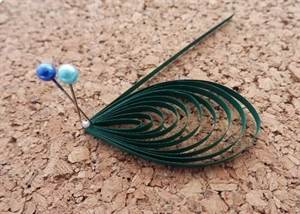
In quilling technique
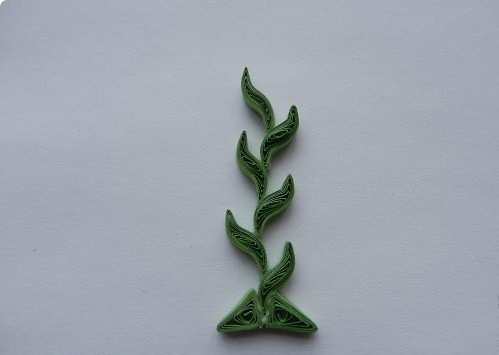
Any quilling patterns turn out to be very unusual and mesmerizing, our goldfish is no exception.
For work we need:
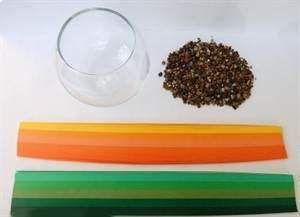
- pieces of paper of various colors (shades of orange and yellow for goldfish. For algae, shades of green are suitable);
- pebbles, rhinestones or beads to saddle eyes;
- an ordinary toothpick;
- PVA glue and super glue;
- plastic cap.

If you are planning to put your fish in the aquarium, you need to:
- a small glass aquarium or round vase;
- pebbles.

Additionally prepare:
- a ruler with round holes;
- pins;
- stand for work.

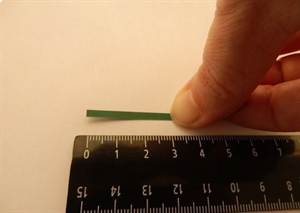
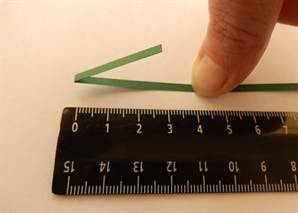
Cut orange colored paper into identical strips and use a toothpick to roll the strips into a paid roller. We put the roller in the round hole of the ruler and release it so that it can bloom. The hole should be medium in size among the rest. We take out the roller and glue its end.

We make six of these rollers and flatten each of them in the middle.

We glue six rollers together as shown in the picture, take a piece of paper strip, wrap the glued rollers with it and glue the end of the strip in the same way.
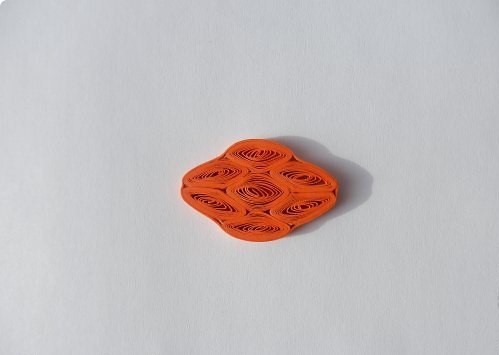
We twist an additional roller, glue it in the center of the workpiece and coat it and the edges of the workpiece with glue.

We twist the second exactly the same part, which will serve as the body of our fish, and glue it to the first. Do should protrude slightly in the center on both sides.

We glue our part with a strip of paper.

Let's move on to the second stage. We need to make eyes and fins for the craft. To do this, we take two pieces of colored paper, one lighter, the other darker, and glue their ends.

We twist a roller from the resulting strip and lower it into a larger hole. The dark paper should be on the outside.

We flatten our rollers and fold them around the edges.

We attach the parts with glue to the body of the fish.

We put the eyes on the glue on both sides.


In the same way, we glue three bright and two light stripes together and after twisting we lower them into a thirty-six mm shape.

Take a couple of pins and use them to move the center point to the side. We fix it with pins, drip a little glue and wait until it dries.

Once the glue has dried, bend the roller like this.

We make a tail from larger and smaller parts and glue it.

We attach the third from above.

Fourth from the bottom.


We glue the tail to the fish.
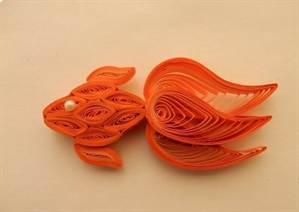
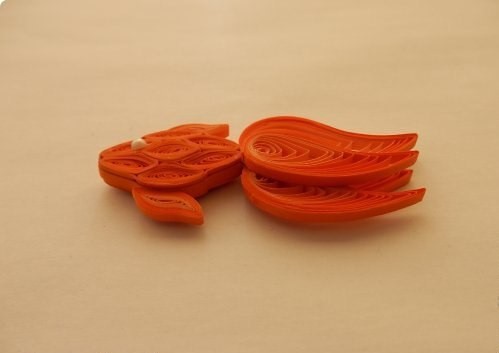
Here's how we did it.


New decor ideas are always great. And if at the same time only natural, harmless and at the same time budget materials are used, this is doubly great. Not only children, but also adults like to create crafts from pasta with their own hands. A large number of detailed step-by-step instructions and a variety of shapes and sizes of pasta allow you to choose the right option for both the baby and the professional designer.
What can be made from pasta?
Horns, shells, spirals and bows, long and short, narrow and wide - such a wide assortment provides endless possibilities for the embodiment of any flight of fantasy. Most often, pasta crafts are used:
- as home decor. An exclusive samovar or an openwork teapot will emphasize the individuality of the kitchen much better than plastic consumer goods from China;
- to develop creativity and improve fine motor skills in children of any age;
- in order to restore body functions after a variety of injuries;
- as comic gifts and themed crafts for schools and kindergartens.
There are practically no restrictions on the size and shape of the finished product. The main thing is to properly fasten the individual parts and carefully think over the shape.
Interesting decor ideas can be gleaned from the video:
Preliminary preparation
Initially, it is worth deciding on the choice of the model and shape of pasta, which will best allow you to embody the idea.
The easiest way is to pre-purchase several varieties of pasta. Spread them out on a flat surface and try several options for combining different types of pasta.
In this case, you need to pay attention not only to the resulting pattern, but also to the number of points of contact of individual pasta. The reliability of the future design will depend on this.
Particular attention should be paid to the places of folds and connections of individual structural elements.
After choosing the design and shape, the pasta should be sorted by size. In the same pack, butterflies or shells can differ from each other in size by 20%. When preparing a dish, such trifles are not important, but when making a serious craft, such a serious error in size can ruin the final result.

It is not worth measuring every detail with a caliper, it is enough to divide the pasta into more and less large ones. In the future, for each row, it is worth taking pasta of approximately the same size. This will make the craft look smoother.
How to paint pasta for crafts?
If you are not satisfied with the natural color of the pasta, you can change it. There are many ways to do this.
Food colors
To do this, the selected color must be diluted in a small amount of water. Some dyes give a brighter and more lasting color when added with vinegar, but not all, so it is better to follow the manufacturer's instructions.
Then the necessary spirals or shells are placed in the coloring solution, and wait a few minutes. After that, the products are removed and laid out in one layer on foil or cling film for drying. During the drying process, it is advisable to mix them from time to time and make sure that they do not stick together.

Natural juices
Juice should be squeezed out of bright vegetables and fruits. Beets, carrots, blueberries, blackberries, and cherries work well. If you don't have a juicer at hand, you can use a grater or blender, and then squeeze the juice out of the resulting mass.
Natural juices paint worse than food colors, so the workpieces will have to be kept in the juice for 30-40 minutes to obtain a sufficiently bright color.
Poor-quality pasta can become sour during this time. Therefore, when choosing this method of dyeing, preference should be given to products from durum wheat.

Spices
In this case, only bright spices are suitable: saffron, turmeric, barberry, etc. To do this, you need to prepare a rich broth from them and cool. Then place the blanks in it for a few minutes. The intensity of the color will directly depend on the saturation of the broth.

Zelenka or iodine
The sunny color and color of young grass can be achieved in 10-15 minutes by placing the required type of pasta in the necessary medicines.
Acrylic paints
This type of paint gives bright colors and leaves no marks on hands after drying. For staining, it is enough to dilute the desired color in a little water. A bright color can be achieved by placing the pasta in the resulting solution for a few minutes.

Nail polish
This method of staining is not particularly popular for three reasons:
- unpleasant odor;
- high varnish consumption;
- not suitable for children's creativity.
Despite a lot of disadvantages, this method gives a very bright and glossy color. Therefore, it is used to paint small details that need to be emphasized.
Aerosol paints
Paint cans are convenient because they give an even saturated color and have a very wide palette. With their help, you can paint pasta at the blank stage, or paint an already fully assembled figure.
But when working with a finished craft, you can only achieve a single color. It should be remembered that this staining method, like varnish, is not suitable for children's creativity.
Do not take gouache for staining. Despite the fact that it gives a rather bright color, even after complete drying, the paint is "taken".
In addition to the fact that gouache stains hands, when the individual elements are connected, the glue leaves untidy stains on the paint. Such a product looks very sloppy.

How to glue pasta for crafts?
Best suited for pasta gluing:

If small children will participate in the manufacture of crafts, then the only option for gluing is PVA.
School-age kids can handle a glue gun or super glue just fine. But when using the last two methods, it is advisable to carry out the work under the supervision of an adult.
Crafts for children
There are infinitely many options for children's crafts. Even kids 2-3 years old can cope with the simplest ones. Such a family pastime not only develops fine motor skills of the child well, but also teaches you to think figuratively, which is useful at any age. These activities are very helpful in developing speech and improving the bond between the child and the parents.
Beads
A vanguard necklace requires a minimum set of tools and materials:
- base for beads (tape, fishing line, cord or nylon thread);
- pasta of various types. The required option is selected based on the age of the bead manufacturer (the lower the age, the larger the details) and the selected design. It is not at all necessary to take tubes, feathers or other products with a hole inside for these purposes. Spring pasta, bows, or stars are quite suitable, the main thing is that they stick well to the fishing line, thread or ribbon;
- paints. If children are involved in the manufacture of beads, then only food or natural dyes can be used, for adults there are no restrictions;
- oilcloth. It can be used to dry pasta after staining, or just use it to protect the table from paints and glue;
- thick needle. For stringing;
- glue gun (if necessary).

Manufacturing steps pasta beads are pretty simple:
- Choose a design. It is best to line up different types of pasta and play with their order. You can draw a sketch of the future product on paper and consider it in several colors.
- Decide on the length. To do this, wrap a thread or cord around the neck and measure the required length, taking into account the strings.
- Coloring. Using the selected method, paint the individual parts in the desired colors and dry. When using nail polish or spray paints, work is best done in a well-ventilated area.
- Assembly. String the "beads" in the right order (or stick with a gun) and tie the ends of the cord.
Using the same instructions, you can make a bracelet for an arm or a leg.

Applications
Animals, birds, fish, insects, ships, rockets, houses and cars - you can make anything from pasta. The main thing is to adequately compare the age of the manufacturer and the complexity of the application.
In this case, you should not dwell only on pasta. Applications can be supplemented with colored paper and cardboard, beads, cotton pads, bulk products (coffee, cereals, legumes), herbarium leaves, etc.
The action plan is quite simple:
- put pasta and other elements of the application (if any) on the base (a sheet of cardboard or thick paper);
- for small children or complex applications, it is advisable to make marks on paper (where which part should be located);
- if necessary, paint individual pasta in the desired color and dry them thoroughly;
- glue the applique elements on a sheet of paper in the desired order.

This application is perfect as a craft for school or kindergarten. It requires a minimum of time and money, while looking very original.
You can also place the applique in a photo frame of a suitable size and decorate the wall of a child's room or kitchen with it. This decor adds coziness and personality to the room.
Sun
The natural color of the pasta even allows you to abandon the dyes. But if you wish, you can add brightness to the craft using a decoction of turmeric, carrot juice, or food coloring for Easter eggs.
There are two ways to make the sun:
- the center is made from scrap materials: plasticine, salt dough, etc. Or simply draw with bright pencils or a yellow felt-tip pen. The rays are made from different types of pasta. For these purposes, spaghetti, tubules, feathers, spirals, etc are well suited;
- the whole craft is made from pasta. They can be of one type or several. In the second case, more rounded species (wheels, flowers, shells) are taken for the center, and straight and long ones for the rays.
Both options can be additionally decorated with bows or flowers painted in a brighter color. Or you can make a cute smiling face for the sun out of colored paper, buttons, or pasta of a different type and color.

You can complement such an applique with clouds or a rainbow of colored pasta. And by removing the rays, you can make a cute kolobok.
Small house
This voluminous craft is more difficult to execute, but it looks more spectacular. For children of kindergarten age, it is unlikely to be suitable, but schoolchildren will quite cope with the task.
To make a house you will need:
- cardboard. Minimum of nine sheets. Old postcards or candy boxes are fine;
- pencil;
- ruler;
- wide tape;
- at least three types of pasta:
- long pasta for logs;
- shorter (feathers or tubes) for the foundation;
- noodles for beshbarmak or an analogue for tiles;
- flowers or shells for decoration (platbands, etc.) at will.
- scissors or utility knife;
- glue gun.
Initially, the frame is made of cardboard.

After making a cardboard house, it is pasted over with painted pasta with a pistol. The gluing sequence is simple:

In this case, you should not use PVA glue to glue pasta, the base can lead.

Letter
A simple version of the application for children 5-6 years old has several advantages at once:
- the child is able to cope with this craft without the help of adults;
- in addition to the development of fine motor skills, the child in the process of creativity "gets acquainted" with the letter and cheerfully learns the alphabet.
To make a craft, it is advisable for a child to issue a stencil: an A4 sheet, on which the outline of the desired letter will be printed (it must be large, on the entire sheet).
In addition to the sheet, you will need any kind of pasta. Products painted in different colors arouse more interest in children than in natural colors. If the child will do the craft himself, it is better to choose the type of pasta that does not have to be cut into pieces during the process of making the applique.
Depending on the age of the child, the letter can be made either from one type of pasta, or different types of pasta can be taken for the outline and the middle.

Hedgehog
Easy and safe craft for preschool children. All you need is a few colors of plasticine and some spaghetti.
From plasticine, you need to roll a drop-shaped figure the size of a child's fist - this will be the body of a hedgehog. Next, 3 small balls are made from a contrasting color - a nose and eyes. They make a muzzle on the pointed part of the "drop". Break the spaghetti into equal parts - these will be needles. Further, the hedgehog carcass is evenly covered with "needles".
If the "needles" are made of spiral pasta, and the plasticine muzzle is covered with a layer of small flowers from the pasta, you can get a glamorous hedgehog. Decorating it with beads and bows, you can achieve a simply stunning effect.

gold fish
Another kind of simple craft for young children. For manufacturing you will need:
- yellow and blue colored paper;
- glue;
- felt-tip pens;
- any pasta shaped like scales.
The blue leaf is the background. The body and fins for the fish should be cut out of yellow colored paper. To make the applique more vivid, the fins can be made with contrasting ones (red, orange, purple, etc.).
Next, the fins and tail should be glued to the background, and the body should be glued on top of them so that it overlaps the joints. The eyes, mouth and head of the fish are drawn with a felt-tip pen. After that, "scales" are glued to the body. You can use pasta in a natural color, or pre-dye it in a brighter color.
Yellow colored paper and felt-tip pens can be replaced with cereals of the desired color. With older children, the tail and fins can be made from pasta, so the fish will be more elegant.

Little bird
There are several options for making a bird from pasta. For children 3-7 years old, a craft in the form of an applique is suitable. Teens and adults can craft a functional bird. For example, in the form of an original container for various little things.
The application is easy to do. On thick paper, you need to outline the contour of the future bird. The ego can be drawn, printed, made from colored paper or plasticine. Then brightly colored pasta feathers are glued to it. Better to take openwork and grooved variations of pasta. This will make the bird look more elegant.

It is much more difficult to make a volumetric structure. Beginners should not undertake such a craft. For a candy-bowl bird, you first need to make a "skeleton" - a base made of thick cardboard or similar materials. Then the workpiece is glued over with horns using a glue gun or super glue. PVA in this situation will not cope. After drying, the finished product is painted with acrylic paints in the desired colors.

New Year ideas
The eve of the new year is the time for school crafts and decorating your own home. Original pasta crafts can be a wonderful New Year's decor. Making jewelry together will help strengthen the relationship between parents and children and set the family up for a festive mood.
Christmas wreath
Wreaths painted with gold or silver spray paint look most impressive. But if small children will take part in the manufacture of crafts, preference should be given to food coloring. They also come with a metallic or pearlescent luster, although they give a less bright color.
To make a wreath you will need:
- thick cardboard;
- scissors;
- superglue, PVA or glue gun;
- loop from tape or cord;
- various types of small pasta (preferably grooved).
You can complement the craft with a decor of cones and needles. They can be artificial or natural. You can also use beads, ribbons and bows.
The wreath making workshop is pretty simple:
- a base is cut out of cardboard, most often it is a ring. But romantic people can make a heart-shaped Christmas wreath, and creative people can give free rein to their imaginations;

- a variety of pasta is glued to the base. It is necessary to ensure that the free space between the individual elements remains as small as possible;
- the workpiece is covered with paint from a spray can. Pre-painted pasta can be used, but spray paint is better. It will reliably hide the base and minor imperfections (glue drops, etc.).
If necessary, the decor is complemented by ribbons, cones, bells and other decorations.

Snowflakes
A cute openwork snowflake can be an excellent craft for kindergarten, a decoration for a Christmas tree or a gift to your beloved grandmother.
Most often, white, gold or silver paint is taken for staining, but there are other options. You can add sparkle to a snowflake using beads or rhinestones.
Best of all, various types of small openwork pasta are suitable for making this craft: flowers, stars, figurines. This makes the snowflakes light and airy.
The workpieces can be pre-painted, or the finished product can be painted in the desired color.
Initially, a "sketch" is laid out in order to find the optimal shape and size of the snowflake. After choosing a model, the parts are glued together. It is better to choose superglue or a glue gun for these purposes, so the product will be stronger.

A snowflake is collected from the center to the edges, evenly, row by row. For more shine, the craft can be decorated with beads or sprinkled with sparkles.
If a Christmas tree is decorated with such pasta snowflakes, a special loop will be required. You can glue it on, or you can just stick the cord through the hole in the pasta.

Christmas tree decorations
In addition to snowflakes, several types of toys can be made to decorate the Christmas tree:
- balloons;
- asterisks;
- angels;
- Christmas trees;
- bows;
- hearts.

The easiest way is to make bows, for this you just need to paint them in a beautiful color and glue or tie loops to them. You can add sparkles or beads.

To make an angel, you will need several types of pasta. For an outfit, it's better to take something fluted. When making a small craft, wings can be made from a bow, and hands from horns. The head can be molded from plasticine or made from a foam ball.

Bulky balls will require more skill, but they also look more spectacular. In addition to the standard set of materials, you should get an inflatable ball. It needs to be inflated to the size of the intended toy. Next, the desired decor is glued onto it in rows from bottom to top.

To make the ball move less during operation, it can be placed in a glass or mug of the desired diameter.
The rows should go all the way to the top so that there is as little white space as possible.
When the decoration is complete and the workpiece is dry, the ball must be carefully blown off. This can be done either through its natural opening or by carefully puncturing it. Then the rubber ball should be pulled out over the top edge of the craft. This must be done carefully so as not to damage the fragile decor.
When using a glue gun, be careful not to glue the craft to the ball. It can burst from hot glue, or damage the workpiece when the ball is deflated.

Next, the upper hole is neatly decorated, and a loop is attached to it for hanging on a Christmas tree. After complete drying, the craft can be painted with spray paint and sprinkled with sparkles (if the workpieces were not painted in advance).

Herringbone
Making a pasta tree is pretty easy. She can decorate an office or home, or become an original New Year's craft for school or kindergarten. For manufacturing you will need:
- a sheet of thick paper;
- scissors,
- compass;
- glue;
- dyes;
- glue;
- small pasta (bows, horns, feathers, spirals, etc.).
The craftsmanship technique is simple. You need to glue a cone out of paper - the parameters of the finished product will depend on its size. To make the lower part smoother, it must first be rounded. To do this, draw a circle of the desired diameter using a compass, and cut a circle along the line.

The top of the tree can be decorated with pointed macaroni, a bow, or a star.
The craft can be painted with acrylic or spray paint. And decorate with "Christmas decorations". Beads and bows of a contrasting color can be used as "toys". When making a completely natural Christmas tree, decorations can be made from cereals and seeds painted in bright colors.

Symbol of 2020
A total of seven shells of different sizes will allow you to make a cute mouse - a symbol of 2020.

The largest shell (usually sold for stuffing) will serve as the torso. 4 small shells - paws are attached to its lower part. On top you need to glue two larger shells - ears.
The tail can be made from a piece of spaghetti or a spring, or from a thin cord. The eyes and nose can be glue droplets or small beads.
It is better to paint the craft with spray paint, it will hide the glue at the joints. If the mouse has to be painted with gouache, then after the paint has dried, it is advisable to cover it with a layer of PVA. The dried glue will become completely transparent, but will add shine to the crafts. At the same time, the gouache, covered with a layer of PVA, will not leave marks on the hands.

Card
Hand-made postcards have been appreciated at all times. A cute handmade gift is much more pleasant to receive than a stamped creation of a local printing house.
Adults and older children can come up with a custom design on their own. For kids, it's better to print ready-made templates. There are a lot of ideas on the Internet for making a variety of pasta pictures for children.

For making a postcard, it is better to take designer cardboard. It costs more than usual, but the original texture and rich palette will make such a gift unforgettable.
The design of the postcard can be chosen for any holiday. Over the years, the most popular variations on the New Year theme have been Christmas trees and snowflakes.

Garland
Such an unusual decoration can become a highlight of the New Year tree. The main thing is to choose the right color.
The garland should be eye-catching, therefore, the more sparkle and shine, the better. You can make it from pasta of any shape, but the easiest way is to work with pasta bows.
They must first be painted in the desired color. For extra shine, they can be additionally covered with a layer of PVA and sprinkled with plenty of sparkles.

After drying, each unit must be tied, or glued to a pretty thread or thin cord.
You can also make a garland from other types of pasta. It is very convenient to string all kinds of tubes on a thread, while the embossed and curved shape can create a very original design.

A finished electric garland can be used to make "shades" from pasta shells. But when implementing such a design, you should be extremely careful. If the garland is defective, the pasta may catch on fire.

Candlestick
A pasta candlestick can decorate a New Year's table, or become an original decor for the kitchen. It can be done in two versions:
- a fire-resistant container, for example, a glass cup, is taken as a candlestick, and pasta is used only as a decoration;
- the candlestick is made entirely of pasta, without auxiliary materials.
It is better to use the first option, so the risk of fire is minimized. In the second case, when the fire comes into contact with the pasta, the structure may catch fire.
In the first case, the selected container is simply pasted over with various pasta, and the whole craft is painted in an arbitrary color scheme (shades that imitate various metals look better).
In the second version, the same glass can serve as a template for crafts, but first it should be wrapped with cling film. After that, it is just the same pasted over with pasta on all sides to the desired height.
The design must be chosen so that the individual pasta is in good contact with each other. After the glue dries, the glass is carefully removed, and the craft is carefully freed from the cling film. The finished product can be painted and decorated with additional decor.


The first method can be used to make a pasta mug or vase. Such a craft can be a very unusual addition to the kitchen.
On March 8
A special gift for March 8 or for Mother's Day can be a beautiful applique or craft made of plasticine and pasta.
Flowers
Not everyone loves artificial flowers, so such a gift should be done carefully. Better to use pasta flowers as a school-themed craft for March 8th.
To make flowers you will need:
- wire or long wooden stem skewers;
- colored pasta (preferably grooved);
- glue gun or superglue;
- additional decor and corrugated paper (optional).
The manufacturing procedure is quite simple:

If "leaves" are needed, then one long and several shorter wires are twisted together from one edge. The long one will play the role of a stem, and the short ones will move away from it at the points of attachment of the “leaves”. After giving the base the desired color, colored pasta leaves are strung onto short pieces of wire and glued.
Casket
The pasta box is made in the same way as a candlestick. If it will be used only as a decoration, it can be made without a base, but such a craft will be very fragile.
When making a functional box (if something will really be stored in it), it is better to use the method with a base. As a base, you can use plastic disposable containers from supermarkets or metal boxes for tea and biscuits.


When making a box without a base, you can use a suitable box or jar, previously wrapped with cling film, as a template.

Even spaghetti and delicate flowers are suitable for making the box. Any of the options will look original and unusual. The general style and strength of the box will simply depend on the type of pasta chosen.
This craft is considered quite complex, so it is advisable to first draw up a diagram on paper. During the manufacturing process, you need to carefully monitor the geometry of the craft, otherwise the box will come out skewed.

On February 23
Defender of the Fatherland Day can also be a great occasion to make a special pasta craft.
Tank
One of the most requested options. The popularity of this craft is added by the game "WOT", which is played by everyone: from teenagers to pensioners.
The easiest way is to make a pasta tank in the form of an applique.
For wheels, flower pasta works best. It is better to make the body and barrel from the same type of pasta, painted in the desired colors. The smaller the pasta, the easier it will be to shape the body.

A more complex version of the tank is a volumetric one. Preschool children will cope with such a craft, only with the help of adults. For schoolchildren, such a tank usually does not cause difficulties.

Wheels can be made from the same flowers. For the body, lasagna sheets or flat noodles are suitable. They will need to be cut into the desired lengths using a clerical knife. Macaroni mafaldine seems to have been created for the manufacture of tank tracks. For the muzzle, it is ideal to use a tube of the correct length and diameter.
Given the complexity of the shape, it is better to paint the parts before assembly, otherwise it will be difficult to paint over hard-to-reach places with high quality.

Star
Pa compared to a tank - this hack is very simple. Even a small child is able to make a pasta star on February 23rd.

The set of materials and tools is minimal:
- a sheet of cardboard;
- scissors;
- pencil and ruler;
- glue;
- pasta;
- dyes.
Draw a star of the correct size on a piece of cardboard. It is advisable to help a small child at this stage.

For older children, the task can be made a little more difficult by making the star more voluminous. But in this case, PVA glue will not be enough. Better to use "Moment" or a glue gun.

Airplane
It is easier to assemble such a craft from flat and thin pasta: spaghetti, noodles, or lasagna sheets.
To make the wings and tail, it is better to draw a sketch on paper, cover it with transparent cling film and glue the wing plane on it.
To assemble a rounded body, a base is required. If you do not have a suitable cone-shaped object at hand, the desired shape can be made from thick cardboard. Next, the workpiece is wrapped in cling film and spaghetti is glued onto it in a circle.
The craft will be stronger if you use spaghetti of different lengths for the body and glue them in a checkerboard pattern. Wheels, like those of a tank, are easiest to make from pasta flowers.

By changing the color to red, gifts for February 23rd can be turned into fire-themed crafts.
Easter
Unusual pasta crafts can diversify Easter gifts.
Easter egg
Using pasta, you can make unusual egg decorations. To do this, you will need to glue the surface of the egg with small flowers or stars. It is better to choose simple patterns: lines, circles, points. The top of the Easter egg can be decorated with a bow or a star.

You can also make an Easter egg entirely from pasta. It is done by analogy with a Christmas tree ball.
For the base, an egg-shaped inflatable ball is taken. It is inflated to the desired size and pasted over with pasta. It is not necessary to glue the entire surface of the ball. You can leave the "window", and put a toy chicken or hare and colored chicken eggs inside.

Such decor will add atmosphere to the bright holiday of Easter.
Basket
When making this craft, it should be borne in mind that the pasta basket will only serve as a decor. You shouldn't carry it by the handle or store anything in it.
It is made, like an egg, on the basis of an inflatable ball. But in this case, only the lower part of the ball is pasted over with pasta.
The base for making a pen can be made by curving a strip cut from cardboard or a plastic bottle.
It is advisable to decorate the junction of the basket and handle with decorative elements.
To make the craft stable, small legs should be made at the bottom.

Church
You should take up a pasta church only if you have the skills in making such crafts. The result of the work looks very impressive, but such a craft is very easy to spoil.
It is better for novice craftsmen to make a church on a frame. To do this, you need to cut out the base of the desired shape from the foam and decorate it with pasta trim. After spray painting the foam and pasta will look like one piece. Such a temple will look harmonious and complete.

Masters of their craft can swing at a pasta church without a frame.
To make the craft smoother, it is better to assemble the pasta structure around the box wrapped in cling film. If the church is in several tiers, then the lower tier is assembled first. The box is carefully removed. Its place is taken by a narrower one (you may need a stand for it) and the next tier is assembled, etc.

For any occasion
A macaroni gift can be made absolutely for any occasion. Such a present will definitely be in the spotlight.
Painting
A picture of pasta is a larger-scale type of applique. It can be made in any color and size. A picture made for a specific interior will add coziness and individuality to any apartment.

The level of complexity of the job should be selected based on the skills of the manufacturer. The painting can be something abstract, or depict a specific object.

To add originality to the craft, you should choose a base with an unusual texture for the background. Or you can supplement the image of pasta with other free-flowing ones. A picture of cereals, coffee or seeds will look no less original.
Panel
The difference between such a craft and a painting is the fabric base. It can be rough burlap or lightweight organza. For a large panel, you can combine several types of bases. The main thing is to feel and maintain the general style of the craft.

The panel can be of any shape and size. If individual parts require painting, they must be painted before starting work so as not to spoil the original background of the craft.

Samovar
A lacy pasta samovar can be a great gift for a housewarming party, mother's day or any other holiday.
To make it, you need an inflatable ball or glass jar of the right size.

The base is pasted over with pasta. The more delicate they are, the more spectacular the samovar will look after painting.
You can use a smaller cup or jar to make the top.
Before removing the base, you need to make sure that the glue is completely dry. It is better to paint a samovar with spray paint.
The samovar can be a separate figure, or part of a pasta set.

Frame
With the help of pasta, you can decorate the finished photo frame, or make it from scratch.
Even a child can handle decorating a finished photo frame. In addition to paints, glue, pasta and the frame itself, nothing is needed in this case.
Pasta is randomly glued to a photo frame. After drying, the craft is painted in the desired color. You can complement the design with beads, lace, coffee beans or cereals.
To make a photo frame, you will need thick cardboard, paper, a stationery knife, glue, paint and pasta.
The manufacturing instruction includes several stages:

Such a DIY craft, complete with a commemorative photo, will be a wonderful gift for any occasion.
Tea-set
Another large-scale craft can be a pasta tea set. It can be made in any configuration. Cups, saucers, spoons, teapot, tray, samovar - all these can become elements of the service.
All parts of the service are best made on the basis of. As a frame, you can take balloons, or real dishes wrapped in cling film (the main thing is to choose the shape so that the base can be taken out of the finished craft).

Topiary
To craft an exclusive tree, you need a base. It is most convenient to purchase a foam ball. They are sold in stores for Hand made. You can decorate such a ball with any kind of pasta. They can be located along the surface, or perpendicular to the plane of the foam blank. So the tree looks more voluminous and natural.

Depending on the season and the holiday, you can make an autumn pasta tree in golden colors, or a winter tree in silver ones. Crafts on the theme of autumn can be additionally decorated with leaves.
Winter variations can be supplemented with icicles and snowflakes. Butterflies are perfect for summer topiary, and half-open buds will reveal the theme of spring.

Topiary not tied to the season can be supplemented with bows or beads.
The top of the craft can turn out to be quite massive. To make the structure stable, the lower part can be weighted with the help of plasticine.
Templates, stencils for applications
Examples of finished works


Master class: "Goldfish". Technique: papier-mâché.
DIY goldfish for children from 8 years old. Master class with step by step photos.
Lavrova Tatyana Nikolaevna, teacher of the GPA MBOU - secondary school No. 11 named after G.M. Pyasetsky in OrelThis fish is not simple
This fish is gold.
You will find understanding with her -
Fulfills three wishes!
Description: I propose to make a hand-made article with children, using the technique of papier-mâché on the theme: "Goldfish". This master class is intended for teachers of additional education of children's associations, primary school teachers, as well as for those who love handicrafts.
Purpose: The material can be used in elementary school in reading lessons when acquainting with the work of A.S. Pushkin, classes in fine arts, at a labor lesson and circle work, as well as for interior decoration.
Target: making paper crafts.
Tasks:- acquaintance with the technique of making "Papier-mache";
- development of interest in nature, curiosity, fantasy;
- fostering perseverance and accuracy when performing work.
Material and tools:

-PVA glue
- pieces of newspaper or any paper
-shiny gold-colored paper
- corrugated paper of blue, cyan and white colors
- eyes
-two wires and a small piece of plexiglass
Progress:
1. From the fabric we sew the blank of the fish and stuff it with the material at hand.

2. Wrap the workpiece with stretch and apply pieces of paper, smeared with glue.
We glue the first layer of "Papier-mâché" on the workpiece along the entire perimeter, let it dry and apply the second layer - in total, you need to make four such layers.
3. To make the wave, I used a piece of plexiglass and two wires. The distance between the wires is sealed with paper smeared with glue. That's what came out of it.

4. Now we "paint over" the wave with pieces of corrugated paper.

5. For the fish, cut strips of golden paper 1.5 cm wide. We make one edge wavy, in the form of scales and glue it to the body. We make the tail from strips 0.5 cm wide.

6. At the end of the work we glue the eyes, make the fins.


7. It remains to make a crown and our fish is ready.

8. To imitate sea foam, I propose to cut corrugated paper of various shades of blue, blue, white paper.

9. Glue the fish to the top of the wave. All is ready. Try it and you will definitely succeed. Good luck!

Marina Orlova
Materials and tools:
a sheet of cardboard, plasticine of blue and green colors of different shades, pasta, stack, gouache or watercolor paints, brush for painting.
As a basis for cardboard, you can use not only cardboard, but also a plastic board. The main thing is that the plasticine sticks well.

Mix plasticine of different colors for the background of the future picture.

Mix the plasticine not until a uniform color, but so that streaks remain. Stretch the resulting plasticine all over the cardboard, but not in a very thin layer so that you can sink into it pasta.

For the picture we will take different pasta - horns, seashells, spaghetti.

To make the picture beautiful, first we will make a frame. We take one at a time pasta, put on the place where the frame should be, and press down. In plasticine pasta holds well.

When the frame is ready, draw a sketch of the picture in a stack.

We start the fish with the body... Lay out small pasta- shells scales fish leaving room for the head.

We spread the head from the others macaroni... The fins are made from spaghetti.

Now let's lay out fish tail... It should be long and handsome.

Lay out the algae from shells and from ordinary macaroni.

Optionally, you can make a crab. It is made from pasta shells and spaghetti.

The picture is ready. Air bubbles can be made from white balls.

In order for our picture to be completely ready, we need to color it.
