Make a paper stick with your own hands. How to make a magic wand: secrets of real magicians. Magic wand for a little fairy
Young sorcerers and sorceresses or those who only dream of learning how to make a magic wand, this article is especially for you. We have prepared a lot of useful recommendations that will really help you become the owner of a magic wand. You will also find a lot of interesting videos that describe in detail the process of making a wand, the secrets of its use and the secrets of initiation into a magical ritual.
From our article you will learn not only how to make a magic wand in literally 5 minutes, but also how and where it should be stored, how to use its power in everyday situations, and in what cases it is better to hide it away. In a word, an exciting journey awaits you, in which you will face true magic, miracle, and magic one-on-one. Otherwise, no matter what you call it, an exciting adventure awaits you.

You can practice magic at home in different ways: for example, make a wish or work hard, or you can make a real magic wand and your dreams will come true by themselves. This is much better than waiting for a goldfish and hoping it will grant you 3 wishes. After all, you want all the best to come true every day. So you will definitely need a magic wand - not for the game, of course, but for real life. This is today, as they say, gadget No. 1. If you don’t have it in stock yet, then here are instructions on how to make it yourself with your own hands.
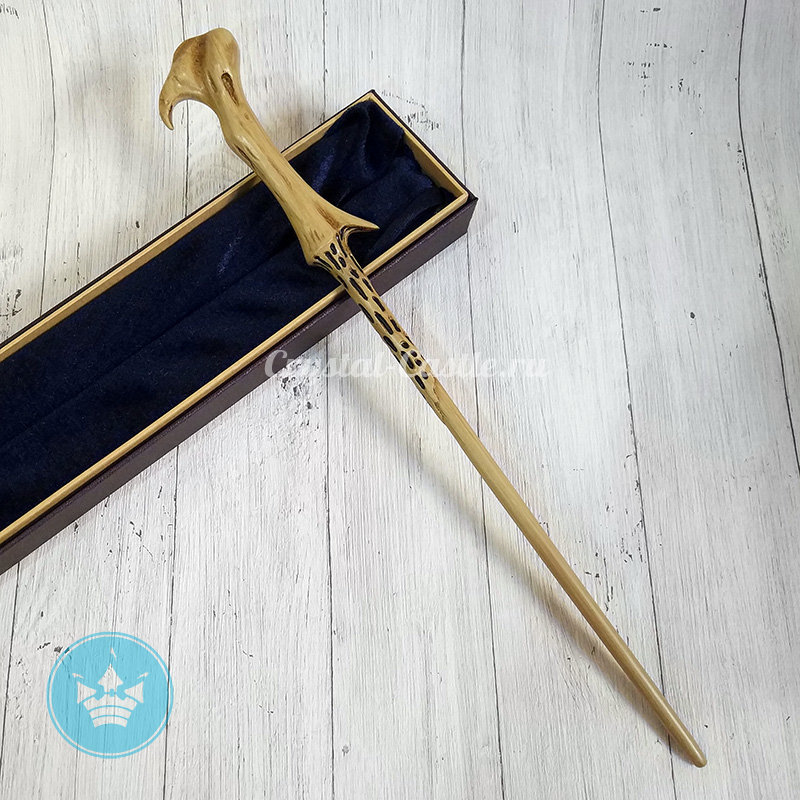
After all, modern magic knows several ways to make magic wands. They differ from each other slightly, however, there is one secret - this is the duration of the wand. If you have long dreamed of how to make a real magic wand in 1 second, then get ready that such a device will not work for very long. Maximum one day. After all, experienced magicians know that the more time it takes to make a wand, the longer it will serve its owner. Aerobatics is, of course, making a magic wand for life. But this should take a whole year. However, not so much, considering the result. Look at what wands the wizards from the Harry Potter movie had and choose a design.

Instantly, a wand for magic can be made using the power of thought. As the great Harry Potter said, and a true magic wand will find its owner on its own. Make a wish that you will have this magical wonder right away. No matter how trivial it may sound, fate itself will provide you with a gift in the form of an oblong object, which, if handled correctly, will certainly become magical. It could be an ordinary pencil that you suddenly come across at home, or a tree in the nearest park that will “give” you one of its branches. Anything can happen! Magic is all around us.

Pencil magic wand: master class for beginner magicians

The easiest and most affordable way to make a magic wand at home and wait is make it from a pencil. Firstly, you don’t need to look for a tree and bring home all sorts of foreign objects. Secondly, a magic wand made from a pencil and improvised items is completely free. So, study the detailed master class, and get ready to cast magic in just 5 minutes.
- Let's start with the most beautiful and interesting thing - the decor. We cut out bright colorful stars different sizes made of felt fabric or felt. Kitchen sponges made of thick fabric are also suitable. Use paper blanks as a template.

- Glue the stars together– large, medium and smallest. It is better to cope with this task with superglue. If you use other types of glue, please note that it should be applied generously, in the center of the largest star.
- For one magic wand you will need 2 decorative stars out of 3 pieces.
- Let's prepare the stick itself. Take a simple one pencil with hardness index “T” or “T2”. It should not be sharpened and hard enough.

- Take a ribbon made of soft, dense fabric and wrap it around the pencil. Do this so that you have room for one more winding.
- Wrap loose areas with tape of a different color. Attach both tapes to the ends of the pencil with glue.

- Place the pencil vertically and On one end we place 3 ribbons of different colors one on top of the other, in the form of a snowflake. Glue them.

- We fasten all the remaining elements. To do this, we glue one star to the end of the pencil where we already have the ribbons attached. Lubricate the perimeter of the star with glue. We glue the second star on the other side pencil so that it secures the ribbons.

And here is another option for how to make a magic wand. And for this you only need 1 sheet of paper.
Prepare everything you need:

- A4 sheet of paper;
- PVA glue;
- glue gun;
- scissors;
- acrylic paints;
- brush;
- golden paint, glitter.
So, we move on to making the stick. Coat a sheet of paper with PVA glue, retreating approximately 2/3 from the edge. We twist it diagonally with a tube, while making sure that our stick thickens towards the top. We wait until the glue dries and trim the edges with scissors.

In order to secure the structure, from the thin cut side, fix the edge with silicone or glue from a gun. Where our edge is wider, we fill the void of the stick with silicone or glue. You can also partially fill the stick with newspaper. When your product is dry, you need to make decoration. To do this, we coat the intricate convex patterns with a gun and wait until they dry.

Coloring the stick. We paint the bulges with golden paint or glitter. The magic wand is ready.
Magic wand in Minecraft
Well, if you are an avid gamer, then you don’t have to bother yourself and do handicrafts. You can simply make your own personal magic wand in Minecraft. For this you you will need an anvil, an ifrit rod and books. Take the ifrit rod, add one book, press the recline button and get a magic wand. You can then improve this element by adding one book at a time. See the video for more details.
Video tutorials: how to make a magic wand at home?
New Year's children's parties are costumed children's parties, where every child has a desire to stand out in their own way. In suits, many aspects play into the advantage of the image: from the fabric from which it is made to accessories. The fashion for wizards and Harry Potter has taken its toll, and now many children want to look exactly like this. We offer you step-by-step instructions that will help you make such an important accessory as a magic wand with your own hands.
Master class No. 1: how to make a Harry Potter wand

In New Year's costumes, such details as accessories play an important role. They help to place the necessary accents in the image. In this master class we will show you how to make a Harry Potter wand in a short period of time.
Materials
Before starting work, prepare:
- a wooden dowel or a long, straight stick;
- hacksaw or saw;
- acrylic paints;
- brush;
- hot glue sticks;
- glue gun;
- sandpaper;
- varnish (can be replaced with clear nail polish);
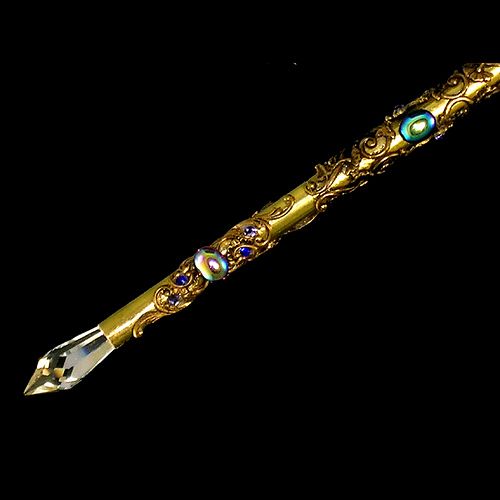
- bead in the form of a large crystal.

Step 1. From a dowel or wooden stick, cut a piece of the length you need. In this case, the length of the stick was 30 cm. If you were unable to trim the dowel carefully, sand the edges with sandpaper. It is imperative to clean them so that the child does not get hurt.


Step 2. For the convenience of further work, place the blanks for the future magic wand in an empty jar with the sharp end. Start applying hot glue to the thicker end. Apply it carefully, layer by layer, letting it cool a little, and then giving it its characteristic shape. A little closer to the thinner end of the stick, apply glue in strips, giving the homemade product a characteristic plant relief.
At the top of the stick, make an even cut directly along the glue. It will be needed to glue the bead.


Step 3. After the glue has completely dried, paint the stick with acrylic paints and, using different shades of brown, add depth to the texture.


Paint the previously prepared flat section with black paint.

Step 4. After the paint has dried, coat the stick with varnish. It's best to use a spray polish or replace it with regular clear nail polish.
Step 5. Glue a crystal bead to the base of the magic wand. Also attach it with hot glue.

After the glue has dried, the Harry Potter wand is ready!

Master class No. 2: do-it-yourself glowing magic wand


Magic wands became especially popular among children after the film adaptation of JK Rowling's book. It’s easy to make one for your child or with him. The materials for this will be the simplest. A little more work and money will have to be invested if you want the wand to become truly magical and glow in the dark. We will tell you how to make a magic wand in this master class.

Materials
To create a magic wand that can glow in the dark, you will need:
- 2 – 3 thick sheets for drawing;
- PVA glue; stationery knife;
- hot glue sticks and gun;
- acrylic paints;
- wet wipes;
- small flashlight with LED bulb;
- wiring;
- blowtorch.
Step 1: Assembling the LED Light for the Stick
It’s good if you managed to get a small flashlight with an LED bulb. In this case, you have less work to do.
Take the light bulb itself out of the flashlight, remove everything unnecessary from it (body, handles, etc.), leaving the switch.
Using a soldering iron, assemble a part of the structure from a switch and long wires. Set it aside.


Step 2: preparing the base of the magic wand
For a regular magic wand, two sheets of thick drawing paper will be enough. They need to be rolled into a cone. One sheet of paper may not be enough - the stick will be short. So twist two cones and insert one into the other. Since there will be additional decoration on the stick, try to roll the cone as narrowly as possible. To prevent it from falling apart, secure the free ends of the cones with PVA glue.
Once the cone is ready, pass the wires through it so that the switch is in the handle of the cone.
Trim the excess length of the wires and solder the contacts of the LED light bulb to them. As a result, it should fit clearly at the end of the stick. At the location of the switch, use a utility knife to cut a hole for the switch.
Carefully fill the cone itself with hot glue. Use it to attach a light bulb to the outside of the end of the magic wand and a switch. Do this work yourself. Working with hot glue requires skill. Plus, it's easy for them to get burned. When filling the cone, work with the glue in stages, periodically letting it cool completely.
Working with glue from the outside, shape it after it has cooled slightly. This will make the stick look neater.


Step 3: Creating the Mold and Preparing for Painting
After the glue has dried, we use it to draw three-dimensional patterns on the outside of the stick.
As the glue dries, you need to start preparing the surface. Ideally, a white primer should be applied. If you don't have it, regular white acrylic paint will do.


Step 4: Painting and Aging
Using a brush, paint the entire stick brown. Once the paint has dried, you can give your wand an authentic antique look.
Take black acrylic paint, dilute it a little with water and use a brush to paint it into the stick.
Use a damp cloth to wipe off the main convex parts of the stick. As a result of such manipulations, the black paint will remain uneven on the surface, adding visual depth.
Cover the convex patterns with golden paint and also remove some of the paint using a napkin. Leave the stick until completely dry.


Since Harry Potter is every bit as popular these days as it once was, I think you just need to make some wands. This instruction is quite simple, but useful. All you need is a piece of paper, glue and paints and 40 minutes of your free time, and you will have a magic wand exactly like in the movie. I have already made these sticks for my kids and even for my girlfriend and her 18 year old daughter and her boyfriend. In the first steps I drew pictures of what you need to do. It's very simple but has a fantastic effect.
Step 1: Prepare your paper
Place a strip of double-sided tape diagonally on an A4 sheet of paper.
Step 2: Roll up the paper tightly, starting from the corner
Roll the paper diagonally, starting from the corner, pressing one end tightly until one side is tapered. Fold the paper halfway until it sticks to the tape.
Step 3: Glue the rest of the paper
Spread the remaining corner with PVA glue so that it is completely covered with glue.
Then continue rolling and hold the stick with your fingers until it dries.
Step 4. Trim the stick around the edges
Wait 30 minutes until the stick is completely dry. Once the glue dries, the stick should become hard. Trim the edges of the stick so that both ends are even.
If you need a harder stick, roll up another sheet of paper tighter than the first one and place it inside the first stick, covering it with this glue in front of it.
I didn't use a real stick because I didn't want to make the wand dangerous. It’s better for a stick to break than for someone to gouge out an eye with it!
Step 5. Fill the stick around the edges
Carefully fill the edges of the stick with glue using a glue gun (wait for each edge to dry). You can also roll paper into balls and stick them into a stick using a pencil. This way you won't need a lot of glue. If you do everything carefully, you may end up with a rounded end of the stick.
The note. If you want your wand to be strong, use epoxy resin instead of the inner wand. It is very liquid, so you will have to pinch the narrow end of the stick. Thus fill the stick with epoxy resin. Let the stick dry.
Step 6: Create the Details
Hold the stick in one hand and the glue gun in the other. Slowly rotate the stick and gently apply glue to the stick. Try to make a beautiful drawing. Start by adding one or two rings on the wide side, then lower down into a grid pattern.
While the glue dries, rotate the stick. Try to apply the design in a minute. After application, the glue will still be sticky for a few minutes, be careful.
Step 7: Apply Base Coat
Apply a base coat to the stick to seal it completely. You can use a can of spray paint (paint sets well, if you don’t have one, use varnish). Let the stick dry.
Step 8: Paint the stick the base color
Paint the stick with the main color. In this case I used brown, but you can use any color. I painted it this color because I wanted it to look like wood. But you can paint it black or white, or any other subtle color. Paint the stick completely. Don't worry if it's uneven, it will even give the added effect that the shelf is made from a natural material (you can see in the picture that I only painted half).
Important! Use water-repellent paint, ideally acrylic. You will understand why in the next step.
To get brown, mix all the primary colors (red, blue and yellow) in different proportions, depending on what shade of brown you want to get. Or mix one primary color with a secondary color (orange, lilac or green). Add black (but not too much) to get a darker shade.
Step 9. Start decorating the stick
Our wand needs to be aged. To do this, dilute black paint in a small amount of water. It is better to use acrylic paints. Cover the stick with black paint, let dry a little, then wipe off any excess paint.
Step 10. Finish decorating the stick 
Wipe off any remaining paint. Use a damp cloth or kitchen towel. If you don't like the effect, color and wipe the stick again. You need to achieve the effect of old age.
You will not be able to remove all the paint; it will remain in the corners and around the decorative glue, which will create a scuffed effect.
Work the handle well. In reality it should be shinier and have fewer dark spots. Wipe the stick until you are satisfied with the result.
Don't be afraid to go back to previous steps and add more lighter shades to achieve the desired effect. Always wait for the previous layer to dry. If you used acrylic paints, repeat painting as needed.
Step 11: Add Gold Detail
Using your finger, apply the gold paste to the protruding parts of the stick. You can use a gold marker, gel pen or gold paint.
For my kids' wands, I used silver to make some parts appear metallic. The effect was amazing. But this is more complicated. First you need to cover the protruding parts of the stick with a thick layer of gold leaf or silver leaf, wait 2 hours for the layer to dry. Then apply a thin layer of another metal and remove excess paint with a brush, then rub the stick with a soft cloth.
Step 12. My works
I took pictures of my magic wands (each took me 20 minutes to do). I hope everything works out for you. Good luck!
P.S. When using text materials on a blog, your website or on personal pages on social networks, the User is required to place a hyperlink to the server indicating the source
Our world is amazing in itself, but sometimes you want to bring a little more magic and enchantment into it! Few people know that you can make a real magic wand yourself!!! So how? Do you want to know how to make a magic wand, following all the magical rules and secrets, how to handle and store it? Follow our instructions exactly, and you will have a personal magic wand that will certainly lift your spirits, serve a wonderful purpose and help you feel like Harry Potter or an excellent student, Hermione.
A real magic wand must be exclusive and individual! Because she herself chooses her, so to speak, owner and copyright holder. She acts as a conductor of the energy of magic and miracle.
Selection of materials
There are few rules, but they exist. Mr. Ollivander confirms!
Firstly, the stick must be natural, i.e. made of wood. It should be chosen in the forest because city trees are weak when it comes to the vitality of the tree. Such trees have a broken connection with the elements.
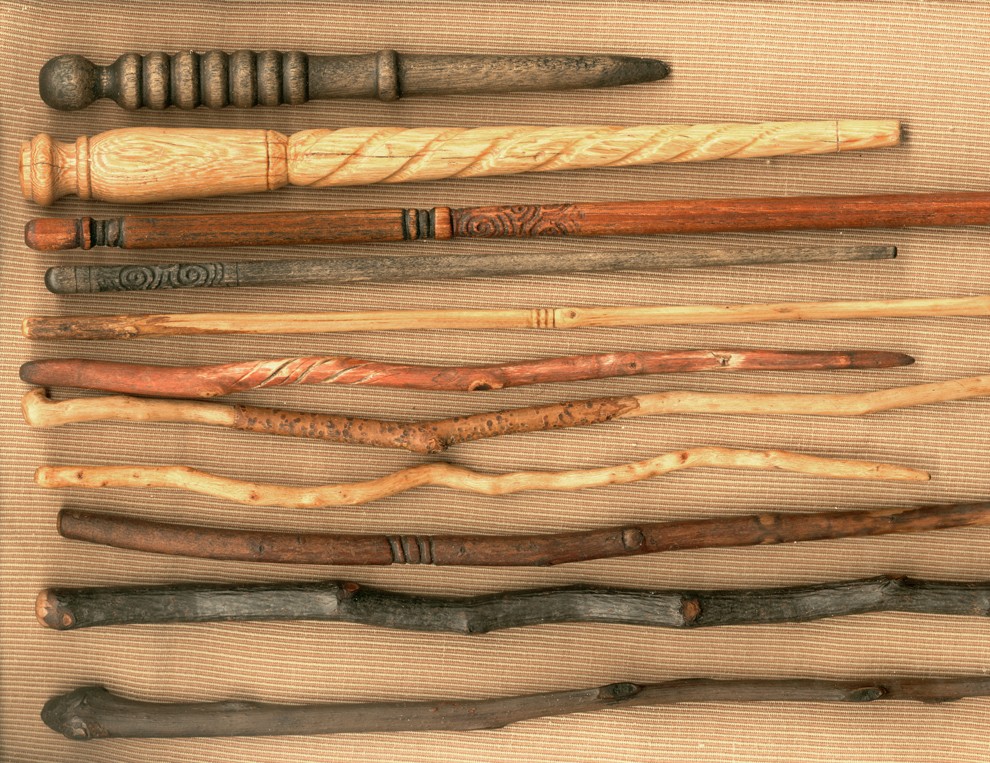
You need to go to the forest or park to pick up a twig with a positive attitude and complete harmony in your soul. At this moment you should have a desire to merge with nature. Also time your trip and making a magic wand with the waxing phase of the moon.
In addition, the tree itself must give you the twig. To do this, you must mentally sincerely make a request to the tree.

Then you should take a twig in your hand and feel exactly your wand. Close your eyes and listen to your feelings: has the twig become an extension of your hand...
Don't forget to thank the tree and give it some of your positive energy. This way the wand will maintain its connection with the forest and will generate its energy.

Since ancient times, it was believed that elderberries and nuts were endowed with magical qualities.
Cut the branch carefully and quickly with a sharp knife. The size of the stick should be equal to the length from your middle finger to your elbow. It is better to hide the selected twig from prying eyes and bring it home. In the house it should be saturated with your energy.
Manufacturing technology
Making a wand is a whole sacrament, so it should be hidden from prying eyes.
Clear the branch of your choice from bark and twigs. Sand gently to make your stick smooth. At the same time, you need to pronounce the magic words to yourself:
“I conjure you, O all-powerful branch (of oak, maple, etc.) with the forces of the four elements - Earth, Air, Water and Fire! Take in their strength and power. Be my faithful assistant!
Next, you need to make a hole at the base of the branch. It can be done using a screwdriver, screw, nail or drill. Do it especially carefully so that the stick does not crack. It is necessary to place a magic core in the hole made. But what kind of core it will be, you need to determine yourself.
If you want help AIR energy, then you can put it in a stick bird feather, but not a black crow or a rooster.
Crystal or pebble will give your wand EARTH energy. Perhaps you will choose a stone that has certain properties or suits your horoscope.
You can also use field herbs. For example, rosemary symbolizes long memory, sage wisdom, lavender devotion, laurel glory.
Attention! Under no circumstances should curry powder be used to create a stick.
Small ember will fill the stick energy of FIRE.
WATER the most complex element, it is unchanging in its variability, therefore it can be symbolized wire, spring washed ashore amber or small sealed flask with water from your chosen source.
After you have placed the core in the stick, you need to seal the hole in the stick. The stick must be sealed in consecrated water. On the seal, draw the initial letter of the selected element. Different schools of occultism have different spellings of the four great elements, choose the one that is closest to you.
Decoration
Some magicians coat the wand with varnish. This is not prohibited, but it is not encouraged either. It is better to cover it with natural, pleasantly smelling oil, wrap it in a scarf and leave it like that until the next full moon.

However, everything depends on the magician, so you can decorate the wand with beads, stones, or give it the desired shape using hot glue and paint it. This is more clearly presented in the master class igrateshka for beginner wizards:
You can also decorate the wand with feathers.

Wrap with magic twine and add a magic crystal.

Acorns, elements of marine fauna - all this can be useful in decorating your wand.

Copper wire will also help with this.

If you are skilled in art, then perhaps you can create a magical masterpiece.

Rite of passage
This is the final stage of creating a wand, one might say, bringing its magic to life. It is recommended to dedicate the wand on Beltane or Walpurgis Night (May 1) or Saiman (October 31). To do this, at midnight the magic wand is placed on a clean white cloth. Place a lit candle nearby.
At the same time, it is necessary to say the following words: “Become a guide, assistant and guardian!” Next, the candle must be extinguished in water and buried in the ground. The ritual must be done completely.
At the same time, the owner of a magic wand must remember:
By wishing and doing evil, the wizard will lose his power. This will happen suddenly and irrevocably!

Don't damage anyone with your wand. Better wish prosperity, health, prosperity and joy to your loved ones and friends!
Don't throw it anywhere and don't point it at anyone! These are important rules when using it!
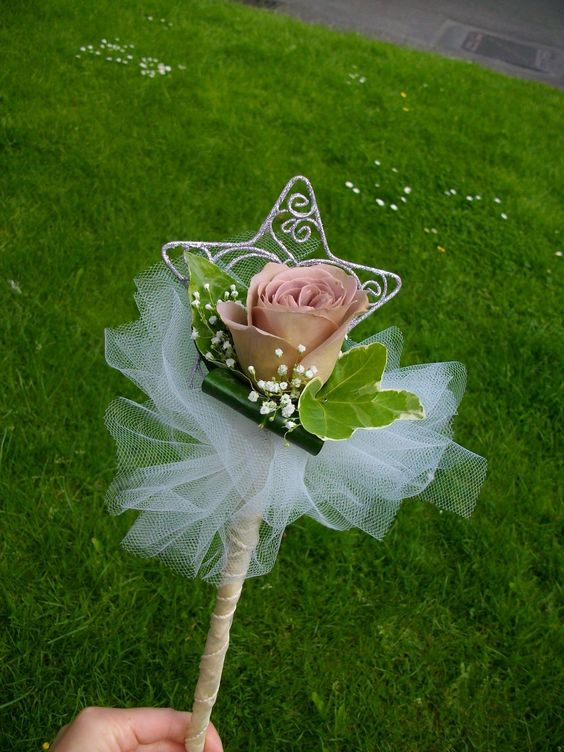
Magic wand for a little fairy
Little fairies also need a real magic wand. There is no need to do it according to all the rules, because children have the power to change the world with the help of fantasies, so the wand should only help you feel like a fairy fairy!


Take a piece of ribbon or fabric and cut it into narrow strips. It will look more interesting if the stripes are of different colors. The more there are, the more magnificent the magic wand, or rather its top, will be. Gather the cut strips into a fluffy pompom. It can be complemented with beads and satin or silk ribbons. We wrap the stick itself with ribbon or paint it in the desired color. Let's assemble our wand by attaching our pompom to it! The wand is ready, even a child can make this!
Watch the master class TullnieShtuchki how to make a gorgeous magic wand:
In the same way you can make an astrologer's wand:


To accompany the stick you can make a small or, with or.

Lace is also relevant in a magical theme!

Beads, rhinestones and feathers will also come in handy.

Don't forget that the wand may belong to the flower fairy.

We turn a simple pencil into a real magic wand!
This is the easiest way to make a stick from improvised materials at home. Firstly, there is no need to look for a twig on a tree. Secondly, it is easy and simple, and a pencil can be found in every home.
We take a pencil, it is better to choose one with a hardness index of “T” or “T2” and sharpen it, and then decorate the stick with a satin ribbon or other dense fabric.

You can combine ribbons of different colors. Carefully secure the ends of the ribbons with glue.


We cut out stars from felt or felt paper that match the color of our stick.

We attach all this to our stick.

The wand is ready, you can go cast some magic!

The simplest magic wand is made of paper
A magic wand can also be made from a simple sheet of A4 paper. In addition, you will need: PVA glue, glue gun, scissors, acrylic paints, brush and glitter.
We take an A4 landscape sheet, coat about 2/3 of it with PVA glue and begin to carefully roll it diagonally into a tube. In this case, the tube should acquire a cone-shaped shape, tapering towards the bottom. Let our future stick dry and cut off the excess edges with scissors.

We take a glue gun and fill the void of the stick from the wider edge. Instead of glue, you can fill it with cotton wool or paper, whichever is more convenient for you to work with.
After the glue has hardened, you can begin decorating the stick. To do this, use a glue gun to make monograms and intricate patterns on a stick. We wait until the pattern dries.
Every little girl during holidays or matinees in kindergarten and school dreamed of being reincarnated as a fairy fairy. In addition to dresses, little ones don’t forget about such things as wings, a crown and, of course, a magic wand. The last thing, thanks to the popular story of JK Rowling, has become known even among boys. Nurturing a child’s sense of beauty begins, among other things, with such little things as a beautiful magic wand made with one’s own hands, so making it with your baby will not only be pleasant but also useful.
Nowadays, it’s not just Harry Potter you can see at costume parties. Such things for costumes can be purchased in stores, but in our article we will look at how to create a magic wand with your own hands.
Magic wands for fairies- These are, most often, small sticks decorated with flowers, bows, ribbons and stars. Girls really like them, but you can create such a miracle yourself; a simple and accessible mk in our article will help you. To work we will need:
- A straight stick (for example, for Chinese food).
- Material felt.
- Needle and thread.
- Sequins.
- Good glue.
- Glitter.
- Cotton wool.
- Sharp scissors and brushes.
Sequence of work:
- Let's cut out three stars from felt, cut off the edges of one of them - this will be a pocket for the main desire. We trim one whole star and a pocket blank with sequins.
- Using a brush, coat the item with glue and sprinkle it with our glitter. When the stick dries, attach cotton wool to its end.
- We sew all the stars together, not forgetting about the pocket, and leave a slit for the product. Insert a stick of cotton into the cut and seal it.
A magical product for a little fairy is made!
The picture in our gallery is an example of what a kanzashi magic wand might look like.
Gallery: magic pencil wand (25 photos)


How to create a wooden magic wand, complete master class
It’s very easy to make a magic wand for a child, similar to the one that often appears in cartoons and fairy tales. . To make it, we need the following materials:

Stages of work:
- Apply hot glue to the product very slowly. If instead of a smooth product you took a tree branch, you must first clean it using sandpaper and remove any unevenness on the surface.
- We will glue a couple of voluminous beads onto the blunt tip of our magic wand. When the glue begins to cool so that it can be touched, we create the pattern we need with our hands. To give it a good texture, before doing this, while the glue is hot, sprinkle it with beads or small grains.
- After the shape of the fabulous product is completed, let it dry.
- Paint the dried product with acrylic paint with a brush. For coloring it is worth taking brown colors. After the paint has dried, our magic wand for a child is ready and the master class is completed!
Magic wand made of paper
A product like in Harry Potter can be made from paper. For this we need:
- Two pieces of paper with A4 size.
- Bulk tape.
- Glue gun.
- PVA glue.
- Acrylic paints.
- Brushes.
- Sharp scissors.
- Wet wipes.
Stages of work:
- Place a strip of double-sided tape on a piece of paper along a diagonal line, closer to the corner. Roll the leaf into a tube diagonally, reaching the strip of tape. We roll it up so that one end of the tube is sharper than the other end. Using a brush, coat the remaining free particle of the leaf with PVA glue and screw the tube to the end. We hold the tube with our fingers until our glue dries completely. We do the same with the second sheet of paper, making the tube thin.
- Then, once the tubes are dry, we insert one into the other. This is necessary so that our wand is strong.
- We cut off the excess paper from the ends of the thing and fill them with warm glue. On the outside, we give the tube a textured look by applying the desired pattern with glue.
- When the glue dries, paint the product with brown acrylic paint.
- Now let’s age our product so that it becomes truly fabulous. Apply a liquid solution of black paint to the surface of the stick. Remove some of it with a damp cloth. In our case, there is no need to rub; we throw off the excess paint by soaking it.
- On large patterns we will apply golden acrylic paint. When it dries, we will repeat the manipulation with black paint again. This is how we get an old fairy wand from Harry Potter.
Magic pencil wand
 How to create a real stick from a pencil? Very easy! Take any beautiful pencil, preferably a long one. It will become the basis for our thing. Now we take materials for decoration. This can be foil (both thin food foil and chocolate foil), colored paper or colorful packaging for a bouquet. Cut a rectangle a little longer than a pencil and wrap it around the base. Secure everything with tape.