How to make a beautiful wreath of autumn leaves. Autumn wreaths on the head of natural material with their own hands. Wreath of paper autumn leaves
Wreath of leaves - an indispensable attribute of autumn photo shoots. The two most popular options are rowan and maple. We have prepared step-by-step master classes for you, of which you will learn how to weave such wreaths on your head. This process requires perfection, but not as folded as it may seem at first glance.
Instead of maple leaves, you can use any other, and rowan can easily replace viburnum or even artificial bright berries. The basis for a wreath can be prepared in advance or use the usual hair rim. However, you can do without anything at all. Someone uses this autumn craft and several times - it does not start, but a little bit will dry. And if you plan to make a wreath for photo shoots on a sufficiently long period, the basis should be durable.

Basis for wreath
First of all, it is necessary to determine the basic material. In this selection you will find several options: Choose the most convenient.

Option number 1: from the rod
To make the basis for the autumn wreath on the head, choose young branches. Willow, Birch, Pine and other trees and shrubs, which are easy to cut thin durable bars.

Clean the branches from the bark and make them smooth. To make a wreath of the leaves beautiful, it is necessary to perform the foundation correctly - it should not be too big or too small. Measure the scum of the head, but constantly pretend the size of the workpiece during operation.
Using a twine tighten the ring from the pntach. Then begin to wind up this frame of the bar. Build them gradually and constantly reinforce the jute.
Make a dense winding when you finish boning branches and achieve the desired bezel thickness for a wreath. Put the workpiece under the press overnight.
Option number 2: From Paper and Capron
This base for the autumn wreath will be made of light materials, but may not doubt the strength and reliability of the design.

Earlier, we have already told you how to work with newspaper tubes. Here the principle is the same. Cut on the strips logs and newspapers, roll them into dense tubes. Twist them with each other or just glue. You can also make the basis for a wreath with a scotch or to sew these strips at all.
In order to finally be finished with the design of each other, take the categories and tightly wrap themselves.
You can stick to such a workpiece or impose leaves, berries or other accessories, from which you want to make your autumn wreath.
Option number 3: Wire
The rim from the wire is good because it turns out thin. This means that you can make an autumn wreath on the head more elegant and easy. This is the perfect option for the assembly of small leaves in one or two layers.

The wire must be folded into one, two or three layers and intertwined with each other, spinning it in the harness. The degree of winding is chosen depending on the thickness of the material.
Wire ends twist together and hide. Top to wind up with twine or ribbon. It is necessary so that the caretaker turns out to be smoother and dodged hair.
Such a wreath can be mastered from above or glued the material directly to it.
To make a wreath on the head more convenient, on the ends of the wire you can form a kind of loop. Then we will give ribbons there and will tie it on the bow. You can make it a kind of decor element: for example, add a wide red ribbon and leave its ends loose.
Weaving scheme
As a rule, all wreaths on the head weave along the same scheme. It looks as follows.

As a basis, you can take flowers, autumn leaves, grass, dried flowers, rowan branches or any decorative material.
Additionally, the gaps between the two adjacent leaves can be fixed with a fishing, thread or twine. You can also use the satin tape so that the wreath is more bright.
Maple Leaf Wreath
The most popular autumn version is a wreath of maple leaves. You can make it with your own hands fast enough. Choose the foundation of those described above, or leafing without it.
First of all, you need to collect as much as possible maple leaves of different sizes. Sweep them a little if it is wet on the street.
Thickening near the leg must be cut off each leaflet.

We take the first sheet and bend the lower edge so that the parallel line with the "stem" is turned out.
The second sheet with a branch of the second sheet is neatly piercing the first as if we do stitch using a needle and thread.

We begin the second sheet in the same way as we added the first sheet before. We take the third maple leaf and repeat the procedure.
So we pass the whole circle. To finish a wreath, you must first try on his head, and then pierce the first and second sheet with the last one.

If you wish, you can make another or two rows.
Wreath of Ryabina
Ensure the autumn wreath of Ryabina with their own hands is also quite simple. So that it turns out perfect, we suggest you to see a visual step-by-step video instruction. With it, you will easily repeat the process of making this beautiful autumn accessory.

Such a wreath can additionally decorate with any autumn leaves so that it turns out even more elegant. You can also make it only from one rowan - large cliffs look very beautiful.
We hope that now you can weave the wreath on your head yourself, and your autumn photo shoots or contests will be even more beautiful. By the way, the leaves of colored paper or phoamiran are very often used for crafts to school. If you need to make something like this, use the proposed instructions and our selection of leaves stencils.
Views: 13 172
Autumn brings the desire to capture the game of paints not only in memory, but also in the house where long winter evenings can be seen, touch, breathe such a beautiful with a slight taste of bitterness. Charm of autumn.

To decorate your home, yielding to a gust, inspected with autumn landscapes, you can simply and simplely typing in the nearest park of multi-colored maple leaves and spreading across the apartment one by one (using high narrow glasses or vases) or oakhaps, as if burning bouquets.

But in the presence of a small amount of time and a minimum of effort, you can build up the real works of art that will rejoice the eye for a long time and will serve as a real decoration of your home.


Other crafts from the autumn gifts of nature:
- crafts from chestnuts, spikelets and other gifts of nature
- crafts from acorns
- crafts from pumpkins
- crafts from cones
- crafts from twigs and rods
- crafts from dried flowers
Pendants and garlands made of maple leaves
You need to take two or three leaves preferably, of different sizes, cover them with a transparent varnish or omit in the paraffin melted on the water bath, and then tie them with a thread that can be decorated with beads to the tone of the leaves and, making a loop from it, rave for example, under Ceiling of the children's room.

You can complicate the task, collecting the leaves treated in this way in the garland. Of which it is easy to build an intricate pattern, fixing it on the wall, or around a picturesque branch set in a vase, or by placing in a highly hanging pot with flowers, it is easy to hang freely, along the wall. If several such garlands combine, a bright curtain will be released.


Maple leaves wreaths
Also a popular autumn craft is also wreaths of maple leaves. You can just risk a wreath of leaves, as the summer college, and do something more intricate. In this case, the wreath is made from birch or other branches, and leaves, acorns, ribbons, bumps and other nature gifts are used for its decor.
See also:
What else can be made of cones.


Decorate candles and candlesticks with leaves
Dried under the mold or iron leaves can be punched with a glass jar, covered with transparent varnish for decoupage, and put the candle inside. It turns out the original lamp capable of decorating any romantic evening. Similarly, thick candles are decorated - the leaves are simply glued, or they are tied to their surface. It looks very unusual, especially if you use candles of bright, inappropriate tones.


Roses and bouquets made of maple leaves
A separate topic deserve roses made of maple leaves, from which not only bouquets can be assembled, but also to tie in wreaths, decorate their wicker products, and vintage style lovers easily fit similar decorations into their interior, covering flowers from golden leaves gold or silver paint.

It is very easy to make roses made of maple leaves, which then collect in one big bouquet. These flowers will delight you all winter. Plus this is an interesting idea for a little surprise. Girl from a guy. These roses are made elementary - just fold the maple leaves and wake up on the workpiece. Do not forget to bend the edges, like a real rose. Here is a detailed step-by-step master class on making roses made of maple leaves and bouquet of them:


But still the ideas of crafts - already from these roses. Of these, after all, you can make a topiary, about which read below, wreath, decorate pictures and much more, and even bouquets of dry leaves can be quite varied:


Wreath is a wonderful headdress that came to our deep antiquity fashion. Only earlier the wreaths had a magical meaning, because they were flewed only on holidays. Today we use wreaths as a hair jewelry even in everyday life. In this article, we will tell you how to make an original wreath of natural and decorative materials with your own hands.
For our ancestors, the wreath was a real faith. They paid special attention to plants that were used with weaving, because each of them had its own sacred designation suitable for a certain event in life.
- The ancient Romans of the wreaths of the laurel leaves on their heads of their emperors to emphasize their power and glory.
- The great soldiers they put on the heads wreaths woven from oak leaves, symbolizing courage and fearlessness.
- Before the feast, Roman men put on wreaths from the Mirate, which, according to beliefs in the Roman Empire, was considered a plant saving from intoxication.
- But the tern wreaths covered the heads of the Romans, which were sentenced to death. Approximately the same rites with wreaths existed in the ancient Greeks.
The peoples of Asia also had several interesting traditions associated with weaving wreaths. For example, the bride on the wedding day had to decorate their head with a wreath of orange colors, which symbolized fertility. And olive wreaths were presented with outstanding writers, poets and playwrights, which symbolized popular recognition and admiration.

For the Slavic peoples, the wreath was an integral part of their lives. With their help, they demonstrated their status, marital status, ailments and important events:
- Orphan girls wore wreaths with blue ribbons. People who met such girls on the street always tried to feed them, give them something.
- A woman who has just become mother wore a wreath of fresh roses and green leaves.
- A cornflower wreath on the head of the girl indicated that she was waiting for a sentence from his beloved hand and hearts.
- Wreath of primrose symbolized loneliness abandoned beauties abandoned by a young man.
- Wreaths from Barwinka wore engaged girls.
You can list the types of Slavic wreaths for a very long time, only the essence of each of them is the same - they were a display of what happened in life, and of course, played the role of decoration.

Modern girls decorate their heads fashionable wreaths, not even thinking about their meaning. They acquire beautiful artificial products on the markets and wear every day to supplement their bright image. In view of this, we have prepared several interesting master classes, with the help of which any girl will be able to personally make wreaths from different materials.
Basis for wreath do it yourself
One of the most difficult stages in creating any wreath is the preparation of the foundation. After all, it should be strong, soft and at the same time practical. From a variety of existing options, we chose the three most optimal.
Basis of branches
The best natural material for creating a wreath is young long coniferous or birch branches. Slowing will not suit, because they are no longer elastic, they will break at the first attempt to be bent. Therefore, we recommend working with freshly cut branches. They need to prepare, as much as possible.
Make the basis for wreath, with their own hands, you can also from a grape vine.

We now turn to the sequence of actions that must be observed during the creation of the base from the branches:
- Clean the branches from the bitch and needles, after which sort them along the length.
- Determine the diameter of the future wreath and select the required number of twigs for work. To create a small wreath you will have enough pair of twigs if a large product is assumed, then you will need about 5 twigs.
- Connect all branches with each other with a linen rope. You will have a thin frame, which you will gradually compact, tying the rest of the branches to it.

- As a result, you should have a sufficiently tight bezel. It must be put under some press so that he lay down under it overnight. So we will achieve perfect flatness of the foundation for the future wreath.

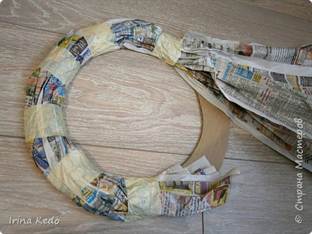
Basis of paper
For the manufacture of a paper base for a wreath you will need a lot of newspaper or journal sheets. Of these, it is necessary to twist dense tubes, which are then glued together with a tape. The tubes will have to do a lot, because they must overlap on each other layers. As a result, you should get such a workpiece:

You can give the density of the paper circumference from old-headed pantyhose. Just wrap them with a paper base, consolidating the ends of Capron Scotch:

On such a workpiece, it will be very easy to fix any jewelry. By the way, if you do not like the Capron as a paper coating, you can use any tissue.
Basis of wire
The wire is very convenient to create a wreath base material, but very tough, so it can damage the scalp. To avoid injuries, the wire is wrapped with a thick layer of hemp or linen thread. You can show fantasy and use any other material - ribbons, foam rubber and so on.

Basis of old wiring
This material is softer than wire, but the same flexible. Therefore, by attaching it to the head to measure the diameter of the future wreath, it will only need to trim along the desired length and that's it. No other manipulations do not have to do.

As an alternative options for the basis of a wreath, you can use the old hoop, the hose from the vacuum cleaner or the hoop.
Wreaths from natural material do it yourself
For the manufacture of wreaths from natural materials, it is necessary to collect as much as possible of different sheets, acorns, cones, twigs, dried colors and berries, as they will be the main decoration of the future head.
Since we have already described the basics of the foundations for wreaths, you will not stop at the stage of their billet. You can use any of the billets to fix natural materials to it, which will be discussed below.

Wreath on the topic "Autumn" with their own hands
Coming out in the park on autumn day, you can find a huge number of beautiful bright leaves and other natural materials, from which the thematic autumn wreath can be soaked. He can use you for a photo shoot or the autumnal ball of your child in kindergarten or at school. We will look at three wreath options:
- Wreath of autumn leaves do it yourself

For the manufacture of this product, you need to choose different fallen leaves so that they are preferably red and yellow. We offer in this article by the option of manufacture maple wreath do it yourself.
- Each sheet will need to be installed in paraffin so that they save their own appearance and did not colaw over time.
- To do this, wear an ordinary candle on the grater, melt the chips and plunge into the resulting liquid each leaflet.
- Instead of paraffin, you can use glycerin, but it will have to spend a little financially.
- When all the leaves are ready, they can be attached to the base. We recommend using a paper base for this wreath to make the ability to glue leaves without bending them.
Maple wreath made by hand, You can not only put on your head, they can also decorate the home interior.

Wreaths from Ryabina flew back in ancient times. People believed the berries of this tree a strong guard from evil and damage. That is why rowan wreaths were put on but the heads of newlyweds, men who go out.
The beauty of wreaths from Ryabin is unique. The scarlet color of berries and their tart autumn fragrance gives an accessory of sophistication. At the same time, it is absolutely any person under the power of creating a rowan wreath. It can be done in two ways:
- Mitigating alternately rose borders with sturdy filaments from the wire (just can also weave do it yourself and laurel wreath);
- Having rolling each berry on the thread like beads. You must have a long garland, which will need to be collapsed in several layers in the diameter of the head and tie them with a red durable thread among themselves.

- Wreaths from rowan leaves do it yourself
- To create such a wreath, you will first need to prepare beams of ripples with leaves.
- If you have collected sprigs with beautiful leaflets, you first put them in paraffin or glycerin, and then with the help of wire, take them to the base of the grape vines.
- If the bunches of rowan berries are separated from the leaves, then you will have these leaves to climb into the clusters with a linen thread.

New Year's wreath do it yourself
For the manufacture of a New Year's wreath you will need such natural materials - Christmas branches and cones. They need them in a well-known scheme to bind to the base (better wire). The cones can be glue with glue-gun.

If you want to dilute natural paints, you can additionally use gouache. White Gouache You can paint the needles Christmas trees to create a snow imitation. An alternative version of the decor is a wreath varnish and sprinkled with sparkles, which will also create some snowy wreath.
Wreaths from living flowers with hands
Wreath of live flowers - head decoration for summer, spring and autumn celebration - weddings, birthday, engagement. You can use absolutely any flowers that grow in your facility. In this article, we will give an example, how to make a magnificent beauty wreath for the bride.

Prepare the necessary material and tools:
- Flowers
- Wire for base
- Ceattor
- Floral tape
Prepare all materials and tools, go to creating a wreath:
- Make the basis for a wreath - wrap the wire tip-ribbon in several layers.

- If you do not know the exact diameter of the bride's head, you can make small loops along the edges of the wire, to turn a ribbon through them, with which the bride itself will fix the decoration.

- Make bundles of flowers and greens. Take each element to each other with a floral tape;

- Each bundle with the help of decorative wires attach to the base. As a result, you should get here such a beautiful product:

Decorative wreaths do it yourself
The difference between decorative wreaths from similar products from natural materials is that as decor you need to use artificially lying leaves, fruits, berries and flowers. They look very beautiful, but cost money. We advise you to resort to their application only if you wear a wreath of decorative elements often.
It is relevant for dance groups that create images for choreographic performances, theater studios, the costumes of which is constantly replenished.

Below we will present photos of wreaths from artificial materials. It is not advisable to paint equipment manufacturing, because it does not differ from the one that we recommended to use to create wreaths from natural materials.
Wreath of artificial colors with their own hands


Autumn wreath with their own hands from decorative materials


Wreath of ribbons with their own hands


Greek wreath do it yourself from decorative materials

At the fashion shows of the recent seasons, you can often see the demonstration of dresses and sundresses in combination with wreaths that decorate the heads of the models. The dimensions of the compositions are the most diverse, as well as the color solutions. The trend on this accessory immediately appreciated the French representatives. Moreover, age does not matter. Everyone can pick up the perfect model, profitable emphasising natural beauty.
Who and for what cases will suit
Use a wreath for hair decoration can be almost all women. Another question in choosing a floristic composition and size of flowers. Teenagers and girls can safely try on themselves any form. The main criterion is the combination with the outfit. Women will suit the restrained compositions of small-sized buds. The color scheme should consist mainly of pastel and light tones.
Wear an accessory appropriate even in everyday life. It is a clear case, you can hardly wear such an accessory. But for meetings with friends, traveling to the weekend such a decor is quite suitable.
The main purpose of the wreath is considered solemn and holidays. In recent years, there has been popularity of the use of the accessory in the image of the bride. Little girls and adult ladies look equally well with gentle little buds on her head. It emphasizes femininity, gives the appearance of gentle notes and charm.
Folk festivities and holidays can also be a reason to transformed with the decoration of the hairstyle wreath. The current youth loves to celebrate Ivan Kupala. Girls with a floral composition on the head look mysterious and charming. This holiday is not required without a mandatory attribute - a wreath, woven of living colors.
When using a flower accessory, it is important to remember that it is relevant in the spring-summer period. Although some fashion guards manage to combine it with fur coats and high boots. To adapt the accessory to the time of the year can be using decorative elements that correspond to the flowering pore. Autumn decorations look beautiful and appropriate from yellowed leaves.
 Wedding hairstyle can be supplemented with gentle wreaths from beads or colors
  Wear an accessory appropriate even in everyday life
  Little girls and adult ladies equally look good with gentle little buds on her head
  Cute little ladies can wear a wreath on a photo session
 How to make it yourself
For manufacture, the following materials will be required:
- wire;
- flowers on branches or individual buds;
- ribbons.
So that the base is firmly fixed on the head, you can use the rim. To complement the flowers are recommended by beads and different greens. So the composition will look more beautiful and richer.
From the tools you will need only scissors. For the convenience of fastening the flowers, stylists advise to apply a glue gun. The hot method of fixation will quickly and reliably secure on the basis of the desired fragment. It will save a lot of time on drying the surface.
Elements for composition are used from different materials. On celebrations and state events, hair is decorated with a rim from living inflorescences. But more often used plastic and paper. Very spectacular composition of the composition made of fabric. The skill is honed for years, as a result of which buds are obtained, which immediately distinguish from living colors will not succeed.

From artificial flowers
Step-by-step instruction:
- Measure the girth of the head to create a wire frame. If there is no possibility to remove the measure, then a wire rim with an impected ends should be made to which the ribbons are fixed. With the tying on the head of the wreath, you can wear different sizes. In the case of the use of measure, it is necessary to cut 3-4 wire ponds, a length of the head of the head plus 4-5 cm for fixing the ring. Twist the basis of them, not closure ends.
- Take the sprigs of artificial colors and disassemble them on separate boutons and leaves. Short sprigs are suitable for the composition. Flowers need to cut close to the bottom, so that the stalks do not interfere with the mount.
- Pre-draw the workpiece from buds and leaves, settling on the table. Larger fragments are placed in the center, to the occipital part - small. Flowers should cross in tone and sizes, and the total composition is supplemented with greens of leaves and twigs.
- Felt cut the circles, Diameter less than flowering buds.
- Glue the felt blank to each fragment So that the center remains a free strip of 0.5-0.7 mm wide.
- Alternately drive all items, stretching the wire base into the empty space in the center of the felt.
- Distribute and adjust the composition.
- Twist the ends of the wire, Wrapped with each other several times.
- Cover the place of connection of the rim with flowers.


From living flowers
Step-by-step manufacture of wreath:
- Make a wire frame. To do this, you need to cut 3-4 pntures, the length of which will be equal to the size of the head of the head plus 3-4 cm on the fixation of the ends.
- Prepare plants by cutting their stems at 10-14 cm. In order for the flowers not to start quickly, they should be treated with floristic sprays. So the wreath will keep a presentable look for a long time.
- The resulting ring is wrapped with a floral ribbon 4-5 cm, after which it alternately lay the fragments of the wreath. Each stalk is tightly fixed with a ribbon, making 3-4 turns. Place the items need to be more densely to each other. Elements will serve the main flowers, field herbs, another greens. As a supplement, you can use beads and pebbles planted on the pieces of wire. In combination with alive colors, the decor will look exquisitely.
- The stalks of the last elements are hiding Under the fixed plants and are tightly fixed with ribbon.
Wreaths from living inflorescences can be mad without creating a frame. Cut the stems in this case is not necessary. Weave to start with the formation of a beam of 3-5 stems. Each new fragment turns around the long stems of the initial beam by two turns (up to the inflorescence and after it).
The end is connected to the beam and closes into the ring using a floral ribbon. To give the accessory of strength to the stems of the initial beam, put the ribbon from the atlas. It is subsequently use to connect the composition.


From autumn leaves
It looks very beautifully a wreath of autumn leaves. The most popular is Klyon. Its leaves are yellowing faster than the other trees, and the structure is durable, not losing the original type for a long time.
Step-by-step instruction:
- On the prepared from the wire, the rim mounting 4-6 leaves at the same time. Fixation is performed using a floral tape.
- After 3-4 beams of maple leaves, insert rowabine. We will not know the reminder of the summer. To do this, you can insert green leaflets every 5-7 rows.
- Stands of the last fragments need to hide Under fixed leaves, but cut off.


From paper
Paper flowers are very gentle and fragile. When wearing can lose the form, so the masters recommend to fix flower arrangements on a solid foundation. The usual hoop is best suited for this. It is better if its foundation is wide, then the accessory will be massive.
Instruction:
- Stay on the table a composition of paper buds and leaves. You can add plastic greenery and beads fixed on the wire. The massive part is located in the middle, and to place small elements to the edges.
- Alternately fasten fragments to the base of the hoopUsing hot glue or pva.
- Seal the composition of greens And another decor.
- Parts of the hoop concerning the ears You do not need to accumulate with floral elements.


From tapes
To create a wreath you will need to prepare the elements: Flowers 4-5 species, greens, stamens. All of them are performed from satin and organza ribbons. If, on the tonality of colors everything is clear (for a beautiful composition, they are performed from various bright colors), then the leaves are cut into the creation of the composition of the composition of several shades of the green ribbon. To add air product, you need to use billets from organza.
The form of greenery should repeat the outline of the leaves of several plants. For example: Poplar, Oak, Clean. All edges of the elements made from the tapes must be melted to prevent the strain of the threads. To this end, you can use a lighter. Of the colors are often selected: poppies, chamomile, cornflowers, roses, chrysanthemums, asters. They are well combined with each other or in addition to other inflorescences.
Step-by-step instruction:
- Wave up the rim with a green ribbon method "Snake". Fix the needle and thread ends of weaving. It will be the basis.
- Stick leafs along the contour of the rim on both sides. Stop the elements of the venge, applying different types of greenery. There should be a volumetric basis.
- Next, alternately consolidate on glue flowers.
- Lastly, a compaction of the composition with organza leaves is sealing. They need to be recorded at once 3-5 pieces. Then the wreath will be great.
- To the edges of the rim to sew a gum 10-15 cm (Depending on the circle of the head). It should be decorated with green organs.
- To sew a few freely saving tapes of 30-40 cm. It will look beautiful if you use satin strips of different thicknesses (1 and 2 cm). Their colors must elaborate with the colors used in the composition. On the edges of the ribbon to perform a beautiful triangular cutting.


- For long events, it is worth carefully using accessories from living inflorescences. They quickly lose sight and by the middle of the celebration will completely lose a presentable look if they pre-hold them in the refrigerator. It will help to prevent a quick fading a special spray bought in a floral store.
- If the active rest is provided, the reliability of the wreath attachment should be taken into account. It will help to better fix the rim on the head of the tape tied on the back of the head.
- A bright wreath of large colors should not be complemented with catching makeup. It turns out an overload image.
- The flower accessory on the loose and slightly curled hair looks spectacularly. The appearance acquires the traits of tenderness, romanticism and freshness.
- You can make a wreath from several twigs of artificial colors. To begin with, the branches on separate fragments should be disassembled. After that collect the composition by gluing the elements on the hoop.
- On the solemn events and weddings it is recommended to use accessories Of the small flowers of pastel tones. Thin satin ribbons will add conformity to the appointment.
- Before making a wreath for a bride from the living colors, you should consult with a florist. The specialist will prompt, from which plants it is better to make a decoration. Fast flower rim damage can spoil the holiday.
- The longer straight, the larger the elements of the composition in a wreath.
- The accessory must be comfortable to put on the head. Do not build too bulky rims. Wearing them uncomfortable, and in the photo the face will be constantly lost in buds and leaves.
- If the outfit of the bride suggests the addition to the wreath, Buds from the rim must cross the bouquet.
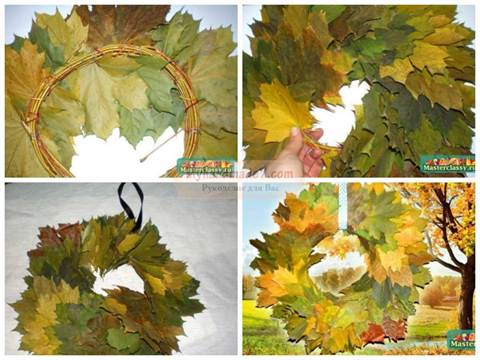
In the fall, so I want to bring the oakha of fallen leaves home, but what to do with them later? We offer you an article with master classes, how to make a wreath of autumn leaves with your own hands.
Simple option
We will need:
- rods;
- autumn leaves;
- wire;
- tape.
From the plates we form a circle, fasten wire. Then begin to adapt the leaves in a circle, they must be placed.
In order to hang a wreath, make a loop from the tape.
Royal flower
Let's make roses from leaves. To do this, they must be a little wet.
When a certain number of colors are ready, we prepare the basis from the thick wire, turning it into the ring.

Now we can connect roses in the troika and start these billets using a thread or a thinner wire secure.


Here is such a wreath in the end we turn out. For suspension also use tapes.

Crafts with children
Most often in the forest or park admire the leaf fall, we go with children. We offer you a master class, how to just make a beautiful wreath, introducing a child to the creative process.
Everything starts just from the collection. Choose multicolored leaves: red, yellow, green. Different types: maple, rowan, birch, etc.
From a disposable plate cut out the basis, how to make, shown below in the photo.


Now turn the pens of a child and his fantasy. Let the kid puts glue and places the leaves on the basis of the order that he tells him the imagination.


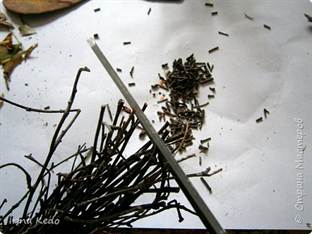
If the twigs are stitching, they must be trimmed.

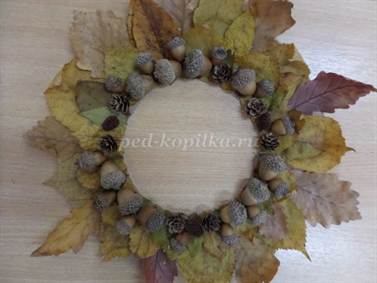
If you and the child have scored not only the leaves, but also a variety of cones, then do the following wreath.

For it, you can also use the base from a disposable plate, and you can cut out of cardboard. The leaves should be glued into several rows and in a checker order. For convenience, you can draw several circles.

When you get to the inner circle, start gluing the rest of the decor. To begin with, let it be a large acorder, but between them small lumps (for example, Olkhovy).

On top of the minor acorns into the space between the largest.
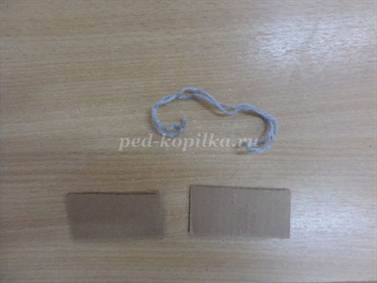
When all additional materials are glued or you will arrange an existing result, proceed to the manufacture of the loop. To do this, cut out two rectangles from the cardboard, and from a woolen thread, twine or ribbon, looping. It is placed between the cards and glue.
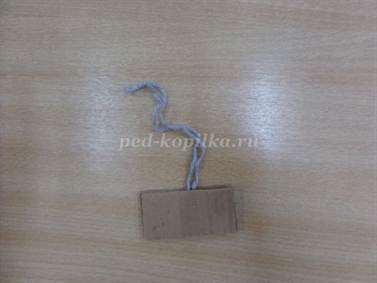
We glue the loop on the back side of the wreath and everything, it is ready.

From rowan leaves and berries

It will take:
- leaves, it is better to take birch or similar to them;
- rowan berries;
- drunks to choose from;
- thin twigs;
- cardboard;
- newspapers;
- twine or tape;
- malyary Scotch;
- glue.
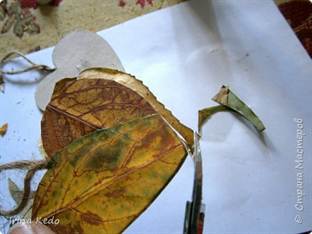
Cut the circle from the cardboard and take it with several layers of the newspaper using a greasy tape. We impose as much paper until we get the desired thickness.

With the help of all the same tape, we begin to cover the surface of the base with the leaves of the mustache. You can use and glue.


In principle, already in itself such a wreath looks beautiful, but let's continue to decorate it. To do this, distribute sprigs with berries throughout the wreath, branches of dried flowers.


Now lay a wreath toward and cut four hearts from cardboard.
You can make them one size, and you can make one of the steam to make a little less than others like you decide.

We glue in pairs, not forgetting between them to put a loot from the twine (or tape).

Now each side of the hearts close with leaves. Excessly cut off.


On the edges of the hearts we apply glue and sprinkle these places with a crumb of twigs.

The central part is decorated with rowan berries.

We attach hearts to a wreath, hiding the loops under the leaves.


Here is a wreath can be decorated with your home. And since he is made with his own hands and his work and spiritual warmth are invested in him, he will become a kind of faithful to your family.
Paper decoration
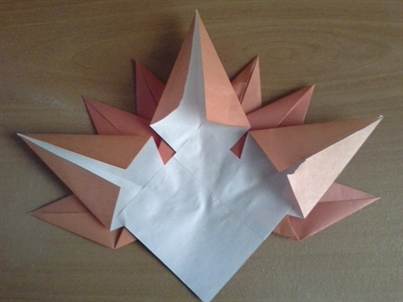
Well, what if, for example, the weather does not allow you to collect live leaves or do you live far from the park? What now, give up the idea of \u200b\u200bcreating an autumn wreath? Do not despair, color paper will come to the rescue. Here you too can use children, it will definitely develop not only from the imagination, but also a small motor. After all, we will make the leaves in the Origami technique.

Prepare:
- colored paper;
- scissors and stationery knife;
- glue;
- cardboard, preferably dense;
- stapler.
From the paper, cut the squares with the sides of 10 centimeters. For each sheet, we will leave 10 pieces. The number of leaves will depend on the size of the base.
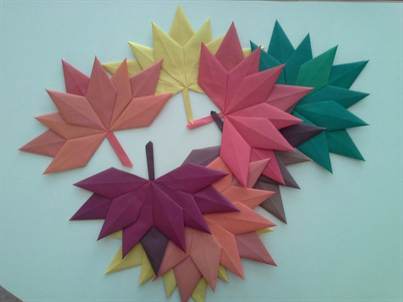
We take six squares and fold them diagonally. Next, both corners fold to the fold line. We have formed the corners below, they also bend them to the center. In three other squares, we will execute only the first stage of the addition of the right and left corner. But the tenth will serve to leaves with a stalk.


When all the details are preparing, we begin to glue them three, as shown below.

Then connect all the top three together. We have their bangs.
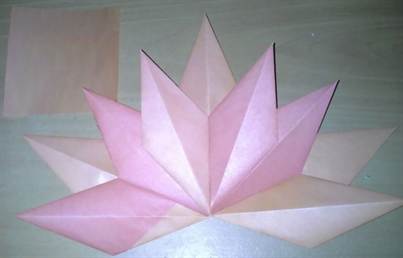

We stick on the reverse side the tenth square, cut it along the edge of the sheet, but not the end. This protruding part is folded in a stalk.


Now from the cardboard cut out the base and begin to place our leaves. We assign one on the other brackets in the inside.
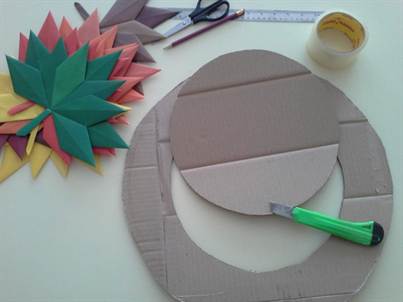

Our autumn wreath is ready. Here are such a variety of wreaths can decorate your house in autumn.
Video on the topic