How to make a beautiful and simple hairstyle. Hairstyle for long hair is beautifully easy quickly. A bundle of a pair of tails
Modern girls often experiment with hair and try to keep up with fashion. So now hairstyles for medium hairhave become especially relevant, because with the help of them you can stand out and emphasize your individuality.
SEE ALSO:Average hair length is considered the most common and comfortable; for this length, you can choose many different interesting and relevant hairstyles. What is considered medium-length hair? As we know everything in the world is relative, someone thinks that long hair should be below the waist, others say that long hair should reach the shoulder blades. Therefore, it is impossible to define a clear border of medium length hair. Most often, the hair is called medium when it reaches the shoulders, but does not fall below the middle of the back. In any case, in this article, everyone will choose a suitable hairstyle for themselves :)
Hairstyle for medium hair bun
Owners of medium-length hair can afford different ones, they can be located on the crown or at the back of the head, you can also collect hair in a bun on the side. The "character" of the bundle depends on the occasion for which you are doing it, for example, a loose, slightly tousled bundle is suitable for every day, a smooth bundle is best done at the exit, as this is the most elegant type of bundle. A slightly sloppy bun with curly hair can be done even for a holiday.Volume bun for medium hair
Step 1.Comb your hair and wind it up to the middle on a curling iron. This is necessary to make the beam look more voluminous.Step 2 and 3. Tie your hair into a high ponytail and secure with a thin elastic band. Before threading your hair in the elastic for the last time, do not pull it all the way, leave a small loop of hair and a free end.
Step 4. Spread the loop from one edge to the other.
Step 5 and 6. Twist the loose end of your hair into a loose bundle and wrap it around the bun.
Step 7 and 8. Secure your hairstyle with bobby pins or hairpins and secure with hairspray.
Bundle with a donut or sock
Such a bunch is suitable for every day, and 5 minutes is enough to make it.1 way
Step 1.Comb your hair and make a ponytail in the place where the future bun will be located.
Step 2. Take a "donut" and thread your hair about halfway through it.
Step 3.Begin to twist the "donut" by winding your hair around it until you reach the base of the ponytail.
Step 4. If necessary, fix the hairstyle with varnish.
2 way
Step 1. As in the first case, make a high ponytail and secure with an elastic band.
Step 2. In this method, the donut or sock should be at the base of the ponytail, so pull your hair all the way through it.
Step 3. Spread your hair evenly over the donut so that it is not visible.
Step 4.Use a thin elastic band to secure the hair in this position, leaving loose hair.
Step 5. We divide the remaining hair into equal parts and weave pigtails from them, then wrap the bundle around and fix it with hairpins.
Step 6. If desired, decorate the hairstyle with accessories.
Elegant bun with braids
Step 1.Divide the hair into 3 sections, the side sections located at the face should be smaller than the main section.Step 2. Secure the bulk of your hair with an elastic band.
Step 3 and 4. Comb the resulting ponytail and make a bun out of it.
Step 5-8.Now we will deal with the side strands. Of these, braids should be braided towards the bundle. It is best to braid back French braids and loosen them up a bit.
Step 9-13.We cross the resulting braids over the bundle and wrap them around it. We fasten with hairpins and our hairstyle is ready!
See our separate article.
Bun with curly hair
Step 1-2. Roll your hair into a small curling iron and separate the curls with your hands to create lush curls.Step 3. Make a messy ponytail out of the hair at the back of your head. The elastic should be thin and inconspicuous.
Step 4. Form a tousled bun out of the hair and secure with hairpins.
Step 5-6.Comb the remaining hair back and leave a couple of strands on the face.
Hairstyles for medium hair with curls
For medium hair, you can make a wide variety of curls. Small curls will make your hairstyle playful and light, while large curls will add romance to your look. For a special occasion, you can choose Hollywood curls on one side, such a hairstyle will definitely attract the eyes of others.Hollywood waves - hairstyle for medium hair
For this hairstyle, we need a curling iron for large curls. Part your hair with a side parting. Start twisting the strands in the usual way, starting from the back of the head. In this case, curls must be twisted in one direction. Only in this case will the desired waves be obtained. After all the hair is curled, take a comb and comb it gently. Using a comb, correct their position and, if necessary, curl the ends of the hair inward with the curling iron. By the way, see how to do it.Hollywood waves hairstyle video tutorial
Fun curls with flagella
Divide slightly damp hair into several equal parts. The smaller the strands, the finer the curls and vice versa. If you want to make more voluminous curls, you can divide your hair into 2-3 equal parts. Now take a strand and start twisting it into a bundle, then twist the strand into a small bun. It is best to do this hairstyle at night, as the hair needs to dry out. And in the morning, you will straighten your curls and get a gorgeous hairstyle for the whole day.Curls with flagella - video
Hairstyles for medium hair with braids
Not only owners of long hair can afford original braids, but also girls with medium length hair.Spit waterfall - do it yourself hairstyle for medium hair
Step 1.Twist your hair for large curls.Step 2. Separate a small section of hair from the side from which the "waterfall" will begin and divide into 3 strands.
Step 3.Start braiding your French braid. To get exactly the waterfall braid, and not just a French braid, you need to do the following: when we grab the upper strand and make the weaving element, then we need to let it down and leave it like that, this will be the "trickle of the waterfall", and to continue weaving we take a new strand under the scythe. Read more in the article "how to weave a waterfall braid".
Step 4. Continue braiding this way until you reach the opposite side and then secure the braid.
Video lesson weaving braids "waterfall"
Simple hairstyle with braids for medium hair
Step 1.Separate a small section of hair from the face and braid it into a regular braid or "spikelet" braid. Do the same on the other side.Step 2. Now we throw one braid from right to left, and the other, on the contrary, should get a kind of framing of the remaining hair. Secure the ends of the braids with hairpins and hide under the opposite braid. This hairstyle will take no more than 5 minutes.
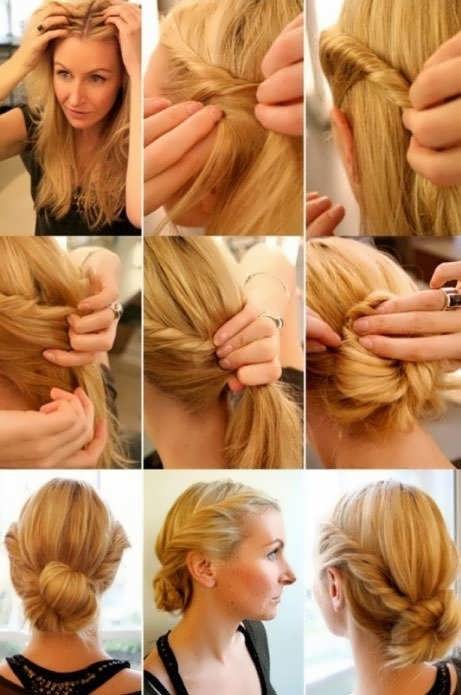
Back braid with bun
Step 1. Part off the side of your hair and braid the French braid in reverse. Secure the end of the braid with an elastic band.Step 2.Collect the remaining hair in a ponytail at the bottom of your head.
Step 3.Use a donut or sock to create a voluminous bun.
Step 4. Now wrap our braid around the bundle and secure it with invisibility.
Voluminous braid with loose hair
The hairstyle is very simple and does not require neatness; a slight negligence, on the contrary, will give the hairstyle lightness. This hairstyle is suitable for voluminous and thick hair.We begin to weave a French braid from one edge of the forehead, moving in the opposite direction to the back of the head. We grab strands from the forehead itself so that there is no loose hair left. At the same time, do not tighten the braid, it should be free. The braid can be braided to a certain point on the back of the head and secured with a hairpin, leaving the tail of the braid free or braiding the braid to the end.
A basket of braids for medium hair
Step 1. Divide the hair into 5 parts, while on top the hair must be divided into 2 parts, and on the bottom into 3.Step 2-4.We fix the upper strands and do not touch it yet, and weave a regular braid from each part from below.
Step 5. We form a basket of three braids and fix it with invisible ones. Braids can be twisted, superimposed on each other, the main thing is to get a beautiful weave of braids.
Step 6-9.Now let's deal with the upper strands, of which it is also necessary to braid braids, they should be looser. It is necessary to weave towards the back of the head. We also decorate the hairstyle with the finished braid. We do the same manipulations with the second upper strand.
We strengthen the finished hairstyle with invisible ones, if you wish, you can add the hairstyle with accessories or flowers.
Hairstyles with pile for medium hair
In everyday life, we do not often do the bouffant, many believe that such an element of the hairstyle is outdated and is only suitable for retro hairstyles, but there are a lot of brushed hairstyles that look gentle, elegant and feminine, the main thing is to know when to stop.Simple combed hairstyle in 5 minutes
Separate a medium-thick strand at the back of the head, twist it into a bundle and make a bun out of it, this will be the basis of our bouffant.Now take a strand closer to your forehead and comb through it. It should completely cover the bundle. Lay it back and comb a little over the top.
Select the strands at the temples and secure them at the back under the fleece using the bobby pins. Sprinkle varnish on your finished hairstyle and go for a walk.
Bouffant with braid rim
Back up the backbone as high as possible and secure the hair at the back. Divide the remaining hair into two equal parts and weave not too tight braids.We throw one pigtail to the other side and fix it behind the ear. We do the same with the second pigtail. Decorate your hair with a flower if desired.
Elegant brushed hairstyle
It will take a long time to create such a hairstyle, but the result is worth it. This hairstyle can be done for a prom or other celebration.Step 1.Divide your hair in two at the nape of the neck. Secure the upper part with a hair clip for a while so that it does not interfere. And from the bottom, make a tail.
Step 2.Comb the top of the ponytail and sprinkle with varnish.
Step 3. Twist your hair around the fleece for an even bun.
Step 4. Wrap the bundle in a small strand to keep it tighter.
Step 5. Separate another small section from the top of your hair and braid it into a braid.
Step 6. Now comb through the hair that remains on top and style it neatly to a bun.
Step 7. Pull the braid out and tuck it around your head, tuck the tip under the top of your hair.
Step 8.Twist the rest of the hair into a bundle and wrap it around the bun, secure it with an invisible one.
Step 9. Secure the hairstyle with hairspray.
Brushed ponytail
The hairstyle is quite simple, but it looks impressive, it can be done like the previous brushed hairstyles. You can see the step-by-step instructions in the photo.Hairstyles for medium hair with a bandage
Such hairstyles are also called in the Greek style. The headband hairstyle suits almost everyone and is ideal for medium length hair. Its popularity reaches its peak in the summer, when it is already hot to walk with loose hair, but you want to look beautiful.To complete this hairstyle, it is enough to take a bandage, put it on your head over your hair, and then twist your hair around the bandage.
We offer several photos of lessons of similar hairstyles:
Headband hairstyle videos
Retro hairstyles for medium hair
Retro hairstyles can spice up your look, but these hairstyles are unlikely to work for every day. Typically, this retro hairstyle is suitable for a theme party or as an addition to an evening look.To make such a hairstyle yourself, you need to practice, since retro hairstyles often contain complex elements.
4778
Reading time ≈ 7 minutesCan I get my hair done in 5 minutes for myself? Well, of course, yes! Moreover, it will look original, stylish and appropriate to the situation. Here and now we have prepared for you the fastest and most fashionable hairstyles that you can easily recreate with your own hands, even without having the proper skill for this. Look, try, be surprised!

Hairstyles in 5 minutes
Double tail
Want to visually lengthen your hair without resorting to a special extension service? Then this hairstyle is for you.
- Divide your hair vertically into two sections. One will be on the top of the head, the second on the back of the head;
- To add volume, the resulting tails can be combed a little;
- Next, you simply lower the upper tail to the lower one and admire the result.

Double tail
From the back, your styling will look like a very long tail. Agree, clever and convenient ?!
Bunch in the shape of a rose
And this hairstyle can be done easily in 5 minutes. It is enough just to perform a few elementary actions:
- Collect part of the hair at the crown, as for "malvinka";
- Then braid a NOT TIGHT braid and secure the tip with a thin elastic band to match the hair color;
- Next, start twisting the pigtail like a spiral;
- Having reached the base, secure the flower with invisible pins and hairpins. If necessary, the petals must be aligned;
- For better hold, apply hairspray to the rose.

Stylish bunch in the form of a rose
This hairstyle is perfect not only for everyday wear, but also for going out. And to enrich it, it is enough to place a pearl or a hairpin with a shiny stone in the center of the rose.
Hair bow
Continuing the theme of romantic images, let's try to recreate a bow on our hair. This is one of the simplest and most beautiful hairstyles that is easy to make for yourself. If you don't believe me, take a look at the photo. The execution technique is elementary. Time costs are minimal. The hairstyle can be done the first time.

Hair bow
- So, again we collect part of the hair at the crown, as for the previous option;
- Then, we divide the resulting tail into two equal parts, after which we make a fleece on each;
- We form the halves in the form of a bow;
- When you manage to do this, fix the ends well with hairpins;
- Sprinkle the outer side of the bow with varnish and smooth it with your hand.
All! Get ready to receive compliments!
Side tail
Too easy, you say? Maybe! But fast and beautiful. And even more so, we suggest that you make not a boring single tail, but a stepped one, but with a twist. By the way, this styling is ideal for long hair.

Side tail
- Start by making a tail on the side. But don't tighten it too tight;
- Now form a gap over the elastic and pass the hair through it;
- Secure the resulting knot with an elastic band. And just below, place another one, over which again form a gap;
- Drag the tail through this "window" again and fix it with an elastic band again;
- Make as many steps as you see fit. A quantity of three or more would be ideal.

Side tail
It is better to choose elastic bands for this hairstyle either from fabric or from silicone. The main thing is that they do not tighten tightly and do not injure the hair.
Bunch on the side
And again on your side? Why not! Well, you must admit that such styling looks playful and feminine. And the version of the bun that we want to offer you now can be safely attributed to the simplest hairstyles.
- First, make a tail on your favorite side;
- Secure it with a loose elastic band and comb it a little;
- Twist the resulting splendor into a tourniquet and immediately wrap it around the elastic;
- You should get a voluminous, slightly sloppy bun, which you firmly secure with hairpins;
- Now you can decorate it with a beautiful hairpin, or a flower, or something else of your choice.

Bunch on the side
Greek
Yes, yes, well, where are we without our beloved Greek styling ?! After all, you must agree that among the light and beautiful hairstyles for medium hair, she is undoubtedly in the lead. 5 minutes and the perfect look is ready!

Greek hairstyle
- Equip yourself with a special elastic band with decorations designed specifically for this occasion;
- Put it on top of your head over the head of your hair;
- Now start wrapping the side and bottom strands under the elastic;
- It is not necessary to tighten it tightly - naturalness is in fashion!
- When everything is ready, secure the structure with invisible ones (believe me, this is more reliable).
Perfectly clean hair is not needed for Greek styling. So, if you didn't have time to wash your hair, this is your chance to hide this fact.
Bun and fake bangs
Sounds weird? Far from it! After all, this is the easiest and most proven way to get bangs for the desired period and without a haircut.
- To do this, you just need to pull the hair into a ponytail, after making it smooth;
- Further, we form a bundle on the top of the head according to any desired pattern, but be sure to leave the ends "free";
- The height of the tail and the length of the ends should be such that you can get bangs of the desired size;
- When everything is arranged according to your taste, carefully secure the strands with invisible locks.
That's it, your "disposable" bangs are ready!

Bun and fake bangs
Braids
Do you like to weave braids as much as we do? Great! Then you will definitely love the following quick and original hairstyle.
- We make a straight parting and collect the hair in two tails on the back of the head on each side;
- We braid your favorite braids the way you like;
- And now we just take and twist them together;
- We fasten it.
Oops! In less than five minutes, and you are already fashionable and beautiful!

Stylish braids
Pigtail-rim
And here is one more five-minute, from which you will definitely be delighted.
- Loosen your wavy hair (yes, wavy is better, it will be more spectacular!);
- Take a strand of medium thickness somewhere near the neck and weave a regular braid;
- Then, when you are finished, pass it, like a rim, over your head;
- Fasten on the opposite side.
Your romantic look is ready!

Pigtail bezel
Quick hairstyles for girls
Thinking about what simple hairstyle your daughter can do for herself in school? Or are you just interested in styling for girls every day in 5 minutes? Then our following recommendations are just for you.
First, the most unmistakable option is braids braided over loose hair. They can be made as many as you like, one-three-five, decorated with multi-colored elastic bands and hairpins, hair can be fixed with them. In short, everything here is subject to your imagination.

Braids on loose stripes
Secondly, all kinds of tail options. Classic, inverted, stepped, on the side or when one tail goes into the other - all this is extremely simple and affordable.
Well, and thirdly, the tourniquet. It's so easy! Twist your hair into bundles, and give it all kinds of shapes. Let it be like a game! Your daughter can design her own hairstyle and do it. Well, isn't it great ?!

Beautiful baby hairstyles
As you can see, there are a lot of hairstyle options in 5 minutes that are easy to make for yourself. It is enough just to listen to the voice of your heart and understand what you want at this very moment. And the technical side will not take long. As a result, you will get the desired image without any extra effort.
Hello dear friends! The article will tell you about the various options for styling your hair without the hassle. Each of us sometimes wants to do something unusual, attractive, even amazing with our hair. But such experiments take time and patience. The ability to create beauty quickly is much more relevant, so today we'll talk about how to make an easy hairstyle from curls of any length.
Jasmine
- Use a hairdryer to add volume to your hair.
- Part it straight or side.
- Gather your hair in a ponytail at the neck, hold the bulk on top.
- Separate the ponytail with elastic bands, leave the end free.
You can make the same tail from the top of the head.
Light weaving
- Select the side strands at the temples, braid as you like.
- Wrap each braid in a thin strand.
- Connect at the back with a beautiful hairpin.
- Select the strands again - already from the level of the ears.
- Braid, wrap, connect below first.
Attention! If your hair is thick enough, you can braid a couple more braids. Tie the result at the back over the bulk of the hair. Choose the same hairpins.
Braid to the waist
Long ones are easy to style in a very romantic hairstyle.
- Divide the hair with a side parting.
- Dry with a hair dryer, add volume.
- Begin to weave the braid from the larger section along the face to the ear. ...
- Grab the hair from the other side, braid it into the braid using the fishtail technique.
- Secure the end with an elastic band or hair clip.
Loosen the braids a little for a lush effect.
Difficult bunch
The bundles are very trendy. Moreover, the more unusual, the more interesting.
- Braid three braids.
- Wrap each around, secure with small hairpins.
- Wrap the middle braids around, staple together.
- Wrap the left braid around the middle one, fasten it.
- Wrap the right one around the left - fasten it again.
Easy hairstyles for medium length
If we consider the average length, like curls to the shoulder blades, then with such a head of hair you can do the same thing as with a long one. It's fashionable now to wear retro hairstyles.
Basket
- Braid two spikelet braids all the way.
- Turn the right one to the left, fasten it under the left.
- Turn the left one to the right - fasten it under the right one.
Knowing how you can make a light hairstyle with a basket, you can experiment: fasten the braids crosswise, leave it slightly hanging or tighten it, slightly loosen the strands - the result will be different.
Hollywood
- Create a deep parting on the side.
- Select a wide strand from the bulk from the crown to the forehead. Comb to one side.
- Gather the hair in a bundle at the back.
- Curl the selected part with a curling iron from the middle to the ends.
- Tousle the curls slightly.
Despite the fact that the hairstyle is quick and easy, it will go well with an evening dress.
The spray will make the strands obedient and shiny. It will also protect them from the harmful effects of hot styling tools.
Youth
- Select a few strands in front.
- Wrap each with a tourniquet to the back of the head, fix.
- Gather the rest of the hair with a high tail.
- Curl the free edges of the tail with a curling iron.
- Arrange the curls so that they hide the ends of the bundles.
If the bangs are long:
- Twist the bundles, 3-5 cm long, do not connect.
- Secure with one long hairpin.
- Comb the rest of the bangs, leave it hanging from the main head of hair.
Perky
- Tie two high tails, leave the strands near the face.
- Twist the tails in a bun each, secure.
- Straighten the facial strands with an iron.
Delicate with long bangs
- Divide the hair vertically.
- Roll the bangs on the right up with a roller along the entire length of the hair, gather it with a tail at the neck.
- Do the same with the second part.
- Wrap the ponytails in a bundle, fix with small invisible pins.
Fashionable
- Add volume to your hair with a hairdryer.
- Apply a styling product to the strands around your face.
- Crumple the strands with your hands to get a very good result.
- Dry, secure with varnish.
It is better to fix a light hairstyle with a varnish of weak hold, it will leave a flying effect.
Stylish
- Blow dry.
- Comb from underneath, lay side strands back.
- Lay the bangs in a light curl at the forehead.
- Sprinkle the result with varnish.
When very short
- Dry your hair with a hairdryer.
- Lay the bangs on one side smoothly. To do this, you can iron it with an iron.
- Fix it with invisibility.
- Curl the rest of your hair with a thin curling iron.
- Let the curls cool, tousle.
- Fasten the side strands back with invisible ones.
- Apply a light hold varnish to the entire hairstyle.
Bold for the very short
- Apply styling product.
- Blow dry, create volume at the crown.
- Select the bangs to the side.
- Remove the side strands behind the ears.
- Sprinkle with varnish.
Complete mess
- Treat wet hair with mousse.
- Dry randomly with a hairdryer, do not use a comb. Move from the back of the head to the forehead.
- Comb the result with your fingers, tousle the bangs and crown of the head.
- Spray your hair with nail polish.
- You can highlight some of the bangs and sides with wax.
For short bob with long bangs
- With a hairdryer, treat the hair, the volume on the back of the head.
- Part the side.
- Braid the bangs with a weak oblique spikelet, fasten the end behind the ear.
- Also braid and secure the side.
Options for the most beautiful hairstyles for curls of different lengths
If your curls go down to the lower back or just flow to the shoulder blades - there are a huge number of styling options for them. Let's take an example of the most fashionable and common ones.
Fashion bow
- Dry your hair after washing, straighten the strands.
- Make a ponytail at the level of the neck, pull the hair out of the elastic to the middle.
- Divide the upper part into two, wrap the remaining part between them so that you get a bow.
- Hide the rest of the hair under the bow, secure it with invisible ones.
- Lay the strands in front as you like: straight bangs, hanging on two sides, back, oblique or curls at the face.
Such a bow can be created with an exit from the weaving of a spikelet from the neck to the back of the head, on the collected side strands with freely falling hair, on the tail on the side there are many options.
Romantic flower
The method is more complicated, therefore, it will require some skill. Set aside a weekend for workout and learn how to do a chic evening hairstyle for long hair.
- Make a traditional tail (choose the height at your discretion).
- Divide into three parts.
- Braid one section in a simple way, pulling the strands out of the weave along the way to get a slightly loose effect. Spray with varnish.
- Do the same with each strand selected from the tail.
- Wrap the last strand around the elastic so that you get a flower, secure the edges with invisible ones. Hide the tip well.
- Wrap the next weaves around the previous ones - the scheme is the same.
- Treat each layer with varnish, secure with invisible ones.
- The dropped edges of the braids should form a flower. You can place a beautiful round hairpin in its middle.

Delicate
Now about how you can make the most beautiful hairstyle with simple braiding:
- Collect the ponytail at the back of your head.
- Separate the strand, wrap it around the elastic.
- Braid the rest of the hair with a reverse spikelet to the very end.
- Gently pull the buckles in the braid so that the braid is weak, wide, almost loose.
- Distribute small beautiful crab hairpins on it, for example, with stones.
The upper part and the tip can also be secured with beautiful hairpins with stones (large at the top, smaller at the bottom).
Light curls near the face will give romance to the image.
Short, semi-short haircuts
Let's consider a semi-short version, as the length is to the chin or slightly below.
What can be done in this case:
Feminine
If the length allows the hair to be gathered, then do the following:
- Wind them up.
- Part it sideways.
- Comb the top strands, lay back.
- Gather on the sides, secure with invisible ones.
- At the back, fix each curl with a small hairpin along the entire length of the back of the head.
- Smooth the bangs with an iron, lay on one side. Or two, if you like (then do the parting straight).
Attention! As you proceed, fix each stage with varnish.
If there are loose, protruding hairs in the hairstyle, you can remove them with an ordinary paper napkin - go over them after fixing with varnish.
Carefree youth
Option on a square with long bangs.
- Part the side.
- Use a hair dryer to add volume to the back of your head.
- On one side, braid, including the hair from the bulk into the outer strand.
- Secure the end behind your ear with an invisible ear.
- Also braid the outermost section of the hair on the other side.
Very short
There are not many options here, but they are. It all depends what kind of image you need, but in any case, you will need auxiliary cosmetics: shaping mousse, wax, gel, varnish. How and what you have to use depends on the type of haircut. You can make waves or straighten strands with an iron, apply special hairdryer attachments to add volume. Now a very fashionable style - a mess on the head. The strands seemed to be blown out by the wind To make such an effect is as easy as shelling pears:
- Blow dry the strands at different angles.
- When the hair has cooled down from the treatment, tousle it with your fingers.
- Secure the result with varnish.
A little about styling fashion
If you want to make a fashionable hairstyle, remember - naturalness is relevant today. Whatever it is, mix light volume with the same casualness and you can consider styling fashionable and modern.
It is not fashionable to create even curls. For a stylish styling, it is enough to make beautiful large waves, beautifully arrange the ends.
Nowadays fashionable weaving - loosely intertwined strands, again light negligence.
Actual hairstyles for 2018-2019: French weaving, all kinds of bundles (including weaving), various options based on the tail.
Good to know
- For an effective result when working with a hairdryer, the strands should be selected no wider than its nozzle.
- Do not direct the hot stream for more than 10 seconds. The hair will dry out, will not lie down as intended.
- Dry the roots poorly - the hairstyle will quickly lose volume.
- Styling will last longer if you finish cold fening.
Conclusion
Need to remember:
- The durability of the created hairstyle is provided by the styling products. They treat wet strands before drying with a hairdryer, dry ones - when working with hot appliances.
- The hair spray makes the curls obedient.
- The gel should be used only when creating a smooth styling.
- When styling a short haircut, the first to process is the temporal locks.
- Varnish is used to consolidate the result, including the stages of creation. The best option is a medium hold. Strong can make hair look sticky.
- Wax is needed to fix the hairstyle, eliminate loose hairs.
- The gel is suitable for creating hairstyles on very short haircuts.
- Mousse is used to add volume.
- It is not fashionable to make tight braids.
- Complex hairstyles require free time in case the hairstyle does not work out the first time.
- To give a spectacular volume, the hair must be treated with mousse, dried with a hairdryer, moistened again, treated with mousse and a hairdryer.
- Argan oil (apply to wet strands) will help protect hair from the effects of hot styling.
- The best level of tail creation: visually draw a line from the cheekbones to the top of the head - this is optimal for the base of the tail.
That's all for now. We hope you found our material useful. If so, don't forget to hit the social media button at the bottom. And if you know interesting options for beautiful and light hairstyles, share them with our visitors. Thank.
See you in a new article!
The hairstyle in the appearance of any person, and especially a woman, is no less important than makeup and clothing. The neatly and tastefully laid hair gives a special gloss to the female appearance, drawing the admiring glances of those around them to their owner. Therefore, the beauties constantly try to monitor the state of their lovely head, wherever they are: at school, at work, at a party or at home.
If the hairdresser where your personal hairdresser works is two steps away from him, consider yourself very lucky. But if suddenly the services of a kuafer are not available at the moment for one reason or another, and the girl urgently needed to bring her hair “into a divine form”, what then?
It's okay: in principle, any of the fair sex is quite capable of independently constructing from her "mane" several options for original and beautiful hairstyles at home. We bring to your attention "hairdressing courses at home", and we hope that our tried and tested tips will help you to believe in yourself.
An important note for those who are experimenting for the first time: try to have at least a two-hour reserve of time in reserve - suddenly you don’t like something, and the "hairdo" will have to be redone.
What do you need for a good hairstyle? First of all, you need to figure out which style will suit you. It depends on many factors, including the contour of the face. He might be:
- square;
- triangular (heart-shaped);
- round;
- elongated;
- oval.
With a square type, rounded hairstyles that close the auricles are suitable. They will add softness and femininity to the image. The length should be medium: too short or too long hair "weighs down" the face, focusing on the chin. 
Holders of "hearts" are looking for images that create volume in the chin area, and thus visually balance the face. Lush bouffants over the forehead - not for them.
Chubby people can experiment: they have a very rich selection of options, from simple to multi-layered. However, rounded shapes that repeat the oval of the face are definitely excluded.
For a lady with an elongated facial type, a short haircut is best suited, visually "expanding" it.
The oval shape is ideal in every sense, almost all types of hairstyles go with it, with the exception of those that cover the forehead and cheeks.
If you find it difficult to determine your type, a simple test will help you: looking in the mirror, carefully trace the contours of the reflection with lipstick, then move away from it. The drawing remaining on the glass will put everything in its place. Next, we suggest finding out how to make your own hairstyle for short hair, medium length or long curls.
Curls and bunches, braids and ponytails
When everything is clear with the face, let's clarify the hairstyle options. They can be simple or complex, everyday or festive. To work on them, you will need various power tools, such as a hairdryer, curling iron and a hairdresser's iron, as well as combs and brushes, hairpins and varnish to fix the result. All is ready? Let's get started!
Scythe - maiden beauty
Braids are one of the most common types of hairstyles for long hair. But do not think that by braiding them, the girl will certainly acquire the appearance of an exemplary high school student from a film of the middle of the last century.
A braid can look very stylish if you use fairly original weaving methods. Let's talk about the two most fashionable ones - the so-called French weaving and “fish tail”: those who are fluent in them can easily cope with the problem of long and thick hair. How to quickly make the simplest hairstyle for yourself?
French braid:

If everything is done correctly, the braid should turn out to be smooth and elastic, and the weaving pattern should be clear and clearly visible.
"Fish tail" - this is how this braiding is called in Europe (English "fish tail"). In Russia, such a braid is usually called "spikelet" or "herringbone".
It is perfect for everyday wear. At the same time, the hair is not stretched, not pinched or injured, and some conceived looseness and delicacy contributes to the fact that, even slightly disheveled at the end of the day, the pigtail does not look untidy. So, forward to French charm!
- Smooth and comb your mane carefully.
- Divide it in half.
- Grabbing the strand from the outside of the left half, throw it over the top to the center and attach it to the right side.
- Repeat this step in mirror order on the right side.
- After finishing weaving, fix the tip with an elastic band or sprinkle with varnish - then it will not crumble without it.
To create a delicate weave, lightly pull the hairs at the roots and loosen them. The middle and lower parts of the braid do not need to be touched so as not to disturb the composition. 
Both the "French" and "mermaid" methods are suitable for both an adult girl and a little girl, but in this case, the mother will have to take care of the pigtail, since the child cannot cope with such a task on her own.
Medium length at high level
From medium-length hair, you can quickly create a variety of bunches.
Method number 1: "harnesses":
- We make a high ponytail on the head.
- We divide it into several equal parts.
- We turn each into a tourniquet.
- We collect a bundle from the bundles.
- We pin it with hairpins.
Method number 2: "shell":

Method number 3: from the "reverse" tail:
- Having combed the hair, make a tail out of it and pull it off with a wide elastic band.
- Pull the elastic down a little and, separating the strands, turn the tail outward, sticking it between them.
- Braid the inverted section in a fishtail style, tying the end with a thin elastic band.
- Stretch the hairs gently to add volume to the braid.
- Lift it up, tucking the tip towards the base.
- Secure the bundle with pins
Method number 4: from braids:

But do not limit yourself to just one beams. On strands of medium length, curls curled with a curling iron look great. Here's how to do it.
Soft waves:
- The temperature of the forceps is medium.
- The strands are wound on the curling blades.
- It is not worth keeping your hair on them for a long time - this time you only need a slight waviness.
- Repeat steps 6 and 7 (see above).

Elastic springs:
- With a high temperature, warm up the tongs.
- Divide hair into several strands, protecting them with a special product from overheating.
- In turn, carefully screw each of them onto the curling iron, withstanding the maximum allowable amount of time.
- Remove the ring from the forceps, fix it on the head with an invisible one and do not remove it until the strands have cooled down.
- Repeat the operation with each strand.
- Comb with a large-toothed comb.
- Sprinkle with varnish.
Bang-broom
There are many types of bangs for medium length hairstyles. Here are the most fashionable ones.
- Straight long - great for a thick "mane" covering a highly intelligent forehead. It starts near the crown and ends at the brow line.
- Straight short - refreshes and rejuvenates, dropping several years in one fell swoop. suitable for those who do not have too large facial features ..
- Semicircular - practically does not stand out from the general line and emphasizes the beauty of the eyes, these "mirrors of the soul."
- Torn - done with thinning, giving the look a perky touch.
- Oblique - masks asymmetric facial features, making the appearance original and stylish.

Bangs on short hair also look very attractive. We offer several design options for this part. How to make the lightest hairstyle on your own hair with bangs:
- Option 1.
The bangs are combed back in the shape of a slight mess. Looks good with any type of face and style of outfit, except for business.
- Option 2.
A comb of thick straight bangs, on both sides of which curls are left. Ideally combined with coloring and highlighting.
- Option 3.
Short cut straight hair with long bangs. The bangs are combed to one side, and the hair is slightly fluffed up with fingers soaked in foam. 
- Option 4.
We straighten the bangs with an iron, and curl the strands on the sides with a curling iron and fix them with varnish. It turns out very elegant, especially if you decorate all this art with a flower - with such a head you can go to any holiday or celebration.
- Option 5.
Side bangs and zigzag parting are perfect for those who prefer an original style.
Short, stylish, beautiful
The widespread belief that the shorter the mane, the more limited the choice of hairstyles, is wrong. Owners of short (but not "boyish") haircuts have many ways to quickly arrange something original and memorable on their heads. 
So, for example, a regular parting can be straight, oblique, zigzaz, etc. There are also more spectacular, but not so difficult samples.
- A volumetric styling made with tongs (now they are more often called an iron), a hair dryer and a brush looks good on a bobbed head. Slightly twisting the strands inward, at the same time dry them with a hairdryer and comb them so that they become lush.
- In the process of "wet" styling, the strands are moistened with a special gel and, with the help of a comb, are placed on the head - as you please.
- Using an iron or curling iron, decorate your haircut with curls. Curled inwards, they will give your look a touch of classicism; if you twist them outward, it will become more creative and modern.
- You will be given a festive look by strands twisted into flagella at the temples, fastened at the back with hairpins and brooches.
- The bob style can be diversified with a low tail, releasing curls on the sides to frame the face.
- Having combed the back of your head in a straight or wavy parting, make a pair of small ponytails from the curls on the sides - and now you are no longer a respectable lady, but a mischievous girl Pippi Long Stocking.
- With an asymmetric haircut, the mane is divided by an oblique parting, and on the smaller side it is twisted into flagella fastened with invisible ones. Most of the hair is curled with light curls and is lightly combed.
Thus, a short haircut is not an obstacle to experiments with the image, which allows you to constantly change your appearance, preventing it from being "commonplace" both in your own eyes and in the eyes of the people around you. 
So, we looked at several types of hairstyles for a wide variety of face and hair types. Now you know how to make a beautiful hairstyle for yourself for a holiday or everyday - to school, to work, to study.
We hope that you can choose the one that will help to give your appearance the features of charming charm and originality.
Be bolder, experiment, add your own inventions to each and do not forget that your "crown" should be in harmony with makeup, clothes, shoes as much as possible.
And then you will be perfect wherever you go: for a business meeting, a gala event or a romantic date.
And another hairstyle idea that you can do yourself is in the next video.
To create stylish hairstyles, some go to a beauty salon, while others are happy to study our master class. In it we will tell and show you how to make a beautiful hairstyle for yourself.
Romantic bundle
- Carefully comb the strands and.
- We collect them in a high ponytail.
- We select two thin strands and weave two tight braids.
- We pin them with invisibility so as not to interfere.
- We make a light bouffant on the tail.
- We put the hair in a free bun. We fix it with hairpins.
- We release the pigtails from invisibility and carefully wrap the bundle with them. We hide the tips under the main mass and pin them with a hairpin.
Fancy tail
1. We select a dense strand from the right ear and wrap it in a ring at the back of the head. Leave the same strand at the left ear free.
2. Pick up the strands remaining at the bottom and twist them into a bundle.
3. We collect hair in a ponytail.
4. Wrap the strand at the left ear around the elastic. We fix the tip with a hairpin.

DIY evening hairstyle
To create this styling, you will need a professional roller or a thick elastic band cut across.
- Comb the strands in a parted part.
- We apply a roller at the very bottom of the hair.
- We wind the hair on the roller, gradually moving up.
- We fix the hairstyle with a pair of hairpins.
- Cover the holes on the sides with hair. These strands also need to be fixed.
- We spray the hair with varnish.

See also a selection of beautiful hairstyles for all occasions:
Feminine braid hairstyle
- We divide the hair into three equal parts. We collect the middle one in the tail, leave the side ones free.
- We braid pigtails from each section (not very tight).
- We lay the braids in bundles, fixing them with hairpins.
- We put the middle pigtail in a bundle around the base of the tail.
- For reliability, we spray the strands with varnish.

Do you like braids hairstyles? Most popular articles:
Beautiful hairstyle for going out
Step 1. We collect hair in a ponytail at the back of the head.
Step 2. Slightly pull the elastic down and put the hair in this "cell". Be sure to pin everything with pins.
Step 3. Decorate the hair with a decorative hairpin.

Festive evening bunch
1. We tie the hair in a low ponytail on the side, leaving only a thin strand of hair at the temple free.
2. We wind the strands with a curling iron or iron.
3. From the curls we form rings and put them around the elastic, securing them with pins and invisibility.
4. Tighten the side strand.
5. We twist it into a bundle and put it around the bundle.
6. Decorate your hair with a decorative hairpin or hairpin.

DIY youth styling
Step 1. Separate a not very thick strand near the forehead. Lightly comb it with a comb and tie it with a thin elastic band.
Step 2. A little lower, select a section of hair of the same thickness. We tie it in a ponytail.
Step 3. We repeat this action, gradually moving from the crown to the back of the head. You will have 5-6 tails.


Step 4. We wind the ponytails on the curlers (you can use an iron or curling iron).

Step 5. We put the curls around the elastic bands, forming loops and curls. We fix everything with invisibility and hairpins.
Step 6. Slightly squeeze the finished hairstyle with your hands, making a mohawk out of it.

Step 7. Spray hair with varnish.

A simple bundle for every day
Not sure how to style your own hair? Believe me, there is nothing easier than forming a stylish bun out of your hair that will not fall apart during the day.
- We do the bouffant on the top of the head.
- We collect hair in a high ponytail.
- We braid two pigtails from it.
- We lay the braids in a bundle. Fix the result with a hairpin.
- We attach a funny bow at the bottom.

How to make a stylish bun in 30 seconds?
High hair bow
- We collect hair in a ponytail at the top of the head.
- We separate the upper part from the total mass (it should not be very thick) and transfer it to the forehead. You can pin it with a clip so that it does not interfere with further work.
- Tie another elastic band in the middle of the tail.
- Flatten the section of hair between the elastic bands. It will split into two parts, forming a future bow. We fix the hairstyle with hairpins.
- We hide the remaining tip inside the bow - this will make it denser.
- We throw the free strand forward - this will be the middle of our bow. We fix it with invisibility both in front and behind. The tip, if it remains, of course, is also hidden in bow slices.
- We spray the hair with varnish.


Fancy ponytail
1. We collect hair in a ponytail at the top of the head.
2. Separate a thin strand and wrap an elastic band with it.
3. We make a light fleece on the tail.
4. We drag it with thin elastic bands in 2 more places.

Delicate curls in a couple of minutes
It can be very difficult for owners of very long hair to wind them up. Our master class will teach you how to do without the help of your mother or girlfriend.
1. We collect strands in a high ponytail.
2. Bend your head down.
3. We disassemble the hair into thin strands. We wind each one on curlers or an iron.
4. Cut the elastic and spray the curls with varnish.

Bundle with harnesses
- Comb in a parted part.
- Separate not too thick strands on both sides.
- We twist them into bundles.
- We attach bundles to the rest of the hair and tie a low ponytail.
- We form a bundle from the tail and fix it with hairpins.
Delicate and very stylish styling
Stage 1. Separate the hair strand in the parietal part.
Stage 2. We comb it with a comb and attach it to the main mass with the help of an invisible one.
Stage 3. We select thin strands on the sides and twist two bundles of them.
Stage 4. We put the harnesses in such a way that they cover the invisibility.
Stage 5. We fix the styling with hairpins and varnish.

Knowing how to make a beautiful hairstyle for yourself at home, you will not only save on the services of a stylist, but you will also be able to surprise everyone with cool styling every day.