Kanzashi photo frames. Master class on creating a kanzashi photo frame with your own hands - original and simple. Video tutorials on creating photo frames using the kanzashi technique
Here are some examples of work where this technique is used: 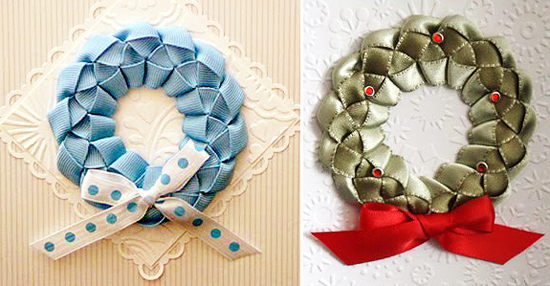


Watch the video, it clearly shows how to achieve these magnificent patterns:
FRAMES FOR POSTCARDSHow can you use regular ribbon to decorate a card? Sometimes you come across amazing ideas! And it seems like you already know a lot, have seen a lot, but here... In general, you can always stumble upon a thing hitherto unknown to you.
Notice how simple and interesting the idea with a ribbon frame looks. And it’s not at all difficult to do this - just make little knots on four pieces of tape, and secure their ends to the postcard, having previously made four holes in it with a breadboard or stationery knife. :-) 


The article was written using materials from the site http://waltzingmouse.blogspot.com
We have already made frames from ribbons for postcards. I propose to continue the topic and consider another recipe for making a frame from ribbons. This is a small idea that you might like. 
What we need:
- glue and foam tape (or ready-made 3D glue squares);
- a ring (as in the picture) made of cardboard or thick paper;
- ribbon and lace (optional);
- scissors;
- watercolor paints or stamp pad.
We take a ring that has already been cut out of paper and begin to wrap it with tape. It is advisable to secure the ribbon with glue on the back side of the ring so that it does not slip off the base. You can use lace (as in the photo) - this is optional. The finished frame is attached to foam tape and at the very end is decorated with a bow from the same ribbon. Everything ingenious is simple! 


1. ELEMENTS OF KANZASHA FOR DECORATING PICTURES AND PHOTO FRAMES
One of the interesting trends in needlework that has gained popularity recently is embroidery of pictures. Cross stitching pictures or beads, many masters and craftswomen create real works of applied art! Paintings can be interestingly decorated. And here the popular decoration technique - kanzashi.
Typically, decorative elements in the kanzashi style are made from satin ribbons or bright multi-colored fabric. The most common crafts are flowers , butterflies, bows. In previous materials we have already told you how to use the kanzashi technique to decorate popular women's hair accessories - brooch, automatic hairpin, headband, crabs.
From this article you will learn how to make it yourself graceful flowers in kanzashi style with round or sharp petals and decorate embroidered paintings or photo frames with them. With the help of simple video and photo master classes for beginners, you will quickly learn how to make elegant flowers that will decorate a picture with a frame using the kanzashi technique.
In general, in Japanese kanzashi there are many interesting ways of making decorative flowers from different materials . Japanese craftsmen use a variety of types of flowers to decorate jewelry: ogi in the form of a fan, kusha combs, birabira pendants, flowers made from kanokodome stones, kogai hairpins, tamas and kusudama. But our most common technique is hana (or tsumami). This is a direction in handicrafts. Only the material used to create individual modules for crafts is not paper, but satin ribbon. Square pieces are cut out of it and elements for decoration are formed.
The most common elements are petals of different shapes, with and without curls. From them flowers are formed, and from flowers - compositions for decorating women's accessories or paintings. The most popular flowers made from kanzashi ribbons among craftsmen are irises, roses, chrysanthemums, and lilies. Sometimes the central part of the flower is decorated with beads, rhinestones, and buttons.
The easiest way to decorate a painting with flowers using the kanzashi technique:
Materials and tools for work:
sharp scissors, hot glue gun, lighter, wide wooden frame, A-4 cardboard, large black beads, felt, burlap, gold braid, steel tape. Satin ribbon in yellow, green, orange, red colors (width - 5 cm) 
Stages of work:
Cut out 5 x 5 cm pieces from satin ribbons.
We form round petals from orange, yellow and red squares using the kanzashi technique (below are separate tutorials for making different petals and flowers)
We make round and sharp petals from green squares. Green petals will be single and double.
Now we make the core for the flower. To do this, carefully cut out a 1.5 cm circle from felt with scissors. Then cut out 4 more similar circles.
We distribute the made petals around the circle of our core and glue them with hot glue.
Beads should be glued to the center of the flower core, and golden braid along the edge.
We cut out sharp petals from a steel ribbon and distribute them between the petals of satin ribbons.
We make the basis for a kanzashi flower arrangement in the form of a picture. We stretch burlap over a sheet of cardboard and secure it with a wooden frame.
Now all that remains is to trust your taste and create a composition of kanzashi flowers on the canvas. Flowers can be glued using super glue.
3. MASTER CLASSES. DIFFERENT OPTIONS OF KANZASHA FLOWERS FROM RIBBONS FOR DECORATING A PICTURE
Master class 1
THE BASICS FOR BEGINNING NEEDLEWORKS. WITH THE HELP OF THIS INSTRUCTION WITH DIAGRAMS AND MK YOU WILL EASILY LEARN TO MAKE INDIVIDUAL ELEMENTS FROM SATIN Ribbons USING THE KANZASHI TECHNIQUE.
Master class 2
HOW TO MAKE AN ORIGINAL FLOWER WITH DOUBLE PETALS WITH YOUR OWN HANDS USING THE KANZASHI TECHNIQUE. STEP-BY-STEP LESSON WITH PHOTO.
Master class 3
How to make different petals and leaves to decorate kanzashi flowers and paintings:
4. VIDEO MK FOR BEGINNERS. DECORATION OF PICTURES USING THE KANZASHI TECHNIQUE
Using beautiful products using this technique, you can make not only headbands and hairpins, but also decorate household items. Kanzashi elements are used in scrapbooking, sewing, and for decorating photo frames and interior items. Today we offer you a master class on “photo frame using the kanzashi technique”.
List of materials
This master class is suitable for diligent beginners. You need to make a lot of elements in it, try several techniques, but the result will definitely please you. If you are not sure that you can complete the product in the master class, practice its execution in stages. Only the most persistent craftsmen will be able to make a photo frame in one go.
The designer accessory is suitable as a hand-made gift and will advantageously decorate the interior of the room. Using different materials and techniques, you can make objects in different styles. Wedding photos will look good framed in a cream shade.
For the photo frame you will need:
- satin ribbons 5 cm wide in two or three colors;
- thin satin ribbon 7 m long;
- scissors;
- glue;
- burner;
- tweezers or forceps;
- wooden frame of the desired size;
- beads or half beads for decoration.
The master class consists of two stages: preparing the frame for work and decorating it. Stock up on materials and patience, and feel free to get to work.
The first stage is preparing a photo frame using the kanzashi technique
Cover the frame with double-sided tape. We fix one end of a thin tape, remove all layers of tape and fix the tape on the adhesive layer. Carefully smooth out any uneven surfaces to ensure your work looks neat.

In this way we process the outer and inner edges of the frame.

You can further decorate it with a braided braid made of satin ribbons. To do this, you will need thin tapes 5 mm wide. To weave a frame 20 by 15 cm you need a total of 7 m.
You need to work in two long sections. We put one loop into another, as in the photo.


We work with the long ends of the ribbons. We fold the long end of the bottom ribbon into a loop and insert it into the top loop. We do the same with the other end. Repeat until the desired length. For clarity, use the video master classes.


When you have made a braid of the desired length, pinch the ends with pliers, trim off the excess and carefully singe the ends. Repeat from the other end of the workpiece.

Decorate the sides of the frame with ribbon. Leave room for the future large flower. We will cover the joints with decorative elements.

The second stage is decorating the frame
At this stage we make a large volumetric flower, small flowers and decorative elements.
For the first level of the flower, we fold rectangular blanks 5 by 5 cm diagonally. We put them together: yellow on the sides, purple in the middle.

Fold all three pieces in half. Fix with forceps. The workpiece looks like this.

We cut off sharp corners (not at the bend) and burn the cuts.

The finished petal looks like this.

We glue the blanks together on a circle of felt or thick cardboard. Glue closer to the edges of the circle.

Making the second level of the flower. We put the triangles folded in half into each other.

Fold the workpiece in half again. Repeat cutting the corners and frying in two places. We glue these petals together (without felt).

We get such a flower.

From white rectangular pieces (3 by 3 cm) we prepare small single petals.

At this point you can decide how you will use the blanks. It can be three different flowers, then you will make the frame faster. But we propose to make a large multi-level flower from the elements.
Glue white elements between the petals of the second blank.

Glue the blank with white petals on top of the first one. Decorate the middle with a bead or half bead.

Making hollow petals. To do this, we fold the square of tape twice diagonally, cut off the lower part, but do not fuse it together, just singe the edges. The petal looks like this.

Make the desired number of flowers and decorate the middle.

Let's start decorating the base. Glue a large multi-level flower onto the remaining space. We additionally decorate the ribbon with hollow petals in the form of a pattern.
Glue flowers with hollow petals to the opposite corner.

This results in a frame like this.

Now you know how to decorate a photo frame with kanzashi flowers. With the help of the learned techniques, you can easily make different flowers, decorate headbands, and braid a braid from a satin ribbon. Don't limit your imagination and experiment with different techniques.
Conclusion
A photo frame using the kanzashi technique consists of two stages. Even a beginner can do it with the help of instructions. To work you need to be diligent and be able to work with basic tools and materials. This designer photo frame will advantageously decorate your shelf with photographs. The manufacturing technique can be simplified and a more minimalistic frame can be made.
Video master class “Photo frame using kanzashi technique”
DIY photo frames are always relevant.
This is a great gift and a wonderful home accessory. A kanzashi photo frame made from satin ribbons made according to our master class will decorate a coffee table, bookshelf or chest of drawers. Delicate flowers and a charming butterfly are symbols of eternal spring and good mood. It is appropriate to give such a gift to friends, colleagues, teachers and doctors. Prepare everything you need and get to work.
Materials and tools for crafts
To make a photo frame in the style of format 10-15, you need to prepare the following materials:
- four sheets of A-4 cardboard;
- turquoise fabric – 30 cm wide and 20 cm long;
- pencil and ruler;
- satin ribbons of the following colors and widths: milky - 0.5 cm and 2.5 cm; golden - 0.5 cm and 2.5 cm; silver –3 cm; purple – 0.5 cm; pink – 2.5 cm; yellow – 2.5 cm; dark green – 5 cm; light green – 2.5 cm; white – 5 cm;
- half beads of different diameters - 15 pieces;
- 8 beads for the butterfly;
- mesh fabric - two pieces: 10 cm x 7 cm;
And tools:
- lighter;
- hot gun.
- stapler;
- fishing line

Step-by-step master class on creating elements and assembling
Take a sheet of cardboard. Draw and cut out the elements for the base of the frame: length of the upper and lower parts: 24 by 5 cm; the length of the side parts is 21 by 5 cm. On each side of the strips, cut the corners and round them. 
In order for the frame decorated with kanzashi to be stronger, you can cut out exactly the same parts again and connect them with a stapler.
Then place each piece on the fabric and trace it with a pencil. It is very important to take into account that you need to increase the length by a centimeter on each side in order to bend the material and glue it to the back side. 
Cut out the pieces and cover the cardboard parts with fabric. Place fabric parts on a flat surface and cardboard parts on top. Carefully apply hot glue in small parts, immediately bend and glue the fabric extending beyond the cardboard onto its back side.

Place the wrong side up on all the pieces the way they should be connected. Cut 4 x 4 cm squares from cardboard and round the edges on both sides. Apply glue to the joints of the photo frame and connect the parts. 
The result is such a frame - the basis for decorating with kanzashi flowers. 
Next, proceed to design. From the mesh, cut 2 pieces of 10 by 7 cm. 
On one side of each piece, gather the edge and secure it with a stapler. Then glue them on both sides diagonally from the wrong side: on the inside, the narrowed part, and on the outer corner, beautifully distribute and attach the wide part of the mesh to make a “fan”. 
To beautifully frame the frame, you need to weave a braid from two narrow ribbons: golden and milky, 0.5 cm wide and 5 meters long.
Cross the ends of the two ribbons. Grasp the milk ribbon with the edge of the top golden ribbon and glue it from below, while the end of the milk ribbon should protrude 2 cm so that a loop remains after it is glued from below. 
Into the resulting loop, thread the golden ribbon, already bent into the tracking loop. 
In the same way, alternating the ribbons, continue to thread the loops into each other until the desired length of the ribbon is reached. 

When the braid is ready, carefully glue the ends down.
Take the frame and glue the tape along the edge. 
Next you need to make kanzashi flowers and a butterfly from ribbons.
Take milky ribbon and cut 36 squares for the petals of the central chrysanthemum. Fold it in half to make a triangle, then fold it in half again. 
Connect the edges of the small triangle together. Trim the bottom ends. Burn the edges with a lighter, pressing lightly with your fingers so that they stick together. 
Connect the nine petals together with hot glue - this will be the top row. 
Attach the second row of petals between the first layer a little lower. For the third and fourth layers of the flower, cut 18 squares of gold ribbon to make two-layer petals.
Fold the square in half, then fold it again. Insert a milk petal into this triangle and connect the edges of the golden triangle, as if you were wrapping it. 
Glue also in a checkerboard pattern next to each other below.
For side chrysanthemums, cut 7 squares of milky ribbon for the top layer of flowers, 14 pink and purple squares, 14 golden ones for the petals of the lower rows of chrysanthemums. The technique is the same as with the first flower. 
Glue mother-of-pearl half-beads to the center of the flowers.
To decorate the next corner of the photo frame, you need to make a kanzashi daisy. To do this, take a white ribbon 5 cm wide and 55 cm long. Cut into squares. Fold the square in half to form a triangle again. Then fold each edge toward its center corner. 
Holding the bent ends, bend them in half again. Trim the sharp edges with scissors and burn them with a lighter. 
Glue the petals one by one with glue. Then cut out a circle from the yellow tape, singe it with a lighter and glue it to the center of the daisy. 
The flowers are ready, now you need to make leaves for them. To do this, take a dark green ribbon 5 cm wide and 45 cm long, a light green ribbon 2.5 by 22.5 cm, and a silver ribbon 3 by 27 cm. 
The technique is the same as for chrysanthemum petals: first make the first light petal, then “wrap” it with a silver layer folded into a double triangle. 
In the same way, wrap two layers of the finished leaf with a dark green layer. Burn and secure the edges and bottom of the leaf well so that it does not crumble. 
Glue leaves 3 at a time along the edges of the side chrysanthemums and on one side of the daisy. 

To make a butterfly, take a peach ribbon: 4 by 8 cm, yellow: 2.5 by 5 cm, golden: 2.5 by 5 cm, milky: 2.5 by 5 cm, as well as 8 beads of different sizes and 9 cm fishing line
The body of the butterfly consists of two parts, the manufacturing technique is the same as in a chamomile petal (only smaller) and a chrysanthemum petal (like the narrow wings of a butterfly).
To make wide wings, fold the square in half, fold the edges of the triangle just above its top, and then to the top. 
Cut off the sharp edges and burn them.
Glue all the parts of the butterfly together, as in the photo. String the beads onto a fishing line. After the last smallest bead, insert the fishing line into the previous one and pull it out from the top one so that two antennae stick out. Glue small beads to the edge of these antennae. 

All the details of the kanzashi frame are ready, but before gluing them, cut out a square from cardboard along the contour for the wrong side, but so that it is not visible from the front. Glue a loop of thin tape under the cardboard on top. Don't glue one of the sides of the cardboard to insert the photo! 
Next, place all the decorative elements made using the kanzashi technique on a photo frame and secure with a hot gun. 
Take half beads of different sizes and place them between the colors. 
An elegant kanzashi style photo frame is ready! You can keep it for yourself or give it to a loved one. By changing the color of the background and ribbons, you will get a new design.
This modern technique produces luxurious ones, and much more. For a selection of master classes on kanzashi, see. See you again!
Photo frames have always been and remain relevant as a gift for any occasion. This interior accessory contains the most precious and beloved memories that will always be in sight. A master class, which will be described in this article, on making a kanzashi photo frame that can decorate a bookshelf, desktop or wall. It would be appropriate to give this craft not only to family and friends, but also to work colleagues. So let's get to work immediately. But first, look at interesting options for decorating frames with satin ribbons for inspiration.


Step-by-step master class in kanzashi technique
To conduct this lesson in kanzashi style you will need the following materials and tools:
- four thick cardboards;
- turquoise fabric;
- pencil with ruler;
- satin ribbons in the following colors: milky, golden, silver, purple, pink, yellow,
- dark green, white and beads in the amount of fifteen pieces;
- mesh fabric;
- candle or lighter, glue gun, stapler and fishing line

First of all, we will make our own cardboard frame. You need to outline and cut out the parts that will make up the craft. The top and bottom blanks of the photo frame should have a size of 25 by 5 cm, the side elements have different dimensions - 22 by 5 cm. The corners must be trimmed and rounded. After this, each blank is placed in fabric and outlined with a pencil. The material is outlined with a margin so that it can be glued to the cardboard.


Connect the joints between the parts using four by four squares with rounded edges. In the photo you can see what kind of photo frame it should be.


Take the mesh fabric and decorate the parallel corners of the frame with it so that they look a little like an open fan. Next, we’ll make a frame for the photo frame with our own hands. Weave a ribbon from two narrow satin ribbons, as shown in the photo. The finished product must be glued evenly along the edges.


Let's move on to forming flowers and butterflies using the kanzashi technique. We take a milky satin ribbon and cut it into thirty-six squares so that we can later have a central chrysanthemum. The square needs to be bent in half, and then again in the same way. Connect and trim the ends, and then scorch them with fire, holding the workpiece with tweezers for gluing.


Glue 9 petals together using a glue gun.

The following photo shows how to make double kanzashi petals. The scheme is the same, only then the smaller petal is placed inside the larger one.

Now we form the side kanzashi flowers for the photo frame. We cut seven squares of a light shade, and then fourteen of pink and the same amount of purple. You will also need 14 pieces of golden ones. We perform all the petals in the same way, as described above in the text. In the center of the finished chrysanthemums you need to glue beads for beauty.

Now you should prepare the blanks for the second half of the frame. This will be a white kanzashi daisy. We cut squares from white satin and bend each of them in half to form a triangle. Next you need to bend each edge towards the middle. Hold the workpiece with tweezers, cut off the sharp corners and scorch them with fire.


Connect the chamomile petals in a circle, and glue yellow satin, also scorched by fire, into the center, as shown in the photo.

Green leaves are made in the same way as chrysanthemum petals, in double form. Then they are glued to the sides, as in the photo.


All that remains is to make the butterfly using the kanzashi technique. We will need a peach, yellow, golden, milk ribbon and eight beads. The body is made of two elements in the same way as the petals of the kanzashi daisy, only smaller in size. We form wide wings of a butterfly: we bend the square in half, and bend the ends of the triangle slightly higher than the upper part. We cut off the sharp edge and burn it.


Assemble a butterfly by making its frame out of beads and fishing line.

After we have everything ready, we can decorate the photo frame in the kanzashi style. Arrange the flowers according to the example and secure them with a glue gun. Beads can be glued in a chaotic order as you like. Now, the elegant and stylish kanzashi photo frame is completely ready.

If anything remains unclear, then watch a detailed master class on decorating a photo frame with kanzashi flowers: