DIY paper decoration ball. How else can you decorate Christmas balls on a Christmas tree: ideas with fingerprints, stained glass paints, salt. How to make a paper pom-pom with your own hands from paper, master class
Summary: Christmas balls on the tree. Making Christmas balls from paper. How to make a Christmas ball with your child with your own hands. Schemes of Christmas balls made of paper, photos of decorations on the Christmas tree.
1. DIY Christmas ball (option 1)
To make this New Year's decoration, you will need colored paper, thin wire, stapler, glue. The balloon you see in the photo above was made from paper in three different colors (pink, blue, and cyan).
Work plan:
1. Take a small glass or glass (wine glass) and trace it on paper with a simple pencil 12 times. You should have 12 circles (4 circles of each color). Cut out the circles with scissors.

2. Fold each circle in half and stack them together as shown in the illustration below. We use three colors of paper (A, B and C) to make this Christmas ball. Stack the mugs in the following sequence - ABBCCAABBCCA. If, when making a New Year's ball, you used paper of two colors (A and B), then in this case the circles had to be folded in the following sequence - ABBAABBAABBA.

3. Secure the paper circles together using thin wire wrapping around them along the fold line. Twist the ends of the wire together. If you don't have wire, you can use a regular stapler to staple the circles together.


4. Straighten the circles and glue the adjacent halves of the circles together. Each half should be connected to one adjacent at the top, and to the other at the bottom.

2. DIY Christmas balls (option 2)
Cut out three circles of the same size but different colors from colored cardboard or heavy paper. In the first of them, cut a cross (Fig. A), in the second circle, make a horizontal incision in the middle and two cuts perpendicular to it in the direction from the circle to the center of the circle (Fig. B), and in the third - four cuts in the form of a cross, also along direction from the circle to the center (Fig. c). Thread circle "c" into circle "b". In the circle "a", bend the corners formed as a result of its notch; you get a square hole. Pass the circles "b" and "c" into it, having previously folded them. Then unfold the corners again (Fig. D). Attach a thread to the resulting ball.
3. Paper Christmas balls (option 3)
From old postcards or colored paper, you can make such cute Christmas tree toys - Christmas balls. Detailed instructions for making this New Year's decoration can be found at the link >>>>

It is not at all necessary to make a large, complex ball, you can make a small Christmas ball from fewer parts.


5. DIY Christmas ball (option 5)
To make these wonderful Christmas lanterns, you will need to cut colored paper into strips of equal length and width. The length and width of the stripes depends on the size of the flashlight you want to make. To make one paper lantern, you will need an average of 14-16 strips of paper. For a detailed New Year's master class, see the link >>>>

When making Christmas balls, you can use strips of paper of different colors and beads to decorate Christmas toys with your own hands. See link >>>>

If the strips of paper are bent in the middle, then you get such a New Year's decoration. Link to the New Year's master class >>>>

6. How to make a New Year's ball (option 6)
We invite you to make such a cute and easy-to-make New Year's craft from old postcards together with your child.

1. Using a small glass or glass, draw and cut out eight identical circles.
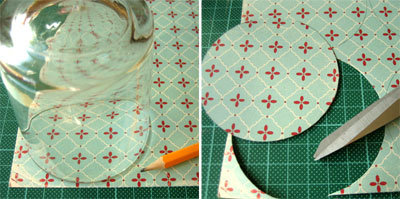
2. Using another object with a round base, but with a smaller diameter, draw and cut out two small circles.

3. Fold each large circle in half and then in half again. See the photo below.

4. Glue the four folded large circles onto one small circle and the remaining four onto the other. As a result, you will have two halves of your future Christmas tree ball.
It is very IMPORTANT to correctly position the quarters of the large circles on the small circle. Try to gently unfold the "pockets" of the folded circles and estimate the correct location before gluing. In this case, be guided by the very first photo, which shows a ready-made ball.

5. Now you just have to glue the two finished halves together and, when the glue dries, straighten all the pockets. The Christmas ball is ready!

7. DIY paper balls (option 7)

Making balls from threads:
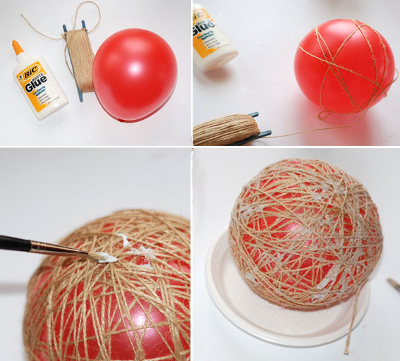
1. You will need: scissors, balloons, fat cream (petroleum jelly), any yarn, PVA glue, a bowl.
2. We dilute PVA glue with water, approximately 3: 1.
3. Inflate the balloon to the desired size, give it a round shape, tie it with a thread.
4. After unwinding the required amount of yarn, put it in a bowl and leave for 5 minutes.
5. Spread the ball with fat cream and wrap it with yarn, leaving a large distance between the thread to begin with.
6. Gradually reduce the distance between the threads until the ball is completely wrapped in yarn and resembles a cocoon.
7. Cut the thread and glue it to the ball. We leave it to dry (for at least a day).
8. Gradually untie the balloon, gently blow it off, then remove it from the thread cocoon; we tie a rope for fastening to the thread ball from above.
9. The ball is ready!
When making a ball, you can use yarn (threads) of any color or paint with any paint or sparkles (spray). Especially for the New Year, you can decorate this thread ball with tinsel, stars. Hang small balls on the Christmas tree, decorate the room with large ones. Dream more daringly!
If you are unable to wind the glue-soaked thread around the ball, you can wind the dry thread, and then thoroughly saturate it with glue using a brush or sponge.
Sugar syrup or starch paste can be used instead of glue. To prepare the paste, take 3 teaspoons of starch in a glass of cold water, mix thoroughly and bring to a boil. Instead of a thread, you can take a thin copper wire and wind it around a ball in the same way.
9. New Year's do it yourself. New Year decoration
Old Christmas balls can be updated by wrapping each of them in a piece of beautiful fabric and tied with a ribbon.

New Year is approaching, which means it's time to think about stylish holiday decorations. You can, of course, go to the store and choose those balls and toys that are in stock. But for the next holiday, you will definitely want something new. And what, go shopping again? So there will not be enough money or free space even in the most spacious apartment. But there is a way out - you can easily make bright decorative elements yourself. So the apartment will look new every time, and the cabinets will not have to be cluttered with unnecessary boxes. Oddly enough, the brightest and most spectacular jewelry is obtained from the simplest materials: paper, cardboard and even plastic bottles. You don't need any artistic ability to make them, just follow the instructions. In this article we will show you how to make a paper ball quickly and easily with your own hands.
We create a beautiful and voluminous paper ball with our own hands
What materials can be used to make a ball:1) Ordinary napkins. Their main advantage is, of course, availability. Use smaller napkins for small balls, and 30 x 30 centimeters for large ones. The napkin can be of any color, but it should not have any flower or Mickey Mouse designs - it will not decorate our ball.

2) Corrugated paper. Balls made of this material look very interesting, the material is quite plastic and makes it easy to create volumetric figures. Also, a big plus is that balls of a larger diameter can be made from corrugated paper than from napkins (it all depends only on the width of the roll).

3) Paper in silence. This word may seem unfamiliar to many, but you have probably already seen such a paper. It is usually used to pack some items - for example, put inside shoe boxes. But very delicate and spectacular crafts are taught from paper in bright colors. Its main advantage is translucency, so it looks beautiful when backlit. By the way, this material is also called tissue paper.
4) The last point is to highlight non-paper materials for the manufacture of decorative balls. These include fabrics that keep their shape well when folded, such as organza and tulle. White fabric balls will look very cute on a winter celebration, as they look like puffy snowflakes or snowballs. And if you make balls from orange fabric, you get tangerines! As you can see, there is no limit to imagination.
So, we looked at various types of paper (and even fabric) from which volumetric balls can be made. Further, in the master class, we will tell you how to make a ball based on napkins. Balls from other materials are made in exactly the same way.
To make a volumetric ball from napkins you will need:- sixteen paper napkins (if the napkins are two-layer, then you can take eight)
- scissors
- wire
- stapler
- ribbon (we will hang the ball on it)
1) We need sixteen paper napkins - eight for each side of the ball. If you have two-layer napkins, carefully divide them into sheets.
2) We take one napkin and fold it in a "fan", fasten it with a stapler in the middle.
3) Repeat the same pattern with seven more napkins.
4) We put all the blanks in a "stack" on top of each other and connect the napkins to each other.
5) Gently round off the edges of the napkins with scissors. Make sure that while doing this they lie flat.
6) We spread the napkins in different planes. We should have half a ball.
7) Using the same scheme, we make the second workpiece.
8) Now you need to connect the two halves of the ball together with a piece of wire. Leave a small part of it free and crochet.
9) From the ribbon we make a loop to hang the ball from the ceiling or on a New Year's tree. Inside the ball, the tape will be attached to the wire hook we made in the previous step.
10) The craft is ready!

We analyze ideas for using volumetric paper balls
The simplest option is balls of one or two colors, which are suspended from the ceiling on ribbons of different lengths. Unfortunately, not every ceiling covering is suitable for such a decor - for this it must have wooden or plastic slats on which the tapes can be fixed. Most often, this method is used to decorate office space.
Single balloons can be turned into fantastic flowers to decorate the festive table with. Peonies are obtained from larger blanks, and small ones are more like a bush carnation.

Volumetric balloons look very stylish on various boxes and gift bags. Such crafts should be transported carefully so that the decoration does not wrinkle.
Related videos
You can see in more detail how to make a ball out of different types of paper in the following videos. With step-by-step instructions from experienced decorators, it's easy to deal with incomprehensible elements and easily cope with making these stylish decorations.
You can make completely different balls out of paper and for different purposes: for decoration for the New Year or another holiday, in order to play and leave (an inflatable ball is ideal here), to give your friends and family such a wonderful magic ball, and just for the sake of fun to further refine your origami technique. You will learn how you can make different balls out of paper from this article and different videos.
1. How to make a Christmas ball out of paper
- colored paper (you can use other paper, including corrugated paper to create balls);
- ruler;
- scissors;
- stationery stapler (although you can do without it);
- glue stick or double-sided thin tape.
As already mentioned, you can take any paper for creating a ball, but only so that it is not very dense. You can take colored paper that has one color - due to the fact that such paper has one side colored and the other white, you will get a wonderful effect. One of the most economical options is colored note paper (which we used as an example), since a whole ream of this paper is enough to decorate not only the tree, but the whole house with balls.
To make a New Year's ball, you need to take 12 pieces of paper (3 different colors - 4 pieces of paper for each color) and put them in one pile. You can use a different number of blanks of paper, and more and less - the splendor of the ball depends on this amount.
Then you need to take any object that has a round shape (we used a glass) and draw a circle around it by drawing a circle on the top sheet.
Take the entire stack of paper and scissors, cut out the circles neatly from the paper (you can not cut the entire stack at once, especially if it is too thick, but divide it into smaller stacks so that cutting is convenient and possible).
We fasten our circles strictly along the fold line with a stapler (if it is not there, then they can simply be sewn, that is, fastened with threads).
We draw an additional template on a sheet of A4 paper, which will be needed in order to glue the circles in the right place. We draw a markup, dividing a semicircle into approximately three equal parts, mark 1/3 at the bottom and at the top, as shown in the image, and draw straight lines, aligning the ruler with the marked points and the center of the circle.
Next, we apply a ruler, aligning it with the line until such time as to grease only the necessary area with glue, and apply the glue with an adhesive pencil to the upper sector, which was limited by the ruler. (The adhesive can be applied in a spot where the arrow points to 1/3 or glued together with a small piece of double-sided tape).
We turn the page of our round book, glue it, move the ruler to the lower sector and repeat the procedure again.
So, gluing the sheets alternately from above and then from below, we are gradually approaching the moment when only two parts remain to be brought together, having unfolded our "book" into a beautiful festive ball made of paper. Before the last action, when you unfold the craft into a ball, we advise you to glue a beautiful thread inside the ball, on which our decoration will later be hung on a Christmas tree or other things.
It's so easy to make a paper Christmas ball.
2. How to make a magic origami ball
This ball, when neatly and correctly folded, folds beautifully on both sides.
It resembles this ball a little bit with bites, but only unlike it, it is created from one sheet of paper. To assemble such a model will take a lot of patience, since you will need to create a large number of neat folds (several hundred). But the result is worth it, as you will create an interesting toy that will appeal to everyone, without exception, both children and adults.
In order to make a magic ball, you need to use a long sheet of paper (15cm -30cm), on which you will have to bend many small squares. Watch the video instructions carefully so as not to miss important points. As a result, you should have a great craft that you can use as a gift.
3. How to make a paper balloon
Children love to inflate, kick, throw, and pierce balloons. For them, you can create an inflatable paper ball with your own hands.
Watch the video on how to create a balloon that can then be inflated. This ball can also turn into a kind of paper bomb, if you fill it not with air, but with water - such a ball can be thrown.
4. How to do 3D paper ball
To make a 3D ball, you will have to print the picture below on thick paper. Or print it on ordinary paper, and then transfer it to thick paper - but just do not use cardboard. You can take velvet paper, pastel paper - it all depends on what you have at home or on your desire (after all, any paper can be purchased in the store). This one will look good both in white and in color.
Two templates - one for the large ball and the other for the small one. It's easier to train at the big one. If you decide to start the workout with a large ball, then print the drawing 2 times - to get 12 parts. Click on the picture and save the template.
From the most ordinary crepe paper, you can make very beautiful balls for decoration. Let's find out how to do this.
Master class "Volumetric paper balls"
First, as always, have all the materials you need ready to have on hand. For manufacturing, you will need: a pack of colored corrugated or any other thin paper, two sheets of thick white cardboard, two colored felt-tip pens, glue stick, large scissors and a needle and thread. So let's get to work!
- Using a compass, draw a circle on a piece of cardboard. Its diameter should be equal to the desired diameter of the future ball. Cut the resulting circle in two. Cut the folded corrugated paper into rectangles. For a medium-sized ball, it will be enough to make 40-50 pieces.
- Place one of the colored pieces of corrugated paper on the second piece of cardboard. Using felt-tip pens, draw evenly spaced vertical stripes on the sheet. The number of cells on the finished ball depends on the number of these strips and their density. There are no special requirements here - try several different options to see which one you like best.
- Moving from one mark to another, draw the vertical lines marked in blue in the picture. This should be done with a glue stick, holding it slightly at an angle.
- Then take the next piece of corrugated paper and repeat the process, this time connecting the stripes marked in pink. Thus, you need to process all the rectangles you have. Fold the glued leaves in a neat stack.
- Attach one of the cardboard semicircles on top, press down so that the top layer of corrugated paper adheres to the cardboard, and outline it.
- Along this line, you should cut out the future ball, folded in half. Use a large, sharp pair of scissors as there are many layers.
- Cardboard is needed to glue the ball. And so that it is not visible on the finished craft, it needs to be slightly disguised. To do this, on the other hand, glue the second semicircle not completely, but after cutting it out in the shape of the letter "c".
- In the corner of the craft, make a hole (with a gypsy needle or awl), and then pass the thread through it. Do not tighten too tightly or your balloon will not open.
- Sew the second corner as well. You can leave one of the threads - you can hang a craft for it, if this simple paper ball will be used to decorate the room. In this case, the thread should be, firstly, long enough, secondly, strong and, thirdly, match the ball in color.
- Now comes the most crucial moment in the work - you need to open the ball. Take both cardboard sides of the craft and gently spread them apart. Be very careful not to tear the thin corrugated paper. If you have completed steps 3 and 4 correctly, then you will not have any special problems with opening the ball (which is why it is so important to use a fresh glue stick). If the individual parts are not glued together, you can glue them along the way.
- This is what your balloon will look like at this stage. The cells that it consists of are the non-glued places on your rectangles from point 4.
- Cardboard joints need to be glued together so that the sphere becomes solid and completely colored. As you can see, making a ball out of corrugated paper turned out to be quite simple.
- Such two- and even three-color balls can be made to decorate your living room or nursery. Such crafts of different sizes and colors will also look very appropriate as New Year's decorations.


16 557
How to make a volumetric paper ball. You can make a very beautiful ball-shaped toy out of multi-colored paper. They can be used to decorate a birthday, party, or just hang on the tree for the new year.
Making a 3D ball is much easier than you think, try it. 
We will need:
- Thin colored paper (tissue paper), or maybe not colored.
- Thin cardboard or thick paper.
- Glue stick.
- Scissors.
- Needle and thread.
It is necessary to make a template from paper or thick cardboard to the size of the ball, draw a circle on paper, then cut out the ball, and then cut the ball into two equal parts. These parts will serve as a template for us, and later will become a part of our craft.
Now we need rectangles of colored tissue paper, you can have solid colors of different colors. Each piece of paper should be slightly larger than our template (half a circle). You will need 40-50 pieces in total.
Then we put a piece of colored paper on a white sheet. We break a sheet of colored paper along the long side into four parts (it can be into any number of parts at a distance of 3-4 centimeters). In accordance with this breakdown, draw vertical, parallel lines on a sheet of white paper on both sides of a colored paper blank. Draw lines in two colors, alternating colors, use two colored markers for this.


Next, we apply strips of glue on colored paper, perpendicular to the larger side of the rectangle. The lines on the white sheet will help us with this. We apply the glue, as if connecting in a single line two pieces of white paper on opposite sides of a rectangle of colored paper. But we do this only with every second pair of segments starting from the left, they will all be the same color (this is what you need two markers for). Then we attach the next sheet of colored paper, glue it on top, and repeat the procedure until the sheets run out, we do not smear the last sheet with glue. If you want, a ball of four colors on 40 sheets, 10 sheets of the same color in a row will go.
Then, using the template, we give the blank the shape of a semicircle.


We glue our semicircles templates on both sides to the workpiece. The inside of the cardboard template can be cut in, or you can trim it off a little on the outside so that the colored paper hides it completely.


After that, using a needle, we pierce our workpiece on both sides, thread a thread and tie it into a knot, wrapping it around the flat edge of the workpiece.
We should not tighten the knot, you get a slack, a small loop.
Holding the blank by the cardboard, we slowly unfold our volumetric ball.
The last step is to glue the cardboard boxes together with glue. As a result, an interesting thing is obtained from plain paper.


