How to make paper carnation leaves. Carnation made of colored paper
Dear lovers of creating flower arrangements from corrugated paper. I suggest you look at a photo of a master class from Polish craftswoman Agnieszka Tsislik on creating carnations, which are not difficult to make


So, we look at a photo master class and get inspired to create paper beauty for drawing up flower arrangements and decorating the interior. But first I would like to introduce you to the Nefertiti beauty salon, which offers cosmetic services using mesotherapy. Mesotherapy is the introduction of drugs under the skin of alopathic and homeopathic action, which effectively helps in the fight against age-related changes in the skin of the face. On the website of the salon nefertiti.lg.ua/mezoterapia.html you can use mesotherapy and learn about all the services offered by the salon.
For work we need corrugated paper, scissors, paper glue, wire and green floral tape

Cut off a strip of paper 45 by 8 cm

We wrap the long side of the strip by 2.5 - 3 cm

We stretch the paper along the entire length, as shown in the photo below:


This is the kind of curly edge you should get.

Now we take a wire and wind our strip with a processed edge on it, forming a carnation flower


We fix the flower with a wire at the base


Cut off the edges

On both sides at the base

Wrap with floral tape

Here's a carnation you will get


To create white carnations, white corrugated paper should be tinted with dark pink pastel chalk
Carnations are wonderful decorative flowers that delight our eyes in parks, squares and home lawns. There are many different varieties of this flower, but only three can be called popular: large, mini and dwarf.
In this master class, I will show several options - how to make paper carnations with your own hands with step-by-step photos and videos. Carnations are most often presented as veterans, as well as for birthdays to grandparents.
Also, this flower will look great on a do-it-yourself volumetric applique for mom for some holiday, for dad for Defender of the Fatherland Day, for grandfather by May 9th. After you see the raft of your creativity, you will definitely find a worthy use for it.
What a summer without flowers ?! So we can safely take corrugated paper, which can be easily replaced with plain napkins. From such a light and thin material, we can easily get a delicate flower with bright red petals.
In addition to corrugated paper, a green half-cardboard will come to the rescue. You can't do without it here, because you need to add a stem, receptacle and leaves to the bud.

Necessary materials:
- red corrugated paper;
- green half-carton;
- scissors;
- pencil;
- glue.

Manufacturing steps:
1. Draw an even circle on the green semi-cardboard. Cut out along the contour and get a template that should be transferred to red corrugated paper. To do this, use a pencil to outline the outline of the template five to six times.

2. Cut out all the details along the contour. We get ready-made elements for creating petals.

3. Put all the corrugated paper circles in a pile.

4. Bend the bottom up in half.


6. Use scissors to create many cuts along the top round edge.

7. Open the blank once and get a carnation bud.


9. Glue the receptacle to the center of the red carnation bud. Next, we attach the stem, and two leaves to it.

10. All layers of corrugated paper in the bud of the carnation should be gently straightened to obtain lush petals.

11. Here is a cute carnation flower made of corrugated paper, where a half-carton was used as an addition.
Paper carnations
and. Master class with detailed photos
We will make carnations from crepe paper. This type of paper is sold at a stationery store. We will make carnations red, just such a bunch will suit any holiday. And it will not wither like ordinary carnations.
To create flowers we need:
- crepe (corrugated) paper
- wooden skewers
- floristic tape
- wire
- scissors
- PVA glue

Let's make carnations together, it's very simple if you know the technology. For one carnation, we need 4 sheets of red crepe paper measuring 10 * 10 cm.

Fold the square in half ...


It turned out a small square measuring 5 * 5 cm. Now we bend this square diagonally.

Raise the bottom edge up.

Cut off the protruding part. So that would be a triangle.

Expand it one fold. And we cut out the notches along the edges.

We unfold the sheet and cut along the folds almost to the middle.

Thus, we make all 4 leaves of the future flower.
Yandex.Direct

Now we need to make the core of the flower. To do this, take a piece of paper 3 * 5 cm in size, grease it with glue and twist it.


We make a hole in the center of the leaf, put it on a skewer, spread it with glue and collect it into a flower, that is, raise the petals up.


We do the same with all the other petals of the flower, do not forget to fix them with glue.


To make the stem of the flower green, we wrap it with floral tape.

Let's start making leaves for a carnation. Cut paper with dimensions 3 * 10 cm - 2 pcs. and 3 * 5 cm - 2 pcs.

Cut off pieces of wire so that they occupy the entire length of the leaf + the length for attaching the leaf to the trunk. We glue them with double-sided tape.

bend the leaf in half and shape it by cutting off the corners.

First we attach small leaves to the flower.


For one bouquet you need 3-5 pieces. flowers. I decided to make three of them. We make them in the same sequence as the previous one, but you can take a different color. For example, I took light beige.

We collect flowers in a bouquet and put them in a vase. Here is our bunch and ready. Enjoy your creativity!


Another type of carnation. For kids.
3. Cut out cups for carnations, stems and leaves from green paper.
4. Fold the cardboard in half to make a postcard.
5. Arrange the elements of the card as you like. Don't forget to leave some space for the inscription.
 |
To make a paper carnation, we need corrugated paper of various colors and with a small pattern or crepe paper. Also, double-sided and paper tape. If there is no tape, you can use PVA glue. You will also need pencil glue, stem wire, felt-tip pens, and a standard set of paper tools.
Prepare square sheets of the following sizes from corrugated paper (white, yellow or red): 8x8cm - 1pc, 9x9cm - 1pc and 10x10 - 2pc.
Bend the prepared square sheet in half and cut along the bend line.
Half a square must be divided into 4 equal parts, for which, bend it in half along the long side of a sheet of paper and bend it in half again. Next, bend it in half again and cut out the petals of the future paper carnations as shown in the photo.
As a result, we have four carnation petals. In the same way, we make four more petals from the remaining half of the square, in the end we get eight petals. We also cut the remaining square sheets into petals in the same way, but do not mix the different sizes of the petals.
We crimp the petals of a carnation, for which we wind the prepared petals on a toothpick.
After all the petals are ready, we start assembling our paper carnation.
First, you need to prepare the base of the stem of the carnation flower, for which we take a copper wire and, stepping back from the edge of the wire by 1-2 cm, make one turn of paper tape around it. Next, you need to bend the protruding part of the wire inward and make another two or three turns of the tape.
We start assembling the petals.
On the prepared base of the carnation flower, glue double-sided tape in a circle. Take the smallest petals and glue to the base as shown in the photo.
After you have pasted over the entire base with petals, you need to seal it, for which you grasp the base of the flower with two fingers and twist the base with your fingers tightly. Then glue the remaining carnation petals in the same way. There should be three layers of petals in total.
We complete the assembly of paper carnation petals. We wrap the last tightly glued row with paper tape in two turns.
Making the base of a carnation flower. To do this, we need green corrugated paper (preferably two shades), we make base sheets from lighter paper. For the base sheets, you need a piece of corrugated paper, about 3x3 cm in size, which must be folded four times and cut a semicircle on one side (see photo). Further, forming a peduncle, we glue the base of the flower with it.
Next, we make small leaves of the pedicel, for which take a sheet of green corrugated paper (preferably a more saturated color or shade darker than the previous sheet) measuring 1x3 cm. Fold it three times and cut a semicircle on one side (see photo) and glue it at the base of the peduncle. Next, wrap the stem with a corrugated strip of the same color.
We just have to make the leaves on the stem and our corrugated paper carnation is ready. For the sheets, take 1x4cm strips of paper, twist them as shown in the photo, carefully unfold and shape the sheets. Next, glue two sheets of paper against each other, and each pair of petals rotated 90 degrees.
Our paper carnations are ready. Just look how beautiful they are. Making them is easy. Therefore, try to prepare them as much as possible. And on May 9, please your loved ones with an original gift. And even if those to whom the carnation will be presented are not war veterans, having received this flower, they will once again remember the heroes who fought for their Motherland ...
Before you start making a carnation from paper, you should clarify that for work you need to take rice, corrugated paper, tracing paper or napkins. As for ordinary paper, it is not suitable for this purpose, as it keeps its shape well. Our workshop will be shown on regular table napkins, although if you use other types of paper, the steps will be the same.
Other auxiliary materials: paper glue, copper wire for the stem base, strips of colored paper, scissors, pencils, marker, ruler, etc.
Let's start the step-by-step execution of making a carnation flower from paper.
In order to get blanks for carnation petals, we must cut two circles from a paper napkin. To do this, the napkin must be folded in half, and then, using a special ruler, draw a circle on it. Instead of a ruler, you can take any item of the desired size and with a round base. Pressing it on a folded napkin, you can get dents in the shape of a circle. A lid from a regular deodorant is perfect for this purpose.
When two circles are cut, all the circles obtained from the napkin layers must be cut into semicircles, and then, all the resulting parts must be divided into three parts.
We fold our semicircles three times as shown in the picture. In the resulting segment, cut out a corner.
Now you can open our petals, while at each spread, making an incision to the middle of the part (see photo below)
Now you need to cut one petal into two halves, as shown in the photo below.
Now you can start making a carnation flower.
To have where to attach the petals, you need to make the central part of the flower. A strip of paper 5 cm long and half a centimeter wide must be wound around the wire, while stepping back from the edge of the wire by 1.5-2 cm. The strip of paper should first be smeared with glue. Then, the wire must be bent and secured as in the photo below.
After the center is done, you can start decorating the cup of our carnation.
The smallest petals go first. Having smeared the glue to the cuts, they need to be glued around the center of the flower, as shown in the photo below.
So, constantly rotating the center of the flower 180 degrees, you need to glue all the small details to the flower in turn.
We glue the larger parts (semicircles) in the same way, but now we turn the center of the flower by 30-45 degrees.
Our flower is ready. It remains only to make him a stalk.
Every flower has a stalk. For our carnation, it will be made from a strip of green colored paper. Having cut the strip, as shown in the photo, we glue it to the very base of the flower.
The stem is not difficult to make. The wire must be wrapped with a green paper strip (1.5x30 cm). In this case, you need to try so that the turns lay down evenly and tightly. For greater strength, it is recommended to glue a paper strip every couple of centimeters.
The very work on creating a paper carnation has come to an end. It remains only to give our flower a finished look, for which, using a pencil or thumb, you need to separate and fluff all the petals.
The cloves are ready.
To make a decorative paper carnation with our own hands, we need the following materials:
- Crepe or corrugated paper of various colors;
- Copper wire for the stem, you can also use ready-made floral stems;
- Glue (different glue can be used, but we recommend PVA glue);
- A set of standard tools for working with paper.
Let's start ...
To make one carnation, we need crepe paper: 10x10 cm in size, in the amount of 4 pieces.
Take one of the prepared square sheets of crepe paper and fold it in half horizontally, then fold it in half vertically, as shown in the photo above. Then, bend the received part diagonally, and bend it diagonally again, dividing the part in half.
Cut a quarter of the circle as shown in the photo. It is necessary to start cutting from the bend line, so that after we unfold, we would get a semicircle as in the photo above.
Now you need to cut out the cloves of the carnation leaf as in the photo.
After cutting the cloves in a circle, unfold the part, and make cuts on the bending lines between the petals of the carnation, to a depth of 2-2.5 cm.
We form the bend of the petals, for which turn each petal 90 degrees. Thus, it is necessary to prepare 4 pieces of paper carnation petals.
Squeezing the center of the details, we shape the crown of the flower.
We fix the base of the flower, for which first tightly tie the bases of the parts with thread, then stick a strip (1.5x4cm) of plain paper around the base. Next, we make a peduncle. For it, we need a strip of green crepe paper, 2x4 cm in size.
Fold the strip four times in width and cut out to 1/3 of the leaves in the shape of triangles. Cover it with glue and wrap the base of the carnation flower.
We make carnation leaves, as shown in the photo. For the leaves, strips of green crepe paper are required in two sizes - 2x5cm and 2x10cm. Place glue on one side of the paper, insert the wire, and fold it in half. Glue the two halves together, the wire should be in the middle of the glued strip. After the glue dries, fold the strip in half (along the wire) and cut the ends of the strip at an angle. As a result, you should get leaves, as shown in the photo.
Start wrapping the green stripe of crepe paper around the stem of the clove. Wrap the stem for a length of 1.5-2 cm, here you need to fix two small leaves. After fixing the leaves, we continue to wrap the stem with a strip of green paper 6-7 cm from the beginning of the wrapping. Here we fix the large petals and continue to wrap the stem to the end.
Leaves of the same size are attached opposite each other, and the leg leaves are rotated 90 degrees around the axis from the small leaves.
To make paper carnations, we need the following materials:
The main material is paper. But for this work, ordinary paper is not very suitable, since it holds the bend well. Rice paper, corrugated paper, and tracing paper will work very well. Also, these carnations can be made from multi-colored napkins. Just below, in the master class, the making of carnations from napkins is shown. Making a carnation flower from other types of paper is similar.
You also need PVA glue or any other stationery glue, copper or other thin wire for stems, colored paper (you can take from the children's kit), standard tools (scissors, pencils, felt-tip pens, a ruler, etc.)
So, a master class on making a carnation flower from paper.
We take one napkin, without changing the factory addition, fold it in half, put on it a ruler with a circle or an object that has the shape of a circle at the base. I use a deodorant cover (just leaves the real size of the flower). We outline the contour with a pencil or press it so that a trace remains in the form of a circle.
Cut out both circles, and combine them into one.
To determine the center of the circle, fold the circles in half in two directions. Step back from the center by 2-3 millimeters, make a hole with an awl or a needle and thread the wire, photo below.
Step back 5-6 mm from the first hole, make another hole and thread the wire back, as shown in the photo below. Next, strengthen the wire by braiding the ends together.
Let's start forming the carnation flower. Uncover our mugs (last photo above). Separate the top circle and form the center of the flower as shown in the photo below.
After you've wrapped all the circles around the center of the flower, you don't need to press down hard on the base of the flower.
So we have finished forming the flower, now we need to give our flower a fluffier and more beautiful look. Bending back with your thumb, use a pencil to fluff it up and give the desired look to our carnation.
Wrap a small strip of paper 0.5 cm wide around the base of the flower (photo below).
We start making a flower stem, for which we wrap a strip (1.5x30 cm) of green colored paper around the wire, gluing it every 2-3 cm, as shown in the photo.
And now our flower is completely ready.
It's just that easy to create such beautiful carnations.
To make our flower petals look just like real ones, you can use scissors with curly blades. Original carnations can be used as an addition to a gift or presented as a bouquet. If desired, such flowers can be used to create a decorative composition. As you yourself have seen in the manufacture of paper carnations, there is nothing complicated. Therefore, children can also be involved in this exciting activity.
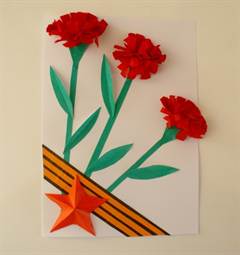
Master class "Carnation for Victory Day". Master class with step by step photos.
Nechaeva Elena Nikolaevna, primary school teacher, KSU "Secondary School No. 21, village Saryozek" Osakarovsky district, Karaganda region, Kazakhstan.
Description: The feats that Soviet soldiers accomplished bringing Victory Day closer will never be forgotten. The events of those days and the symbols of victory will forever remain in our memory - May 9, 1945. What kind of flowers represent a symbol of victory? Of course it's a red carnation. Master class "Carnation for Victory Day" is intended for primary school students, teachers, parents.
Purpose: a gift for Victory Day.
Target: creating a greeting card.
Tasks: develop practical skills in working with paper; to consolidate safety techniques for working with scissors: to develop artistic taste, creativity: to form a work culture: to foster patriotic feelings ..
Material: colored cardboard, office paper, colored paper, templates, glue, scissors, pencil.
The feats that Soviet soldiers accomplished bringing Victory Day closer will never be forgotten. The events of those days and the symbols of victory will forever remain in our memory - May 9, 1945. What kind of flowers represent a symbol of victory? Of course it's a red carnation.
Guys, listen to the poem "Carnations sparkle with dew on Victory Day"
... We too often forget veterans
That merciless, merciless war ...
Only on May Day we present them with tulips ...
The carnations are bright ... in the color of the glow of spring ...
So today, on the anniversary Victory Day
We give veterans scarlet flowers ...
And in their hearts the fire, warmed by attention,
Freed from "permafrost" !!!
They do not complain, needing help ...
And they retain their vitality, optimism !!!
They live hard, fighting with fate every day -
The struggle for life continues for them !!!
Every year the sun undeaths them weaker and weaker
And he doesn't bring him to the parade in the spring ...
Yes, unfortunately, there are less and less of them ...
Living memory ... we are losing ... about the war ...
Well, now they are pressing to the heart
"Victory" flowers so dear to them ...
Gray heads bow in reverence,
In a mournful silence for a moment frozen ...
Carnations slightly frozen from the cold
To the Memorial of Eternal Memory they put ...
Of them, as if a groan, pinching the heart, quiet,
Suddenly it breaks out ... And tears suddenly flow ...
Carnations are the fires of courage! And fortitude!
Their unbending proud flowers
On a knotty, strong stem - pain, devastation,
All troubles will stand! Enemies will not break them !!!
They fearlessly look into the eyes of a fierce death!
And they soar high flowers with kumach!
Ready to lead the Soldier of Victory into mortal battle -
For honor, freedom, justice and love !!!
Carnations are red - like our veterans
That do not bend under the weight of fate
And they never surrender on the battlefield !!!
"Flowers of Fire"! "Flowers of Love"! "Flowers of Struggle"!
Yes, sometimes Victory sparkles with dew
On bright fiery double petals ...
Then they dream of war disturbing pages,
After all, Victory Day is "with tears in my eyes" !!!
Yes, since childhood carnations have been associated with victory, veterans, parades in the square and many carnations. Carnations speak of admiration for a person, that we will remember him. After all, we admire our veterans and are grateful to them for the fact that we now live under a peaceful sky.
Safety precautions when working with scissors:
Use scissors with rounded ends.
Store the scissors in a specific place, put them with the closed sharp ends away from you.
Pass the scissors in rings forward with closed blades.
Cannot be cut on the fly.
When working with scissors, it is necessary to monitor the movement and position of the blades during operation.
Do not work with blunt scissors or with a loose hinge.
Do not hold the scissors with the blade up.

Cut out the following details for pattern appliqué:
- stem 3 pcs;
- 5x 15 cm green paper strips for 3 leaves;
- cut 15 red circles according to the template;
- inscription - May 9.
Application step by step:
1. Step by step we will make green leaves.


2. Let's make the flower cups step by step.

3. Step by step we will make the petals of the flower, fold each circle in half and glue the middle.

4. Glue the stem onto the cardboard.

5. Glue a circle folded in half on the stem.

6. Also glue two circles folded in half and glued in the middle. Each circle is glued slightly below the other.

7. Next, fold the circle in half and in half and glue it onto the flower.

8. Glue the flower cup.

9. Glue the sheet prepared step by step.

10. Make the flower double.

11. Using the same principle, we will make two more flowers.


So the gift for Victory Day is ready.
A do-it-yourself paper carnation is a craft that will decorate any interior and add coziness and colors to the house. Several of these carnations can replace a whole bunch of fresh flowers. The main materials for creating products are corrugated paper and paper napkins. Perhaps at first glance it seems that such a carnation is difficult to make on your own. But this is a big misconception, the origami technique, thanks to which the products are created, is very easy to work with.
This master class, consisting of the best descriptions and photos, is sure to come in handy for everyone who is not indifferent to needlework.

Delicate carnation from napkins
This manufacturing technique is very simple, so such a flower can be made even with a child.
Necessary materials:
- paper napkins of several colors;
- pencil;
- marker;
- compass;
- sharp scissors;
- stapler;
- straws for drinks;
- plasticine.
First you need to take a few paper napkins and put them on top of each other. The more napkins, the thicker and more magnificent the flower will be. Then you need to fasten them in the center with a stapler. Using a compass, draw a circle 8 cm in diameter on napkins and cut it out. If you don't have a compass, you can use a glass or cup. Now we have got carnation petals. Outline the edges of the napkins with a marker.
Then, in the center of the circle, make a hole for the stem with an awl. Insert a cocktail tube there.

Secure the napkins to the tube with a small piece of plasticine.


We work with corrugated paper
Roses are made very beautifully and gracefully from special corrugated paper.
To make a beautiful carnation, you need to take:
- corrugated paper (red, white and green shades);
- green ribbon;
- wooden skewers;
- wire;
- glue;
- sharp scissors.
Cut four squares with sides of 10 centimeters from red corrugated paper. Fold it in half in half. Bend the square that turned out 5 × 5 cm diagonally. Next, lift the bottom right edge and trim off the excess paper at the top so that the triangle comes out. On the upper side of the triangle, make cloves with scissors. Then unfold it in some places and make cuts to the middle. Thus, make three more petals for the carnation.
Now take a skewer and glue one tip with red paper. Make a hole in each of all the petals and put it on a skewer, glue it. Next, spread the leaves and lift them up, fixing the bud as in the photo. For the stem of the flower, wrap the green ribbon around the skewer.
It's time to start making carnation leaves. To do this, take a green leaf and cut off four strips: two pieces of 10 cm and two pieces of 5 cm, 3 cm wide.

Next, take each strip and fold it in half to cut the edge of the paper. It turned out beautiful leaves. Then cut the wire along the length of the leaves with a margin for attaching to the stem. Place it in a piece of paper and glue a small piece of white paper. Fold all the leaves and attach them to the stem: small at the top, large at the bottom. Such a carnation will perfectly decorate your apartment!


Related videos
Similar articles:
The white dove is a bird of the world, which is known to absolutely everyone and is associated exclusively with good, hope and love. An image of this bird with p ...
What will lovely ladies not come up with to look bright, beautiful and unique? Among the huge selection of ready-made jewelry and accessories, many women of fashion ...