Craft on the theme of spring drops. Spring crafts photo
After a long winter, the bright sun, the sonorous singing of birds, fresh green grass and the first flowers bring special joy. New forces for creativity appear. Children begin to bring crafts to the kindergarten, spring brings many new themes.
The sun
Bright sun is the first association with spring. Of course, hand-made "Spring has come" handicrafts are not complete without bright rays. The sun not only occupies a central place in children's spring drawings and applications, but can also become an independent object.
You can decorate a window with a paper sun, and children's palms will look great instead of rays. Attach long wooden clothespins to an unwanted disc, paint them yellow, and the Spring is Coming craft is ready.
Salted dough is an irreplaceable material for children's creativity. It is very simple to make it - you need a glass of flour, half a glass of fine salt and about 100-120 ml of water. You can immediately add yellow paint to the dough or paint the craft after drying (after a few days), decorate it with patterns and a pretty face. Glue a magnet to the sun, attach it to the refrigerator, and it will illuminate your kitchen for a long time.
Flowers
Delicate snowdrops, fragrant lilies of the valley, bright yellow dandelions on green grass, fluffy willow - all this is inseparably connected with spring, and handicrafts made by spring cannot do without these images.
Snowdrop flowers can be folded using the origami technique, and lilies of the valley can be imitated using foam balls or small cones made of white paper can be glued together. Draw a vase, brown branches, glue lumps of soft white cotton wool - you get a bunch of pussy willow.
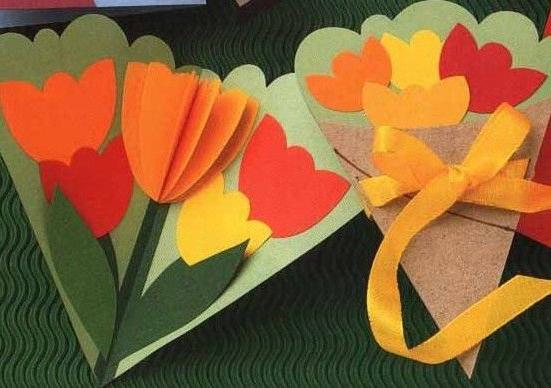
Thinly cut yellow paper or thread will make a beautiful dandelion. Children's crafts on the theme "Spring" can be made in the form of postcards made of green cardboard, decorated with voluminous multi-colored flowers. Voluminous flowers can be made of plasticine or salt dough.
You can make a whole basket of flowers. The container can be made using the origami technique, woven from paper tubes, or simply folded in the shape of a box. It remains to fill the basket with paper flowers, or nylon.

Trees
Blooming apple and cherry trees delight our eyes in spring. Children's crafts on the theme of "Spring" rarely depict trees in bloom. It is not difficult to make them, but such things look unusual and sophisticated. Draw a thin cherry twig on paper and then white ones either with your fingers or the bottom of a small plastic bottle. They look original fragile on real branches or twigs made of wire and thread.

Butterflies
Colorful butterflies will bring any picture with flowers to life. Crafts on the theme "Spring has come" are often decorated with these fresh flowers. Lightweight paper butterflies can be hung by strings from the ceiling. They can be made using the origami technique from colored paper, cut out butterflies can be painted with paints or a pattern can be applied using appliqués.
Do-it-yourself beautiful crafts by spring will be obtained if you use hard wire and nylon. With the help of these materials, you can make very delicate and airy butterflies. The butterfly can be decorated with multi-colored beads, buttons and beads.

ladybugs
Ladybugs begin to appear in May. Children simply adore them, and it is very easy to make a craft in the form of this funny bug. The smallest can draw a ladybug using a footprint. The heel is covered with black paint and the rest of the foot is red. Now you need to make a print and draw black polka dots, antennae and paws with your finger.
To make, fold a sheet of red colored paper several times, cut out the body of the beetle, attach the polka dots and antennae. Now it can be glued to the green leaf.
Children love to collect pebbles and this can be used. Round stones can be painted like a ladybug using gouache or other paints.
Birds
DIY crafts "Spring has come" can be done using images of birds. Even from the simple silhouettes of swallows on a white background, spring blows. Colorful birds can be made from colorful wrapping paper. If you fold several birds using a simple origami scheme, then they can be hung on branches using a thin line.
Bare trees in the garden can be decorated with fun paper birds decorated with patterns, glitter, feathers. Beautiful crafts on the theme of "Spring" can be made in the form of cute birds using the quilling technique.
You can mold small figures of birds from salted dough, dry them, paint them with gouache, and varnish them. Then cut off a few branches and hang the birds with thread or thin ribbons. Remember to make neat holes for the strings in the figurines before the dough dries.
DIY crafts for spring can be made of woolen threads for knitting. From white, black, blue, red and yellow bunches you can make small bright birds, titmouses and bullfinches, and from gray and brown ones you can make sparrows, just like real ones. All kinds of felt figures are popular now. Even a beginner can do such crafts on the theme "Spring has come".
Birdhouses
In winter, children make feeders and feed the birds in their yards and kindergartens, and in early spring it's time to meet starlings and prepare houses for them. This theme can be reflected in the making of crafts for the spring competition in kindergarten.
Draw a large tree decorated with colorful patterns on a large piece of paper. On its branches, place several voluminous birdhouses made of colored paper and their inhabitants, decorate the picture with satin ribbons and flowers.
The birdhouse can be made of thick cardboard, decorated with multi-colored buttons, paper flowers. Inside you can put a small nest with eggs and a bird made of fabric or woolen threads.

Herbs
Fresh green grass is an obligatory symbol of spring. You can make your own lawn in a flower pot, but it's much more interesting to make your own grass. This craft can be crafted with unnecessary soil and wheat or grass seeds.
Grass seeds need to be poured into a stocking, covered with a substrate on top and tied. As a filler, you can use earth, a substrate for flowers, sawdust and even cotton wool (in this case, it is better to first pour a small layer of earth). The blank can be made in the form of an animal, for example a hedgehog, or simply in the form of a man's head with a funny face.
In order for the grass to sprout, the craft needs to be watered. When she has grown long enough, you can arm yourself with scissors and make the little man an original hairstyle.

Ships
Streams murmur, and boats are another symbol of spring days. Folding them out of plain white paper is boring. It is more interesting to decorate such crafts by the spring with your own hands using different materials, put passengers in them, attach a mast with a sail.
Original boats can be made from wine corks. The sail for such a vessel is made of fabric; linen or rough sacking is better. You can also make a small boat from walnut shells, toothpicks and candy wrappers.
Another idea for a craft on the theme of "Spring" is a volumetric applique. You can depict a stream, sky, clouds and the bow of a ship with a sail, or place a folded boat on a sheet of blue paper.

Easter crafts
Easter is associated with spring, awakening, Easter chickens and bunnies. On the eve of the holiday, I just want to decorate the house with cute hand-made things.
You can decorate not only real eggs or empty shells, but make them from salted dough, plasticine, sew from fabric or simply cut out of paper. Patterns can be very different: flowers, colorful stripes, birds and biblical stories. For decoration, use not only paints and paper, but also fabrics, ribbons, beads.
It is easy to make beautiful spring birds from empty shells by gluing wings, tails and beaks from colored paper to them. It can be chickens with hens, and exotic birds. The shell is also suitable for making bunnies - draw a muzzle, glue long ears and legs on strings.
Such original handicrafts made with your own hands will not only help develop your child's imagination, but will also bring a piece of spring mood into your home. They can also be used in the kindergarten spring craft competition.
After celebrating International Women's Day, we begin to look forward to the Bright Day of Easter. And this makes it so joyful, because on the street you can hear drops and singing of birds, the sun shines brighter and longer. We are looking for cooking.
In the meantime, parents have to while away the evenings again thinking about homework. During this period, in all kindergartens and schools, he is asked one thing - to make crafts on the spring theme. Usually, they do not specify and do not set a framework, so as not to limit the child's, but rather the parent's, flight of fantasy.
I am a parent myself and I also need to look for new simple and beautiful ideas every year in order to once again help the child to do something original and interesting. Therefore, today I will share my findings in this thread.
Paper and cardboard are one of the easiest materials for creating crafts, and therefore they prefer to take them for creative activities in kindergartens. And this means that you and I can create something simple and.
First of all, we start thinking about what exactly to do. And the symbols of spring come to mind: butterflies, rain, flowers and a rainbow.
For example, these cute butterflies can be created from cardboard and toilet paper rolls. If you choose bright color combinations for them, you get a very elegant present.

Use this template for the wings.

The sleeve needs to be pasted over with decor. I would rather buy a self-adhesive for this, it will turn out faster, and it is more convenient for children to work with it.

We decorate the wings to your liking, using cardboard, braid, beads or ribbons. Felt in bright colors is also perfect for flowers here.

It is better to glue all the parts with hot glue, it will turn out more reliable. But, if you are working with children, then take PVA glue, as the safest and non-toxic.
I want to offer you a more complex craft. This is a voluminous lawn that looks very interesting. I remember that as a child, our generation was very fond of books with a 3D effect, when the pictures became three-dimensional, at that time I still did not understand at all how such a miracle could be done. Now I know the whole process!

The entire master class is shown in the photo in step-by-step action.
We need to bend the sheet in half and make cuts from the side of the fold, at a distance of 1 centimeter from each other. The length of the incision towards the center is reduced to 1 centimeter. Make each slit synchronously in a mirror image of the same size. Start with a side length of 5 centimeters.

Bend inward through one of our slots, so you get the stems for the leaves. In general, the most difficult part is over. Now you can trim the edges of the sheet beautifully and stick to the base.

Start carving out flowers and leaves. The leaves will need to be bent inward lengthwise to achieve more realism.

Add butterflies or weed. It turns out a quick, but very original application.
And in spring the earth wakes up, the snow melts and the worms and pupae of the butterfly begin to hatch. Let's make a fun paper worm.

You need to make many circles of the same diameter. If you have special stamps, the whole process will be faster.
To get a lot of circles, you need to take a long strip of the paper you need, measure the width equal to the diameter of the circle and roll the strip into an accordion. Draw a contour and cut patterns along it.
You will have as many circles as you have folded the strip.

Now we will fold each detail exactly in half and begin to shape the body. To do this, smear the lower part of the circle with glue and stick the next part on it.

And so on until the length of the calf seems to you the most optimal.

We fix the muzzle and antennae.

Lovely spring suns can be made from toothpicks and sheets of different colors and given to all your girlfriends to friends.

And to make a bouquet for the teacher, molds for sweets and cupcakes are quite suitable. They are already on sale in different diameters and colors.

Of course, spring is associated not only with rain and sun, but also with a rainbow! How she cheers us up, and how children rejoice at her appearance in heaven. And it's very easy to make it.
You will need two identical parts of the cloud and seven stripes of the same width and length, in accordance with the color of the rainbow: red, orange, yellow, green, blue, blue and purple (we memorized their sequence according to the sentence "Every hunter wants to know where the pheasant is sitting" where the beginning of the word suggests the letter the color starts with).

When you have glued all the strips, close the wrong side with the second piece.

Do you remember how you used to make garlands from paper rings? Now this is not relevant, children no longer decorate the walls with them for the holiday, but the technique itself remained. And it will make a great bouquet.

Or a fluffy cloud with rain.

I also really liked the idea of a voluminous snowdrop. After all, this is the most long-awaited messenger of spring.

You need to take three identical white stripes.

Make a drop out of each by gluing one end of the strip to the opposite. So the resulting three loops are then connected together.

And cover the gluing place with a semicircle of green paper.

This craft is very simple, preschoolers will definitely cope with it. But the strips need to be cut in advance so that they are even, because not all children of four or five years old can make a straight line with scissors.
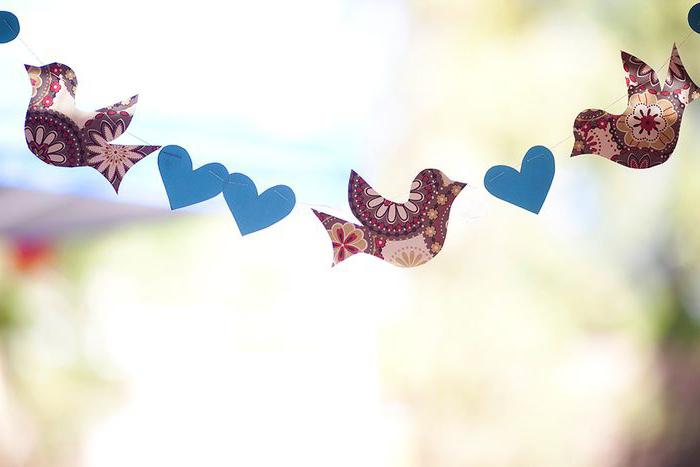
Creative felt birds for school
Felt is a very popular material. It has many shades, which only attracts needlewomen to it even more. We are already with you from this material, and today I want to propose to you to make cute birds from felt and thread pom-poms. They look very decent, but are made in one hour.

Pompons are very simple to make, I have already described the process of making them. You can wind the thread on a fork, or you can cut out special blanks from cardboard on which you will need to wind the thread.
And from the felt, matched to the birds, a tail and wings are cut out.

Well, now I invite you to watch the video, where the craftswoman shows in detail the entire process of creating birds.
By the way, you can take absolutely any template for crafts, and it can be a silhouette of any bird.
Original crafts with birds
Of course, with the arrival of spring, we meet rooks and swallows. Titmouses begin to sing louder and sparrows chirp. Therefore, we also consider cute birds to be symbols of spring. Basically, we choose from them swallows and rooks, which "fly to us in the canopy in the spring."
You can make original mobiles. Make the base from crossed branches. And make the birds themselves out of paper.
By the way, do not forget, because the birds tired of the long flight will want to eat, and you can show the children an excellent example of caring for our smaller brothers.

See what beauty is obtained using the quilling technique. In the springtime, tender and bright.

You need to attach the birds to the base very well; double-sided tape or hot glue is suitable for this.
Sticks can be painted, or you can leave their natural beauty and wood texture.
In the form of a suspension, a transparent fishing line is used to create the feeling that the birds are hovering and catching air currents.

Cotton clouds can also be replaced with flowers, stars or raindrops. It only depends on your imagination.
How to make a plasticine panel?
Plasticine perfectly develops the image and motor skills. And motor skills, as you know, help you better master control of your body and start talking earlier. Therefore, it is so often found in the classroom with preschoolers. Now they roll cakes, then flagella. This is a very useful business.
See what kind of panel with willows can be made using several materials at hand.

You will need:
- green cardboard sheet,
- soft plasticine of three colors: brown, blue and light blue,
- cotton wool,
- pencil.
1. The outlines of a vase and branches are drawn on the cardboard.
2. The child tears off small pieces from the plate and rolls them into flagella.
3. With blue flagella, begin to form a vase in a circle so that there are no gaps left.
4. Make the inside of the vase blue to add volume to the craft.
5. Roll up pieces of cotton wool in the shape of a capsule, wrap the edges with plasticine.
6. We make twigs from flagella, at the ends of which we will place cotton capsules.
All work is ready, with a four-year-old child, this process took thirty minutes. It all depends on the perseverance of your kid.
Master classes of crafts from natural materials
I was captivated by works made from the most ordinary things. Sometimes, in general, you consider them rubbish, but no, you can use them in your art. In fact, I have always admired people who can see something unusual in simple things and use them for other purposes. Like, for example.
I liked the panel with flowers from egg trays and buttons.

To do this, cut off the cells from the tray.

We paint them with gouache on the inside and outside.

Inside, on double-sided tape, hot glue or liquid nails, we fix beautiful buttons of different sizes and colors.

And we form the stems from the shaggy wire. It is sold in both home and art stores. We will beautifully connect them with a ribbon.

First, we glue the buds, form a composition of buds, and only then glue the stems, hiding them inside under the flowers.

I also liked the idea of using disposable paper plates as a base.

We make both the sun and large flowers from them, cutting the edges to the middle and painting with paint. In general, there are a lot of ideas.
Of course, you can't pass by cute ladybugs made from plastic disposable spoons. The master class below shows how to make them.

Do you have a textile glove at home? Fine! Here's an idea for a garden decor. very cute chicks are obtained.

Buttons are now often used in applications. They are produced in an unusually wide range of colors, so you can choose products for any composition.

Of course, there are always seeds at hand. Depending on the area of residence, the culture that gives these nuclei is different, but the meaning remains the same.
Arrange the bird with buckwheat, rice, corn or peas. Let's take a closer look at how to do this.

first, let's decide on the materials. Take a sheet of cardboard, a thick sheet of paper that will be the base. We need PVA glue, scissors and grains.

On cardboard we sketch the shape of a bird and cut it out along the contour.

We glue the part on the base, which is completely smeared with glue.

You will get it as in the photo below.

Now we put the cereal on the not yet dried glue and check that it does not fall off. It may be necessary to apply a fresh adhesive layer.

Try to place the nuclei very close to each other so that there are no gaps.
Another idea of working from food. Check out this marvelous pasta panel. They lend themselves well to coloring and fixing A, thanks to the large number of shapes, a lot of interesting crafts can be made from them.

Continuing the pasta theme, check out this cute snail with a house made of shell pasta.

You can also create bright butterflies from scrap materials. For the wings, napkins or tulle are suitable, but the body is made of decorative tape, which is definitely on sale in all needlework stores.

also an idea for a craft that uses faux fur and paper.

A little higher, I described how to make an applique from cereals, but now look at what cute flowers can be formed from pumpkin seeds.

Take a sheet of thick green felt as a base. Seed snowdrops can be painted in different colors, from blue to yellow.
Volumetric spring paper bouquet
Of course, spring is the time of flowering, the first buds and young leaves. Let's make original bouquets to fill with the feeling of awakening life from hibernation.

We make such a bouquet from colored double-sided paper. We fold the sheet in half and mark along the entire length of the strip, 1 centimeter wide. You can take any length, but leave about 5-7 centimeters from the opposite edge.

We glue both edges.

We take the toilet paper sleeve and cut it off from the edge at a distance of 5 - 7 centimeters.
We coat with glue and wrap the resulting grass around the sleeve to the end.

It remains to glue the prepared flowers. You can use pom-poms or beads instead to make the bouquet look more unusual.

Another very simple version of the bouquet that preschoolers will like.

the base is an accordion. How to fold it is shown in the diagram. So, the entire sheet is bent into a fan, and the ends of the sheet are glued together with glue, forming such a semicircular shape.

And now you can start thinking about which buds will decorate your base. Can you cut out daisies, tulips or snowdrops? Absolutely any, even a fancy flower will be appropriate here.
Origami snowdrops
I have already written a lot in previous articles about this technique, and every time I am amazed at the many ideas that people embody in it. For example, what are the very first spring flowers? I think everyone will answer that these are snowdrops.
So we will make its buds using a simple origami technique.

You will need a square of white and not thick paper, with sides of 5 centimeters. Bend it in half, finding this line in the middle.
Then turn the tip down and the part itself becomes a little like a trapezoid. And in one direction, which looks at you, bend the edges.
Run the tip of your nail along all the folds to lock the paper in that position.
Spring sun crochet
I didn't think that you could crochet something that resembles spring, but as soon as I saw this sun, I realized that this is a real spring craft.
The simplest product is knitted with single crochets. You can knit two identical sides for the same number of loops, and then sew from.This will be an easier option for beginners.

See what cute sunbeams you can create.

And I give a step-by-step description of the manufacture of another volumetric product. 
Here all the abbreviations that are used in the description are deciphered, so there will be no difficulties. The main thing is not to miscalculate and not to miss an extra loop.
Simple and quick craft from newspaper tubes
Newspaper straws allow many craftsmen to replace the vine and master the weaving technique. Indeed, this material is more affordable than the vine, which must first be found, then properly dried, and only then master the weaving process. Of course, newspaper products do not have such high wear resistance, but they look gorgeous.
Since this article is devoted specifically to children's crafts, I propose to watch a video, where a description of the sun with rays from newspaper tubes is given in great detail.
My dear ones, thank you for your attention and wish to spend every evening with the children, because they grow so quickly. And these evening gatherings for common creativity will definitely remain in your memory.
Spring crafts for kindergarten are a wide scope for creativity, because nature itself offers many interesting topics. Starting from the main thematic ideas and using imagination, you can come up with many original compositions on the theme of "Spring", which are easy to do with children. Here are the basic ideas for an original spring kindergarten craft. Starting from them, you can create your masterpiece with a spring mood with your child.
The first association with spring is the awakening of nature. Spring crafts for kindergarten on the theme of the first messengers of spring - snowdrops or crocuses - offers a wide range of interesting options for its creation. With babies, you can create a beautiful applique in the form of small and fragile harbingers of spring - snowdrops - breaking through from under the snow in a forest clearing. Colored paper, scissors, glue as the necessary tools, combined with imagination and a willingness to help the kid create his spring craft for kindergarten - all that is needed for this purpose.
With older children, you can create more complex variations of spring crafts on the theme of primroses. A simple but beautiful spring craft for kindergarten will turn out if paper flower arrangements are supplemented with a beautiful vase sculpted from plasticine. Entrust your child with the opportunity to show their imagination and create an original vase in which you can place paper crocuses and snowdrops.

An ordinary glass or tin can can also be used as an original vase. It only takes a little of her creative transformation. A background of a spring meadow is created from colored paper. It can be either from plain paper or from colored stripes of different shades. On the entire outer surface of the can, glue must be applied, and then this background must be glued. Already directly on the background surface, you can stick additional decor in the form of multi-colored buttons, beads or small figurines of birds and ladybugs.
Original volumetric compositions
Flowers can be created both in a simple flat view (for example, using drawn plant patterns or by making them out of felt), or in a 3D version. Volumetric flower arrangements can be created using the quilling technique using twisted colored paper specially designed for such creativity. Cocktail straws can be used as flower stems. A sakura twig will look especially beautiful in this technique.

Beautiful voluminous dandelions can be created from yellow woolen threads. The same tubes can be used as stems. But in order for the composition to look harmonious, they should also be wrapped (previously covered with glue) with green woolen threads.
Another, no less interesting version of the 3D composition - flower buds made of corrugated paper. If for a flower arrangement you decide to create voluminous tulips or daffodils, then you can arrange a flower-candy bouquet. Chocolates will be the heart of flowers made from corrugated paper.

An original flower arrangement on the theme of spring primroses can be created not only from paper, but from an unusual base - disposable plastic spoons. They make beautiful bouquets of snowdrops and tulips. In addition to spoons (up to 5 of them are needed for one bud), to create such a spring craft, you will need corrugated paper, glue and tape. If a bouquet of tulips is being created, then the upper parts of the spoons are neatly wrapped in red corrugated paper, and the lower ones (which will act as stems) in green.

The resulting blanks are collected in a bouquet. Leaves are cut out of corrugated green paper, which are then attached to the bouquet with the help of adhesive tape and a beautiful ribbon on top of it. Similarly, you can create bouquets of snowdrops or daffodils. As a result of such creativity, a luxurious floral arrangement is obtained. Disposable plastic spoons can also be used to decorate the vase in which the bouquet will be placed.
The birds have arrived
Flower arrangements are not the only option for interesting spring crafts for kindergarten. The return from the warm land of migratory birds is another vivid association with spring, which can be reflected in creativity with children. You can create a beautiful spring panel on this theme. To do this, you first need to think through all the elements of the picture (the sun in the sky, trees and bushes, flowers in a meadow, birds and a nest in a tree), and then cut them out of paper. The picture will turn out to be more expressive if all the figures are cut out of paper, and the nest for birds is made of woolen threads.

Funny birds, ideal for arranging on compositions of flowering twigs, are obtained from ordinary wooden clothespins. It is best to pre-paint each clothespin with some kind of bright paint, which will add some positivity. To create cute birds from such blanks, it is enough to paint the eyes and beak with paints or a marker. You can also just glue on ready-made funny eyes, which are easy to purchase at any store for creativity. The finishing touch to creating this spring craft is gluing a feather tail to the blank. For these purposes, you can use ordinary poultry feathers. To make the composition bright and positive, it is also advisable to paint the feathers with bright colors.

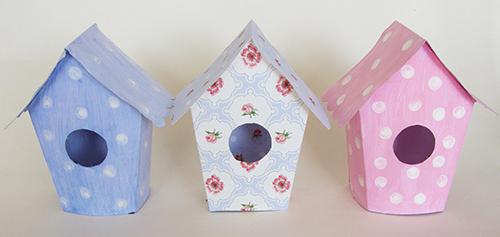
Colorful bird houses can be an interesting spring craft. With older children, you can try to make a real wooden birdhouse. For creativity with kids, the creation of colorful houses from colored cardboard will be more relevant. The birdhouse template is pre-cut, which is then connected along the ledges into a single house. A simpler option is to use a ready-made dairy product box, which can be pasted over with a beautiful background. The finished craft can be decorated with bright buttons glued to its surface, and inside the house you can even put a nest made of threads or small dry branches.

The starling is usually considered the first herald of spring. But the heralds of the real spring warmth are the storks returning from the warm regions. You can make beautiful crafts of these birds from a simple and affordable material - plastic plates and spoons. First you need to carefully cut the plate into pieces. How exactly to do this is clearly seen in the photo. The edges of the plastic parts that will play the role of wings should be painted with black paint or painted with a marker.

The red spoons are intended for the role of the stork's legs. To make these legs look beautiful, it is advisable to pre-cut the edges of the spoons, reducing their area. Further work consists in gluing all the details that will make up the stork figurine. Wings, legs and a head (from a white plastic spoon) are glued to the main part - the body, onto which the eyes and a red beak are glued (you can take this piece from the scraps of a red spoon).
Blooming garden, bugs and ladybugs
Another association with spring is flowering trees. A sprig of blooming sakura or peach, made with your own hands, will be a wonderful craft on the spring theme. With the support of parents, such a composition will be easy to perform even for kids. The easiest option is to draw a branch of a tree on paper, supplementing it with glued leaves and flowers made of paper or felt.

A little more creative work will be required to create a realistic blooming tree branch. As a basis for such a craft, you can take a real dry tree branch, which can be wrapped with woolen threads for general attractiveness. Flowers can be created from paper or fabric. Plastic spoons are also suitable for these purposes. The created tree branches can be decorated with birds cut out of paper or felt. Blooming twigs with figurines of birds hanging on strings will look beautiful.

An interesting spring-themed panel can be created using crafts from natural materials. For example, you can create insects from pebbles for a spring meadow. Pebbles of the right size, bright colors and a little imagination - all that is required to create bugs, spiders and ladybugs that crawled out onto the ground warmed by the spring sun.

By painting the pebbles with black and brown paint and gluing the wings to it, you can get funny spring bugs. Likewise, using red and white to create cute ladybugs. To create spiders, chestnuts and acorns are suitable, to which the threads-legs are glued. Large leaves can be cut out of green fabric, on which it will be possible to place all this group of insects.
The streams murmur, the sails fly along the waves
It will be interesting for boys to create an original spring craft for kindergarten in the form of a boat or a raft. Such a toy can even be tested while walking in the park. The simplest option, which even very young children can master, is a boat made from walnut shells. The bottom of the future sailboat can be covered with plasticine, which will allow you to fix the mast (from a toothpick) with a sail made from a piece of burlap.

From such simple boats, you can create a whole composition (both a paper applique and a plasticine fairy tale). A beautiful spring meadow with flowers and a babbling stream flowing through it is the basis of the picture, which will be "revived" by sailboats made of walnutshells.

From the dry twigs collected during a walk in the park, you can fold a raft, securing the resulting structure with glue or strong threads. A simple spring craft is almost done. It remains only to add a mast with a sail in the center of the raft. To create it, you can use the same dry twig. A piece of tarpaulin - for the role of a sail, and ready to resist the water element, the raft is ready.

An equally interesting version of a spring raft can be made from wine corks by gluing them into a single structure. There are a lot of ideas. A little imagination - and you can create real miracles.