Crafts from color corrugated cardboard. Diy cardboard crafts from corrugated cardboard and master classes of interesting gifts with instructions
Content
Crafts made from the simplest cardboard look no worse than expensive designer decor. Finding material is not difficult in any home, and in the store it is not too expensive. So arm yourself with material, scissors and glue and let's create stylish things. At the very bottom you will find a video master class and tips for working with cardboard.
Christmas tree decorations
Crafts made of cardboard for the New Year can be the simplest to perform, but very cute for decorating a home or a Christmas tree.
To create a Christmas tree decoration, we need:
- scissors;
- thick cardboard (you can use an electronics box);
- watercolor paints;
- brush;
- simple pencil;
- twine;
- dry straw;
- beads / pearls / rhinestones;
- ribbons / bows.
First you need to decide what exactly you want to make out of cardboard: a cookie cutter, a herringbone, a deer, a star, a snowflake. Now you need to draw the future craft either directly on the material, or first on a draft, and then transfer it to cardboard.
Now the blank needs to be cut out, and then, using paints and decor, to give the Christmas tree decoration a complete look. Let's see what might come out:

Next year is the year of the dog, so the New Year's figure has already been determined.

Use twine to decorate a cardboard horse
And some more toys based on dense material with twine:

Use spray gold paint:

Decorative tree
This is a decoration from the category of volumetric cardboard crafts for the New Year. The dense material acts as a base here, and the following materials will be needed for decoration:
- twine;
- colored paper;
- beads;
- bows;
- tree beads;
- threads;
- paints.
Everything is elementary simple - you need to twist a cone from the main material, which will act as the basis for the Christmas tree. Use a glue gun to secure the decor to the cardboard.


Use colored twine to create such an interesting Christmas tree.
By the way, pasta, peas, nuts, beans and other materials can be used as decoration for a cardboard Christmas tree.

Deer made of cardboard
A beautiful and stylish piece of Christmas reindeer head craft can be hung in the hallway or living room. For such a large cardboard craft for the New Year, you will need:
- thick cardboard (box);
- tailor scissors;
- paints;
- brush;
- fir branches;
- cones and other decor.

First you need to draw a template for the future deer: separately draw the head, antlers and base for the wreath. Fold the box flat and attach the template to the fold. You should go out so that the deer's nose will be the connecting link between the two parts of the head.
Now draw in the plane of the horns, which will then need to be inserted into the grooves of the head.
Connect the parts and, if necessary, glue with glue. Now go for the wreath. From the same material, you need to cut out a medium-width "bagel" on which you will glue the spruce branches. It remains to completely connect all the details and find a place for the Christmas deer.
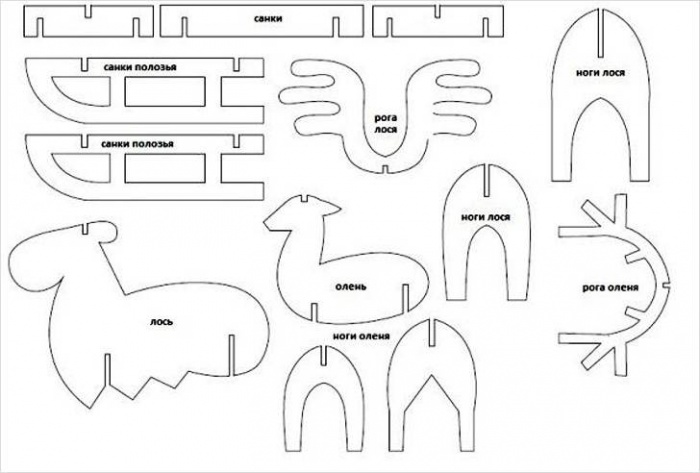
You can make a huge interior composition with a deer and a sled.

For such a composition, you will need part templates, which you will then assemble together. Bulky cardboard crafts for the New Year look very impressive.
Corrugated cardboard crafts
Corrugated cardboard itself is a very beautiful material and original Christmas tree decorations are obtained from it. Use corrugated cardboard ribbons and create Snowmen, Santa Clauses, different animals, Christmas trees and other decorations:

Use glue, scissors and paint to bring your craft to life:

Let's try to create a corrugated herringbone step by step. You can buy it from a specialty art store or use industrial cardboard.
First you need to cut the cardboard into strips of medium width, twist them into circles and secure with glue. Make enough circles to connect them into a tree: the bottom row will consist of 4-5 circles, and then in descending order.
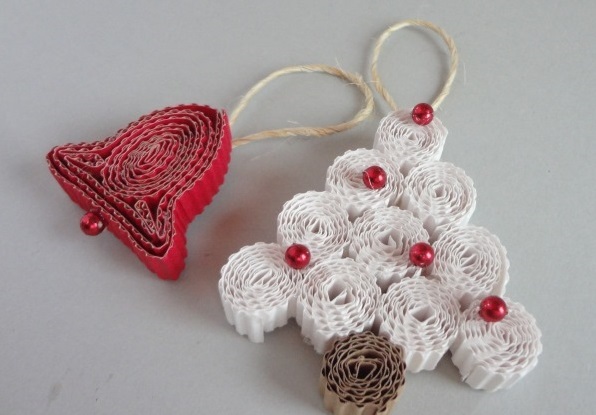
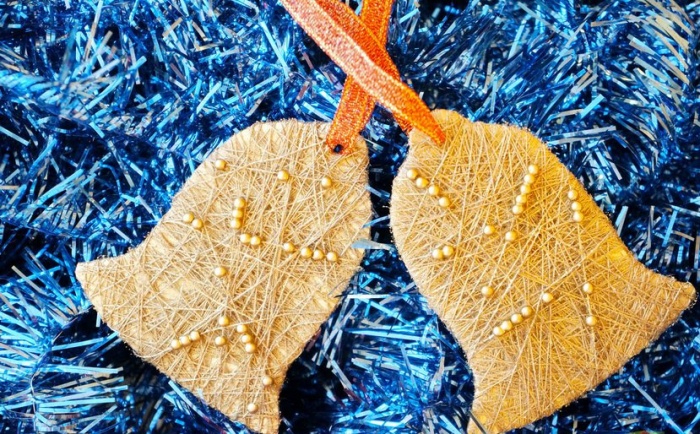
And to make such a bell, you need to take one long strip of red corrugated material and twist it into an oval. Then lightly squeeze the sides of the workpiece to give the desired shape. Now we make a bell shape from a separate strip and glue it to the oval. It remains to attach the bead and string.
How to Create White Cardboard Decorations
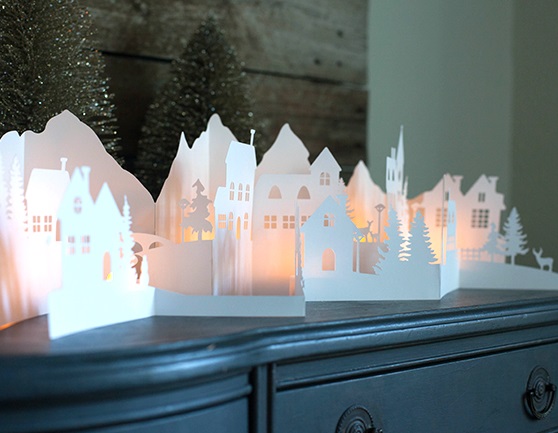
What white cardboard crafts for the New Year can you make? Use this material to create interesting "snowy" New Year's decorations that can be placed on the windowsill.

It is necessary to cut the Christmas trees according to the template and connect them with a stapler to each other. In the middle, you can put a garland on batteries and the New Year's mood will be provided for the whole year. And with a simple template, you can create a whole New Year's town out of white cardboard. Use nail scissors, PVA glue, and a stapler to create your Christmas craft.

You don't have to glue the houses, but place them on the chest of drawers in the plane:
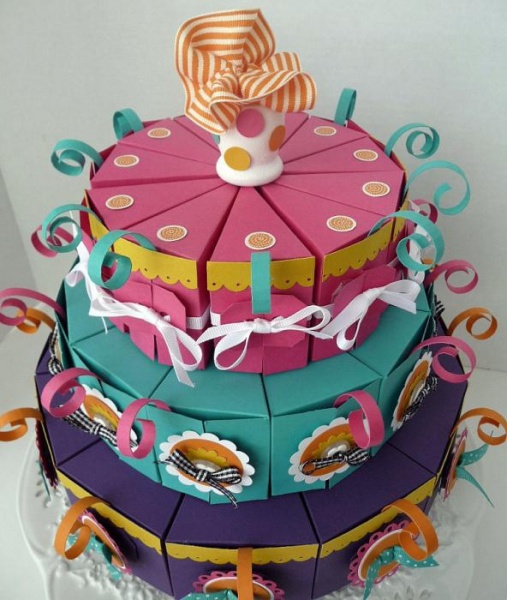
How to make a "cake"
You can use this material to present a gift or make a "cake" with New Year's predictions in an original way. What you need:
- thick cardboard;
- scissors;
- pattern;
- beads;
- tapes;
- bows;
- colored cardboard or paper.
First you need to print the template:

One template equals one piece of cake. The more such pieces there are, the larger the cake will turn out. You need to bend the part along the fold line and secure the part with hooks. The finished cake can be decorated with quilling details, beads, felt toys, Christmas tree beads. In each of the pieces, you can put a wish for the New Year.

Such a cake can be presented to children for the New Year, putting a small surprise in each piece.

You can make several tiers from different styles of cakes. The first tier will contain, for example, 6 large pieces, the next - 10 small ones, and the next - 12 very narrow ones.
At first glance, it seems that difficulties should not arise, but this material will be easy for you to succumb to if you work with it correctly:
- use only sharp scissors or a utility knife to keep the edges of the cardboard neat;
- use grooves and gaps to connect parts. The grooves can be pre-lubricated with PVA glue so that the structure is held tight;
- use a ballpoint pen that is no longer writing to mark the fold lines. In this case, the cardboard will bend nicely and not roughly;
- if you are using colored cardboard, then select the markers by color so that you can paint over the folds of the product;
- do not give up needlework if the craft does not work the first time. Start with something simple, see how cardboard behaves in your hands. Then take on the harder work.
We are sure that you will prepare very carefully for the New Year and create coziness and a fairy tale at home with the help of your own handicrafts.
And as usual, at the end of the article, we offer a video master class on creating interesting crafts. This time, we are watching a lesson on how to create a Christmas tree from corrugated material:
Corrugated cardboard quilling. Master class with step by step photos
Master class: hand-made corrugated cardboard "Heart present for dad and mom"
Author: Fateeva Oksana Yuryevna, methodologist for decorative and applied creativity and fine arts MBOU DOD TsRTDiU, Kamensk-Shakhtinsky, Rostov region.The master class is designed to work in a children's creative association for children 7-10 years old and older, for teachers, parents.
Purpose: This work is a handmade gift.
The purpose of the master class: master the technique of corrugated cardboard quilling.

Progress:
The cat consists of a torso-heart, legs-stand, muzzle, ears and tail.
At the first stage it is necessary to cut 10 strips 1 cm wide from red cardboard in length. These are blanks for the body-heart.

The heart consists of two parts - dense oval discs. For each disc, it is necessary to glue tapes of 5 strips with PVA glue.

And then, stepping back from the edge of 10 tubercles, twist into tight oval discs.

Press down the discs, giving the shape of a drop. We glue the heart.
Second phase: we prepare the legs-stand, muzzle, ears and tail. Cut 12 strips 5 mm wide from white cardboard.

Divide the first strip into two equal parts and twist a tight disk from each half.

We squeeze and shape into triangles - these are ears.

One whole strip is a tight disk. This is the cheek. The cat has two.

Give the cheeks a droplet shape

Stand feet require 6 strips. The base is two tight discs of two strips. We give them a droplet shape and glue them like a heart. For "fingers" we divide the strip into 4 equal parts. We twist a tight disk from each part.

Divide one strip in half. Twist a disk from the half - a beard for the muzzle. Cut the remaining half in half again and twist two more "fingers".

We make the tail from the remaining strips. After gluing them into a tape, and stepping back from the edge of 15-20 tubercles, we twist an oval-shaped disc, similarly to half a heart. The tail will turn out to be "loose", in order to strengthen it and give the desired shape, we will glue red stripes.

Stage three: preparing the details of the craft, we worked with PVA glue. But it's better to collect the craft with a glue gun. The assembly will not take long.
DIY corrugated snowman. Master class with step by step photos
Craft for the New Year - "Snowman"
The work was carried out by the pupil 1 "A" class MBOU gymnasium № 69 of the city of Krasnodar Markov Vladislav.Target: making New Year's crafts from corrugated cardboard using the quilling technique.
Tasks:
1. To contribute to the formation of an idea of a new kind of arts and crafts - quilling.
2. To acquaint students with the technique of quilling.
3. Develop imagination, visual-figurative thinking, creative abilities of the child.
4. Develop interest in the subject, paper handling skills, fine motor skills of the hands.
5. To instill in students a creative attitude to work, accuracy.
We made a snowball
They made a hat on it
The nose was attached, and in an instant
It turned out ... (Snowman)
You can make a funny volumetric snowman for the New Year with your own hands from colored corrugated cardboard!

Material:
- colored corrugated board
- scissors and glue
- plastic toy eyes

We fold the corrugated cardboard tapes into tight circles. We do every detail in duplicate.

Extrude the center of each circle to create a volume effect.

The resulting balls are fastened together with a glue gun.

We glue the halves together.

One ball will become the head and the other will become the body of the snowman.

We glue the blanks.

We make a carrot nose from corrugated ribbons and glue the eyes.

A scarf for a snowman made of corrugated tape.

Made of corrugated ribbons for hands, feet, a hat and buttons.

Let's collect a lump from the snow.
We will put a pot on top.
A carrot will replace his nose.
He holds the broom dexterously in his hands.
We will put on a scarf for him
And he will not freeze in a blizzard.
He was not at all used to warmth.
After all, this is a miracle - a snowman!
In everyday life, we are constantly surrounded by various things that we often do not pay special attention to. Meanwhile, some of these things can be very useful, such as cardboard. In the modern world, cardboard surrounds every person: people see goods packed in cardboard boxes in stores, buy milk and eggs in cardboard boxes, use paper towels and toilet paper, which are wound on special cardboard sleeves. We can safely say that cardboard is a universal thing that will turn out to be not only useful in the household, but also a material for original interior decorations.
Some cardboard crafts will not only add a touch of originality to the interior, but also significantly make life easier their owners. Do-it-yourself cardboard products will help save money on the purchase of store counterparts and add a little practicality to the room. Watch the following master classes to make some useful little thing for your home with your own hands.
Charger box
People who know the problem forever tangled wires, the following craft is especially suitable. It often happens that the wires get confused with each other, and it becomes very difficult to figure out which charging a certain wire leads to. To prevent confusion, you can follow the advice below and build a small charger box. It is very simple to make it: you only need small box, for example, from under shoes and a carrier socket, and then follow the master class:
- Punch as many round holes in the side of the box as there are sockets on the carrier and one on the side. The wire from the carrier will pass through this hole, and the wires from the chargers will go through the rest. Optionally, you can glue the box with colored paper, decorate it with ribbons or other decorative items.
- Place the carrying receptacle inside the box by inserting the wire from it into the hole on the side.
- Insert the necessary chargers into the carrier, passing each of the wires into a separate hole. If you wish, you can sign the holes so as not to forget where the wire is from a particular device.
Gallery: volumetric cardboard crafts (25 photos)


Jewelry storage box
Women who have a lot of different jewelry at home are probably familiar with the situation when they have nowhere to put them so as not to lose and, if necessary, immediately find the necessary jewelry. This problem is perfectly solved special stands for jewelry, for which it is not necessary to spend money in stores, it is enough to find unnecessary box and some transform her... The following master class will show you how to do this:

Children's house
Many children dream of their own small house in which they could hide, play and just have a great time. Such a house can be made independently from ordinary cardboard boxes... This will require several large boxes. For more details, see the master class below:

In the same way, you can build a small dollhouse, as well as furniture for it.
From a sheet of cardboard you can make many different toys, in the manufacture of which the child himself can take an active part.
Volumetric figures
There are many schemes that can be printed or transferred to cardboard by yourself, cut and fold into some little animal... Such voluminous crafts are especially popular among children, because they look like real toys and it is very easy to make them. Below are several diagrams that can be printed and assembled into a figure.
Such toys will be especially interesting for kids, but older children often pay attention and love such things. The meaning of the jerk toy is that its parts are tied with strings by pulling on which you can achieve the effect of a moving figure. The next master class will cover toy-jerk in the form of a dog:

Corrugated cardboard and crafts made from it
Corrugated board is widely used in craft making. Children like to use such cardboard more, thanks to its airiness and unusual appearance, and crafts from it are obtained more interesting... Crafts made of corrugated cardboard for children are very simple, so you can make them with a child of any age using any master class below.
 One of the most basic corrugated cardboard crafts is a robot. An ordinary one is used as a basis. toilet roll pasted over cardboard... You can choose any colors, black and gray are used in the master class.
- The first step is to paint the top and bottom of the sleeve. black paint... This will be the head and legs.
- The unpainted part is pasted over a piece of gray corrugated cardboard.
- Of the usual black cardboard cut out two strips and fold them into an accordion. When folded, we glue them to the body of the robot and fix it stationery to achieve the best effect.
- In a few minutes elastic is removed and the accordion straightens out, forming hands.
snowman
The following craft is a small figurine of a snowman, made using a special technique - corrugated cardboard quilling... A distinctive feature of this technique is that a ribbon of cardboard is wrapped around a pencil, forming a circle, and various shapes are formed from these circles. Quilling made of corrugated paper or cardboard looks very original, and making them with your own hands is an interesting activity.

Chick
A more complex corrugated cardboard quilling craft is a chicken. Such a cute bird perfectly decorate the children's room, and the child will be interested in doing it step by step with his own hands.

Cardboard has many uses, so don't throw away the various boxes right away. Sheets of cardboard may be needed not only for children's crafts, but also to make everyday life easier. DIY corrugated cardboard crafts are very interesting to do with children.


Crafts look very impressive.
Recently, my daughter and I discovered a completely new application for corrugated cardboard - voluminous crafts.
Bulky corrugated cardboard crafts are easy to perform. They can become a toy for a child or an interior decoration. But we have found another application for them -.
You will need:
- corrugated cardboard sheets of different colors;
- scissors;
- ruler;
- PVA glue;
- shifty eyes;
- a thin ribbon, or a beautiful thread.
Preparing for the craft
We cut sheets of corrugated cardboard into strips 1 cm wide. For some small parts, narrow strips of 0.5 cm will be needed. From these strips we will twist circles - the basis for crafts.
Looking ahead, I will say that for the manufacture of large parts (head, body), a strip 1-2 meters long is required. Standard sheets of corrugated cardboard about 28 cm long. Therefore, cut the required number of strips (3-4 strips for example) and in the process of twisting, simply glue them one next to the other.
The scheme of all crafts is the same. The only difference is in the scenery. Let's look at the production of basic parts using the example of a tiger cub.
1. For the head you need a strip 1 cm wide and 1 meter long.
We cut strips along the length of the sheet, measure and determine how many strips we need up to a meter (usually 3-4 strips). Then we take the first strip and twist it into a tight circle. We glue the end, and next to the joint we glue another strip.

For the muzzle, you need a strip 0.5 cm wide and 50 cm long.
For ears: width 1 cm, length 16 cm.
For the spout: width 0.5 cm, length 7 cm.
2. For the torso:
- one orange strip 1 cm wide, 50 cm long.
- one white strip 1 cm wide, 50 cm long.
3. For the feet: 4 strips 1 cm wide and 16 cm long.
The process of creating a tiger cub from corrugated cardboard
We twist a circle for the head, a circle for the muzzle, a nose, and two ears, gluing the ends of the corrugated cardboard. We form triangles from the circles for the ears with our fingers.
When twisting, we try to make the first turns tight.
My daughter and I did this: I began to twist tightly and passed it to Anya. When the tape ran out, Anya glued it on and twisted it on. Then I held the circle until the glue seized, at which time I began to twist the second part.
When all the details are ready, we glue them together, forming the face of the tiger cub and arrange it as you wish. Our tiger turned out to be angry - this is Anya's idea - a saber-toothed tiger from The Wizard of the Emerald City.

By analogy, we form the body.
To add volume to the corrugated cardboard craft, you need to squeeze out the middle of the circle with your finger, forming a dome. For strength, coat the inside with PVA glue. In a tiger cub, volume can be created on the tummy.
Christmas decorations made of corrugated cardboard
To make a Christmas tree decoration when twisting the head in the last circle, insert a thin tape and fix it with glue. We did not do this, as the idea with Christmas decorations came later.
But it doesn't matter. In the intervals, we will insert a regular thread with a needle and hang the tiger cub on the tree. And we will make the next toy - a volumetric snowman, as expected.

photo from the internet
I found a lot of ideas for crafts from corrugated cardboard in the book.