Brooches from beads. Brooches made of beads on felt Embroidered beaded brooch mk rose
We will need:
Beads: brown and beige iridescent size 12; gold, dark green and green light;
Faceted beads in gold, green, burgundy and beige. Natural pomegranate and chrysoprase beads;
The basis for the brooch and golden fittings (hugs for beads, figured metal beads);
Interlining (or felt);
Leather, thick paper, glue Moment;
Monofilament and beaded needles.
When creating a rose, we will use the technique of mosaic weaving. For convenience, I drew two diagrams: on the first - a diagram of weaving the middle of a rose, and on the second, an example of creating cloves on the edge of the petals. Starting to embroider, we mark the center on the base with a line and draw a flattened spiral a little closer to the edge from the center. We embroider it with brown rainbow, and along the edges we use beige beads. Note that the sum of the beads must be odd. Now we fill the voids inside the spiral with dark green, and then weave along the sewn brown beads with a mosaic technique, not forgetting that the edges should be light and therefore we use beige rainbow beads for them.

Now that the center of the flower is ready, we weave 4 petals around a little overlap. We draw a contour on the base, embroider it with beads and fill the inner gap with dark green. To make the rose more, brighter and more interesting, I sew more faceted gold and green beads in between. We make the petals a little higher than the center by adding 2 rows. At the edges we weave cloves. To make the petal stronger, we pass the needle and thread again along all the extreme beads and tighten.

Only after finishing the petal, we draw the outline of the next one, because you never know what will happen. The larger and longer the petal, the higher it should be due to the added rows. The next petals should be slightly overlapped in the center.
We make the lower petals smaller by rounding the bottom of the rose. There is another trick here: for the beginning of the petal at the base, I choose wider beads, and for the edges - narrower ones, which is why they are wrapped inside me. Each rose is individual, because. it does not use a single template. The flower is created from the center, and how its petals will be located is up to the master and his taste. The choice of color for filling voids between the petals is better, darker, or at least in tone with the materials that you are going to include in the work.

Cut out the finished rose. I tint the bright white edges of the base with brown acrylics. I embroider tightly and, of course, in such cases, the base of the embroidery is deformed. Then, when gluing the work, I have to put something heavy on top so that the product comes out smooth after the glue dries. You can't do that with brooches. Then I just cut an opening the size of a brooch base in a hard box and use it all the time.

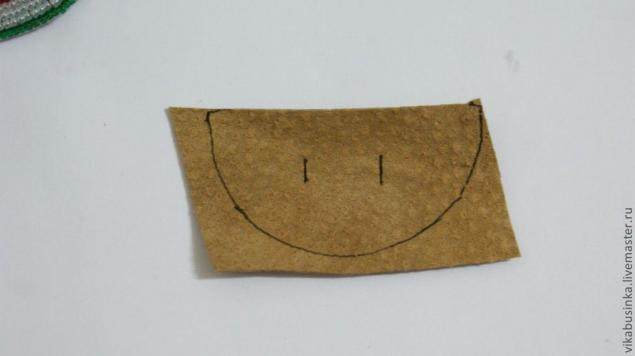
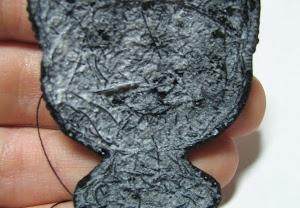
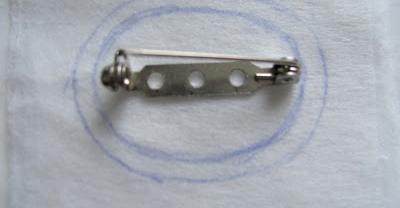
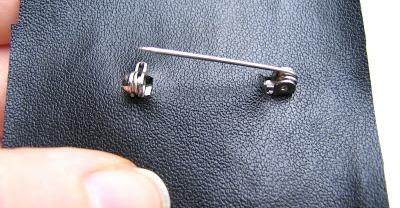
From the skin I cut out a blank for the design of the wrong side. I mark the places where cuts are required and with scissors I cut out two holes for the spring and the eye of the fastener on the mount. I smear it with glue, insert a needle with a spring and a fastener eye into the cut holes. Then we glue a pattern of thick paper to the wrong side of the embroidery (a postcard or a box of sweets will do). It should be 2-3 mm smaller than the contour of our rose. Then again we glue the inside out with glue and glue it to the suede side of the leather with the fastener. We place the future brooch on the box with a clasp in the opening and laying something weighty on top, we go to rest for 15 minutes, allowing the glue to dry.

After resting and gaining strength, we proceed to sheathing the edge of the pendant with dark green beads. After sheathing the edges, we proceed to decorating and, here, as a fantasy, it whispers. In my case, I decorated the bottom with pendants made of beads and golden fittings. Sheathed the edges with a green light with gold beads and faceted beads.
Each work is a complete improvisation that does not have exact schemes. I wish you all good luck, inspiration and success in all your endeavors!
A source http://biserok.org/brosh-osennyaya-roza/
Very beautiful flower, delicate, light, elegant!
«
A small preface.
To create a flower, I used TOHO beads 11/0 (color: white ceylon) and Czech white beads 10/0. I wove the petals with fishing line, and sewed them together with yarn (it was just more convenient for me).
Let's start with.
1. We weave petals with brick weaving according to the following scheme

It is necessary to make 3 small, 4 medium and 5 large leaves. It is not necessary to completely adhere to the scheme - I sometimes made some changes on the tops of the petals already during weaving. The main thing is that you like the look of the petal.
2. We sew small petals as follows: sew the beads of the second row of one petal to the beads of the second row of another petal, as in the diagram. Sew 4 bottom beads

Each next petal should, as it were, overlap the previous one (the second is sewn on the first, the third on the second, and the first on the third).
The result should be such a middle

3. Sew on the middle petals. The beads of the first row of the middle petal are sewn to the beads of the second row of one of the small petals. And then in the same way we sew the next middle petal to the previous one.
SchemkaV

as a result we get

4. Sew the first and last middle petals. And sew a row of middle petals to the inner ones for the lower beads
This is what should be the result

and from the front

5. In the same way as the middle row, sew 5 petals of the outer row. We sew them and sew them to the petals of the middle row. There is no special technique in sewing one row to another, I just sew on the bottom row of beads so that the petals are well and neatly fastened. The flower on the back should look like this

6. So that there is no hole in the middle, you can sew beads there

7. On the reverse side of the hole, I sew a round flat bead in size

If the flower is made for a brooch, then you can attach a strainer at the back.
8. We admire the result

In other colors

beads «

A beaded brooch is an original and very beautiful accessory that invariably emphasizes the charm and grace of its owner. Today we will tell you how to weave such decorations. We have collected for you the best ideas for inspiration and step-by-step master classes that even beginners can handle.
In this article, you will find all the necessary information on how to make a beaded brooch with your own hands, as well as some valuable tips and interesting patterns. Some (more complex) accessories come with weaving patterns, while others have an accessible description. In our selections you will find brooches embroidered on felt, as well as woven jewelry. Flowers, birds, leaves, dragonflies and other most popular beaded crafts - you can do all this and much more yourself.
Before starting work
If you have never worked with beads before, or if your familiarity with the weaving technique is superficial, you should pay attention to beading master classes for beginners. Brooches - accessories are quite simple, but each of them has its own nuances. For beginners, it is best to look not at woven jewelry, but at those that are embroidered with beads on felt.
The simplest brooches are petals, embroidered flowers, birds and other decorations that do not require small details. So, for example, to make a beaded brooch in the form of a woven flower bud, you will need to weave several petals separately, and then carefully fasten them together - this is not too easy. For an embroidered flower, you only need to draw an image and attach beads to it.
In a word, it is better for beginners not to take on bulky brooches. However, you should not take this as a rule - it is quite possible that you will be able to do something difficult with your own hands and the first time.

Which beads to choose?
The choice of beads for a homemade brooch depends on its style. In some cases, you will need not only the standard round beads, but also several other types of beads.
The following usually works:
- small beads with a large hole for the needle;
- standard glossy or matte beads;
- beads in the form of rice;
- bugle;
- beads of small and medium size;
- half beads;
- rhinestones;
- ornamental stones.
Other accessories for creating a brooch:
- felt;
- fabric base (for example, jeans or wool);
- threads (preferably silk);
- fishing line;
- needles of various sizes;
- glue gun;
- tweezers.

You will not need all of these materials, but usually many of them go to work at the same time.
Master class: brooch in the form of an owl
Beginners will like this step-by-step instruction, because you can make such a brooch with your own hands in just half an hour, and for its “assembly” you will need the simplest materials. The master class should not be neglected for those who have been working with beads for a long time, because owls are very popular today. And this means that you will get a fashionable exclusive brooch that even the most advanced fashionistas will envy.

What will we need?
- large beads of several colors;
- beads in the form of rice;
- two large rhinestones of the same size;
- thin fabric base;
- cardboard;
- dense leather base (can be replaced with dense matter);
- thread or fishing line;
- Super glue.

How to do?
First of all, we make out the eyes of an owl. To do this, we string small beads on a fishing line or thread and close it in a circle a little larger than rhinestones. We connect the circle and place the pupil-rhinestone in the center. Glue. We fix the eyes on a fabric basis with a thread or glue.

We sew to the base a beak made of oblong dark beads and a bang made of light beads. The owl's head is almost ready, and this is already half of the brooch.

We draw the body of the owl and add a few more elongated beads to the head. We sew another row of beads around the eyes - we use all the same small beads.

We lay out the beads in a continuous row along the contour of the body. You can string beads on a fishing line, and then sew it to the base of the brooch. We do the same with the body of an owl: we collect it on a fishing line and glue or sew one bead at a time.

Cut off the excess fabric and glue the future brooch to a small oval piece of cardboard.

Then we make two holes for the pin in the leather base, insert it and glue the structure to the workpiece.

We make paws and wings with the help of small oblong beads, add another row to the body to hide the excess fabric. Ready!

Try different color combinations. Make owls black and white, brown or even very bright. In any case, your homemade beaded brooch will turn out to be very cute, touching and original. This is a great gift and a great everyday accessory for girls and women of all ages.
Master class: bird brooch
A very beautiful felt brooch that any woman will love. In this step-by-step instruction, you will find a pattern for weaving and embroidering a bullfinch, however, your bird can be any - it depends on the chosen pattern and colors.

What will we need?
- a piece of felt;
- sewn-on rhinestones;
- standard size beads (two or more colors);
- beaded needle;
- thread or fishing line;
- pin or ready-made accessories for a brooch.
Please note that felt can be easily replaced with a piece of woolen fabric or any other material (glued with cardboard and a piece of leather - for reliability).
Before starting work, you need to select a stencil of any bird and print it. If it is not possible to do this (or you draw well), then copy the image on paper. The main thing is that you have a ready-made template of the size you want to see the brooch. We advise you to pay attention to our selection of bird stencils.
How to do?
We attach the bird figure to the felt and circle it. Cut out.

We lay the wing with large rhinestones. Glue or sew them on.

We sew the wing with beads. To do this, we fix the thread from the wrong side, string two beads and make a seam. You can also sew one at a time if your rhinestones have a complex shape.

We make trim along the contour of the future brooch. It is better to do this in several passes and not be lazy to change the thread and tie knots - so the rows will lie more evenly.

Add a second, third and other colors to create the breast and neck of the bird.

Fill in all the small details with beads (you can also fix it with glue), and then make another extra row around the entire outline.

The brooch is almost ready. It remains for us to cut out another piece of felt according to the stencil, connect it with a pin, and then glue it with the embroidered part, laying the stencil itself between them.

This beaded brooch can decorate not only the lapel of a jacket, but also a fabric handbag. By the way, it is believed that birds bring good luck, so your homemade brooch is not only a beautiful accessory, but also a kind of talisman.
Master class: clover brooch
A beaded brooch in the form of a clover leaf is your good luck charm. This accessory looks great on a scarf, jacket, handbag and even on a hat. Cute, neat, original - this brooch will be a great addition to your look.

What will we need?
- green felt;
- green satin fabric;
- small beads with a small hole;
- brown rhinestone;
- green beads;
- green bugle;
- flat wide beads;
- a piece of skin;
- a pin or ready-made accessories for a brooch;
- threads;
- Super glue.
How to do?
First you need to draw a quatrefoil on paper: on your own or using a stencil. We transfer the image to felt.

We string brown small beads on a thread and close the ring. It is better to perform it in two rows.

Sew fabric to one half of the clover. We also pre-cut it on a stencil. To make a beautiful fold, use thread and beads. For convenience, it is better to pull the felt over something.

In one of the corners we place a rhinestone, and on top of the ring, which we completed in the second step. We process the contour with green beads. We fill the space with beads and beads of various sizes in random order. Details can be sewn or glued.

Gradually fill all the free space with decor.

We release the felt from the clamp and cut off the excess.

We glue a pin or accessories and a piece of leather to make a solid base. The brooch is ready!

Such a homemade beaded brooch can be given as a gift or simply always carried with you for good luck. This is a very beautiful accessory that will make you stand out and be remembered by others.
Bonus: video tutorial
In this master class, you will learn how to make a sponge brooch, another popular accessory today. In a similar way, you can make a brooch with any other image.
Choose any of the presented master classes and be sure to try to make a beaded brooch with your own hands. It's quick and easy, and the result is a very beautiful accessory that you'll wear for years. In addition, your brooch will be unique: even if you choose a popular silhouette, the colors and sizes of the jewelry will be exclusive. Create and wear with pleasure!
Views: 132 528
Today, handmade items are in trend, from decorative items for the home to sweet products. The cost of such products is quite high, but with a little perseverance and minor material investments, you yourself can do something similar. In this article, we will dwell in detail on beading, namely, on brooches embroidered with beads with our own hands. Consider the necessary materials and tools. We will learn how to make a beaded brooch on felt, a master class will help us with this.
Necessary materials and tools
The set of tools may vary depending on the type of product. In the future, each master has his own preferences and tricks, but we will consider the basic tools and schemes.
Instruments


- natural. They have a wide color palette, they are soft, tactilely pleasant. There are also disadvantages - low strength, quickly torn, rot at high humidity (after beeswax treatment, this disadvantage can be eliminated);
- synthetic from polyamide and lavsan. Their advantages are high strength, resistance to external factors, low shrinkage, high durability and sliding ability, do not get tangled. But such threads due to chemicals can cause allergic reactions;
- reinforced from a lavsan core, braided with a second thread. They have high strength, elasticity, wear resistance, resistance to external factors. Among the shortcomings are the high cost and inclusions of chemical elements that can cause allergies.
In addition to the material, it is important to consider the thickness of the thread. Sometimes threads can be replaced with fishing line or monofilament.
- Scissors.
Work materials
To make a beautiful brooch, you will need:
This is our basis for embroidery. This material is based on wool fiber. It happens:
- natural - quite resistant, malleable to coloring. It repels dirt, hypoallergenic. It has a high cost and an increased ability to deform;
- semi-woolen - often the ratio of wool to viscose is 60:40. It is not inferior to natural in properties, but for small details, for example, for a brooch, it is completely unsuitable, because. the product will lose its shape;
- artificial - acrylic or eco-felt. Suitable for washing, retains its shape, dyes well, does not shed, hard, not elastic;
- with bamboo fibers and viscose - hard, durable, well-dyed, pleasant to the body, but loses its shape.

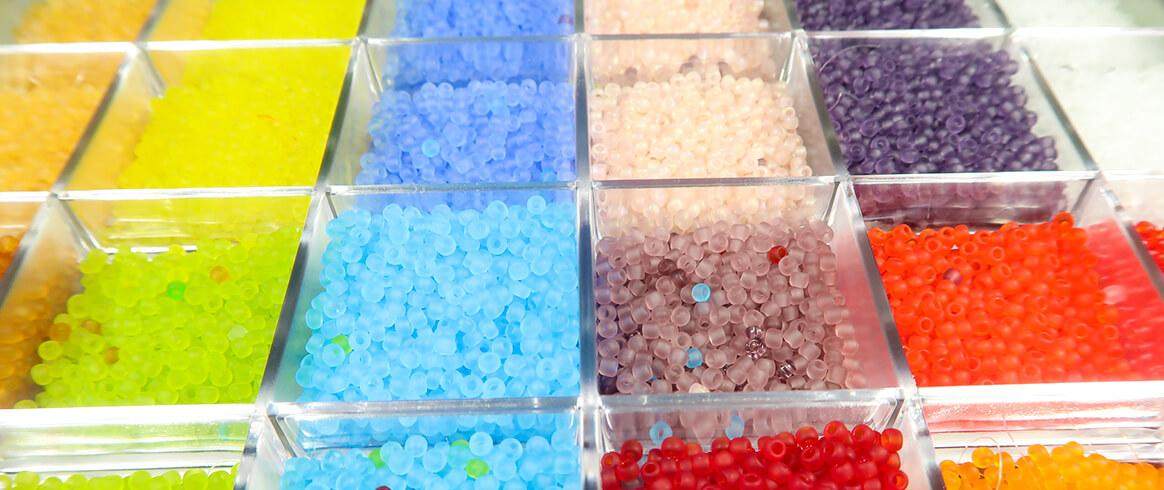
Beads
These are small beads of various shapes. When choosing the type of beads, it is better to stop at one, so that the pattern does not seem blurry, inhomogeneous, or individual beads are not knocked out.
Quality control points are uniformity (the size and shape of the beads do not differ from each other) and do not stain when water enters.
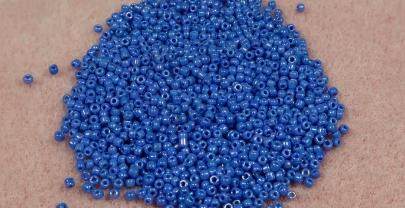
Types of beads can be divided depending on the country of origin:
- Chinese - small, beads are not the same. Therefore, to create a brooch with beads on felt, it is better not to use it, since you will have to spend a lot of time and consumables to get a picture;
- Czech. Beads with clear and even edges. Enjoys great popularity. Please note: color shades are different from batch to batch, and there are also defective beads. Czech beads are in the middle price category;
- Japanese is one of the highest quality: matching the color scheme, shape, size, weight, but the price is an indicator of this;

Japanese beads Miyuki

Japanese beads Delica

Czech beads
Chinese beads
- Taiwanese or Indian. It cannot be classified as quality. It is very brittle, heterogeneous, there are pointed edges, a narrow range of colors, the paint is unstable;
- Indian - has all the characteristics of Taiwanese.
Each country uses its own size classification system, so it is important to consider these features.
The form is distinguished:
- beads - a round shape with a rounded or square hole, the edges are melted;
- felling - short cylindrical shape (about 2 mm);
- glass beads - a cylindrical shape (3-25 mm), the edges are rounded, faceted, twisted.

Round beads


glass beads
Size classification: 6.0 - 15.0. How to understand the marking: it is assumed that 1 inch (which is 2.54 cm) contains the number of beads stated on the marking. For example, 15/0 - 15 pcs. beads will fit in one row of 2.54 cm.
In addition, it also depends on the number:
- hole diameter;
- number of beads in 1 g.
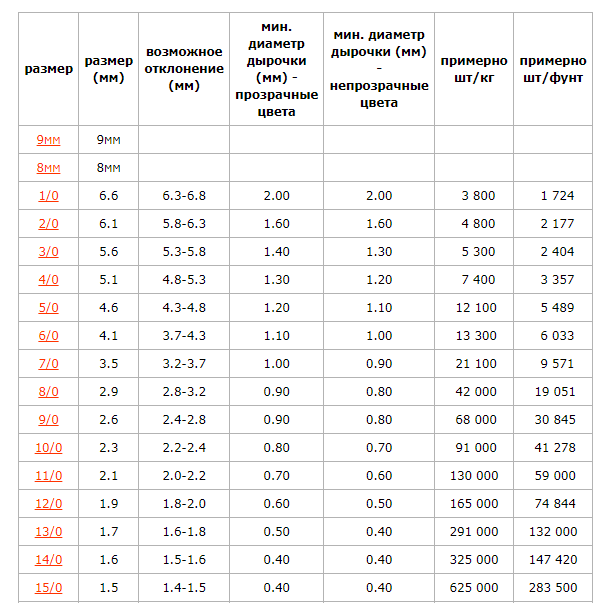
There is no single measurement system, sometimes books on needlework have their own way of marking.
- Genuine leather - for the reverse side of the brooch.
- Beads - have a smooth spherical shape. In a brooch, they are used to highlight part of the picture, to give volume. Beads can be natural, artificial and semi-precious.
- Stamens are an additional element for creating flowers (like a core), as a decoration.
- Ribbons are an additional element of brooch decor, useful for finishing edges and giving volume. By type of material are different (silk, satin, cotton).
Where to start and how to choose the most effective combination of materials
First you need to decide on the type of decoration. It can be an insect, flower, animal, part of a plant. Based on this, a weaving pattern is selected. As a rule, in the master class it is known what materials you will need. But you can change them to your liking.
At the preparatory stage, you need:
- choose the type of product (shape, size, purpose) - for beginners, it is better to train on simple flowers and butterflies. Before choosing the type of brooch, think about what you will wear it with, where to attach it. For a summer outfit or a spring jacket, a funny bug, fruit or bee is suitable. For an autumn coat or knitted sweater - a voluminous, large sheet, not very colorful with shades;
- choose materials and their compatibility. A brooch can be made from budget materials (plastic beads, Chinese beads, plain felt), or you can weave a real jewel. Of course, for this you will need silver-plated beads, semi-precious or crystal stones, rhinestones and beads. But you must admit that the appearance of such a product will be much more representative and effective.
- practice stringing beads and evaluate how evenly the pattern lays down, whether the tools are convenient.
Brooches made of beads and felt and their patterns
After preparing the necessary equipment, you can proceed to step-by-step master classes. There is no one universal scheme for any type of brooch, so we suggest focusing on the most famous ones.
Embroidery with beads on felt - the scheme of the brooch "Watermelon", master class


Separate each inner segment with color shades, creating the outline of a watermelon due to more saturated colors. 
- If you need to replace the filament, or if it has run out:
- do not use the thread completely, leave it to secure the beads;
- with the rest of the thread, fasten the last few beads several times;
- with stitches on the inside, bring the thread to the center of the future brooch and secure with a knot;
- bring a new thread through the middle of the embroidery through the last 3-4 beads.

- We transfer the drawing template onto cardboard. The new template should be a few millimeters smaller than the embroidered pattern;

- carefully grease the felt with glue, thereby fixing all the knots, transitions, and glue the cardboard;
- now glue the pin on the cardboard. Let the glue dry;

- on suede or leather (wrong side material) we make holes for the size of the pin;
- lightly lubricate the pin with glue for fixing;

- cut off unnecessary parts of suede (leather);

- sew felt and purl material. We make a knot on the wrong side, stringing beads, we pass with any processing seam along the edges.


Embroidery from felt, beads of the scheme of the brooch "Butterfly" and a master class

Some stages will be similar to each other or repeated, so we will not dwell on them in detail.

(Click on the picture to open it in full size)

Brooch made of beads on felt "Cat, cat"
There are many variations of schemes for cats and cats, let's consider a more complex type of scheme - a Siamese cat. The difficulty lies in the following: in order for the brooch to correspond to the species characteristics of the animal, it is necessary to observe the transition of the characteristic coat color. Before you start, carefully study and consider which beads and which shades will be best combined and not merge.


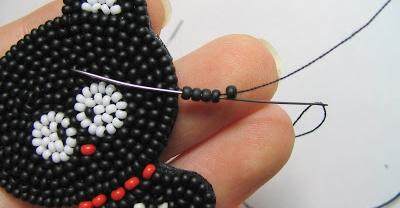

You can pay attention that the technique of embroidering brooches on felt with beads is the same, just pre-set the features. For example:


Beads make beautiful not only brooches, but also necklaces, belts, collars, the latter are especially gaining popularity and are in trend.
Video lessons
Additional SCHEMESbrooches and pendants
Dear master, if you are passionate about creating embroidered pendants and brooches, then this set will suit you perfectly! With it, you can create a variety of compositions for any occasion. We drew them ourselves, so they are 100% original and fit the tutorial. You can use them for any purpose, including commercial.

Enter your Name and your email where to send a set of schemes
Simple tips from experts will help you create a masterpiece. Just listen to them:
- Pay attention to the size of the beads.
- Czech-made beads are more common on the market. It's inexpensive and good.
- When attaching the pin to the skin, pre-mark the insertion points.
- When making cuts or holes for inserting a pin, let them be slightly smaller than necessary.
- It is better to sew on beads on a non-slip fabric, and felt is ideal.
- Use organizers or small containers to store your beads. In such containers, the beads are calibrated in color and size (which reduces the time when embroidering), if this is not the case, pour beads in small portions on a napkin.
- Pick up beads with a needle.
- For beginners, at first it is better to use ready-made schemes, gradually include one new element at a time and not deviate from step-by-step instructions.
- If it is difficult to insert the thread into the eye of the needle, then you can end the thread:
- dip in a colorless varnish, dry, press down with your fingers;
- with your fingers, press the end of the thread to the candle and stretch it;
- Scorch the end of the thread a little with a lighter.
- It is better to start from schemes that include no more than 5-6 color shades.
- The process should not affect health, so use a lamp, a magnifying glass, place materials and tools conveniently and nearby. Do not hold the product too close or too far away from you.
- Do not experiment with new ways of attaching beads to the product, do practice stitches on a separate material.
- Don't limit yourself to one stitch, learn new techniques. From this product will only benefit.
Brooch "Autumn rose" beadedThus, despite the many nuances and features of embroidering a brooch with felt beads, this type of handmade work should not cause great difficulties. The main thing is to clearly define the scheme and purpose of the product.
We will need:
Beads: brown and beige iridescent size 12; gold, dark green and green light;
Faceted beads in gold, green, burgundy and beige. Natural pomegranate and chrysoprase beads;
The basis for the brooch and golden fittings (hugs for beads, figured metal beads);
Interlining (or felt);
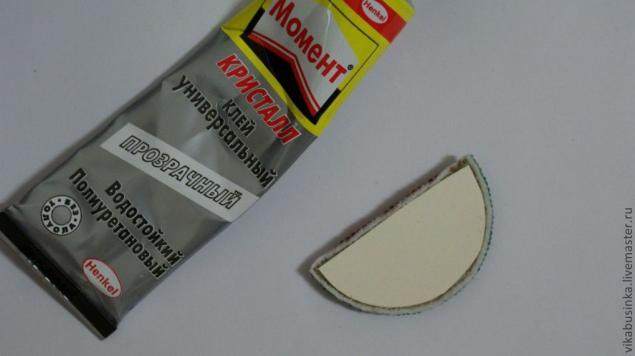
Leather, thick paper, glue Moment;
Monofilament and beaded needles.
When creating a rose, we will use the technique of mosaic weaving. For convenience, I drew two diagrams: on the first - a diagram of weaving the middle of a rose, and on the second, an example of creating cloves on the edge of the petals. Starting to embroider, we mark the center on the base with a line and draw a flattened spiral a little closer to the edge from the center. We embroider it with brown rainbow, and along the edges we use beige beads. Note that the sum of the beads must be odd. Now we fill the voids inside the spiral with dark green, and then weave along the sewn brown beads with a mosaic technique, not forgetting that the edges should be light and therefore we use beige rainbow beads for them.

Now that the center of the flower is ready, we weave 4 petals around a little overlap. We draw a contour on the base, embroider it with beads and fill the inner gap with dark green. To make the rose more, brighter and more interesting, I sew more faceted gold and green beads in between. We make the petals a little higher than the center by adding 2 rows. At the edges we weave cloves. To make the petal stronger, we pass the needle and thread again along all the extreme beads and tighten.

Only after finishing the petal, we draw the outline of the next one, because you never know what will happen. The larger and longer the petal, the higher it should be due to the added rows. The next petals should be slightly overlapped in the center.
We make the lower petals smaller by rounding the bottom of the rose. There is another trick here: for the beginning of the petal at the base, I choose wider beads, and for the edges - narrower ones, which is why they are wrapped inside me. Each rose is individual, because. it does not use a single template. The flower is created from the center, and how its petals will be located is up to the master and his taste. The choice of color for filling voids between the petals is better, darker, or at least in tone with the materials that you are going to include in the work.

Cut out the finished rose. I tint the bright white edges of the base with brown acrylics. I embroider tightly and, of course, in such cases, the base of the embroidery is deformed. Then, when gluing the work, I have to put something heavy on top so that the product comes out smooth after the glue dries. You can't do that with brooches. Then I just cut an opening the size of a brooch base in a hard box and use it all the time.

From the skin I cut out a blank for the design of the wrong side. I mark the places where cuts are required and with scissors I cut out two holes for the spring and the eye of the fastener on the mount. I smear it with glue, insert a needle with a spring and a fastener eye into the cut holes. Then we glue a pattern of thick paper to the wrong side of the embroidery (a postcard or a box of sweets will do). It should be 2-3 mm smaller than the contour of our rose. Then again we glue the inside out with glue and glue it to the suede side of the leather with the fastener. We place the future brooch on the box with a clasp in the opening and laying something weighty on top, we go to rest for 15 minutes, allowing the glue to dry.
After resting and gaining strength, we proceed to sheathing the edge of the pendant with dark green beads. After sheathing the edges, we proceed to decorating and, here, as a fantasy, it whispers. In my case, I decorated the bottom with pendants made of beads and golden fittings. Sheathed the edges with a green light with gold beads and faceted beads.
Each work is a complete improvisation that does not have exact schemes. I wish you all good luck, inspiration and success in all your endeavors!
A source http://biserok.org/brosh-osennyaya-roza/