How to make a picture from scraps of fabric. How to make original paintings from fabric with your own hands - types, instructions, photos. Patchwork technique in patchwork: patterns for beginners
The needlewomen know. But what kinusaiga is, many have only heard. The unfamiliar magic word actually means the art of making paintings from silk rags. A kind of patchwork, only without a needle. This type of needlework was born in Japan. Kinusaiga was founded by Setsu Maena, a professor at a Japanese university. Over time, kinusaiga spread beyond the homeland and European craftswomen immediately adopted this technique of creating beauty with their own hands. But how can you pass by creating stunning things from scraps and remnants of silk fabric? Simply put, European needlewomen received the art of creating masterpieces, saving on expensive materials.
Kinusaiga was founded by Setsu Maena, a professor at a Japanese university.
Kinusaiga or patchwork without a needle: in detail about the technique and tools that are needed
The kinusaiga technique does not imply the use of a needle as in the patchwork technique, but is based on making a sketch on paper, which is then transferred to a wooden board.
A slot is made along the outline of the sketch - a recess. After that, the picture itself is made with shreds of silk. The Japanese women took these pieces of silk from old kimonos, which the thrifty Japanese never threw away - silk after all.
The scraps are laid out on the cut elements of the sketch and the edges of the scraps are pressed into these very slots. With the right choice of paints and colors, paintings are obtained of unique beauty. And it would seem - scraps of an old kimono! We can say that the natural economy of the Japanese became the parent of this art - kinusaigi.
Gallery: kinusayga (25 photos)


Kinusaiga: master class (video)
How to make a picture on polystyrene from fabric with your own hands: a master class for novice needlewomen
How to make a picture in New Year's style in patchwork for children? New Year's patterns always look beautiful and festive. You can talk about the art of kinusaiga for a very long time. But it's better to see how you can still make at least a small masterpiece with your own hands. Below is a Styrofoam painting technique for beginners.
What you need to start a master class:
- Styrofoam sheet (at least 1 cm thick;
- scraps of fabric of different colors;
- scissors;
- stationery knife (scalpel);
- nail file (for filling fabric in foam);
- sketch (your own or you can take any ready-made);
- carbon copy.
The fabric should be selected that is not stretchable and thin enough. The edges should not fray.
First, look at what is in stock: old scraps, leftover fabrics that were not thrown away after sewing some wardrobe item. Everything will go to work. If the check of the storerooms did not give a result, then you will have to take whole pieces and cut out the elements of the conceived picture from them.
Process:
First you need to decide on the pattern. For the first time, you should not choose something complex, with many elements. Let it be light geometric shapes. And from them you can already build a small pretty house.

Using a sheet of carbon paper, you need to transfer the sketch to a piece of styrofoam.

Using a knife or scalpel, make a cut along the outline of the sketch to a depth of about 3 mm.

Cut the selected fabric into patches of the desired size. Use a nail file or something more convenient to tuck the pieces of fabric into the Styrofoam sheet. Thus, fill in the whole "picture". The edges of the fabric should fit snugly into the slits.

Cut off excess edges of the foam with a scalpel or utility knife.

Further, the resulting panel can be framed. It can be purchased, or you can make it yourself. If there are suitable materials. You can simply make the edging with decorative tape, which needs to be secured with beautiful pushpins. These buttons are sold at any office supply store. Buttons in bronze or gold colors look beautiful.


Often, the kinusaiga technique is used to decorate the lids for boxes or boxes (for example, for sewing supplies or cosmetics).
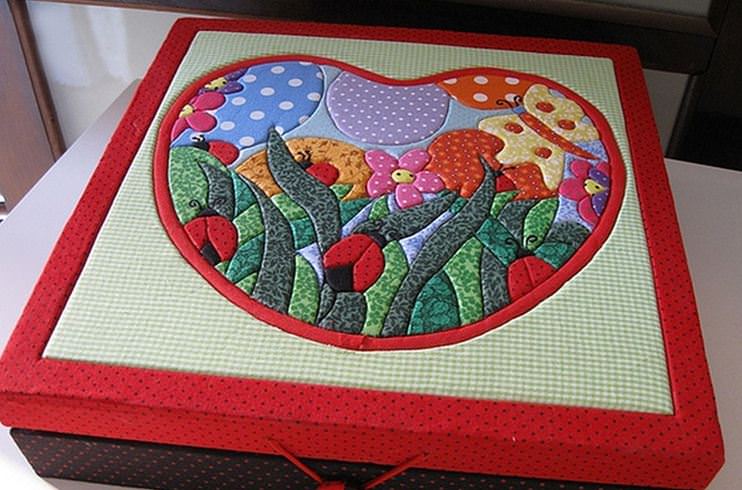

Stunning Christmas tree decorations and crafts are made using this technique.

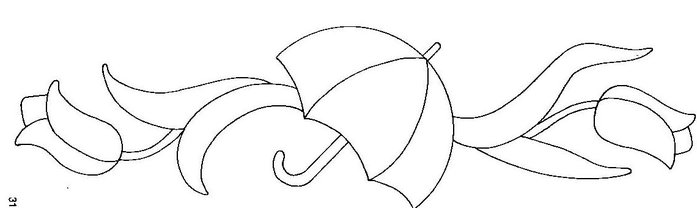
Kinusaiga: simple patterns and their execution
Kinusaiga allows the use of any scheme that is at hand... Templates can be bought, or you can make yourself. The easiest way is to use stencils. As an example, below is a kinusaiga master class based on a simple template.
To complete this needlework, you must:
- A3 size cardboard;
- A4 size cardboard;
- scraps of fabric in different colors;
- synthetic winterizer;
- glue;
- nailfile;
- threads;
- needle;
- scissors;
- acrylic paints;
- thin brush;
- cord (soutache) of different colors;
- pins;
- frame.
Painting scheme:

In the work, you can use any scraps that you can find.
- The drawing must be transferred to tracing paper. Cut into component parts - parts.
- After the division is completed, you need to number the parts of the drawing. Then cut out elements from the fabric along them. Leave a 3 mm allowance around the edges.
- Then prepare the canvas for the future painting. For this purpose, you need to take a sheet of ceiling tiles. The thickness should be half a centimeter. Glue the sheet onto thick cardboard.
- Glue the second copy of the picture, which was printed in advance, to the foam. Cut a groove in it, the depth of which should not exceed 2 mm, along the outline of the sketch.
- Apply glue along the cut grooves with a glue stick. When doing this Japanese handicraft for the first time, it is recommended to smear the entire surface with a glue stick.
- This is followed by the process of creating the applique itself: the edges of all the parts made prepared from the fabric must be pushed into the grooves so that their edges plunge into the grooves and fit tightly there.
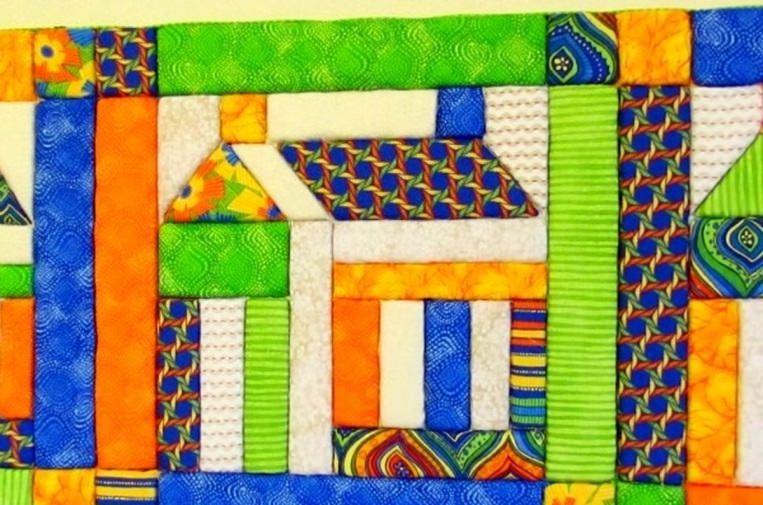
Some ideas and schemes for decorating a kitchen using the kinusaiga technique
Below are sketches and schemes for decorating and decorating the kitchen with kinusaiga paintings.


This whole application is not done quickly, but the result is worth the time. Needle embroidery takes much longer than kinusaiga paintings. When the knowledge base of kinusaiga technique is secured, you can tackle more complex panels and paintings that will surely decorate your home and become an excellent gift for any occasion.
With the spread of kinusaiga art all over the world, specialized shops began to open, in which tools for this type of needlework began to be sold. Also on sale there are special sets of fabrics (not every European has an old kimono at home that can be put on rags).
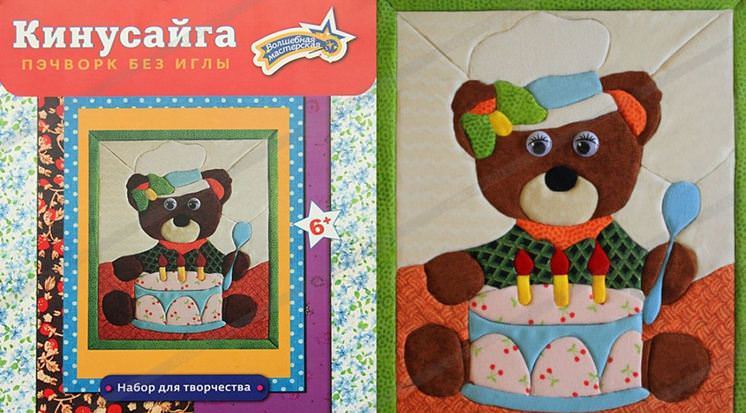
In addition to fabrics, you can also purchase combined sets in such stores, which include tools, fabrics and drawings - sketches of varying degrees of complexity. Such sets are designed for both novice needlewomen and those who have been engaged in this art for several days.
Here's what these sets look like:


Recently, handicraft has been greatly appreciated. We invite you to talk today about the following - "Do-it-yourself paintings from fabric." If you approach this issue very responsibly, you can make a beautiful and original painting that will look much more expensive than paintings by famous artists. Of course, it is not recommended to use cheap fabrics in this case. Today on the market, the buyer is presented with many different types of fabrics, both in color and in density.
So, here are some step-by-step instructions for your attention. We wish you patience. Let's get started.
On a wooden frame
To make a picture, you will need the following tools and materials:
- Wooden frame (choose the size you want the picture to be);
- Textile;
- Cutter's scissors;
- Staple gun.
First of all, you need to iron the fabric. This is required in order for the picture to be free of various bulges or other irregularities. We lay out the fabric on the table where you will work. We put the frame on top. We cut out the necessary piece of fabric with scissors, do not forget to leave additional space on each side, about seven centimeters.
Then you need to pull the fabric over the frame so that no fasteners are visible. Then we take a gun for driving staples and, pulling the fabric, we fix it on the frame. It is necessary to tighten it so that there are no irregularities.

That's all, the fabric picture is completely ready! You can safely hang it on any of the walls of your apartment or house.

Styrofoam option
For manufacturing, you will need the following tools and materials:
- Textile;
- Styrofoam;
- Cutter's scissors;
- Satin ribbon;
- Loop for attaching a picture;
- Glue;
- Pins.
Cut out the fabric from the finished foam. We glue the fabric on it.

The side parts also need to be made to match the picture. To do this, we take a satin ribbon of the required size and glue it on the sides, as shown in the photo:


In order for the made picture to be attached to the wall, we attach a loop for fastening to the back of the foam.

Using this manufacturing technique, you can make several paintings for one composition.


The painting can be any size and shape. Imagine and experiment.
One option is to create a modular picture. As an example, below is such a picture in the photo.

Three-dimensional picture
It is not so easy to create three-dimensional paintings, but they look very expensive and rich. The most important rule is to learn how to cut and make volumetric shapes.

- Picture frame;
- Plywood sheet to fit the frame;
- Textile;
- Burning device;
- Iron with steam function;
- Fabric paint (if required);
- Scissors;
- Glue;
Using glue, we fix the fabric on the plywood sheet (base). If required, paint on the fabric. Then we attach the drawing and with the help of a burning apparatus we make a contour. Then we cut out our drawing and use the iron to fix it like an applique.

The frame for the figures can be made of wire. To do this, we wrap it with a cloth and attach it to the picture. If your painting contains elements that require a certain shape, then this is not difficult to do. We just fill them with filler, for example, synthetic winterizer or foam rubber. Be careful in this matter, no threads should be visible in your image.
Then we insert the finished picture into the frame. That's all, you can safely hang it on any of the walls of your home.
From scraps of cloth
To work we need the following tools and materials:
- Polyfoam - we use it as a base;
- Stationery knife;
- Simple black pencil;
- Fabric adhesive;
- Iron thin nail file.
So, on the prepared foam, draw the necessary picture. In our case, these are houses.

It is necessary to walk along the drawn lines with a knife at a depth of 5 millimeters, grease them with ordinary glue.

We cut out the necessary parts from scraps of fabric, only they should be slightly larger. We insert each of the shreds into the finished slots.

Now let's move on to styling the edges of the styrofoam. To do this, we take the fabric and fix it with decorative studs.

At this, the master class came to an end. The picture is completely ready, and you can admire your work of art.
With this method of creating paintings, you can make such works of art that no one else has. Basically, in the manufacture of such panels, they use such figures as flowers from scraps of fabric, which can be painted with paints of your choice. Having filled your hand with these masterpieces, you can create a much more interesting and original picture, not with ordinary colors. You can also use beads as an addition to the main picture.
Patterns of paintings that can be made from pieces of fabric or from denim:


Related videos
One of the most colorful, vibrant and easy-to-follow ways to create decor is fabric decor. Patterns made from scraps of fabric look expensive and do not require any special skills.
Such a solution will not only allow you to decorate your home with unique works or make original gifts, but it can also become an income-generating activity.

Necessary materials
The list of devices and materials that may be required in the process depends on the chosen direction and technique. To create paintings from rags, you may need the following materials:
- scraps of fabric of various colors and textures;
- tapes;
- scissors (preferably tailor's);
- nails and screws;
- glue;
- hammer;
- staple gun (construction stapler);
- frame material (slats, baguettes).

Simple panels
To create the simplest options for decor made of fabric, a fabric that is suitable in style and design is attached to a frame of the required size. Such a panel is in perfect harmony with modern interiors, especially since it is easy to find textiles with beautiful decoration on sale.

Floral arrangements, street views of different cities, animal prints or just a play of contrasts can be an excellent subject for future decor. Foam can also serve as a basis.

A picture of fabric on foam can be done in the same way as when using a frame, or cut around the perimeter of the base. In the latter case, the side sections will need to be decorated separately. To do this, you can use a tape that matches the color.

Volumetric paintings
The technique of work depends on the selected type of product. If a frame is used as a base, then the canvas is fixed on it with a construction stapler. If the base of the picture is a board or foam, the textiles should be glued over the entire area.

Decor elements made of ribbons, zippers and patches are fixed on the canvas with the help of glue.

A three-dimensional painting made of fabric, a master class or step-by-step instructions of which will help you do the job correctly, most often depicts flower arrangements or animals.

Painting in patchwork style
The most original, striking and unusual version of fabric decor remains patchwork paintings from pieces of fabric. In a more complex version, the necessary appliqué elements are cut out of separate patches, which are then sewn into a single canvas and fixed on the base.

But this requires sewing skills. And those who have no experience with the machine can use the patchwork patchwork technique without sewing.

To do this, cuts are made along the lines of the pattern on a sheet of foam or wood with a clerical knife, in which the edges of the flaps of the desired color are placed. The edges of the cut close together to secure the textiles.

It is noteworthy that even those who do not have artistic talent can use this technique. To do this, just select an image and print it on a printer. After that, the drawing can be easily transferred to the canvas by attaching a sheet and forming cuts along the lines.

As you can see, there are many options to transform your life by decorating the premises with unusual and sophisticated decor in the form of fabric paintings.

All work techniques are easy to implement regardless of financial capabilities and creative skills, and the necessary materials are easy to find in every home.
Each owner of an apartment or house wants to express his individuality, including through the decoration of the room in which he lives. Things made with your own hands will become unique decorations for your interior.
Pictures are often used for decoration, but high-quality and beautiful canvases cost a lot of money. But what if, instead of free wall space, you really want to admire a real work of art?

We offer you to pay attention to this type of decor, as paintings from fabric. Well-made, they will not only replace classic paintings, but will also reflect your preferences.

At a minimal cost, such designer items can look very expensive, of course, if you do not use very cheap fabrics for their manufacture. In stores, you can find material in stunning colors and patterns.
In addition, paintings made from fabric are quite simple to make, and it does not take much time. Perhaps you will have a talent for making them. In this case, you can sell your works or give to friends and acquaintances on all kinds of holidays.

Moreover, the picture is a universal gift that can be presented to both a woman and a man. And if you know the interior design of the people to whom the original gift is intended, then it will always perfectly fit into the surrounding environment.

Tools and materials
First, you will need to select the material that you will use for the frame and stretcher. They can be made of wood or foam.

The wood is stiffer and the material holds better on it. If you choose a material such as polystyrene for making a picture, then you will not need a frame at all, since the fabric will simply be pressed into the surface of the foam.
Note! DIY chandelier - original design ideas. Instruction +100 photos!

For manufacturing, you will need scissors with which you will cut the material. It is advisable that these were special tailor's scissors for fabric. You will also need self-tapping screws, small nails and a hammer, as well as a staple gun and frame slats.

When choosing a material for a future painting, everything is limited by your imagination and the breadth of choice of fabrics in stores.

When buying the selected material, it should be borne in mind that if your frame is made of wood, then the piece of fabric should be slightly larger than your frame, by about 7 cm.

Making a painting
To begin with, we will make a frame from wooden slats, connecting them with self-tapping screws. Then we start preparing the fabric. It should be ironed well. The better this is done, the better the finished picture will look.
After all the preparatory work, we proceed directly to the production of the picture itself. Place the fabric on the wrong side of the table and place a stretcher on top.

Fold up the edges of the fabric and attach with a staple gun.

When performing this operation, stretch the fabric well to avoid wrinkling or bulging. You just have to cut off the remnants of the fabric and attach the frame from the outside. The picture is ready!

As mentioned, no frame is needed for a Styrofoam painting. In this case, the fabric is simply glued to the surface and cut to fit the foam. In order for the picture to look complete, it is worth trimming its sides as well.

On them, you can glue tapes of material or paper in color that match the main color of the picture. Don't forget to attach a mount so you can hang the painting on the wall.

Due to the fact that fabric paintings on polystyrene do not have a frame, they can be made in such a way that you can then make a whole composition out of them.

The advantages of foam as a base also lie in the fact that the paintings can be made in the form of any geometric shapes.

These can be diamonds, circles and other shapes. You can also divide a whole piece of fabric into separate parts and then create a single picture.
![]()
Volumetric paintings
To create three-dimensional paintings from fabric, you will need a fabric that will act as a background. This can be a regular white fabric that you will dye in a color that suits you.


Then we cut out the necessary elements of the pattern from another fabric and attach them over the background. This can be done in a convenient way for you, for example, sew on or attach with an iron.

To create volume, you can use a wire frame, which is decorated with a wrapped cloth or put foam rubber or other material under some parts of the picture.

The main thing when making such pictures is that seams and other joints are not visible.

The frame for such a picture is made in the same way as for ordinary fabric pictures. Of course, you will spend much more time and effort on creating a three-dimensional picture, but such a work will look much more impressive.

Photo of fabric paintings


There were times when paintings made with paints and brushes were in incredible demand. However, now they are in much less demand. They are competing with pictures made of scraps of fabric. Even those who have never been familiar with this technique will be able to make such a masterpiece with their own hands. The main thing is to carefully study the material presented below.
A few words about history
The technology, the features of which will be presented below, appeared relatively recently. But it quickly gained popularity. The Japanese invented it and called it kinusaiga. This creative technique involves working with scraps of fabric and allows you to create original crafts from what is often thrown into the trash. It is also worth noting that it includes several subspecies. The first is called patchwork, and the second is quilting, or, in simpler terms, sewing from patches. The main difference is in the principle of work or the specifics of creation. And the common thing is the material - various types of scraps or tissue remnants. In any case, the creative process allows you not only to spend time interestingly, but also to create a very beautiful and original picture from scraps of fabric with your own hands. If the needlewoman has imagination and proper execution, it will be possible to complete a craft that will decorate any room, become a wonderful accent and create a cozy and comfortable environment.
Reasons for the popularity of the technique

Scientists have long come to the conclusion that a person needs to be engaged in creative work. Otherwise, coping with the hustle and bustle of everyday work can be so difficult that depression will begin or various ailments and illnesses will appear on nervous grounds. Professional needlewomen do not insist, but they advise the craftswomen to at least try to make a picture from scraps of fabric. This process is really exciting! In addition, the finished product can be used to decorate absolutely any kitchen. Or a room decorated in country or Provencal style. Also, a picture made with your own hands can be presented to relatives, close friends, acquaintances for a birthday or other holiday. And for a housewarming party, such an original gift will be especially useful! And this is all despite the fact that the work will require available materials, and the creative process does not take much time.
Patchwork technique
Experienced needlewomen, talking about the features of this technique, note that it is unique, that is, one of a kind. This is because no sewing needle or thread is used during work. It is believed that the main advantage of patchwork is its simplicity, simplicity, uncomplicated execution. However, regardless of this, the pictures made with your own hands from scraps of fabric look interesting and original. It is also noteworthy that patchwork is ideal for novice craftsmen, because it allows you to create spectacular crafts for those who have no experience in needlework.
Patchwork tools and materials

To bring your idea to life, first of all, you need to prepare various rags and leftovers of fabric of all sizes, colors and textures. Professional craftswomen recommend using thinner material. Because it is much easier and more convenient to work with it. In addition, you should prepare:
- stationery knife for cutting paper;
- wooden ruler;
- comfortable scissors;
- black marker;
- buttons.
You also need to purchase a seam ripper at a handicraft store - a tool for ripping seams. If you cannot find one, it is permissible to use a regular nail file. A rectangular or square piece of styrofoam serves as the basis for creating a patchwork pattern using the patchwork technique. Moreover, you can take the one that is used to protect household appliances from damage. Experienced needlewomen say that if you have to cut the foam yourself, you should go to a room that does not have a carpet or carpet. Otherwise, the subsequent cleaning will turn into a real nightmare.
Since we will not be stitching the craft, glue is required. However, it is important to note right away that it is worth choosing PVA glue or another stationery, because various types of superglue can melt the foam. Also, for work, you need to print an image of a picture or prepare a drawing, which we will use as a template for creativity.
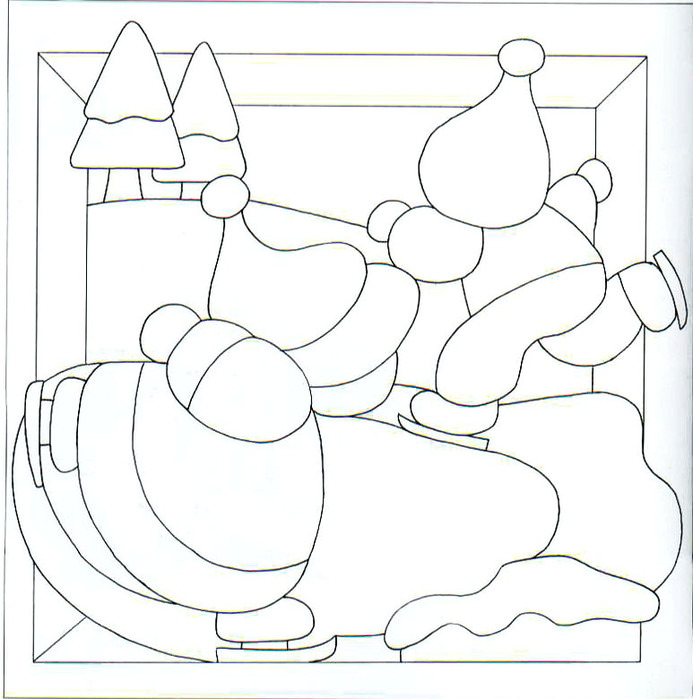
Features of the choice of drawing
If you consider a photo of paintings from scraps of fabric, you will want to make the most interesting and original craft with your own hands. However, experienced craftsmen do not recommend that beginners immediately take on a difficult option. The kinusaiga technique allows for very simple yet attractive paintings. Therefore, at first, it is better to choose a simple image. If the reader wants to do a unique job, he can draw a picture. But in this case, you should also not add miniature elements, and it is better to make the lines as straight as possible. Only having mastered the technology and having made a few pictures, you can start making large and complex images, as well as modular ones. In addition, it is important to note that if the reader cannot find the best version of the drawing in any way, professional craftswomen are advised to consider the pictures presented in children's coloring pages. These images are simplified as much as possible and adapted for children. Therefore, it will be easy for novice craftsmen to turn them into a patchwork picture.

How to make patchwork paintings
When all the necessary ready-made is at hand, we proceed to making a picture with our own hands from scraps of fabric.
- First of all, we take a prepared piece of polystyrene and, stepping back two centimeters from each edge, draw a frame with a ruler and marker.
- We press the resulting lines with a clerical knife. We do not lower it too deep, it is enough - "grooves" in half a centimeter.
- Then we take a drawing or a picture. Place the foam in the center and attach with buttons at the four corners.
- Using a knife, very carefully make indentations along the contour of the image.
- At this stage, the preparatory stage ends, and we go directly to the instructions on how to make pictures on foam from scraps of fabric.
- In fact, this process does not involve difficult actions. We take the prepared material and a parser or nail file.
- Determine the area of the drawing that we will decorate, and apply a little glue to it.
- We cut out or select a flap of the desired size.
- We apply the image to the desired area and begin to gently push the edges of the flap into the "grooves".
- If there is excess fabric, it should be carefully trimmed with scissors and tucked in. Experienced needlewomen recommend using slightly curved nail scissors for these purposes.
That, in fact, is the whole essence of the technique of making paintings from scraps of fabric. Further work involves filling all areas with tissue as described earlier. After that, you need to arrange the paintings with a frame. To do this, cut out the whole frame or separate pieces. On the front side we tuck the edges into the "grooves", and on the sides we slightly bend them and fasten them with buttons. In conclusion, we complement the finished crochet craft so that it can be hung on the wall.
Quilting technique

The next art form of creating amazingly beautiful patchwork paintings involves stitching various materials on a typewriter or by hand. Moreover, it is important to note that this technique allows you to create three-dimensional or volumetric paintings from fabric with your own hands. Experienced craftsmen find this handicraft option difficult for beginners. However, if you wish, you can still try to make a simple and original picture. In addition, many craftswomen can turn to their grandmother for advice and help. After all, decorative items made in the studied technology were very popular in the last century. Perhaps someone even kept a cover made from shreds or multi-colored pillows. As we mentioned earlier, such crafts are still popular today. They are especially often used to decorate interiors in Provencal or country style. Designers suggest complementing minimalist interiors with patchwork paintings to create a warmer and more homely environment.
Layering in quilting technique
Professional needlewomen, explaining the principle of drawing up a picture from scraps of fabric to beginners, note that layers are of great importance in the technique, the sequence of which is important to observe. Therefore, the article should study this feature of the technology in detail. Cotton material acts as a base or first layer. It serves as a lining. The second layer is necessary to create volume, so a padding polyester or wadding layer follows. The third is the canvas. You can purchase it at any craft store. The fourth and final layer is also called the front layer. It is, in fact, a decorative finish with stripes, appliqués, various patterns and more. It is extremely important to note that needlewomen must sew all layers so that the finished picture from scraps of fabric for children or adults is one-piece. At the same time, if they work by hand, they make a seam in the form of stitches.

Quilting tools and supplies
The attentive reader has already noticed that this technology involves working with a needle and thread or a sewing machine. Therefore, the first thing we do is prepare these tools. A picture or drawing is also needed, according to which we will build our craft. In addition, you need scissors, an iron or a steam generator, several sheets of cardboard, carbon paper, many colorful rags and, if necessary, a thimble. Experienced craftswomen recommend planning your work in advance. This requires a simple pencil. They should draw lines on the prepared image, thus marking the lines of the seams.
How to make paintings using the quilting technique
Having prepared everything you need, proceed to the instructions on how to make a picture from scraps of fabric.
- First of all, we transfer our drawing to a prepared sheet of cardboard. We do this with a simple pencil and carbon paper.
- Then carefully outline the contours of all the fragments, outline the lines of the seams.
- We number all the details.
- We select from the prepared patches those that most correspond to the color scheme of the conceived picture. We are especially carefully looking for a material with which it will be possible to create transitions from one shade to another.
- We lay out the prepared flaps as they will be located in the idea. This is necessary in order to finally be convinced of the correct choice.
- We straighten all approved flaps, and then thoroughly steam them.
- Cut out all the numbered fragments from the cardboard.
- We use them as templates for cutting out fabric details.
- Additionally, we prepare a cotton base (you can use an old sheet), a dense lining and canvas. The dimensions of the three layers must be the same.
- Next, we work with the details that serve as the background. We fold the adjacent ones with their front side to each other and carefully sew them by hand or using a typewriter.
- Cut off the excess, turn it over on your face and steam it well. The last action is necessary so that the flaps do not move and the picture does not turn out to be crooked.
- Having assembled the background of the picture, we "animate" it with the help of the rest of the fragments.
- Then we sew the lining to the base, and then the canvas with the applique.
- We decorate the panel with a finishing inlay.
- And once again, we thoroughly steam all the work.

Master class for beginner craftsmen and children
Earlier it was said that at first it is better to choose simpler pictures from scraps of fabric. Photo of professional work, of course, attracts attention. However, to complete them, you must have at least basic skills in the kinusaiga technique. As you know, skill comes with experience, so first you should practice on the most elementary sketches in the style of a child's drawing. At the same time, patchwork, as a variety of the studied technique, is best suited for novice craftsmen and children. Below is a video tutorial prepared by a professional master. It will be possible to follow the entire creative process and, if desired, follow the step-by-step recommendations of the master class, repeat the picture.

Now you should understand the specifics of creating original paintings from fabric with your own hands. Photos of finished works and a detailed description will help the reader determine the most suitable and interesting technique, and then implement any of his ideas. Experienced needlewomen note that the creative process is so addictive that the training will take place quickly and will bring a lot of pleasant emotions. After some time, experience is gained, and even then the former beginner will be able to make real masterpieces.