We make beautiful and festive garlands ourselves. New Year paper garlands: master classes DIY garland of stars templates
Very little remains until the New Year holidays. And although the Metal White Rat will come into its own only on January 25, it is necessary to prepare for the meeting now. Think over the menu, which should be. Think about how to decorate a house, apartment,.
The totem likes everything original, so do-it-yourself or garlands will do just fine. The rat is very fond of shine and soft colors. She will especially like gold and silver, white, shades of the pastel spectrum, orange, purple. You should not use everything in one piece of jewelry at once, it is better to give preference to one piece.
I offer you some interesting options that everyone will surely like and will decorate your home. Many tasks can be done with children or even offered to do something in labor lessons at school.
How to make DIY Christmas garlands with the symbol of the year - Rat (Mouse) templates
Themed decorations are the easiest and most original way to appease the symbol of the year. Cute, almost cartoonish, images will surely delight children. Therefore, such garlands will decorate a nursery, groups in a kindergarten.

For work we need:
- thick paper;
- scissors;
- hole puncher;
- braid.
Operating procedure:
Download animal templates. Images are mirrored. This is done so that the garland looks the same from either side. Carefully cut around the office and glue. Make holes on the ears of the animals with a hole punch, thread the braid through them.


The finished decoration can be fixed to the ceiling. Or you can make simple flags with an image.

Catch the flag pattern and single animal images. Right-click, download, and then just enlarge to the size you need. You can also draw a blank by hand.


Another option is to fix it in a spiral on the tree. The same or different images can be placed on one garland.
And try to create another decoration in Japanese origami technique... Such work can be entrusted to children of 9-10 years old. They will surely like how a pretty cute mouse is made from a simple sheet of paper.

For work we need:
- paper (ordinary or special for origami) 15x15 cm;
- rope;
- wide tape.
Operating procedure:
Fold the sheet diagonally twice. Make sure that the corners converge clearly, the fold lines are clear, even. Position the workpiece so that the square becomes a rhombus. Reduce the lower vertex on the left and right to the center line. Repeat the same steps from the top.
Expand. Fold in the folds, making a triangle fold in the center. These are the ears of the future. You should get an elongated rhombus. Immediately determine where the mouse will have a muzzle (in this master class it is from the bottom), and where the tail is. Take each eye triangle as the top point and lead to the base. Iron all folds thoroughly.
The diagram looks like this.

Lead the lower part of the workpiece with the top to the triangle, which is formed by the folds next to the “ears”. The tops must touch. Iron the fold, fold back. Turn the workpiece over. Fold the halves towards the middle on both sides. Turn inward. It turned out to be a muzzle.
Take the top point of the rest of the workpiece. Lower it down by folding it in half. Draw a crease. Gently unfold and fold the middle inward. Then bend the tip so that they go slightly inside the first fold. Hide everything unnecessary by simply folding it up. This will create a tail and back.
Return to the ears. Fold in the top so that it forms a line with the back. Take pencils, felt-tip pens and draw a mustache and eyes for the mouse. Attach the finished symbols of the year to the rope with some distance from each other. For this I use decorative clothespins or bright paper clips.
I suggest tying wide ribbon bows between the mice. Its color should match the tone of the central design elements.
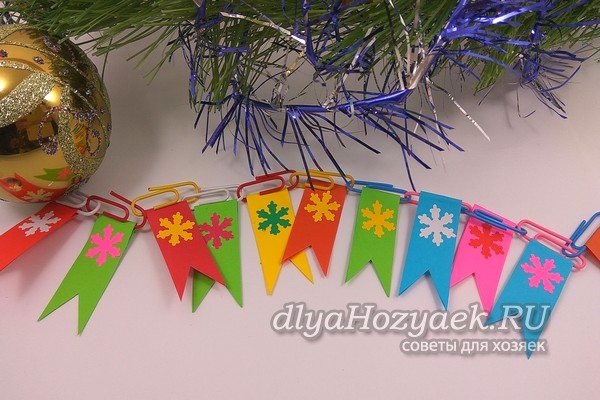
Garland flags made of paper and paper clips for the New Year 2020
It is not hard to imagine that such multi-colored chains can become the basis of beautiful garlands. They can be hung in this form on a small Christmas tree, they will look bright. But you can also make the flags that children love. And come up with your own decoration option.

What needs to be prepared to create a craft:
- a box of multi-colored paper clips;
- colored paper (you can use leftovers from previous creative works, since you will still need to cut the paper into thin strips);
- glue;
- a snowflake-shaped hole punch for decoration (or stickers, prints of snowflake designs, pens to draw, and so on);
- scissors.

How to do
To create the frame, take precisely colored paper clips, covered with enamel on top or painted in another way. For the flags themselves, you will need colored paper. Cut thin strips from it. The width should not exceed the length of the paper clip. Draw a bird on one side to cut out the corner of the flag later.

Pass one side of the strip through a paper clip and pull through. Fold the strip in half across. Glue the ends together. Cut the lower part with a bird to get a flag.

Prepare many strips of the same size for decoration.

Insert a different color of paper into the hole of each brightly colored paper clip and turn it into flags in the same way. Use glue and scissors.

With the help of a curly hole punch, make a snowfall, using not only white, but also colored paper. This way you can mix 3 colors in each link.

Stick snowflakes on both sides of each flag (or use a different decoration technique, such as adding snowmen, penguins, bullfinches, or other winter objects).

It remains to fasten the paper clips in the standard way to form a long chain of flags. The result is a wonderful New Year's garland, which will become an unusual festive decoration.

Homemade garland of candy wrappers
You can collect a huge number of candy wrappers that are different in color, ornament, texture, you should not throw away this wealth, because you can make New Year's crafts from it. It is enough to come up with some fragments that you can endlessly alternate and collect on a thread, and you will get an interesting decoration.

For work you will need:
- mix of candy wrappers and foil;
- thread and needle;
- stapler if necessary;
- scissors if necessary.

Prepare different wrappers. It is advisable to use different shades, and the sizes can either be the same, or cut them with scissors. All completed parts will be attached to a strong thread.
Phased work
Roll into balls of approximately the same size from silver foil. They, like beads, will be strung on a thread.

To fan the parts to create alternating links, fold each candy wrapper like an accordion. Then bend the resulting stripes in the center. Use your fingers to squeeze the area to lock in the bend.

Take a long thread and thread the needle, tie a knot at the end of the thread. Pass the first foil ball, then pass the folded section of the fan.

Thus, alternate the details. Pass the balls, and then the wide parts. You can use a stapler to hold the sides together and the garland becomes one piece.

Collect a snake from a large number of segments. If you use the original wrappers of different colors, then the whole design will turn out to be motley.

I suggested a great way to dispose of the wealth that children collect after every candy they eat. And after the holiday, you will have even more of such raw materials, so you can come up with other options for decorating the Christmas tree.

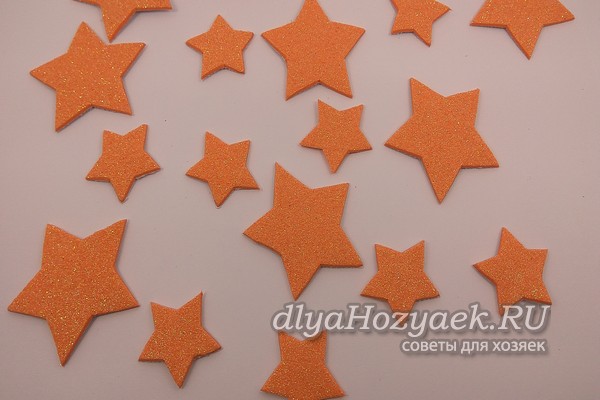
Craft Asterisks in the form of a garland for the New Year for kindergarten
You can do this beauty with your own hands using glitter foamiran (preferably on an adhesive basis). Be sure to involve children in such creativity, because it is for them, by and large, that the room and the Christmas tree dress up before the fabulous night. Glitter foamiran on an adhesive base is an inexpensive material for children's creativity, which is sold in sets. You can buy yourself such a sparkling wealth, then make many different sized stars to fill the garland of the desired length. Consider a master class on making it.

What was used:
- glitter foamiran (thick, sticky on the back);
- 2 star patterns printed on the printer;
- scissors;
- strong thread (knitting yarn, but can be replaced with nylon or other thread, thin ribbon).

How to make
Choose 2 sheets of different colors or use the entire mix in the set for a colorful effect. Print on paper and cut out stars, two sizes or more can be used. Stick the templates onto cardboard for convenience. Trace the sprockets on the back of the selected sheets of shiny material.

Cut out all the stars along the outline. Prepare 2 servings if you only chose 2 sheets to work with.
For one asterisk on the garland, you will need 2 blanks, since they will be glued together with the back parts. Take a strong thread. Remove the protective paper. Stick the thread in the center on the sticky layer.

Cover the top with a second of the same asterisk, trying to clearly combine the corners to get a symmetrical figure.

Assemble a long garland at random, alternating parts by color and size. Such adhesive-based material adheres perfectly.

A beautiful interior decoration or Christmas tree is ready. It sparkles and sparkles, looks very beautiful, and is easy to do if you work collectively.


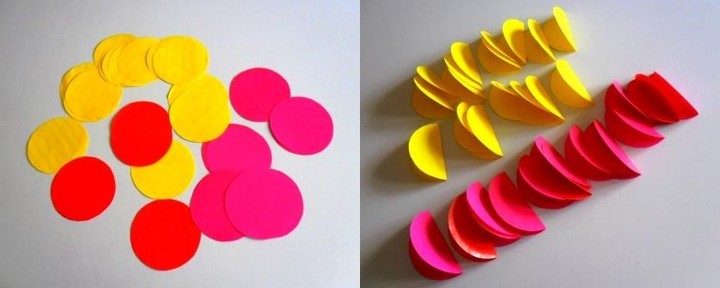
Easy workshop on making colored paper garlands
The name speaks for itself. It will take very little time to work, but the result will please. Such decorations are suitable for home, kindergarten or even school. The idea can be implemented in school labor lessons.
 Source: https://www.youtube.com/channel/UC5ULDV816GiEvfgvrC4hNsg
 For work we need:
- double-sided colored paper;
- scissors;
- ruler;
- pencil.
Operating procedure:
Fold the paper in half lengthwise. Then again from the dull side. Iron the folds carefully. Lay the workpiece with the fold down. Draw a strip 1 cm wide from above. On the fold line, place marks in increments of 1.5 cm. Draw lines. Slice the noodles to a horizontal line.

Turn over. Make cuts between the cuts, also not reaching the edge of 1 cm. Carefully unfold the sheet and stretch. You should get a "network".

Make a few more blanks in other colors. Glue them together, bringing them to the desired length. The garland can be hung on the window, secured to the tulle with hairpins.

DIY garland of paper snowflakes on NG
I really like paper analogs of winter precipitation. But I also love garlands. In this master class, I propose to combine them. You will get one original decoration.
 Source: https://www.youtube.com/channel/UCWqcfwUxk9a7qGqt7892FFA
 For work we need:
- white paper;
- scissors;
- pencil.
Operating procedure:
Divide a sheet of paper in half lengthwise. Then each half across another two p. Fold the resulting rectangle in width. Each wing is folded. Fold in half again.

Starting from the fold line, draw the outline of the future snowflake. Cut carefully, then unfold.

Repeat step 1-3 with the remaining paper. Secure all parts of the garland together with tape. Add elements until you reach the length you want.

Snowflakes do not have to be white, they can be colored.

How to make a garland of cones and bows to decorate a room
Look what a beauty! Natural material can be painted with golden paint and bows, beads or Christmas balls can be added. A variant of such a craft is presented in this master class, and you can easily reproduce a similar copy with your children to decorate a room or even an entire class. The more cones you collect in the fall in the park or in the forest, the longer the garland you will get.

What needs to be prepared for work:
- twine or thin brocade tape for the base;
- cones;
- gold acrylic paint with a brush or other paint to cover the surface of the buds;
- beautiful satin ribbon with lurex;
- glue;
- half-beads;
- Christmas balls.

How to do
Take all the materials you need to work. You can keep the bows and balls in the same color scheme, but you do not need to use balls if you have enough bumps to fill the decoration. Cover the surface of the natural material with golden acrylic paint. If you use a brush, the coverage will be uneven. Full staining can be achieved using spray paint.

Prepare the base of the garland, such as twine or thin brocade ribbon. Attach the cones with a glue gun at some distance from each other.

For additional decoration, prepare satin ribbon bows, and decorate the middle of the bows with beautiful half-beads.

Glue each resulting bow to the top of the cone to hide the attachment points to the twine. Thus, you will already have a beautiful garland modeled, but in addition you can also decorate it.

Glue small balls between natural materials. So a wonderful Christmas decoration is ready, which can be hung on a Christmas tree or on a wall. It is unusual, looks elegant, festive and cheers up.


Stage-by-stage production of the New Year's garland "Snowmen" on the windows
Glass surfaces are often painted in my family on New Year's Eve. But how difficult it is to wash them afterwards. And I found an alternative. Making such a decoration is not as difficult as it might seem.
 Source: https://www.youtube.com/channel/UCfUNn0nNcM35FBKL11tB1Iw
 For work we need:
- A4 paper;
- stationery knife;
- pencil;
- scissors.
Operating procedure:
Divide the paper along the long side. Take one half. Fold it in half. Then each wing again, guiding towards the fold line. Draw a snowman. Carefully cut along the outline. Expand.

Repeat step 1-3. Then we paint our characters, draw the nose, eyes, buttons and a hat. We connect all the parts with tape. And you can do all this using the applique technique - it will be even more beautiful.

We make a plasticine garland on a wall or a Christmas tree with the children
Candy decoration is popular at all times. Who among us has not made long chains of sweets and hung them on the Christmas tree, on the walls. How nice it is to gradually remove the sweets from the branches and feast on such delicious and favorite treats. This lesson also shows how to make a simple garland of candies, but these will not be real sweets, but candies made from ball plasticine. Such a craft can be considered as a prank, because friends, for sure, will want to eat delicious sweets, but it turns out that they are not real at all.

What needs to be prepared for making New Year's crafts:
- ball plasticine;
- stapler;
- file or dense plastic bag;
- golden ribbon or serpentine;
- thread (optional).

How to make a decoration
Prepare plasticine for work. Sweets resembling lollipops will be made from it. You can tie "treats" to the thread, or simply staple them together. First, prepare these little pieces.

Turn each into a small triangular slice. Connect together, alternating in colors. These slices should be about the same size.

To make each lollipop rounded, glue about 4 wedges of two colors together around the circumference. You will have two-tone caramels. Then continue working the next day when the plasticine dries well.

Cut the prepared file or a dense plastic bag into squares. Wrap a piece of candy in each. Also prepare a golden ribbon for tying the ends.

Twist the candy wrappers, the candies will be clearly visible through the transparent plastic, they will in no way be inferior to the real ones. Tie the bows with golden ribbon at the ends.

Use a stapler to assemble a garland or tie each candy to a string. It turned out to be a beautiful New Year's decoration - bright and believable.


Ideas for making garlands with your own hands from all sorts of things
Shortly before the New Year, all the housewives begin to sort out all the boxes, boxes, packages in search of what is high time to throw out. But please take your time. I offer several master classes in which I will tell you how unnecessary items can be easily turned into a real masterpiece. I'll start with the original, very fragrant garland... Such eco decorations are in trend today. And the Metal Rat likes them too.

For the New Year, a paper garland is used to decorate a festive tree and as an independent decor. It is easy to make it from scrap materials with your own hands. There are several options for creating such a decoration.
Garland of paper lanterns
Christmas garland for lanterns can be used as a night light
The finished decoration can be put on top of electric flashlights. Just before that, they carefully examine it, checking the wires for integrity.
To create flashlights, you will need the following materials:
- scissors;
- colored paper;
- simple pencil;
- ruler;
- needle;
- glue;
- thread.
Garland manufacturing takes place in several stages:
- Cut a strip 7–8 cm wide from a sheet of colored paper.
- On a piece of paper, use a ruler to mark it out with a pencil. You should get vertical stripes of the same size.
- Repeat the procedure, but use a needle instead of a pencil. Then the details are easier to bend in places where the lines marked with a pencil are pressed through with a needle.
- In the middle of the workpiece - perpendicular to the lines on it - outline a zigzag with a pencil, push through with a needle.
- Collect the resulting workpiece in an accordion. It is important to pay attention to the slanting areas in the middle of the workpiece.
- Using glue or thread with a needle, assemble the accordion into a flashlight.
- String several lanterns.
The diagram shows the sequence of steps in the manufacture of a flashlight.
A garland of paper lanterns is perfect not only for the New Year, but also at normal times for interior decoration, shop windows, etc.
Decor from volumetric stars for the New Year
If the stars are made of white material, then they can be painted with paints or felt-tip pens.
To create the decoration, use ordinary white paper, colored or wrapping. You can use scrapbook paper.
Materials for making stars:
- paper;
- scissors;
- eraser;
- protractor;
- compass or saucer;
- ruler;
- simple pencil.
The work is done in a specific order:
- Flip the paper over. On it, using a compass, draw a circle - the diameter of the star. Instead of a compass, you can use a saucer - attach it to the paper and circle it with a pencil. Draw a straight line from the edge to the center.
- Use a protractor to measure the 72 ° angle. Draw a straight line. Repeat the procedure along the entire diameter. The result should be 5 lines with the same distance between them.
- In the middle between the straight lines, draw additional ones - you can use a dotted line. Connect the resulting lines to form a star. Erase the circle and other extra lines with an elastic band. Mark a connecting strip on the right side of each star edge.
To make a garland, it is good to use elements of different colors and sizes.
- Cut the resulting workpiece, bend it along the guide lines. If the paper is thick, fold the folds with scissors or a ruler to give them maximum expressiveness. Then the workpiece should be bent.
- Make the second half of the star using the same principle. Grease the connecting strips with glue, glue the two parts together.
The result is a three-dimensional star
Paper ball decoration
The garland can be hung in any position - both horizontal and vertical
To make a garland, you will need:
- colored paper;
- compass;
- scissors;
- glue;
- needle with thread.
Work order:
If you glue a rectangle to each shape from below, you get baskets with balloons. Then, in the interval between them, clouds cut from paper can be strung on a garland.
Volumetric paper snowflakes
It is advisable to choose cardboard with a density of 65 g / sq. cm. The larger the square, the higher the density of the paper should be.
To make a piece of jewelry, you need materials and tools:
- cardboard - 6 squares;
- scissors;
- stapler;
- glue;
- threads;
- pencil.

Paper garlands are a simple and inexpensive option for holiday decor. Children are always interested in making New Year's decorations, enjoying the process itself and rejoicing at its result.
Why not make the starry sky themed for your wedding? Let the stars be everywhere. In the decorations of the hall, in the dress of the bride and groom, on the sweet table and in the hands of the bridesmaids.
It is not difficult to prepare details and decorations for such a wedding; you can make them yourself. And such a wedding will look really fabulous.
In this master class, we will show you how to make garlands of stars. They will serve as a decoration for the banquet hall and the bride's room; you can also take them with you to a photo session and hang them on the trees in the park. You will get original photos.
To make garlands of stars, we need:
Colored cardboard (you can use silver or gold)
Long satin ribbons, 0.5 cm wide
Glue
Note: in the master class, a thermal gun and hot melt glue are used. Its distinctive feature is instant solidification (10-20 seconds) and strong connection. But the first time it is not so easy to master the glue gun, and besides, it is not cheap. Therefore, the thermo gun can be replaced with ordinary glue.
Scissors
Pencil
The process of making garlands of stars:

For a "star" wedding, you can also make
New Year is the most beloved holiday associated with miracles and magic. The celebration of the coming of the new year is characterized by festivities and joyful meetings. It is impossible not to love this time of the year, when everything around is changing, and every house or shop window looks like a scenery for a fairy tale. Everyone wants to participate in this transformation, and therefore they try to decorate their homes in all sorts of ways. In addition to the main decoration of the New Year - an elegant spruce, New Year's garlands from all kinds of materials are popular. Today there are a huge number of options for creating this home decoration, with your own hands.
A garland is a decoration made of interconnected objects. Any things, paper, etc. can be used as the material. And they are held together with a thread or other more durable material. Garlands are used to decorate rooms. They are used not only for the New Year, but also for other holidays.
Homemade Christmas garlands
There are a lot of ways to create festive garlands for the New Year. You can decorate anything with such crafts, they will look appropriate and beautiful anywhere. The most common option would be to decorate a festive fir tree with a garland. But it will be good not only on it. Garlands are actively used in decorating doorways and windows, it all depends on the length and style of the garland. And if the house has a fireplace, then it will not do without a garland of socks.
Children love to create garlands with their own hands. Mothers can use the following options for making these decorations to create a New Year's atmosphere with their child. So, to create garlands with your own hands you will need:
- Material for the desired garland (paper, cardboard, felt, fabrics, polymer clay, light bulbs, etc.)
- Scissors
- Rope or thread
- Paints
- Glitter and stones for decoration
- Glue gun
Christmas garlands made of paper
Perhaps, the material is simpler and lighter than paper, it is worth looking. It is definitely in everyone's house and in any quantity. Paper garlands are very airy and attractive. You can use both ordinary office paper and colored paper, cardboard for crafts, parchment paper, and also foil.


Everyone remembers the most popular garland of their childhood made of multi-colored strips of colored paper. Surprisingly, it is still a success. It is very simple to make it, even for a child it will not be difficult. Cut thin strips of colored paper, about 4 cm, must be fastened together in the form of rings with glue. No threads are needed here. The size of the rings and the length of the garland itself depends on the desire.


The winter atmosphere is perfectly emphasized by garlands of snowflakes. They are suitable for decorating a tree or windows. To make them, you need to cut openwork snowflakes, you can have different shapes, or you can have the same ones. Next, make a small hole and use a needle to string the snowflakes onto the thread. The paper garland is very light, so simple sewing threads will do.

The beauty and sophistication of the interior will be created by volumetric paper balls, which can be used both as independent units and in combination with other elements.

And from paper of golden or silver color, wonderful stars for a garland will turn out. Any shape can be given. All you need is scissors and a flight of imagination. However, golden stars are simple and corny. For those who really want an unusual garland, it is worth trying the volumetric paper lanterns. It is done a little harder than the stars, but it looks incredibly cool!

Paper can also be used for origami, which can then be hung on a rope. You can make three-dimensional stars using this technique.


# 14 Christmas garland in the form of volumetric balls

# 15 Origami garland for the new year: making stars for LED garlands


You can make a garland with Christmas decorations and the spruce itself. You need to cut out a simple shape of the Christmas tree, gluing sequins or beads to it, depicting toys. Alternate the tree with ball-shaped toys, which are also decorated with beads. String on a thread, making small holes in the figures.


Garlands of paper bows are made very simply, but they look spectacular. Fold a small square of paper with an accordion, and tie in the middle with a thread. Next, hang each bow on strings to a common rope.
A garland of flowers or exotic paper plants will also look very cool. Such a garland will be especially relevant at themed parties, for example, a Cuban-style party with such a garland will sparkle with new colors!


Garlands of incredible beauty are made from paper honeycombs. Such blanks can be bought at the store, or you can make yourself.
# 27 DIY Christmas garland: ice cream garland - surprise your guests

# 28 Honeycomb ball garland: DIY

To celebrate the New Year with your loved ones, you can create a romantic atmosphere by making a garland of paper hearts. Moreover, the hearts can be made from both thin strips, tying them like a garland of rings, or simply cut out an ordinary heart from colored paper and strung on a common thread. Such garlands will look very beautiful suspended from the ceiling.


Looking for more New Year paper ideas?
Garlands of fabric
Who said that garlands can only be made of paper? All kinds of fabrics are great for this role too. Do not throw away scraps and scraps left over from other work. It is they who will go into operation.


Fabric garlands can be modeled after paper garlands. But the advantage of using fabric as a material is that by cutting out ordinary circles, you can already get a beautiful garland, which is unlikely to work with paper. It is enough to choose the most colorful and bright patches, you can from different materials, and sew them to a common rope. At will, give any shape: circles, triangles, trees. You can complement the cutouts from the fabric with buttons, beads and more. Fabrics are slightly heavier than paper, so thin thread may not work. Better to use a tighter line or rope.

A garland of fabric flowers will look very appropriate for the New Year's holiday. The patterns for creating flowers are very diverse. For example, flowers made of ribbons will be the simplest in technique. It is necessary to fold the ribbon like an accordion, while folding it in a circle. There are also flowers with individual fabric petals. All this will create a very delicate and unique garland. It is better to take thin fabrics for flowers, and you can place them on a thread at different lengths, this will give originality.

Felt garlands
Felt - this fabric is now very popular for making crafts. Felt garlands are no exception. The fabric is very comfortable to use, it is soft and does not wrinkle, it lends itself well to sewing with a machine and by hand.

The simplest version of the felt garland will be circles of different shapes. Of course, a garland made of felt of different colors will look more beautiful. Different circles can be simply strung on a common rope. But, it will look much more interesting if you fold multi-layer mugs of different shapes and colors one to one. This will add flavor. The circles must be sewn to each other.

Confetti garland. To make such a garland, you need multi-colored felt in the form of squares and rectangles of different sizes. They need to be sewn to one rope at a distance of about 1-2 cm from each other. You will get the effect of scattered colorful confetti. Will decorate any room.
Interwoven felt garland. You need to make 2 strips of felt, 1-2 meters long (depending on the size of the room you want to decorate) and 1 cm wide. Then you need to sew the second one to the beginning of one of the strips. The second felt tape should be wrapped around the first one, which remains stationary. This is a ready-made garland that does not need a common rope on which it needs to be strung. Looks pretty unusual.

A good command of the sewing machine will help you create whole compositional garlands. You can sew small figures of deer, Santa Claus, harness, Christmas tree or fireplace mittens from felt.

Felt lanterns are perfect for a child's room. Cut out ovals from yellow felt, resembling light bulbs of an electric garland. For fun, you can make eyes and a smile with threads - the children will be satisfied.

A garland with large felt balls will decorate an elegant Christmas tree no worse than glass toys. The size depends on the height of the tree. Beads, beads and even buttons are suitable for decorating such fabric balls.
You may be interested in:
"Sweet" felt garlands can be obtained by making cookie, candy and gingerbread figures. For candy, use red and white felt. You need to fold 2 strips together to get a bright candy. Sew round gingerbread cookies or a whole gingerbread man from yellow or orange felt. The product must be glued to the common rope with a glue gun.

Garlands from scrap materials
And to create the most original and unusual garlands, all the materials at hand will be used. This will already be a non-standard, but no less striking, approach. It is enough just to look around you in the room - for sure something is suitable for creating a New Year's garland.
Probably everyone has already tried to make a "snow" garland. It creates the effect of snowfall and is very easy to do. To create it, you will need cotton wool and threads. From the cotton mass, you need to form circles that imitate snowballs. Then, sew them with a thread and a needle and hang them from a common thread.

Garlands on which paper cups are strung will be very appropriate for youth New Year's parties. The multi-colored cups under the ceiling are a very funny sight. And you can improve such a decoration simply by adding a glass on top of a garland of lights. Make a hole on the bottom of the cup and insert into the light bulb. The result is a dim light effect - a great solution for a party with friends.
You May Like:

You can use cones to create a garland. To do this, you need to insert a small hook into the bump, for which you can then hang it on a thread. To improve the effect, cones can be coated with gold or silver paint, or glitter.

Why not use real sweets, such as candies, to decorate your home. You can not only put them in a vase, but also simply string them on a thread with a needle. Another plus of such a garland is that after the end of the holiday, the children will willingly cope with it.
You may be interested in:

Small balls can be used for the Christmas tree garland. It's already commonplace to hang them on the tree, but wrapping a spruce with a whole garland of such balls is already something new.
# 5 Christmas ball garland: DIY

If you want to liven up the New Year's holiday, make an ice cream garland. No, no, of course, the ice cream is not real, but very appetizing. You will need a foam tube and ice cream sticks! Children will be delighted, and guests, of course!
# 6 Unusual Christmas garland in the shape of ice cream

Garlands from ordinary cocktail tubes look very cool. There are many variations on the theme, just turn on your imagination and get creative! By the way, kids can handle such a garland, and you just control it.
# 7 Making a garland for the new year from cocktail tubes

# 8 Variation on the theme of Christmas garland of tubes

# 9 And another version of the Christmas garland of tubes

The youth party will appreciate the ping-pong ball garland. This garland will create a suitable atmosphere for the evening.
# 10 New Year's garland of ping-pong balls

You can make a garland from salt dough figurines. From it, you can already tinker with figures of any shape, and then hang them by a thread on a garland.

Ordinary plastic plates, which can be easily turned into improvised snowmen, are also suitable as improvised materials for the New Year's garland!

Garlands of burned out light bulbs. To make such a craft, you need to prepare in advance by collecting burned out light bulbs. They need to be covered with white paint, and then sprinkled with glitter or glue on any picture of the New Year's theme. Then tie a thread around the bulb holder and hang it from the garland.

Walnut garland - durable and durable! You can do a wide variety of things, but we suggest turning walnuts into apples on New Year's Eve! Isn't this real magic?
You may also be interested in:
# 14 New Year's garland from walnuts

Also, from edible materials for a garland, openwork pasta of a round shape is suitable. You just need to pick up a beautiful option in the store and decorate them a little with paint and glitter.

There are a lot of options for making Christmas garlands. For every taste, from any material, of varying complexity. Basically, all of the options shown here are very easy to manufacture. It is worth trying to create a garland for the New Year with your own hands - this will definitely cheer you up, and the result will delight your loved ones.
Help us become better: if you notice an error, highlight the fragment and click Ctrl + Enter.
rhiannonbosse.comThis option is suitable for those who want to diversify the usual old garland.
What do you need
- white paper cups;
- a sheet of plain paper;
- pencil;
- scissors;
- scrapbooking paper;
- glue or double-sided tape;
- stationery knife;
- electric garland.
How to do
First you need to make a "wrapper" for the cups. To do this, cut one glass in half, cut off the bottom and edges. Straighten it, lay it on plain paper and make a template.

Place the template on the back of the scrapbooking paper and cut out as many wrappers as you have cups. By the way, you can choose any color of paper. Just try to match the color with the electric garland.

Then wrap the cups in paper and glue the edges with glue or double-sided tape.

At the bottom of each cup, make a cruciform cut with a clerical knife. Insert electric garland bulbs into the cuts. An unusual Christmas garland is ready!

 purlsoho.com
 It is very easy to make such a beautiful soft garland. The amount of material depends on the desired length of the decoration.
What do you need
- white and red strips of felt 2.5 cm wide;
- 2 needles;
- threads.
How to do
Place a white strip of felt over the red one and secure with needles on both sides. Then make longitudinal cuts in the middle of the strips at equal distances from each other.
 purlsoho.com
 If you want to make a very long garland, cut the felt gradually: make no more than five cuts at once, go to weaving, and then repeat the procedure. Thanks to this scheme, the strips will not slide off, and it will be much easier for you.
To braid a two-tone braid, thread the end of the strip through the first hole and tighten tighter to keep the strips from splitting. Then, in the same way, thread the garland through all the other holes.
 purlsoho.com
 Trim and sew the strips together at the ends of the finished garland so they don't stick out. By the way, you can combine any colors of your choice. For example, such:
 abigail.engineer
 thecheesethief.com
 These miniature stars look like glass, although they are made of plain cellophane! This material is not as malleable as paper, but this unusual garland is well worth the work.
What do you need
- cellophane;
- lined sheet of paper;
- scissors;
- thin needle;
- thin threads.
How to do
Cut the cellophane into strips. It is more convenient to do this by placing a lined sheet of paper under the cellophane. Please note that the length of the strips should be at least 30 times their width. In other words, if the width is 1 cm, then the length should be at least 30 cm.
Then make stars out of the stripes as shown in this video:
Carefully pierce the stars with a long-threading needle. The stars should be at a short distance from each other.
By the way, garlands of paper stars also look very beautiful. Therefore, choose the material to your taste.


 oneperfectdayblog.net
 Choose tartlets in classic New Year colors: green, red and white. Both adults and children will like such bright Christmas trees.
What do you need
- multi-colored paper tartlets (muffin tins);
- glue;
- decorative sequins in the form of stars;
- twine or tape;
- Scotch.
How to do
Fold the paper mold in four to form a triangle.

Lubricate the corners of the two triangles with glue. Place three triangles on top of each other and glue them together to form a Christmas tree. Likewise, make as many trees as you need for your garland.
Decorate them with sequins. If you didn't find the star-shaped sequins, just cut them out of colored cardboard.
Then tape the Christmas trees to the string or tape at a short distance from each other. The garland is ready! Decorate with it or hang it on the wall.

 createcraftlove.com
 Another way to transform a bored electric garland.
What do you need
- decorative sacking of New Year's flowers;
- scissors;
- electric garland.
How to do
Cut the burlap into even small strips. Tie them in a knot in turn between the light bulbs.
 createcraftlove.com
 Very simple and beautiful!

 annfarnsworth.com
 This beautiful garland looks very impressive, and it is very easy to make it. If you don't have string, you can use thick thread or yarn.
What do you need
- Balloons;
- petrolatum;
- ½ l PVA glue;
- 2 tablespoons cornstarch
- 2 tablespoons of warm water;
- twine;
- needle;
- electric garland.
How to do
Inflate balloons that are the same size. Note: a garland of small balls will look more beautiful. Lubricate them with Vaseline. This is to prevent the string from sticking to the balls tightly.
Mix glue, starch and water. If the mixture is too thick, add a little more water. Just do not overdo it, so that it is not very runny.
Soak the string in the resulting glue solution. Then wrap the balls with the rope. The easiest way to do this is by hanging the balls from a rail. Just do not forget in this case to put an oilcloth under them, where excess glue will drain. The density of the balls of the future garland depends on how much twine you wind.

Leave the balls to dry overnight. Then, pierce each balloon with a needle to make it burst. First, check if the string has become stiff enough and whether the finished ball will hold its shape. Remove the balloon carefully.

Then insert the light bulbs of the electric garland into the balls from the twine. If the balls are very dense, then you can make holes in them with scissors or a pen.

 stubbornlycrafty.com
 For such a garland, you need thick paper, for example, cardstock. But thin cardboard is fine.
What do you need
- thick paper (gray and several other colors to choose from);
- scissors;
- hole puncher;
- glue;
- twine.
How to do
Cut the gray paper into strips measuring 3 × 10 cm. The dimensions of the strips from the rest of the paper are 2.5 × 20 cm. The number of strips depends on the desired length of the garland.
Roll the gray strips into octagons and punch holes for the twine with a hole punch as shown in the photo. Then glue the edges of the octagons.
 stubbornlycrafty.com
 Now make the "bulbs". To do this, fold a long strip in half, just lightly running your fingers along the fold. Holding the strip by the ends, press it against your palm. When you release the paper, it will change to the shape of a light bulb.
 stubbornlycrafty.com
 At the ends of the strip, exactly in the middle, punch a hole for the string with a hole punch. Pass the string first through one hole in the gray octagon, then through the "light bulb", and finally into the second hole in the octagon. Repeat these steps with all the other details and align the "bulbs" along the length of the string.
 stubbornlycrafty.com
 acupofthuy.com
 Such beauty can become not only a New Year's decor, but also a decoration of a children's room.
What do you need
- A4 paper packaging;
- template (download);
- scissors;
- glue stick;
- Double-sided tape;
- threads.
How to do
Print and cut out the templates, and circle them on the sheets of paper as shown in the image below. For a garland, you need 24 first and second parts of flashlights and 126 stars. And to speed up the process, draw stars on the sheets folded four times.
Cut out all the details.
 acupofthuy.com
 Take one piece of the flashlight and grease one side with glue. Glue the same piece to it. One flashlight should be composed of six identical parts. Just do not glue the sides of the first and sixth parts until you make a loop.
To do this, stick double-sided tape on the fold. Glue the thread from bottom to top, make a small loop on top, then glue the thread from top to bottom and cut off the excess. Now you can glue the sides of the first and last parts.
Repeat the same for the rest of the lanterns. You will have 8 flashlights in total.
 acupofthuy.com
 In the same way, make 21 volumetric stars. The only difference will be in gluing the thread. It must be pulled through three stars, making a loop on the topmost one.
Now pull the thread through all the loops, forming such a beautiful garland:
 acupofthuy.com
 linesacross.com
 It is enough just to cut out the details according to the ready-made template and decorate them with sparkles.
What do you need
- thin cardboard;
- template (download);
- scissors;
- stationery glue;
- colored sequins;
- twine.
How to do
Print on thin cardboard and cut out the patterns along the solid lines. The number of parts required depends on the desired length of the garland. Bend the blanks along the dotted lines.
 linesacross.com
 After one, grease the triangles on the templates with glue and sprinkle with glitter. When the glue is dry, shake them off. You may need to repeat these steps one more time to get the glitter over the triangles.
 linesacross.com
 Then grease the semicircular parts on the templates with glue and glue the figures. Pull the string through the figures. If you are afraid that you will not be able to do this, pass a string through each figurine before gluing, and not after.
 thepartyteacher.com
 Such Christmas trees can be decorated with anything: sequins, sequins or buttons. Connect your imagination!
What do you need
- green tissue paper;
- scissors;
- glue;
- yellow cardboard;
- red cardboard;
- twine.
How to do
Straighten the tissue paper. By the way, this can be done with an iron, setting it to the lowest temperature. Fold a long sheet of paper across in half and cut it in half lengthwise. You will have two long stripes folded in the middle. Make long cuts in them, leaving part of the fold intact. You will need as many details as there are trees you want to make for the garland.
 thepartyteacher.com
 Unfold the strip and twist it thinly. Make a loop at the place of the fold and twist it several times so that it does not fall apart. If desired, you can fix it with glue.
 thepartyteacher.com
 Tie the resulting trees to the string. Then cut out stars from yellow cardboard, and circles from red cardboard and glue them. Try to secure the sprockets so that the knots on the string are not visible.
 shelterness.com
 And finally, an option for those who do not have time to tinker with something at all, but have a great desire to update the New Year's decor.
What do you need
- beautiful Christmas balls;
- twine.
How to do
All you need to do is pass the string through the loops of the Christmas balls, tying it in knots and placing the balls at the same distance from each other.