DIY Christmas decorations from balloons. Crafts from polystyrene master class: a wonderful ball for a Christmas tree
A classic and at the same time a magnificent symbol of the new year is the New Year's ball. But do not rush to the store to purchase a set of balls. Moreover, you shouldn't spend your money on it. And all because you can make Christmas balls with your own hands. It is worth saying that lately it has been very fashionable to make toys for the Christmas tree. And so we want to invite you to make Christmas balls with your own hands.
How and from what to make Christmas balls at home
Festive balls for the Christmas tree made of colored paper.
To make the ball that you see in the picture, you need to prepare:
- thin wire
- colored paper,
- glue and stapler.

Working process:
- For such a ball, you will need to cut out several circles from colored paper. To make the circles even, take a glass and circle it with a simple pencil. You will need to do 12 circles. Moreover, they should all be of different colors, as shown in the photo.
- Now you must bend each circle in half. Now put all the circles in a pile. For the manufacture of this ball, paper of three colors is used, which should be designated with the letters ABC. You must fold the mugs in the following order. ABBVVAABBVVA.
- You should fasten the paper circles together with a thin wire. Wrap it along the fold line. When doing this, you must twist the ends of the wire together. Now, with a stapler, you fix the circles.
- Next, we straighten the circles and glue the adjacent halves of the circles together. In this case, each half must have a connection with the adjacent half from the top, and from the other from the bottom.


How to update an old Christmas ball.
From this article you can learn how to make Christmas balls with your own hands. And here you will see more than one master class that will help you see the process of creating crafts.
If you still have old Christmas balls at home, which have long ceased to please the eye, then you should not replace them with new plastic balls. Just wrap it in a beautiful fabric and tie it with an original satin ribbon. As a result, you should end up with something interesting.

New Year's ball made of acorn caps.
If you have collected a large number of acorns in the fall, then for the next New Year's ball you will have to use only hats. Remember that such a ball will look very beautiful and at the same time unusual.

For crafts, take a ball of a suitable size and glue it with acorn caps. When the glue is dry, paint the craft with silver paint. And of course, don't forget the beautiful satin ribbon used for decoration.
Openwork Christmas ball.
You liked the openwork ball and you dream of making it, then prepare:
- threads of different colors,
- Balloon,
- PVA glue,
- foil, markers.

Working process:
- First of all, you must saturate the threads with glue solution.
- While the threads are soaking, inflate the balloon and tie it up.
- Wrap the ball with threads not very tightly.
- If the glue is dry, then blow off the ball and take it out of the cocoon.
- Now let's start decorating the ball. We fix various flowers and other accessories on the ball with a wire.
Fluffy Christmas ball.
Fluffy balls can settle on your tree. And to make them you need to prepare:
- multi-colored threads,
- cardboard,
- ribbons and scissors.
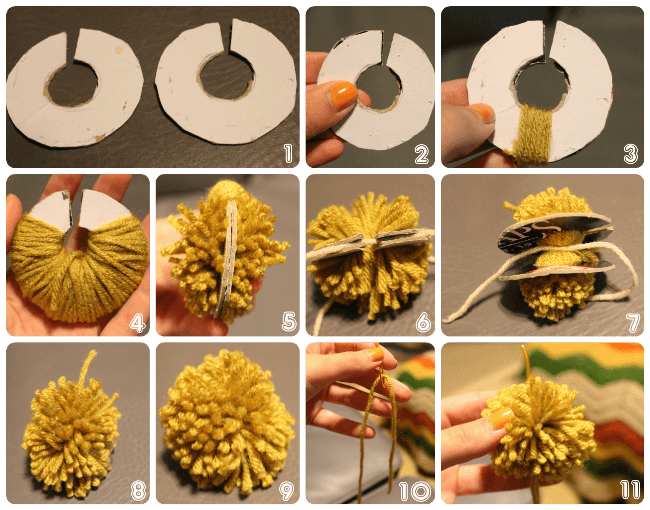
Working process:
- First, 2 circles should be cut out of cardboard.
- A hole should be cut in each circle.
- Fold the circles together and draw a ribbon between them.
- Now wrap the circles with threads.
- Spread out the ball and decorate it with sparkles.
- We tie a ribbon at the top and hang the ball.
Foam ball.
Now it's worth telling you about what do-it-yourself Christmas balls from foam balls can be. Naturally, such a craft will require foam blanks. And in order for them to become unusual and very beautiful, it is worth preparing:
- pins for fastening,
- beads and satin ribbon.

Styrofoam Christmas ball decorated with paper flowers.
For such a pretty ball, use a curly hole punch to make a lot of flowers. Use purple and white paper in this case. In this case, you must put a white flower in a purple flower. It is worth bending the edges to a cent. And then, using pins with heads, we pin the resulting blank to the foam ball.

Another option for a foam ball. In this case, use a wire to glue the candy to the foam base.

Ball for a Christmas tree from a CD.
For crafts, prepare:
- transparent christmas ball,
- old CDs,
- scissors, tape, glue.

Working process:
- Using scissors, you should cut the old discs into small pieces.
- Now we take the ball in our hand, apply a drop of glue to a certain place and glue the piece of the resulting mosaic to the ball. Moreover, the shiny side is up.
- Next, we continue to glue the disc elements. Work should be continued until the entire surface of the ball is covered with them. But when you work, do not forget to leave free space through which the tape will be visible.
- If you pasted over the ball, then place a bright satin ribbon in it.
Balls decorated with fingerprints.
It is worth saying that plain balls in decorating a Christmas tree look boring. But if you show a little imagination, then you can get something interesting. So, prepare:
- plain Christmas balls,
- watercolor paints,
- brushes.

Working process:
- Making such a craft is a sheer pleasure. Just paint the tip of your finger with any acrylic paint. Press your finger to the ball and then remove. Wait for the paint to dry.
- If the paint is dry, then use a brush to add the rest of the details to the drawing.
- Wait until it is completely dry, and then hang your ball on the tree.
Fragrant balls for the new year.
Let in the new year, your tree is decorated not only with ordinary balls. Make an unusual ball with your own hands. For this you need:
- wide tape or elastic band,
- lemon or orange,
- ribbon,
- spices (cloves or cinnamon),
- an ordinary toothpick.
Working process:
- If you bought a lemon or orange, put an elastic band on it anyway. In this case, the elastic should be located in the middle.
- Next, use a toothpick to make holes in the fruit.
- Insert a stud into the holes. At the same time, you should not insert it too tightly. Wrap the whole fruit with cloves.
- Wait 2 weeks for the craft to dry. Well, if there is no time to wait, then put it in the oven for an hour.
- Now decorate the fruit with the ribbon with which you hang the craft.

Decoration of the New Year's ball with felt.
Now you know how to make Christmas balls with your own hands. But these are not all interesting ideas. Now we will give you another interesting master class. Prepare for him:
- ball,
- several colors of felt,
- thread and scissors.
Working process:
- Small circles should be cut out of felt. Approximate perimeter 3 cm.
- Now we remove the mount from the ball and begin to glue the mugs to the ball. Start this process from the top of your head and gradually work your way down. Glue the circles in a checkerboard pattern. Take a look at the photo, which will demonstrate how the circles should lie on the ball.


Finally
Make balls with your own hands. Make original decorations and admire your tree throughout the New Years.
On the eve of the New Year and Christmas holidays, work on the manufacture of decorations for the Christmas tree becomes relevant. No exception are made of polystyrene, a master class on the manufacture of which will show what interesting Christmas tree toys you can make yourself.
Since the foam is taken as a basis, the resulting Christmas balls will be unbreakable, which will delight the parents of the kids.
So, for such unbreakable balls, we need multi-colored threads, polystyrene, any decor.
A ball of the required size cut out of polystyrene must be wrapped with thread. Having fixed the beginning of the thread, it is necessary to wrap the ball crosswise, gradually moving over the entire area of the ball.

At a certain stage, you can wind up in a chaotic manner until the foam ball is completely hidden under the threads.


When the winding is already finished, the end should be well fixed.

The decoration of the resulting ball depends only on your imagination and imagination. Various patterns can be embroidered.

Sew on an invented applique and decorate with beads.

Sew on sequins in the form of flowers.

Be sure to come up with and fix a rope for which the resulting ball can be hung on the Christmas tree.


Another option for a foam New Year's crafts in the kimekomi style. The technique is quite interesting and originated in Japan for making dolls. In this same master class, kimekomi is used to decorate foam balls.


We prepare in advance: a foam ball, multi-colored scraps of fabric, lace for decoration, various colored ribbons, beads, buttons, sequins, sewing pins, a stationery knife, scissors and other improvised sewing tools.
Since the pattern on the ball is usually symmetrical about its poles, they must be marked at the very beginning of the work.

We outline lines from the poles that are equidistant from each other. You can use a pen, pencil, or a disappearing marker for this.

Now all the lines of the pattern should be cut with a clerical knife to a depth of one centimeter. The work should be done very carefully and carefully.

We start working with the first part of the pattern, for which we coat it with glue in the form of a pencil.

Take a piece of the selected fabric and apply it to this part of the pattern. At this stage, the fabric should be positioned correctly depending on the direction of the pile.

Next, the kimekomi technique itself begins - with the help of a thick needle or knitting needle, the fabric is stuck into the slots along the entire contour of the selected part of the pattern. Make sure that the fabric is flat and not distorted.


After all of the fabric is stuck in around the perimeter of the pattern, the rest of the fabric can be trimmed with scissors so that two to three millimeters remain.

The resulting allowances can now be completely hidden in the slots.


This is what one finished pattern segment looks like.

We do the same with the rest of the segments.

In principle, at this stage, the ball already looks finished, but if you wish, you can continue the work further.
With the help of glue and the same large needle, we will glue and stick in a decorative lace at the borders of the pattern elements.

First, we coat the place with glue, and then insert the lace there.
In some places, the lace can be completely hidden, but this is at your discretion.

In our case, such a cap for large beads will give the finished look to the New Year's ball, but you can just use a bead, sequin or something else.

Using a sewing pin, we pierce our ball, while the pin must first be coated with glue.

For the pendant, we use the same decorative lace.

To slightly dilute the usual lace, we suggest decorating it with such a bow. To do this, you need to wind the ribbon around several fingers, literally five turns, without straightening to pierce with a pin.

To fix it more and more securely, we also coat the pin with glue and stick it into our ball. Now the bow can be straightened in all directions, and the petals themselves can be grabbed a little with glue for reliability.


For all the proposed foam crafts, you need a perfectly flat foam ball, which is quite difficult to cut yourself. However, for such work, you can make a special device that will greatly facilitate your task.
First of all, you need a pipe, the diameter of which is a couple of millimeters larger than the diameter of the future ball. The length of the pipe must be at least four times the length of the ball diameter.
In the prepared tube, cut off a part of it, the length of which is equal to two diameters of the ball. Next, we glue a zero sandpaper in the cut out part from the inside. On the back of the tube, the sandpaper should be glued in the same way as shown in the photo.
New Year is associated with a Christmas tree, and she, in turn, with beautiful toys. Christmas balls are the most common outfit for a forest beauty. Today, homemade Christmas balls are very popular. They are used to decorate a festive tree and are presented with pleasure to loved ones. These toys are very diverse, ranging from size to material of manufacture. Priority is given to paper.
Christmas balls made of paper
Option number 1
On colored paper, using an improvised object with a round shape, draw 12 circles. We take scissors and cut out circles along the contour. Then we bend the blank circles one by one in half and put them together. We fasten the circles along the fold lines with a stapler or sew them up with a machine. This line will be exactly in the middle. Next, on the semicircles we apply markings, mark 1/3 at the bottom and 1/3 at the top. We straighten the circles and glue them in a checkerboard pattern. Each half will be connected to the adjacent half at the top and the other at the bottom.
Colored paper toy
Option number 2
This job will require scrapbooking paper and glue. From it we cut out 8 circles of the same diameter and 2 circles of a smaller diameter. Set aside 2 circles, and add the remaining 8 into four. We take small circles and glue 4 large quarters on each with an angle in the center. Next, glue the upper parts of the quarters together, and then the lower ones.

Ball on a Christmas tree made of paper for scrapbooking
Option number 3
Original origami kusudama ball
Video of a master class on making a ball using the kusudami technique
Option number 4
A Christmas ball made of napkins looks very impressive. To make such a toy with a diameter of 22 cm you will need:
- newspapers;
- Scotch;
- scissors;
- napkin, you can have several colors;
- glue;
- pencil;
- stapler;
- tape 25 cm long;
First, we make a base of crumpled newspapers, wrapped one in another so as to get a round ball. We wrap the resulting "lump" of newspapers with tape, leveling the corners and roughness. We glue the tape. Now we take a napkin and fold it in half in 4 layers. We fasten the resulting square of napkins in the center with a stapler, cut out a circle according to the template. Next, we make roses. Carefully lift the top layer of the napkin and crush it slightly. Proceed in the same way with the rest of the napkin layers. The result is a "fluffy" flower that looks like a rose. We make the right amount of such roses. The larger the base, the more flowers you need. We glue the flowers to the ball, starting with the ribbon. We attach the roses tightly to each other. If the flowers are multi-colored, then we alternate shades.

Ball on a Christmas tree made of napkins
Option number 5
To make balls from paper tubes you will need:
- foam ball;
- glue gun;
- old magazines, books, newspapers;
- ribbon
We make thin tubes from sheets of paper and roll them into a spiral. We take a ball and apply glue, to this place we attach the tip of our tube. After the end is glued and “grabbed”, we apply glue along the length of the spiral and glue the rest of the tube. And so we continue to glue the spirals over the entire surface. At the end we will attach a ribbon.

Volumetric ball of tubes
Christmas balls from textiles
Soft and shaggy balls are obtained from the fabric. For the base, we take a cropped sock, tightly stuffed with rags, in the shape of a bun. We make ruffles from scraps. To do this, we sew small rectangular pieces of fabric tightly to each other.

Christmas tree toy
It is even easier to make a ball of threads. This workshop will require a balloon, thread, glitter, and glue. First, inflate the balloon of the desired size. We tie a thread to it, wrap it in any shape. Then we dip the workpiece into the glue solution. After a while, when the glue dries, pierce the balloon with a needle and carefully remove it from the case. We decorate the finished creation with paint in spray, glitter, beads and other materials at our discretion.

Ball of threads
A ball of ribbons and paper flowers can be made according to the step-by-step instructions from the photo below.

Master class: a ball of ribbons with step-by-step instructions
Christmas ball from a plastic bottle
For making, we take an empty white bottle. From the middle part, we cut rings 1 cm wide. Glue the resulting rings together, for this we apply a drop of glue from above and below. Then carefully push the rings into one another perpendicularly. Let the glue dry and start decorating with improvised means.

Balls from plastic bottles
Decoupage: Christmas ball with photo
Decoupage is a technique for decorating Christmas balls using appliqués. We will consider this technique in the following example. We take a foam base and paint it with white paint, for this we blot the paint with foam rubber and apply it to the surface. When dry, a beautiful snow coating will be obtained. While the base dries, cut out the photo, edited to the desired size and printed on photo paper. Then, with wet fingers, carefully roll the white layer off the back of the photo. It must be done carefully so as not to damage the top layer where the image itself is located. When we get to the top film, we will make cuts so that when the photo is superimposed on the curved surface of the base, there are no wrinkles. Next, we grease the white side of our photo with glue and press it against the ball. When dry, decorate and fix with acrylic varnish.

How to make a Christmas ball using the decoupage technique with your own hands
The New Year is coming soon and everyone wants a fairy tale, a holiday, joy, so that the house is cozy and beautiful. And what a New Year without a Christmas tree, New Year's toys and balls.
Today we will offer some creative ideas on how to make Christmas balls with your own hands.
How to make a Christmas ball out of fabric
Each house has bright fabric scraps, ruffles, ribbons. First you need to make the foundation. We take different rags (you can use old socks) and make a tight ball out of them. You can also use a styrofoam ball. And then the flight of your imagination. You can sew the shreds to the ball in the form of a ruffle, or first give the shreds the shape of triangles, rectangles and sew them tightly to the ball. As a result, we got interesting knitted balls.


We take strong threads, PVA glue, small air balls, sparkles.
First, we inflate the balloon to the size we want our balloon to be. We knit with a thread. We spread the rest of the thread with glue and wrap our balloon. Cover the thread with sparkles and wait until it dries and becomes firm. Then we burst the ball and carefully pull it out of the middle with tweezers. We have got a beautiful openwork ball.


We can also apply lace and cover it with glue just like a thread.


DIY styrofoam Christmas balls


For the base of the toys, you can take polystyrene. It can be decorated with multi-colored soft felt, beads, sequins, paper products, ribbons.
Interesting DIY Christmas ball ideas
When you have a huge Christmas tree, you want more toys on it. Let's make balls from a floral sponge that can be cut in the form of any figurine and, using hairpins, pin flowers, twigs, small toys.
For those who love antiques, matching Christmas balls can be made. We take the lace, glue it on the toy and apply paint with a brush or sponge.


You can also decorate discs.


It's funny when toys in the form of a sweet treat hang on the tree. This is very easy to do. We roll a foam ball covered with glue in sparkles, glue the thread on top for which we will hang the toy. For a highlight, glue the berry. Then we put our ball into a special cupcake mold, anointed with glue.

DIY original Christmas decorations
On New Year's Eve, I want everything to sparkle and shine. Let's decorate our balls with beads, beautiful stones, jewelry, artificial pearls, shards from old glass, New Year's toys, bright shiny sequins.There is never a lot of sparkle in the New Year.


Christmas decorations made from natural materials


Also, cones, spruce branches, rowan berries can be decoration.
Using paper for decoration is inexpensive and creative.


Knitted Christmas toys
For those who know how to knit or crochet, you can knit an "outfit" into balls from bright, beautiful threads.
Edible Christmas toys
Who loves sweets, you can make balls from sweets, cookies, peanuts - this is not only interesting, but also delicious. Your kids will love this idea.
With such toys, the New Year will be joyful, merry and happy.
DIY Christmas balls video
Factory New Year's decorations can never replace the warmth and soulfulness of hand-made products, and even if home hand-made is not quite perfect, but the whole soul will be invested in it, and this is worth a lot! Today we will show you how to make Christmas balls with your own hands, so that they would not be ashamed to decorate the interior of your beloved home. In addition, you can involve children in the creative process, firstly, such work is useful for the development of children's motor skills, and secondly, any common cause is very close, and thirdly, together you will have time to make much more unusual Christmas balls.
One of the legends says that the first Christmas balls appeared in Germany in 1848. In those days, Christmas trees were decorated with real apples, but 1848 turned out to be a barren year, and local glassblowers urgently created glass "apples", which successfully replaced the real ones. Locals appreciated the idea of glass decorations, and so they gradually replaced fresh candy with apples.
Christmas balls from newspaper tubes.
We take a sheet of magazine, twist it into a bundle, if you need bundles, you can create several harnesses by gluing them together. Then we take a foam ball, glue the end of the magazine flagellum on top, and start winding around the ball's perimeter, as in the photo below, gluing each layer with polymer glue.


Christmas balls made of felt.
Draw flower patterns on paper, one larger than the other smaller. We take tracing paper, lay it on pink felt fabric and outline a large flower, you will need a lot of such flowers, so we create the required number of them. Then we take white felt, put tracing paper on it and circle a small flower, they will need exactly the same amount as pink flowers. We cut out all the details with scissors, sew two flowers together, and glue a bead in the center. According to this scheme, we sew the rest of the flowers. We glue the resulting flowers with a glue gun to a foam ball.

DIY Christmas balls from paper flowers.
Using a curly hole punch with a flower attachment, we create a lot of purple and white flowers from paper. We put the white flower into the purple one, bend the edges to the center, then pin them to the foam ball with pins with bead heads.

Christmas balls in corrugated paper roses.
We create miniature roses from corrugated paper (the process of creating roses is captured in the photo below). We tie the flower leg with a thread so that the bud does not disintegrate, cut off the long legs, closer to the threads, glue the flowers with a glue gun or moment glue to the surface of the foam ball. Fill in the gaps with large beads.

Christmas balls from sequins.
Each sequin must be fixed on the surface of the foam ball using sewing pins (these are used by dressmakers). Sequins need to be overlapped.

Christmas balls decorated with beads.
On a pin of a carnation with a bead head, we string beautiful beads of different sizes, each such carnation is injected into the surface of a foam ball. Do not forget to glue or pin the pendant ribbon. 
How to make paper balls.
The first way. According to the template below, we cut out many parts, which we connect together as in the photo below, forming a ball.
 Second way. We cut the paper into strips (4 pcs.), Lay them crosswise, connect them in the center with a nail, connect the ends together from below, forming a ball, fasten them with a stapler. From the rope we create a pendant, which we fix on a carnation.

Third way. We cut the paper into circles, bend the sides of the circles to the center, it looks like a triangle. We glue the parts together, forming a ball.

Christmas tree balls made of cinnamon sticks.
We cut cinnamon sticks into segments of equal length, each of which is glued on polymer glue to the surface of the foam ball.

Christmas tree balls decorated with paper scales.
Using a large round hole punch, we create many circles, which, with the help of a glue gun, overlap to the surface of the foam ball.


DIY Christmas balls from branches.
Let's think of a ball (it's even better to take a thin rubber ball of a round shape that can be blown and inflated), cut dry branches into small pieces with a pruner, apply branches to the surface of the ball and glue them together with a glue gun. When the glue dries, blow off the ball and pull it out through one of the wide holes.

How to make a Christmas ball from threads.
We inflate the ball, wrap it with threads, then thoroughly soak it with PVA glue, hang it in a dry place to dry the glue. As soon as the glue dries, pierce the ball with a needle and pull it out through one of the holes. To make the ball of threads look more impressive, immediately after applying the glue, it can be sprinkled abundantly with coarse shine.

How to make a "chocolate" ball.
We take any unnecessary ball, cover it with glue from a gun on top, creating spectacular drips, when the glue dries up, paint the ball with paint from a spray can in a chocolate color. After the paint dries, cover the spectacular chocolate drip with a layer of PVA glue and sprinkle with a large white glitter. From above we glue red decorative berries and twigs. 
How to make a ball out of rope.
We inflate the medical fingertip, tie it with a thread, soak the rope in PVA glue, wind the rope around the fingertip ball. We leave the product to dry, after which we glue the hanger on top. Details on how to create such a ball can be found in the article. 
How to decorate a ball with acorn caps.
We paint the foam ball with acrylic paint brown, take polymer glue, grease the acorn cap abundantly with it and glue it to the surface of the ball, according to this scheme, we completely cover the ball with acorn caps. Finally, the gaps can be masked with beads and particles of silvery sheen.


How to make a ball of cones.
We take a dense garbage bag, put cotton wool tightly inside, tie a bag. Separate the tops from the cones, and glue them to the surface of the ball using polymer glue or a glue gun.

How to decorate a ball with cone scales.
Separate the scales from the cones with nippers. Then we take a foam ball and use a glue gun to glue all the scales overlapping to its entire surface.

How to decorate a ball with decorative balls.
Such padding polyester balls are sold in the departments of everything for creativity, we glue them to the surface of the foam ball with a glue gun, alternating between simple white balls and shiny balls.

How to decorate a ball with lace.
We cut out details from lace, for example - flowers, glue the flowers to the surface of the foam ball with PVA glue. We paint the ball with white acrylic paint, then bronze, after which we take a sponge and dab it over the surface of the ball. The surface acquires the effect of aging, it remains to glue the pendant hat and tie a beautiful ribbon. 

10 ideas - DIY Christmas toys (video)
How to make Christmas toys (video master class 21 ideas):
Today we have shown how to make Christmas balls with our own hands, without unnecessary financial and time costs, such beautiful decorations will definitely not go unnoticed, and your friends will certainly appreciate all your efforts.