Pape art technique: master class. Pape art technique: a master class on making a money bottle
The paper-art technique is an imitation of other, more expensive techniques - filigree, chasing. She is quite young: she was invented in 2007 by the artist Tatyana Sorokina and since then has earned popularity among needlework masters. The technique is decorating various items with paper napkins, but it is not at all like decoupage. Various items are decorated with patterns of napkins twisted into a thread - this is the essence of the paper art technique.
The literal translation of the concept of paper art means "paper art".
With the help of paper art, you can imitate a variety of textures and create objects of art that imitate more complex and expensive techniques - woodcarving, embossing, metal-plastic or embroidery. As a result, things are obtained that combine the artistic embodiment of the master's intention and the practical use of the thing being decorated. Pape art is simple to perform, almost any person, including a child, can do it.
In paper art, elastic paper threads become the main material, with the help of which a volumetric image is created on the surface of the decorated object. Further, with the help of other available tools and artistic materials, the final image of the object is created.
Paper art does not impose restrictions on forms, there are no basic elements for creating an image. For paper art, paper of a lower density is needed, namely, two or three-layer paper napkins.
In the old form of handicraft called "decoupage", images that are pre-cut from napkins are used, which are transferred to the surface to be decorated and imitate hand painting with their help.
In paper art, the main emphasis is on the formation of texture and volume. Common to these artistic directions is the material of creativity - thin paper napkins, as well as the fact that decoupage and paper art imitate other types of creativity.
What you need to create products using the paper art technique
Regardless of what you are going to decorate, you need to stock the following materials:
- Paper napkins (single or multi-layer);
- PVA glue;
- Scissors;
- Brushes of different thicknesses;
- Foam sponge;
- Wet wipes.
Making flagella
Cut paper napkins into even strips about 1.5 cm wide. If multi-layer napkins are used, separate them into separate layers.
Place the strips in a container of water for a few seconds so that they become wet and slightly swollen.
Holding the strip with one hand, twist the tight flagellum with the other. It should not have thickening and loose areas. If you can't make a high-quality flagellum from a wet napkin, you can try to make it from a dry one by moistening your fingers with water.
To make a long flagellum, it is necessary to overlap the ends of several strips, and carefully seal the joints with your fingers when twisting.
It is possible not to divide a multi-layer napkin into separate layers and make flagella from 2-3 layers of paper. In this case, workpieces of greater thickness will be obtained.
It should be remembered that during operation, the flagella must remain plastic, therefore, dried workpieces must be moistened with water.
Master Class. Decorating a glass surface using the pip-art technique
In addition to the basic materials, you will need the following:
- Glass vessel (vase, bottle, jar)
- Paints (gouache of different colors and bronze acrylic paint);
- Glossy acrylic varnish;
- Additional decor, such as curly pasta, cereals, etc.
Beforehand, the glass surface must be washed inside and outside, removing the remnants of the label and glue, and dry thoroughly. Immediately before decorating, it will be useful to degrease its outer surface with alcohol or acetone.
With the help of PVA, it is necessary to prime the part of the bottle where it is planned to apply the background. The glue should be applied in several layers with intermediate drying, the excess should be removed with a napkin. Then, using a foam sponge, apply bronze acrylic paint to the primed area and let it dry thoroughly.
Decorating
After the background is prepared, we start decorating.
To begin with, we apply PVA glue with a brush strictly along the contour of the background and glue the blank from the napkin. It is necessary to ensure that the flagellum is firmly adhered to the entire surface, for which it should be firmly pressed with a brush dipped in glue.
In the same way, we lay out a simple pattern of flagella and additional decor at your discretion. Then the decorative elements must be additionally fixed by smearing them on top with PVA glue in several layers.
Dyeing
Prepare the paint by mixing black gouache with a little red and green. Add gloss acrylic varnish in a 1: 1 ratio. If necessary, dilute the resulting mixture with water. Using a sponge, apply paint to the decorated part of the glass surface with a foam sponge in several layers.
Then the surface is lightly tinted with bronze acrylic paint with a sponge and covered with two layers of glossy varnish. It is better to use a brush for applying varnish.
We offer you to try your hand at a new interesting experiment - the pip-art technique, a master class from experienced needlewomen will help you better master the new art. Pape-art (English "paper art") is a relatively young author's technique, invented in 2006 by the talented craftswoman Tatyana Sorokina. This is the decoration of objects with the help of flagella made of paper napkins, imitating products from chasing, wood carving and other more expensive techniques. This technique is also called napkin forging.
The simplicity of execution and the availability of materials in a short time spread this art throughout the world. Without special artistic skills, needlewomen use paper art to create works that stagger the imagination.
Create threads
The most important thing in paper art is to be able to prepare a thread from three-layer napkins. To do this, we stock up on two-layer or three-layer napkins and start making threads:
- cut strips 1-1.5 cm wide from a napkin;

- you need to dip them into the water and immediately get them so that they do not get wet;

- we roll the strip into a thread or a thin flagellum. If the thread breaks, it's okay. The work uses threads of different lengths. You can also roll the strips onto the fabric. The thread will be denser and smoother;

- so that the flagellum does not break, you can try to wet your hands in water, not strips;
- toilet paper is also good for rolling up the flagella.
This is shown very clearly in the proposed video:
In addition to paper flagella, in paper art you can use everything that can be used in decor. Small pebbles, shells, figurines made of salt dough, dried flowers and leaves of trees. For the original pattern, even curly pasta is used - bows, letters, curls. The main thing is to carefully coat every detail with glue before fixing it. The glue is used with PVA or any other water-based glue.

Highest quality from Portugal or Spain. Polish keraplast may crack after drying, but this can be easily repaired. Dilute a small piece to a thick sour cream and gently paint over all the cracks with a brush. It can be done several times until the cracks disappear completely. You can level the surface with sandpaper No. 0.
The paper art technique is perfectly combined with other types of creativity. Decoupage masters actively use paper cords in the creation of their products to add volume to the composition.

From simple to complex
For beginner creators, a little training is offered:
- Prepare paper threads;
- Draw any shape on thick paper or cardboard and try to lay it out with napkin threads, sticking them with PVA glue;
- Contour first, then fill the entire surface of the shape. Then the volumetric image will turn out smooth.
The next step is to make a picture for the children's room using the paper art technique.
- Transfer the plot from the children's coloring to cardboard or plywood. You need to choose a plot with a minimum of small details;
- Lay out it with flagella, starting from the contour;
- Paint it in the colors you want. After the painting is dry, you can varnish and frame it.

You can create beautiful patterns from twine. It does not require any special training and is easy to use. Even without coloring the finished product, it looks great. You can verify this by looking at the photo:
You can proceed to the next stage of the paper art technique.
Talisman for wealth
In no house will this talisman be superfluous - a money bottle. In addition to attracting wealth to the house, it will decorate any interior.


Materials:
- original bottle shape;
- paper towels;
- glue gun;
- black and bronze acrylic paints;
- synthetic brush;
- coins;
- metal zipper;
- PVA glue;
- foam sponge;
- matt varnish (water-based).

Glue the coins on the bottle with a glue gun. Glue together heap, tighter to each other, so that the impression of abundance is created. Glue the zipper on top of the coins.

Then you need to dilute the PVA glue with water 1: 1, to a liquid consistency, but so that it does not lose its adhesive properties.
Cut paper towels into pieces of the required size and soak them in an adhesive solution. Squeeze lightly.
Glass decanter made using paper art technique.
You can do real magic with your own hands thanks to the author's decorating technique by Tatyana Sorokina paper art.
Well, isn't it magic - using table napkins, PVA glue and gouache to turn glass, plastic and even cardboard into antique copper, noble silver or antique bronze ?!
I saw a very interesting idea of partially decorating the surface of a product using the paper art technique from Natashkin from the Land of Masters. Natashkin's daughter Alevtina is the author of exquisite wine glasses with frames made using the paper art technique.
I have long wanted to do something like this. Therefore, today I present my version of the craft, partially decorated in the author's technique of Tatyana Sorokina paper art:
Workshop on decorating a bottle using the paper art technique
This is a decanter-shaped glass bottle:

And I'm going to make a "bronze" setting for this decanter.
To decorate a bottle using the paper art technique, I will need:
- table napkin
- PVA glue
- scissors
- bronze acrylic paint
- a piece of foam rubber
- bamboo skewer
- millet groats
- star shaped pasta
- gouache (red, black, green)
- brushes (with synthetic bristles - for PVA glue, with natural bristles - for varnish)
- glossy acrylic varnish
- wet sanitary napkins
Important note: high-quality PVA glue is required for work. I am using the same PVA glue and acrylic varnish , as for work in decoupage technique.
1. Preparation of the bottle surface for paper-art
Before starting decorating using the paper-art technique, I degrease the surface of the bottle and remove the remaining glue from the labels using wet sanitary napkins.
Since only part of the surface of the bottle will be decorated with paper art, I will not paste over the decanter with a napkin, as is usually done. Otherwise, glued napkins and other decor will be visible from the inside of the bottle through the glass.
I cover the part of the bottle surface with PVA glue, where it is supposed to make a "bronze" frame using the paper-art technique.

I apply several layers of PVA with intermediate drying to prepare the base for laying out paper art patterns... Excess glue, spreading beyond the boundaries of the future "bronze" rim of the bottle, I remove with a damp cloth.
After the PVA glue has completely dried, I cover the primed part of the bottle with bronze acrylic paint using a sponge made from a piece of foam rubber.

Thus, from the inside, the frame of the decanter will have a "bronze" appearance.
2. Patterns using the paper art technique
To create a pattern using the paper art technique, I use double flagella from napkins, millet groats and curly pasta-stars.
To make a double flagellum from a napkin, I first make a long single flagellum.
To make a long single flagellum in the process of twisting, I connect several tissue strips, overlapping the ends of the strips one on top of the other.

I additionally seal the junction of the strips of napkins in the flagellum with my fingers so that the flagellum for paper art has the same thickness along its entire length.
Having rolled a single tourniquet of four strips of napkin, I twist its ends in opposite directions, while keeping the tourniquet taut. This procedure is similar to the process of making a coiled cord.
After the tissue flagellum is rolled up to failure, with one hand I hold the tourniquet in the middle, and with the other hand I connect its ends together, and the tourniquet is twisted.

I coat the borders of the "bronze" frame for a bottle with PVA glue using the paper-art technique

and glue a double flagellum, rolled from a napkin, until it has time to dry.
To create patterns of paper art, the flagella from napkins must be wet. If the finished tissue tourniquet has already dried out, it must be slightly moistened with water so that the flagellum becomes plastic again

In order for the flagellum to stick tightly to the surface of the bottle, you can additionally press it with a brush dipped in PVA.
All kinds of sewing accessories (locks, buttons, rivets), as well as cereals, are also suitable for decorating the craft.
Therefore, as a complement to the flagella from the napkin, I lay out patterns from millet groats and curly star-shaped pasta. To do this, first I draw pattern elements on the surface of the bottle with PVA glue, and then I spread the millet and pasta stars using a bamboo skewer.

I also use a tissue tourniquet to decorate the lower part of the bottle rim.
In addition, I spread identical patterns of flagella and cereals on each side of the decanter.


It is very important to fix the paper art patterns well. I cover the decor glued to the surface of the bottle using the paper art technique with PVA glue. I apply several thin layers of glue so as not to flood the relief elements of the pattern. I dry each layer of PVA.

If pasta sticks to the primed surface of the bottle immediately and almost tightly, then millet groats quite easily lag behind. That is why I pay the most attention to the areas with glued millet. In these places I apply 4-5 layers of PVA.
And now the paper art patterns are laid out and securely fixed. Before proceeding to the next stage of work, dry the bottle for 12 hours.
3. Painting the bottle using the pip-art technique
In order for the finished glass bottle frame to look like bronze, the surface with the paper art patterns must be painted.
I mix gouache of red, green and black colors. At the same time, I am very reminiscent of the cartoon character Wreck, who mixed bright multi-colored paints to make dirt. But in the end I get a mixture, in my opinion, very similar in color to antique bronze that has darkened with time.
I add glossy acrylic varnish to the gouache in a 1: 1 ratio. The composition, as usual, is too thick, and I dilute it with a little water to the consistency of acrylic paint.
I apply the resulting paint to the surface of the bottle rim using a piece of foam rubber.

I cover the frame with several layers of paint with intermediate drying. I pay special attention to places with a relief pattern. It is very important that all decorative elements are well painted over.
4. Toning the bottle using the paper-art technique
When the paint has dried, I tint the surface of the bottle rim with bronze acrylic paint.
To do this, I put some paint on a foam sponge, make several prints with a sponge on paper, and then wipe the surface of the bottle with patterns using the paper art technique with the sponge without pressing.

5. Fixation of work in the paper-art technique
I fix the work in the paper art technique with glossy acrylic varnish. I cover the bottle with two layers of varnish. Dry each layer of acrylic lacquer for 3 hours.

After the last layer of varnish has dried, I use a damp cloth to remove excess paint, glue and varnish along the edges of the “bronze” rim of the bottle. Now you can admire the finished piece using the paper art technique.
These are the details of the peyp-art patterns on the surface of the decanter and on the top of the cork:

And this is the bottle itself, decorated using the paper art technique:

In my opinion, the combination of glass and "antique bronze" looks very noble. Is not it?
Bottle decoration using the "Grapevine" Pape-art technique.
Master class name: Decorating a bottle using the "Grapevine" Pape-art technique
Tarasenko Galina Alexandrovna
Position: educator
Place of work: MBDOU No. 28, Krasnodar Territory, Ust-Labinsky District, the village of Voronezh.
Work description: The master class is useful for creative people who like to make original things with their own hands.
Purpose: gift or interior decoration.
Target: decorating a glass bottle using the Pape-art technique.
Tasks:
- to teach how to create an original decor using the Paper Art technique on the surface of a glass bottle;
- develop creativity, artistic taste;
Materials, tools:
Glass bottle without labels
Two-three-layer paper napkins (any)
Scissors
PVA glue
Soft brushes 2 pcs. (No. 3, No. 4)
Pencil
Sketches of elements of ornaments, patterns, curls (for ideas)
Terry cloth or small towel dampened with water
Acrylic colors: bronze color, black color.
Container with water
A piece of sponge
Colorless varnish, yacht
Oilcloth on the table
Wet wipes for hands
Gloves

Work description: Would you like to be able to create unique things or transform existing ones? To do this, it is enough to discover an amazing needlework technique - Pape-art. Pape art allows you to change almost any things in everyday life: glass and wood products, beyond recognition, while its main plus is that using this technique you can simulate various effects, for example, wood carving or metal embossing, which, you must agree, is not will do every second. And for these purposes, basically, you only need paper in the form of thin napkins and polymer clay.
You can buy interesting things in the store, but it's better to do them yourself. They will be copyright, inimitable, unique and valuable. The product can become part of the interior of the room, but also with your work you can please your loved ones and dear people, which will be especially pleasant.
In my master class, you will only get acquainted with the basics of this creativity, so the craft given as an example is quite simple, without the use of polymer clay. Your task is to evaluate the capabilities of technology and understand what, in the end, you can create amazing masterpieces with its help. Try it and, perhaps, you will also become a fan of this wonderful type of needlework.
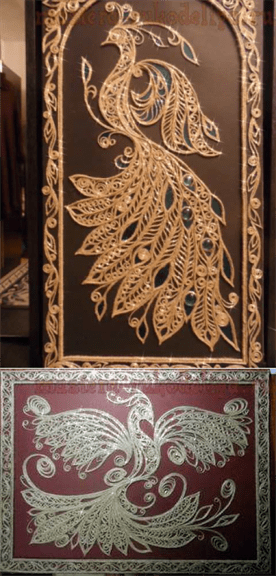
It is interesting: Literally the name of this type of creativity is translated as "paper art". "Peyp-Art" is a new idea of Tatiana Sorokina's needlework. Tatiana Sorokina is a poet, artist, designer, head of the Akvarel creative studio. She has several collections of poems "Liberia", "Defensive Reaction", "Poetic Watercolors", "Artelen" and a personal book "Tunnel of the Transition", which is framed by her color illustrations. She tried a lot of needlework techniques, but she wanted something new, her own. And she came up with "Paper Art" (2006). Initially, she called her technique "Napkin plastic" and it was under this name that the works of her students won 1st place and "Grand Prix" at the International Festival of Children's Creativity. An interesting new idea of needlework appealed to many craftswomen and instantly scattered all over the world. What is “Paper Art”? This is a paper napkin decorating technique. Do not confuse paper art with decoupage, because it is not just covering the surface with napkins, but decorating with paper threads. Tatyana Sorokina came up with the idea of edging the drawings with napkin thread. This technique imitates more expensive image techniques such as carving, embossing, and weaving.
Progress:
I paste over the surface of the prepared bottle (washed it, removed all the labels) with pieces of napkins so that the surface becomes textured (in my opinion, the bottle will look more impressive). With a brush moistened with PVA glue, I smooth a piece of napkin, achieving a snug fit to the surface of the bottle and soaking it completely with glue.


So putting pieces of napkins on the surface, slightly combining their ends, I glue the entire bottle, not forgetting about the bottom.

After the bottle is completely dry, draw a sketch of the pattern with a pencil. In my case, it is an ornamental vine. You can spy on interesting elements on the Internet or come up with simple patterns on your own.


To make a paper thread, take two or three-layer paper napkins, cut them into strips of different lengths and a width of about 3.5 cm (you can make it thinner if the bottle is small).

I carefully separate the layers so that the stripes are single-layer.

I put the finished strip on a wet towel and gently, lightly pressing it with my hand, soak it with water.

Scrolling with my fingers in different directions from one end to the other, I form a flagellum thread. If the flagellum breaks during twisting, it means that the paper has absorbed a lot of moisture. Do not rush to throw away torn filaments from a paper napkin; they can also be used when decorating a bottle.

Finished flagella should dry completely.

Then I take a ready-made flagellum from a paper napkin and apply PVA glue (only on that part of the side that will be attached to the surface of the bottle), gradually gluing it along the length (making the glue set), form a pattern.

Flagella can be joined if there is not enough length.

You can safely go beyond the drawn sketch, given the thickness and length of the rope, or if you see that it will look better this way. Creativity and imagination are encouraged in this technique.

I made the grapes by winding the flagellum into a tight spiral, in the form of a snail shell. I fixed the tip with a drop of glue.

Then she applied glue to the surface of the bottle in the form of a circle equal to the diameter of the finished grape and pressed it down.
You may be surprised, but new types of handicrafts appear in the world every year. To create something truly new and original, you need to have a rich imagination and tremendous talent, and most importantly, remember the simple truth - all ingenious is simple. Several years ago, the craftswoman Tatyana Sorokina created a small miracle out of nothing by inventing a new technique for decorating objects with flagella from ordinary paper napkins. Pape art, and this is the name given to this unusual occupation, immediately won the hearts of many needlewomen. Why don't you get acquainted with this interesting technique, because everyone has a couple of napkins and glue at home? So let's do a paper art workshop together!
The finished work will not leave anyone indifferent: it is hard to believe that such masterpieces are made of simple paper flagella.
Learning the original paper art technique: a master class for beginners
Regardless of what you are going to decorate, you need to stock the following materials:
- paper napkins (single or multi-layer);
- PVA glue;
- scissors;
- brushes of different thicknesses, foam sponge, wet wipes.
- Cut paper napkins into even strips about 1.5 cm wide. If multi-layer napkins are used, separate them into separate layers.
- Place the strips in a container of water for a few seconds so that they become wet and slightly swollen.
- Holding the strip with one hand, twist the tight flagellum with the other. It should not have thickening and loose areas. If you can't make a high-quality flagellum from a wet napkin, you can try to make it from a dry one by moistening your fingers with water.
- To make a long flagellum, it is necessary to overlap the ends of several strips, and carefully seal the joints with your fingers when twisting.
It is possible not to divide a multi-layer napkin into separate layers and make flagella from 2-3 layers of paper. In this case, workpieces of greater thickness will be obtained.
It should be remembered that during operation, the flagella must remain plastic, therefore, dried workpieces must be moistened with water.
We disassemble the step-by-step decoration of a bottle using the paper art technique
To begin with, we suggest trying your hand at decorating a volumetric object - a glass bottle. In addition to the basic materials, you will need the following:
- bottle or other glass container;
- paints (gouache of different colors and bronze acrylic paint);
- glossy acrylic varnish;
- additional decor: curly pasta, millet.
Beforehand, the bottle must be washed inside and outside, removing the remnants of the label and glue, and dry thoroughly. Immediately before decorating, it will be useful to degrease its outer surface with alcohol or acetone.
With the help of PVA, it is necessary to prime the part of the bottle where it is planned to apply the bronze background. The glue should be applied in several layers with intermediate drying, the excess should be removed with a napkin. Then, using a foam sponge, apply bronze acrylic paint to the primed area and let it dry thoroughly.
Decorating.After the background is prepared, we start decorating. In our case, long and short flagella made of napkins, asterisk pasta and millet grains are used as decor.
To begin with, we apply PVA glue with a brush strictly along the contour of the background and glue the blank from the napkin. It is necessary to ensure that the flagellum is firmly adhered to the entire surface, for which it should be firmly pressed with a brush dipped in glue.
In the same way, we lay out a simple pattern of flagella, pasta and millet at your discretion. It is convenient to spread the wheat grains using fine tweezers or a toothpick moistened with water. Then the decorative elements must be additionally fixed by smearing them on top with PVA glue in several layers.
Coloring the bottle.Prepare the paint by mixing black gouache with a little red and green. Add gloss acrylic varnish in a 1: 1 ratio. If necessary, dilute the resulting mixture with water. Using a sponge, apply paint to the decorated part of the bottle with a foam sponge in several layers.
Then the surface is lightly tinted with bronze acrylic paint with a sponge and covered with two layers of glossy varnish. It is better to use a brush for applying varnish.
The bottle using the paper art technique is ready!
Decorating the chest using the paper art technique:
Various containers decorated using the paper art technique look very beautiful. Let's try to decorate a box, box or small chest.
In addition to the materials listed above, we will need:
- the base of the chest (in our master class, a pre-glued cardboard box is used, but you can use a ready-made box);
- keraplast (clay-like modeling mass that hardens in air);
- acrylic paint in black and gold.
With the help of PVA glue, it is necessary to paste over the entire surface of the chest with toilet paper cut into pieces. When gluing, the paper should be slightly stretched to prevent the formation of air bubbles. Then you should once again grease the box with diluted water with glue on top of the paper and let it dry.
Decorating.With the help of keraplast, it is necessary to arrange the lid of the chest: to mold flowers and leaves and carefully glue them with PVA glue in random order. The veins on the leaves can be made with a needle or toothpick.
The legs, edges and corners of the future chest are shaped in the same way. We decorate the rest of the surface with the help of pre-prepared flagella made of paper napkins, using glue to lay out patterns from them and press them tightly over the entire surface.
Coloring.With a wide brush in several layers, it is necessary to apply black acrylic paint, and after it has completely dried, slightly shade the convex parts of the pattern with gold using a foam sponge.

If desired, decorate the inside of the chest (glue a mirror on the lid, make a lining of fabric).
Another successful example of this unusual technique is the making of a decorative plate.
To make such an interior decoration, you will need a small faience plate about 20 cm in diameter with or without a pattern. The surface must be primed with glue in advance. With the help of pre-prepared flagella and PVA glue, an arbitrary pattern is laid out. Additional decor - pea halves - it is better to plant on Titan glue.

After the glue has dried, paint the plate inside and out with several coats of black acrylic paint, and then lightly decorate the decorated surface with gold or bronze paint.

Related videos
For those who have already mastered the basics of the paper art technique, it is proposed to try their hand at making other products using the video master classes below.