How to quilt a blanket on a sewing machine. Patchwork quilt: creation technology, selection of optimal fabric and design recommendations (110 photos)
A quilt is an incredibly beautiful and practical thing. In addition, it is practically out of fashion. A do-it-yourself quilt, made by a skilled diligent craftswoman, will become a unique decoration for the bedroom, warm on a cool evening. If earlier down-feather filler was used for such products, now synthetics are used (quilted batting, synthetic winterizer). It is advisable to sew such a product from natural fabric. We will deal with everything in order in this article.
What will be useful for work?
Before sewing your quilt, prepare your materials and tools. Suitable for work:
- Material for the top (beautiful compacted textiles).
- Chintz or calico for sewing the inside.
- Synthetic filler.
- For marking: chalk, tailor's ruler and square.
- Sewing accessories.
Do-it-yourself quilt - master class, procedure
In this case, the template is not needed. It will come in handy if you plan to sew the top from separate patches.
cutting material
Cut out 4 pieces, 2 pieces from each type of textile.
Important! Specific dimensions depend on the dimensions of the bed. At the same time, make the details for the inside a little larger than for the outside.
The size difference depends on how thick the packing is. If you use batting in one layer as padding, then the difference in dimensions in length and width is approximately 100 mm. Don't forget the 15mm seam allowance.
For the outer shell, you can use bright satin or satin. The choice of fabric for the inside depends on the properties of the filler:
- If it is a synthetic winterizer, batting or cotton wool, then for the outer part of the blanket you can use coarse calico, chintz or any cotton textile.
- Thick teak is better for down filling.
Cut out the rectangles from the filler. The size corresponds to the dimensions of the inner part of the blanket, but without seam allowances.
Important! Many fabrics shrink after wetting, so it is advisable to wash both pieces of textile before cutting.

Product assembly
The assembly algorithm depends on which filler you use. First, let's look at how to sew a quilt. Use synthetic winterizer or batting in this way:
- Spread one of the panels of the outer part “face down” on the floor.
- Lay one of the sheets for the inner bag on it.
- Next is the insulating layer.
- Cover the filler with the second sheet of the inner bag.
- The upper part of the resulting “sandwich” is the front canvas, but already “face up”.
- Pin all layers carefully with safety pins, or baste a few stitches through all layers.
Important! To control the correct manufacture of the workpiece, pull 2 cords between opposite corners.
stitch pattern
The easiest option is to quilt the product with mutually perpendicular longitudinal and transverse lines. Lines can be directed obliquely.
Important! The complex pattern looks very nice. Apply a pattern with chalk on top of the product. Begin to fasten the layers, moving from the center to the edges.
Align the product along the edges, using a ruler and a tailor's square. The ruler can be replaced with a long rail. Finish the edge with a border. Its width is 16 cm, and the length corresponds to the perimeter of the product.
Features of making a duvet:
- Sew 2 bags: outer - satin, inner - teak.
- Put one bag inside another.
- Mark with chalk and stitch longitudinal stripes. Get separate compartments.
- Stuff them with down to the first horizontal stripe. Quilt.
- Then follow the same algorithm.
- After the stuffing is finished, sew up the teak bag first, then the satin bag.
footage
As you can see, there is nothing complicated in how to sew a quilt with your own hands. A little imagination, diligence, and you will certainly succeed perfectly!
Designers often note that the interior is created by details. They reflect the individuality of the owner, his style, the ability to create a comfortable and cozy environment. Today, beautiful sewn products are often used in decoration. One of them is a quilt.
DIY Quilted Blanket
Quilt making technique
Quilts and bedspreads are stylish decor items. They will look especially relevant in the interior of shabby chic, Provence, country, etc. A blanket of this sewing method will bring mood, beauty to the interior and make it cozy.
A quilt can be created for almost any interior style. It all depends on what fabrics and colors you prefer for the top layer.
Most often, quilts / blankets are created from materials that are easy to work with: chintz, cotton, coarse calico, linen. These fabrics are distinguished by colorful patterns, density, ease of care. This makes quilts a sought-after item in children's rooms. The most popular manufacturing technique is patchwork or patchwork. In addition to the fabric of several colors, you will need: - sheet synthetic winterizer; - fabric for the wrong side; - scissors; - threads; - sewing machine.
Start making a blanket with a sketch and sizing the future product. A sketch is necessary for the correct connection of the shreds. Next, cut out a square / rectangle / triangle from cardboard, equal in size to one piece. When transferring the part to the fabric, be sure to make allowances of 1–1.5 cm for subsequent stitching.
Cut out all the details from the fabric and sew one by one according to the sketch. Sew all the flaps so that they form a single canvas. The top layer of the quilt is ready.
Prepare the lining. It should be 2-3 cm larger around the entire perimeter than the top layer. Iron the lining and patchwork and place a synthetic winterizer between them. Baste all three layers of the blanket on the four sides. The blank for the future stitch is ready.
Quilt Stitching Techniques
There are two ways to make a blanket stitch: on a typewriter, using an embroidery foot and a thick needle, or by hand. In the first case, the top thread is taken white or colored (corresponding to the main color direction), and the bottom thread is taken to match the lining material. If you are quilting by hand, use a short needle, hoop and thimble.
A quilt does not have to be sewn in a patchwork technique. The stitch can be done on plain fabric using a variety of patterned stitches. However, such finishing requires a high professional level and good technique.
Rest is extremely important for recuperation. Therefore, attributes for sleep should be comfortable, environmentally friendly and safe. In this material, we will consider how to choose a quilted blanket, we will try to decide on the best filler.
wadded blanket
Although such filler options are gradually becoming a thing of the past, such products still have their advantages. First of all, a wadded quilt perfectly retains heat, absorbs moisture well. The specified filler does not cause allergic reactions.
At the same time, a wadded blanket has an impressive weight, the material does not “breathe” enough. The main disadvantage is the complexity of care. In the case of washing, the filler gets lost in lumps. If you subject the material to dry cleaning, noticeable stains will remain on the surface of the product.
Synthetics

A quilted synthetic blanket is an indispensable option for owners of fairly cool housing. Products of this category quickly warm the body even in unheated rooms.
Benefits of Buying a Synthetic Quilt:
- providing comfort in conditions of high humidity;
- absolute safety for allergy sufferers;
- ease of storage and care;
- retaining its original shape even after washing.
The disadvantage of synthetics is poor absorption of moisture. Therefore, this option is not suitable for people who sweat a lot while relaxing. At the same time, it is absolutely not recommended to sleep under a blanket with such a filler for those who suffer from shortness of breath, hypertension, and heart disease.
natural down

With down filler they are distinguished by low weight, extremely soft structure, elasticity. Such products last as long as possible with regular use. Down perfectly retains heat and at the same time acts as an airtight base. Under such a blanket is not hot in summer and not cold in winter.
However, the fluff dampens rather quickly. It starts up which is especially dangerous for people suffering from allergies. To avoid harm to health, it is important to periodically take out a duvet for airing.
camel blanket
Camel wool is an excellent natural filler, from which moisture is well vented. The material provides comfortable conditions for rest, as it reliably retains heat. Quilted do not accumulate a charge of static electricity. The last nuance is important in terms of the convenience of everyday use of the product.
At the same time, quilted is not suitable for allergy sufferers. In addition, natural material acts as an ideal breeding ground for dust mites. To prevent this, it is necessary to regularly machine wash the product using delicate programs. It is also important to periodically air the blanket.
How to choose a baby quilt?

When choosing a quilt for a child, it is important to pay attention to the conditions in the room. If the baby is resting in a well-ventilated room, where a fairly low temperature is maintained, then a duvet will be the best option. When the house is humid and warm, you should give preference to a woolen product. For relaxing in a room with warm, dry air, a blanket made of synthetic materials is suitable.
For a child, it is advisable to purchase several blankets for the summer and winter. If the baby is prone to allergic reactions, you should abandon the blanket made using natural materials.
DIY Quilted Blanket

There are not so many real needlewomen who prefer to sew on their own, avoiding the purchase of finished products. However, those who have sufficient experience and a supply of free time should use the recommendations that will allow them to sew a quilted blanket on their own.
To complete the work, you will need the following tools and materials:
- synthetic winterizer;
- stitch;
- atlas;
- spandex to create frills;
- decorative tape;
- ruler;
- scotch;
- sewing machine.
Before sewing a quilted blanket, it is necessary to carefully iron the materials used. It is better to resort here to the use of a steam iron. This solution will avoid subsequent shrinkage of the finished product.
The stitch is firmly fixed to the floor with adhesive tape. Organza, synthetic winterizer and satin fit here. The surfaces are leveled with a ruler, which will avoid wrinkles on the fabric layers.
The selected pattern is applied to the stitch with a water marker. All layers of the future product are fixed with pins. Stepping back 10 cm from the cut, the edges need to be processed with a line. Then you can proceed directly to the stitching of the product. In this case, you should not protrude beyond the curb. The frills are processed with an overlock, the edges are neatly trimmed.
The folds are attached to the wrong side of the product with pins. The quilted blanket is sewn in such a way that the corners of the frills converge. Finally, the top layer of fabric can be treated with decorative tape.
Finally
When choosing a quilt, it is recommended to give preference to products from reputable manufacturers, which place high demands on the quality of the raw materials used. When buying, it is advisable to check the availability of certificates confirming the origin and safety of products. It is also worth once again evaluating the overall quality of the product: inspect the seams, check if the filler comes out, if the blanket has an unpleasant, specific smell.
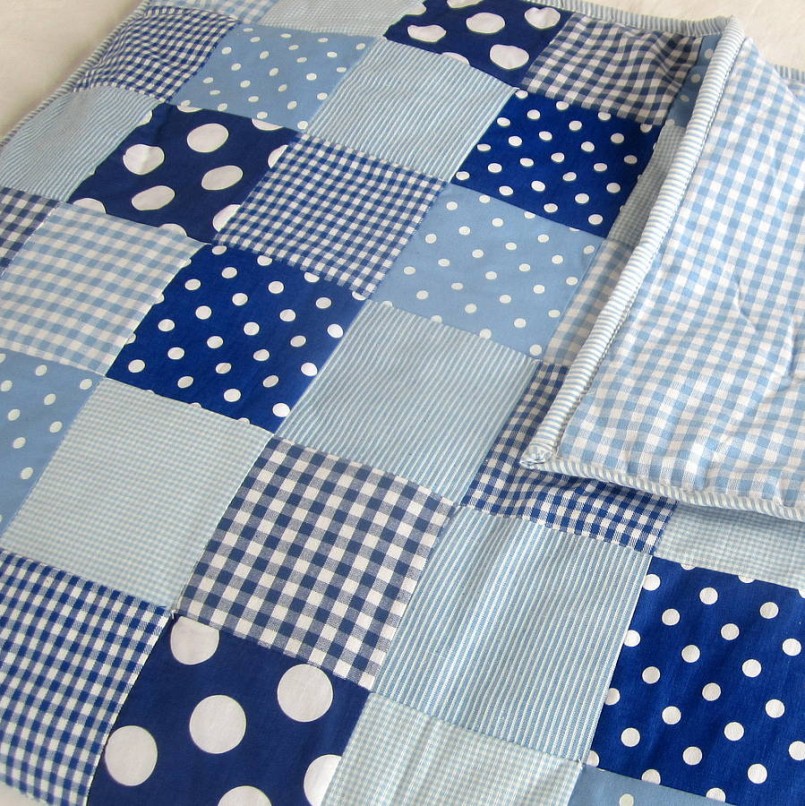
Most of the townsfolk will agree that patchwork blankets are warm memories from childhood associated with trips to grandmother in the village. These various pieces of fabric, tied together, really create a cozy home environment, especially with the onset of cold weather.
The technique of patchwork or patchwork is rooted in the distant past, but today it is reviving again and enjoying wide popularity. Naturally, over time, patchwork technologies have changed and become more modern, as shown in the photo of patchwork quilts.
Creation technology
The process of sewing a product from small pieces of fabric is, in fact, a very exciting experience. In addition, it does not require huge financial investments. After all, the necessary materials in the form of a variety of pieces of fabric can be purchased in a set or use old things that may be in your closet.

As a result, things that have gone out of fashion will be able to continue their existence in a new way and will remind you of a wonderful past. But you should not use very dilapidated things so that zeal is not in vain.
Even more instructions for creating homemade products can be found on this site: https://podelki.org/category/svoimi-rukami/

To create a patchwork quilt, you need to prepare 6 or more different colors of fabric. To embody a unique design with the help of your irrepressible imagination, you should use different colors, fabric structures and patterns on them. Slightly gathered details will give volume of the invoice and effective appearance.


How to sew a patchwork quilt with your own hands? To do this, just look at the master classes from the Internet, which will help you learn the patchwork technique on your own.

Selecting the right fabric
To sew a patchwork blanket with your own hands, you need pieces of fabric of the same thickness and texture. The color palette of fabrics is chosen in accordance with the interior style, wall colors and furniture.

Contrasting combinations of fabrics look most advantageous against the discreet background of the main canvas. You should not allow excesses of variegation, it is better to give preference to moderation.

Before starting the sewing process, it is necessary to make a preliminary layout of the blanks on the leading base of the fabric, move away from it a little and evaluate the resulting masterpiece. So to say, a look from the outside will help to understand the success of the combination of pattern and color scheme.

Blanket filling material
A patchwork blanket has three main layers: a beautiful top, insulation and a lining bottom. If you pull out the insulation from the blanket, you get an ordinary bedspread.


For the insulation of the product, a synthetic winterizer is most often used, which does not shrink after washing. Therefore, it does not need to be soaked before sewing, as it will not change its original appearance and size.

Its only drawback is that it is synthetic. For children, the use of synthetics is undesirable, it is better to use the most natural materials.

As alternative options, you can use natural fillers:
- made of cotton, similar to lightweight batting without threads. It is milky in color, 2 or 3 mm thick, does not crumble. But after contact with water, it can shrink by about 5%. In this regard, it should be pre-soaked, carefully squeezed in a towel and dried.
- from 100% natural wool. Its main property is considered to be excellent thermal insulation, which is great for needlework.

Used sewing patterns
Do-it-yourself patchwork compositions can contain patches of various configurations: quadrangles, triangles or stripes. At the beginning, they are cut out of cardboard or thick paper. The easiest way is to create a patchwork masterpiece from large squares, which will undoubtedly appeal to novice needlewomen.

Schemes of increased complexity of a patchwork quilt can be viewed on special sites so as not to suffer on your own, or you can buy it in a needlework kit.


Patch Quilt Stitching Technique
To avoid deformation of the form during operation, when washing or cleaning the product, the layers of the blanket must be interconnected. In addition, the stitches perform the mission of decoration, hide the defects that appear during work.


The joining of the layers can be machine or manual. To save time, it is better to use a typewriter, in addition, you can perform the necessary line. A self-quilted product is softer to the touch and in use.

After the border is sewn, the blanket stitch begins. First, the layers are securely fixed. The blanket is turned inside out and hand basted from the center to the edges. This stage must be approached very responsibly.

If the basting is done poorly, then the machine line will be of poor quality with bubbles and assemblies, which cannot be fixed. To avoid material run-on, a preliminary basting and stitch should be made from the middle to the edges.


Required materials and tools
To organize and create a patchwork quilt, you will need: a table, threads, a template, prepared fabrics, insulation material, lining fabric, inlay, needles, pins, chalk or remnants, scissors, a centimeter, a sewing machine and an iron.

Using various fabrics, you can get various masterpiece patchwork blankets that will become a real decoration of the interior, besides warm and cozy. To create children's patchwork quilts, use only natural materials. Keep it up and you will succeed!

Photo of a patchwork quilt


Properly selected textile accessories can transform any interior in an instant. But it is especially nice when they are not only beautiful, but functional. A stylish and warm quilted bedspread will make your home more comfortable and warm on long winter evenings. And it is especially nice if this original decor element is sewn with your own hands.
A blanket with a stitch will be warmer and its surface is obtained with an elegant texture.
If you decide to sew a quilt or bedspread with your own hands, you need to carefully prepare for work. Such an element of decor will be beautiful enough only if it is executed flawlessly. And so that all stages of tailoring do not cause difficulties, you need to heed the advice of specialists and experienced craftsmen.
Any quilted product consists of 3 layers:
- Front side. For her, a beautiful fabric is usually used, most often plain, so that the lines do not deform the pattern. If you are inexperienced in sewing, it is better to choose a material that does not show needle holes too much. This property of the fabric will serve you well if you have to rip out some of the stitches.
- Pad. This layer is designed to warm the product and give it the necessary texture. It is better to use synthetic winterizer, holofiber or batting. Ordinary cotton wool is not suitable, as it will not endure washing.
- Lining. The bottom layer in contact with the surface of a sofa or bed. There are no special requirements for the choice, but if the furniture upholstery is slippery enough, it is better to choose a material that is rough to the touch. This will keep the cover from slipping.
In addition to the basic materials, you will need a sewing machine, scissors, needles and threads, and ribbon for finishing the edge.
Taking measurements and cutting material

The quilted bedspread in the bedroom hides all the bumps, so the room will always look neat.
In order for the result of the work to please, it is important to be careful at every stage of tailoring. Choose a model of the future textile accessory. Bedspreads with a frill along the bottom edge look especially attractive, often it is this detail that makes them charming.
First of all, you need to correctly measure the furniture so that the bedspread is not too small. This precaution is due to the fact that during the firmware process, the dimensions of the product may decrease. To purchase a sufficient amount of material, you need to measure the length, height and width of the bed and the corners. If there are no problems with the first three measurements, then the corners can be driven into a dead end. The best solution is to attach a sheet of paper to the surface, transfer the outlines to it and carefully cut it out, so you get a finished pattern.
After taking measurements, in addition to allowances for seams and processing, add 1-2 cm to each indicator - a margin in case of shrinkage of the material. When calculating the length of the frill, keep in mind that a gap of 2-3 cm between the floor and the edge of the bedspread makes the bed visually higher and greatly simplifies the process of cleaning the room.
So, the measurements are taken, you can start cutting out the details. To avoid force majeure during the sewing process, follow the recommendations:
- The fabric for the front layer is cut in accordance with the measurements taken with the addition of 2-3 cm for processing and 1-2 cm for shrinkage during stitching.
- Cut out the cushioning material, focusing on the dimensions of the front web. It is important to make a margin of 1-2 cm on each side. This will insure you against unpleasant surprises if the synthetic winterizer decreases during sewing due to stitching. Surplus can always be removed in the process.
- The size of the lining should always be 5 cm larger than the front. This stock will ensure flawless processing of seams and frill lines.
Preparatory stage
For sewing a high-quality bedspread, it is better to use a sewing machine, but you can make stitches with your own hands. The sewing technology will not be too different, but in the second case it will take a lot of time, in addition, it is very difficult to make the lines even by hand.

Cover size chart.
First of all, you need to collect the cake. Lay the front fabric on the floor wrong side up. Then on it is a gasket, and after that - a lining. Carefully align all layers, otherwise creases and folds will spoil the final look of the product. After that, be sure to fix the structure. The easiest way to do this is with sewing pins and basting.
Pin the edges with pins and secure the center of the future bedspread. After that, decide how you will quilt the product. For beginners, it is preferable to choose simple patterns, such as diamonds or squares. After that, using a needle and thread in a contrasting color, outline the pattern of the future stitch. But if you are using a fabric that shows puncture marks, such as satin, this step should be skipped. Or use a special adhesive tape that is securely fastened and acts as a guide. It is easily removed without leaving any traces, it is worth moistening it with water.
After that, you can proceed directly to stitching.
We sew a quilted bedspread
If you will use a sewing machine for stitching, make sure that the kit has a special presser foot for stitching. It provides a uniform supply of material, which reduces the likelihood of distortions and creases.
It is necessary to sew all layers in the direction from the center to the edges.
During each pass of the needle, you need to slightly stretch the fabric with both hands. Single tension hello to thread breakage. After completing each step, the line must be aligned and slightly stretched, making sure that the seam is not damaged. Each new line must be started from the center, this technique allows you to preserve the arrangement of the layers as much as possible. After the last stitch has been sewn, line the edges of the bedspread with sharp scissors and remove the basting. Only after that proceed to the processing of the edge.
If you are sewing a blanket or bedspread without a frill, you should make an edge according to the following pattern. Take a tape to decorate the edge or any fairly wide braid. Sew it to the front of the bedspread, carefully tuck the cushioning material inside and stitch it to the lining. This processing method is quite simple and easy to use.
If you decide to decorate the bedspread with a frill, it is not at all difficult to do this, because the decorative element is single-layer and consists only of the fabric of the front side. Cut the material taking into account the data obtained during the measurement. The width of the frill is the height of the bed. Length - the perimeter of the bedspread, multiplied by 1.5-2, such a margin is necessary for laying beautiful coattails.
If you managed to sew a bedspread without defects, making a frill will seem like an easy task. Sew the material evenly with a double seam, laying folds, usually 8-10 cm of distance between them is enough.
In a similar pattern, pillowcases for pillows or chair covers can be sewn from the remnants of the fabric. Decorative details from the same fabric will make the interior stylish and complete.
If you managed to sew a flawless bedspread with your own hands, you can rightfully consider yourself a craftsman. With these skills, you can decorate your home and cottage with other quilted products, because they always look stylish, cozy and relevant.